Tag Archives: Azure
Using Postman to make changes to signed-in user’s profile
prerequisites:
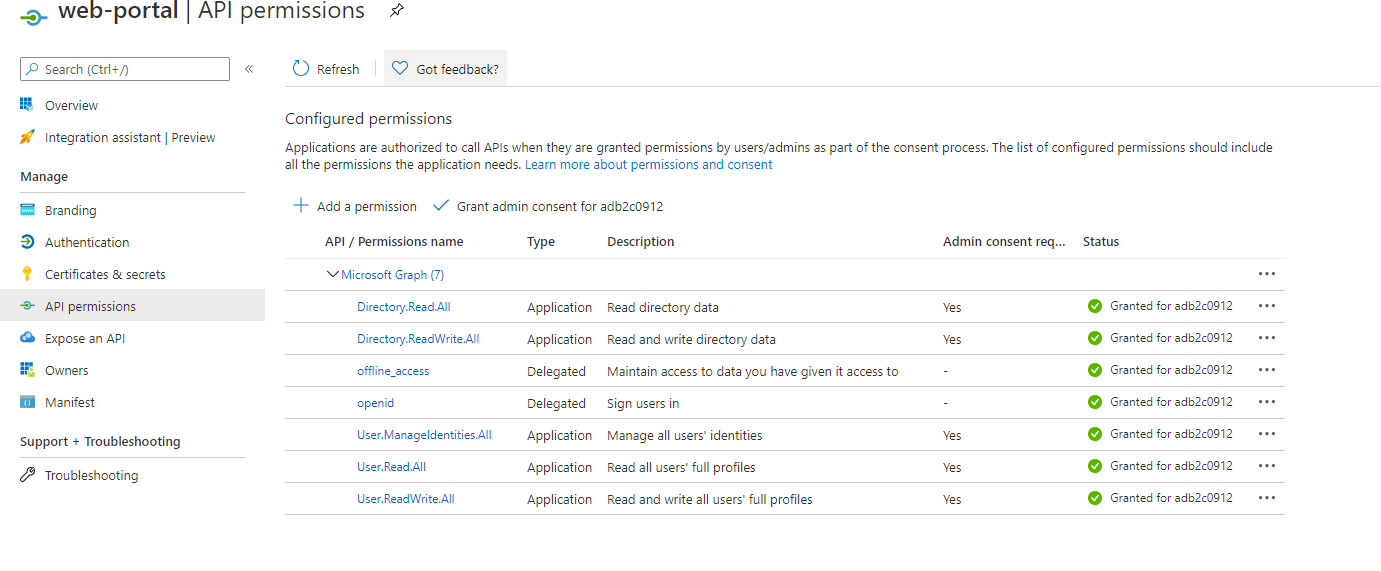
Azure AD B2C has an app.
This app should have these minimum permissions which you need to set:
Set up Postman to query for MS Graph API
ref – https://docs.microsoft.com/en-us/graph/use-postman
Open up Postman app.
Choose File | Import ….
Select Import From Link.
Paste the following two URLs and choose Import after each:
https://raw.githubusercontent.com/microsoftgraph/microsoftgraph-postman-collections/master/Microsoft%20Graph.postman_collection.json
https://raw.githubusercontent.com/microsoftgraph/microsoftgraph-postman-collections/master/Microsoft%20Graph.postman_environment.json
You should now see the Microsoft Graph environment in the top right environment drop down by the eye icon. Now you need to set up your environment.
Set up application API calls
Choose the No environment drop down in top right corner.
Select Microsoft Graph environment.
Choose the eye icon to the right and then choose Edit.
Enter your Microsoft Identity Application in the current (not initial) variables:
ClientID,
ClientSecret
TenantID.
When you created your app, it will have its own clientID and tenantID. For ClientSecret, just generate one like so:
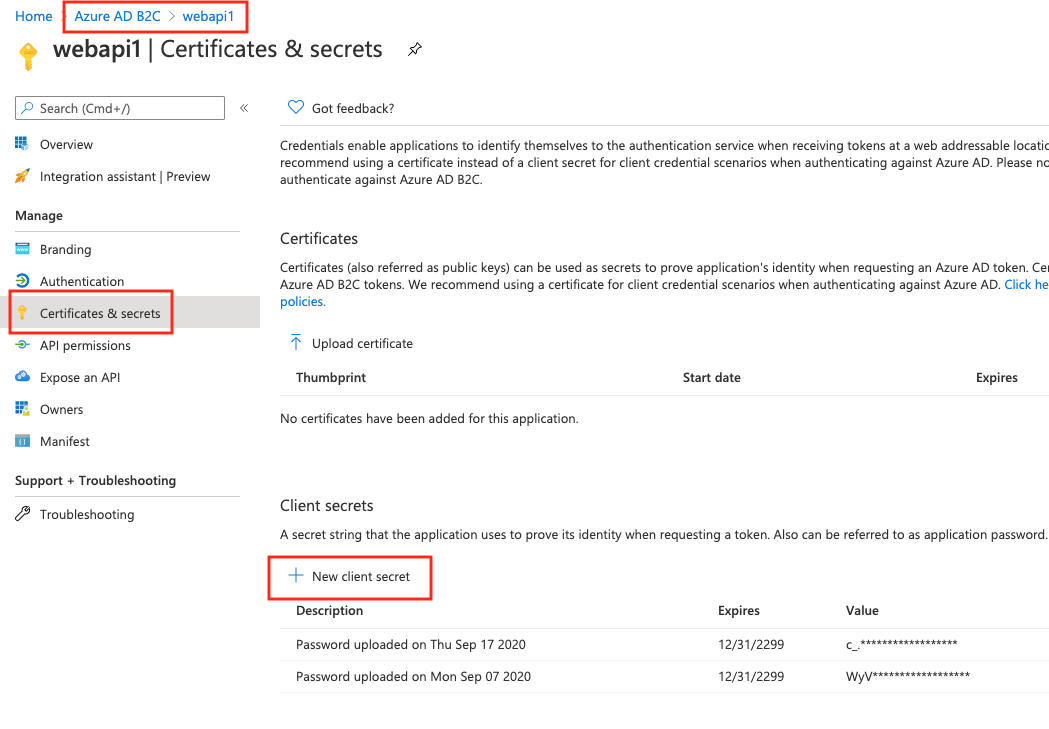
Make sure you copy the secret onto a text, because after refresh, Azure will cover it.
Select Update.
Close the Manage Environments dialog box. In the MicrosoftGraph | Application collection on left side, choose
Get App-only Access Token.
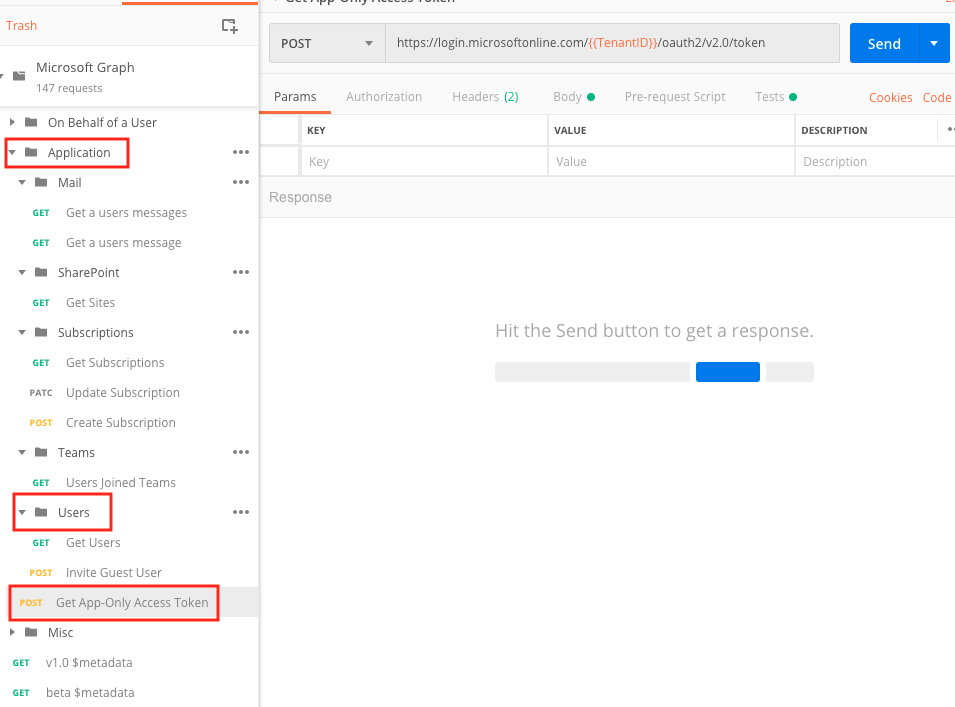
Then choose Send.
You’ll get a App Access Token.
On the left sidebar, under Application, click on Get users. In your environment variables, make sure you copy and paste this App Access Token into the AppAccessToken variable.
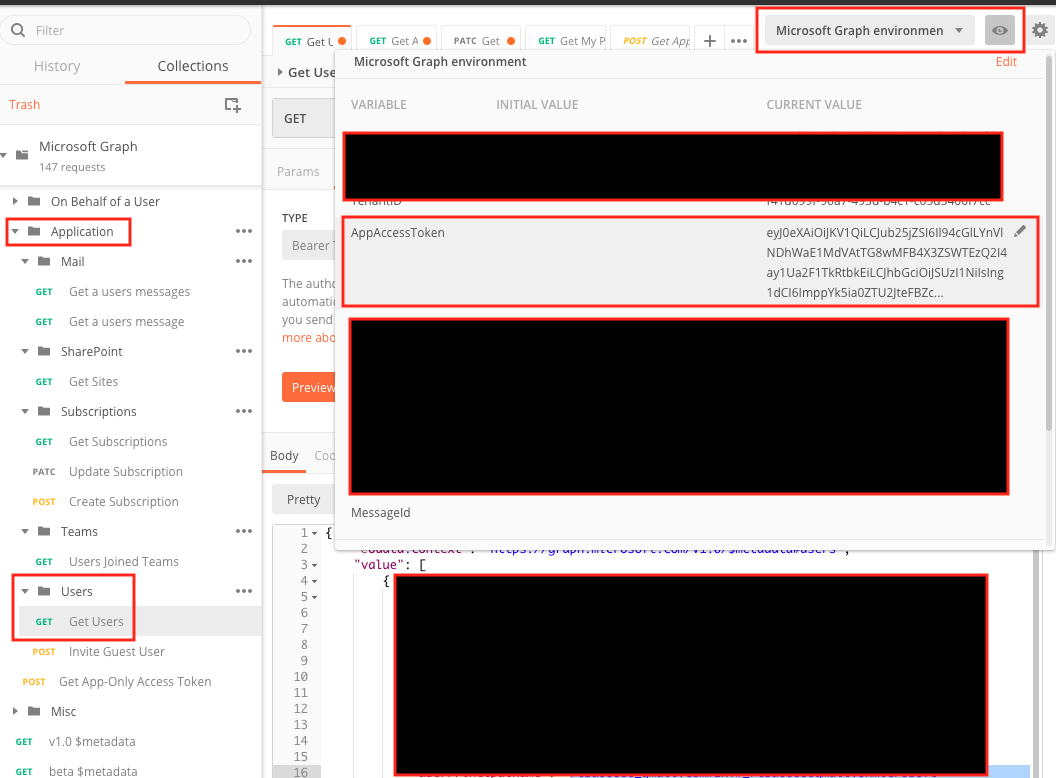
Confirm that it is set under Bearer Token in Authorization tab.
Now you are ready to make changes to the user profile data.
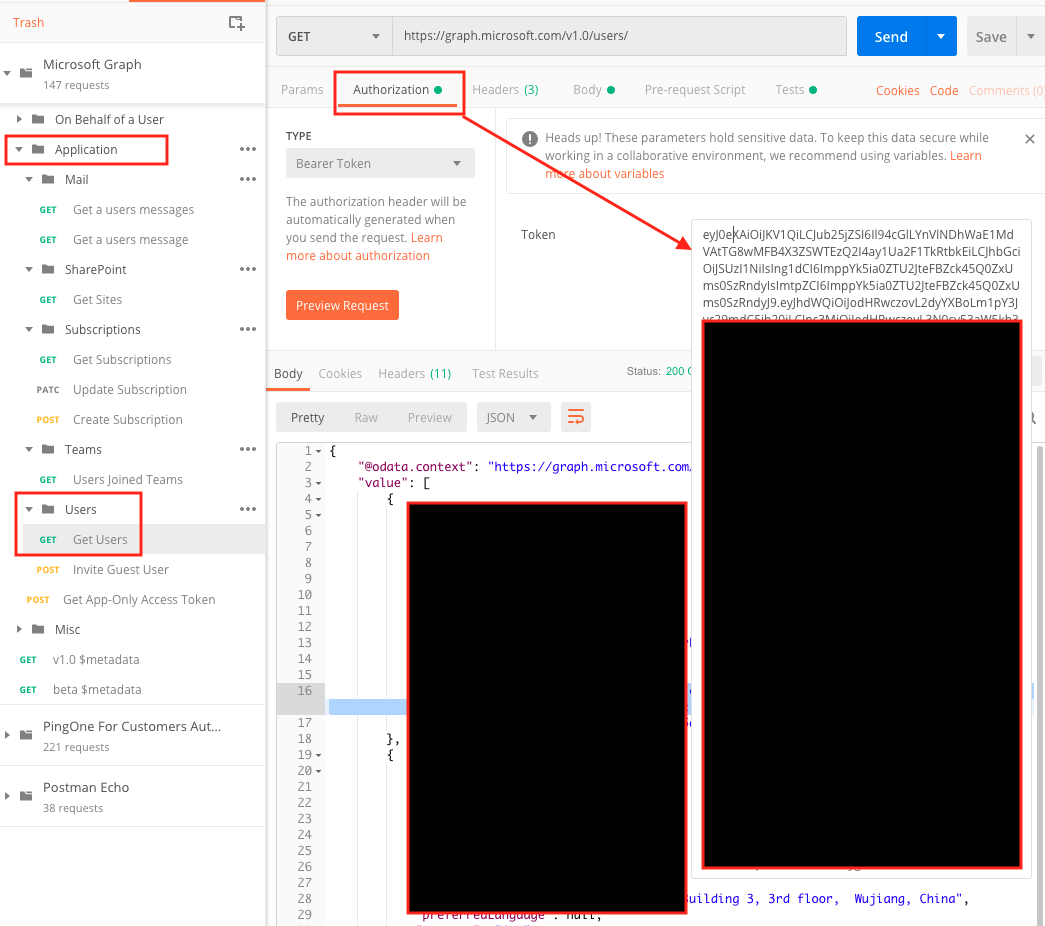
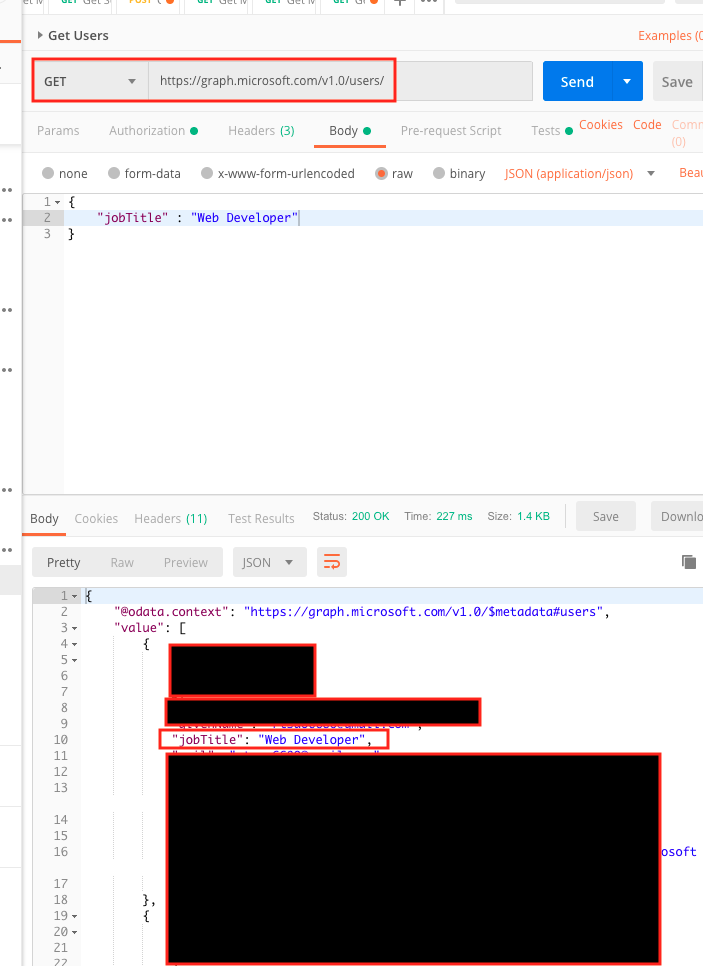
On the left side, under Application | Users folder and choose Get Users.
The URL should be https://graph.microsoft.com/v1.0/users/ the HTTP method should be GET.
Then choose Send.
You’ll get a list of the users. Choose one user, and copy the id.
Changing the profile data
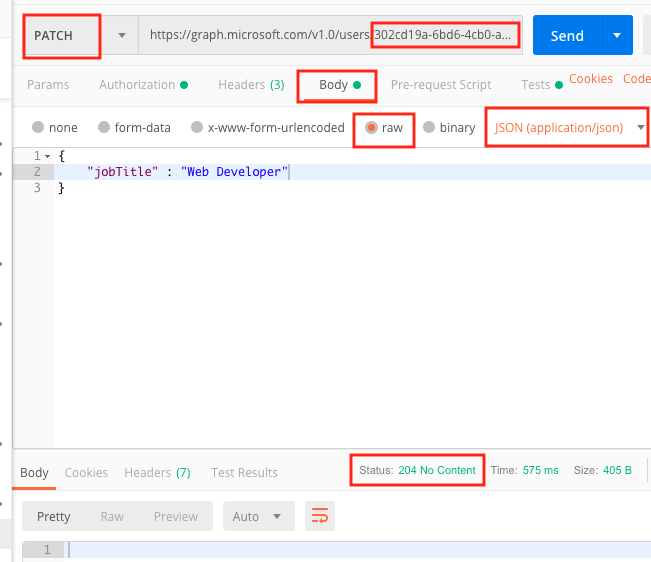
Now, on the top, change the HTTP method to PATCH. copy and paste the id at the end like so:
https://graph.microsoft.com/v1.0/users/302cd19a-6bd6-4cb0-a161-00cf925d8da7
Then choose Body tab. Select the raw radio button. Finally, choose JSON (application/json) for the pull down, which was originally defaulted to text.
Let’s say we want to change property displayName. We use JSON for this:
|
1 2 3 |
{ "jobTitle" : "Web Developer" } |
click send.
GET POST using fetch from client to web api
Using fetch, we get a GET request on a web API using Azure authentication and passport
node server
|
1 2 3 4 5 6 7 8 9 10 11 12 13 14 15 16 |
// API endpoint app.get("/hello", passport.authenticate('oauth-bearer', {session: false}), (req, res) => { console.log('User info: ', req.user); console.log('Validated claims: ', req.authInfo); if ('scp' in req.authInfo && req.authInfo['scp'].split(" ").indexOf("demo.read") >= 0) { // Service relies on the name claim. res.status(200).json({'name': req.authInfo['name']}); } else { console.log("Invalid Scope, 403"); res.status(403).json({'error': 'insufficient_scope'}); } } ); |
client
|
1 2 3 4 5 6 7 8 9 10 11 12 13 14 15 16 17 18 19 20 21 |
// helper function to access the resource with the token function callApiWithAccessToken(endpoint, token) { const headers = new Headers(); const bearer = `Bearer ${token}`; headers.append("Authorization", bearer); const options = { method: "GET", headers: headers }; fetch(endpoint, options) .then(response => response.json()) .then(response => { logMessage("Web API returned:\n" + JSON.stringify(response)); }).catch(error => { logMessage("Error calling the Web api:\n" + error); }); } |
Using fetch, we get a POST request on a web API using Azure authentication and passport
node server
|
1 2 3 4 5 6 7 8 |
app.post("/hello", passport.authenticate('oauth-bearer', {session: false}), (req, res) => { console.log(`POST on /hello`); console.log('message: ', req.body); res.status(200).json({'message':`received`}); } ); |
client
|
1 2 3 4 5 6 7 8 9 10 11 12 13 14 15 16 17 18 19 20 21 22 23 24 25 |
function callApiWithAccessToken(endpoint, token) { const headers = new Headers(); const bearer = `Bearer ${token}`; headers.append("Authorization", bearer); headers.append("Content-Type", "application/json"); headers.append("Accept", "application/json"); let data = { message: 'please call me' }; const options = { method: "POST", headers: headers, body: JSON.stringify(data) }; fetch(endpoint, options) .then(response => response.json()) .then(response => { logMessage("Web API returned:\n" + JSON.stringify(response)); }).catch(error => { logMessage("Error calling the Web api:\n" + error); }); } |
Passing a form data to the Web API with no authentication
client
|
1 2 3 4 5 6 7 8 9 10 11 12 13 14 15 16 17 18 19 20 21 22 23 24 25 26 27 28 29 30 31 32 33 34 35 36 37 38 39 40 41 42 43 44 45 46 47 |
<form name='emailForm'> <div class="form-group"> <label for="exampleInputEmail1">Email address</label> <input type="email" class="form-control" id="exampleInputEmail1" aria-describedby="emailHelp" placeholder="Enter email"> <small id="emailHelp" class="form-text text-muted">We'll never share your email with anyone else.</small> </div> <div class="form-group"> <label for="exampleInputPassword1">Password</label> <input type="password" class="form-control" id="exampleInputPassword1" placeholder="Password"> </div> <div class="form-check"> <input type="checkbox" class="form-check-input" id="exampleCheck1"> <label class="form-check-label" for="exampleCheck1">Check me out</label> </div> <button type="submit" class="btn btn-primary" onclick="passEmailToApi(event)">Submit</button> </form> function passEmailToApi(e) { e.preventDefault(); // stop the submission let form = document.getElementsByName('emailForm')[0]; storeEmailData(form[0].value, form[1].value); } function storeEmailData(email) { const headers = new Headers(); headers.append("Content-Type", "application/json"); headers.append("Accept", "application/json"); let data = {message: 'please call me'}; const options = { method: "POST", headers: headers, body: JSON.stringify(data) }; fetch('http://localhost:5000/saveMessage', options) .then(response => response.json()) .then(response => { logMessage("Web API returned:\n" + JSON.stringify(response)); }).catch(error => { logMessage("Error calling the Web api:\n" + error); }); } |
Protected: Azure AD B2C – WebApi and Client setup
Create and Deploy a React App on MS Azure
ref –
- https://css-tricks.com/deploying-a-client-side-rendered-create-react-app-to-microsoft-azure/
- https://stackoverflow.com/questions/57618453/process-for-react-app-deployment-to-azure-web
- download demo
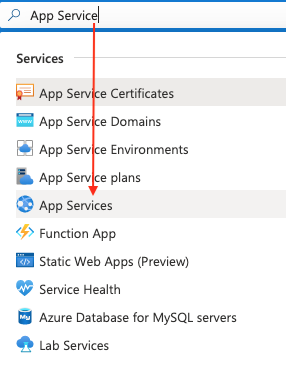
First we search for “App Services”. Then click on the plus button to create one.
Since I”m on free trial, that is the account I belong to. We give it a name for the group that this app belongs to. Stack should be Node. Region should be East Asia.
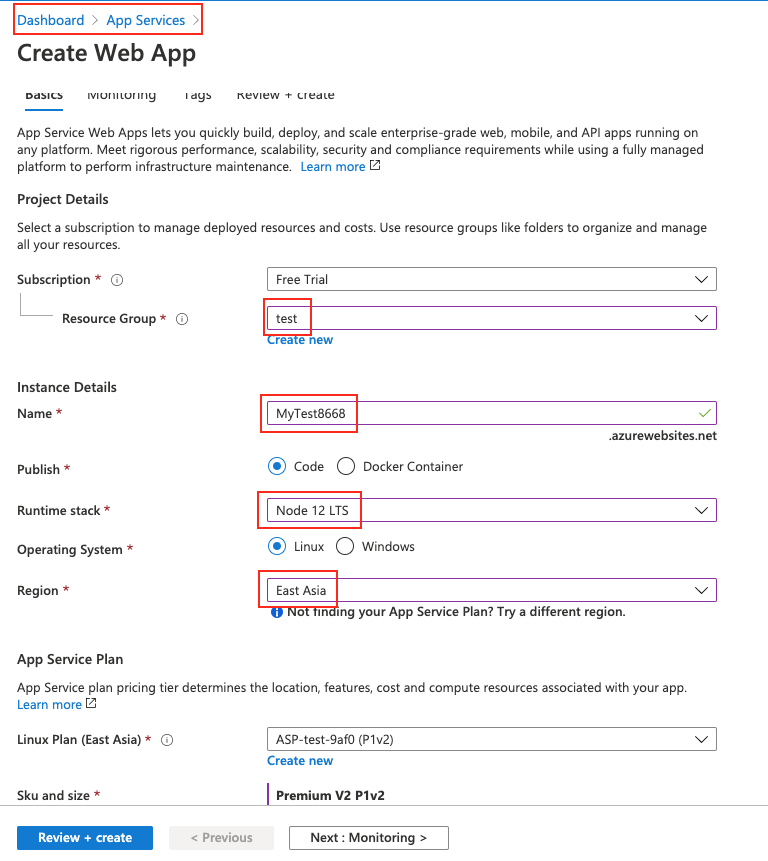
Use default on the rest of the options. Review your changes and click create.
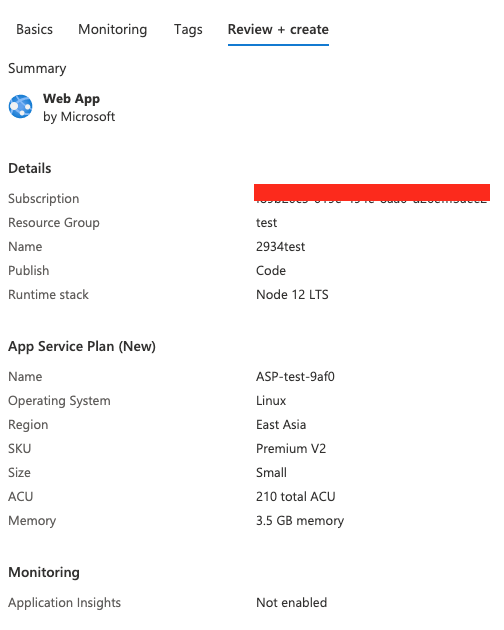
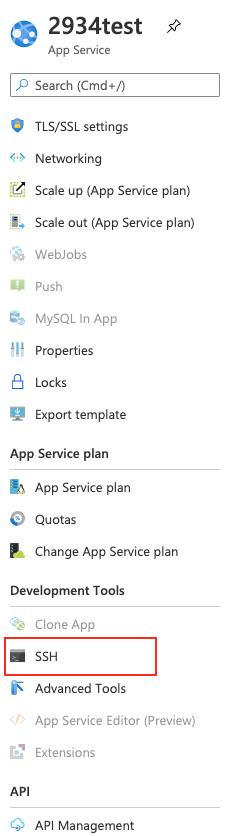
Once it finishes creating, you’ll come back to the dashboard with your newly created Web Service. Click on it and you’ll see the web service’s stats. Notice the URL. Click on it to see your default page. This page is actually serviced from your server’s site/wwwroot/hostingstart.html. You can verify this by clicking on the SSH icon on your left, a window pops up and you’re in your server. cd into site/wwwroot and you’ll be able to see it.
Creating React App locally
We create the app and name it azure-react-demo:
npx create-react-app azure-react-demo
We go into the directory and install react-router-dom for routing features:
cd azure-react-demo
npm i react-router-dom
In your directory, you should now see node_modules, public, src ..etc.
Then create pages folder in src.
src/App.js
|
1 2 3 4 5 6 7 8 9 10 11 12 13 14 15 16 17 18 19 20 21 22 |
import React, { Component } from "react"; import "./App.css"; import Home from "./pages/Home"; import Page1 from "./pages/Page1"; import Page2 from "./pages/Page2"; import { BrowserRouter as Router, Switch, Route } from "react-router-dom"; class App extends Component { render() { return ( <Router> <Switch> <Route exact path="/" component={Home} /> <Route path="/page1" component={Page1} /> <Route path="/page2" component={Page2} /> </Switch> </Router> ); } } export default App; |
src/pages/Home.js
|
1 2 3 4 5 6 7 8 9 10 11 12 13 14 15 16 17 18 19 20 21 22 23 24 25 26 |
import React from "react"; import { Link } from "react-router-dom"; const Home = () => { return ( <div className="flags"> <div className="page page1"> <div className="flagTop" /> <div className="flagCenter"> <h1 className="country">Argentina (PAGE 1)</h1> <Link to="/page1">Click to go to Page 1</Link> </div> <div className="flagBottom" /> </div> <div className="page page2"> <div className="flagTop" /> <div className="flagCenter"> <h1 className="country">Nigeria (PAGE 2)</h1> <Link to="/page2">Click to go to Page 2</Link> </div> <div className="flagBottom" /> </div> </div> ); }; export default Home; |
src/pages/Page1.js
|
1 2 3 4 5 6 7 8 9 10 11 12 13 14 15 16 17 18 19 20 21 |
// Page1.js import React from "react"; import { Link } from "react-router-dom"; const Page1 = () => { return ( <div className="page page1"> <div className="flagTop" /> <div className="flagCenter"> <h1 className="country">Argentina (PAGE 1)</h1> <div className="otherLinks"> <Link to="/page2">Nigeria</Link> <Link to="/">Home</Link> </div> </div> <div className="flagBottom" /> </div> ); }; export default Page1; |
src/pages/Page2.js
|
1 2 3 4 5 6 7 8 9 10 11 12 13 14 15 16 17 18 19 20 |
import React from "react"; import { Link } from "react-router-dom"; const Page2 = () => { return ( <div className="page page2"> <div className="flagTop" /> <div className="flagCenter"> <h1 className="country">Nigeria (PAGE 2)</h1> <div className="otherLinks"> <Link to="/page1">Argentina</Link> <Link to="/">Home</Link> </div> </div> <div className="flagBottom" /> </div> ); }; export default Page2; |
src/App.css
|
1 2 3 4 5 6 7 8 9 10 11 12 13 14 15 16 17 18 19 20 21 22 23 24 25 26 27 28 29 30 31 32 33 34 35 36 37 38 39 40 41 42 43 44 45 46 47 48 49 50 |
/* App.css */ html { box-sizing: border-box; } body { margin: 0; } .page { display: grid; grid-template-rows: repeat(3, 1fr); height: 100vh; } .page1 .flagTop, .page1 .flagBottom { background-color: blue; } .page2 .flagTop, .page2 .flagBottom { background-color: green; } .flagCenter { display: flex; align-items: center; flex-direction: column; justify-content: center; text-align: center; } .page a { border: 2px solid currentColor; font-weight: bold; margin: 0 30px; padding: 5px; text-decoration: none; text-transform: uppercase; } .flags { display: flex; width: 100%; } .flags > .page { flex: 1; } |
run npm start and you should see a simple app with pages. We are going to deploy it to Azure.
Deploy to Azure
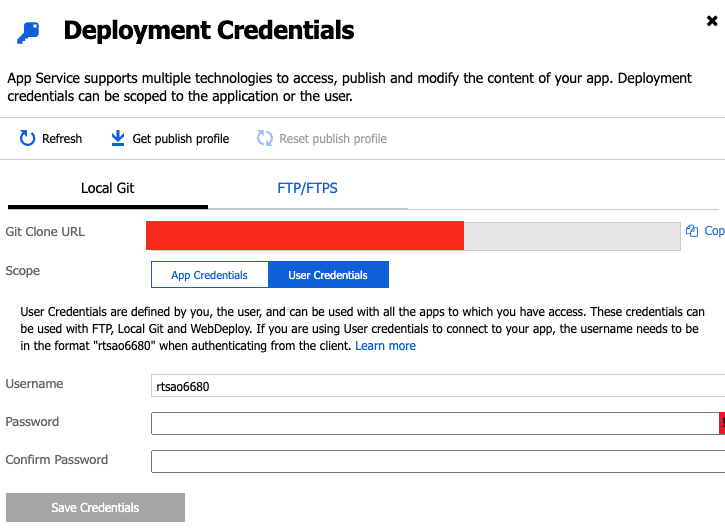
First go to Deployment Credentials
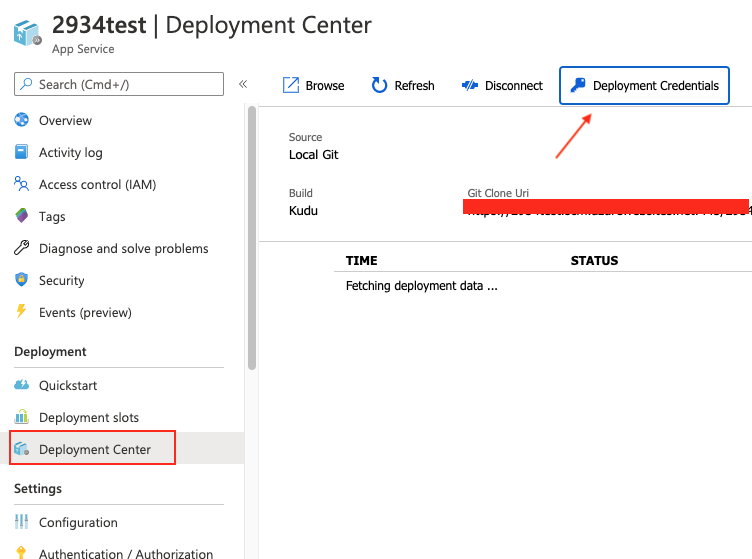
set up credentials for a user.
Now go to the deployment center and set it up for our local project.
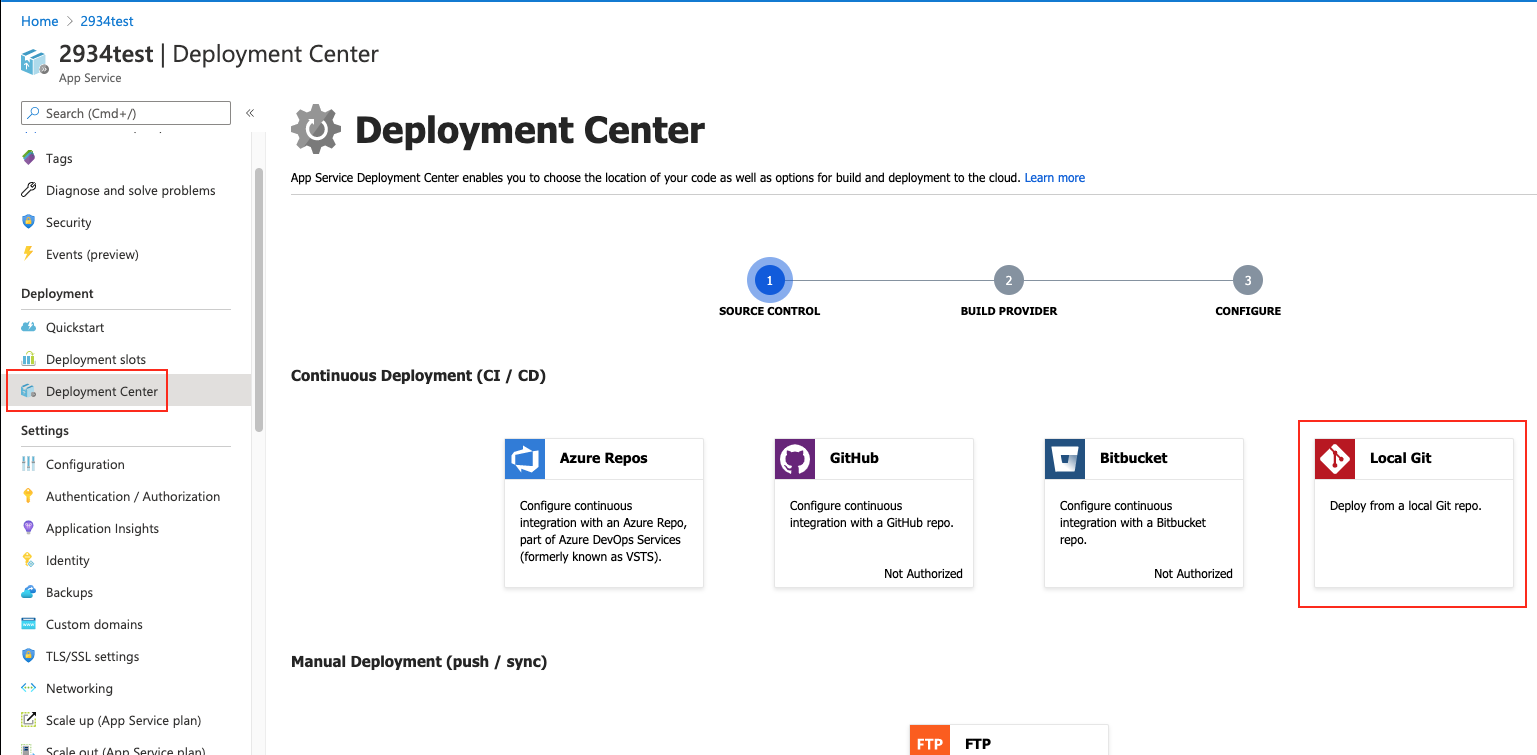
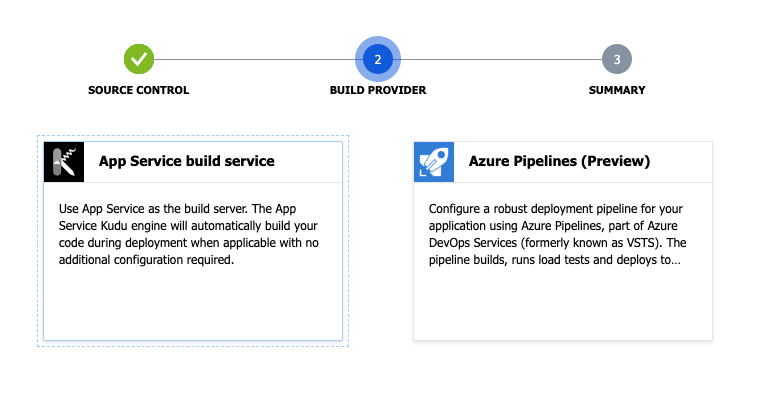
After the third step, Azure generates a local git repo for you. And it gives you a remote link to point your react app to.
something like this: https://YourAppName.scm.azurewebsites.net/YourAppName.git
Create the build folder
Now in our root directory, npm run build
Once the build folder generates, we CD into it:
|
1 2 3 4 5 |
git init git add . git commit -m "Initial Commit" git remote add azure <git clone url> git push azure master |
Make sure you use the git url like this: https://YourAppName.scm.azurewebsites.net/YourAppName.git
And then put in your username and password when it prompts you.
Startup command
If you are using Windows, you’re ready to go. Because we are using Node, we need to do something that would allow Azure to point to our static website.
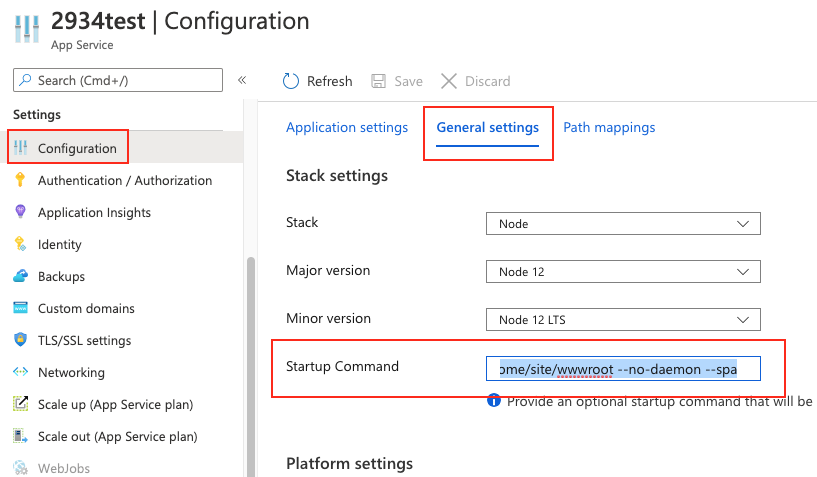
Configuration > General Settings > Startup Command:
pm2 serve /home/site/wwwroot –no-daemon –spa
If you use react-router (which we are using) and wants to make any direct access on custom routes be handled by index.html you need to add –spa option on the same command.
then go to your site and it should work. When you click around, all the links should work. In addition, entering URLs in the browser will work also.

IF you do not put in the Startup command, the site will always display the default page. It will not even run your app.
If you put the startup command WITHOUT the –spa, the site will work, but you can’t access other pages through the URL. Every URL page must be accessed through the front page.
Thus, pm2 serve /home/site/wwwroot –no-daemon –spa solves both problems.
Refresh Token for Azure Active Directory
30 Days of Zumo.v2 (Azure Mobile Apps): Day 7 – Refresh Tokens
Getting the key from your Azure AD Portal
Go to your Azure Active Directory Portal via manage.windowsazure.com
Sign in, and click on Active Directory, then you should be able to see your app.
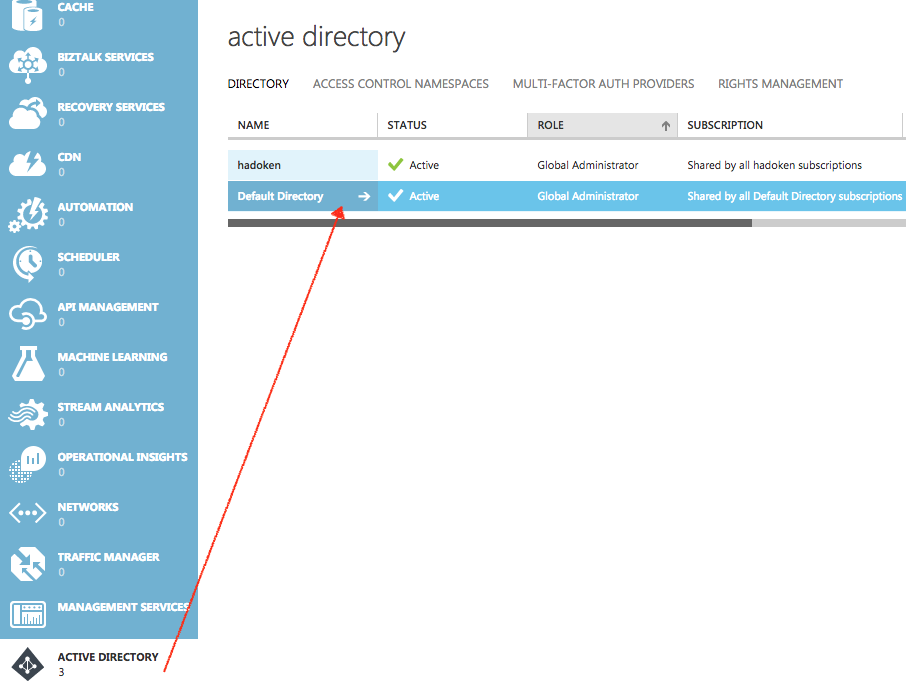
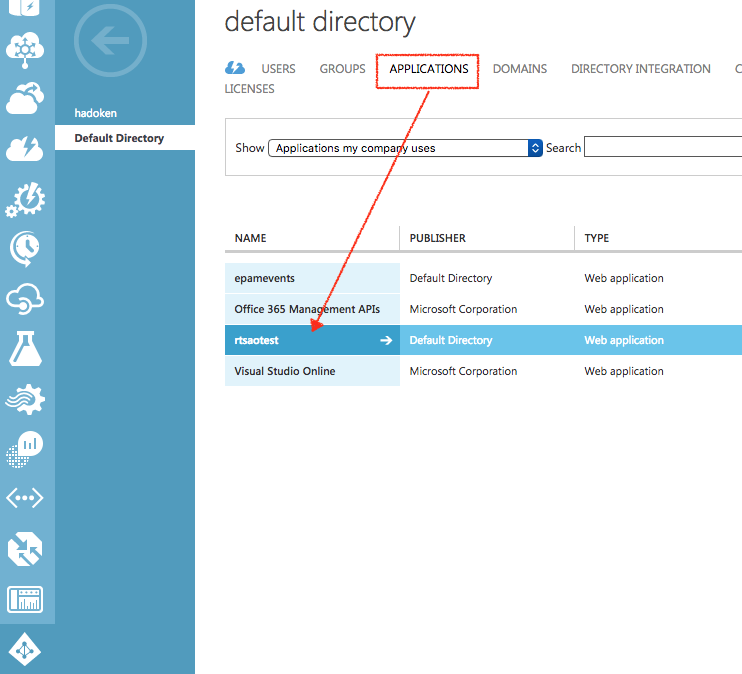
Click on Applications, then your app name
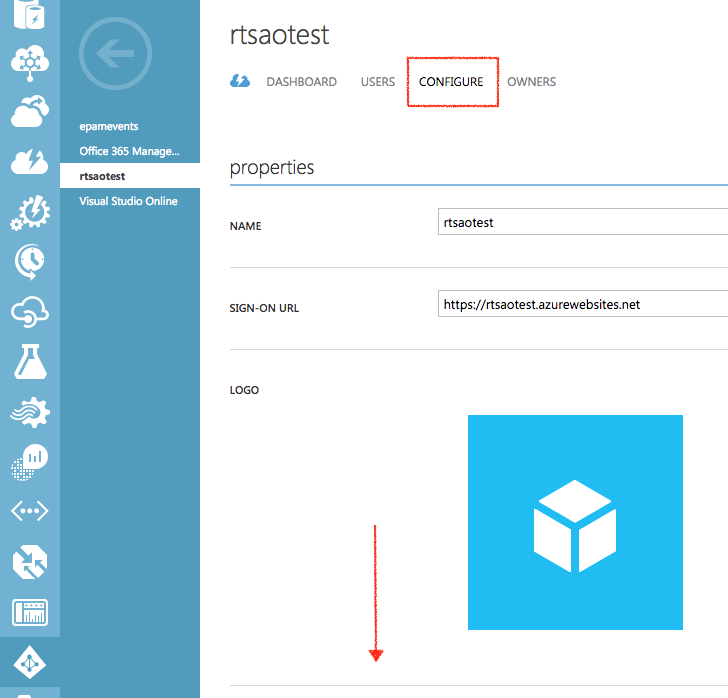
In the next screen, click on Configure, then scroll down the page
Under ‘Keys”, select a year, and then save. You will then see the secret key appear. Copy that into test.js under the other global variables.
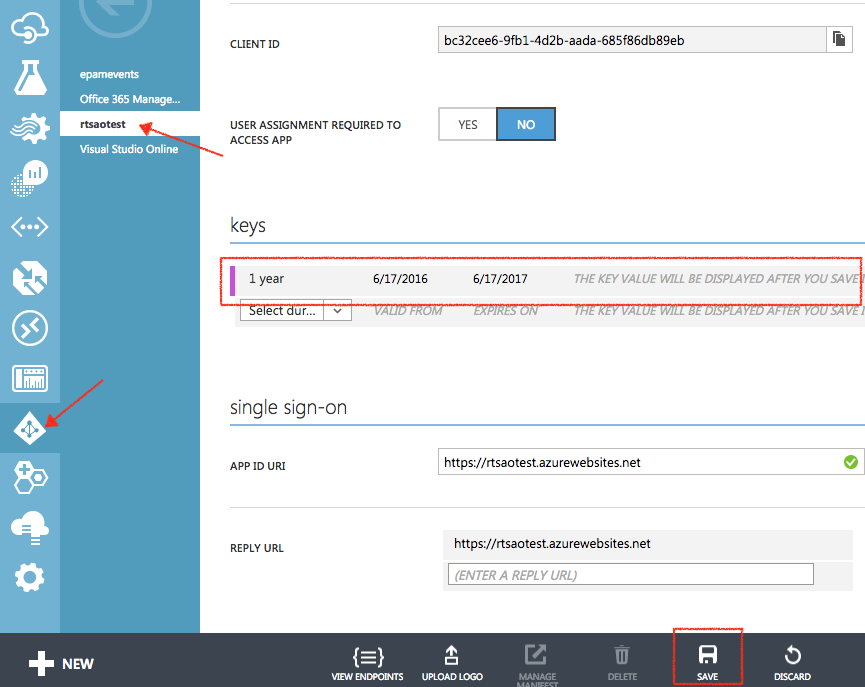
Save your client ID, and your key because we will be using it later.
Configured the Azure AD service to use refresh tokens
Log into your portal, select your app, scroll down to Resource explorer. You’ll see the next blade have a Go link. Click on the go link.

A separate page will appear with a lot of resource data. On the left hand side of the window is a tree explorer of your app’s resources. Expand the tree menu config and then authSettings.
Because this is a dangerous place, it’s set to read-only mode.
Click on the grey Read/Write box at the top of the screen, then click on Edit next to the PUT button.
I need to set two things. Firstly, the key that I created in the Azure AD portal needs to be copied into the clientSecret field as a string. Secondly, I need to set the additionalLoginParams to [“response_type=code id_token”], like this:
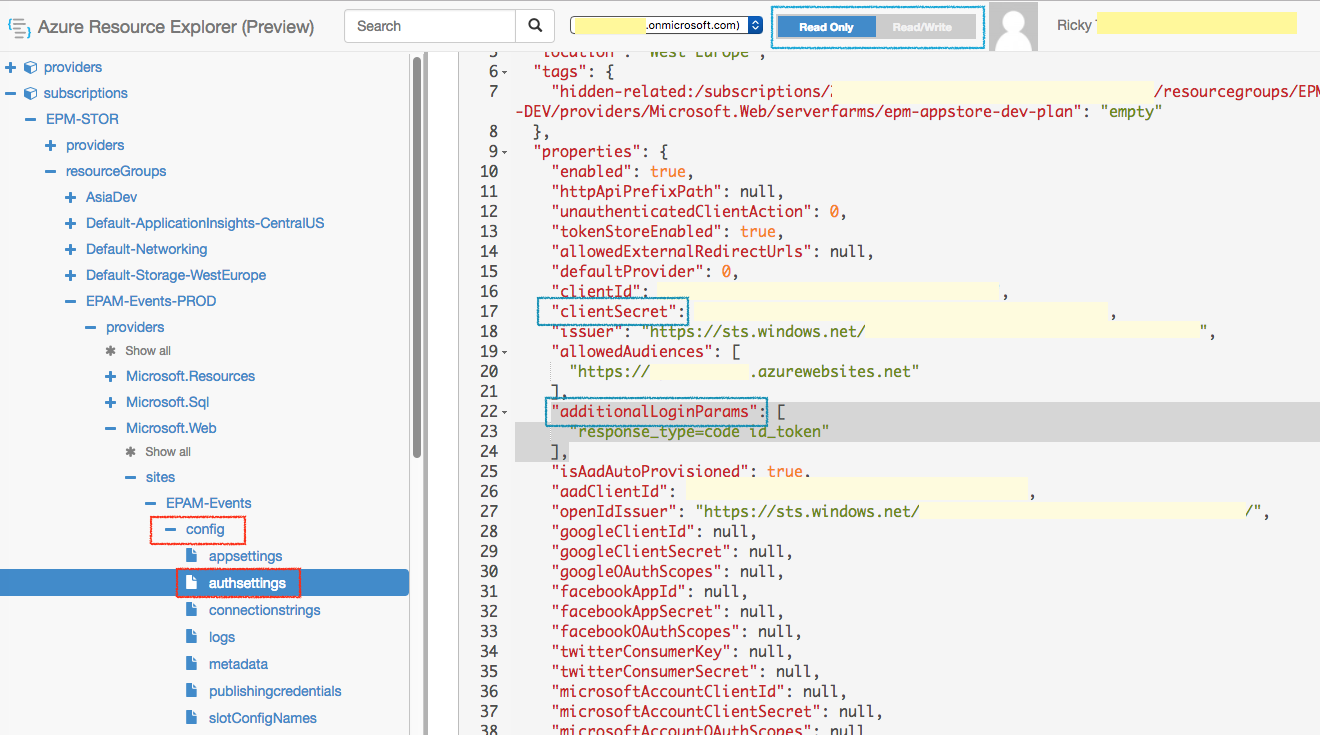
Also make sure the client ID matches from your Active Directory management portal from above.
Deleting in Azure
Given that a refresh pull involves pulling data that is filtered according to an attribute, Soft Delete involves setting that attribute to YES/NO. This affects clients in that they will then not be able to pull that data. Additionally, that data is kept safe in Easy Table for future references and undeletes.
For example, let’s say you create an attribute “complete”.
When pulling data, you may specify that you want to pull all data that has NO for attribute “complete”.
Once you assign YES for attribute complete on say row 88, client refresh pulls will not include row 88 anymore. It will include all rows with NO for attribute “complete”.
|
1 2 3 4 5 6 7 8 9 10 11 12 13 14 15 16 17 18 19 |
-(void)completeItem:(NSDictionary *)item completion:(QSCompletionBlock)completion { // Set the item to be complete (we need a mutable copy) NSMutableDictionary *mutable = [item mutableCopy]; [mutable setObject:@YES forKey:@"complete"]; // Update the item in the TodoItem table and remove from the items array on completion [self.syncTable update:mutable completion:^(NSError *error) { [self logErrorIfNotNil:error]; [self syncData: ^{ // Let the caller know that we finished if (completion != nil) { dispatch_async(dispatch_get_main_queue(), completion); } }]; }]; } |
When fetching from your fetch controller/core data, simply filter data according to complete == NO.
|
1 2 3 4 5 6 7 8 9 10 11 12 13 14 15 16 17 18 19 20 21 22 23 24 25 26 27 28 29 30 31 |
- (NSFetchedResultsController *)fetchedResultsController { if (_fetchedResultsController != nil) { return _fetchedResultsController; } NSFetchRequest *fetchRequest = [[NSFetchRequest alloc] init]; QSAppDelegate *delegate = (QSAppDelegate *)[[UIApplication sharedApplication] delegate]; NSManagedObjectContext *context = delegate.managedObjectContext; fetchRequest.entity = [NSEntityDescription entityForName:@"TodoItem" inManagedObjectContext:context]; // show only non-completed items fetchRequest.predicate = [NSPredicate predicateWithFormat:@"complete == NO"]; // sort by item text fetchRequest.sortDescriptors = @[[NSSortDescriptor sortDescriptorWithKey:@"createdAt" ascending:YES]]; // Note: if storing a lot of data, you should specify a cache for the last parameter // for more information, see Apple's documentation: http://go.microsoft.com/fwlink/?LinkId=524591&clcid=0x409 NSFetchedResultsController *theFetchedResultsController = [[NSFetchedResultsController alloc] initWithFetchRequest:fetchRequest managedObjectContext:context sectionNameKeyPath:nil cacheName:nil]; self.fetchedResultsController = theFetchedResultsController; _fetchedResultsController.delegate = self; return _fetchedResultsController; } |
HARD DELETE – Delete on Local and Server
If you want to remove local AND server data, all you have to do is call the delete method from your MSSyncTable.
It sends a request to your local data source to remove the given item, then queues a request to send the delete to the mobile service.
It first removes the data locally.
Then, when the queued request goes through into the mobile service, then it will update remotely, and you can log into your Azure account, look at the Easy Tables, and see that the item has been removed.
|
1 2 3 4 5 6 7 8 9 10 11 |
/// Sends a request to the MSSyncContext's data source to delete the given /// item in the local store. In addition QUEUES a request to send the delete /// to the mobile service. [self.syncTable delete:item completion:^(NSError * _Nullable error) { if(error) { NSLog(@"ERROR %@", error); } else { NSLog(@"DELETED LOCALLY!"); dispatch_async(dispatch_get_main_queue(), completion); } }]; //delete |
Notes
Do not remove data by hand on the backend directly. Currently, MS have no way to re-syncing, and your client app will have many error messages on its request queue.