ref and source – https://github.com/redmacdev1988/avl-binary-tree
Balanced and UnBalanced Trees
height(left) – height(right) <= 1
- Perfect tree – triangle. Height of every node is 0
- Right skewed tree – nodes have right childs only
- Left skewed tree – nodes have left childs only
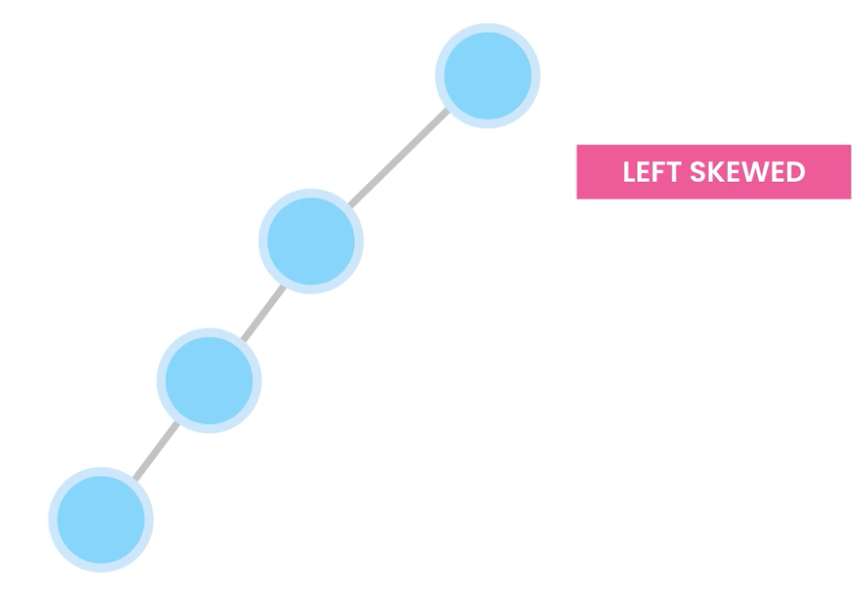
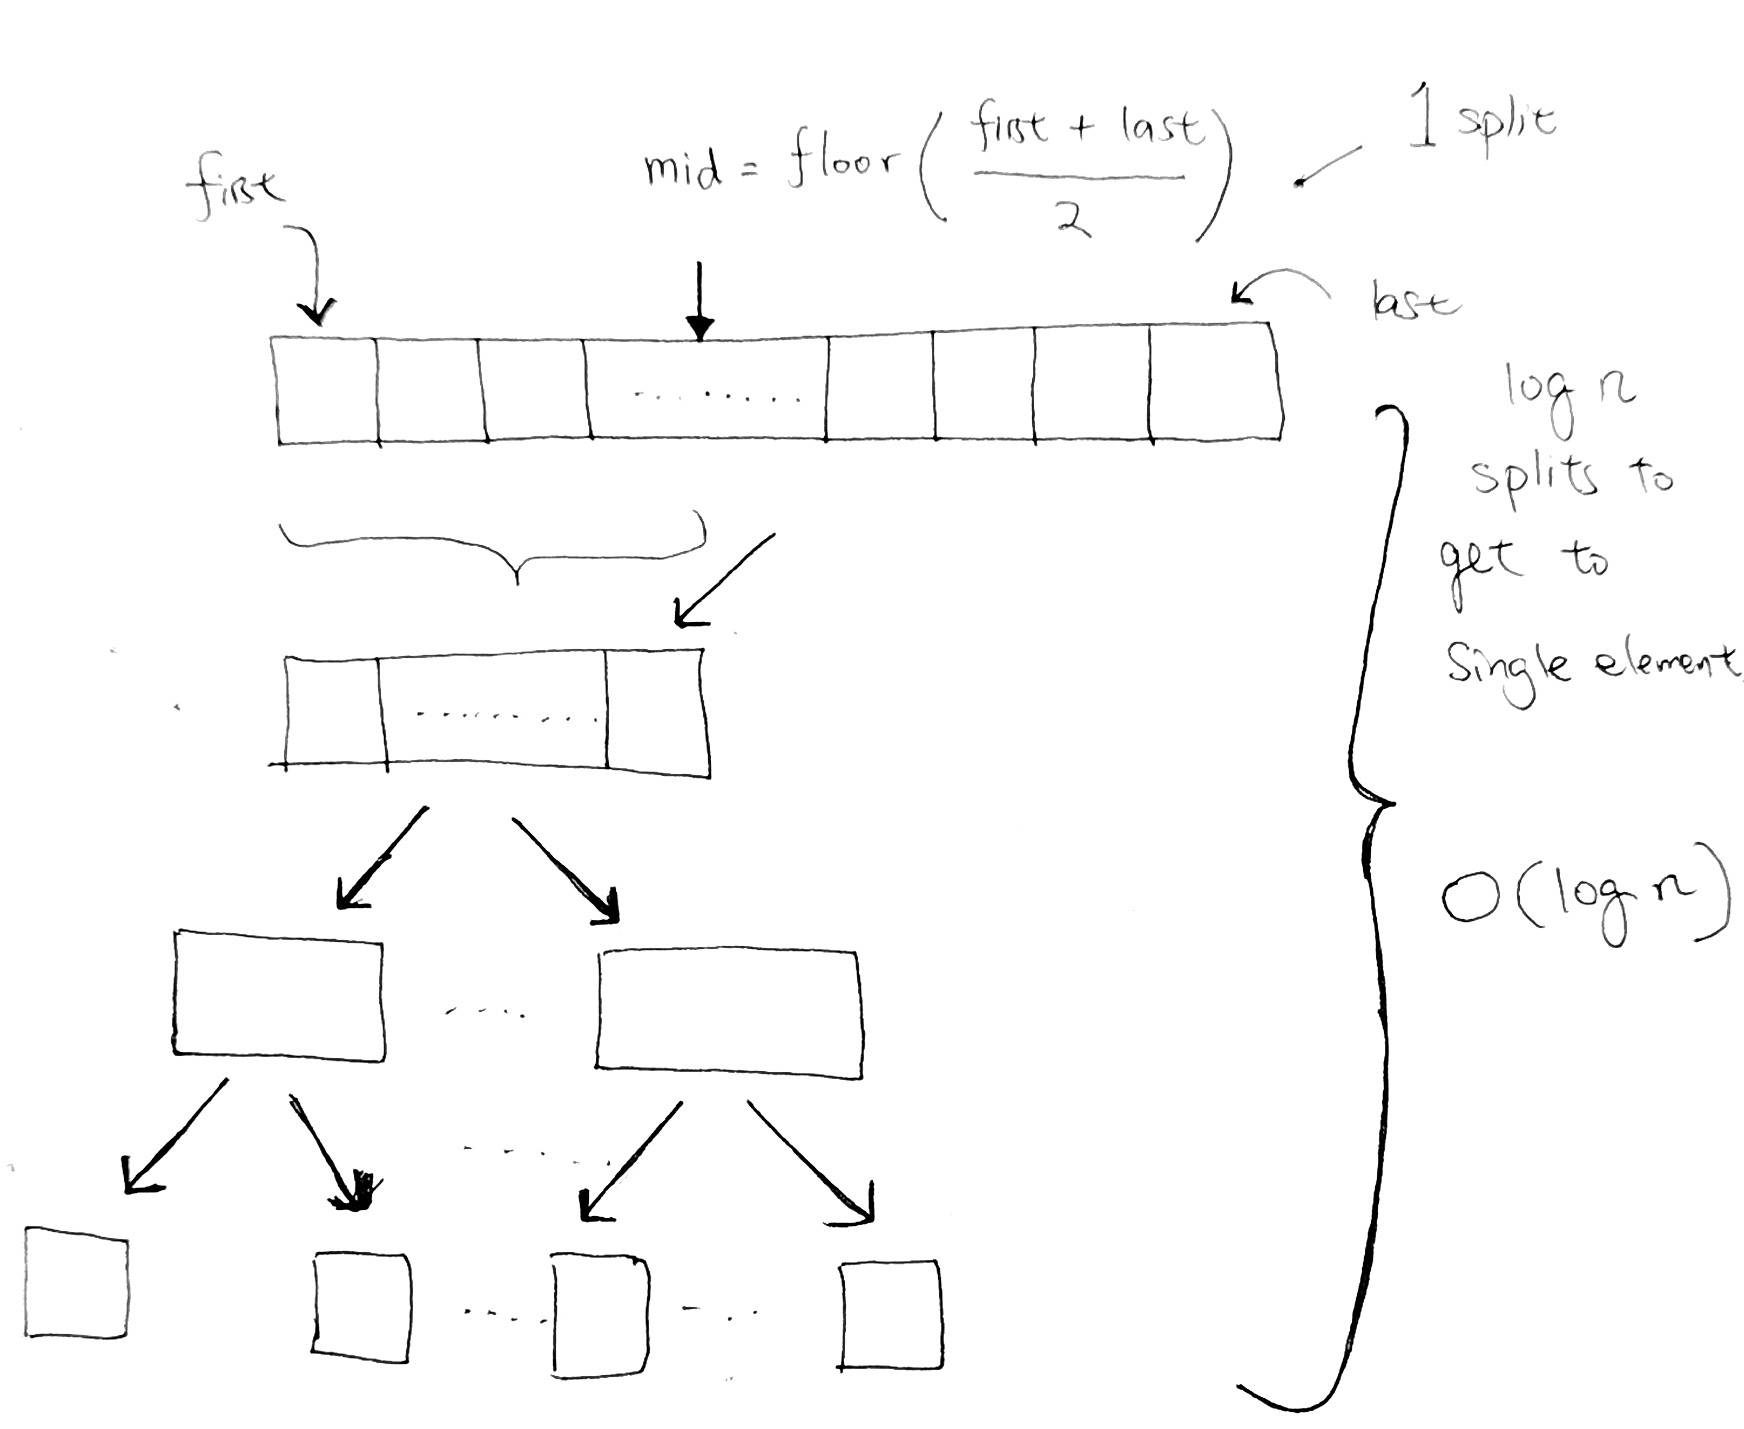
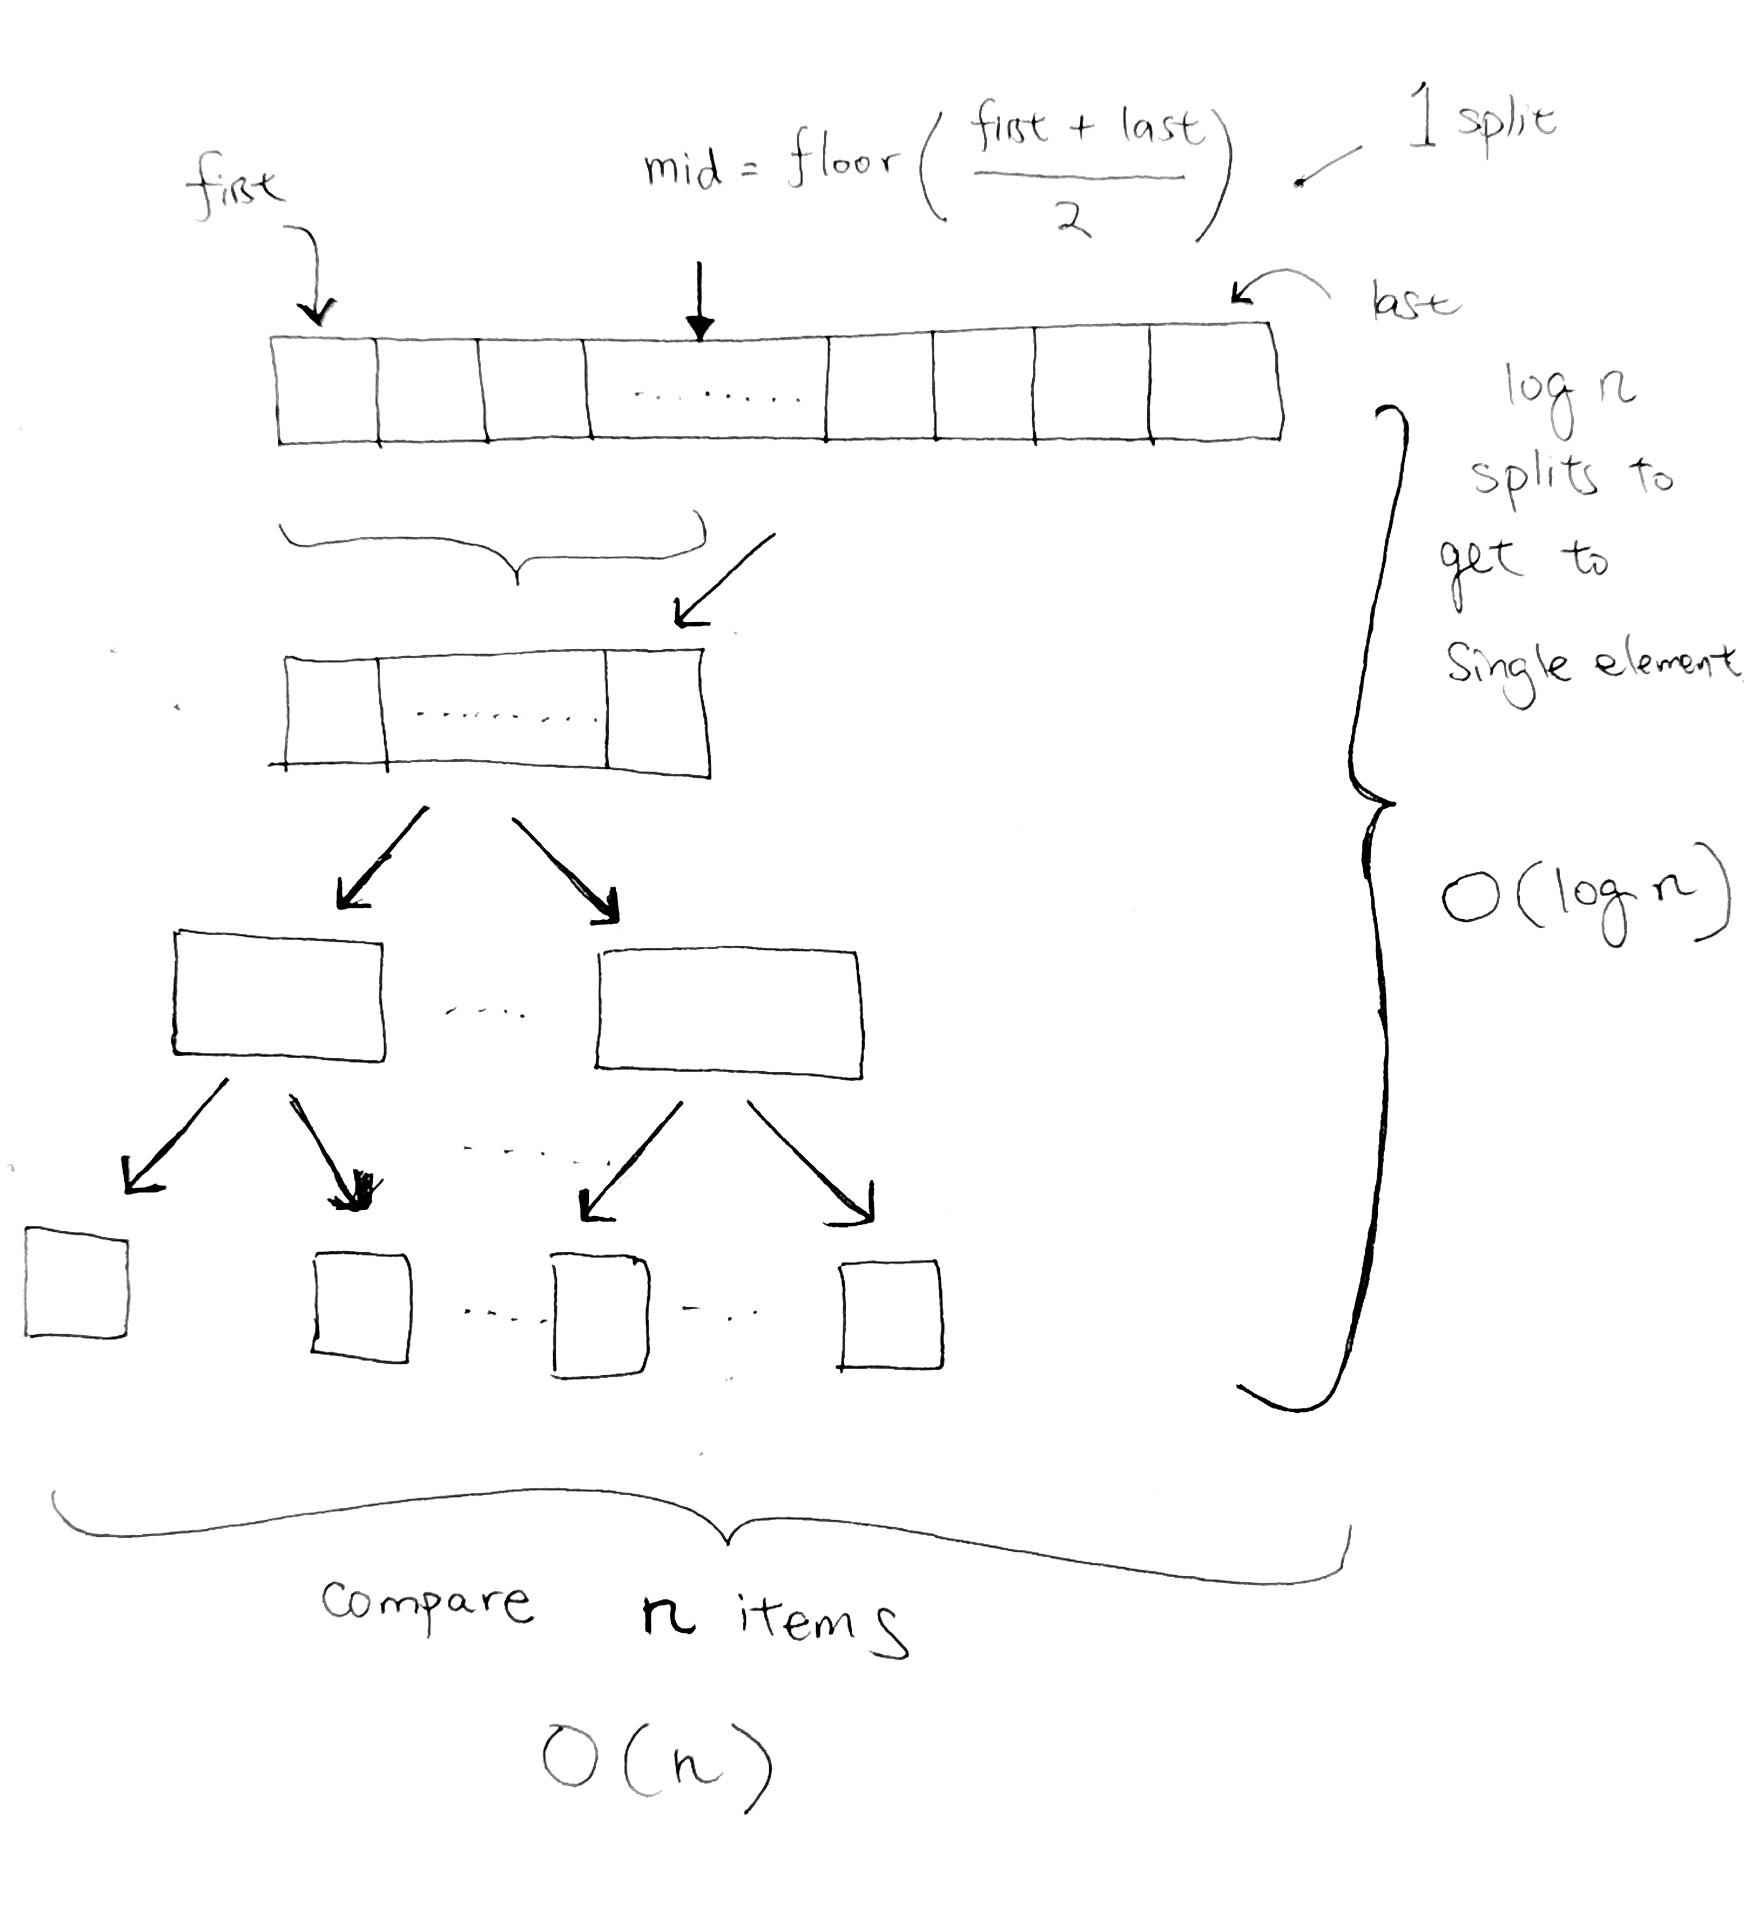
It becomes a linked list and the run time back to O(n).
so…how should we add to BST so that it is more balanced?
AVL (Adelson-Velsky and Landis) is a special BST where it has self-balancing properties. There are other popular trees that also self-balances, such as red-black trees, 2-3 trees, b-trees…etc.
If distance > 1, use rotation to re-balance itself.
4 types of rotation:
Left (LL)
Right(RR)
Left-Right (LR)
Right-Left (RL
height and balance
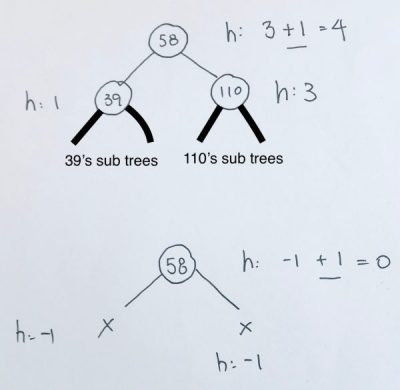
The height of a node is the maximum number of vertices from the leaf to itself. Note thath height always start from the ground.
Thus, a leaf has a height of 0.
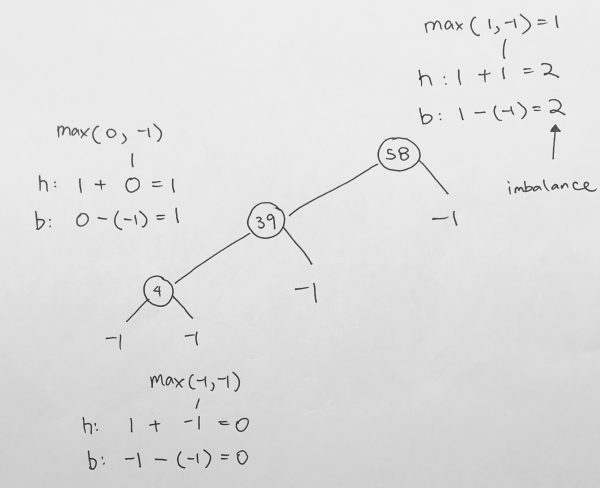
If the leaf has a parent node, the parent node’s height would be 1.
The balance factor of a node is the height of the left subtree minus the height of the right subtree.
- If the result is > 0, the left subtree is larger
- If the result is < 0, the right subtree is larger
In our example, we use absolute value as we don’t care which side is larger. We simply want to see what the balance factor is.
simple example
We have a root node 5, and its left node of value 2.
We calculate from the leaf. 2 is a leaf, so its height is 0. And in turn, balance factor is 0.
The left and right of a leaf is always null, thus, we don’t add 1.
At 5, the height is calculated as height of the subtree + 1. Thus, we get 1 for left subtree. And obviously 0 for right subtree. The height is the max of those 2 numbers. We get 1. The balance is the difference in the height of the left and right subtree, which is 1.
In the next example, it is the same, but simply flipped. The leaf has height of 0 because there is no left or right subtrees. Thus, its balance is also 0.
The root node 8’s left subtree is null, so its height is defaulted to 0.
Its right subtree exists so we add 1 to right subtree height (0), which results to 1.
Our balance is abs value of (left height – right height), which is abs(0-1) = 1.

In the last example, 50 is the root. Its left subtree is 10, which has height of 0, balance of 0.
Its right subtree is 80 which has height of 0, balance of 0.
Thus, at 50, its left height is 0 + 1. right height is 0 + 1, thus, max of left and right height is 1.
Its balance is therefore abs(1 – 1) = 0
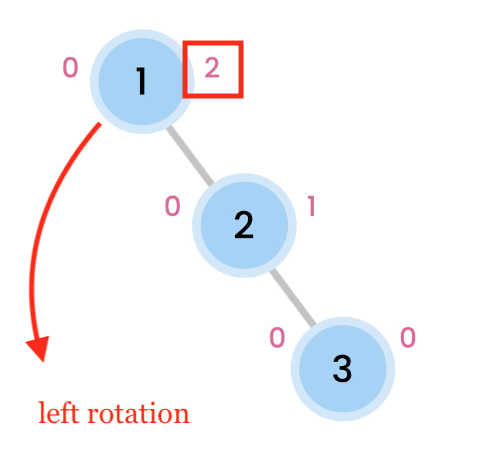
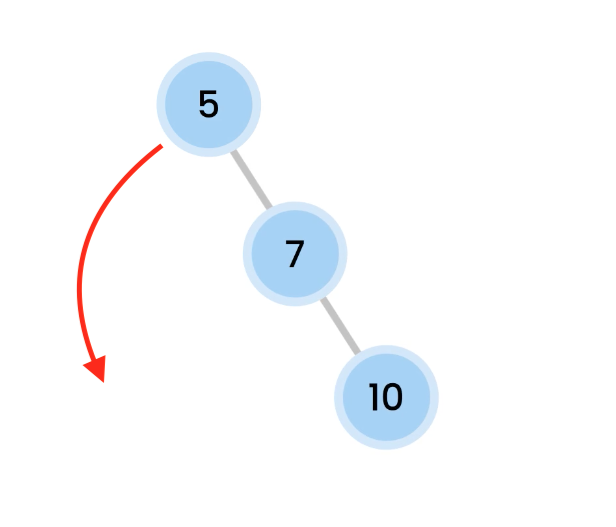
Left Rotation
Right skewed trees are rebalanced by doing a Left Rotation.
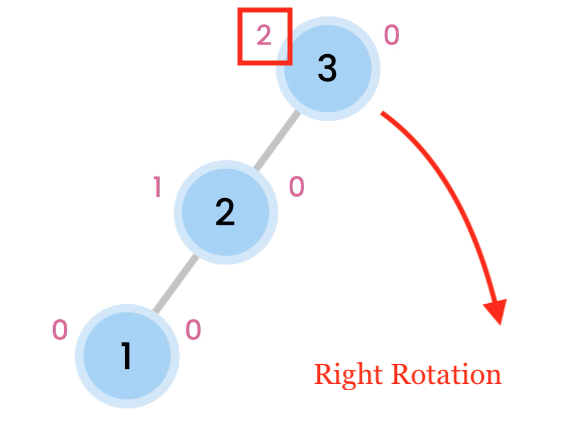
Right Rotation
Left skewed trees are rebalanced by doing a Right Rotation.
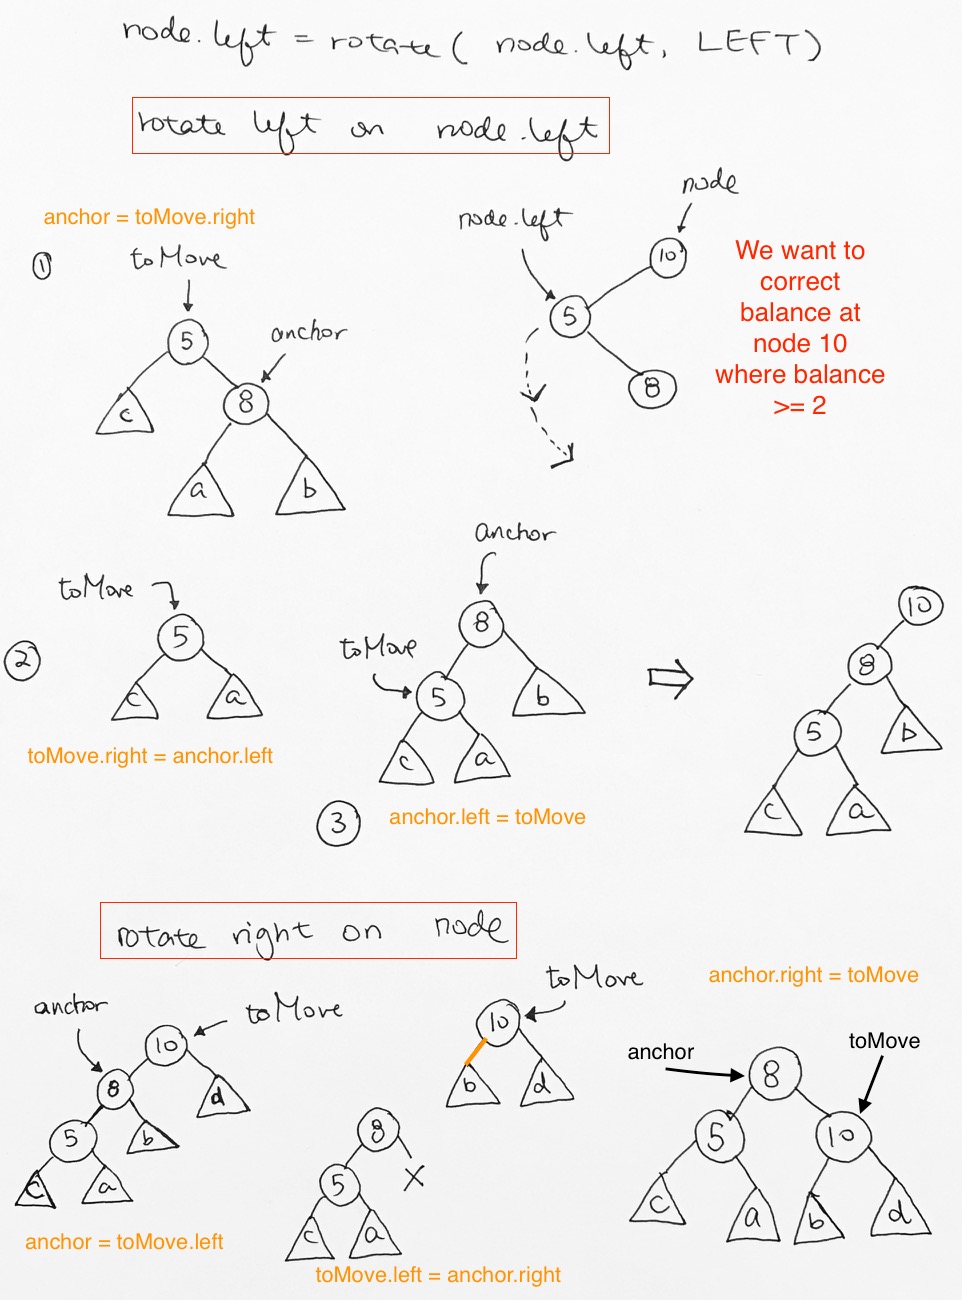
Left Right Rotation
Left rotation on 5, so 7 comes up.
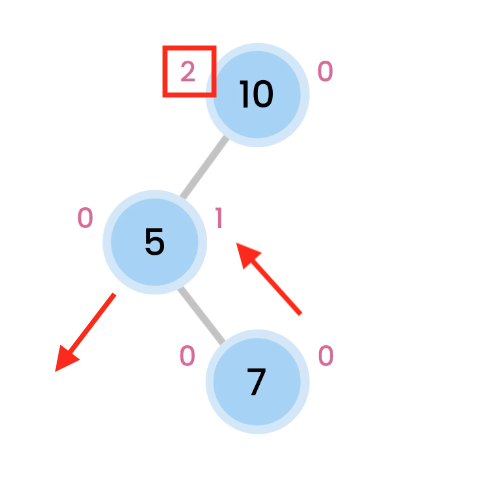
then we do a Right rotation, which makes 10 comes down.
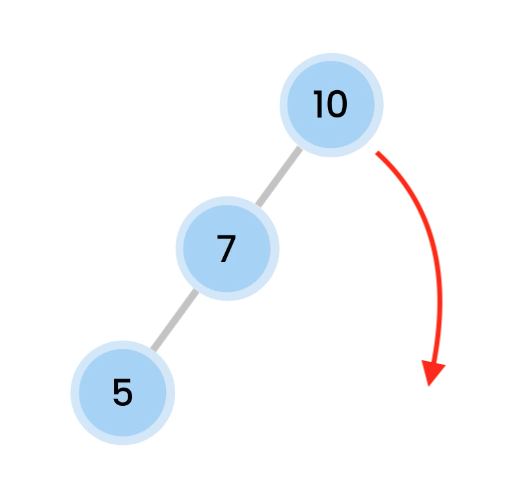
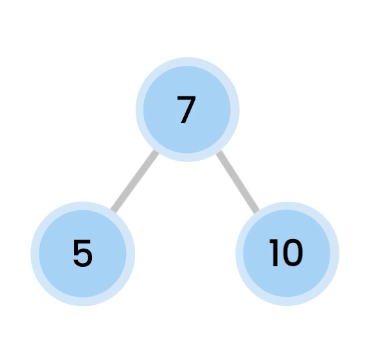
And now, we are balanced.
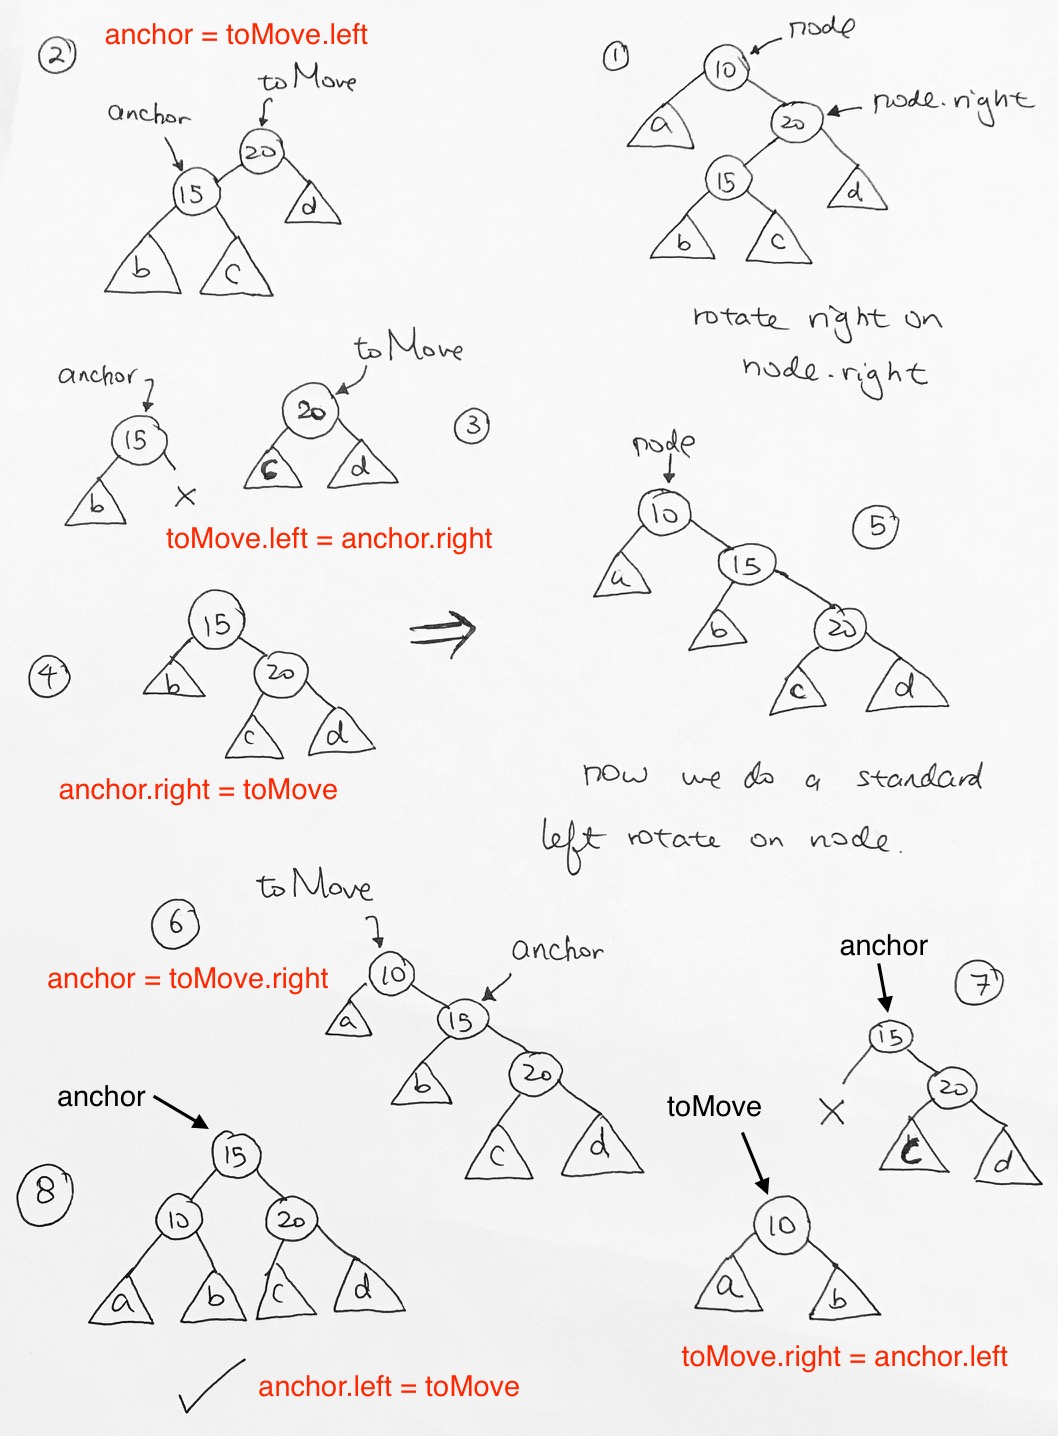
Left Right Rotation
Height Calculations
After inserting new node into an AVL tree, we must re-calculate every node’s height.
|
1 2 3 4 5 |
function heightOfTree(node) { if (node === null) return -1; return Math.max(heightOfTree(node.left), heightOfTree(node.right)) + 1; } |
code for UPDATE of height and balance

The code shows, if we’re at a subtree that is null, we don’t add 1. If there exists a subtree, we add 1 to the height of that subtree in order to get our current height.
We do this for both left and right.
The balance is simply the difference between the heights.
balanceFactor = height(L) – height(R)
> 1 => left heavy, perform right rotation
< -1 right heavy, perform left rotation
|
1 2 3 4 5 6 7 |
// O( 1 ) function calculateAndAssignNewBalance(node) { if (node === null) return 0; let leftHeight = (node.left ? node.left.height: -1); let rightHeight = (node.right ? node.right.height: -1); node.balance = leftHeight - rightHeight; } |
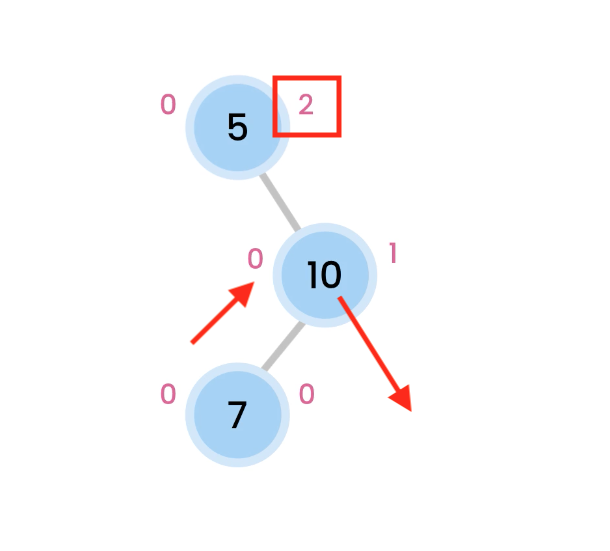
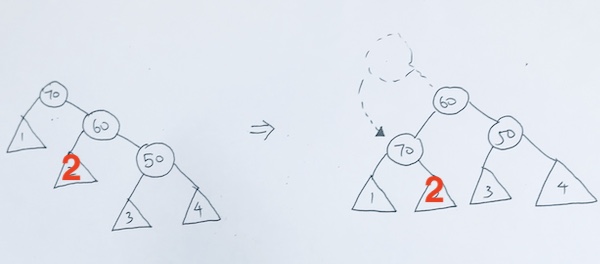
more examples
/ rotation

< rotation
> rotation
\ rotation
In order to fix it, we must do a left rotation.
Insertion with Balance
|
1 2 3 4 5 6 7 8 9 10 11 12 13 14 15 16 17 18 19 20 21 22 23 24 25 26 27 28 29 30 31 32 33 34 35 36 37 38 39 |
// O( log n ) for the insertion function stdBSTInsert(data, node) { // check if reached bottom if (node === null) { return new TreeNode(null, data, 0, 0, null); } // numbers and strings work the same if (data < node.data) { node.left = stdBSTInsert(data, node.left); } else { node.right = stdBSTInsert(data, node.right); } node.height = 1 + Math.max((node.left) ? node.left.height: 0, (node.right) ? node.right.height: 0); // O( 1 ) node.balance = balance(node); // O( 1 ) if (node.balance >= 2) { if (node.left && node.left.balance >= 1) { node = rotate(node, CONSTANTS.RIGHT); // O(log n) } if (node.left && node.left.balance <= -1) { node.left = rotate(node.left, CONSTANTS.LEFT); // O(log n) node = rotate(node, CONSTANTS.RIGHT); // O(log n) } } if (node.balance <= -2) { if (node.right && node.right.balance <= -1) { node = rotate(node, CONSTANTS.LEFT); // O(log n) } if (node.right && node.right.balance >= 1) { node.right = rotate(node.right, CONSTANTS.RIGHT); // O(log n) node = rotate(node, CONSTANTS.LEFT); // O(log n) } } return node; } |
Removal of Node
Removal of Node is straightforward. We use public function remove and it uses utility traverseRemove function. travereRemove traverses the tree until it gets to the node with the value you want to remove.
|
1 2 3 4 5 6 7 8 9 10 11 12 13 14 15 16 |
function traverseRemove(number, node) { if (node == null) { //console.log("Ø You're at leaf end, null. Number " + number + " not found. :P )"); return null; } if (number > node.data) { node.right = traverseRemove(number, node.right); return node; } else if (number < node.data) { node.left = traverseRemove(number, node.left); return node; } else if (number == node.data) { // found what we're looking to delete return node; } } |
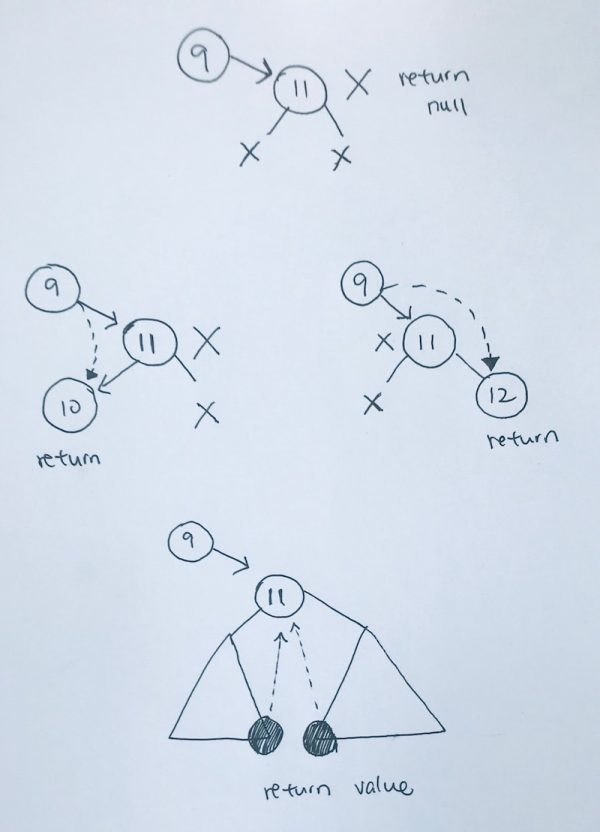
When we find the node we’re looking for, it will look at 4 situations:
1) no children, simply delete and remove the current node
2) only the left child exist, so we return the node’s left subtree to be attached. remove the node
3) only the right child exist, so we return the node’s right subtree to be attached. remove the node.
|
1 2 3 4 5 6 7 8 9 10 11 12 |
if (noChildren(node)) { node.delete(); return null; } if (leftChildOnly(node)) { var leftNodeRef = node.left; node.delete(); return leftNodeRef; } if (rightChildOnly(node)) { var rightNodeRef = node.right; node.delete(); return rightNodeRef; } if (bothChildExist(node)) { // } |
4) both child exist.
This is the key in deletion. In this particular case, we want to return the leftmost of the right subtree or rightmost of the left subtree.
In our example, we return the leftmost of the rightsubtree.
|
1 2 3 4 5 6 7 8 9 10 11 12 13 14 |
function deleteMinimum(node, removeCallBack) { if (noChildren(node)) { removeCallBack(node); return null; } if (rightChildOnly(node)) { removeCallBack(node); return node.right; } if (node.left) { node.left = deleteMinimum(node.left, removeCallBack); return node; } } |
ref – https://github.com/redmacdev1988/avl-binary-tree