Background Tasking

http://stackoverflow.com/questions/12071726/how-to-use-beginbackgroundtaskwithexpirationhandler-for-already-running-task-in
http://stackoverflow.com/questions/28993628/how-to-pass-background-task-identifier-to-completion-handler
http://www.raywenderlich.com/29948/backgrounding-for-ios

The Problem

When you do an update, an add of an event, or whatever feature that you would like to update on the Azure, it will take anywhere from 1 to maybe a few long seconds to sync the data over the network.

This will cause a problem if the user hits the home button and causes our app to process in the background. iOS will give the app 5 seconds to do what it needs to do before it suspends it.

But what if our network task takes longer!? How to make sure whatever network task we have runs completes safely?

Solution

Apple introduced a feature where you get to background your task for a full 3 minutes. If it can’t finish after 3 minutes, then you’re out of luck and it will suspend your app. But for some network task where we’re synching user data/actions against an Azure server, etc…3 minutes is plenty!

How it Works

When a network task happens, we create a timer to check on the application state for the lifetime of that network task.

For example, when the network starts, we create a timer that calls on method evaluate every 1 second to check on the application state like so:

For the whole duration of the network task, we need to check if the APP is in active state UIApplicationStateActive, or not. If its in the active state, then do nothing, and let the app continue its network task.

Say while the network task is processing, the user presses the Home button. Our app gets backgrounded, and the (UIApplicationStateActive) STATE would the be false. When this happens, the App’s singleton backgroundTimeRemaining will start counting down.

We simply log out to see what the remaining time is. We have a full 180 seconds.

The logs will let you know that as you’re processing this network task, the backgroundTimeRemaining will decrease while the app is in the background.

If the user clicks on the app again within the 3 minutes, your backgroundTimeRemaining will reset.

When the 3 minutes are up, it will call an expiration handler that your property

points to like this:

Binary Data and Base64

Binary Data – any data represented in binary form. It is a sequence of bytes. Each byte is 8 bits.

The term “binary file” is often used as a term meaning “non-text file”.

Binary files typically contain bytes that are intended to be interpreted as something other than text characters.

* Base64 is a group of similar binary-to-text encoding schemes that represent binary data in an ASCII string format by translating it into a radix-64 representation.

* Base64 is a way to encode binary data into a character set known to pretty much every computer system, in order to transmit the data without loss or modification of the contents itself.

When you have some binary data that you want to ship across a network, you generally don’t do it by just streaming the bits and bytes over the wire in a raw format.

Why?

…because some media are made for streaming text. You never know — some protocols may interpret your binary data as control characters (like a modem), or your binary data could be screwed up because the underlying protocol might think that you’ve entered a special character combination (like how FTP translates line endings).

So to get around this, people encode the binary data into characters. Base64 is one of these types of encodings. Why 64? Because you can generally rely on the same 64 characters being present in many character sets, and you can be reasonably confident that your data’s going to end up on the other side of the wire uncorrupted.

* Some transportation protocols only allow alphanumerical characters to be transmitted. Just imagine a situation where control characters are used to trigger special actions and/or that only supports a limited bit width per character. Base64 transforms any input into an encoding that only uses alphanumeric characters, +, / and the = as a padding character.

Text content

M a n

ASCII

‘M’ 77 (0x4d) ‘a’ 97 (0x61) ‘n’ 110 (0x6e)

Bit pattern

‘M’, 77 = 64 + 0 + 0 + 8 + 4 + 0 + 1
01001101

‘a’, 97 = 64 + 32 + 0 + 0 + 0 + 0 + 1
01100001

‘n’ 110 = 64 + 32 + 0 + 8 + 4 + 2 + 0
01101110

Base 64 means that groups of 6 bits (6 bits have a maximum of 2^6 = 64 different binary values) are converted into individual numbers from left to right (in this case, there are four numbers in a 24-bit string), which are then converted into their corresponding Base64 character values:

01001101 01100001 01101110

becomes

010011 010110 000101 101110
where
010011 is 19
010110 is 22
000101 is 5
101110 is 46

The base 64’s table (as opposed to ASCII table),
converts 0-25 as ‘A’ – ‘Z’,
26-51 as ‘a’ – ‘z’,
and 52-61 as 0 – 9

Hence
Base64-encoded

010011 (19) is T
010110 (22) is W
000101 (5) is F
101110 (46) is u

Access Token, Refresh Token

https://medium.com/@bantic/more-oauth-2-0-surprises-the-refresh-token-1831d71f4af6#.i6aemn6ol

https://auth0.com/learn/refresh-tokens/

Since access tokens are so powerful yet also so potentially insecure, their risk is mitigated by giving them short-lived expiration windows.

Hence an access token returned by Azure iOS client framework will last for 1 hour. Within that hour, you can access data from your Easy Table. After an hour, you will get an authentication error.

However, this introduces another difficulty for web programmers — how to continue to access data on behalf of your users when their access tokens expire? Enter refresh tokens.

Refresh Token

What is a Refresh Token?

A Refresh Token is a special kind of token that can be used to obtain a renewed access token. An access token allows accessing a protected resource (i.e https://abc-123.azurewebsites.net/TodoItems) at any time.

You can keep requesting new access tokens until the refresh token expires.

Refresh tokens must be stored securely by an application because they essentially allow a user to remain authenticated forever.

How Refresh Tokens work

An Access Token is required to access a protected resource. Thus, a client will use a Refresh Token to get that Access Token, which is issued by the Authentication Server.

Although Access Tokens can be renewed at any time using Refresh Tokens, they should be renewed when old ones have expired, or when getting access to a new resource for the first time. Refresh Tokens can also expire but are rather long-lived. They are usually subject to strict storage requirements to ensure they are not leaked. Nevertheless, they can be blacklisted by the authorization server.

A Refresh Token is used to obtain new Access Tokens (and access protected resources) until it is expires (which may take a long time).

Access Tokens must also be kept secret, but due to its shorter life, security considerations are less critical.

In the case of Azure Active Directory refresh tokens

When refresh tokens were first explained to me, I was told something along the lines that a refresh token is used to refresh an access token. The word “refresh” certainly implies that that is the case. When I thought about it this way I imagine the access token as a battery-operated toy with dead batteries. It is “stale”, and cannot be used. In order to “refresh” it you replace the batteries and now the freshened toy works again.

But that is not what a refresh token does. Access tokens do not become stale only to be refreshed later on and reused. Access tokens expire, never to be valid again. A refresh token is not tied to an access token. It is simply used to get a new, valid access token when you need it.

How do you know when your access token is not valid? By attempting to use it and having the OAuth provider reject it.

Azure AAD token notes

http://cgillum.tech/2016/03/07/app-service-token-store/

Please, correct me if I’m wrong:
– the first time end-user uses my xamarin app (google authentication), he gets a token that will expire in 1 hour, after that, he finishes use my app and closes it.
– Three hours later, he opens the app and tries to access data from an azure table (for example): in this case, now, his “old” token is expired so, using your code above, he gets a “new” refresh token and he is able to obtain his data from azure. Perfect.

And now, what happens? will this new refreshed token expire in one hour like the first one?
So, does he have to get a new one in 72-hours? And so on with the cycle?
If not, “a fresh re-auth by the end-user will be required to get a new, non-expired authentication token”?

cgillum says:
May 25, 2016 at 9:31 am
Your understanding is correct. Refreshed tokens will have the same lifetime as the original tokens (1 hour in the case of Google). The tokens can be refreshed at anytime before or within the 72-hour window without requiring a re-auth. This will be a regular cycle within your app.

When the Access Token expires, you can use the Refresh Token to get a new Access Token. This Access token, along with the 1st access token, all expire in 1 hour. You can continue to use refresh token to request access tokens. The standard request token expiration date is 14 days. After 14 days, you need to sign in again.

Refresh Token for Azure Active Directory

30 Days of Zumo.v2 (Azure Mobile Apps): Day 7 – Refresh Tokens

Getting the key from your Azure AD Portal

Go to your Azure Active Directory Portal via manage.windowsazure.com

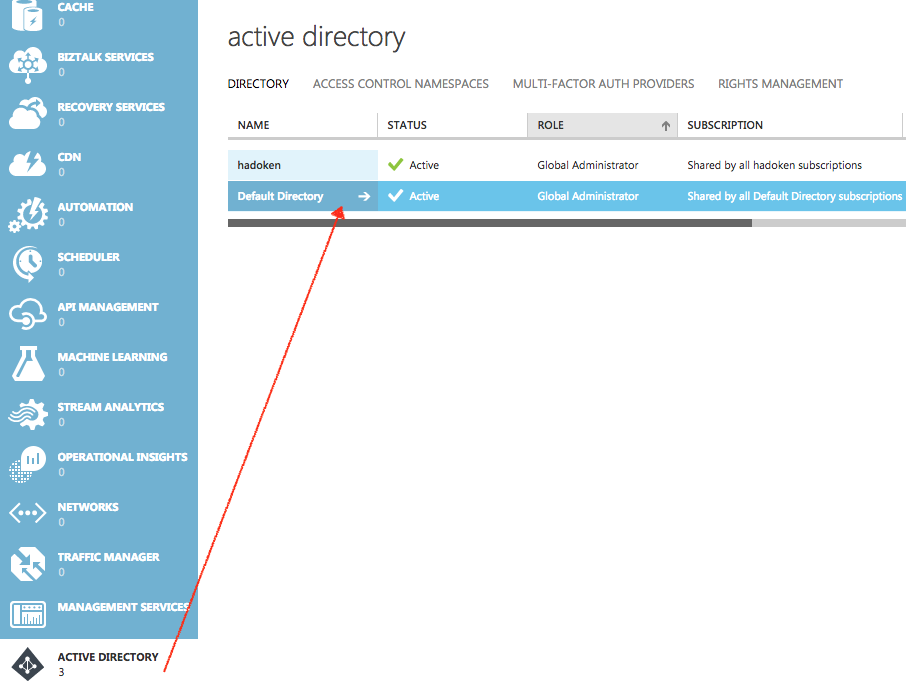
Sign in, and click on Active Directory, then you should be able to see your app.

refresh_token_aad

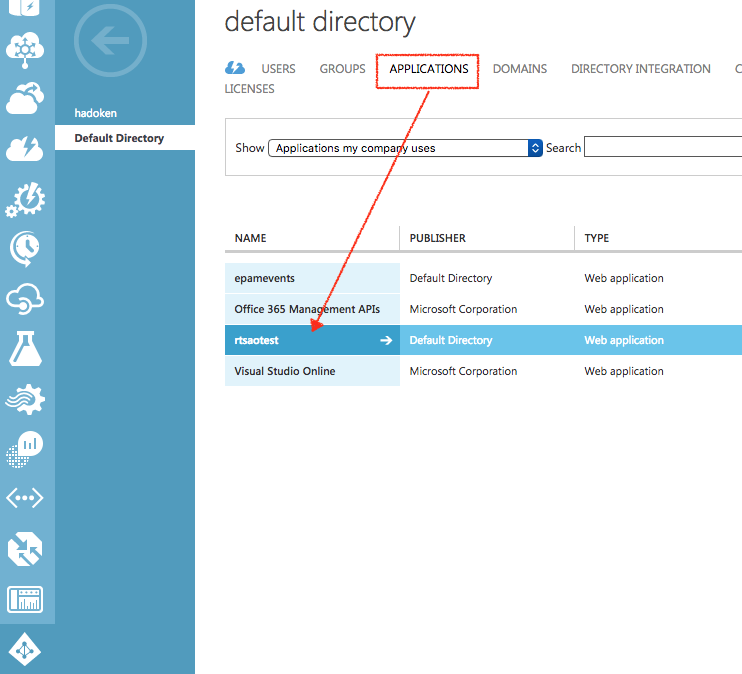
Click on Applications, then your app name

refresh_token_applications

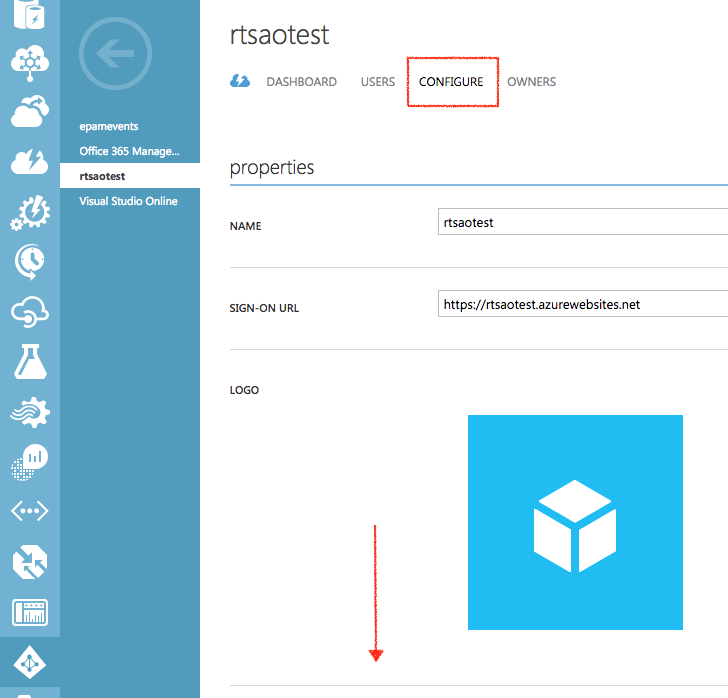
In the next screen, click on Configure, then scroll down the page

refresh_token_configure

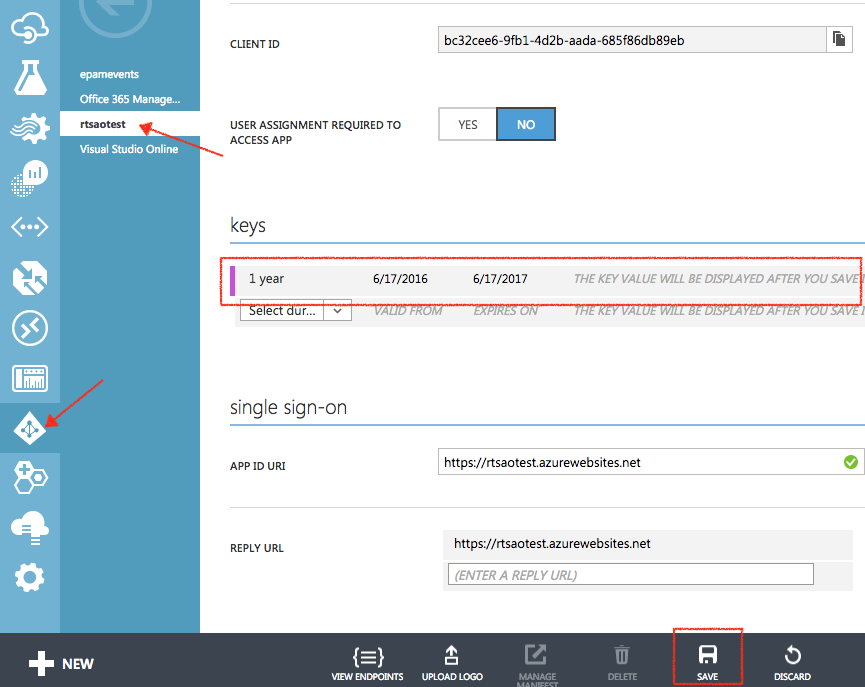
Under ‘Keys”, select a year, and then save. You will then see the secret key appear. Copy that into test.js under the other global variables.

client_secret

Save your client ID, and your key because we will be using it later.

Configured the Azure AD service to use refresh tokens

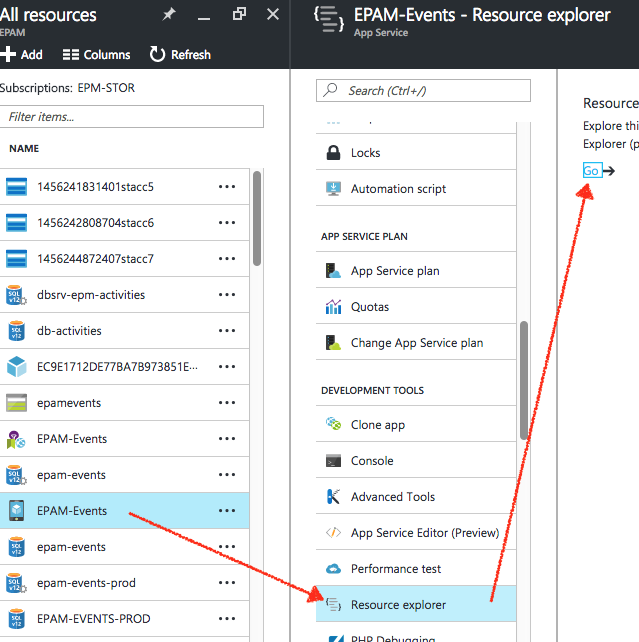
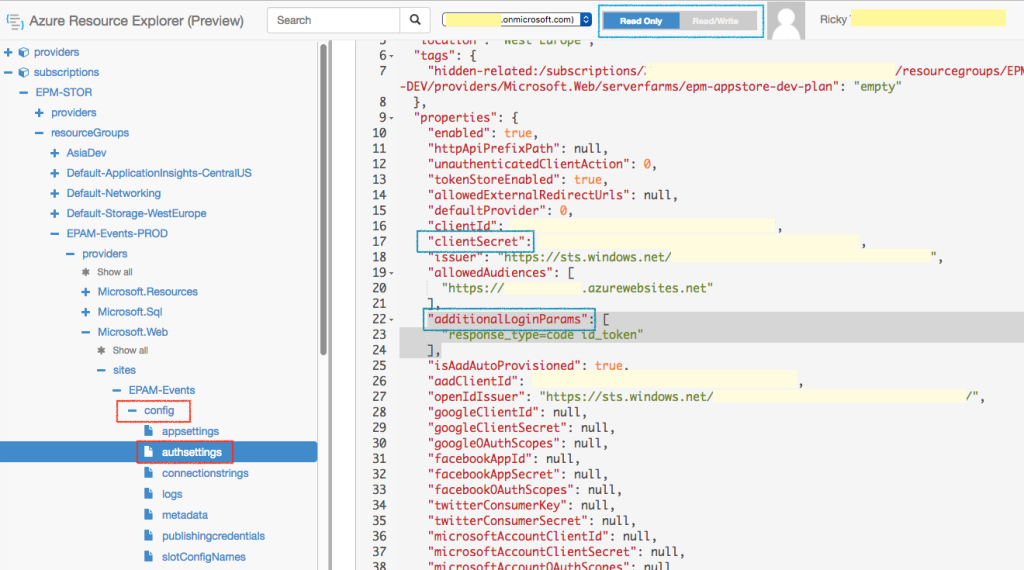
Log into your portal, select your app, scroll down to Resource explorer. You’ll see the next blade have a Go link. Click on the go link.

refresh_token_portal

A separate page will appear with a lot of resource data. On the left hand side of the window is a tree explorer of your app’s resources. Expand the tree menu config and then authSettings.

Because this is a dangerous place, it’s set to read-only mode.

Click on the grey Read/Write box at the top of the screen, then click on Edit next to the PUT button.

I need to set two things. Firstly, the key that I created in the Azure AD portal needs to be copied into the clientSecret field as a string. Secondly, I need to set the additionalLoginParams to [“response_type=code id_token”], like this:

refresh_token_resource_explorer

Also make sure the client ID matches from your Active Directory management portal from above.

Install Azure iOS SDK (framework)

azuresdk-ios-v3-2-0

http://azure.github.io/azure-mobile-apps-ios-client/
http://stackoverflow.com/questions/27615041/uiwebview-and-wkwebview

First, unzip the framework. Drag the framework into your project.

Then, you may get a
undefined symbols for architecture arm64 MSLoginView

Solution:
Go to your Project, click on General, scroll down to Linked Frameworks and Libraries, and add WebKit.framework as Optional.

Working with UITableViewDelegate and UITableViewDataSource methods

iOS Tutorial: Editing TableViews

xCode 7.3 demo

Basics

  1. Declare an Array data structure
  2. numberOfSectionsInTableView
  3. numberOfRowsInSection
  4. cellForRowAtIndexPath
1. Declare an Array data structure

The table always matches an array(s) of some sort to represent data.
Each row matches up to an element in the array.

2. numberOfSectionsInTableView

The first order things is to let the table know how many sections we will represent. Each table can contain m sections.
Each sections can contain n rows. For simplicity purposes, we’ll designate only 1 section for our table.

Usually, use one array to represent one section. Each section will have n number of rows, which matches up to n number of elements in that array.

3. numberOfRowsInSection

Now, we simply specify the number of rows for each section. Each section usually represent an array, where n elements in that array
matches up to n number of rows in that section.

4. cellForRowAtIndexPath

The concept here is that the UITableView keeps a list of reusable cells.

At first, before showing the rows, it will have nothing. So dequeueReusableCellWithIdentifier will return nil. If you run the app, you’ll see the log show that it creates the cell:


-[RootViewController tableView:cellForRowAtIndexPath:] – Creating new cell
row 0 setting text
[RootViewController tableView:cellForRowAtIndexPath:] – Creating new cell
row 1 setting text
-[RootViewController tableView:cellForRowAtIndexPath:] – Creating new cell
row 2 setting text

In the case of UITableView building new cells for displaying the rows, we get the cell variable reference and point it to a newly created
UITableViewCell object allocated on the heap. We only do this if the cell returned is nil.

Once it creates the cell, it will set the cell’s properties.

Notice there is no ‘else’. That’s because whenever dequeueReusableCellWithIdentifier return a valid cell to be displayed, we always want to make sure the properties are correct, by assigning them.

Always reset all content when reusing a cell

https://developer.apple.com/library/ios/documentation/UserExperience/Conceptual/TableView_iPhone/TableViewCells/TableViewCells.html

An example of this is if you pull the table up and the rows disappear from the screen.
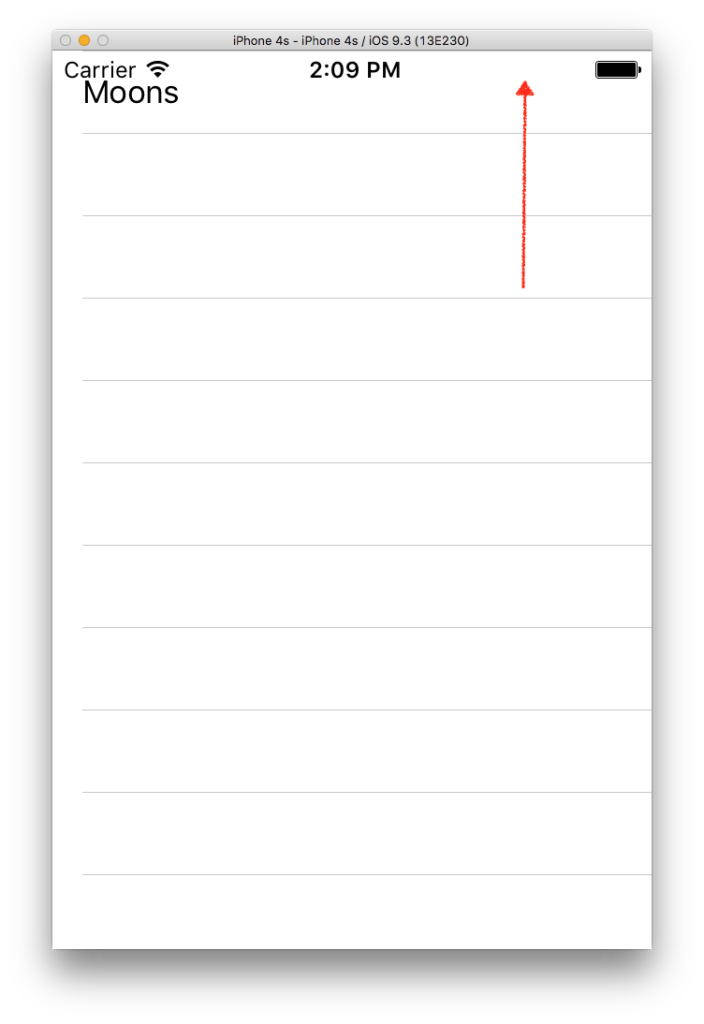
pull-up-table

Once the table bounces back on the visible screen, you’ll see logs like this:

row 0 setting text
row 1 setting text

That’s because when dequeueReusableCellWithIdentifier returns valid cells, you need to always reset the contents of the cell when the reusable cell is returned.

Cells and Table View Performance

The proper use of table view cells, whether off-the-shelf or custom cell objects, is a major factor in the performance of table views. Ensure that your application does the following three things:

Reuse cells. Object allocation has a performance cost, especially if the allocation has to happen repeatedly over a short period—say, when the user scrolls a table view. If you reuse cells instead of allocating new ones, you greatly enhance table view performance.
Avoid relayout of content. When reusing cells with custom subviews, refrain from laying out those subviews each time the table view requests a cell. Lay out the subviews once, when the cell is created.
Use opaque subviews. When customizing table view cells, make the subviews of the cell opaque, not transparent.

Select Row

When you click on a row, this method will be triggered. Then call method setEditing on the table view object. Once you set it to YES, the row will animate its set settings where your deletion option appears on the left, and the move row button appears on the right.

Click and drag the first row’s move icon for a row and move it to the very bottom. Basically we’ll be switching the topmost row with the bottom most row.
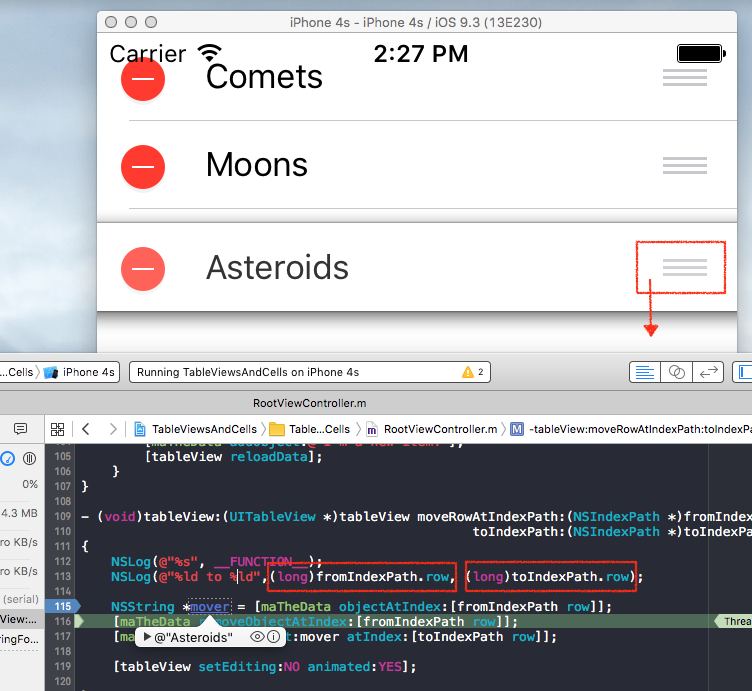
uitableview-move-rows

You can see that by using the fromIndexPath.row, we can get the string by our data array. We use the NSArray’s methods to manipulate the data so that it reflects what’s happening on the UI.

Namely, use removeObjectAtIndex at from index path, and then insertObject on the row string at index toIndexPath.row.
Finally, we use a NO on setEditing to tell the tableView to finish.

Commit your Edit

Once in edit mode, you will commit on a task. A common one is to delete the row. Once you click on the Delete button, you’ll hit the commitEditingStyle:forRowAtIndexPath method in which you commit your deletion.

When the delete button is selected, it will hit commitEditingStyle:forRowAtIndexPath: method where the editingStyle is UITableViewCellEditingStyleDelete.
From there, its the same as moving rows, where you manipulate your array. You remove the object at the data source, then call deleteRowsAtIndexPaths on the UI tableview object.

Once the deletion takes place, the tableview will redraw all the rows, thus, it will go through numberOfSectionsInTableView: and tableView:numberOfRowsInSection: to recalculate how many elements of the array it should show.

Adding a Insertion Row

Adding an insertion row involves 3 steps

1. Return Insert macro for Row

We want to add a row specifically for entering data and inserting that data into our table. Hence, let’s just designate the first row for that. Hence,
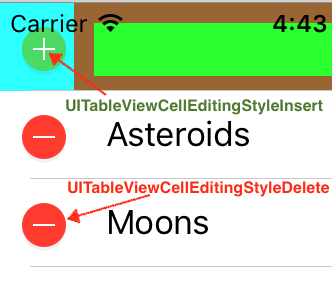
we specify in method editingStyleForRowAtIndexPath, where we return the insert macro for the 0th row to tell the table view to show an “Insert” button when the edit mode is on.

For all other rows, show the delete button when the edit mode is on.

editing_styles

Then in your commitEditingStyle:forRowAtIndexPath method, use an option where if the editing style is for insertion
we add a property NSString where it points to the string to be added

2. Setting up a Custom Row to receive data

One easy way to do this is to create a custom cell with a textfield in there that receives a string.

3. ViewController observe UITextFieldTextDidChangeNotification messages from UITextField

Insert a property InsertionCell, where it will point to the 0th row of type InsertionCell.

You assign it in cellForRowAtIndexPath, where when after 0th cell is created, you simply
assign a reference to it so we can keep track of it.

Then, we register for the UITextFieldTextDidChangeNotification notifications on
textfield of the insertion Cell:

This means that whenever the user enter a character, the UITextfield will send UITextFieldTextDidChangeNotification,
in which the ViewController will observer.

It will run textUpdated: method, like so:

The notification message will contain the UITextField with its text. Hence we just have a NSString property point to that text.

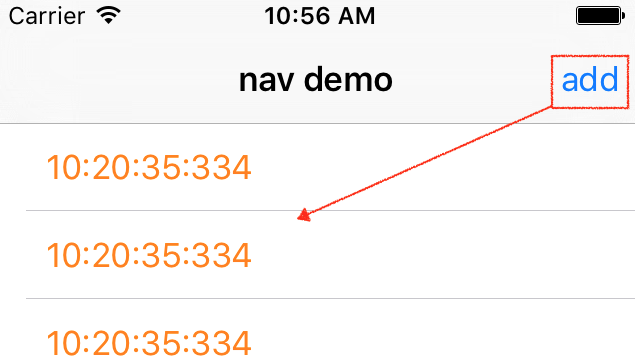
When the green plus button is clicked, it will run to commitEditingStyle:forRowAtIndexPath:, check that editingStyle is UITableViewCellEditingStyleInsert and add the string to the data source array. Then it refresh the data by calling the table view’s reloadData method method.
NSFetchedResultsController

frc-basic-demo

The signatures of the delegate methods reveal the true purpose of the NSFetchedResultsController class. On iOS, the NSFetchedResultsController class was designed to manage the data displayed by a UITableView or a UICollectionView. It tells its delegate exactly which records changed, how to update the user interface, and when to do this.

Creating the Fetch Results Controller

First, create a NSFetchedResultsController property

Make sure to synthesize it

Create the accessor.

NSFetchedResultsController takes:

  • NSFetchRequest, which must set inject a sort descriptor
  • Managed Object Context

In your accessor, you’ve set the fetchResultsController’s delegate to self. This means
it’ll be delegating messages to us and we have to take care of it. Thus, we do so by conforming to that delegate and implementing its methods.

In your class extension, conform to NSFetchedResultsControllerDelegate:

Finally, perform the fetch in your viewDidLoad:

Basic FRC delegate methods

Adding some Data

First, we get the MOC that’s connected to our fetch results controller.
Then, we set inject that MOC into NSEntityDescription’s insertNewObjectForEntityForName method, which returns us an Managed Object “Hero”.

We then set the properties of that Hero object and have the MOC call save.

Finally, let’s have our fetch results controller do a performFetch. We see that it now has objects.

When you add additional data and have your MOC save, it’ll call the FRC’s didChangeObject: method, which in turn inserts data into your table view by calling insertRowsAtIndexPaths:withRowAnimation.

Making the Results show up

Use your fetch controller for data display instead of NSArray in your cellForRowAtIndexPath.

Do the same for numberOfRowsInSection

Adding objects in a loop

We loop through creating a bunch of Managed Objects. We set the properties to milliseconds to give them unique data.
Then after the loop is done, we simply tell the MOC to save.

Once, you save, you’ll see that our FRC will animate all the adding of the newly added objects into our table.

frc-add
Its output is:

As you can see FRC’s delegate methods will and did change content are always wrapped around insertions, deletions, changes, etc.


ADDING GROUP OF PEOPLE

-[ViewController controllerWillChangeContent:]

-[ViewController controller:didChangeObject:atIndexPath:forChangeType:newIndexPath:]
tableView insertRowsAtIndexPaths:withRowAnimation:


-[ViewController controller:didChangeObject:atIndexPath:forChangeType:newIndexPath:]
tableView insertRowsAtIndexPaths:withRowAnimation:

-[ViewController controllerDidChangeContent:]

Deleting Objects

We delete objects by clicking on the delete button in edit mode. In order to get into edit mode, we need to set TRUE for editing on a table row.

Let’s make the table view editable when we click on a row:

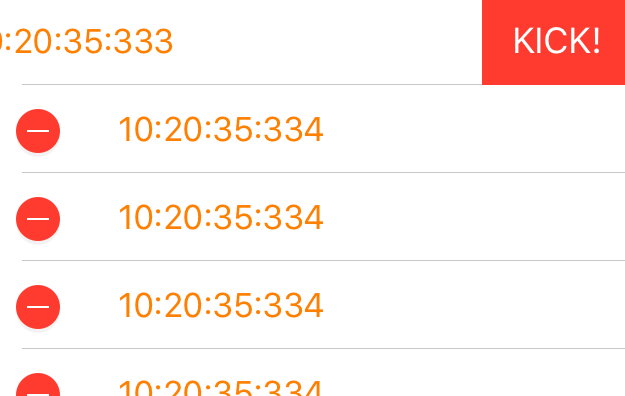
When the edit mode is on, let’s use the default delete button style, which is a rectangular red button.

We can also set the string of the button. Instead of the standard Delete, let’s use “Kick!” instead:

frc-delete

output:

— DELETING OBJECT —
-[ViewController controllerWillChangeContent:]

-[ViewController controller:didChangeObject:atIndexPath:forChangeType:newIndexPath:]
tableView deleteRowsAtIndexPaths:withRowAnimation:

-[ViewController controllerDidChangeContent:]

As you can see, the deletion is animated in our table view!

Click and re-click to get in/out of editing mode

When a table is in edit mode, by default, it does not allow you to re-click or re-select rows. However, if you set the property allowsSelectionDuringEditing to YES, then you can.

Let’s say you want the user to be able to go back to non-edit mode by clicking the table again. Look at property isEditing to see if you’re in edit mode. If so, just simply set the tableview back to NO for setEditing.

Core Data – Child save context, propogate up to Parent

xCode 7.3 demo

Parent-Child Contexts

An important point that you need to get a good grip on is that contexts can be chained such that one is the child of another.

CoreDataStack.h

CoreDataStack.m

We create a private (child) and parent context.
The parent is what connects to the Persistent Store Coordinator.
The child is connected to the parent context through the parentContext property.
The child DOES NOT connect to the PSC.

If and when you do this, you have to realize that:

  • Changes saved in a child context are pushed to the parent, not to the persistent store.
  • The parent context behaves as the child’s persistent store.
  • Changes saved in a parent are not pushed down to the child.
  • Changes saved in a sibling are not pushed to other siblings.

This means that changes only propagate one level up in a context hierarchy. If the context you are saving is several levels away from the persistent store, you will need to save each parent context in the hierarchy until you reach the context that saves to the persistent store to actually persist your changes.

Demo – Changes saved in an child context are pushed to the parent

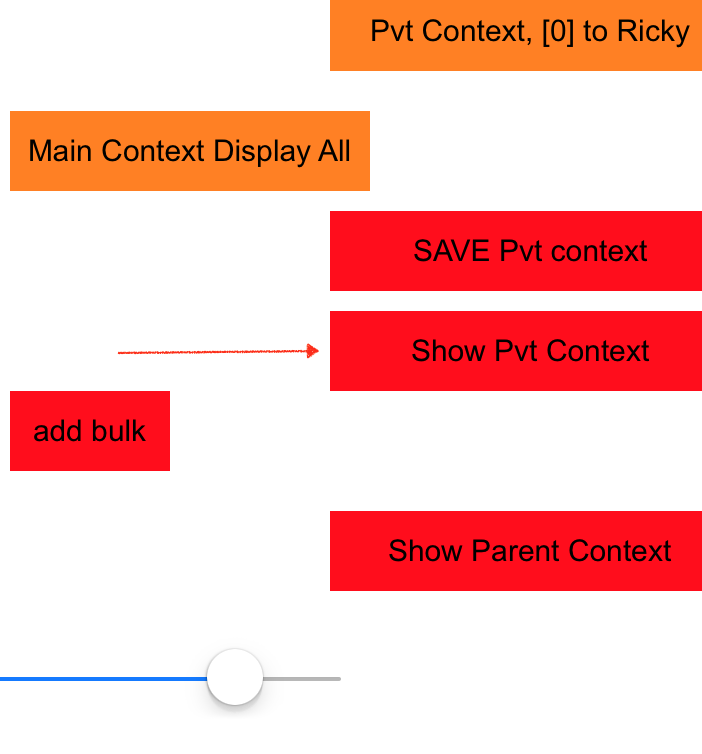
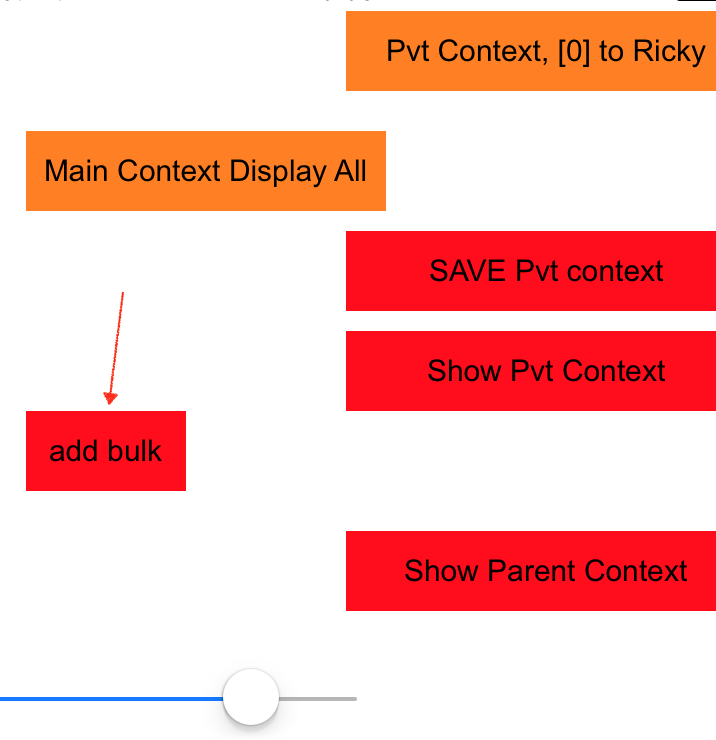
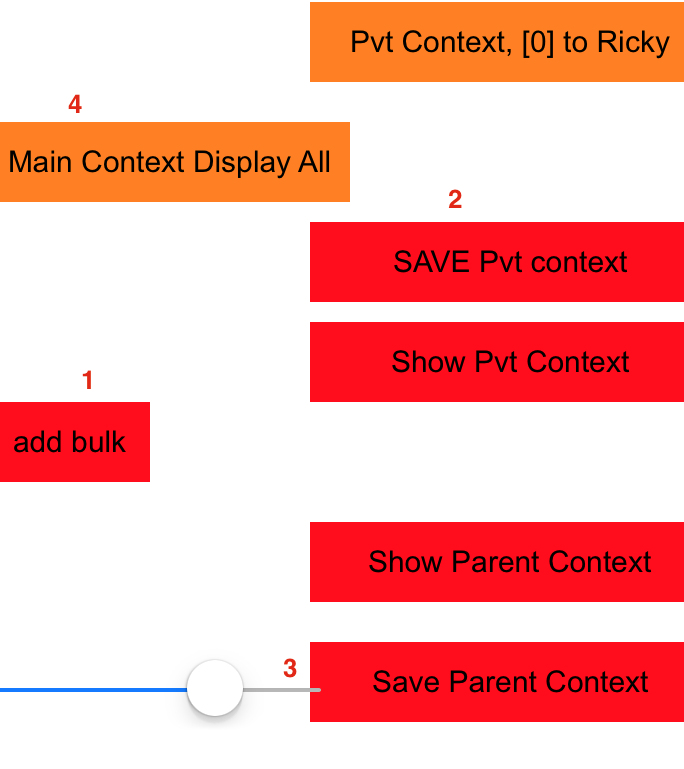
First click the Show Private Context Button.

show_pvt_context


output:
(PRIVATE CONTEXT) – no people found

Do the same for “Show Parent Context” and you’ll get the same output.

Hence, we know that both child/parent contexts do not have any data so far.

Okay, Let’s first add some objects.

We first put a block task onto the private context. Its basically adding three Person objects.
Once those objects are initialized, we tell the context to save.

Press the ‘add bulk’ button do add the objects.

add_bulk


output:
——– ADD BULK PEOPLE ———–
added remark: 1472782237.562826 1472782237.562826
added remark: 1472782237.563077 1472782237.563077
added remark: 1472782237.563318 1472782237.563318
PRIVATE CONTEXT save success!

Now, if you click the “Show Pvt Context” button and “Show Parent Context” button, you’ll see that they both show data. This is because when the private context saves its data, it pushes it up to the parent automatically.


output:

(PRIVATE CONTEXT) —— RESULTS ————
There are 3 number of entries so far
0 —————-
firstName = remark: 1472782941.371055
lastName = 1472782941.371055
object address is: 0x7f835bf95af0

(PARENT CONTEXT) —— RESULTS ————
There are 3 number of entries so far
0 —————-
firstName = remark: 1472782941.371055
lastName = 1472782941.371055
object address is: 0x7f835bf11150
….

What happens to the parent context if child does not save?

Let’s edit the first object by pressing the “Pvt Context, [0] to Ricky” button.
We put a task block onto the private context. It gets the first object, and changes
the first name to “Ricky”


output:

PRIVATE CONTEXT — CHANGE FIRST PERSON TO RICKY… ————

Then have the private context display its results. You will see that Ricky appears.


output:

(PRIVATE CONTEXT) —— RESULTS ————
There are 3 number of entries so far

0 —————-
firstName = RICKY
lastName = 1472783378.062207
object address is: 0x7f8bc161d400

But if you display the PARENT CONTEXT, you will not see it. The reason why is because you need to save the private context in order
to propagate the changes up the parent.

Try clicking on the “Save Pvt context” button. You’ll see this:
PRIVATE CONTEXT save success!

Then click the “Show Parent Context” button and you’ll see Ricky in the results:


output:

(PARENT CONTEXT) —— RESULTS ————
There are 3 number of entries so far

0 —————-
firstName = RICKY
lastName = 1472783378.062207
object address is: 0x7f8bc161b390

Now, press the “Main Context Display All”, you’ll see that its empty:

That’s because each save only propagate up one level. Thus, in order for the changes to be saved into the PSC, 2 points must hold:

1) The context must be connected to the PSC
2) The context’s parent context must be nil.

Our parent context satisfies both.

Click on “Main Context Display All”. You’ll still get:

There are no people in the data store yet. We need to make sure each context saves to propagate the changes up.

propagate

Now, save the parent context by clicking on “Save Parent Context”.

Due to the parentContext’s PSC is set, and that its parent context is nil, its saves will reflect to the PSC.

Thus, whatever context that’s connected to the PSC will be able to see the results.
Click on “Main Context Display All” and you’ll see that our main context now has the results:


(MAIN CONTEXT) —— RESULTS ————
There are 3 number of entries so far

firstName = RICKY
lastName = 1472784795.060829
object address is: 0x7fac7acbbeb0