Swift 3 classes

Classes

ref – https://code.tutsplus.com/tutorials/swift-from-scratch-an-introduction-to-classes-and-structures–cms-23197

go to full source

or download xCode proj here

Create a basic class:

First, we must create instance variables (ivars). The ivars are to be private because we do not want others to access.

Also, we use optional so it can have nil values.

We declare private as the accessor. Then use var, so that the ivar’s state can be changed.

Initializers

Initializers are called to create a new instance of a particular type. In its simplest form, an initializer is like an instance method with no parameters, written using the init keyword.

#function is a macro used to display the local scope’s function call name.
print is a function used to log strings to the console.
self is to reference the current instance working instance.

You can have overloaded functions, with different parameters.

Functions

This function is called toStringFromArray
Accessor is private
parameter name is data
parameter label is OfStrings
parameter is an array of type String as denoted by [String]
return value is String as denoted by -> String

We have a variable called total that is of type String. It is initialized to empty string literal.
We then use for in to loop through the array “data”. The temp variable “aString” used in the loop
it to denote the string value at each index. We add that string to our total string.

We basically append all the strings from the array data, into the string total. Then return it.

In order to use this function we go

We will be using toStringFromArray in another function like so.

function name is fullName
return type is String
accessor is private

It basically does optional binding to get the values of our instance variables.
then it calls our private function toStringFromArray in order to take an array, and
return a String variable with all the array’s string data int it.

Unwrapping Conditional

Now that we have the data we need from fullName function, and a instance variable,
we can unwrap conditional for the instance variable self.gender. Then place it together with fullName
to return the Person’s full information

Underscore _

underscores are used as the parameter label to denote that the label is optional

You can then call the function without denoting the parameter labels

Using just the parameter names, no label

You can also use just use the parameter name like so:

Full Source Code


Output:

Hello, World!
–> init(first:last:gender:)
<-- init(first:last:gender:) --> fullName()
<-- fullName() --> toStringFromArray(OfStrings:)
<-- toStringFromArray(OfStrings:) The full name is: Ricky Tsao , Male --> init(first:last:)
<-- init(first:last:) The full name is: Sorry, data is incomplete Program ended with exit code: 0

Swift 3.0 – Mutating
Modifying Value Types from Within Instance Methods

Structures and enumerations are value types. By default, the properties of a value type cannot be modified from within its instance methods.

However, if you need to modify the properties of your structure or enumeration within a particular method, you can opt in to mutating behavior for that method. The method can then mutate (that is, change) its properties from within the method, and any changes that it makes are written back to the original structure when the method ends. The method can also assign a completely new instance to its implicit self property, and this new instance will replace the existing one when the method ends.

You can opt in to this behavior by placing the mutating keyword before the func keyword for that method:

// Prints “The point is now at (3.0, 4.0)”

The Point structure above defines a mutating moveBy(x:y:) method, which moves a Point instance by a certain amount. Instead of returning a new point, this method actually modifies the point on which it is called. The mutating keyword is added to its definition to enable it to modify its properties.

Note that you cannot call a mutating method on a constant of structure type, because its properties cannot be changed, even if they are variable properties, as described in Stored Properties of Constant Structure Instances:

// this will report an error

Swift 3.0 – Methods, Instance, Self

https://developer.apple.com/library/content/documentation/Swift/Conceptual/Swift_Programming_Language/Methods.html#//apple_ref/doc/uid/TP40014097-CH15-ID236

Instance methods are functions that belong to instances of a particular class, structure, or enumeration. They support the functionality of those instances, either by providing ways to access and modify instance properties, or by providing functionality related to the instance’s purpose.

The Counter class defines three instance methods:

increment() increments the counter by 1.
increment(by: Int) increments the counter by a specified integer amount.
reset() resets the counter to zero.
The Counter class also declares a variable property, count, to keep track of the current counter value.

You call instance methods with the same dot syntax as properties:

Dictionaries (swift)

ref – http://jamesonquave.com/blog/swift-3-tutorial-fundamentals/

Dictionaries

Dictionaries are able to store values based on a key, typically the key is of type String, but it could actually be many different Swift types. In this example, we create a basic Dictionary with String keys and Int values for the age of each person:

We can access these values by their String keys:

result:
10
15

Note that we’re unwrapping these because they are optional values, and could potentially be nil. It is generally safer to use optional binding to unwrap the value from a Dictionary, especially if you have reason to believe the value could often be nil.

result:
Arya is 10 years old

We can also store arrays inside of dictionaries, or dictionaries inside of arrays, or a mix of both.

Here we have the dictionary like before. Except in this case, this dictionary is the value of key “Stark”, and key “Baratheon”.

In order to access, unwrap optional families[“Baratheon”]. It will give you an optional Dictionary. Unwrap it like this:

Then access the value at key “Tommen”, and the unwrap the optional int value.

Hence,

Tommen is 8 years old

The type of houses here would be [String: [String: Int]]
Or in other words it is a dictionary with a String key, and it’s values are [String: Int], another dictionary with String keys and Int values.

Sets

A Swift 3 Set is similar to an Array, except the values in a Set are unique and unordered.

Initializing a Set looks almost exactly like initializing an Array, the only different is the type:

This code creates a new set of type String. The greater than / less than symbols < and > are used to indicate Swift generic types, including the types of a Set as shown here.

You’ll notice we included “Blue” twice in our list, but if we print out the contents of colors, we only see it once:

result
[“Orange”, “Red”, “Blue”]

You may also notice that the ordering is inconsistent. Sets do not maintain any particular order for their contents.

We can not access members of a Set using indexes as we can with arrays, but instead we use the methods built-in to the Set type to add and remove objects. We can also call the contains method to check if the Set includes something.

result:

[“Black”, “Orange”, “Blue”]
true
false

Constructing sets of objects is a common way to catalogue what is included or excluded in a list of things, as long as there is no need to order or have duplicates of the objects.

Tuples

Tuples are not technically a collection, but instead simply multiple variables that can be passed around with a single identifier.

The type of the tuple here is (String, String), and we can manually access each numbered tuple element using dot-syntax, followed by the index:

result:
Quave
Jameson

Tuples can also be deconstructed in to new variable names:

Since we’re not using the last name here, we could just ignore that value by using an underscore _ and still deconstruct the first name:

let (first, _) = (“Jameson”, “Quave”)
print(first)
Jameson

Tuples are useful when you have a method that you want to return multiple values.

Swift – constants, variables, optionals

Swift 3 Tutorial – Fundamentals

Constants and Variables

Any Swift variable is either a constant or not.

constants and variables are just ways to describe terms that hold a value which can change (are mutable), and constants that can not be changed (becuase they are immutable)

To define a constant, use the let keyword

Example:

let name = “Jameson”
If you were to try and change the value of name, you would be unable to do so, and the Swift compiler would produce an error.

let name = “Jameson”
name = “Bob”
error: cannot assign to value: ‘name’ is a ‘let’ constant
name = “Bob”
~~~~ ^

On the other hand, by using the var keyword, we define a variable that can change

var name = “Jameson”
name = “Bob”
This code does not produce an error.

In general, you should always default to using the let keyword, unless you know you need a var keyword.

This leads to code that is ultimately safer. If you define a constant, and later attempt to modify it, you will get an error and at that time can determine if you should switch to use the var keyword, or if the error is giving you a hint that maybe you should rethink the current logic flow.

In general, immutability is preferred over mutability; it simply leads to less programmers errors and makes it easier to reason about your code.

Basic Types

In Swift, a type is indicated by declaring a variable, then putting a colon, followed by the type name. For example to declare an integer, which is of Swift type Int, you could use the following:

Or similarly, if you want to declare a string:

Swift supports type inference, which means the compiler determine what the type should be based on its initial value. Hence, you can usually omit the type information.

Working with Strings

It’s frequently useful to print a command to the console or otherwise evaluate a String containing other variables. For example, I might want to form a sentence with my variables age and name and print it to the console. I can do this using the + operator between each String.

result:
Robb is 15

A shortcut for this is to write your String as you normally would without the + operator separating each string, and put each variable inside of a set of parentheses, proceeded by a backslash \.

result:
Robb is 15

One thing you may have noticed is that age is now of type String because it was assigned the value “15” instead of just 15 without the quotes. This is because concatenating a String and an Int will not automatically cast the Int to String, which is a necessary step before concatenating is possible.

Non-Optionals and Optionals

https://drewag.me/posts/2014/07/05/what-is-an-optional-in-swift

What is the Problem
In C, it is possible to create a variable without giving it a value. This would look something like this:

If you were to try to use the value before assigning it a value, you would get undefined behavior (that is very bad).

In contrast Swift, for safety reasons, requires all variables and constants to always hold a value. This prevents that scenario where the value of a variable can be unknown. Thus, in swift, by default, we have non-optional values.

They always have a value. If you tried to assign nil to a non-optional variable, you will get a compiler error:

error: nil cannot be assigned to type ‘String’

Similarly, non-optional values can not be assigned to nil during their declaration:

error: variables must have an initial value

However, there are still cases in programming where one wants to represent the absence of a value.

A great example of this is when performing a search. One would want to be able to return something from the search that indicates that no value was found.
Thus, the concept of an optional is introduced:

An optional is just a variable that can be nil, null, or otherwise not set to any value.

How is an Optional Defined

To solve this problem, Swift created the type Optional that can either hold no value (None) or hold some value (Some). In fact, because Swift allows enums to have associated values, an optional is defined as an enum:

You declare an optional version of a type by adding a ? after the type name (String?).

Let’s use favoriteColor as an example. Many people have a favorite color, but it’s possible someone doesn’t, or we just don’t have the data. We would declare this variable as an optional, and not assign it to any value.

Implicit in the declaration of an optional with no value set, is the assignment to nil. We can verify this by examining the value of favoriteColor after declaring it as an optional by printing it to the console using the print() function.

result:
nil

We can later assign something to favoriteColor and see that it is no longer nil.


result:
Optional(“Blue”)

Note that instead of just getting the string “Blue”, we get Optional(“Blue”). This is because the value is still “wrapped” inside of the optional.

Unwrapping Optionals

  • optional binding
  • force-unwrapping

Before you use the value from an Optional you must first “unwrap” it. We consider an optional value “wrapped” because the real value is actually held inside the enumeration.

Let’s look at an example. Here we will declare two optionals, one called favoriteAnimal which is set to Fox, and one set to favoriteSong, which we will not set (it will remain nil)

You can unwrap an optional in both a “safe” and “unsafe” way

The safe way is to use Optional Binding:

In this case, we create a constant variable on the local stack. Assign our optional variable’s value to it, which is nil. the if/else statement evaluates the nil, and goes to the else block.


result:
I don’t know what your favorite song is!

Let’s employ optional binding to discover if each variable is set, and if so we’ll print a sentence containing the value to the console. First we’ll do it with favoriteAnimal. When we assign a constant to an optional Variable, it takes on the value. If the value exist, we make it print.


result:
Favorite animal is: Fox

In the event that the value is not set, we simply will trigger whatever is in the else block, or nothing at all if an else block isn’t specified.

Forced Unwrapping- you assert that it does indeed hold a value

A forced unwrapping, is an optional that doesn’t need to be unwrapped because it is done implicitly. These types of optionals are declared with an ! instead of a ?. Sometimes you know for sure that a variable holds an actual value and you can assert that with Forced Unwrapping by using an exclamation point (!):

If possibleString were None (did not hold a value), the whole program would crash with a runtime error and therefore, forced unwrapping is considered “unsafe”.

Implicitly unwrapped optional

ref – https://drewag.me/posts/2014/07/05/uses-for-implicitly-unwrapped-optionals-in-swift

There are a few main reasons that one would create an Implicitly Unwrapped Optional. All have to do with defining a variable that will never be accessed when nil because otherwise, the Swift compiler will always force you to explicitly unwrap an Optional.

Situation: A Constant That Cannot Be Defined During Initialization. In other words, WHEN YOU HAVE A PROPERTY THAT CAN’T BE POPULATED DURING INITIALIZATION.

Every member constant must have a value by the time initialization is complete.

Sometimes, a constant cannot be initialized with its correct value during initialization, but it can still be guaranteed to have a value before being accessed.

  1. the Optional is automatically initialized with nil, and can be printed only. However, if you try to dereference it, it will crash. Hence make sure you use chaining in order to dereference it
  2. the value it will eventually contain will still be immutable

However, the problem is, it can be a pain to constantly unwrap a variable that you know for sure is not nil via Forced Unwrapping, or Optional Binding.

Solution: Implicitly Unwrapped Optionals achieve the same benefits as an Optional with the added benefit that one does not have to explicitly unwrap it everywhere.

“Because the value of an implicitly unwrapped optional is automatically unwrapped when you use it, there’s no need to use the ! operator to unwrap it. That said, if you try to use an implicitly unwrapped optional that has a value of nil, you’ll get a runtime error.”

As long as your implicit optional is initialized during creation or at another time, you can access and it will be valid.

Like an optional, an implicit optional will also have nil by default during creation. We can initialize the creation of an implicit optional by assigning it data during creation, or at a later time as shown above. Then when we try to access it, it will be valid.

However, if we try to access it without some kind of initialization, we’ll get a compiler error like so:

an implicitly unwrapped optional promises the compiler it has a value when it is accessed

If you create an implicit optional, and somehow set it to nil at a later time, you’ll print out the nil instead.

Take Note

When you create a constant, this means the reference is immutable. That reference points to an object and that object only. you cannot change the reference to any other objects. Thus, by definition, you start off with the reference opVar2 pointing to a Optional object with data of type String. That’s why when you try to use it right after the declaration, you get a compiler error.

Result:

(lldb) po opVar2
▿ Optional
– some : “”

(lldb) po opVar3
nil

Because opVar3 is a mutable reference, it just points to nil as its default initialization. This means you can freely assign assign the reference to different String objects later.

ref – https://krakendev.io/when-to-use-implicitly-unwrapped-optionals/

A great example of this is when a member variable cannot be initialized in a UIView subclass until the view is loaded:

another example:

http://stackoverflow.com/questions/24006975/why-create-implicitly-unwrapped-optionals

1. A Constant That Cannot Be Defined During Initialization

Every member constant must have a value by the time initialization is complete. Sometimes, a constant cannot be initialized with its correct value during initialization, but it can still be guaranteed to have a value before being accessed.

Using an Optional variable gets around this issue because an Optional is automatically initialized with nil and the value it will eventually contain will still be immutable. However, it can be a pain to be constantly unwrapping a variable that you know for sure is not nil. Implicitly Unwrapped Optionals achieve the same benefits as an Optional with the added benefit that one does not have to explicitly unwrap it everywhere.

A great example of this is when a member variable cannot be initialized in a UIView subclass until the view is loaded:

Here, you cannot calculate the original width of the button until the view loads, but you know that viewDidLoad will be called before any other method on the view (other than initialization). Instead of forcing the value to be explicitly unwrapped pointlessly all over your class, you can declare it as an Implicitly Unwrapped Optional.

2. Interacting with an Objective-C API

Every reference to an object in Objective-C is a pointer, which means that it can be nil.
That means, that every interaction with an Objective-C API from Swift must use an optional where there is a reference to an object.

You could use a normal Optional in every one of these cases, but if you know for sure that the reference will not be nil, you can save yourself unwrapping code by declaring it as an Implicitly Unwrapped Optional.

Here, you know that the method will never be called without a tableView or indexPath.
Thus, the parameters are declared as implicitly unwrapped optional. You can safely use the dot operator
on tableView, and cellForRowAtIndexPath.

3. When Your App Cannot Recover From a Variable Being nil

This should be extremely rare, but if your app could literally not continue to run if a variable is nil when accessed, it would be a waste of time to bother testing it for nil.

Normally if you have a condition that must absolutely be true for your app to continue running, you would use an assert. An Implicitly Unwrapped Optional has an assert for nil built right into it.

4. NSObject Initializers

Apple does have at least one strange case of Implicitly Unwrapped Optionals. Technically, all initializers from classes that inherit from NSObject return Implicitly Unwrapped Optionals. This is because initialization in Objective-C can return nil. That means, in some cases, that you will still want to be able to test the result of initialization for nil. A perfect example of this is with UIImage if the image does not exist:

If you think there is a chance that your image does not exist and you can gracefully handle that scenario, you can declare the variable capturing the initialization explicitly as an Optional so that you can check it for nil. You could also use an Implicitly Unwrapped Optional here, but since you are planning to check it anyway, it is better to use a normal Optional.

Optional Chaining

Adding ? to the end of a type makes it Optional.
Adding ? to the end of an optional variable invokes Optional Chaining.

You specify optional chaining by placing a question mark (?) after the optional value on which you wish to call a property

…method or subscript if the optional is non-nil. This is very similar to placing an exclamation mark (!) after an optional value to force the unwrapping of its value.

The main difference is that optional chaining fails gracefully when the optional is nil, whereas forced unwrapping triggers a runtime error when the optional is nil.

Hence if you declare an optional object in your class, and you want to access that object’s properties, you must use the “?” on the optional object in order to get the valid unwrapped object. That you can continue to access the unwrapped object’s values. If you just use “.” without the “?”, the optional object is looked upon as an enum, and thus, you’ll get an error.

example:

we use ? after navigationController, this is called optional chaining
the reason why is because navigationController is an optional var.
in order to access properties of an optional var (or chaining),
we use someVar?.

if we do not do this, and try to use the dot notation to access properties straight on the variable like this:

essentially, what’s happening is that you are trying to access the enum of the optional var “someVar” instead. That is incorrect.

Thus, in order to access the properties of optional variable make sure to use

optional-chaining

Swift 3.0 – data structures

ref – https://www.raywenderlich.com/123100/collection-data-structures-swift-2

Arrays

  • An array is a group of items placed in a specific order, and you can access each item via an index — a number that indicates its position in the order. When you write the index in brackets after the name of the array variable, this is subscripting.
  • Swift arrays are immutable if you define them as constants with let, and mutable if you define them as variables with var.
  • In contrast, a Foundation NSArray is immutable by default. If you want to add, remove or modify items after creating the array, you must use the mutable variant class NSMutableArray.
  • An NSArray is heterogeneous, meaning it can contain Cocoa objects of different types. Swift arrays are homogeneous, meaning that each Array is guaranteed to contain only one type of object.
    However, you can still define a single Swift Array so it stores various types of Cocoa objects by specifying that the one type is AnyObject, since every Cocoa type is also a subtype of this.

The primary reason to use an array is when the order of variables matters. Think about those times when you sort contacts by first or last name, a to-do list by date, or any other situation when it’s critical to find or display data in a specific order.

Run time for Arrays

Accessing any value at a particular index in an array should usually be O(1)
Searching for an object at an unknown index will generally be O(n).
Inserting or deleting an object will often be O(1).

Dictionaries

Dictionaries are a way of storing values that don’t need to be in any particular order and are uniquely associated with keys. You use the key to store or look up a value.

Dictionaries also use subscripting syntax, so when you write dictionary[“hello”], you’ll get the value associated with the key hello.

Like arrays, Swift dictionaries are immutable if you declare them with let and mutable if you declare them with var. Similarly on the Foundation side, there are both NSDictionary and NSMutableDictionary classes for you to use.

When to use Dictionaries

Dictionaries are best used when there isn’t a particular order to what you need to store, but the data has meaningful association.

Sets

  • A set is a data structure that stores unordered, unique values. Unique is the key word; you won’t won’t be able to add a duplicate.
  • Swift sets are type-specific, so all the items in a Swift Set must be of the same type.
  • Swift added support for a native Set structure in version 1.2 – for earlier versions of Swift, you could only access Foundation’s NSSet.
    Note that like arrays and dictionaries, a native Swift Set is immutable if you declare it with let and mutable if you declare it with var. Once again on the Foundation side, there are both NSSet and NSMutableSet classes for you to use.

Hash Map (chaining)

demo

ref –
http://www.algolist.net/Data_structures/Hash_table/Chaining
http://stackoverflow.com/questions/9214353/hash-table-runtime-complexity-insert-search-and-delete

Hash Map with Chaining

The load factor is a measure of how full the hash table is allowed to get before its capacity is automatically increased.

When the number of entries in the hash table exceeds the product of the load factor and the current capacity,
the hash table is rehashed (that is, internal data structures are rebuilt) so that the hash table has
approximately twice the number of buckets.

The Node

.h file

.cpp file

The Hash Map

HashTable.hpp

The way we go about creating the Hash Table is by using an array of pointers. Each pointer at array[i] will point to a node. That node can link to another node. This is so that we can have an array of linked list. Which by definition, is what constitutes a chained hash map.

Thus, we use double pointers to point to this array of pointers: LinkedHashEntry ** table.

*table (or table[0]) dereferences the 1st array element.
*(table+1) (or table[1]) dereferences the 2nd array element.
..and so on

In order to allocate memory, we allocate this array of pointers on the heap.

Think of it like this:

We want to allocate on the heap (new)
an array of certain size ([MAX])
of LinkedHashEntry pointers (LinkedHashEntry *):

LinkedHashEntry ** table = new LinkedHashEntry * [MAX]

By definition, we always have a pointer pointing to the address of the first element of the array.

In every array, we always assign an array anchor (a pointer) to the 1st element of the array.
For example, an array of integers, int * i = new int [8];

int * i points to the first integer element’s address.
*i will dereference and get the int value.

In our case, since our first element is a pointer, we need a pointer to a pointer to act as the array anchor, and that is
why we use LinkedHashEntry ** table.

Now, we have an array of LinkedHashEntry pointers, and we are set to work.

Insertion

While certain operations for a given algorithm may have a significant cost in resources, other operations may not be as costly.

Amortized analysis considers both the costly and less costly operations together over the whole series of operations of the algorithm. This may include accounting for different types of input, length of the input, and other factors that affect its performance

insertion O(1) average and amortized case complexity, however it suffers from O(n) worst case time complexity.

BUT WHY?
Hash tables suffer from O(n) worst time complexity due to two reasons:

If too many elements were hashed into the same key. Thus, it degrades into a linked list
for that particular slot. Searching through this list may take O(n) time. see 2), where it keeps appending elements at the same slot.

Once a hash table has passed its load balance, it has to rehash [create a new bigger table, and re-insert each element to the table].

The reason why it is O(1) average and amortized case because:

  • It is very rare that many items will be hashed to the same key
  • if you chose a good hash function and you don’t have too big load balance.
  • The rehash operation, which is O(n), can at most happen after n/2 ops
  • which are all assumed O(1): Thus when you sum the average time per op, you get : (n*O(1) + O(n)) / n) = O(1)

Deletion

Deletion has the same concept as Insertion. Amortized case O(1), worst time O(n).

deleteNode is just a simple function that sets a LinkedHashEntry pointer to NULL and wipes out everything.

recurseAndRemove uses recursion to run through a list of LinkedHashEntry nodes, and remove the node with the specified key.

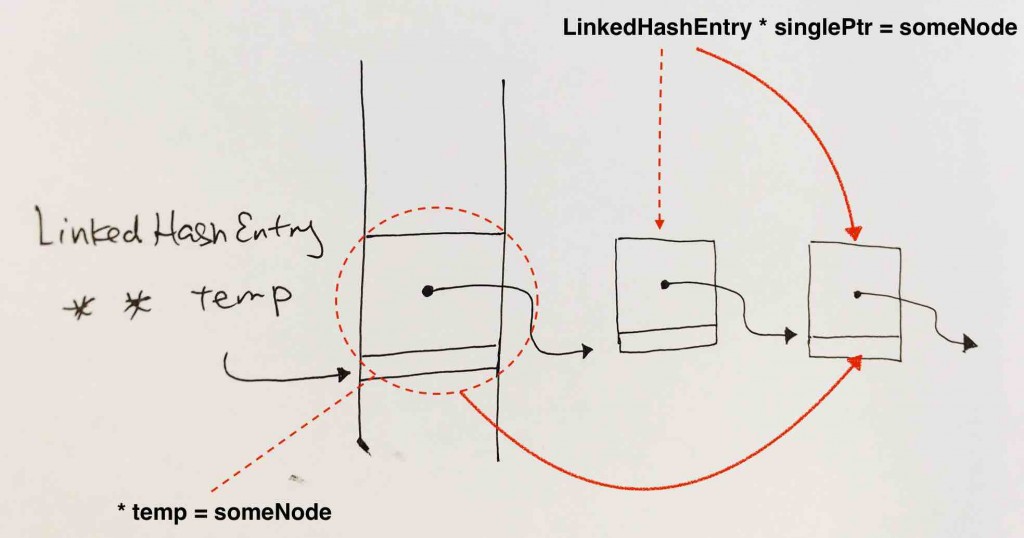
The list of nodes is given by LinkedHashEntry ** temp. Pointer of a pointer means that the double pointer points to the the address of a pointer. That pointer points to the address of the node.

hashentry_dblptr

Hence, if we want to reassign the pointer at this->table[i] to another node, it means:

this->table[i] is a pointer, thus we have to use a double pointer (HashEntry ** temp) to point to this->table[i]. Deference it like this (*temp) to control the pointer this->table[i] itself….and assign it to another node as shown in the image.

If we simply have a pointer like HashEntry * singlePtr = this->table[i], it won’t work because singlePtr will be pointing to whatever this->table[i] is pointing to. singlePtr is pushed onto the local stack, and has nothing to do with the pointer that is this->table[i].

singlePtr simply points to whatever this->table[i] points to. singlePtr is pushed onto the local stack

Once you understand this, the rest is just simple recursion and node traversal.

There are 2 cases:

  • You need to remove the first node. This means in order to get control of the first pointer, you need to get the address of the initial pointer, dereference it (at this point, you have full control of the pointer) and point it
  • You need to remove 2nd..and after node. This is simple because dereferencing the temp pointer gives you full control of the next pointer.

Controller Renderer, Static rendering, Dynamic rendering

ref – https://www.youtube.com/watch?v=i3Mwcphtz4w

Static Rendering

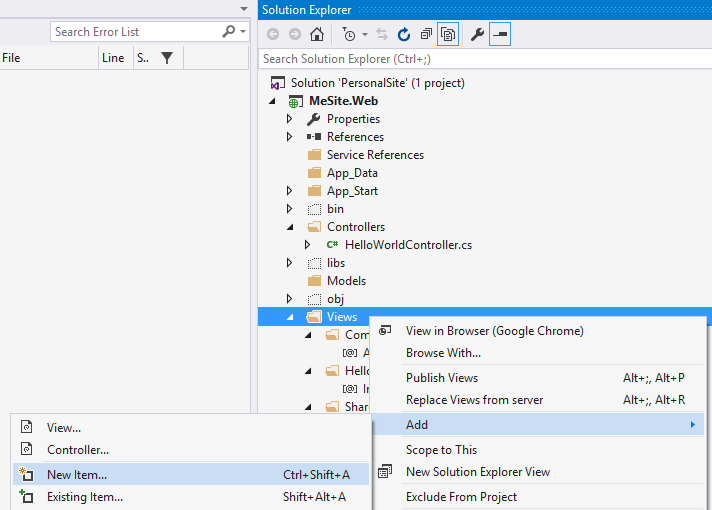
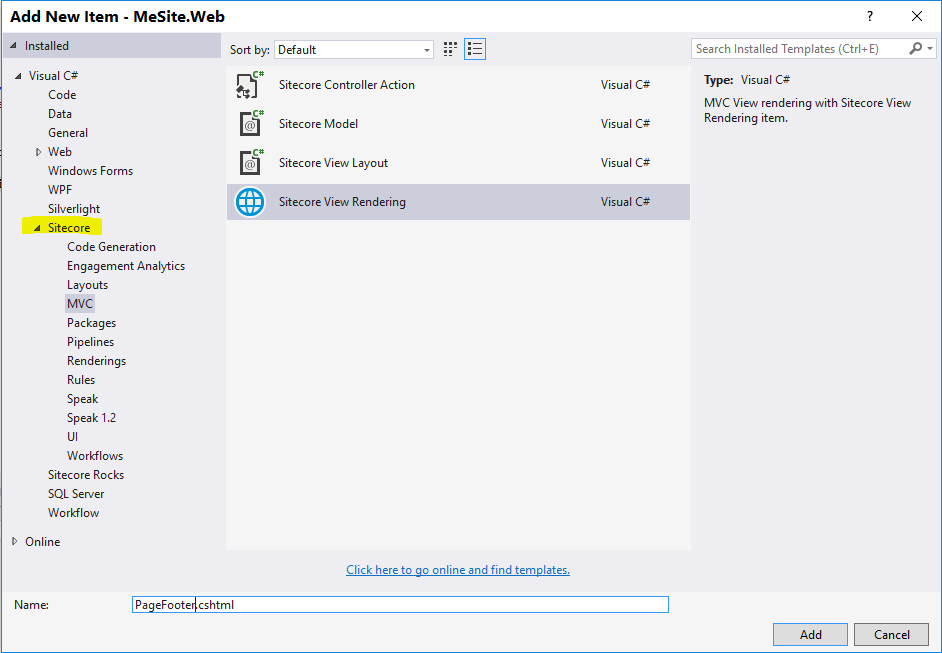
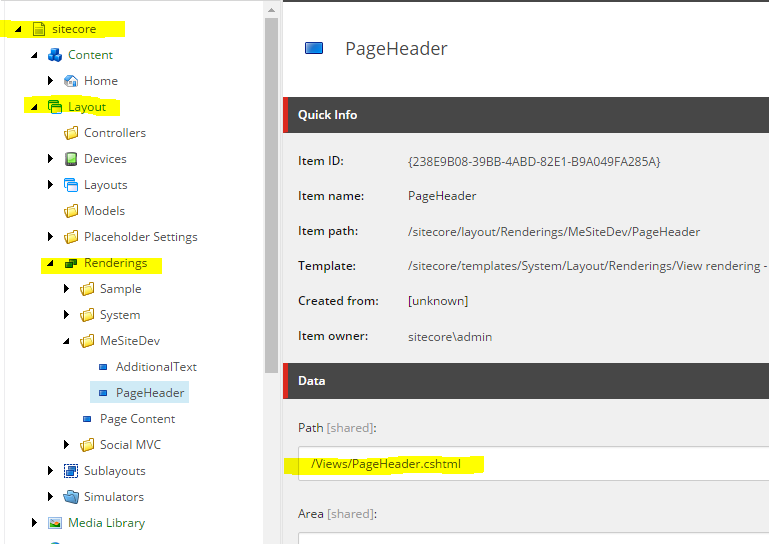
newitem

sitecore_viewrendering

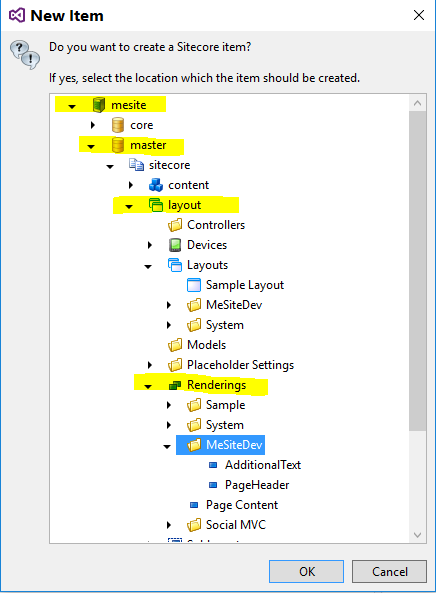
prompt_where_to_save_in_sitecore

sitecore_side

It will then produce something like this:

Enter code for when we use the @Model object. The @Model object is a representation of the template data that we create under Content.
@Model’s field properties include the fields that you specify in your Data Template. Let’s see how it works.

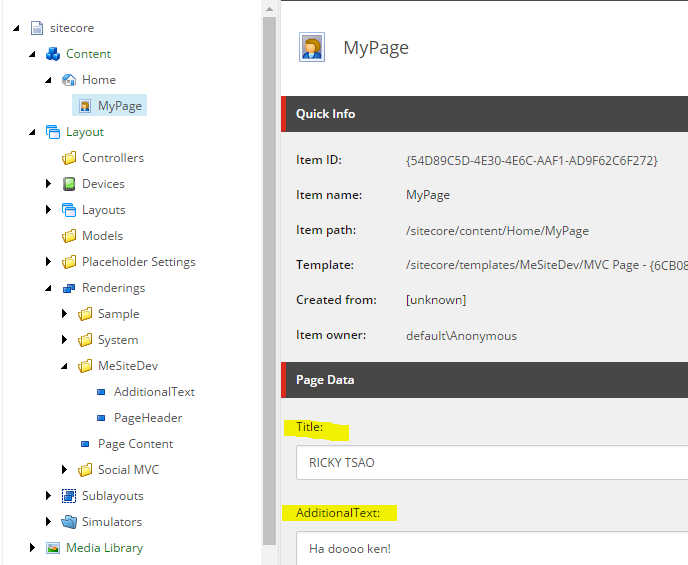
Say in your data template fields, you have title and AdditionalText
data_template_fields

We can display the field in our cshtml by using @Html.Sitecore().Field(“field_name”)

Setting up the Layout attached to your Data Template

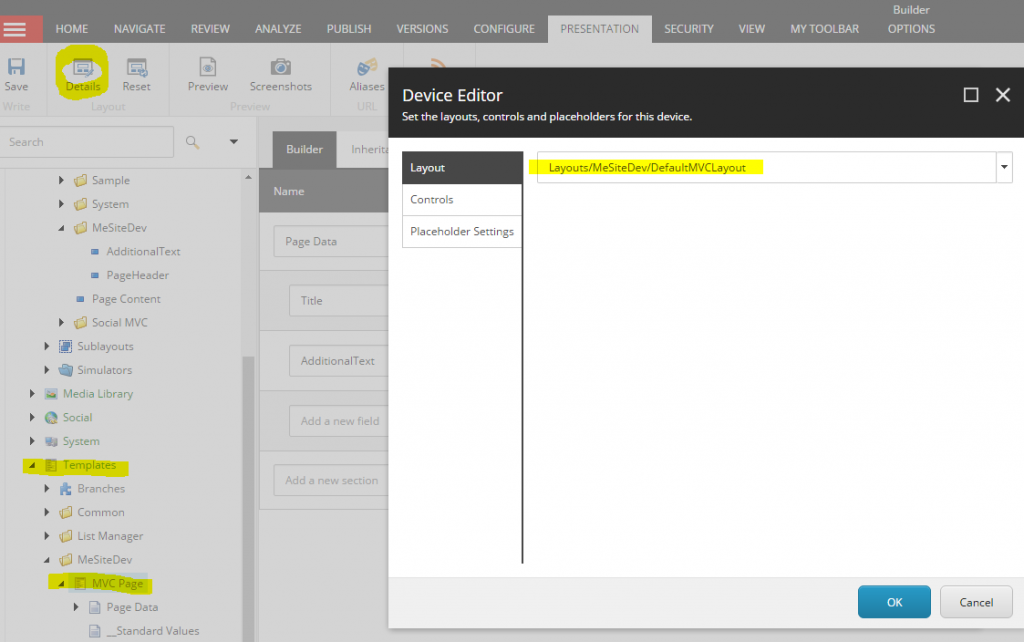
The page you create in Content uses a Data Template. When you create your Data Template, you specify which layout you it to use.

datatemplate_uses_layout

In our case, we created a layout DefaultMVCLayout, and we use that. It corresponds to the DefaultMVCLayout.cshtml in our Visual Studios. Let’s place our Rendering in that layout file.

We can statically bind our PageHeader.cshtml to the layout by using @Html.Sitecore().ViewRendering

Dynamic Rendering

Dynamic rendering involves using a Placeholder instead. In that Placeholder, you can specify what kinds of renderings to enter. That way, you can enter all different sorts of headers, footers, menus….etc.

@Html.Sitecore().Placeholder(“placeholder_name”)

Controller Rendering

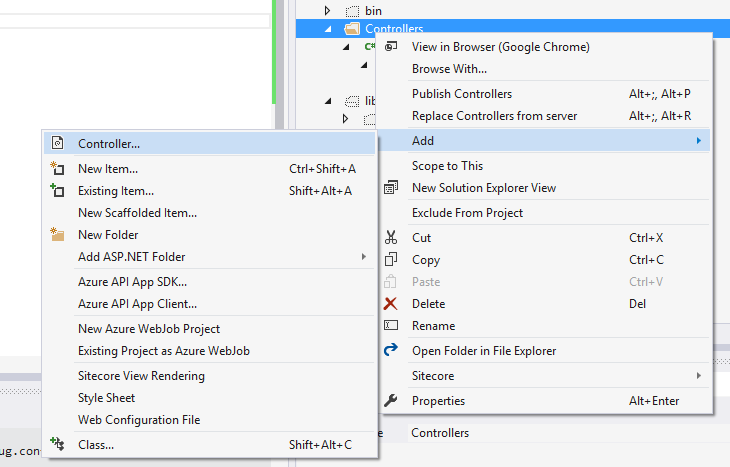
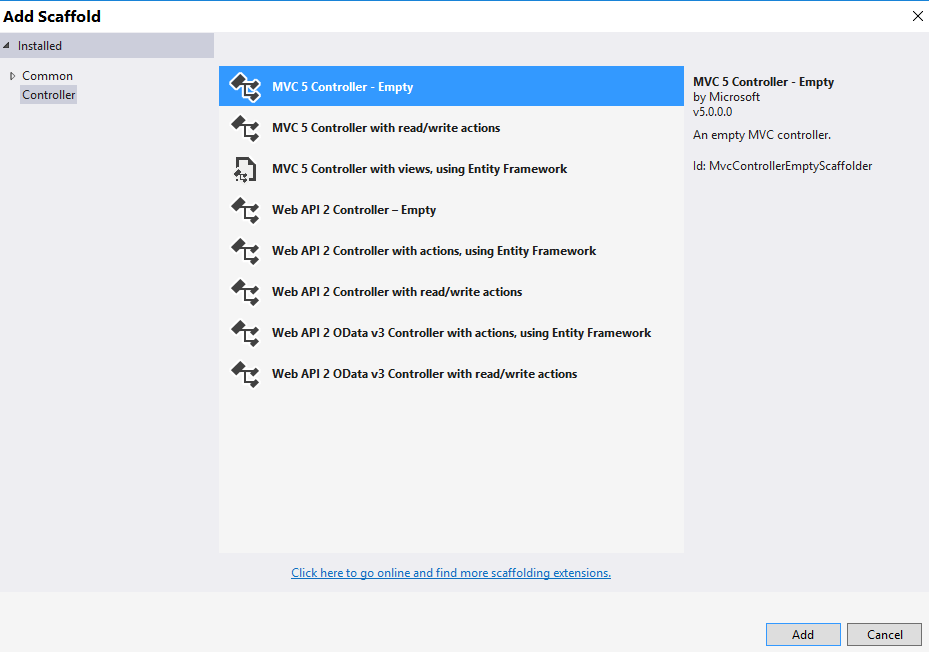
First of all, create a controller. Right click on the folder controller.

add_controller

emptycontroller

Type in your controller name say HelloWorldController

That controller only has one method called Index. Pass in a parameter DateTime.Now. Which is a static method to get the current time.

Create View for the Controller

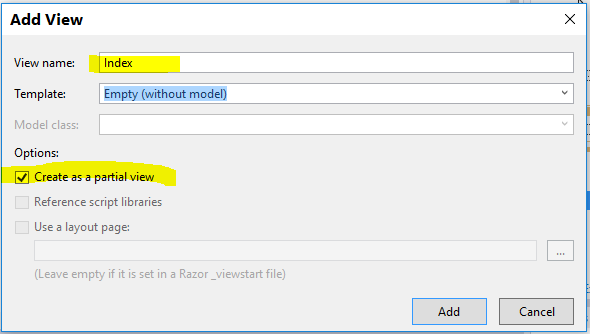
Under your Views folder, you will see that a folder is automatically created called HelloWorld.

Right click on the folder, Add > View. Call it Index. Make sure Create as partial View is checked.

create_controller_view

Then insert code to show the current time.

Make Sitecore aware this controller exists.

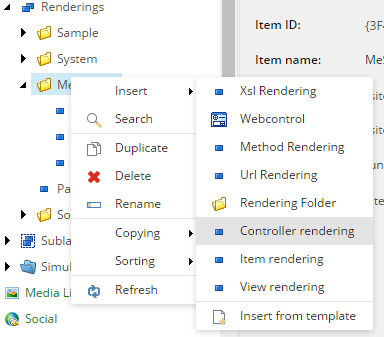
right click Rendering > Insert > Controller Rendering.

sitecore_add_controller_rendering

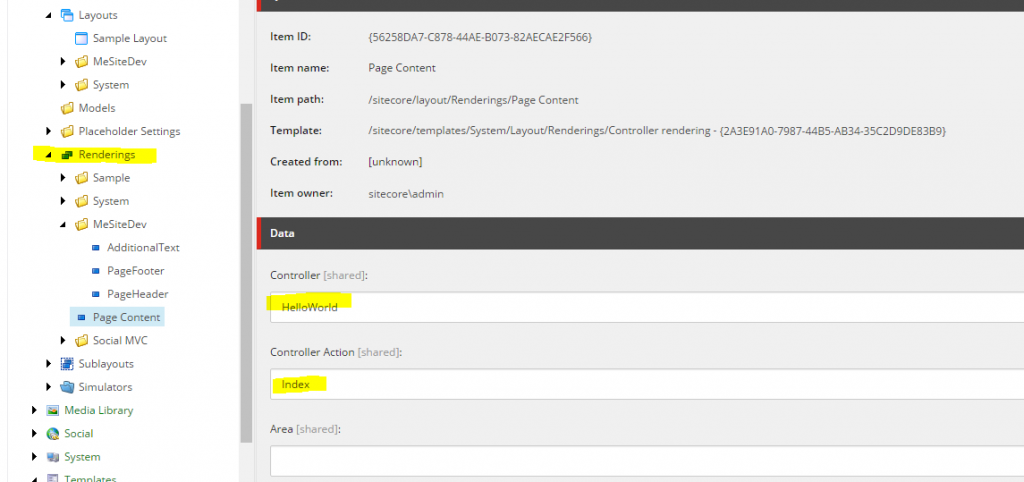
Call it Page Content

Then under Controller, call it HelloWorld WITHOUT THE word CONTROLLER!

controller_spec

When you encounter this rendering, I want you to execute this Controller and return this Action.

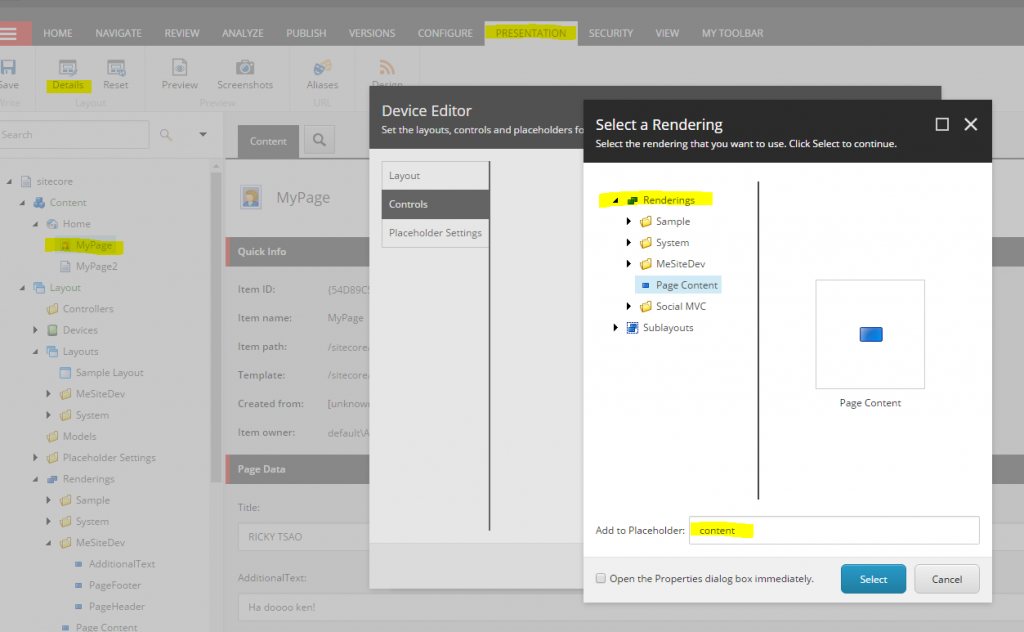
After the controller, let’s go and add this to our Content Page’s presentation details. Click on your content page. Then click on ‘Presentation’ tab.
On the ribbon, click Details.

add_controller_to_existing_content_page

We add the controller to the page layout that is used by our ‘Content Page’
We add a Control, and add our controller as shown.
Then we add it to the placeholder ‘content’.

Then publish.

Make sure you deploy your files in Visual Studios.

Then you’ll see that DefaultMVCLayout.cshtml, you can see that the code we put in there matches what we have on the output.

controller_result

ref – https://www.youtube.com/watch?v=dW_rQp9bMmE

Pro_SiteCore_Ch2 – Building a Component (View Rendering)

Sitecore installation

Use the SIM to install a sitecore instance onto your computer.
Name it “mesite”.

A page within Sitecore is assigned one layout to control what the page looks like.

Placeholders are added onto layouts.

Components are dropped into placeholders.

Create a Visual Studio Solution

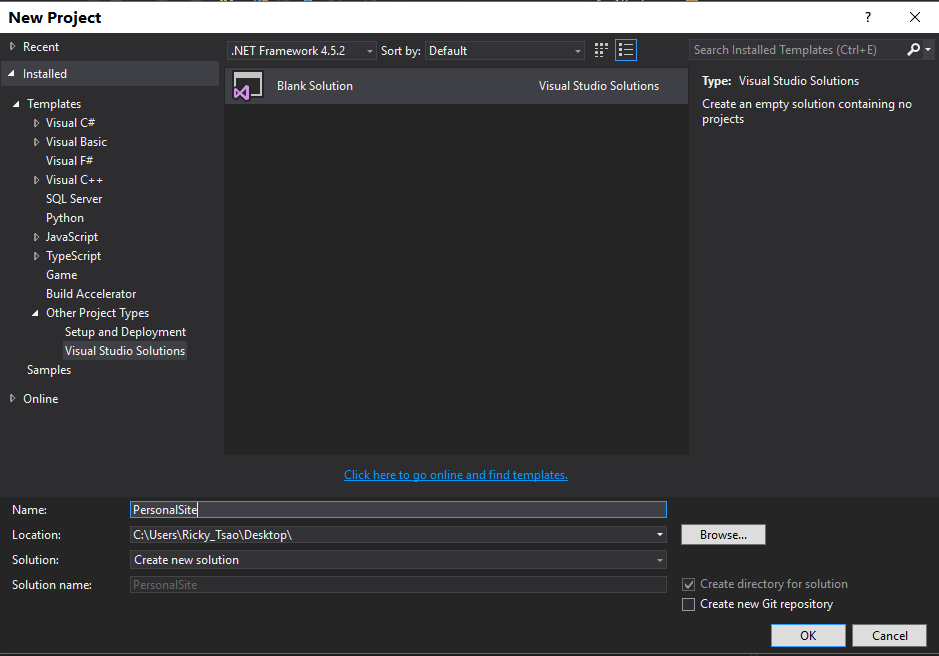
File > New > Project.

In the left pane, select: Installed > Templates > Other Project Types > Visual Studio Solutions.

With that selected, in the middle, select Blank solution.
Give your solution a name, such as PersonalSite, and specify a location.

Give a location on your Desktop, such as
E:\Users\YourName\Desktop
Click OK.

create_solution

Under Empty Solution, add Web Project

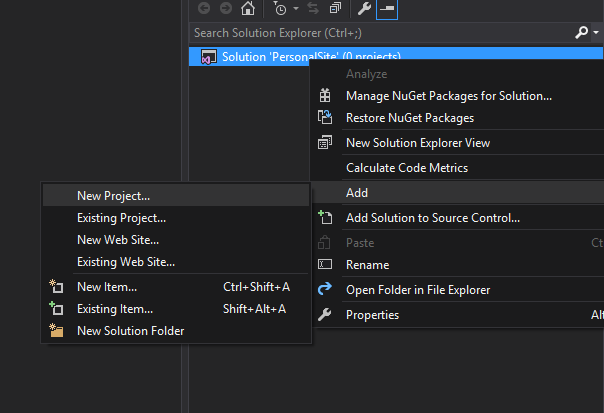
Right click the solution, and select:

Add > New Project.

add_web_proj

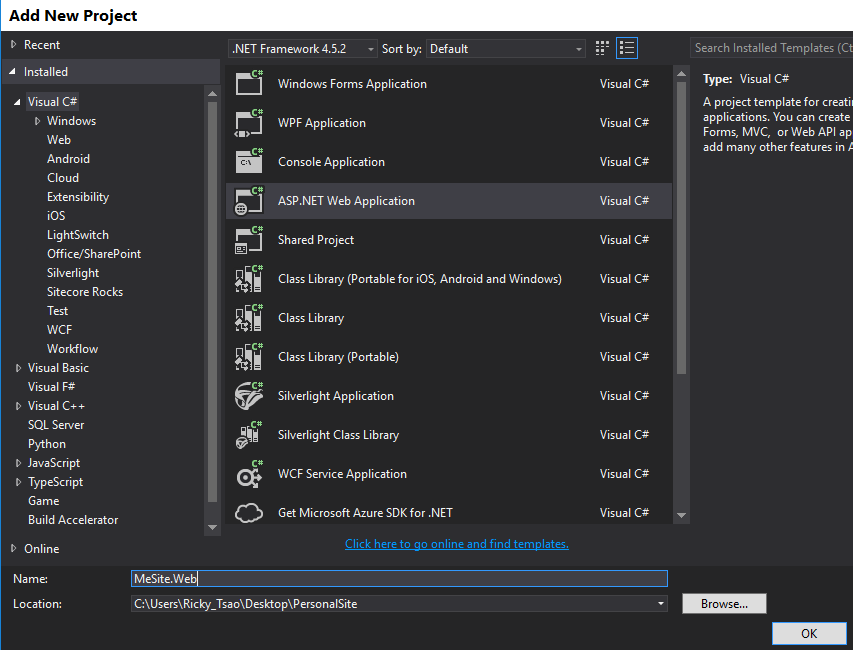
In the Add New Project dialog, select ASP.NET Web application and give it a name.
I chose to call it MeSite.Web

name_web_proj

click OK.

This will then open eh ASP.NET Project dialog. Select the Empty ASP.NET Template and check the MVC box down below. This will result in an empty ASP.NET MVC web site.

project_settings

From your Visual Studio Solutions, add reference to Sitecore’s DLL files

Copy Sitecore.Kernel.dll and Sitecore.Mvc.dell from /bin of the Sitecore mesite installation.
ex:
C:\inetpub\wwwroot\mesite\Website\bin

Go to C:\Users\YourName\Desktop\PersonalSite\MeSite.Web directory.
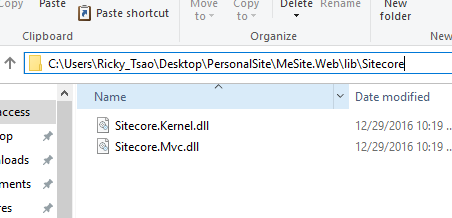
Create a folder called libs. Inside libs, create Sitecore.

ex:
C:\Users\YourName\Desktop\PersonalSite\MeSite.Web\libs\Sitecore

Paste the Sitecore.Kernel.dll and Sitecore.Mvc.dell files into this Sitecore folder.

copy_sitecore_dlls

Back in Visual Studio, right-click References > Add Reference.
In the Reference Manager dialog, click the Browse button, and navigate to
C:\Users\YourName\Desktop\PersonalSite\MeSite.Web\libs\Sitecore. You’ll see the .dll files that you’ve just pasted. Select them both, and click Add. Click OK.

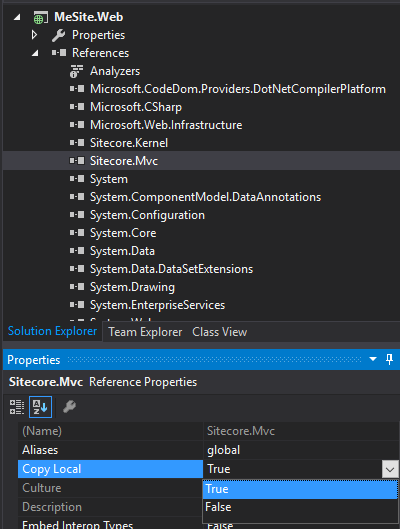
Once the ferences have been added, right click each of the references, and select Properties. Set the property Copy Local to False.

set_copy_local_false

The copy the contents of the Web.config Views/web.config from
C:\inetpub\wwwroot\mesite\Website and paste them into

their corresponding files/folders in the Visual Studio solution.

C:\Users\YourName\Desktop\Projects\Personalsite\MeSite.Web

In the your Visual Solution web directory, you will see a folder called App_Start. It has a RouteConfig.cs file. In the RegisterRoutes method, remove the default route, and replace with:

Finally, in the Visual Studio solution, open the Global.asax.cs file and change the base class of MvcApplication from System.Web.HttpApplication to Sitecore.Web.Application.

should look like this:

Open up a browser, type http://mesite/sitecore

and you should see the working site. Enter admin/b to log in.


http://mesite/sitecore
log in with admin/b
Once you’re logged in, click on Content Editor.

Create Layout: Generate .cshtml file

First things’s first. We must create a layout for our Data Template. We insert Data Templates onto a page to use. But a Data Template needs a certain layout to render everything. Thus, we need to create the layout. And that layout matches up with a .cshtml file.

Notice the tree on the left side, navigate to /sitecore/Layout/Layouts

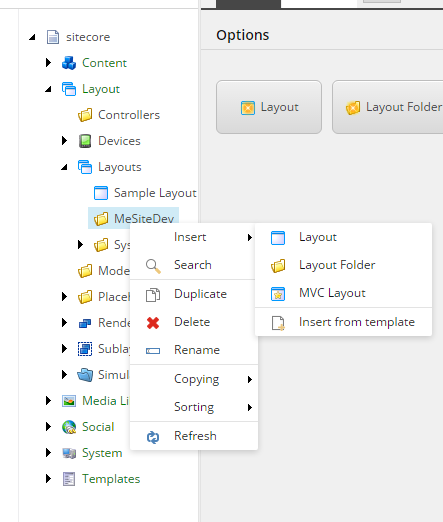
Right click on the Layout Item and Create a new Layout Folder. Name that folder
MeSiteDev.

Creating the MVC Layout in Sitecore’s Content Editor

Right click that MeSiteDev folder and choose Insert > MVC Layout. We’ll name this layout DefaultMVCLayout. Click Next. When asked for a Layout location, select MeSiteDev and click Next.

Then, it will ask you for the location to place the .cshtml file. This .cshtml file location will correspond to the location in Visual Studios.

We can save it at /Views/Shared.

mvc_layout

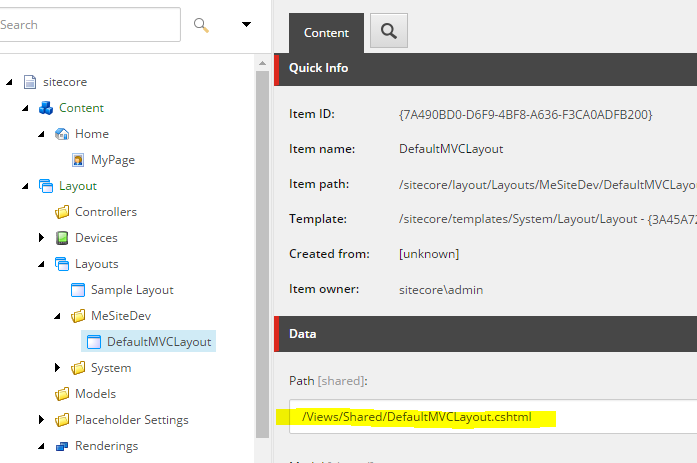
Click on DefaultMVCLayout. Look at ‘Data’ section. You will see then see that the path is /Views/Shared/DefaultMVCLayout.cshtml

. Go to your Visual Studio, and view the file at the same location.

When you clicked create MVCLayout, it created DefaultMVCLayout.cshtml at c:\inetpub\wwwroot\mesite\Website\Views\Shared\

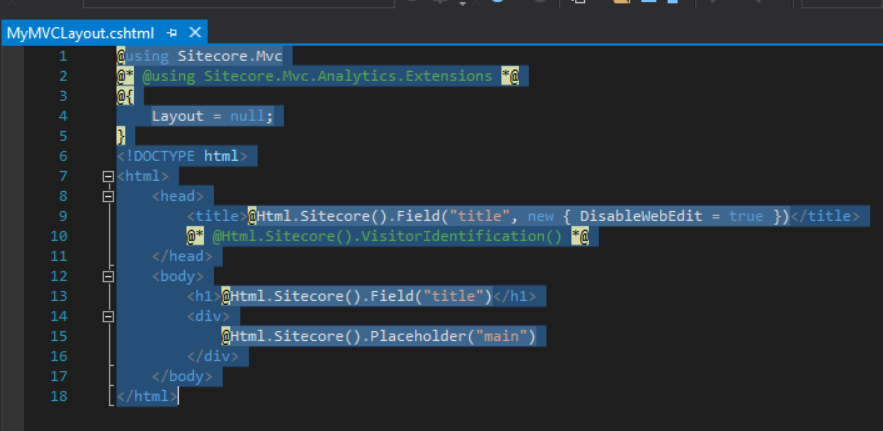
Open up c:\inetpub\wwwroot\mesite\Website\Views\Shared\DefaultMVCLayout.cshtml and copy all the contents

cshtml_template

Create DefaultMVCLayout.cshtml in Visual Studio to Match Sitecore

Because Sitecore created DefaultMVCLayout.cshtml at /Views/Shared, we have to match that in Visual Studios.
Go to your Visual Studios, under Views, create Shared folder, so that we have /Views/Shared directory.
Then, right click on Shared folder, Add > View and name it DefaultMVCLayout. Be sure to UNCHECK “use a layout page” option.

Thus, in Visual Studios, we have:
C:\Users\Ricky_Tsao\Desktop\PersonalSite\MeSite.Web\Views\Shared\DefaultMVCLayout.cshtml

At the sitecore site, we have:
C:\inetpub\wwwroot\mesite\Website\Views\Shared\DefaultMVCLayout.cshtml

But how does what you prorgram into Visual Studio gets reflected in Sitecore?

When you do a publish in Visual Studios, the contents from your Visual Studio’s DefaultMVCLayout.cshtml
gets copied into Sitecore site’s DefaultMVCLayout.cshtml

Paste Sitecore’s generated cshtml into your Visual Studio created file

Paste what you copied from c:\inetpub\wwwroot\mesite\Website\Views\Shared\DefaultMVCLayout.cshtml
and copy it into your newly created DefaultMVCLayout views in your Solution Explorer.

Save All in Visual Studios.

Now that we have a layout, we can Create a Data Template

The concept is, when you create a page, you insert Data Templates. Within Data Templates, you have placeholders. And in placeholders,
you insert components.

Go back to Content Editor within Sitecore. Create new Data Template that we’ll use with our new page.

In the left pane of Content Editor, sitecore > templates

Right click on Templates and Insert > Template Folder.

Name this folder MeSiteDev.

Right click MeSiteDev and choose Insert > New Template. Name this template MVC Page, and click Next.

template_mvc_page
When it asks for location, select the MeSiteDev template folder we just created and click Next.

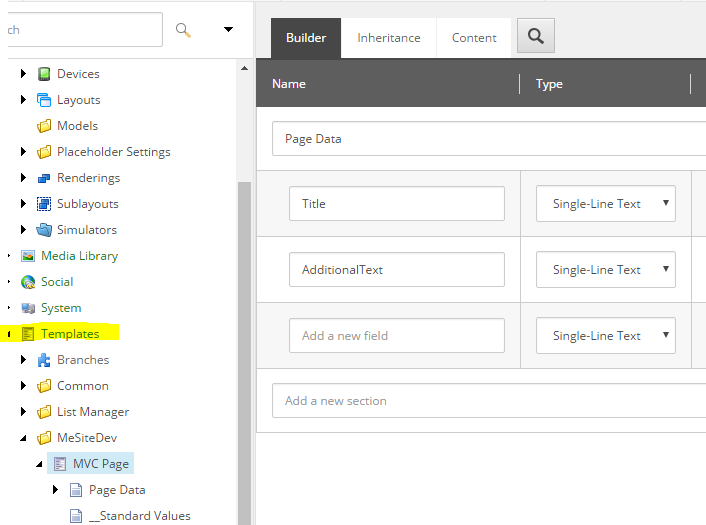
After creating this template, look at the Builder.

You’ll notice Builder. Then under Section, enter “Page Data”.

Then you can create new fields.
Let’s create two new fields:

  • Title
  • AdditionalText
  • Leave their type as “single-line text”.

    Once you are done, click Save.

    Standard Values

    When an item is created from a template, standard values set the defaults for the metadata and/or presentation details.

    In detail, standard values are a way of having default or fallback values for fields in Sitecore, meaning that when items are created, you can specify a field value that should be used by default. This does not only account for custom fields you build, but also standard fields in Sitecore such as presentations and insert options. This means that you can specify a value on the standard values, and when you create a new item which inherits from this template, it will by default use the values specified on the standard values.

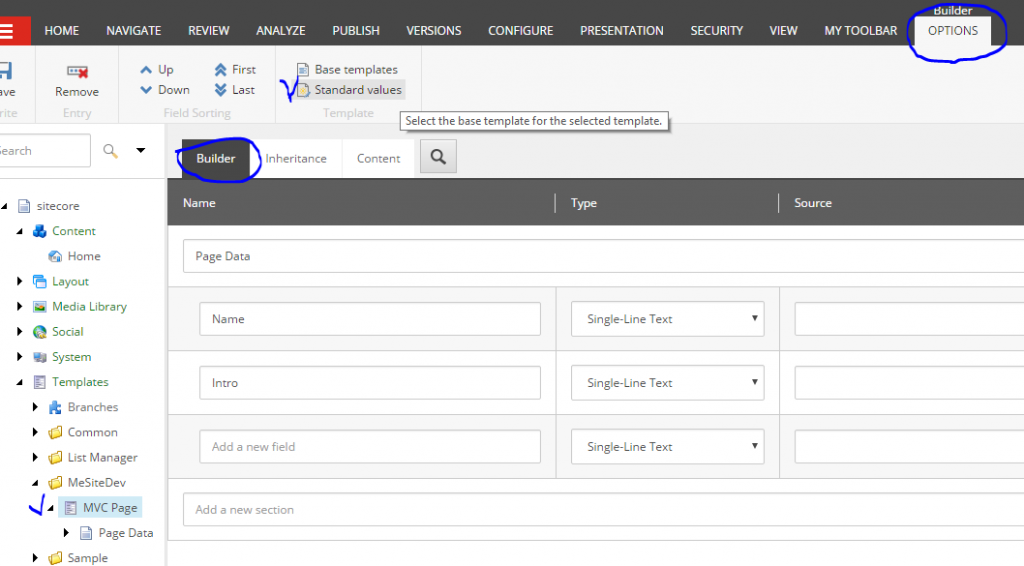
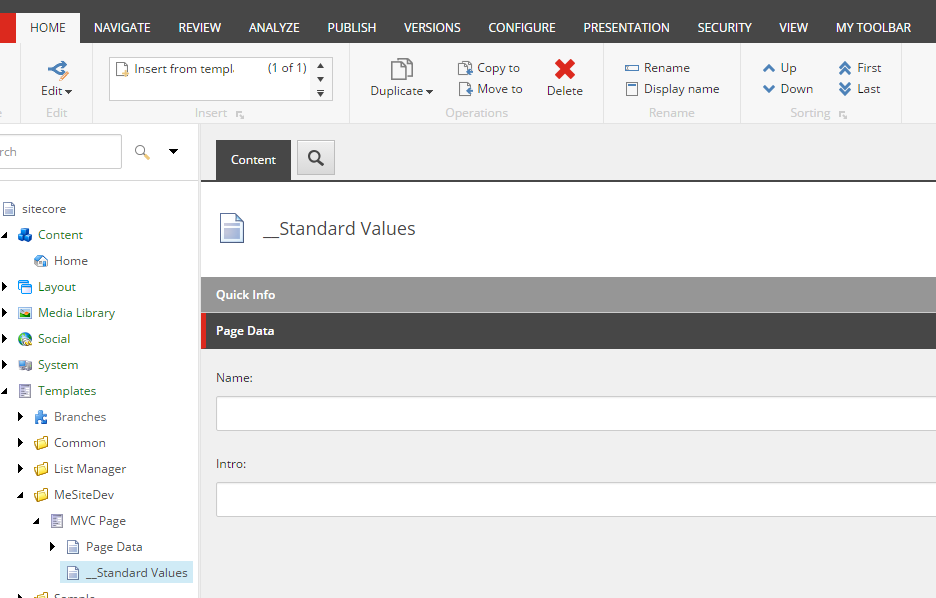
    With the Builder tab selected on your MVC Page template, click the Options tab in the ribbon, then click on the Standard Values button. This will create a Standard Values item for your new MVC Page Template.

    create_standard_values

    set_standard_values

    Setting a Layout to your Template

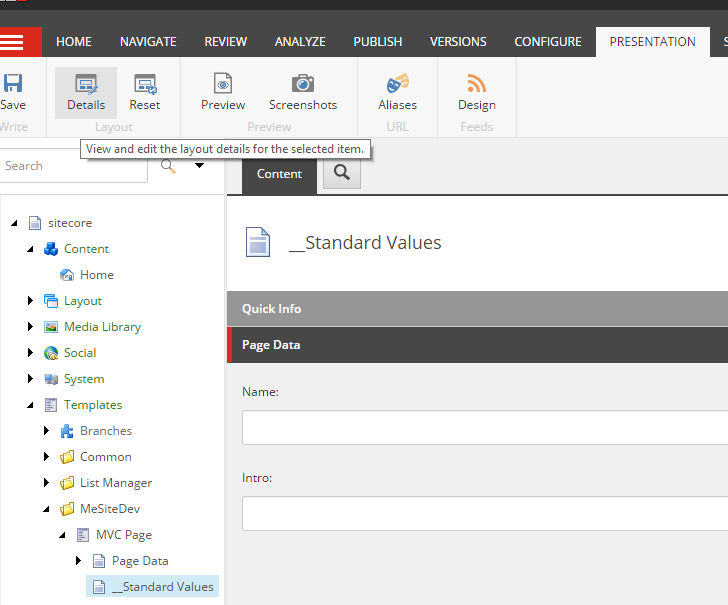
    Now select the __Standard Values item below the MVC Page template item. Select the Presentation tab in the ribbon and click on Details button to open the Layout Details dialog.

    standard_values_presentation

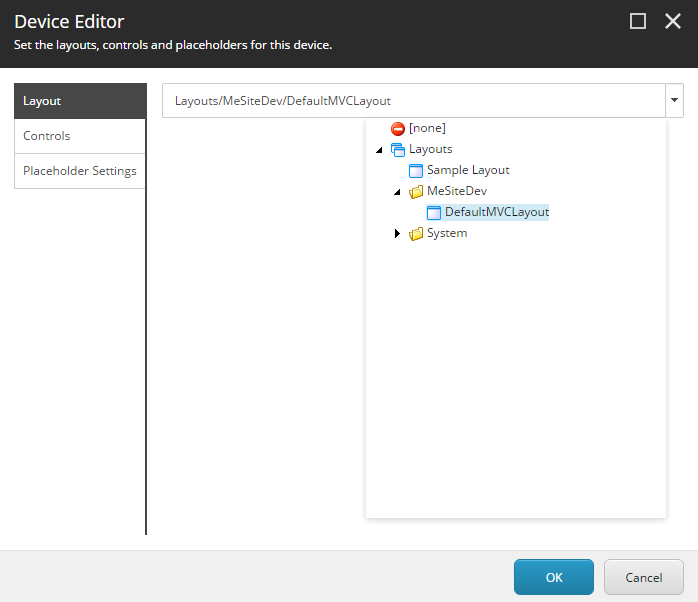
    On the Shared Layout tab, to the right of the Default device profile, click on the Edit link. This will open the Device Editor dialog. On the Layout tab of Device Editor dialog, click on the drop down arrow to the right and select the DefaultMVCLayout layout that you created earlier. Click OK, and OK again on the Layout Details dialog. Save your changes.

    standard_values_layout

    the last step is to add a Placeholder item for the main placeholder in our DefaultMVCLayout.

    Adding Placeholder “main” into your Layout

    So we have a MVC layout. What we want to do is to organize certain placeholders in our layout and allow users to load in different components.
    These placeholders look like this:

    placeholder

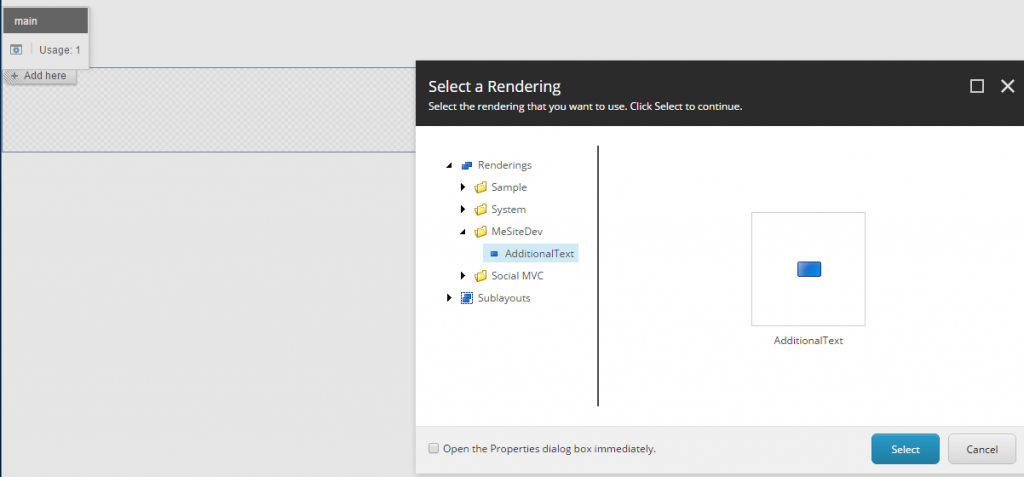
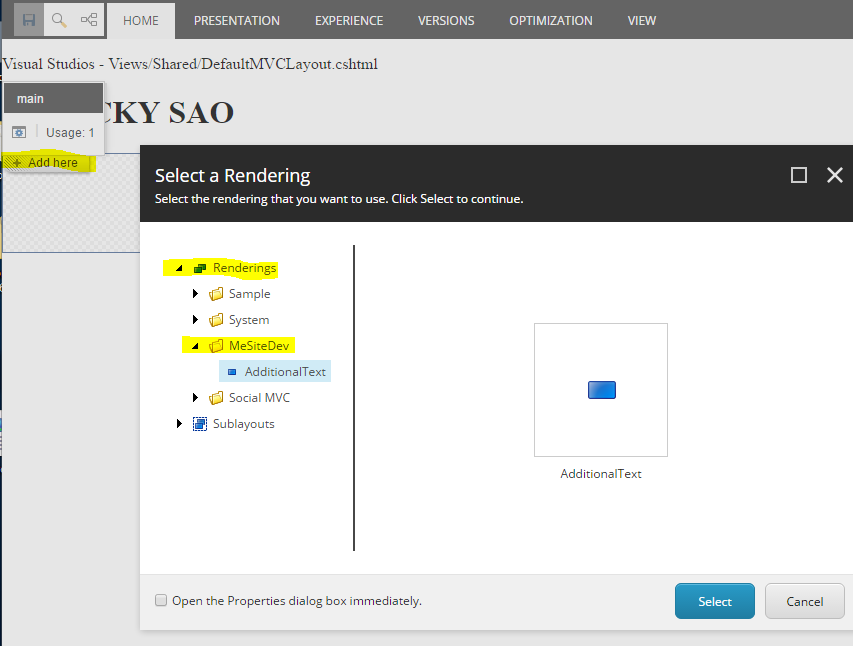
    When a user starts adding pages, they will see the layout, and within the layout, they will see different placeholders for them to add components. When they hover their mouse over these placeholders, it will allow them add renderings like so:

    add_rendering

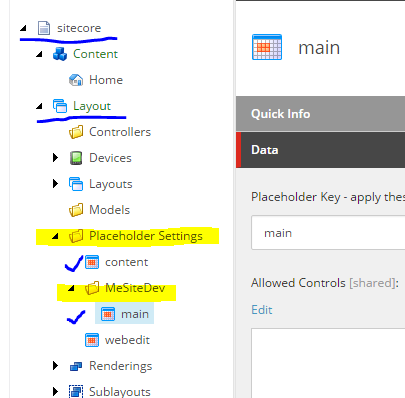
    Navigate to sitecore > Layouts > Placeholder Settings.

    right click on Placeholder Settings

    Insert > Placeholder Settings folder

    Name it MeSiteDev and click OK.

    right click on the new MeSiteDev folder and select Insert > Placeholder.

    Name it main, then click OK.

    layout_placeholder

    The “main” placeholder corresponds to the @Html.Sitecore.Placeholder(“main”)

    In your Visual Studios, Views > Shared > DefaultMVCLayout.cshtml, you’ll see

    You can see how your placeholder “main” is used in the DefaultMVCLayout.cshtml
    This is how Sitecore knows how to associate renderings with placeholders in MVC views so they are rendered in the right place within the placeholder in the MVC view.

    Creating the Component: Add a View (Rendering) in Visual Studios

    Now that we have a placeholder “main” to put a component, let’s build our first component.

    This component will only render some text, that a user will enter in the Experience Editor.

    The component we build now will retrieve the content from the user, and then render it.

    1) Creating component that will retrieve user data: The View

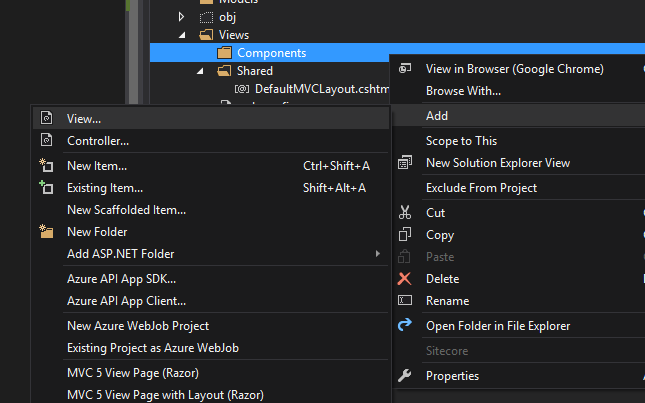
    In MeSiteDev.Web project, right click on the Views folder and select Add > New Folder. Name it Components.

    Right click on the Components folder and select Add > View. Name the view AdditionalTextView, and then click Add.

    add_view

    You will see the View with some basic c sharp and HTML set up. It uses c sharp and HTML to render code, sitecore fields, and such.

    Use Sitecore’s API to insert the “AdditionalText” field.

    Make sure you put in some log statements so you know where this view is being rendered. Your final code should look something like this:

    save this view.

    2) Create View Rendering item in Sitecore and point it to our View

    In Sitecore, open the Content Editor, in left pane, sitecore > layouts > Renderings.

    Right-click on the Renderings item, select Insert > Rendering Folder. Name this folder MeSiteDev.

    Right click on MeSiteDev rendering folder and select Insert > View Rendering. Name it AdditionalText. Press OK.

    In the Data section, type the following into the Path field: /Views/Components/AdditionalTextView.cshtml

    WARNING: If you do not put the correct PATH, you will get an “Unknown error occured”, when you try to insert a component into your placeholder

    Save your changes.

    This is to match up with what we just did in Visual Studio.

    Deploy to Sitecore

    In Visual Studio,

    View > ToolBars > Web One Click Publish (make sure its checked)

    click on the drop down box that says “Create Publish Settings”

    If its checked, you’ll see the Publish dropbox.

    click “New Custom Profile”
    Name new profile Local. Click OK.

    For Publish Method, change option to File System.
    Select web root as your Target Location. Should be something like c:\inetpub\wwwroot\mesite\Website

    Click Next, and change Configuration option to Debug. Click Publish.

    In action! Create your Page!

    First, we will add the MVC template that we created earlier.

    In the left pane of the Content Editor, navigate to sitecore > content > Home.
    Right click on Home and select Insert > Insert from Tempalte

    This will open the Insert from Template dialog.

    Select the Templates > MeSiteDev > MVC Page template, name it MyPage and click Insert.

    You’ve now created the page template for others to use!

    Having users enter data

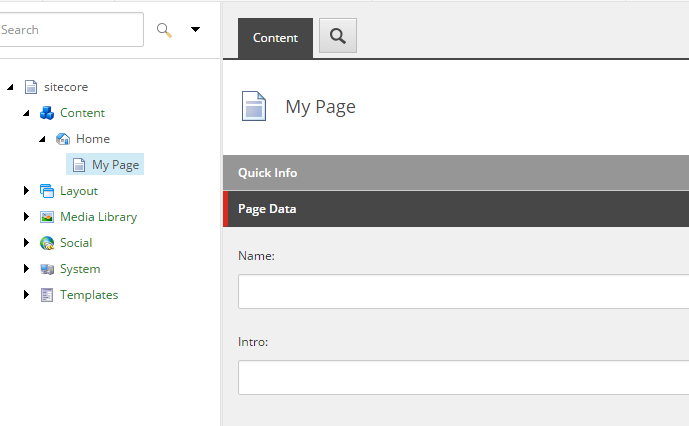
    In the Page Data section, fill in some text in the Title and AdditionalText fields
    Click Save.

    entering_template

    Publish it via publish tab.

    Once its published, make sure your page is selected in the left pane. Then, click on Experience Editor. Sitecore will open everything for you,
    and you’ll see your layout, along with the placeholder.

    ..and there’s a place holder with the name “main” there. The reason why its like that is because
    in Visual Studio, Views/Shared/DefaultMVCLayout.cshtml, what you laid out there in the source file is what you see.

    WARNING: If you do not put the correct PATH, you will get an “Unknown error occured”, when you try to insert a component into your placeholder

    mvc_layout

    you had the “title” field show between h1 tags

    You placed your Placeholder called “main” inside a div

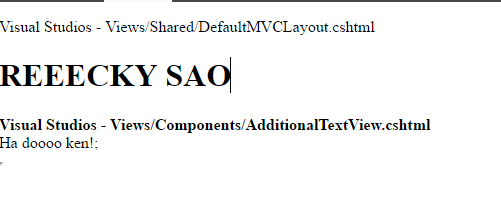
    Also, look at the log text you put in there, from there you can see that the file generated is from Visual Studios’s
    Views/Shared/DefaultMVCLayout.cshtml file:

    Go ahead and add in AdditionalText

    additionaltextrendering

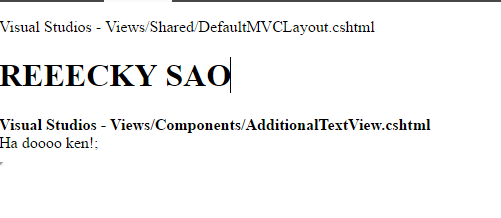
    Once it gets inserted, it will display the template .cshtml file from your Visual Studios at /views/Components/AdditionalTextView.cshtml

    result_additionaltext

    because that was the file you specified at Path in the Data Section when you created the MVCDefaultLayout

    specify_path_for_layout

    You will see the log of the file location from AdditionalTextView.cshtml. In the middle you will see that AdditionalTextView.cshtml displays your field “AdditionalText” via

    Result:

    result_additionaltext

    Viewing Your Results

    You can make text changes for Title.
    After making your changes and happy that your site is ready. Make sure to save it. Then highlight by clicking on your page node on the left pane in Content Editor.

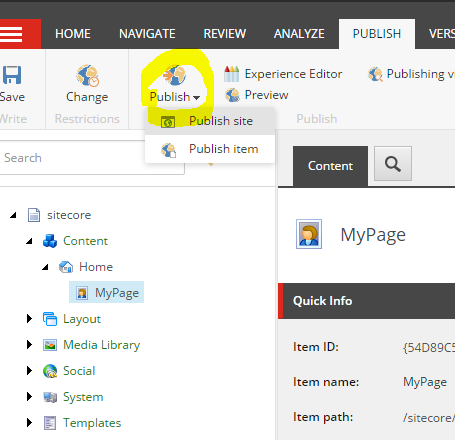
    On the top ribbon bar,

    publish_page

    Do a Smart Publish, and then click OK.

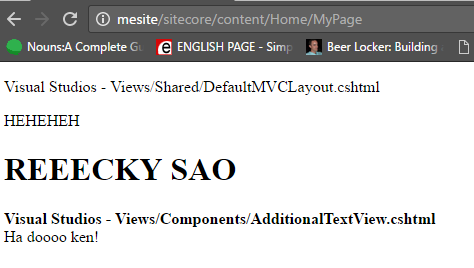
    Then, open an Incognito browser:
    http://mesite/sitecore/content/Home/MyPage

    sitecore_ex_result