createAsyncThunk – Redux ToolKit (RTK)
ref – https://blog.logrocket.com/using-redux-toolkits-createasyncthunk/
Redux store possesses great state management features, but it doesn’t know how to deal with asynchronous logic.
Redux can’t handle asynchronous logic simply because it doesn’t know what you want to do with the data you fetched.
Middleware has since been used in Redux applications to perform asynchronous tasks.
Redux Thunk’s middleware being the most popular package.
With Redux Toolkit,
Redux Thunk is included by default.
This allows createAsyncThunk to perform delayed, asynchronous logic before sending the processed result to the reducers.
The Slice
We create the Redux slice via createSlice function.
A slice is a function that contains your store and reducer functions used to modify store data
Its name is posts, and we initialize it with some default data.
As you can see we create a getPosts that uses createAsyncThunk function. We initialize its action type string as ‘posts/getPosts’.
This is used in reducers in switch statements to catch the data to be stored.
Then we implement the async functionality.
We do our async feature in there and then return the data.
|
1 2 3 4 5 6 7 8 9 10 11 12 13 14 15 16 17 18 19 20 21 22 23 24 25 26 27 |
import { createSlice, createAsyncThunk } from '@reduxjs/toolkit' const initialState = { entities: [], loading: false, } const getPosts = createAsyncThunk( 'posts/getPosts', //action type string async (thunkAPI) => { // callback function (called payloadCreator) const res = await fetch('https://jsonplaceholder.typicode.com/posts').then( (data) => data.json() ) return res }) export const postSlice = createSlice({ name: 'posts', initialState, reducers: {}, extraReducers: {}, }) export const postReducer = postSlice.reducer |
- Synchronous Requests – Within createSlice, synchronous requests made to the store are handled in the reducers object
- Async Requests – Within createSlice, extraReducers handles asynchronous requests, which is our main focus
Asynchronous requests created with createAsyncThunk accept three parameters:
- an action type string
- a callback function (referred to as a payloadCreator)
- and an options object
|
1 2 3 4 5 6 7 |
const getPosts = createAsyncThunk( 'posts/getPosts', //1 - action type string async (thunkAPI) => { // 2 - payloadCreator then executes to return either a result or an error. const res = await fetch('https://jsonplaceholder.typicode.com/posts').then((data) => data.json()) return res } ) |
ref – https://redux-toolkit.js.org/api/createAsyncThunk#payloadcreator
It’s important to note that payloadCreator accepts only two parameters:
- custom argument that may be used in your request
- thunkAPI is an object containing all of the parameters that are normally passed to a Redux Thunk function — like dispatch and getState. Take a look at all the acceptable parameters.
The payloadCreator function will be called with two arguments:
arg: a single value, containing the first parameter that was passed to the thunk action creator when it was dispatched. This is useful for passing in values like item IDs that may be needed as part of the request. If you need to pass in multiple values, pass them together in an object when you dispatch the thunk, like
1dispatch(fetchUsers({id: 52345, status: 'active', sortBy: 'name'})).thunkAPI: an object containing all of the parameters that are normally passed to a Redux thunk function, as well as additional other options:
- dispatch: the Redux store dispatch method
- getState: the Redux store getState method
For example, in this payloadCreator, we have the main object goalData, which has all the data packaged into an object, so that it can contain various properties and their values.
Then we have thunkAPI, which has getState, and dispatch. In our example, it uses the getState, and then uses the auth slice to access its user’s token value:
123456789async (goalData, thunkAPI) => {try {const token = thunkAPI.getState().auth.user.tokenreturn await goalService.createGoal(goalData, token)} catch (error) {// take care of errorreturn thunkAPI.rejectWithValue(message)}}Whenever the payloadCreator is dispatched from a component within our application, createAsyncThunk generates promise lifecycle action types using this string as a prefix:
pending: posts/getPosts/pending
fulfilled: posts/getPosts/fulfilled
rejected: posts/getPosts/rejectedThe three lifecycle action types mentioned earlier can then be evaluated in extraReducers, where we make our desired changes to the store. In this case, let’s populate entities with some data and appropriately set the loading state in each action type:
123456789101112131415161718192021export const postSlice = createSlice({name: 'posts',initialState,reducers: {},extraReducers: {[getPosts.pending]: (state) => {state.loading = true},[getPosts.fulfilled]: (state, { payload }) => {state.loading = falsestate.entities = payload},[getPosts.rejected]: (state) => {state.loading = false},},})Dispatching it in your UI
By using useSelector and useDispatch from react-redux, we can read state from a Redux store and dispatch any action from a component, respectively.
1234567891011121314151617181920212223mport { useEffect } from 'react'import { useDispatch, useSelector } from 'react-redux'import { getPosts } from '../redux/features/posts/postThunk'export default function Home() {const dispatch = useDispatch()const { entities, loading } = useSelector((state) => state.posts)useEffect(() => {dispatch(getPosts()) // HERE!}, [])if (loading) return <p>Loading...</p>return (<div><h2>Blog Posts</h2>{entities.map((post) => (<p key={post.id}>{post.title}</p>))}</div>)}Example
Given a fetch function in a service file.
We have a function that takes in data, and a token.
This function will be used in a payloadCreator.frontend/src/features/goals/goalService.js
123456789const createGoal = async (goalData, token) => {const config = {headers: {Authorization: `Bearer ${token}`,},}const response = await axios.post(API_URL, goalData, config)return response.data}Thus, we receive this data and token from thunkAPI:
frontend/src/features/goals/goalSlice.js
1234567891011121314151617181920212223242526272829303132333435363738394041424344454647484950515253const initialState = {goals: [],isError: false,isSuccess: false,isLoading: false,message: '',}export const createGoal = createAsyncThunk('goals/create',// we implement the async function.async (goalData, thunkAPI) => {try {const token = thunkAPI.getState().auth.user.tokenreturn await goalService.createGoal(goalData, token)} catch (error) {const message =(error.response &&error.response.data &&error.response.data.message) ||error.message ||error.toString()return thunkAPI.rejectWithValue(message)}})export const goalSlice = createSlice({name: 'goal',initialState,reducers: {reset: (state) => initialState,},extraReducers: (builder) => { // we take care of the promise's status herebuilder.addCase(createGoal.pending, (state) => {state.isLoading = true}).addCase(createGoal.fulfilled, (state, action) => {state.isLoading = falsestate.isSuccess = truestate.goals.push(action.payload)}).addCase(createGoal.rejected, (state, action) => {state.isLoading = falsestate.isError = truestate.message = action.payload})},})export const { reset } = goalSlice.actionsexport default goalSlice.reducer1) So we import an action function from our slice.
2) We then dispatch that action.12345678910111213141516171819202122// we take in an action from our sliceimport { createGoal } from '../features/goals/goalSlice'function GoalForm() {const [text, setText] = useState('')const dispatch = useDispatch()const onSubmit = (e) => {e.preventDefault()// when the form is submitted, we dispatch createGoal.dispatch(createGoal({ text }))}return (/* JSX here */)}export default GoalForm
useMemo
ref – https://www.w3schools.com/react/react_usememo.asp
|
1 2 3 4 5 6 7 8 9 10 11 12 13 14 |
const App = () => { const [count, setCount] = useState(0); const [todos, setTodos] = useState([]); const calculation = expensiveCalculation(count); ... ... const expensiveCalculation = (num) => { console.log("Calculating..."); for (let i = 0; i < 1000000000; i++) { num += 1; } return num; }; |
Use useMemo
To fix this performance issue, we can use the useMemo Hook to memoize the expensiveCalculation function. This will cause the function to only run when needed.
We can wrap the expensive function call with useMemo.
The useMemoHook accepts a second parameter to declare dependencies. The expensive function will only run when its dependencies have changed.
In the following example, the expensive function will only run when count is changed and not when todo’s are added.
|
1 2 3 4 5 6 7 8 9 10 11 12 13 14 |
const App = () => { const [count, setCount] = useState(0); const [todos, setTodos] = useState([]); const calculation = useMemo(() => expensiveCalculation(count), [count]); return ( <div> <div> <h2>Expensive Calculation</h2> {calculation} </div> </div> ); }; |
Create DB (Rest API)
ref – https://www.youtube.com/watch?v=-0exw-9YJBo
console.log(your string.cyan.underline);
Create folder
mkdir mern-tutorial
cd mern-tutorial
Code .
empty folder
create folder backend
in backend folder, create file server.js
npm init
entry point: (index.js) server.js
create another file .gitignore:
|
1 2 |
node_modules .env |
npm i express dotenv mongoose colors
npm i -D nodemon
package.json
|
1 2 3 4 |
"scripts": { "start": "node backend/server.js", "server": "nodemond backekend/server.js" } |
Add git repository
git init
git add .
git commit -m “Initial Commit”
server.js
|
1 2 3 4 5 |
const express = require('express') const dotenv = require('dotenv).config() const port = 5000; const app = express(); app.listen(port, () => console.log(`Server started on port ${port}`)) |
create .env
.env
|
1 2 |
NODE_ENV= development PORT = 5000 |
Now we can do:
|
1 |
process.env.port || 5000 |
|
1 2 3 |
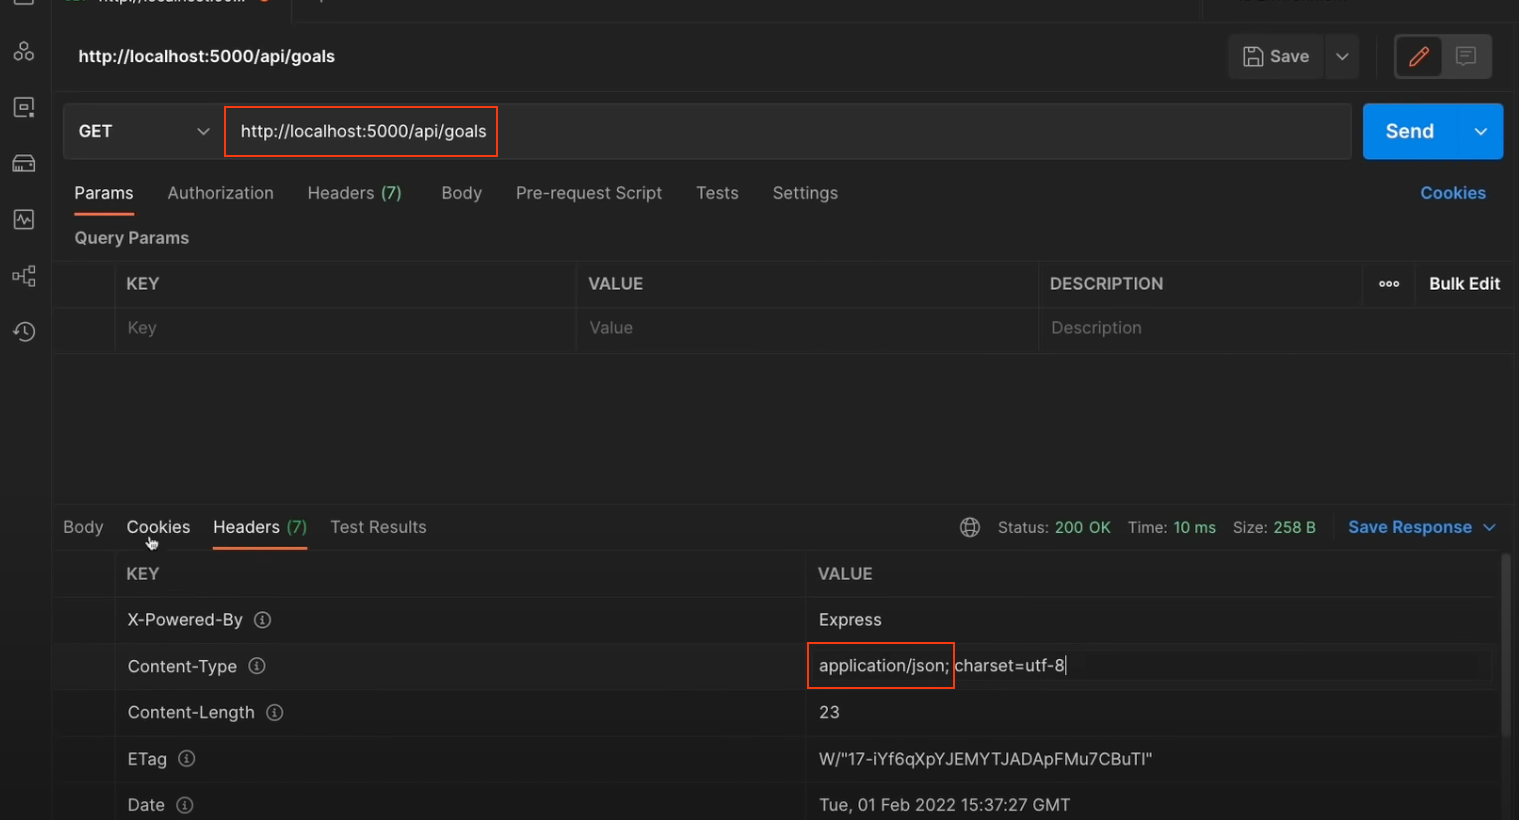
app.get('/api/goals', (req, res) => { res.status(200).send({message: 'Get Goals'}) }) |
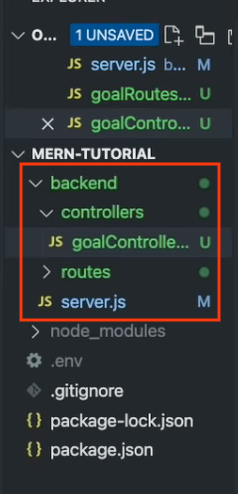
Create routes folder in backend folder.
Then create goalRoutes.js in routes folder.
goalRoutes.js
|
1 2 3 4 5 6 7 8 9 10 11 12 13 14 15 16 17 18 19 20 |
const express = require('express') const router = express.Router(); router.get('/', (req, res) => { res.status(200).send({message: 'Get Goals'}) }); router.post('/', (req, res) => { res.status(200).send({ message: 'Set Goals' }) }); router.put('/:id', (req, res) => { res.status(200).send({message: 'Update Goals ${req.params.id}'}) }); router.get('/:id', (req, res) => { res.status(200).send({ message: 'Delete goal ${req.params.id}' }) }); module.exports = router |
create controllers folder.
create goalController.js in controllers folder.
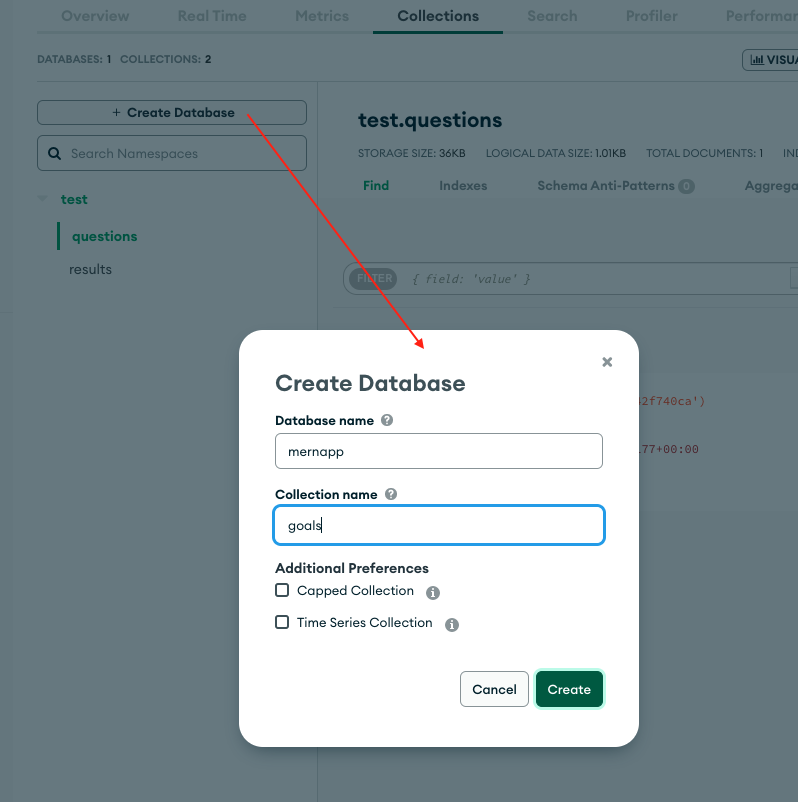
Create MongoDB
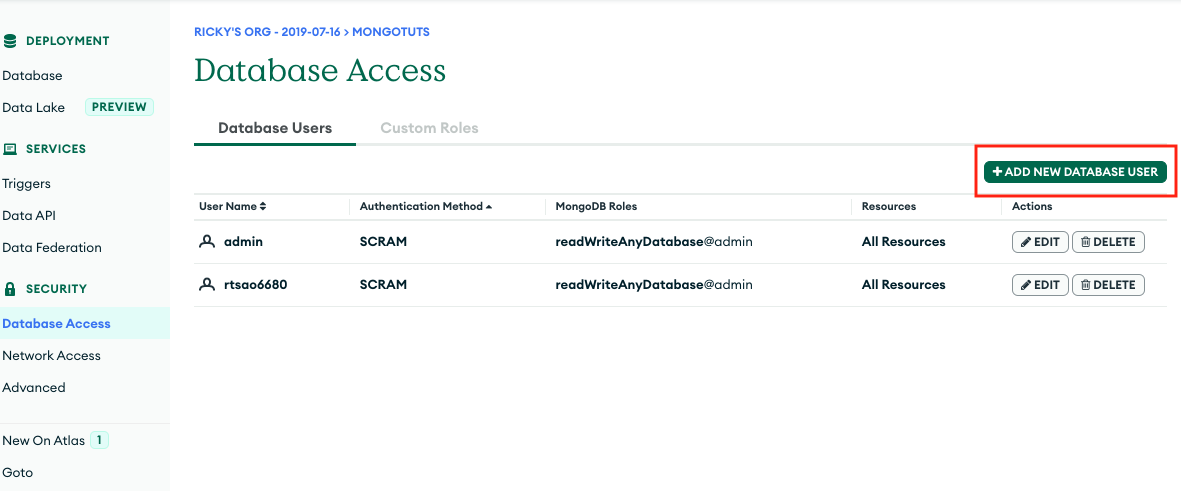
mongodb+srv://admin:admin@cluster0.z0xxwz0.mongodb.net/mernapp
.env
|
1 |
MONGO_URI=mongodb+srv://admin:admin@cluster0.z0xxwz0.mongodb.net/mernapp |
questionnaire env
questionnaire-node
ATLAS_URI=”mongodb+srv://admin:admin@cluster0.z0xxwz0.mongodb.net/?retryWrites=true&w=majority”
PORT=”8800″
SECRET_KEY = rickyabc
questionnaire react
REACT_APP_SERVER_HOSTNAME=’https://api.rickyabc.com’
REACT_APP_API_URL = ‘https://api.rickyabc.com/api’
PORT=3000
PUBLIC_URL=https://rickyabcenglish.com
Axios and fetch both returns a Promise object
ref –
- https://stackoverflow.com/questions/37555031/why-does-json-return-a-promise
- https://stackoverflow.com/questions/67043652/why-is-response-json-returning-a-promise
Fetch will return a Promise object rsp.
However, when you access json() of rps, it also returns a promise.
Why is this?
Because you receive the response as soon as all headers have arrived.
Calling .json() gets you another promise for the body of the http response that is yet to be loaded.
So when the headers have arrived, the promise for the fetch will resolve. But in order to the data from the body, you’ll have to wait for the promise from json() to resolve.
|
1 2 3 4 5 6 7 8 9 10 11 12 13 14 15 16 17 18 19 20 21 |
"use strict"; // Fetch a random joke async function fetchQuote() { const rsp = await fetch( "https://www.7timer.info/bin/astro.php?lon=113.2&lat=23.1&ac=0&unit=metric&output=json&tzshift=0"); const data = await rsp.json(); return data.product; } async function sayJoke() { try { let result = await fetchQuote(); document.writeln( `Joke: ${ result }` ); } catch( err ) { console.error( err ); } } console.log('-- begin --'); sayJoke(); |
Another way to do it is to receive the promise object from then callback.
It is a Promise, so we’ll have to wrap it with async.
This promise means the header has arrived. Then in order to receive the body data, we’ll have to do an await on the promise object’s json(), which returns another Promise.
Once this Promise resolves, it means the body data has arrived in data.
|
1 2 3 4 5 6 7 8 9 10 11 12 13 14 15 16 17 18 19 |
async function fetchQuote() { return await fetch( "https://www.7timer.info/bin/astro.php?lon=113.2&lat=23.1&ac=0&unit=metric&output=json&tzshift=0").then( async (promise) => { const data = await promise.json(); // console.log(data) // the whole JSON object return data.product; // return a property of the data }) } async function sayJoke() { try { let result = await fetchQuote(); document.writeln( `Joke: ${ result }` ); } catch( err ) { console.error( err ); } } console.log('-- begin test --'); sayJoke(); |
Quiz App
ref – https://www.youtube.com/watch?v=BNN4o4gnSF4
How to Operate
If you need to make updates to the questions and answer, make sure you delete existing object in questions collections.
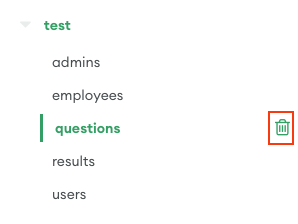
Then create a new object with Postman like so:
POST localhost:8080/api/questions
This way, it updates mongo db.
When there are already data in results and you want to clear it, in your Postman:
DELETE localhost:8080/api/result

In our results reducer, we keep state for wechat id, douyin id and the user’s results. All answers from this user will will be saved in this slice.
|
1 2 3 4 5 6 7 8 9 10 11 12 13 14 15 16 17 |
export const resultReducer = createSlice({ name: 'result', initialState : { douyinUserId : null, wechatUserId: null, result : [] }, reducers : { setDouyinUserId : (state, action) => { state.douyinUserId = action.payload }, setWechatUserId : (state, action) => { state.wechatUserId = action.payload }, ... ... }) |
Users and checking for existing users
First we check to see if the user’s wechat id or telephone exists.
When we start the app, we first save the user’s id from input to slice:
src/components/Main.js
|
1 2 3 4 5 6 7 |
const res = await checkIfUserExistInMongoDB(wechatId, mobile); if (Array.isArray(res) && res.length > 0) { const { mobile: respMobile, wechatUsername } = res && res.length && res[0]; if (respMobile || wechatUsername) { setMessage(ID_USED); } } |
We do a fetch using checkIfUserExistInMongoDB. It will return the user’s information if EITHER the wechat id or mobile matches. If it does, we throw out an error message.
If BOTH wechat id and mobile does not exist, we can proceed to save the data locally to the store:
src/components/Main.js
|
1 2 3 4 5 6 7 |
if(mobileInputRef.current?.value){ dispatch(setMobile(mobile)) } if (wechatInputRef.current?.value) { dispatch(setWechatUserId(wechatId)) } |
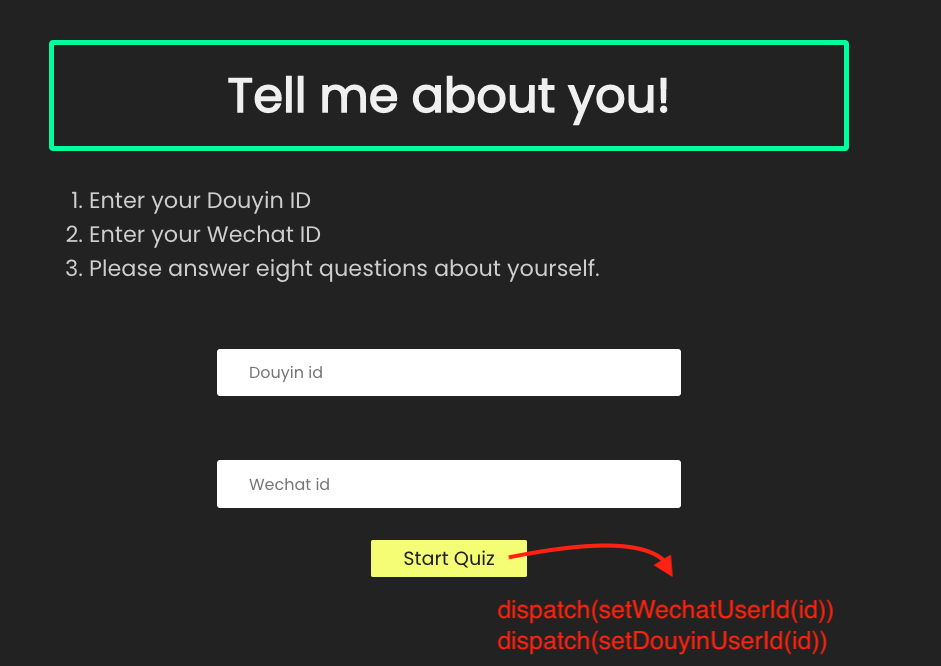
In startQuiz function, we dispatch actions generated from result_reducer.
src/redux/question_reducer.js
|
1 |
export const { setWechatUserId, setDouyinUserId, pushResultAction, resetResultAction, updateResultAction } = resultReducer.actions; |
we throw in the user entered string into the action.
src/components/Main.js
|
1 |
dispatch(setDouyinUserId(douyinInputRef.current?.value)) |
The action object gets into the reducer.
src/redux/result_reducer.js
|
1 2 3 4 5 6 7 8 9 10 |
reducers : { setDouyinUserId : (state, action) => { state.douyinUserId = action.payload }, setWechatUserId : (state, action) => { state.wechatUserId = action.payload }, ... ... } |
Question Reducer
Question reducer keeps track of what question index we’re on, the questions themselves, and the answers.
state:
queue is to represent the array of questions.
answers is to represent the array of answers the user inputs
questionIndex is to represent the cur of the data structure.
src/redux/question_reducer.js
|
1 2 3 4 5 6 7 8 9 10 11 12 13 14 15 16 17 18 19 20 21 22 23 |
export const questionReducer = createSlice({ name: 'questions', initialState : { queue: [], answers : [], questionIndex : 0 }, moveNextAction : (state) => { return { ...state, questionIndex : state.questionIndex + 1 } }, movePrevAction : (state) => { return { ...state, questionIndex : state.questionIndex - 1 } }, ... ... ... |
When the next button is clicked, we dispatch an action to move the question index forward.
When the prev button is clicked, we dispatch an action to move backwards.
This is very similar to how a custom array would work. We have the array data, but keep a cur to keep track of what index we’re on.
src/hooks/FetchQuestion.js
|
1 2 3 4 5 6 7 |
export const MoveNextQuestion = () => async (dispatch) => { try { dispatch(Action.moveNextAction()); /** increase trace by 1 */ } catch (error) { console.log(error) } } |
Okay, so this is all happening in the store.
But for the UI, before we even touch the store, we need to create local state in order to get the user selected radio index. So we define value for the radio button index that the user has checked:
src/components/Quiz.js
|
1 |
const [checkedIndex, setCheckedIndex] = useState(undefined) |
We then get the current question by getting the questionIndex and using it to get the element in queue.
|
1 2 3 4 5 |
const aQuestion = useSelector(state => { const questionIndex = state.questions.questionIndex; const questionsArr = state.questions.queue; return questionsArr[questionIndex]; }); |
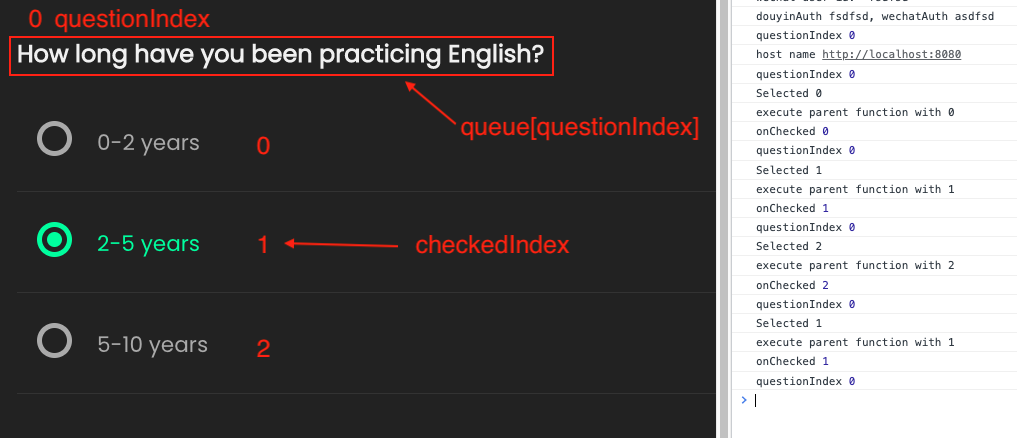
Now we render the options associated with this question object.
As you know aQuestion is an object from the store.
It contains:
- question
- id – the id of the whole question
- options – an array of answer values. Thus, we use map to iterate through all the answer available.
src/components/Questions.js
|
1 2 3 4 5 6 7 8 9 10 11 12 13 14 15 16 17 18 |
{<ul key={aQuestion?.id}> { aQuestion?.options.map((answer, index) => ( <li key={index}> <input type="radio" value={false} name="options" id={`q${index}-option`} onChange={() => onSelect(index)} /> <label className='text-primary' htmlFor={`q${index}-option`}>{answer}</label> <div className={`check ${result[questionIndex] == index ? 'checked' : ''}`}></div> </li> )) } </ul>} |
Fetching that Question object
So we see how we retrieve the question object from the store. But how did we fetch from the web?
We use a custom hook called useFetchQestion.
src/components/Questions.js
|
1 |
const [{ isLoading, apiData, serverError}] = useFetchQestion(); |
It runs whenever our Question component is refreshed.
We start off basics. We use local state to show:
|
1 |
const [getData, setGetData] = useState({ isLoading : false, apiData : [], serverError: null}); |
- isLoading – whether something is loading/done
- apiData – data container from the response object
- serverError – will have data when/if error occurs
We initialize local data to default. As long as the component does not update, we use the same dispatch reference.
Note:
Its safe to add dispatch to the dependency array because its identity is stable across renders.
The doc says like in React’s useReducer, the returned dispatch function identity is stable and won’t change on re-renders
unless you change the store being passed to the , which would be extremely unusual
In similar situation, the dispatch function reference will be stable as long as the same store instance is being passed to the
However, the React hooks lint rules do not know that dispatch should be stable, and will warn that the dispatch variable should be added to dependency arrays for useEffect and useCallback. The simplest solution is to do just that:
|
1 2 3 4 5 6 7 8 |
export const Todos = () => { const dispatch = useDispatch() useEffect(() => { dispatch(fetchTodos()) // Safe to add dispatch to the dependencies array }, [dispatch]) } |
Using and declaring async IIFE function in the effect to fetch data
In useEffect, we must give the declaration and immediately invoke it in order for the async operation to be part of the effect. Thus that’s why we declare the function, and then execute it.
If there is an error, we set local data isLoading to false so any kind of spinner can stop.
We also pass the error object to serverError.
|
1 2 3 4 5 6 7 8 |
(async () => { try { dispatch(Action); } catch (error) { setGetData(prev => ({...prev, isLoading : false})); setGetData(prev => ({...prev, serverError : error})); } })(); |
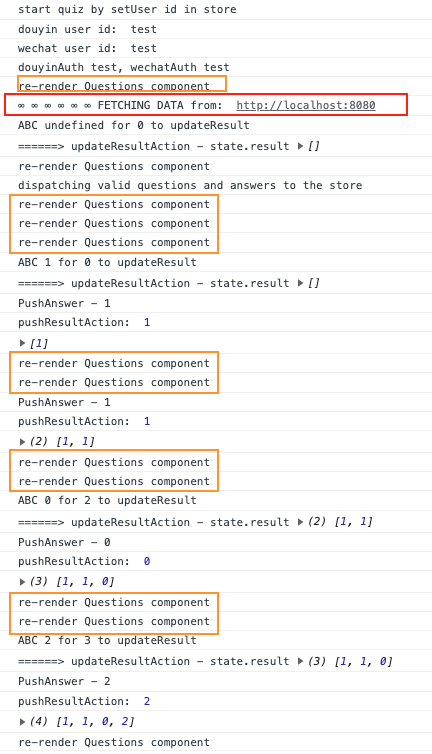
Successfully fetching the data
|
1 |
const [{ questions, answers }] = await getServerData(`${process.env.REACT_APP_SERVER_HOSTNAME}/api/questions`, (data) => data) |
Where getServerData awaits on an axios’s get on url http://localhost:8080/api/questions
src/helper/helper.js
|
1 2 3 4 |
export async function getServerData(url, callback){ const data = await (await axios.get(url))?.data; return callback ? callback(data) : data; } |
ref – http://chineseruleof8.com/code/index.php/2022/12/16/axios-and-fetch-both-returns-a-promise-object/
So we see two awaits. First, we return a promise when the headers arrive. This is to let us know that the get response has returned. But in order to the get json data response, we’ll have to call json() to get another Promise object, which resolves to our data. Hence this is why we need a 2nd await.
After data returns, we create an array holder for it.
If questions array is valid, we first set local isLoading to false to say we’re done fetching data.
|
1 2 3 |
if(questions.length > 0) { setGetData(prev => ({...prev, isLoading : false})); setGetData(prev => ({...prev, apiData : questions})); |
Then, we apply questions to local state apiData. Once we have have apiData, getData will have the valid data to be used and we return it from the functional component. However, in our app we don’t use this apiData data. We would fetch from the store as will be explained later.
src/components/Questions.js
|
1 |
const [{ isLoading, apiData, serverError}] = useFetchQestion(); |
After we dispatch action startExamAction, it goes to our question reducer startExamAction and the data is loaded from the action object’s payload.
We then assign them to the slice’s state:
src/redux/question_reducer.js
|
1 2 3 4 5 6 7 8 9 10 11 12 13 14 15 16 |
export const questionReducer = createSlice({ name: 'questions', initialState : { queue: [], answers : [], questionIndex : 0 }, reducers : { startExamAction : (state, action) => { let { question, answers} = action.payload return { ...state, queue : question, answers } }, |
Pushing Next button
When the next button is pushed, it will evaluate what question index we’re on from the state.questions via question index.
If it’s still within the index of the last question, we will update the state to the next question.
src/components/Quiz.js
|
1 2 3 4 5 6 7 8 9 10 11 12 13 14 15 16 17 18 |
const { queue, questionIndex } = useSelector(state => state.questions); const result = useSelector(state => state.result.result); ... ... function onNext() { if(questionIndex < queue.length){ // increase the trace value by one using MoveNextAction dispatch(MoveNextQuestion()); // insert a new result in the array if(result.length <= questionIndex) { dispatch(PushAnswer(checkedIndex)) } } setCheckedIndex(undefined) } |
dispatch(MoveNextQuestion()) will increase the questionIndex:
src/redux/question_reducer.js
|
1 2 3 4 5 6 |
moveNextAction : (state) => { return { ...state, questionIndex : state.questionIndex + 1 } }, |
Once questionIndex is updated, then when we retrieve a question object from the store, it will update:
src/components/Questions.js
|
1 2 3 4 5 |
const aQuestion = useSelector(state => { const questionIndex = state.questions.questionIndex; // updated ! const questionsArr = state.questions.queue; // queue keeps array of question objects. return questionsArr[questionIndex]; }); |
We know that questionIndex gets updated from pressing Next button, how does it get rendered?
How does Question data get rendered?

|
1 2 3 4 5 6 7 8 9 10 11 12 13 14 15 16 17 18 19 20 21 |
// data fetching and retrieving const [{ isLoading, apiData, serverError}] = useFetchQestion(); // fetch data and place into store const aQuestion = useSelector(state => { // fetches question object from store }); // question index logic const [checked, setChecked] = useState(undefined) const { questionIndex } = useSelector(state => state.questions); useEffect(() => { dispatch(updateResult({ questionIndex, checked})) }, [checked]) function onSelect(i) { ... setChecked(i) // updateResult dispatch(updateResult({ questionIndex, checked})) } |
Keeping track of the question index
questionIndex is increased/decreased via MoveNextQuestion.
|
1 2 3 4 5 6 7 8 9 10 |
const { queue, questionIndex } = useSelector(state => state.questions); ... ... function onNext() { if(questionIndex < queue.length){ } } |
Redux-Saga with Redux-Toolkit | Movie Search App
ref – https://www.youtube.com/watch?v=DPOzlL1fpnU
npx create-react-app movie-app
npm install @mui/material @emotion/react @emotion/styled
npm install @mui/material react-redux @reduxjs/toolkit redux-saga react-router-dom axios
First, we have a simple Promise that fetches data from the server.
This is a non-blocking operation, because it involves I/O with the web environment.
Thus when we asynchronously execute the fetch, we can let it process and go on to other tasks.
src/redux/api.js
|
1 2 3 4 5 6 7 8 |
import axios from "axios"; const REACT_APP_MOVIE_API_KEY = '924f6884'; const API_ENDPOINT = `https://www.omdbapi.com/?i=tt3896198&apikey=${REACT_APP_MOVIE_API_KEY}`; export const fetchMovies = async (movieName) => { return axios.get(`${API_ENDPOINT}&s=${movieName}`); } |
Since we asynchronously execute the fetch, we use call. This is because call stops the saga middleware and waits for its operation to finish.
Once we get the response, then we continue on. fetchMovies still processes it asynchronously.
Finally, we use put (non-blocking) to put the data in the store. (We have received the data already, so storing data can be done asynchronously here)
src/redux/movieSagas.js
|
1 2 3 4 5 6 7 8 9 10 11 12 13 14 15 16 17 18 19 20 21 22 23 |
import { takeLatest, put, fork, call } from "redux-saga/effects"; import { getMovies, setMovies } from "./feature/movieSlice"; import { fetchMovies } from "./api"; function* onLoadMoviesAsync({payload}) { try { const movieName = payload; const response = yield call(fetchMovies, movieName); // call stops saga middleware and waits for fetchMovies's response. console.log('response status: ', response.status); // we're looking for 200 to be successful if (response.status===200) { console.log(`response successful`); yield put(setMovies({...response.data})); } } catch (error) {} } function *onLoadMovies() { yield takeLatest(getMovies.type, onLoadMoviesAsync) } export const movieSagas = [fork(onLoadMovies)]; |
and executes onLoadMoviesAsync when it receives that message.
Notice that takeLatest listens for getMovies.type, which logs ‘movie/getMovies’. But how did it create this tring?
It takes the name property of the slice:
|
1 2 3 4 5 6 7 8 9 |
const movieSlice = createSlice({ name: "movie", initialState: { moviesList: [], movie: {} }, ... ... }); |
and then append the action name “getMovies” behind it.
src/redux/feature/movieSlice.js
|
1 |
export const { getMovies, setMovies } = movieSlice.actions; |
If you log getMovies, which is a function reference, you’ll see that it creates an action for you:
|
1 2 3 4 5 6 7 8 9 10 11 12 13 14 15 16 17 18 19 20 21 22 23 24 25 26 27 |
export function createAction(type: string, prepareAction?: Function): any { function actionCreator(...args: any[]) { // start if (prepareAction) { let prepared = prepareAction(...args) if (!prepared) { throw new Error('prepareAction did not return an object') } return { type, payload: prepared.payload, ...('meta' in prepared && { meta: prepared.meta }), ...('error' in prepared && { error: prepared.error }), } } return { type, payload: args[0] } } // end actionCreator.toString = () => `${type}` actionCreator.type = type actionCreator.match = (action: Action<unknown>): action is PayloadAction => action.type === type return actionCreator } |
type is passed in from createAction from another execution so we know that we’re being used as a curried function.
Run the app and we start with initial state:
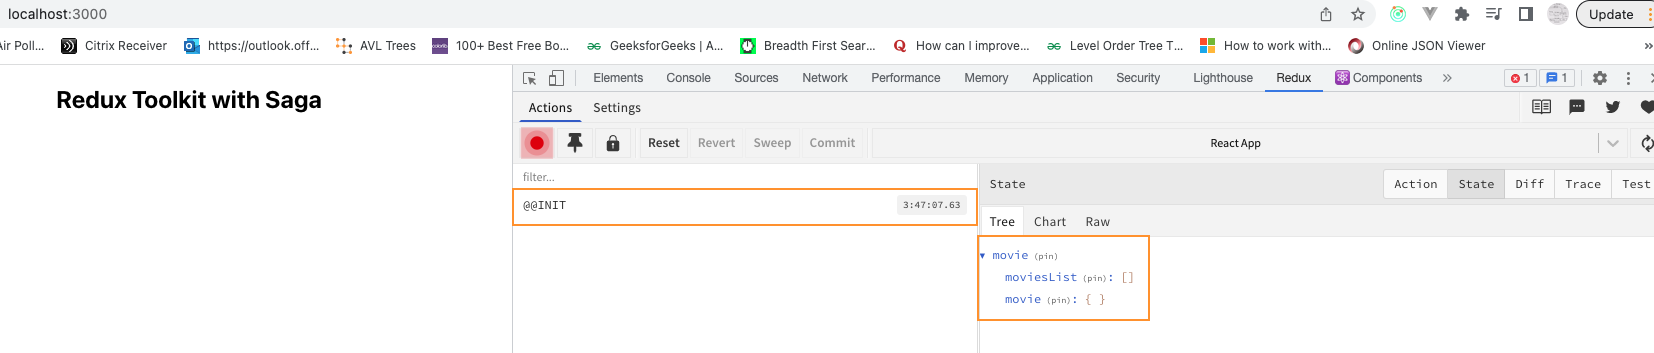
Then we do a get movies, which returns the initial state:

We run our dispatch getMovies in useEffect of our Search component, which has default value ‘spider’ and get a return of all movies with spider keyword.
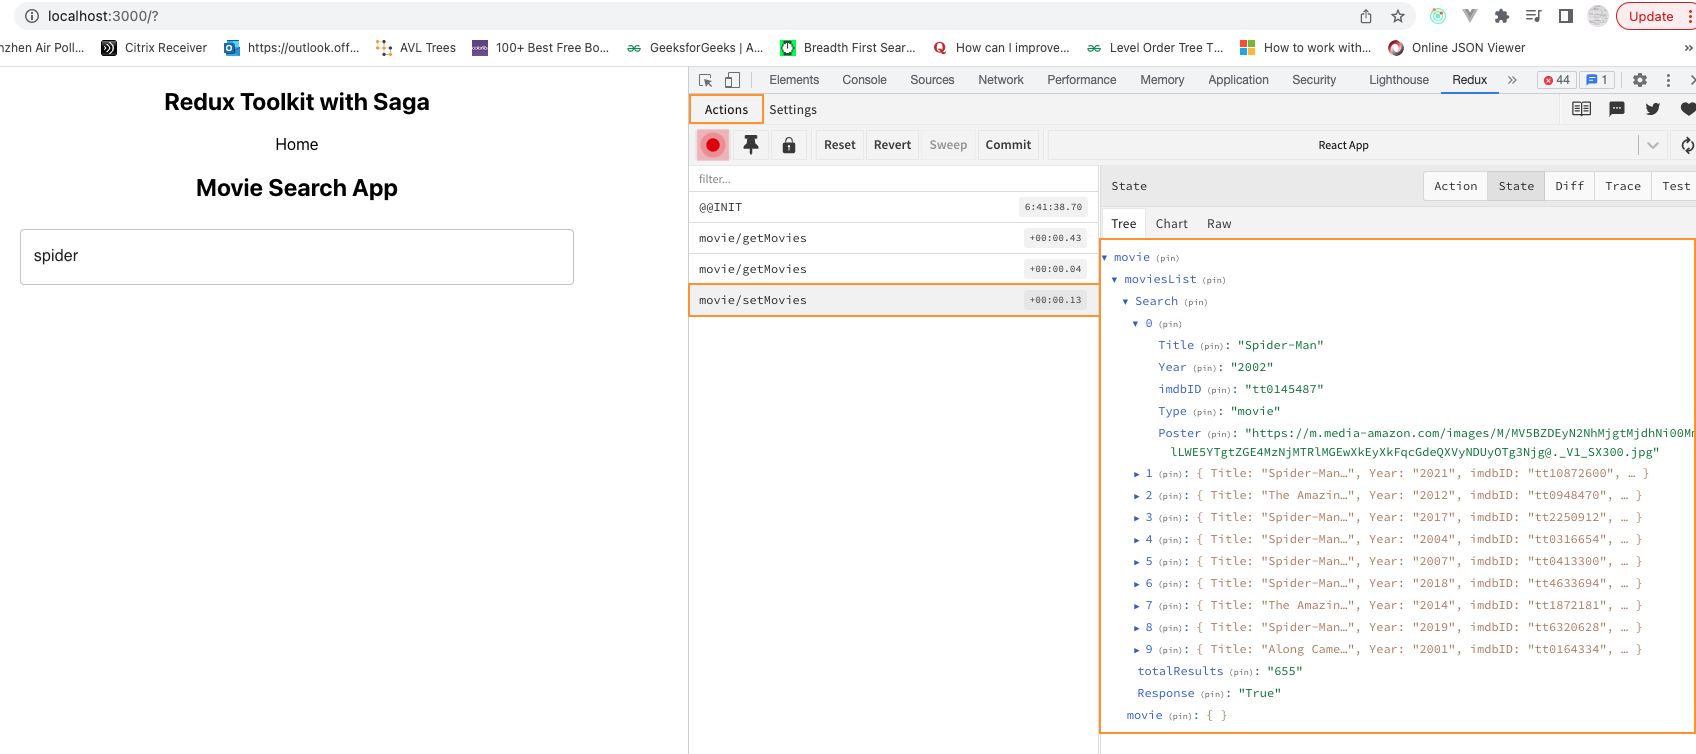
– 38:00 at the video
Receipt App Redux Saga
ref – https://www.youtube.com/watch?v=4s2bTUbKNUs
https://stackoverflow.com/questions/71713111/mui-installation-doesnt-work-with-react-18
demo (search keyword and receives data)
Create the app.
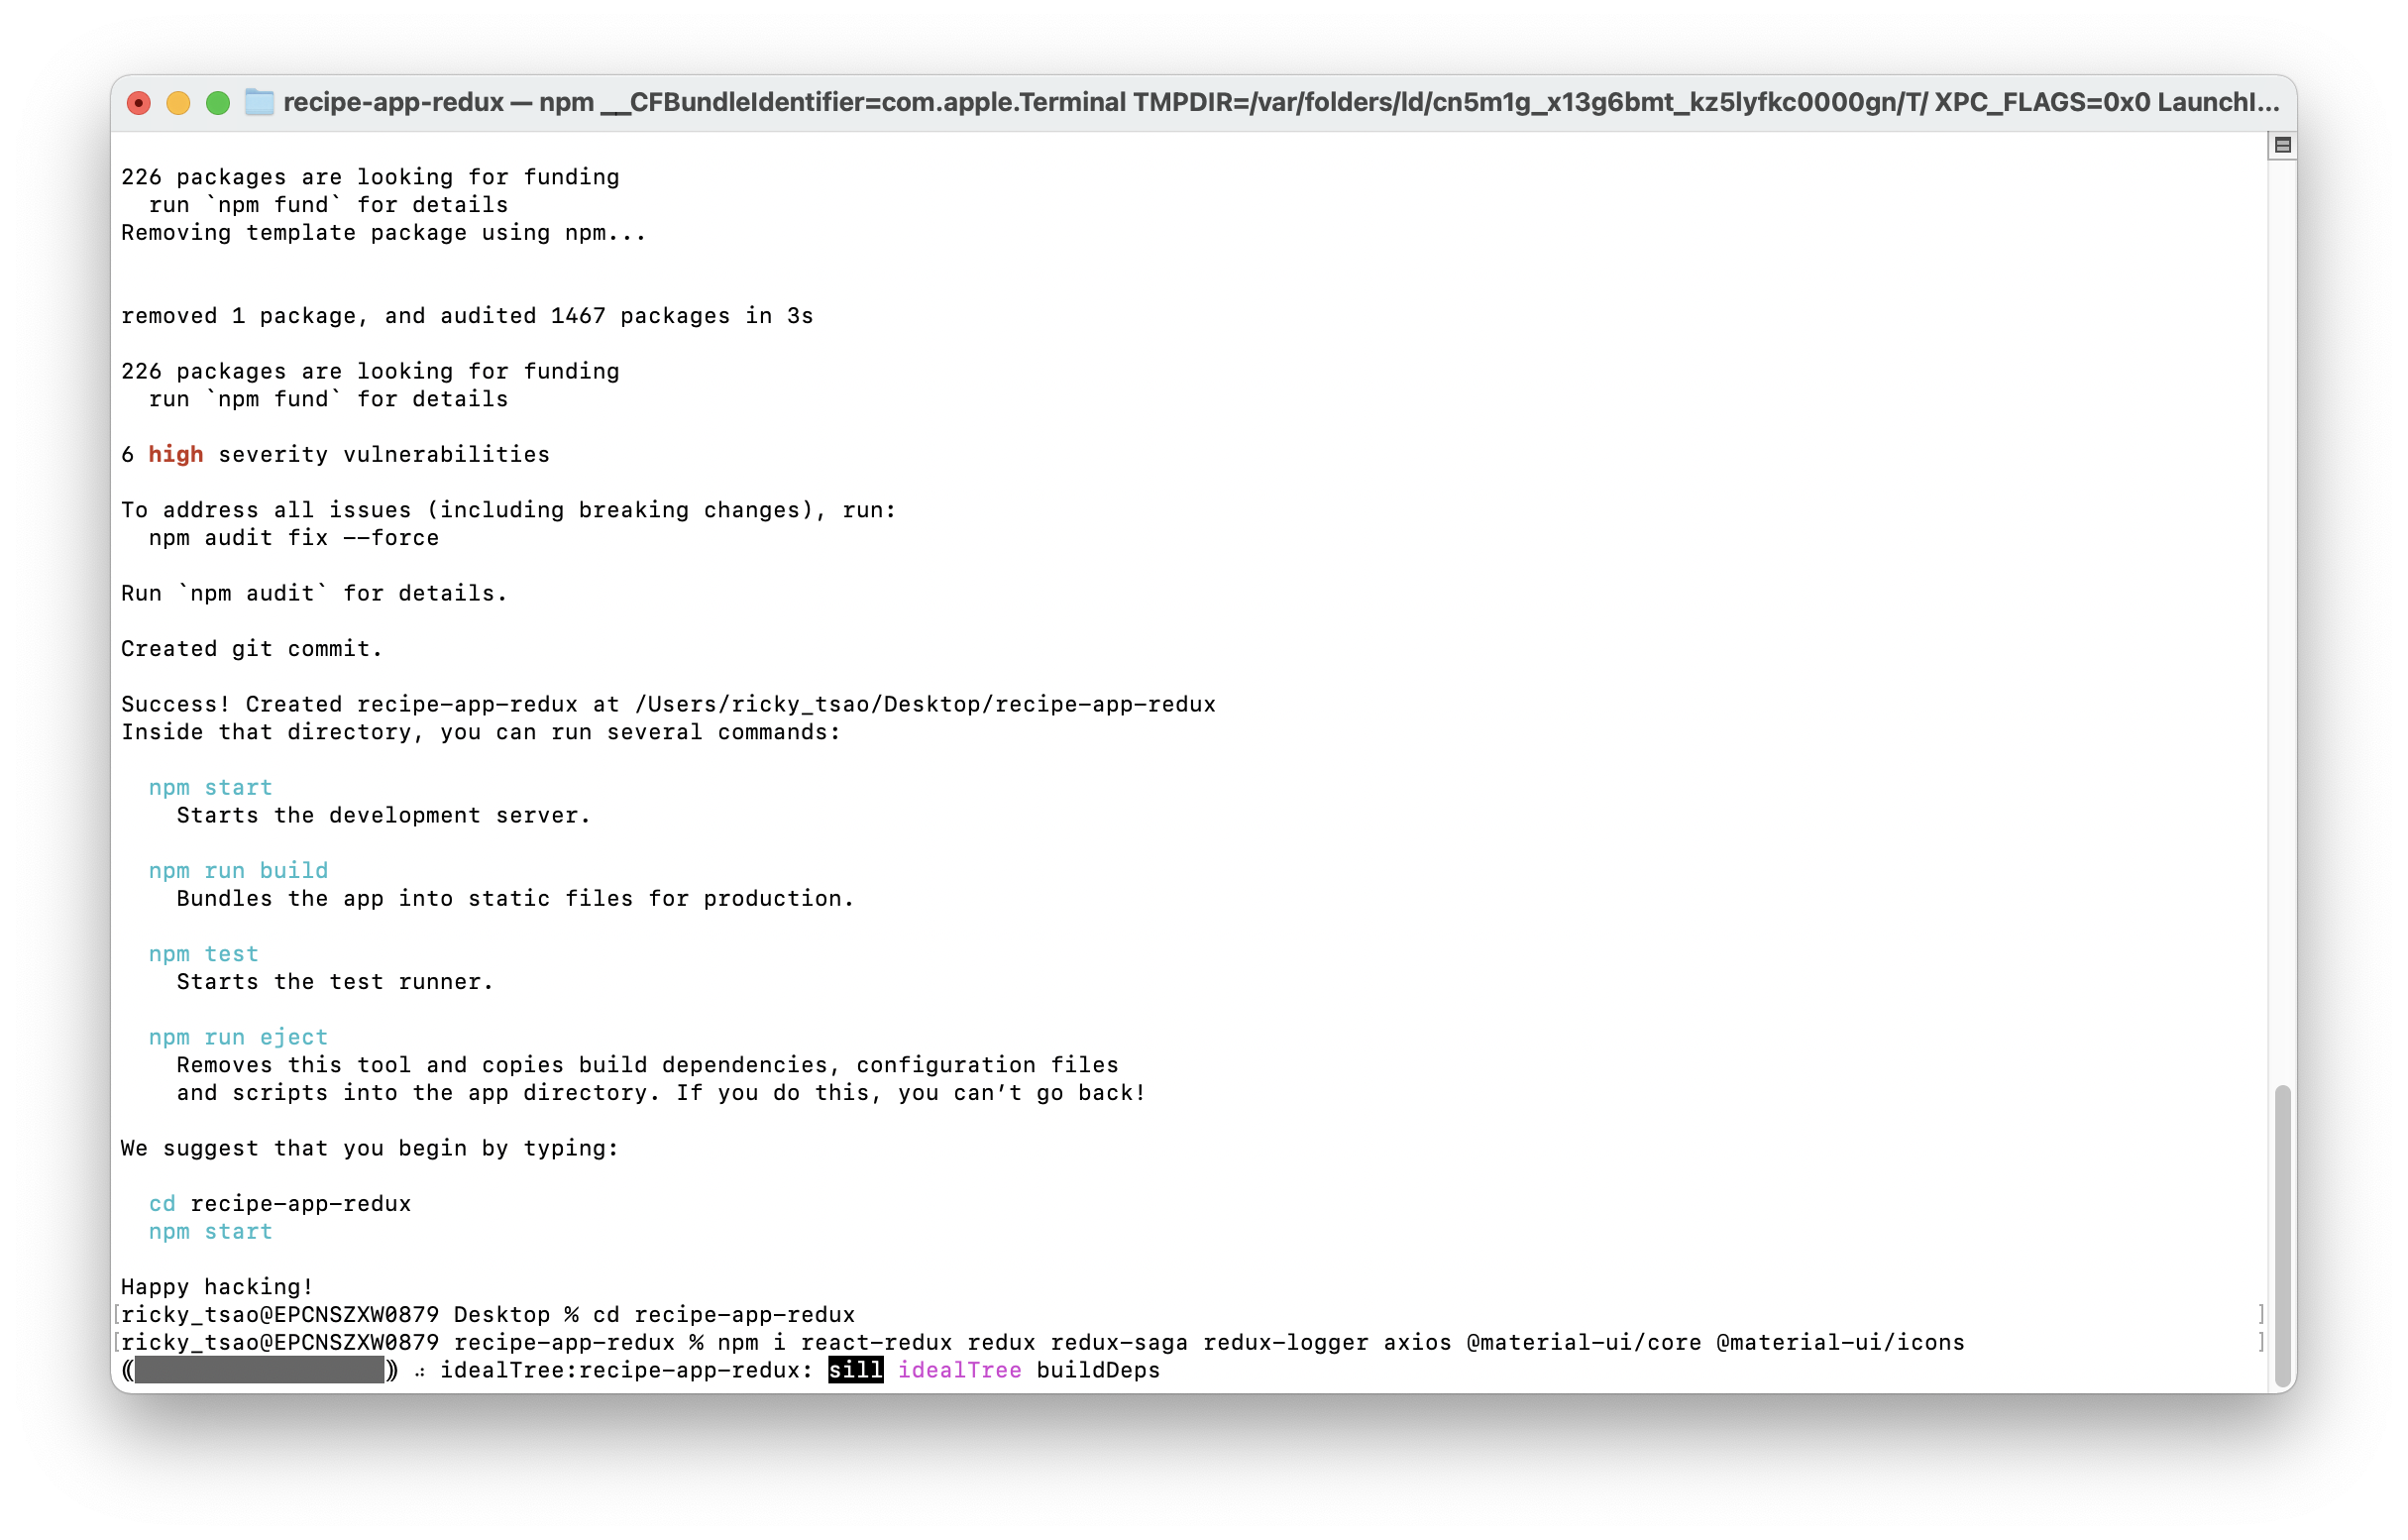
npx create-react-app recipe-app-redux
cd receipe-app-redux
Install packages required to build this app.
npm i react-redux redux redux-saga redux-logger
npm i axios
npm install @mui/material @emotion/react @emotion/styled –legacy-peer-deps
npm install @mui/icons-material –legacy-peer-deps
First, we create a saga middleware.
then we insert the middleware into the store.
Finally, we run imported root saga in our saga middleware.
src/redux/store.js
|
1 2 3 4 5 6 7 8 9 10 11 |
import rootSaga from "./sagas"; // 1) create the saga middle ware const sagaMiddleWare = createSagaMiddleware(); // 2) insert the middleware into the store const middleware = [sagaMiddleWare]; const store = createStore(rootReducer, applyMiddleware(...middleware)); // 3) run root saga in saga middleware sagaMiddleWare.run(rootSaga); |
First know that whenever we dispatch an action for type FETCH_RECIPE_START, we will execute onLoadRecipeAsync.
takeLatest listens for action types (i.e FETCH_RECIPE_START), and then execute the corresponding function (i.e onLoadRecipeAsync)
(note: for takelatest, if task A was started previously and still running, we cancel the current one)
Hence takelatest is like registering for event listeners. Thus we need to execute this ‘registration’ via fork. Fork is non-blocking because
we want to asynchronously do this registration.
We then use all to make sure all “async registrations” (i.e recipeSaga) are run in parallel and wait for all of them to complete.
fork vs call
First, some concepts.
ref –
- https://stackoverflow.com/questions/47798900/redux-saga-call-vs-fork-and-join
- https://stackoverflow.com/questions/42938520/redux-saga-when-to-use-fork/42961360#42961360
|
1 2 3 4 5 6 7 8 9 |
function* main() { yield fork(someSaga); console.log('this won't wait for the completion of someSaga'); } function* main() { yield call(someSaga); console.log('this will wait for the completion of someSaga'); } |
src/redux/sagas.js
|
1 2 3 4 5 6 7 8 9 |
export function* onLoadRecipe() { yield takeLatest(types.FETCH_RECIPE_START, onLoadRecipeAsync); } const recipeSaga = [fork(onLoadRecipe)]; // non-blocking export default function* rootSaga() { yield all([...recipeSaga]); } |
so essentially, what we’re doing here is to make sure we register all takeLatest, which registers event listeners for action type to functions.
Now, let’s look at the worker function onLoadRecipeAsync. What we’re trying to do here is to run a getRecipes function with some query data. getRecipes just makes a request to a server somewhere. THEN, we put the response data into the reducer. These two steps must be synced. Step 1 must finish first, then step 2 can go.
Hence that’s why we use call. getRecipes itself is a Promise, so it runs asynchronously, but we use call to pause saga so that the next saga effect will wait for the response of this saga effect.
src/redux/sagas.js
|
1 2 3 4 5 6 7 8 9 10 11 12 13 |
export function* onLoadRecipeAsync({ query }) { try { // we use call here because we MUST (block) make sure the next line of code waits for the response: they must be sync. // 1) we query and get data first. We need to WAIT for the return of this data. const response = yield call(getRecipes, query); // is blocking // if it returns a promise, it pauses the saga until the promise is resolved. // 2) Only then, put data into reducer (non-blocking) yield put({type: types.FETCH_RECIPE_SUCCESS, payload: response.data}); } catch (error) { } } |
After receiving the response, we can then use put to put the data into the reducer. put is non-blocking. (We have received the data already…storing data can be done asynchronously here)
Fetching the Data
The word non-blocking is usually used with I/O, while asynchronous is used in a more generic sense with a broader range of operations.
But few major differences are:1) Asynchronous does not respond immediately, While Nonblocking responds immediately if the data is available and if not that simply returns an error.2) Asynchronous improves the efficiency by doing the task fast as the response might come later, meanwhile, can do complete other tasks.
Fetching the data is simply a Promise. It asynchronously does an I/O operation for fetch in the web environment using axios. Thus, this is non-blocking.
src/redux/api.js
|
1 2 3 4 5 |
// returns a promise export const getRecipes = async (query) => { const url = `https://api.edamam.com/search?q=${query}&app_id=${APP_ID}&app_key=${APP_KEY}&from=0&to=3&calories=591-722&health=alcohol-free`; return await axios.get(url); }; |
Notice that we use call to execute getRecipes which returns a promise. call is blocking, while getRecipes is async. So is this all blocked or simply all async? The answer is that due to getRecipes being an I/O operation for the web environment, it is non-blocking. So UI still functions. The blocking part from call pauses the saga middleware so that future middleware must wait for its data response.
Implementing the UI
todo – use Antd for UI since now we have all the data.
Refresh Tokens and reuse detection
Functionalities
Simple log in, log out
First make sure there are no previous cookies in your browser.
![]()
Simply log in, and make sure we receive a refresh token.
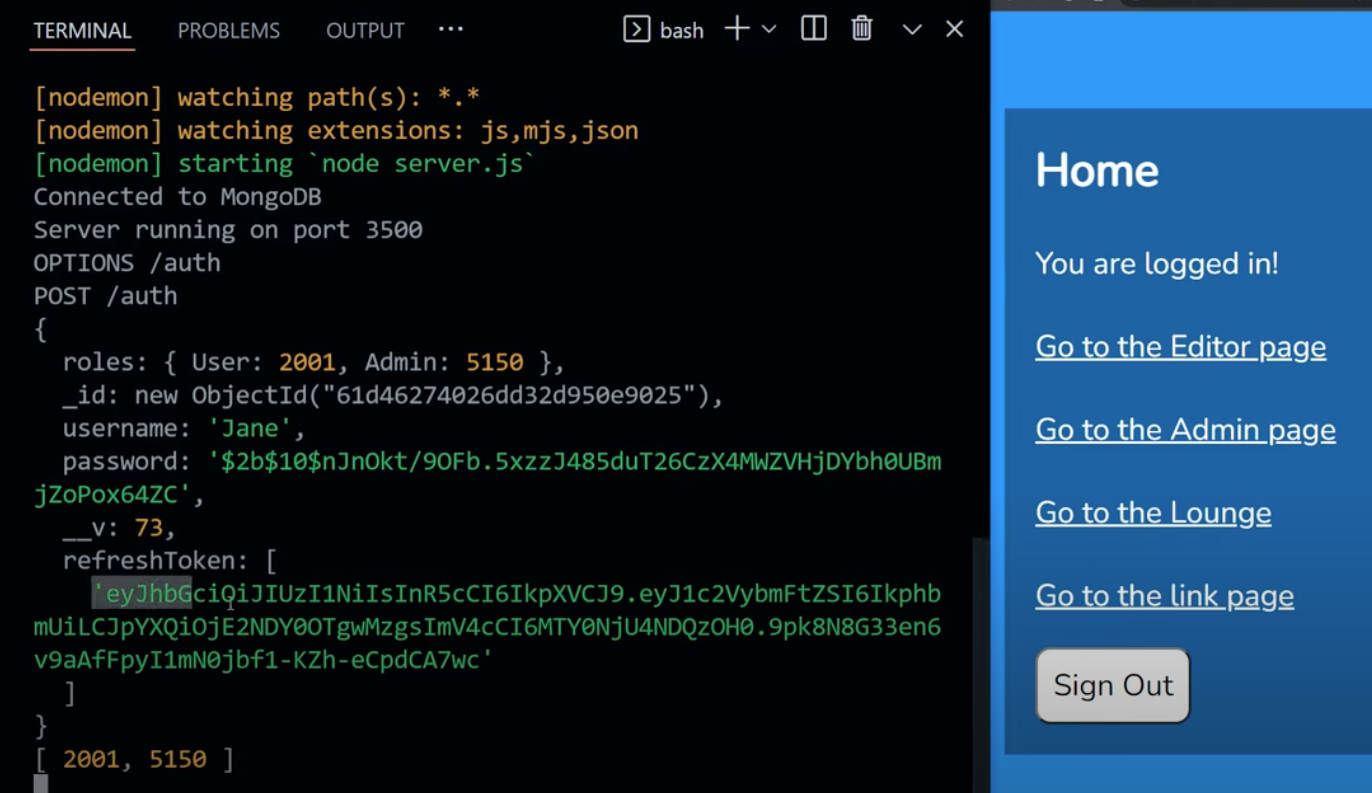
When we log out, make sure our refresh token array is emptied.
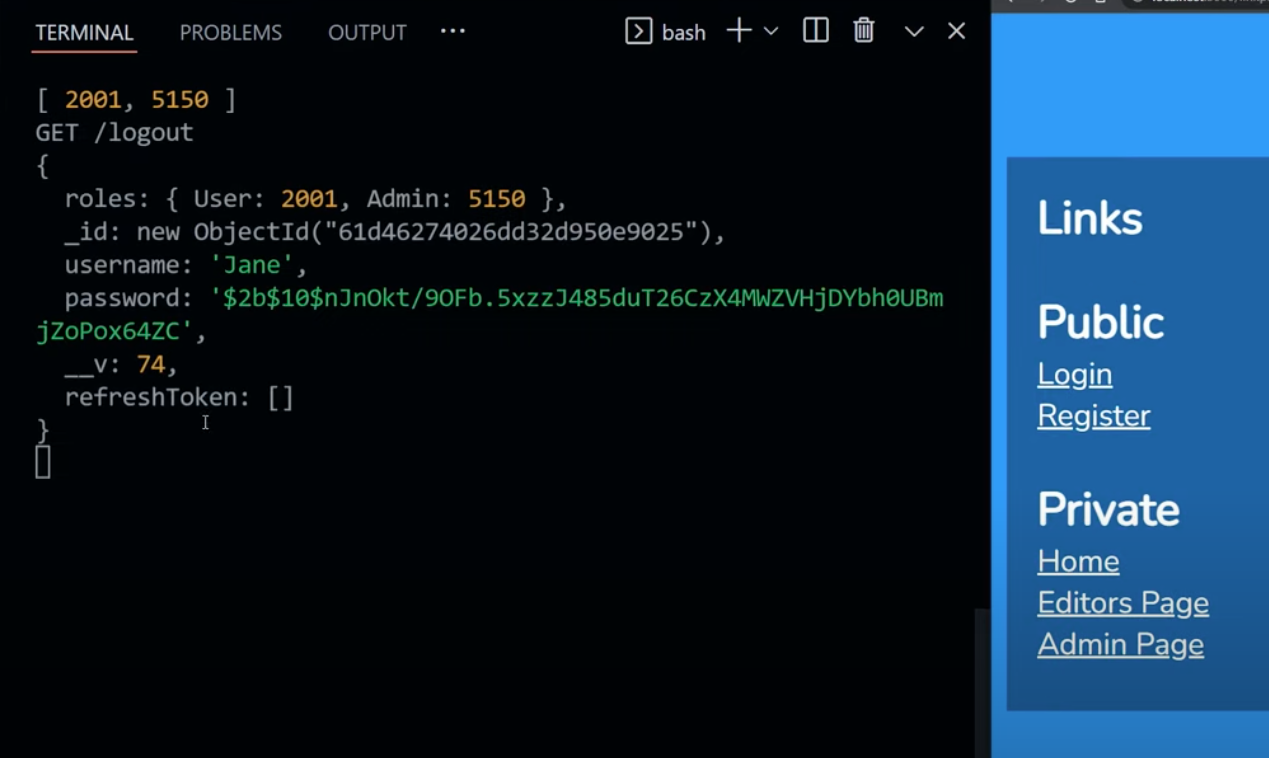
Visit /login with previous refresh token in cookie
First, we have a token (expired or not is ok) in our cookie.
When we look at the cookie on the server side, make sure the jwt token is there.

So whenever we hit /login url, it will execute handleLogin on the server.
We find the user from User Collections, then make sure the passwords match via bcrypt.compare
This tells us if we have a valid user.
If we do, we simply create a new access token and refresh token combo. This is always true, when the user visits /login
Now, the question is, what do we do if we already have a previous refresh token? (embedded in the cookie)

The answer is, we check to see if the previous token exists in the user’s refresh token array. We KEEP any refresh token that does NOT match the previous refresh token.
This is because we don’t want/care about the previous refresh token when we visit /login
We filter it out!
|
1 2 3 4 |
let existingTokenArray = foundUser.refreshToken; let newRefreshTokenArray = !cookies?.jwt ? existingTokenArray // if there is no previous token, do nothing : existingTokenArray.filter(rt => rt !== cookies.jwt); // there is a previous token, let's filter it out from our user's token array |
If the user has logged in AND there is a jwt embedded in the cookie, we simply clear the cookie. This way, we force the newly logged in user to use the latest created refresh token.
|
1 |
res.clearCookie('jwt', { httpOnly: true, sameSite: 'None', secure: true }); |
The next step is that we go the normal route. We ADD newly created refresh token to the user’s refresh token array.
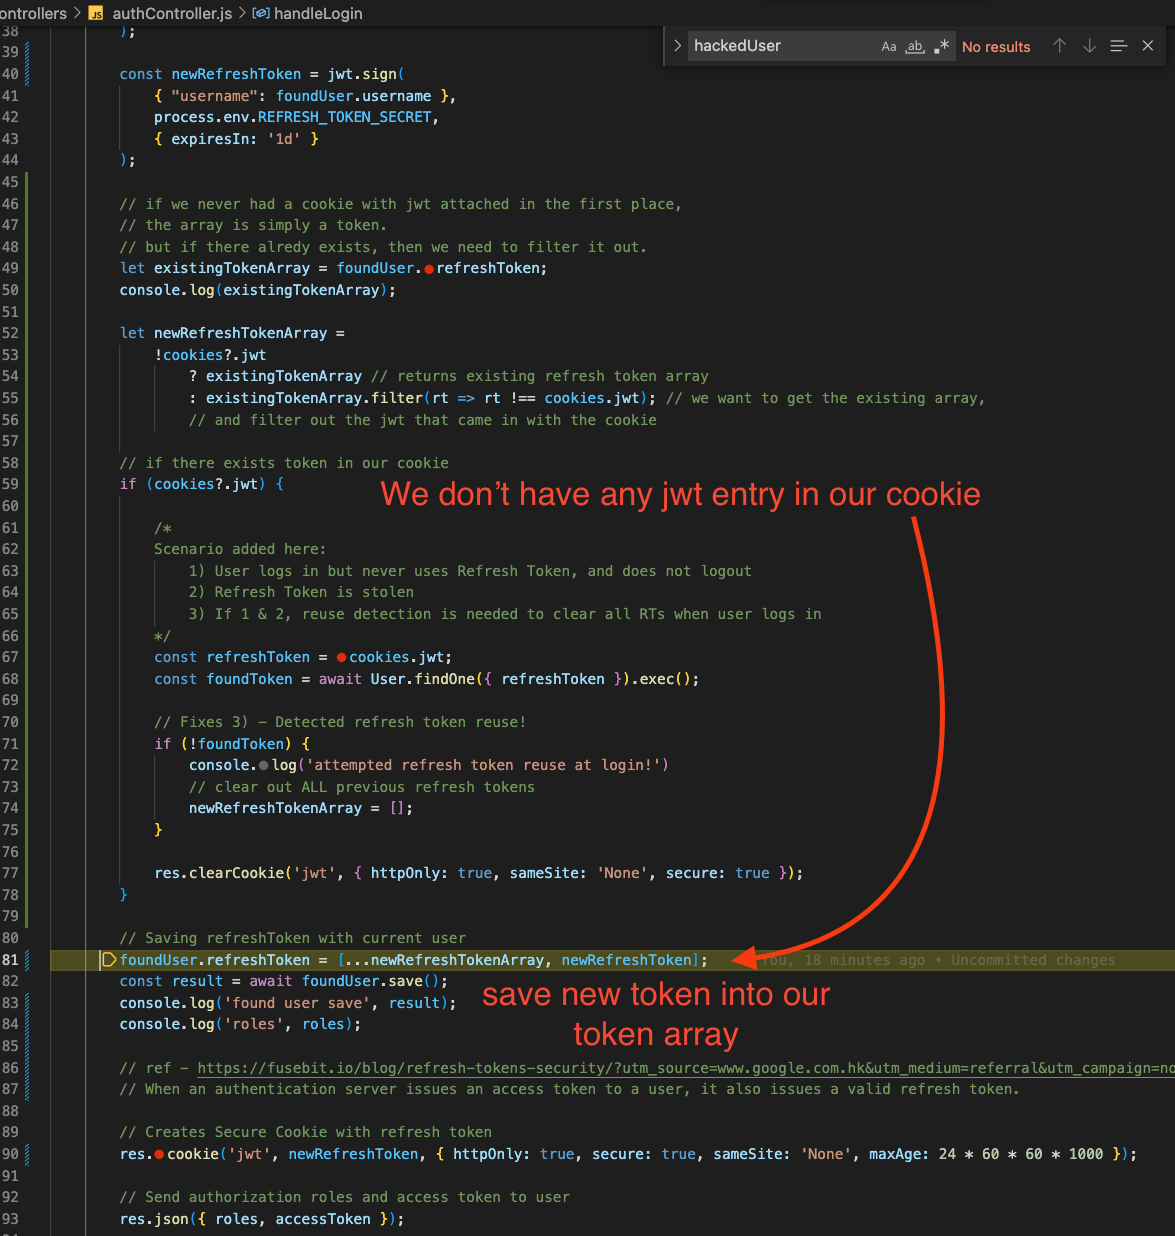
Using expired token
* make sure your refresh token is set to 60 seconds.
right before you sign in, there may be expired tokens from previous usage.
Log in (/login) you’ll get an access and refresh token.

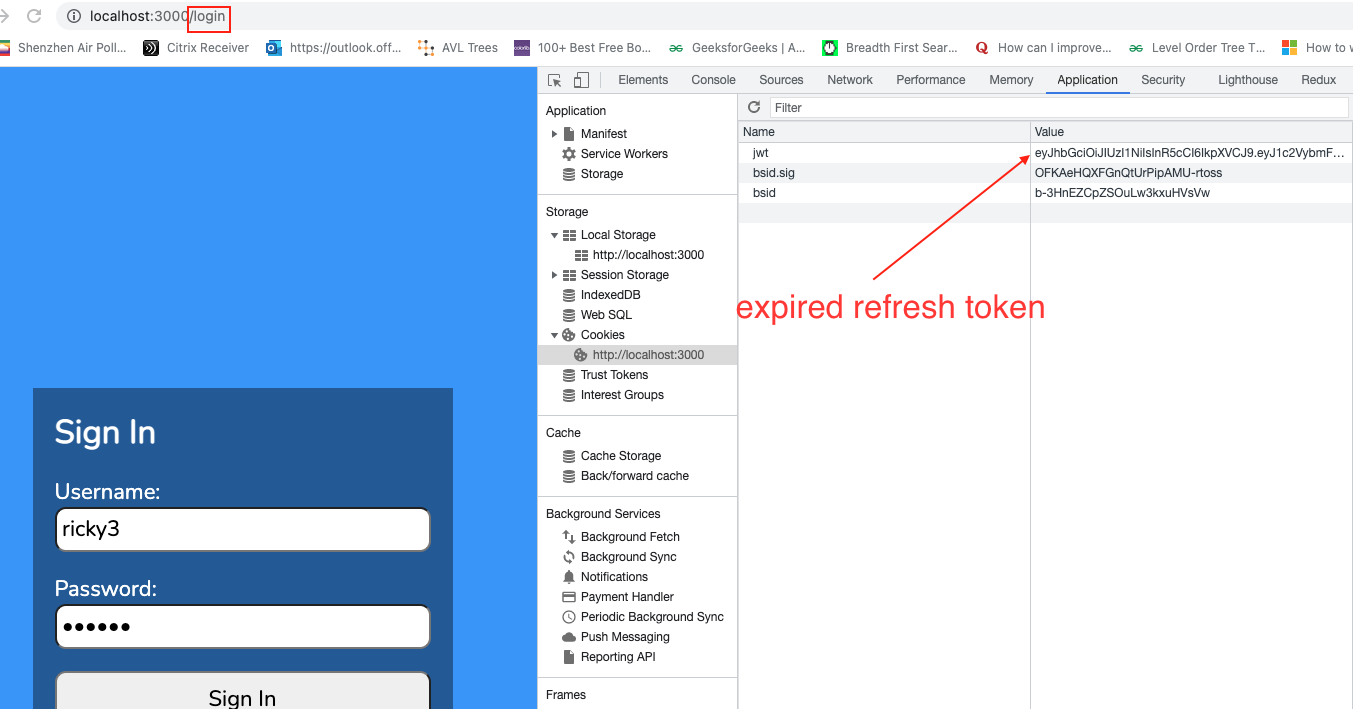
Click on the admin link. Look at the refresh token.
In Cookies, click on jwt, and copy the token.
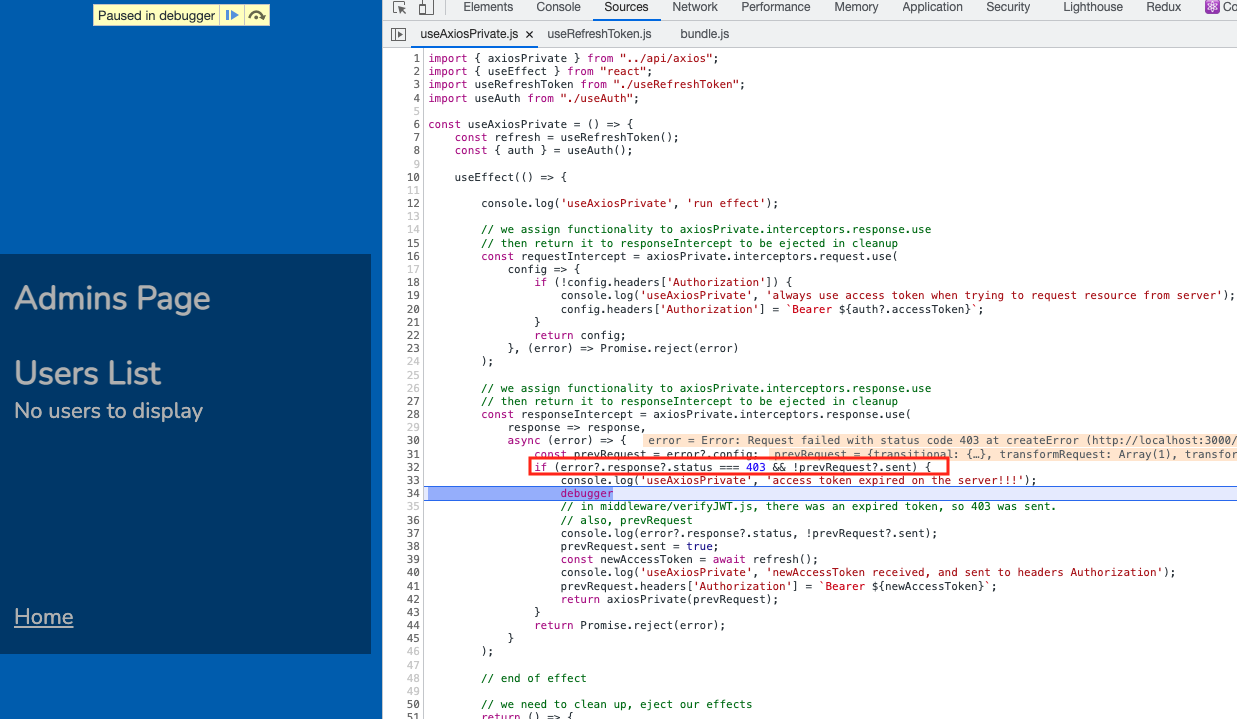
Then click on Home, Wait for 60 seconds for it to expire. Click on the admin link again. This time, verifyJWT on the server side will detect that it has an expired refresh token:

The backend will return a 403 to the client. The client response interceptor gets the 403 and proceeds to do a request for a new refresh token:
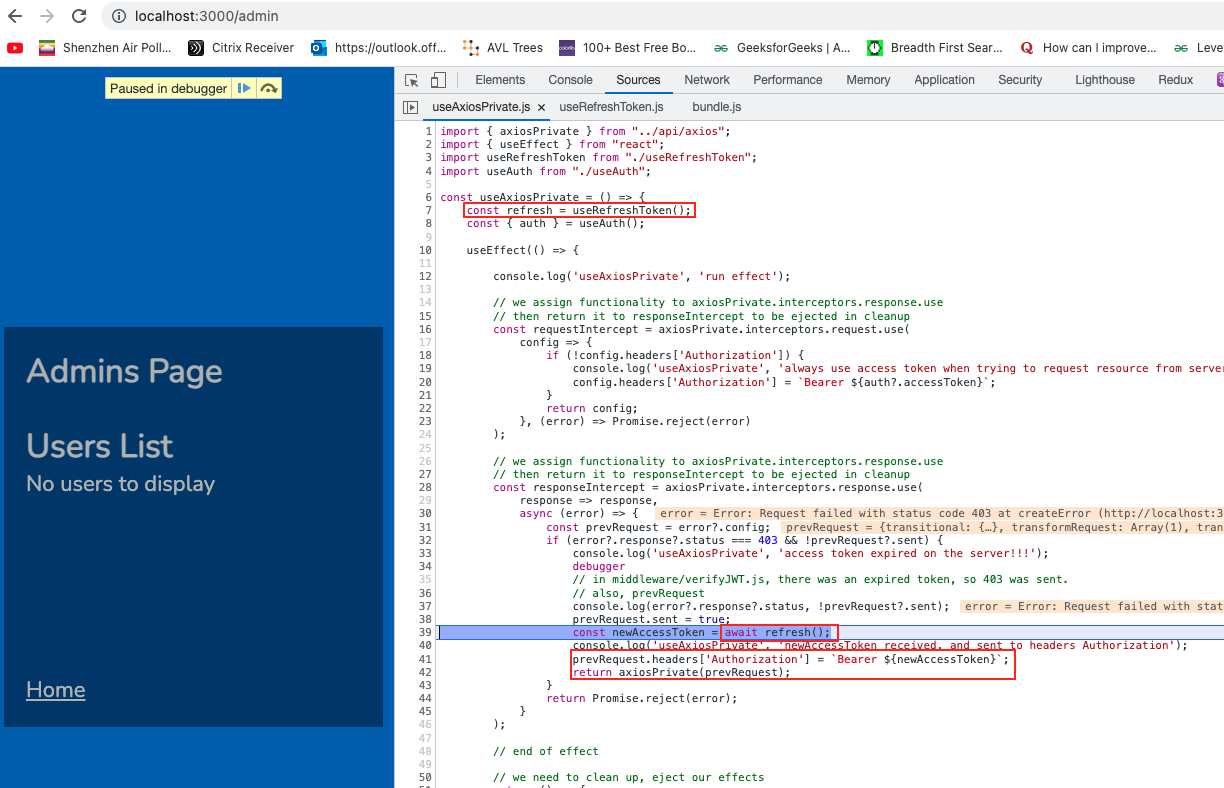
It will execute its refresh request to the backend. And later when the backend returns the refresh token, put it in our previous request’s header. Then use Axios’s axiosPrivate to execute the previous request again.
First…let’s look at the refresh request to the backend.
We hit the backend on /refresh, which calls handleRefreshToken. We reference the cookie’s jwt first..keep a handle on it. Then we always clear the client’s cookie jwt.
We look to see if our reference to the cookie’s refresh token exist in any of our users.
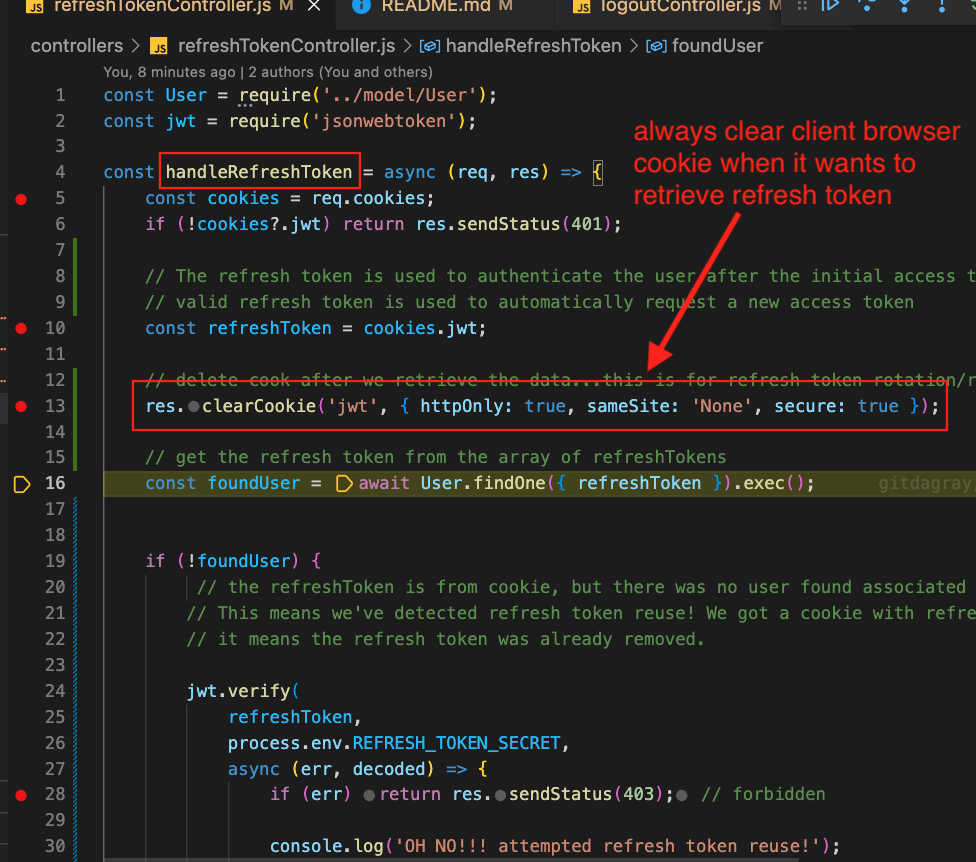
Unfortunately, it doesn’t. This we detected a token reuse. So we decode the token to find out which user this refresh token belongs to.
We get the decoded’s username and try to find it in our Users. The reason why is because we want to clear all of this user’s refresh tokens and have them sign in again.
This will make the hacker’s refresh token unusable. And forces our valid user to re-sign in and get a new refresh token to use. And if that’s the case, a 403 will redirect to the /login page again.
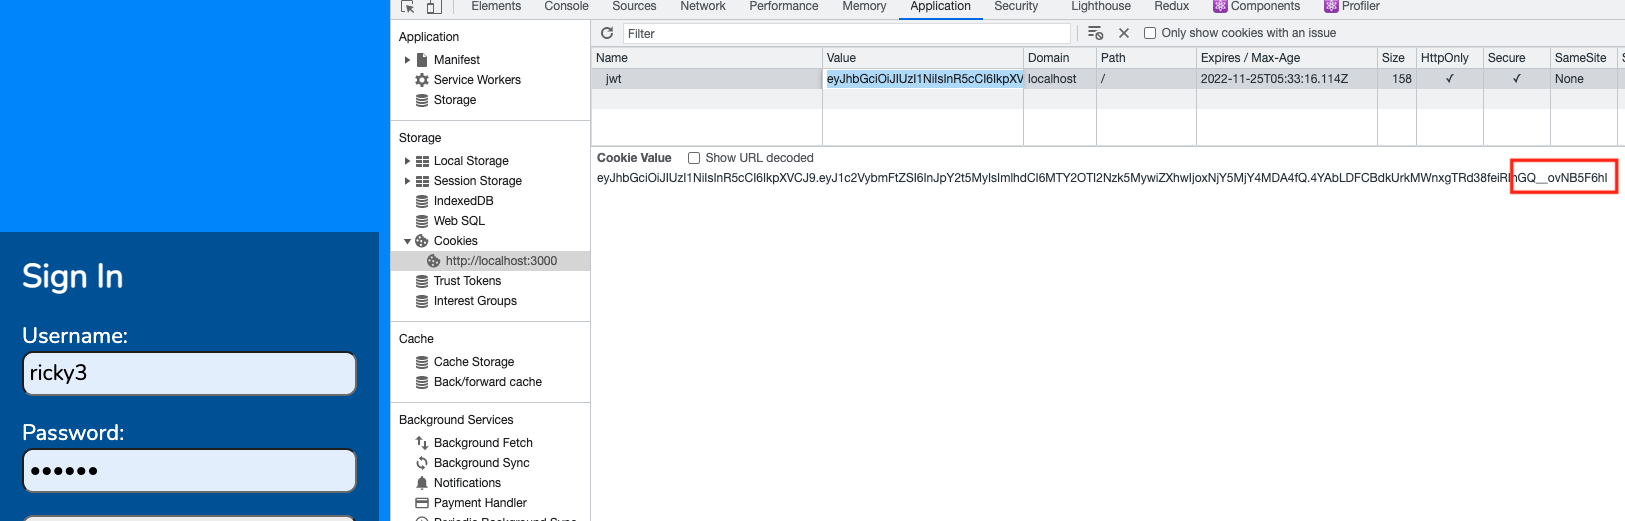
Let’s now attempt to use the expired refresh token
Open up Postman,
GET localhost:3500/refresh
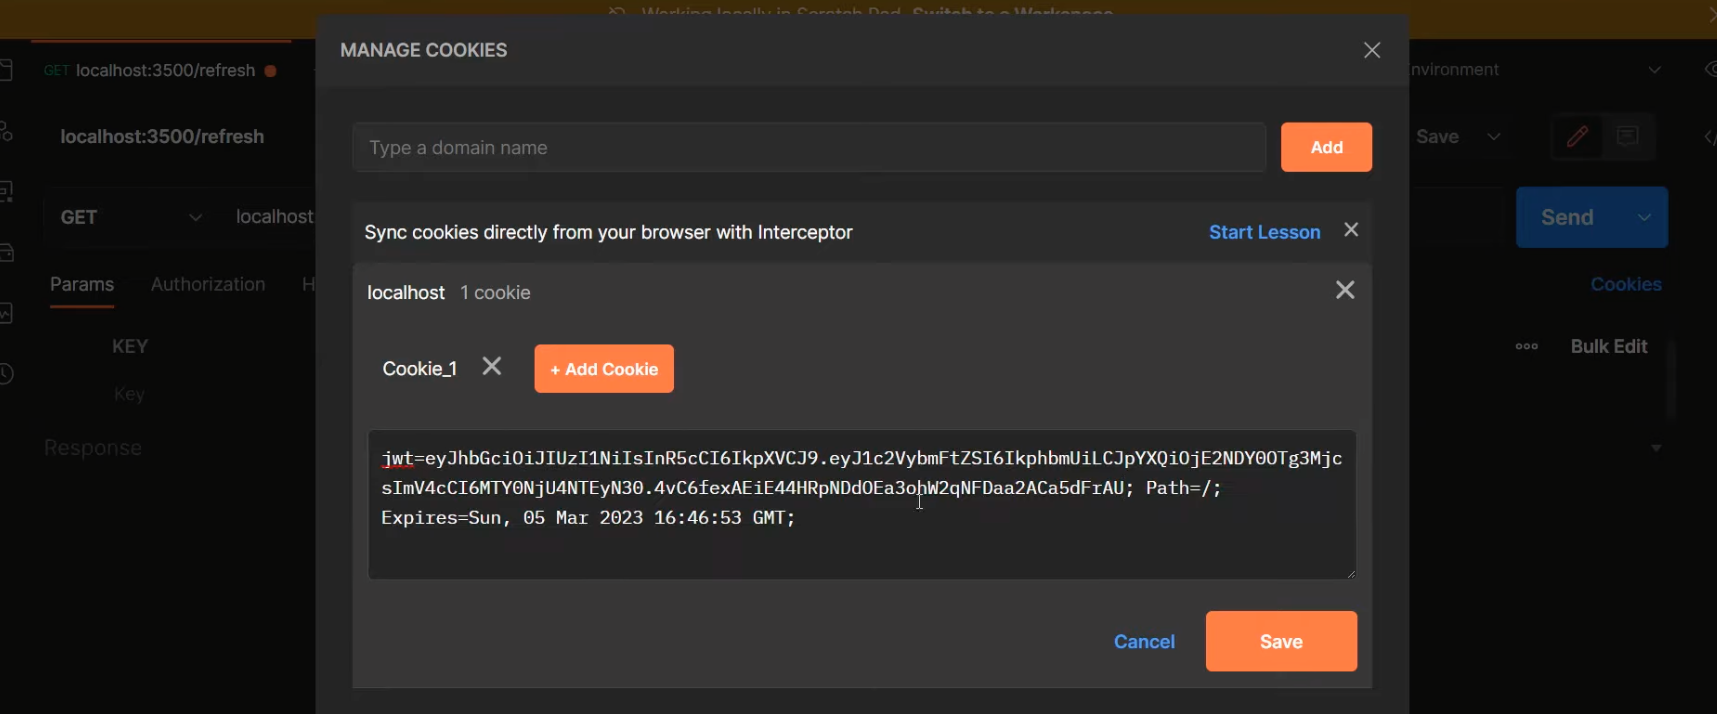
Simply paste in the refresh token. Let’s save it and use it by clicking on ‘Send’.
![]()
If any of the situation where the user does not exist, or if the username from the decoded token does not match what we have in Users, we return 403 and have them login again.

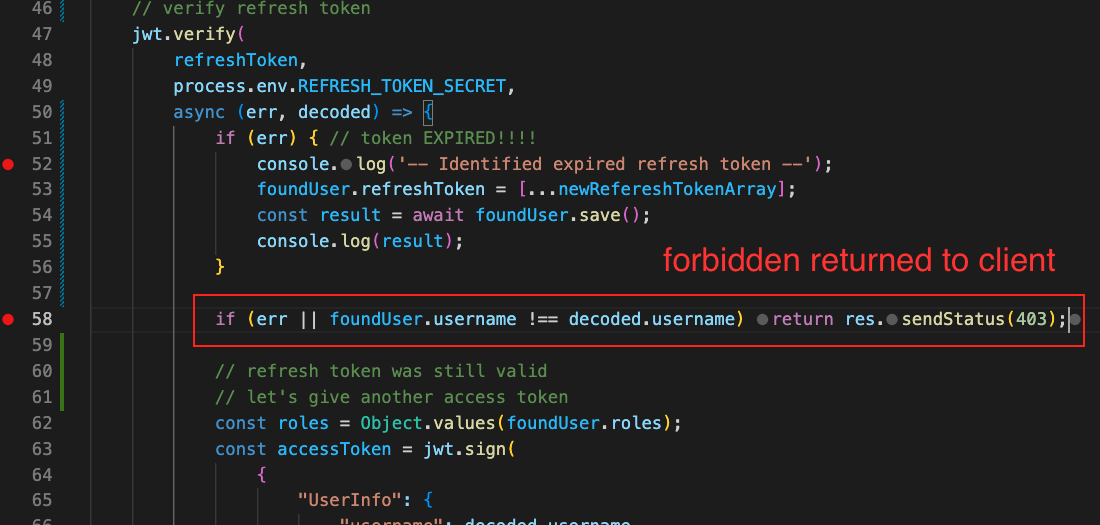
We get forbidden.