ref –
- https://medium.com/dartlang/dart-asynchronous-programming-isolates-and-event-loops-bffc3e296a6a
- https://stackoverflow.com/questions/63707220/how-to-pass-arguments-besides-sendport-to-a-spawned-isolate-in-dart
- https://medium.com/@lelandzach/dart-isolate-2-way-communication-89e75d973f34
- https://www.javatpoint.com/dart-isolates
The Event Loop
Event loops is what makes async code possible.
In the lifetime of an app, we can’t predict when I/O, clicks, etc will happen. We don’t know when or in what order these events will happen.
Hence, a Dart or JS app needs to handle them with a single thread.
It uses an event loop. It grabs the oldest event from the event queue, and process it. Then it processes the next one..until the event queue is empty.
Taps, downloading, timer goes off…event loop processes these events one at a time. When there’s nothing left, the thread waits for the next event, or triggers the Garbage collector…etc.
In order for developers to work with the event loop, we use a Future. A Future represents a potential value, or error, that will be available at some time in the future.
Common asynchronous operations include:
– fetching data over network
– reading data from a database
– reading data from a file
Let’s take a look at a simple example.
|
|
void main() { print('Begin Program'); var myfut1 = Future.value(14).then((result) => print(result)); print(myfut1); // Instance of '_Future<void>' print('End Program'); } |
We run down the program synchronously. W first print Begin Program. We create a Future that will return a value of 14. This Future is incomplete and is queued onto the event loop.
When this Future completes later on, it will take the then callback and process it.
Then we naturally come to print End Program.
At this point, our Future value of 14 is being processed on the event loop. It finishes and returns it to the then. We then print 14.
output:
Begin Program
Instance of ‘_Future‘
End Program
14
So we synchronously run the main program. If there is a Future, it is put on the event loop. The event loop starts processing after the main app. That’s why we get 14 after End Program.
In order to make sure we wait for 14 value to arrive, before hitting the end, we can use await. Remember that all awaits must be inside of an async function. Thus we add async to main.
|
|
void main() async { print('Begin Program'); var myfut1 = await Future.value(14); print(myfut1); // 14 print('End Program'); } |
output:
Begin Program
14
End Program
Async calls are divided into multiple parts. What comes after an await is not executed immediately because we need to wait for the Future to finish. What it happens is that the main function gets split. “Splitting Function” calls is fundamental because it avoids events on the queue to wait for the futures to finish.
i.e IF the main were executed entirely, the event loop would have been blocked until Future completed.
Let’s describe the situation with another piece of code:
1 2 3 4 5 6 7 8 9 10 11 12 13 14 15 16 17 18 19 20 21 22 23 24 25 26 27 28 29 |
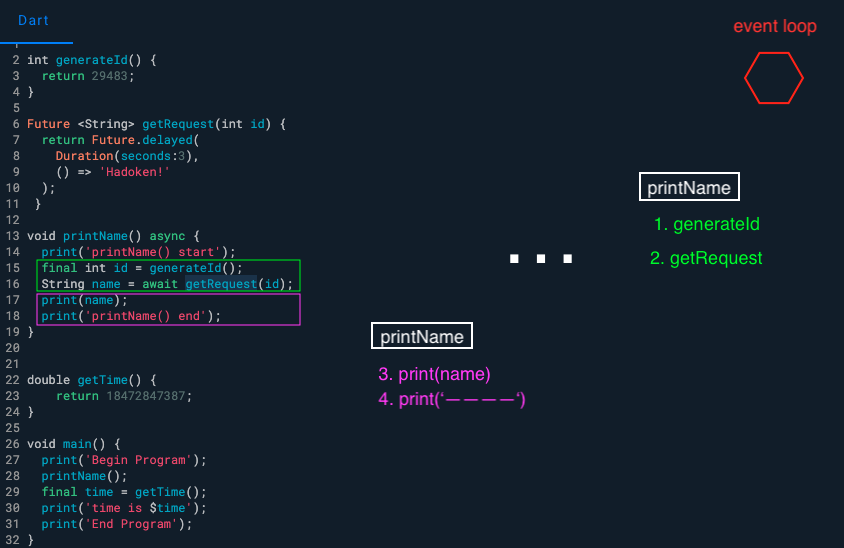
int generateId() { return 29483; } Future <String> getRequest(int id) { return Future.delayed( Duration(seconds:3), () => 'Hadoken!' ); } void printName() async { print('printName() start'); final int id = generateId(); String name = await getRequest(id); print(name); print('printName() end'); } double getTime() { return 18472847387; } void main() { print('Begin Program'); printName(); final time = getTime(); } |
We see that we have getRequest that returns a Future. This Future will return a string. Thing is, we need o wait for this Future to complete. Essentially this is whats happening:
output:
Begin Program
printName() start
When we call printName(), we print the start msg. It is an async operation so we put it on the event loop. However, because there is an await, we only place the code up to the await onto the event loop like so:
It will take the code below await and save it for later.
We then continue our execution:
output:
Begin Program
printName() start
time is 18472847387
End Program
Our program finishes executing and now we’re just waiting around while nothing is happening. However, we’re not blocking the event queue. If others have an event and gets added to the event queue, they will be processed. Our program is just waiting on getRequest to finish.
So in this way, we don’t block, and give other events a chance to be executed. Once getRequest returns, we then add the saved code (that was below await in printName()) onto the event loop. It receives the name ‘Hadoken!’, prints it and then prints that printName function has ended.
output:
Begin Program
printName() start
time is 18472847387
End Program
Hadoken!
printName() end
Future in loops
1 2 3 4 5 6 7 8 9 10 11 12 13 14 15 16 17 18 19 20 21 22 |
void longRunningOperation1(int i) { for (var x = 0; x < 100000000; x += 1) { if (x % 10000000 == 0) { print('longRunningOperation $i: $x'); } } print('done with operation $i'); } Future<void> function1(int i) async { final result = Future<void>(() => longRunningOperation1(i)); print(result); } Future <void> main() async { print('-- start main --'); for (var i = 0; i < 3; i++) { print('--- processing $i -----'); function1(i); } print('--- end program ---'); } |
As you can see from the output, our index.dart gets processed first with all the prints. The longRunningOperation(int i) for i 0, 1, 2 gets placed onto the event loop.
Then the event loop senses that there are item on the loop, will start processing. It executes i 0, 1, and finally 2.
output:
— start main —
— procesing 0 —–
Instance of ‘Future‘
— procesing 1 —–
Instance of ‘Future‘
— procesing 2 —–
Instance of ‘Future‘
— end program —
longRunningOperation 0: 0
longRunningOperation 0: 10000000
longRunningOperation 0: 20000000
longRunningOperation 0: 30000000
longRunningOperation 0: 40000000
longRunningOperation 0: 50000000
longRunningOperation 0: 60000000
longRunningOperation 0: 70000000
longRunningOperation 0: 80000000
longRunningOperation 0: 90000000
done with operation 0
longRunningOperation 1: 0
longRunningOperation 1: 10000000
longRunningOperation 1: 20000000
longRunningOperation 1: 30000000
longRunningOperation 1: 40000000
longRunningOperation 1: 50000000
longRunningOperation 1: 60000000
longRunningOperation 1: 70000000
longRunningOperation 1: 80000000
longRunningOperation 1: 90000000
done with operation 1
longRunningOperation 2: 0
longRunningOperation 2: 10000000
longRunningOperation 2: 20000000
longRunningOperation 2: 30000000
longRunningOperation 2: 40000000
longRunningOperation 2: 50000000
longRunningOperation 2: 60000000
longRunningOperation 2: 70000000
longRunningOperation 2: 80000000
longRunningOperation 2: 90000000
done with operation 2
Long Running Tasks
But! Here’s a problem. A long running task on the event loop will block all the events. On a Flutter app, you can try press the other controls for an event. They won’t be processed.
In this case, we should use Isolate. The Isolate works differently in comparison of Thread. The isolates are independent workers that do not share memory, but instead interconnect by passing message over channels. Since isolates completes its task by passing message thus it need a way to serialize a message. The communication between the isolates is done by the message passing as a client and server. It helps the program to take advantage of multicore microprocessor out of the box.
In other words, Dart allows a programmer to execute a function asynchronously in a separate thread! This can be done using the Isolate class, which is in a native Dart library. A Dart Isolate is an object that executes a specific function in a newly spawned thread. The second thread can communicate with the main thread continuously.
Isolate
An Isolate have its own event loop, and memory area.
Dart Concurrent programming uses Isolates: independent workers that are similar to threads but don’t share memory, communicating only via messages.
The Isolate class was designed for message passing between threads using a non-broadcast streaming object called a ReceivePort. You first declare ReceivePort like so:
|
|
final receivePort = ReceivePort(); |
Then we create an Isolate we make use of .spawn() method in Dart. In our ReceivePort object, there is a property called sendPort. We give it to the long running function so that it can signal to us when it is done. We give the reference of sendPort inside the param array:
|
|
final isolate = await Isolate.spawn( long running function, [reference to send port, data], // the arguments that pass in ); |
We use our ReceivePort instance to listen for messages. ReceivePort can be listened to just once.
|
|
receivePort.listen((message) { print('-- received message --'); print(message); receivePort.close(); isolate.kill(); }); |
When the long running function is done, it uses the reference to sendPort to send whatever data and a message to the listening receivePort that we are done.
|
|
sendPort.send(42 + number); |
Example
function downloadAndCompressTheInternet
|
|
void downloadAndCompressTheInternet(List<Object> arguments) { print("-- downloadAndCompressTheInternet --"); SendPort sendPort = arguments[0] as SendPort; int number = arguments[1] as int; for (var i = 0; i < 100000000; i += 1) { if (i % 10000000 == 0) { print('longRunningOperation1: $i'); } } print('done with operation 1'); print(arguments); sendPort.send(42 + number); } |
main.dart
1 2 3 4 5 6 7 8 9 10 11 12 13 14 15 16 17 18 19 20 21 22 23 24 25 26 |
Future <void> main() async { print('-- start main --'); final receivePort = ReceivePort(); final isolate = await Isolate.spawn( downloadAndCompressTheInternet, [receivePort.sendPort, 3], // the arguments that pass in ); receivePort.listen((message) { print('-- received message --'); print(message); receivePort.close(); isolate.kill(); }); print('Future is Bright'); for (var i = 0; i < 100000000; i += 1) { if (i % 10000000 == 0) { print('longRunningOperation2: $i'); } } print('done with operation 2'); } |
So when we start executing and executes synchronously. We spawn an Isolate that processes downloadAndCompressTheInternet. As you can see we then print ‘Future is Bright’. So this proves that our Isolate is executing already. After ‘Future is Bright’, our main Isolate will process longRunningOperation2. Then longRunningOperation1, then longRunningOperation2. So our main Isolate and spawned Isolate are running in parallel. We have a long running task that is being executed in parallel with a long running task on main Isolate.
When our spawned Isolate is done, we then send a message to main Isolate, where we created a ReceivePort, and listened for events.
output:
— start main —
— downloadAndCompressTheInternet —
longRunningOperation1: 0
Future is Bright
longRunningOperation2: 0
longRunningOperation1: 10000000
longRunningOperation2: 10000000
longRunningOperation1: 20000000
longRunningOperation1: 30000000
longRunningOperation2: 20000000
longRunningOperation1: 40000000
longRunningOperation2: 30000000
longRunningOperation1: 50000000
longRunningOperation2: 40000000
longRunningOperation1: 60000000
longRunningOperation1: 70000000
longRunningOperation2: 50000000
longRunningOperation1: 80000000
longRunningOperation2: 60000000
longRunningOperation1: 90000000
done with operation 1
[SendPort, 3]
longRunningOperation2: 70000000
longRunningOperation2: 80000000
longRunningOperation2: 90000000
done with operation 2
— end program —
— received message —
45