Category Archives: windows
Controller Renderer, Static rendering, Dynamic rendering
ref – https://www.youtube.com/watch?v=i3Mwcphtz4w
Static Rendering
It will then produce something like this:
|
1 2 3 4 5 6 7 8 9 |
@using Sitecore.Mvc @using Sitecore.Mvc.Presentation @model RenderingModel @{ } <div> </div> |
Enter code for when we use the @Model object. The @Model object is a representation of the template data that we create under Content.
@Model’s field properties include the fields that you specify in your Data Template. Let’s see how it works.
Say in your data template fields, you have title and AdditionalText
We can display the field in our cshtml by using @Html.Sitecore().Field(“field_name”)
|
1 2 3 4 5 6 7 8 9 10 11 12 13 14 15 16 |
@using Sitecore.Mvc @using Sitecore.Mvc.Presentation @model RenderingModel @{ } <h3>This is the PageHeader.cshtml</h3> <div> <b>Location of this file at - C:\Users\Ricky_Tsao\Desktop\PersonalSite\MeSite.Web\Views\PageHeader.cshtml</b>\ <p> @Model.Item.Name has a title of EDITABLE IN EXPERIENCE EDITOR: @Html.Sitecore().Field("Title") </p> </div> |
Setting up the Layout attached to your Data Template
The page you create in Content uses a Data Template. When you create your Data Template, you specify which layout you it to use.
In our case, we created a layout DefaultMVCLayout, and we use that. It corresponds to the DefaultMVCLayout.cshtml in our Visual Studios. Let’s place our Rendering in that layout file.
We can statically bind our PageHeader.cshtml to the layout by using @Html.Sitecore().ViewRendering
|
1 2 3 4 5 6 7 8 9 10 11 12 13 14 15 16 17 18 19 20 21 22 23 24 25 |
@using Sitecore.Mvc @* @using Sitecore.Mvc.Analytics.Extensions *@ @{ Layout = null; } <!DOCTYPE html> <html> <head> <title>@Html.Sitecore().Field("title", new { DisableWebEdit = true })</title> </head> <body> <b>DefaultMVCLayout.cshtml</b> <div style="color: forestgreen"> <h4>Statically Bind a View Rendering</h4> @Html.Sitecore().ViewRendering("../PageHeader.cshtml"); </div> <h1>@Html.Sitecore().Field("Title")</h1> <div> @Html.Sitecore().Placeholder("main") </div> </body> </html> |
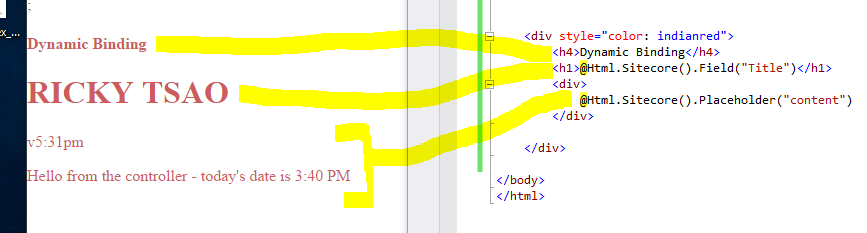
Dynamic Rendering
Dynamic rendering involves using a Placeholder instead. In that Placeholder, you can specify what kinds of renderings to enter. That way, you can enter all different sorts of headers, footers, menus….etc.
@Html.Sitecore().Placeholder(“placeholder_name”)
|
1 2 3 4 5 6 7 8 |
<div style="color: indianred"> <h4>Dynamic Binding</h4> <h1>@Html.Sitecore().Field("Title")</h1> <div> @Html.Sitecore().Placeholder("content") </div> </div> |
Controller Rendering
First of all, create a controller. Right click on the folder controller.
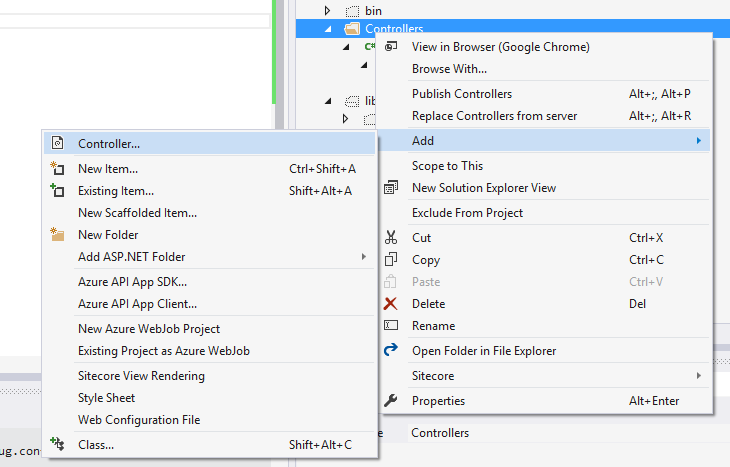
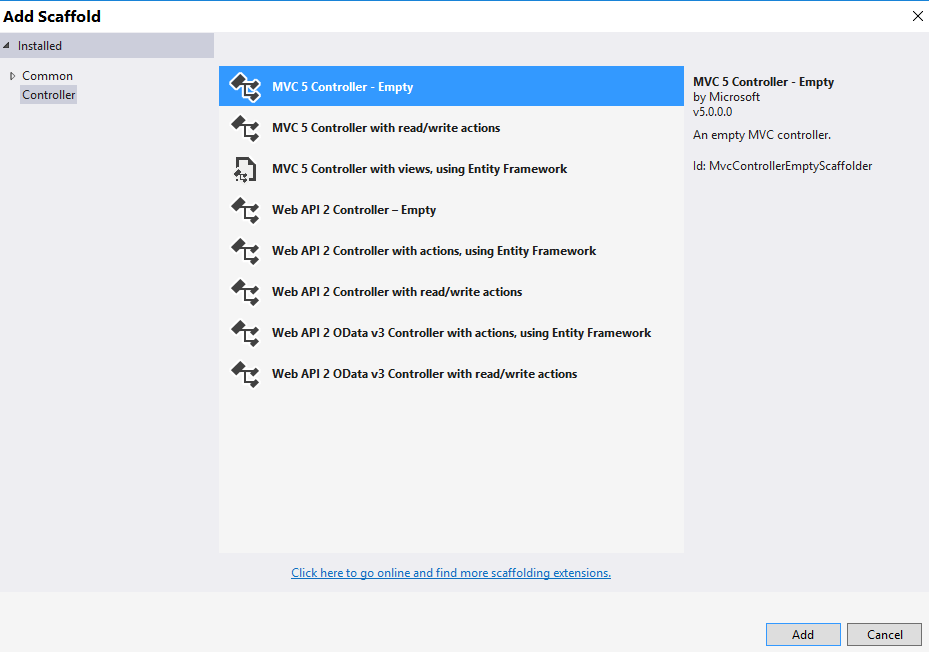
Type in your controller name say HelloWorldController
|
1 2 3 4 5 6 7 8 9 10 11 12 13 14 15 16 17 |
using System; using System.Collections.Generic; using System.Linq; using System.Web; using System.Web.Mvc; namespace MeSite.Web.Controllers { public class HelloWorldController : Controller { // GET: HelloWorld public ActionResult Index() { return View(DateTime.Now); } } } |
That controller only has one method called Index. Pass in a parameter DateTime.Now. Which is a static method to get the current time.
Create View for the Controller
Under your Views folder, you will see that a folder is automatically created called HelloWorld.
Right click on the folder, Add > View. Call it Index. Make sure Create as partial View is checked.
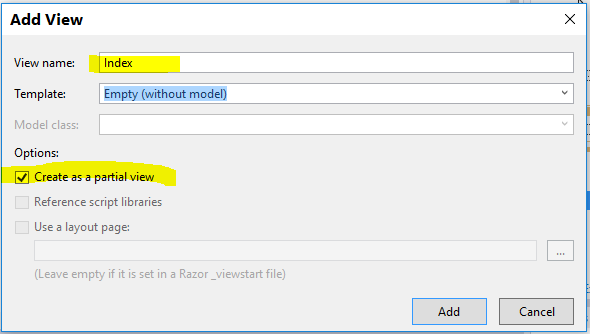
Then insert code to show the current time.
|
1 2 3 |
@model DateTime <p>Hello from the controller - today's date is @Model.ToShortTimeString()</p> |
Make Sitecore aware this controller exists.
right click Rendering > Insert > Controller Rendering.
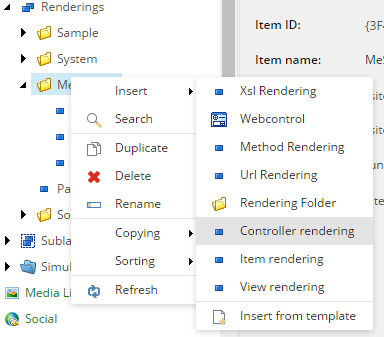
Call it Page Content
Then under Controller, call it HelloWorld WITHOUT THE word CONTROLLER!
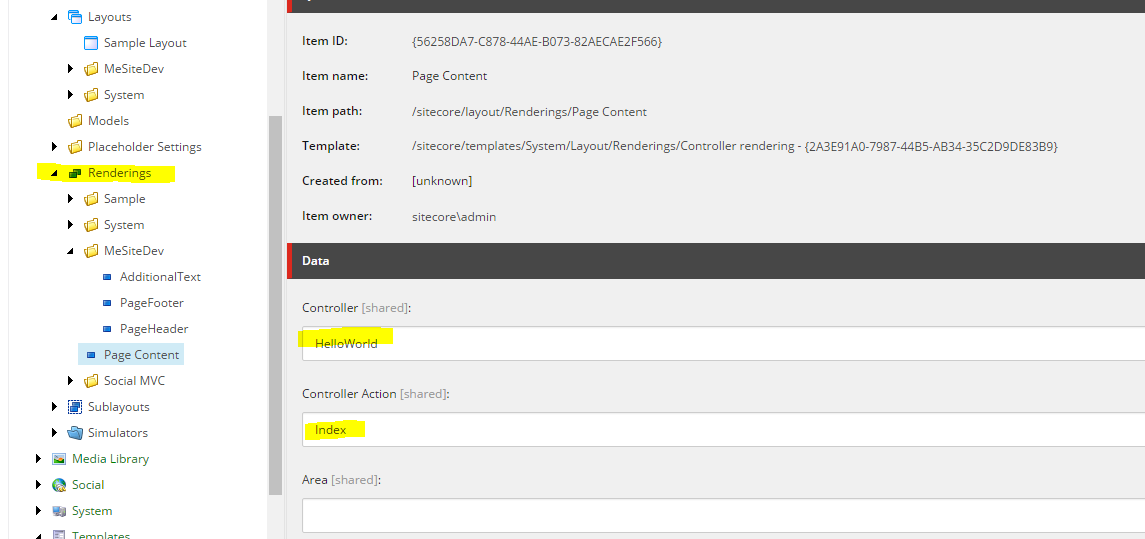
When you encounter this rendering, I want you to execute this Controller and return this Action.
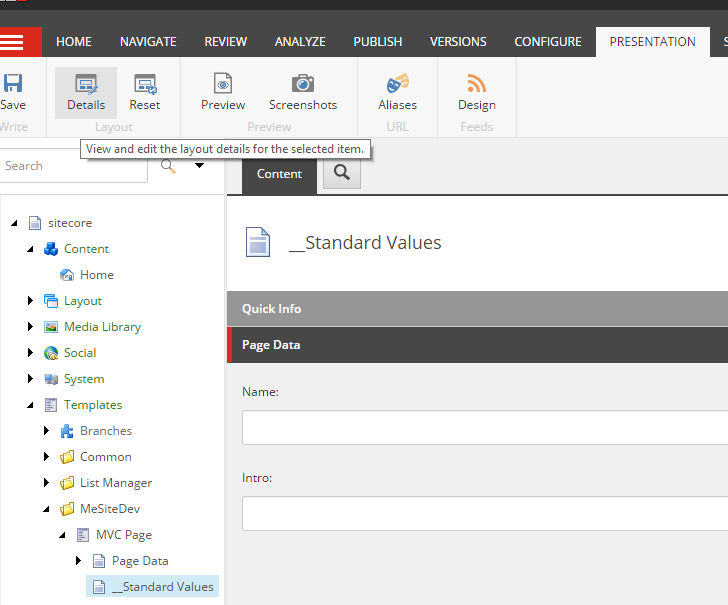
After the controller, let’s go and add this to our Content Page’s presentation details. Click on your content page. Then click on ‘Presentation’ tab.
On the ribbon, click Details.
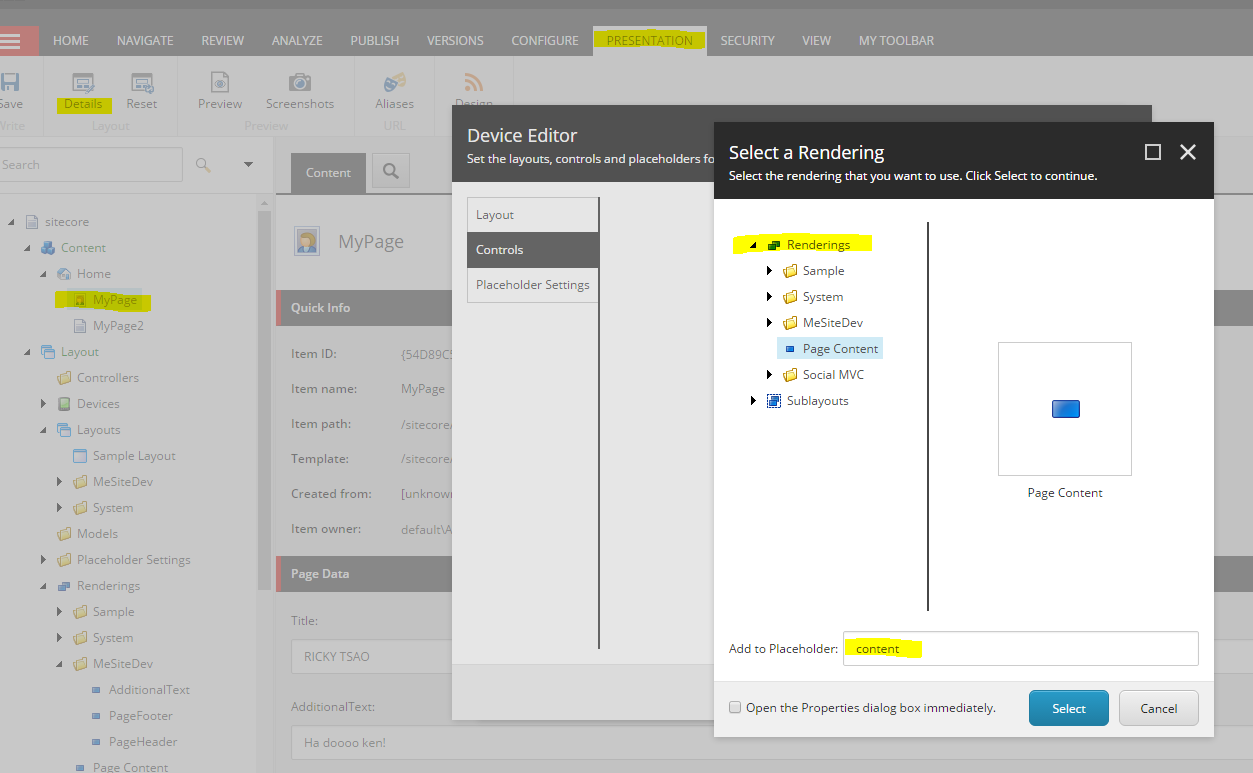
We add the controller to the page layout that is used by our ‘Content Page’
We add a Control, and add our controller as shown.
Then we add it to the placeholder ‘content’.
Then publish.
Make sure you deploy your files in Visual Studios.
Then you’ll see that DefaultMVCLayout.cshtml, you can see that the code we put in there matches what we have on the output.
ref – https://www.youtube.com/watch?v=dW_rQp9bMmE
Pro_SiteCore_Ch2 – Building a Component (View Rendering)
Sitecore installation
Use the SIM to install a sitecore instance onto your computer.
Name it “mesite”.
A page within Sitecore is assigned one layout to control what the page looks like.
Placeholders are added onto layouts.
Components are dropped into placeholders.
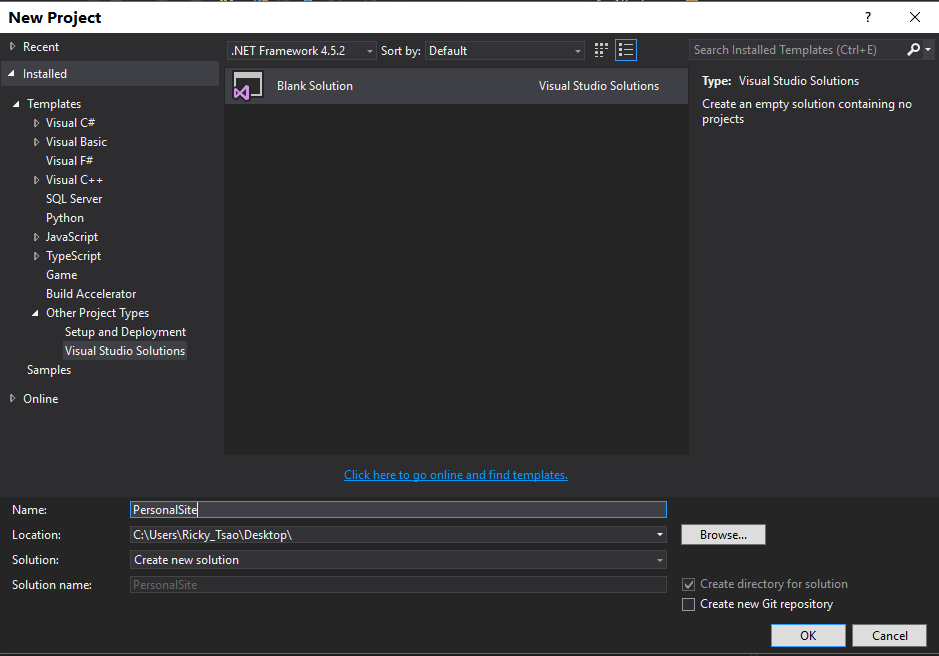
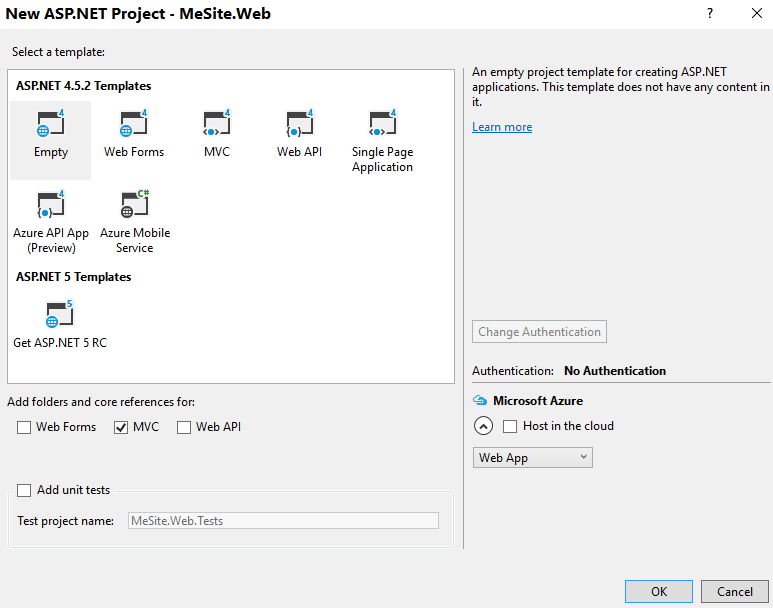
Create a Visual Studio Solution
File > New > Project.
In the left pane, select: Installed > Templates > Other Project Types > Visual Studio Solutions.
With that selected, in the middle, select Blank solution.
Give your solution a name, such as PersonalSite, and specify a location.
Give a location on your Desktop, such as
E:\Users\YourName\Desktop
Click OK.
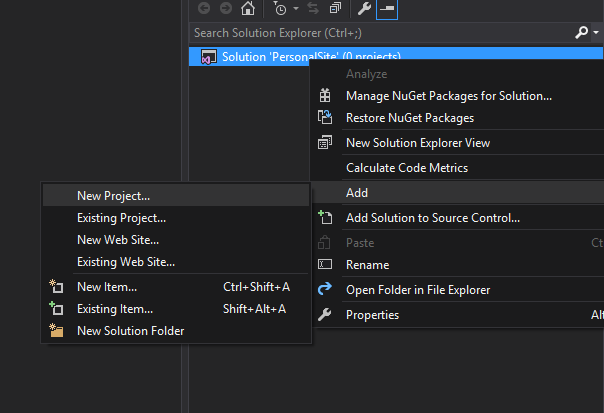
Under Empty Solution, add Web Project
Right click the solution, and select:
Add > New Project.
In the Add New Project dialog, select ASP.NET Web application and give it a name.
I chose to call it MeSite.Web
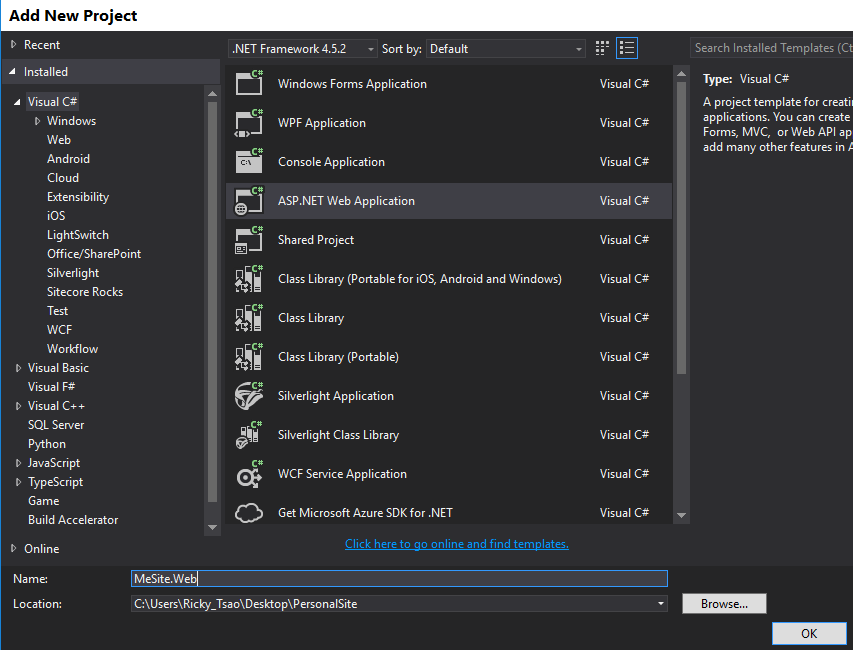
click OK.
This will then open eh ASP.NET Project dialog. Select the Empty ASP.NET Template and check the MVC box down below. This will result in an empty ASP.NET MVC web site.
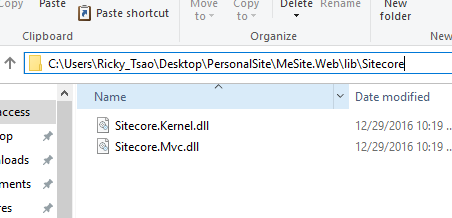
From your Visual Studio Solutions, add reference to Sitecore’s DLL files
Copy Sitecore.Kernel.dll and Sitecore.Mvc.dell from /bin of the Sitecore mesite installation.
ex:
C:\inetpub\wwwroot\mesite\Website\bin
Go to C:\Users\YourName\Desktop\PersonalSite\MeSite.Web directory.
Create a folder called libs. Inside libs, create Sitecore.
ex:
C:\Users\YourName\Desktop\PersonalSite\MeSite.Web\libs\Sitecore
Paste the Sitecore.Kernel.dll and Sitecore.Mvc.dell files into this Sitecore folder.
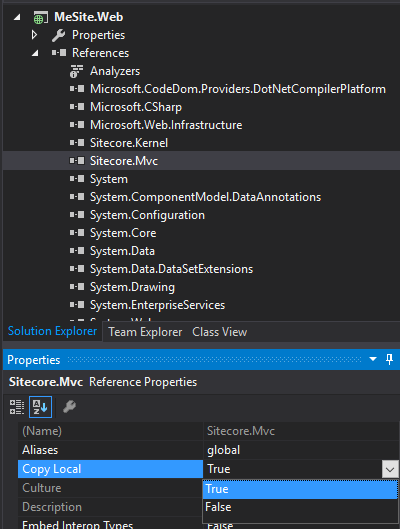
Back in Visual Studio, right-click References > Add Reference.
In the Reference Manager dialog, click the Browse button, and navigate to
C:\Users\YourName\Desktop\PersonalSite\MeSite.Web\libs\Sitecore. You’ll see the .dll files that you’ve just pasted. Select them both, and click Add. Click OK.
Once the ferences have been added, right click each of the references, and select Properties. Set the property Copy Local to False.
The copy the contents of the Web.config Views/web.config from
C:\inetpub\wwwroot\mesite\Website and paste them into
their corresponding files/folders in the Visual Studio solution.
C:\Users\YourName\Desktop\Projects\Personalsite\MeSite.Web
In the your Visual Solution web directory, you will see a folder called App_Start. It has a RouteConfig.cs file. In the RegisterRoutes method, remove the default route, and replace with:
|
1 2 3 4 5 6 7 8 9 10 |
namespace MeSite.Web { public class RouteConfig { public static void RegisterRoutes(RouteCollection routes) { routes.IgnoreRoute("{resource}.axd/{*pathInfo}"); } } } |
Finally, in the Visual Studio solution, open the Global.asax.cs file and change the base class of MvcApplication from System.Web.HttpApplication to Sitecore.Web.Application.
should look like this:
|
1 2 3 4 5 6 7 8 9 10 11 |
namespace MeSite.Web { public class MvcApplication : Sitecore.Web.Application { protected void Application_Start() { AreaRegistration.RegisterAllAreas(); RouteConfig.RegisterRoutes(RouteTable.Routes); } } } |
Open up a browser, type http://mesite/sitecore
and you should see the working site. Enter admin/b to log in.
http://mesite/sitecore
log in with admin/b
Once you’re logged in, click on Content Editor.
Create Layout: Generate .cshtml file
First things’s first. We must create a layout for our Data Template. We insert Data Templates onto a page to use. But a Data Template needs a certain layout to render everything. Thus, we need to create the layout. And that layout matches up with a .cshtml file.
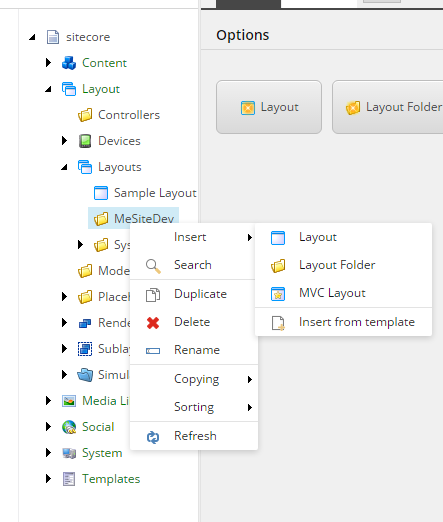
Notice the tree on the left side, navigate to /sitecore/Layout/Layouts
Right click on the Layout Item and Create a new Layout Folder. Name that folder
MeSiteDev.
Creating the MVC Layout in Sitecore’s Content Editor
Right click that MeSiteDev folder and choose Insert > MVC Layout. We’ll name this layout DefaultMVCLayout. Click Next. When asked for a Layout location, select MeSiteDev and click Next.
Then, it will ask you for the location to place the .cshtml file. This .cshtml file location will correspond to the location in Visual Studios.
We can save it at /Views/Shared.
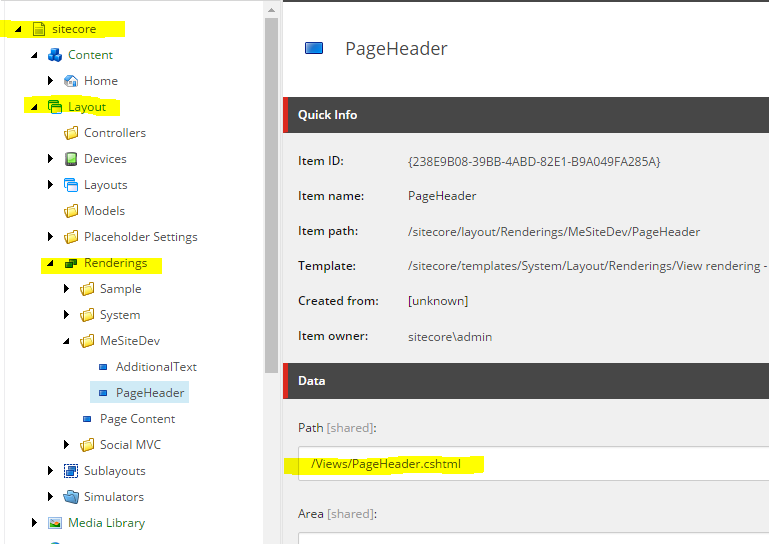
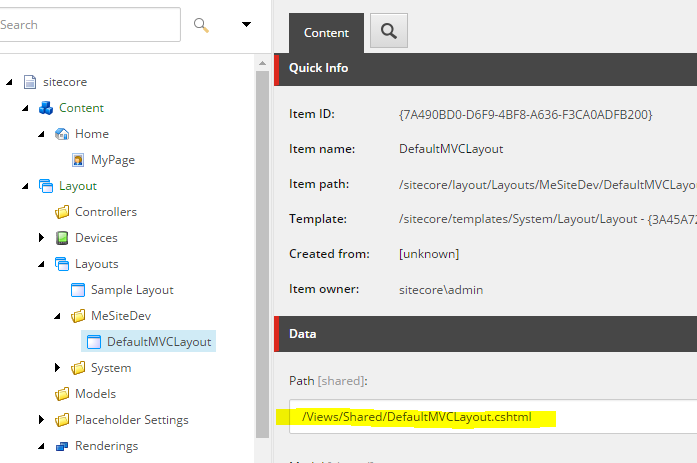
Click on DefaultMVCLayout. Look at ‘Data’ section. You will see then see that the path is /Views/Shared/DefaultMVCLayout.cshtml
. Go to your Visual Studio, and view the file at the same location.
When you clicked create MVCLayout, it created DefaultMVCLayout.cshtml at c:\inetpub\wwwroot\mesite\Website\Views\Shared\
Open up c:\inetpub\wwwroot\mesite\Website\Views\Shared\DefaultMVCLayout.cshtml and copy all the contents
Create DefaultMVCLayout.cshtml in Visual Studio to Match Sitecore
Because Sitecore created DefaultMVCLayout.cshtml at /Views/Shared, we have to match that in Visual Studios.
Go to your Visual Studios, under Views, create Shared folder, so that we have /Views/Shared directory.
Then, right click on Shared folder, Add > View and name it DefaultMVCLayout. Be sure to UNCHECK “use a layout page” option.
Thus, in Visual Studios, we have:
C:\Users\Ricky_Tsao\Desktop\PersonalSite\MeSite.Web\Views\Shared\DefaultMVCLayout.cshtml
At the sitecore site, we have:
C:\inetpub\wwwroot\mesite\Website\Views\Shared\DefaultMVCLayout.cshtml
But how does what you prorgram into Visual Studio gets reflected in Sitecore?
When you do a publish in Visual Studios, the contents from your Visual Studio’s DefaultMVCLayout.cshtml
gets copied into Sitecore site’s DefaultMVCLayout.cshtml
Paste Sitecore’s generated cshtml into your Visual Studio created file
Paste what you copied from c:\inetpub\wwwroot\mesite\Website\Views\Shared\DefaultMVCLayout.cshtml
and copy it into your newly created DefaultMVCLayout views in your Solution Explorer.
Save All in Visual Studios.
Now that we have a layout, we can Create a Data Template
The concept is, when you create a page, you insert Data Templates. Within Data Templates, you have placeholders. And in placeholders,
you insert components.
Go back to Content Editor within Sitecore. Create new Data Template that we’ll use with our new page.
In the left pane of Content Editor, sitecore > templates
Right click on Templates and Insert > Template Folder.
Name this folder MeSiteDev.
Right click MeSiteDev and choose Insert > New Template. Name this template MVC Page, and click Next.
When it asks for location, select the MeSiteDev template folder we just created and click Next.
After creating this template, look at the Builder.
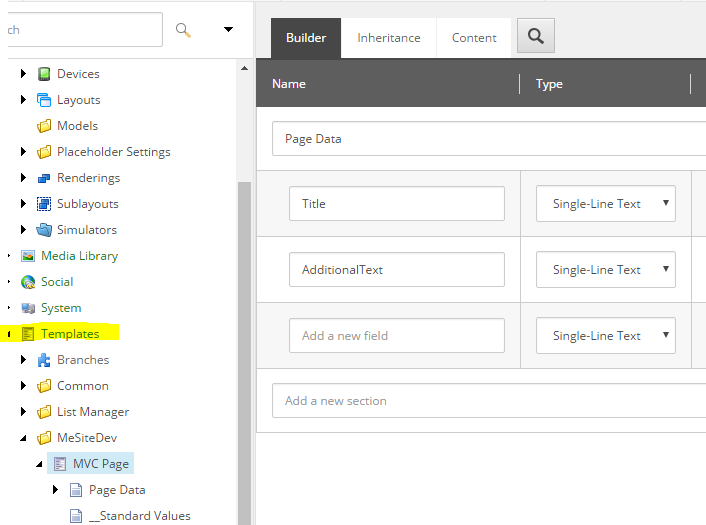
You’ll notice Builder. Then under Section, enter “Page Data”.
Then you can create new fields.
Let’s create two new fields:
- Title
- AdditionalText
Leave their type as “single-line text”.
Once you are done, click Save.
Standard Values
When an item is created from a template, standard values set the defaults for the metadata and/or presentation details.
In detail, standard values are a way of having default or fallback values for fields in Sitecore, meaning that when items are created, you can specify a field value that should be used by default. This does not only account for custom fields you build, but also standard fields in Sitecore such as presentations and insert options. This means that you can specify a value on the standard values, and when you create a new item which inherits from this template, it will by default use the values specified on the standard values.
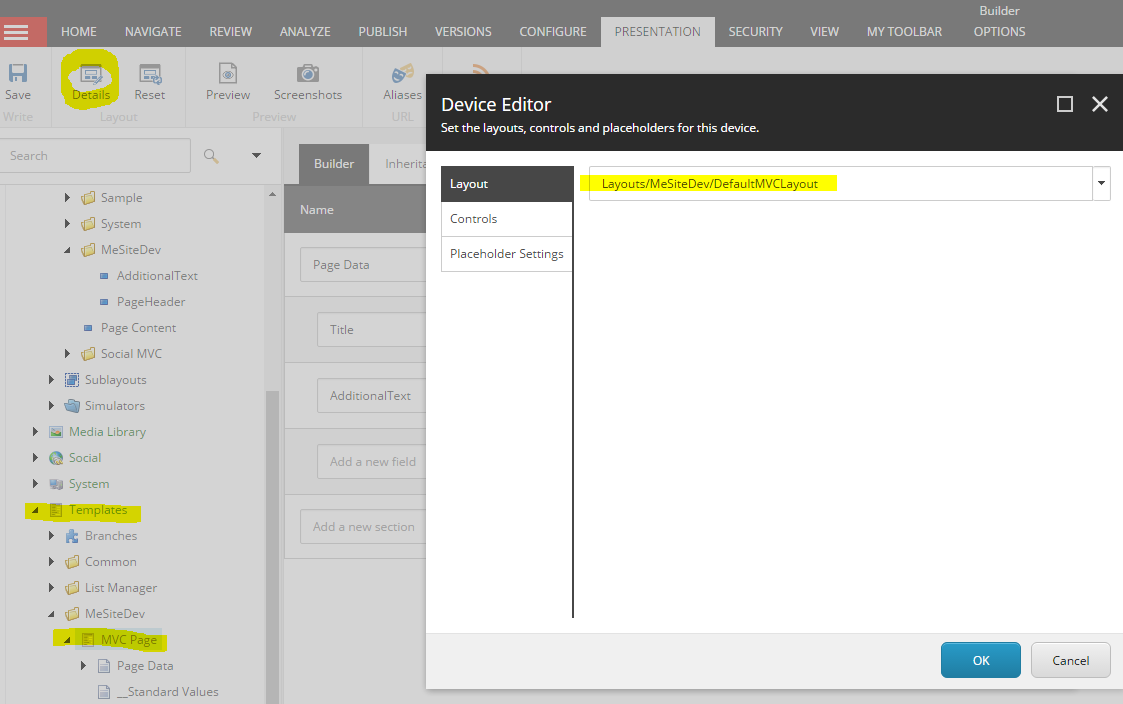
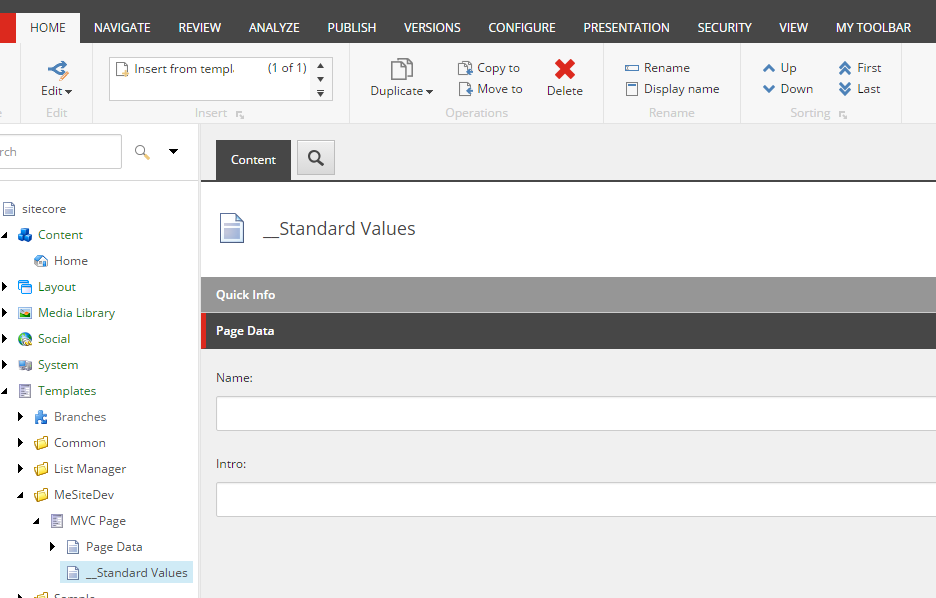
With the Builder tab selected on your MVC Page template, click the Options tab in the ribbon, then click on the Standard Values button. This will create a Standard Values item for your new MVC Page Template.
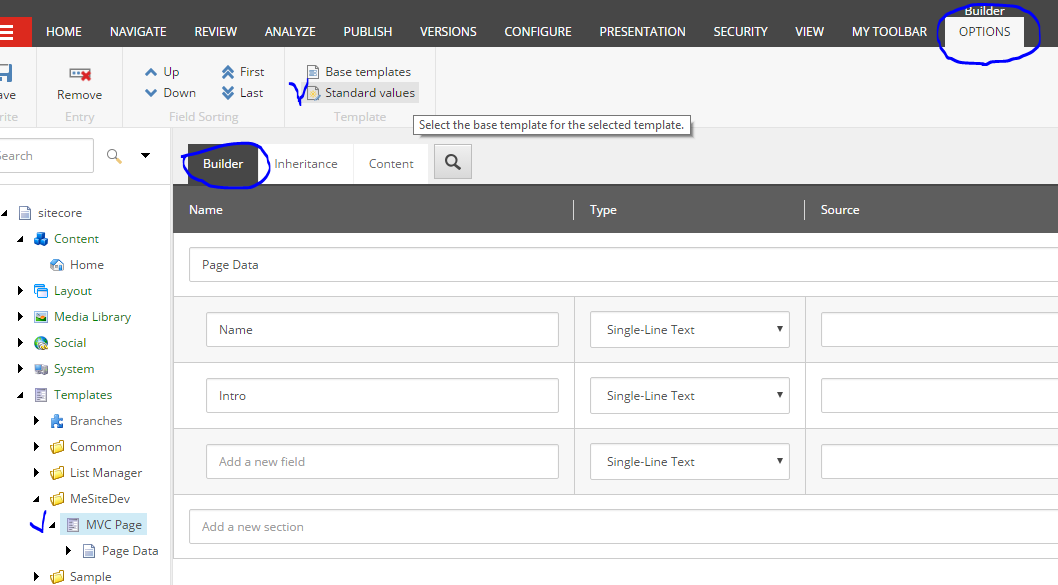
Setting a Layout to your Template
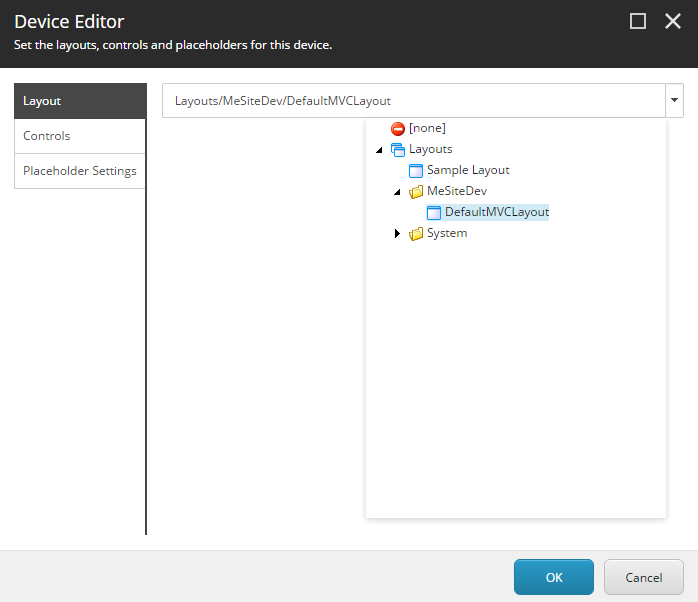
Now select the __Standard Values item below the MVC Page template item. Select the Presentation tab in the ribbon and click on Details button to open the Layout Details dialog.
On the Shared Layout tab, to the right of the Default device profile, click on the Edit link. This will open the Device Editor dialog. On the Layout tab of Device Editor dialog, click on the drop down arrow to the right and select the DefaultMVCLayout layout that you created earlier. Click OK, and OK again on the Layout Details dialog. Save your changes.
the last step is to add a Placeholder item for the main placeholder in our DefaultMVCLayout.
Adding Placeholder “main” into your Layout
So we have a MVC layout. What we want to do is to organize certain placeholders in our layout and allow users to load in different components.
These placeholders look like this:

When a user starts adding pages, they will see the layout, and within the layout, they will see different placeholders for them to add components. When they hover their mouse over these placeholders, it will allow them add renderings like so:
Navigate to sitecore > Layouts > Placeholder Settings.
right click on Placeholder Settings
Insert > Placeholder Settings folder
Name it MeSiteDev and click OK.
right click on the new MeSiteDev folder and select Insert > Placeholder.
Name it main, then click OK.
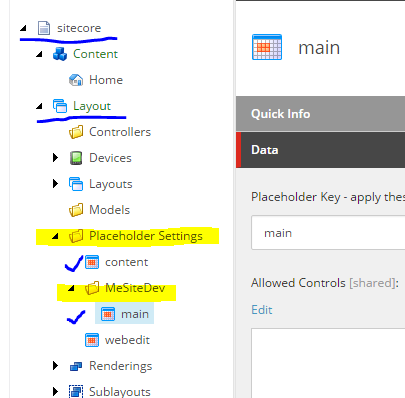
The “main” placeholder corresponds to the @Html.Sitecore.Placeholder(“main”)
In your Visual Studios, Views > Shared > DefaultMVCLayout.cshtml, you’ll see
|
1 2 3 4 5 6 7 8 9 10 11 12 |
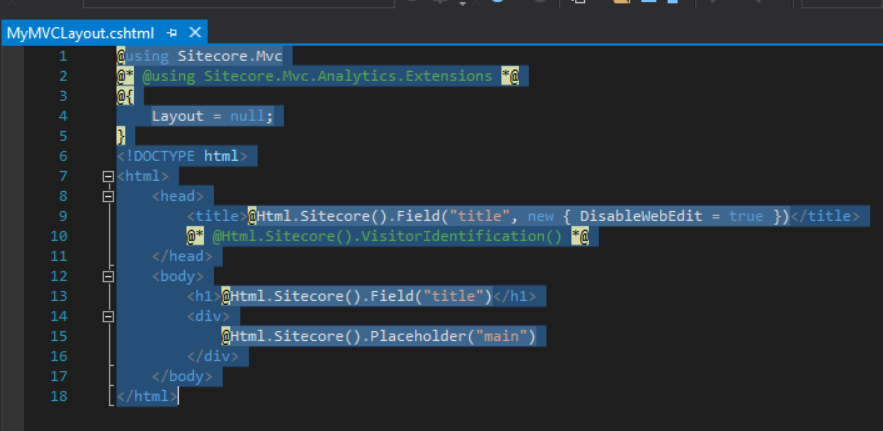
<html> <head> <title>@Html.Sitecore().Field("title", new { DisableWebEdit = true })</title> @* @Html.Sitecore().VisitorIdentification() *@ </head> <body> <h1>@Html.Sitecore().Field("title")</h1> <div> @Html.Sitecore().Placeholder("main") </div> </body> </html> |
You can see how your placeholder “main” is used in the DefaultMVCLayout.cshtml
This is how Sitecore knows how to associate renderings with placeholders in MVC views so they are rendered in the right place within the placeholder in the MVC view.
Creating the Component: Add a View (Rendering) in Visual Studios
Now that we have a placeholder “main” to put a component, let’s build our first component.
This component will only render some text, that a user will enter in the Experience Editor.
The component we build now will retrieve the content from the user, and then render it.
1) Creating component that will retrieve user data: The View
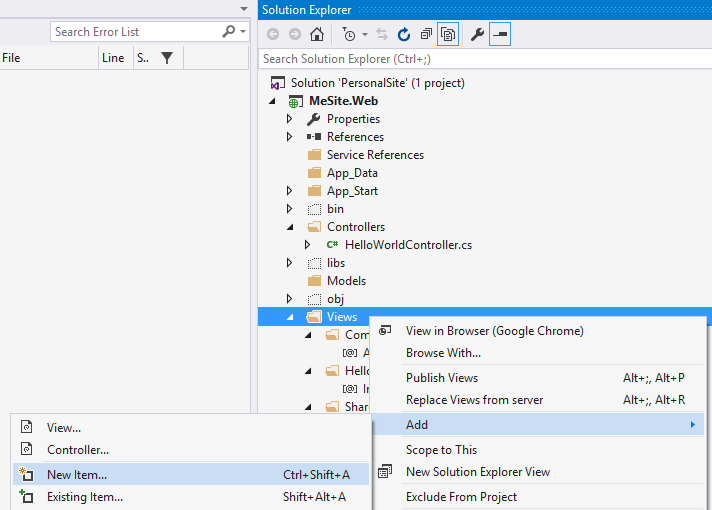
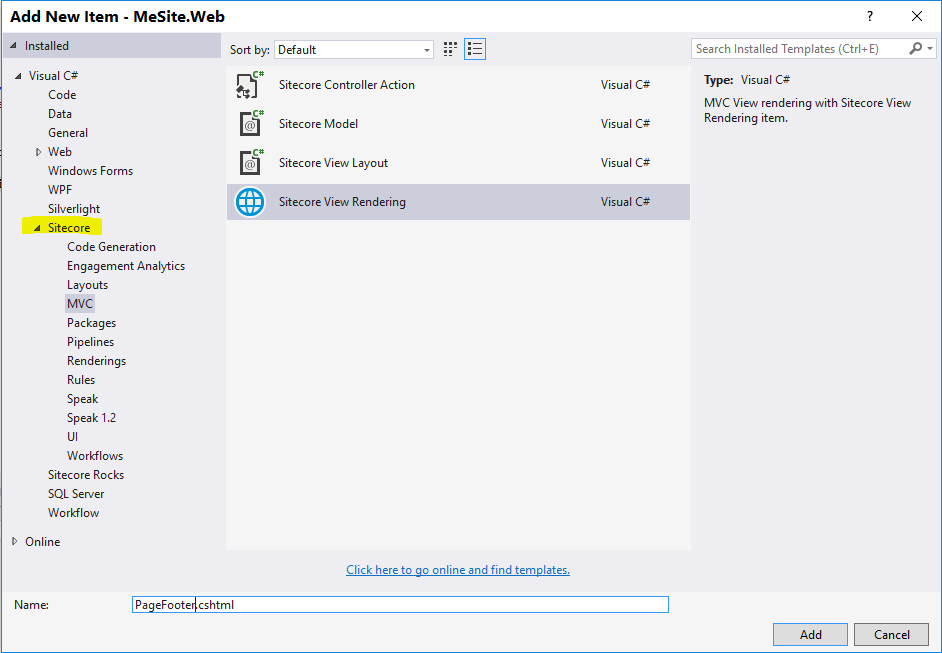
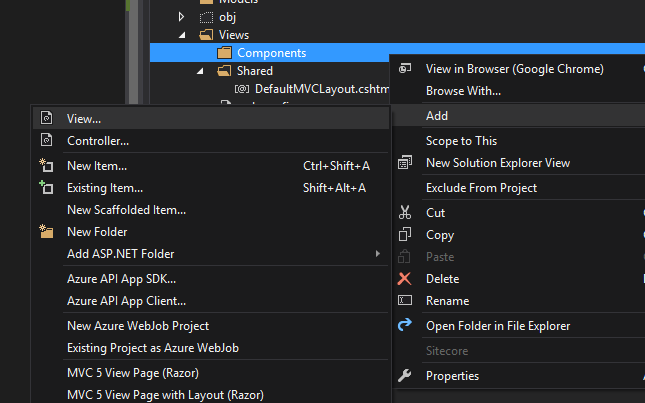
In MeSiteDev.Web project, right click on the Views folder and select Add > New Folder. Name it Components.
Right click on the Components folder and select Add > View. Name the view AdditionalTextView, and then click Add.
You will see the View with some basic c sharp and HTML set up. It uses c sharp and HTML to render code, sitecore fields, and such.
Use Sitecore’s API to insert the “AdditionalText” field.
|
1 |
@Html.Sitecore().Field("AdditionalText") |
Make sure you put in some log statements so you know where this view is being rendered. Your final code should look something like this:
|
1 2 3 4 5 6 7 8 9 10 11 12 13 14 15 16 17 18 |
@{ Layout = null; } <!DOCTYPE html> <html> <head> <meta name="viewport" content="width=device-width" /> <title>AdditionalTextView</title> </head> <body> <b> Visual Studios - Views/Components/AdditionalTextView.cshtml</b> <div> @Html.Sitecore().Field("AdditionalText") </div> </body> </html> |
save this view.
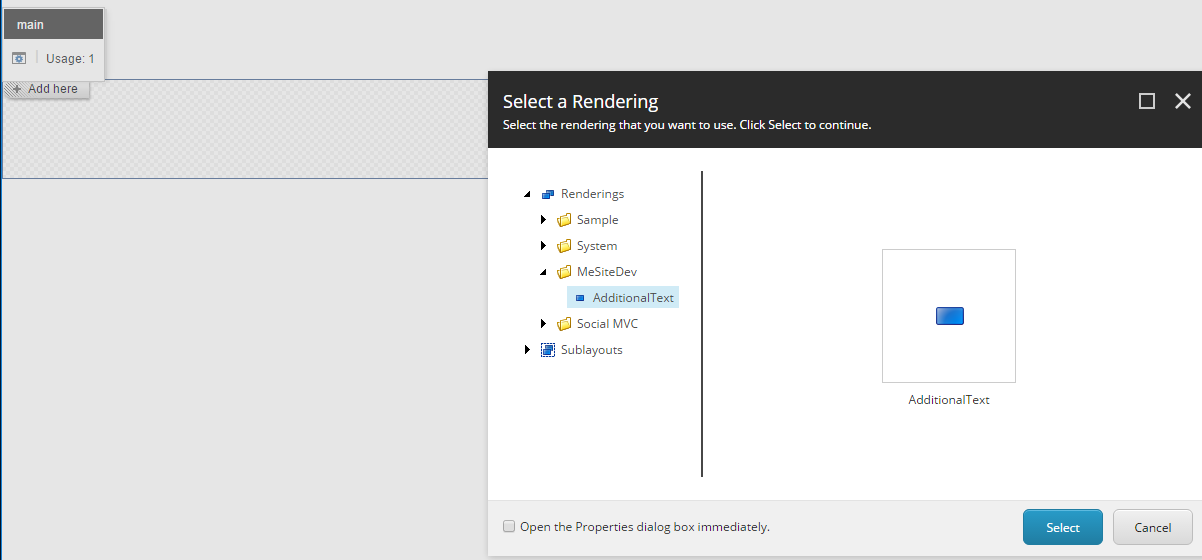
2) Create View Rendering item in Sitecore and point it to our View
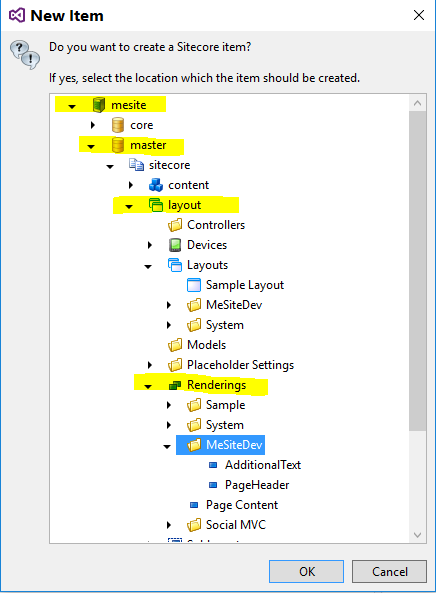
In Sitecore, open the Content Editor, in left pane, sitecore > layouts > Renderings.
Right-click on the Renderings item, select Insert > Rendering Folder. Name this folder MeSiteDev.
Right click on MeSiteDev rendering folder and select Insert > View Rendering. Name it AdditionalText. Press OK.
In the Data section, type the following into the Path field: /Views/Components/AdditionalTextView.cshtml
WARNING: If you do not put the correct PATH, you will get an “Unknown error occured”, when you try to insert a component into your placeholder
Save your changes.
This is to match up with what we just did in Visual Studio.
Deploy to Sitecore
In Visual Studio,
View > ToolBars > Web One Click Publish (make sure its checked)
click on the drop down box that says “Create Publish Settings”
If its checked, you’ll see the Publish dropbox.
click “New Custom Profile”
Name new profile Local. Click OK.
For Publish Method, change option to File System.
Select web root as your Target Location. Should be something like c:\inetpub\wwwroot\mesite\Website
Click Next, and change Configuration option to Debug. Click Publish.
In action! Create your Page!
First, we will add the MVC template that we created earlier.
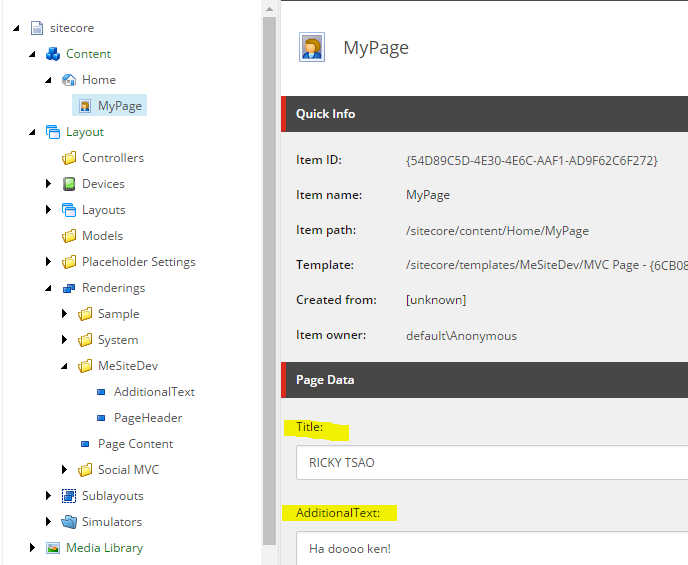
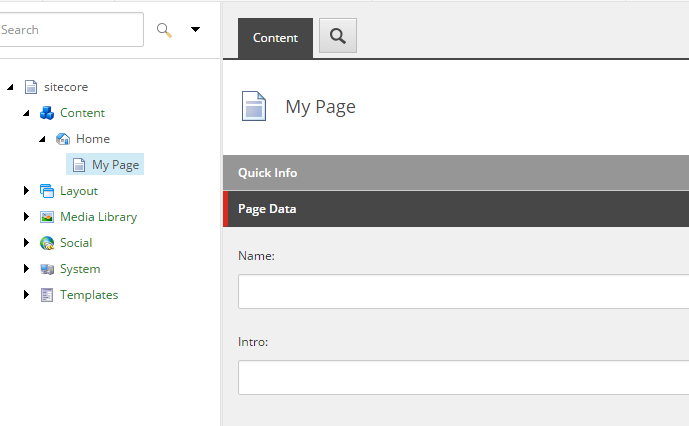
In the left pane of the Content Editor, navigate to sitecore > content > Home.
Right click on Home and select Insert > Insert from Tempalte
This will open the Insert from Template dialog.
Select the Templates > MeSiteDev > MVC Page template, name it MyPage and click Insert.
You’ve now created the page template for others to use!
Having users enter data
In the Page Data section, fill in some text in the Title and AdditionalText fields
Click Save.
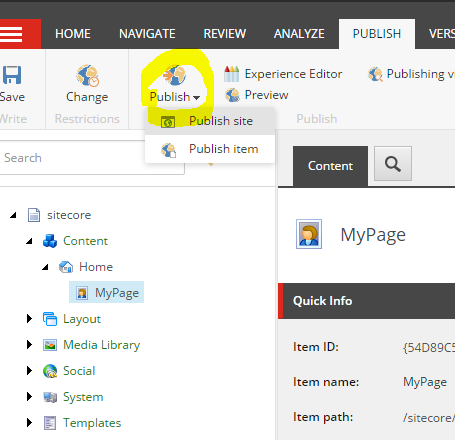
Publish it via publish tab.
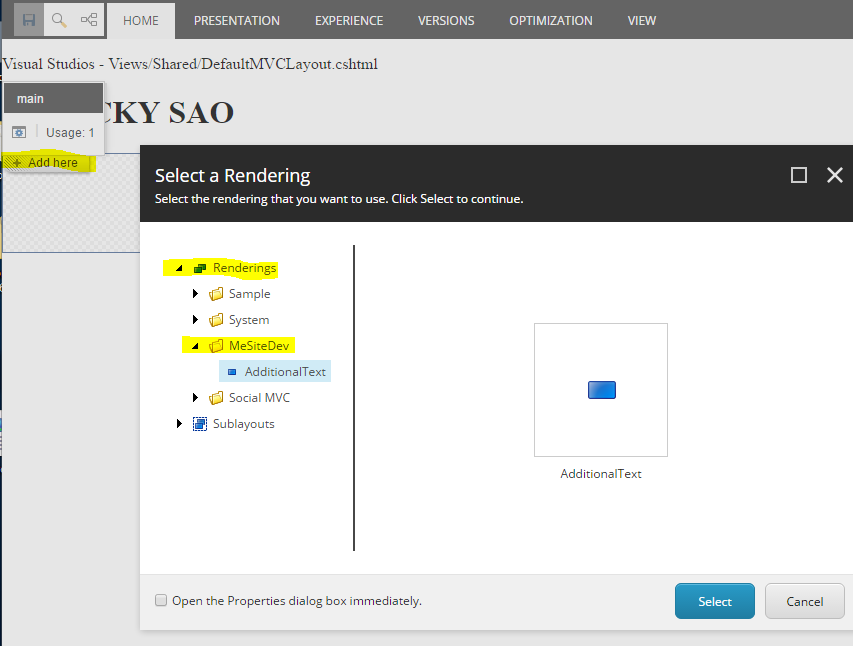
Once its published, make sure your page is selected in the left pane. Then, click on Experience Editor. Sitecore will open everything for you,
and you’ll see your layout, along with the placeholder.
..and there’s a place holder with the name “main” there. The reason why its like that is because
in Visual Studio, Views/Shared/DefaultMVCLayout.cshtml, what you laid out there in the source file is what you see.
WARNING: If you do not put the correct PATH, you will get an “Unknown error occured”, when you try to insert a component into your placeholder
you had the “title” field show between h1 tags
|
1 |
<h1>@Html.Sitecore().Field("title")</h1> |
You placed your Placeholder called “main” inside a div
|
1 2 3 |
<div> @Html.Sitecore().Placeholder("main") </div> |
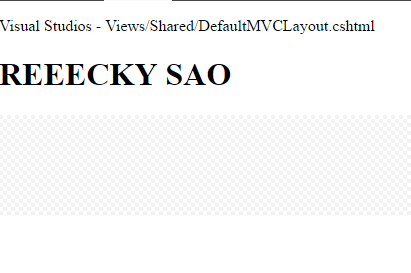
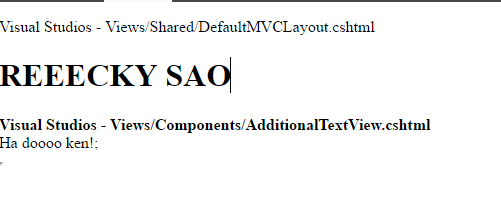
Also, look at the log text you put in there, from there you can see that the file generated is from Visual Studios’s
Views/Shared/DefaultMVCLayout.cshtml file:
|
1 2 3 4 5 6 7 8 9 10 11 12 13 14 15 16 17 18 19 |
@using Sitecore.Mvc @* @using Sitecore.Mvc.Analytics.Extensions *@ @{ Layout = null; } <!DOCTYPE html> <html> <head> <title>@Html.Sitecore().Field("title", new { DisableWebEdit = true })</title> @* @Html.Sitecore().VisitorIdentification() *@ </head> <body> <p>Visual Studios - Views/Shared/DefaultMVCLayout.cshtml</p> <h1>@Html.Sitecore().Field("title")</h1> <div> @Html.Sitecore().Placeholder("main") </div> </body> </html> |
Go ahead and add in AdditionalText
Once it gets inserted, it will display the template .cshtml file from your Visual Studios at /views/Components/AdditionalTextView.cshtml

because that was the file you specified at Path in the Data Section when you created the MVCDefaultLayout
You will see the log of the file location from AdditionalTextView.cshtml. In the middle you will see that AdditionalTextView.cshtml displays your field “AdditionalText” via
|
1 |
@Html.Sitecore().Field("AdditionalText") |
Result:
Viewing Your Results
You can make text changes for Title.
After making your changes and happy that your site is ready. Make sure to save it. Then highlight by clicking on your page node on the left pane in Content Editor.
On the top ribbon bar,
Do a Smart Publish, and then click OK.
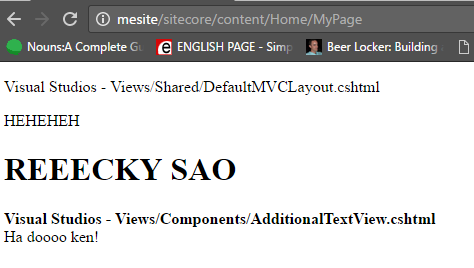
Then, open an Incognito browser:
http://mesite/sitecore/content/Home/MyPage
Adding a style sheet to your page
Click on the PageSettings icon of your Page. Then, Add > New Item
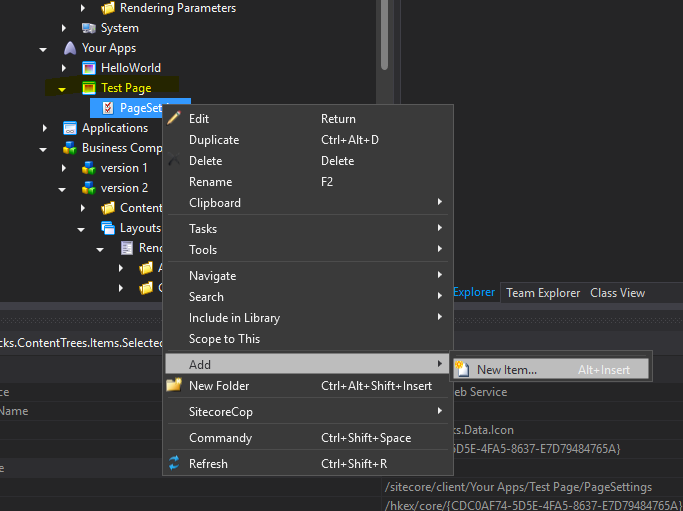
In the search box, look for Page-Stylesheet-file.

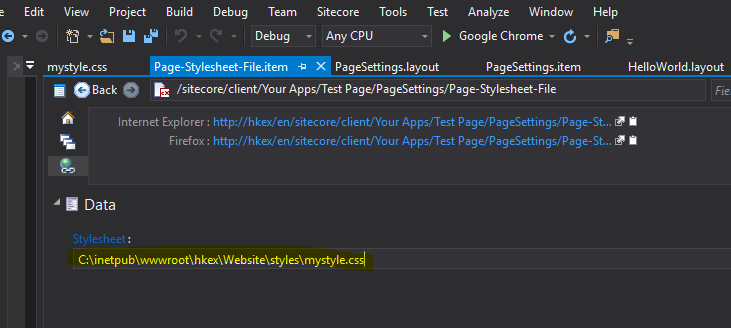
Create your own custom CSS file called mystyle.css.
|
1 2 3 4 |
body { background-color:red; } |
Put it in C:\inetpub\wwwroot\hkex\Website\styles
You can verify this location in your Sitecore Rocks explorer by hitting up Website\styles
Then, insert this into the location of your style sheet:
Reload your site and you should see that the background has turned red.
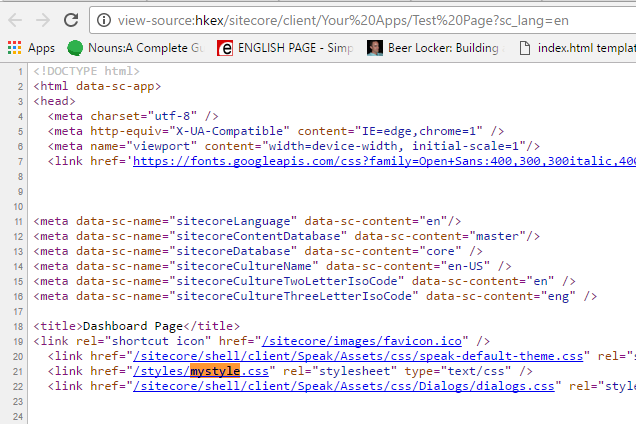
You can also right click on your web page and select “Page Source”. Once the HTML source comes up, search for your file name mystyle.css to verify that the page has loaded it.
Set up Visual Studios 2015 project with installed Sitecore
ref – https://www.akshaysura.com/2016/06/29/tihidi-setup-a-visual-studio-2015-sitecore-8-x-mvc-solution/
Assuming you have a Sitecore site already set up with the Sitecore Instance Manager, you want to create a project in Visual studio so that you can start developing custom code for sitecore.
Initial Setup
First create a new folder on your desktop like so:
C:\Users\Ricky_Tsao\Desktop\Projects\TIHIDI
Then create folders Dependencies and Source like so:
C:\Users\Ricky_Tsao\Desktop\Projects\TIHIDI\Dependencies
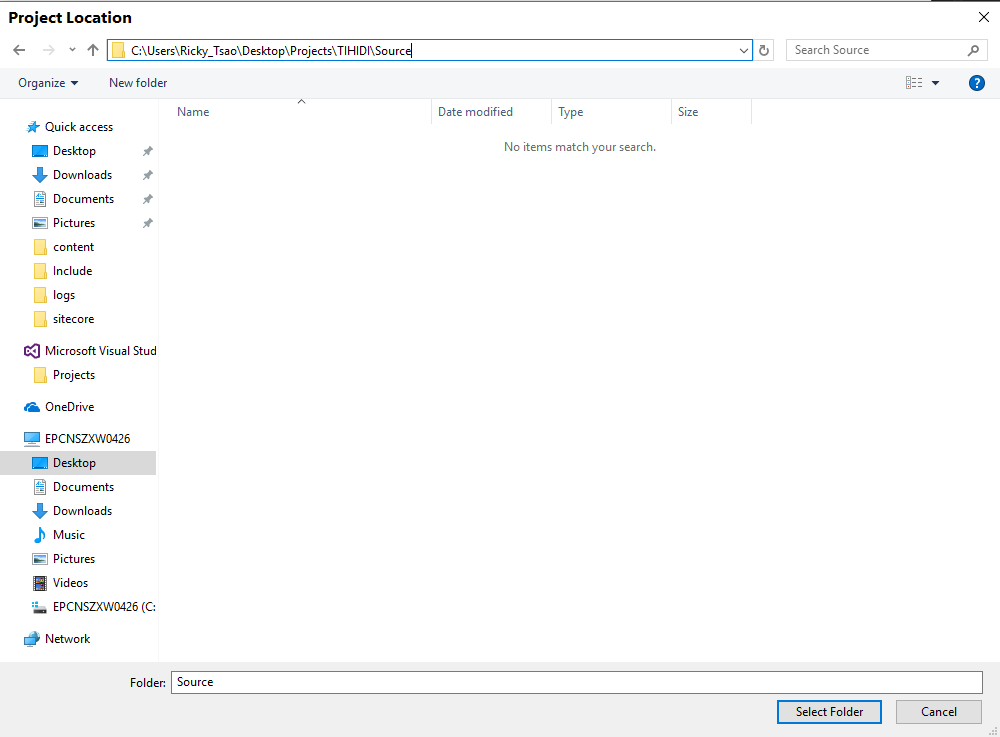
C:\Users\Ricky_Tsao\Desktop\Projects\TIHIDI\Source
Source folder is where you’ll put your Visual Studios project.
Then create folder Sitecore under Dependencies like so:
C:\Users\Ricky_Tsao\Desktop\Projects\TIHIDI\Dependencies\Sitecore
Creating VS project
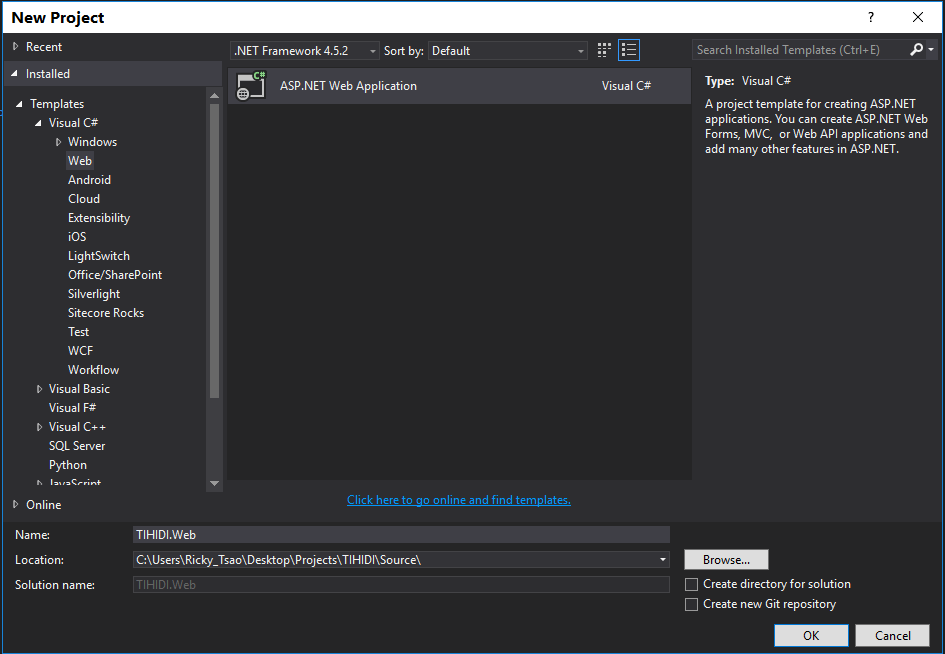
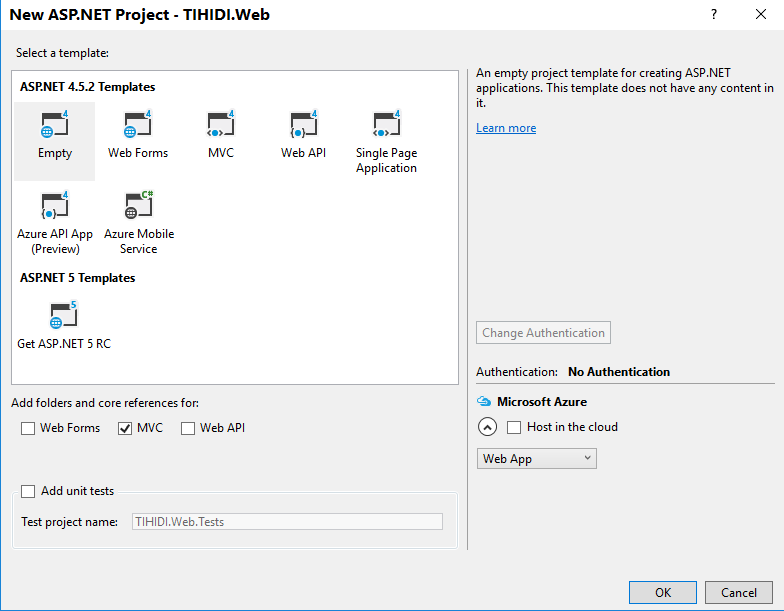
Start the VS as an admin. Go to File > New > Project. Under New Project, click on Web, then new ASP.NET project.
Give it a name, say THIHIDI.WEB. Then under location, Browse to:
C:\Users\Ricky_Tsao\Desktop\Projects\TIHIDI\Source
This is where you will be putting all the project files. Uncheck create directory for solution. This is because the Source folder is already the directory for our solution.
Then on the next screen, we’ll select the Empty project, check the “MVC” box, and click OK.
Settings
When the project is up, Delete the Web.config and Global.asax.
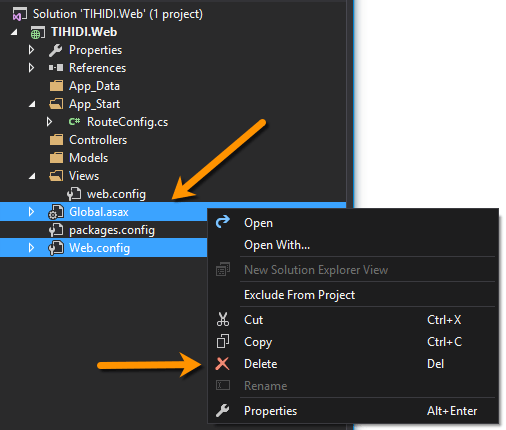
What we’re gunna do is to get the web.config and global.asax from the installed sitecore site, and copy it into our visual studio project.
copy global.asax and config.web from:
C:\inetpub\wwwroot\hadoken\Website
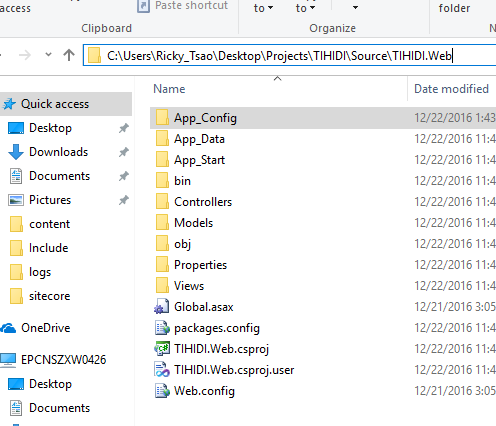
into
C:\Users\Ricky_Tsao\Desktop\Projects\TIHIDI\Source\TIHIDI.Web\
App Config
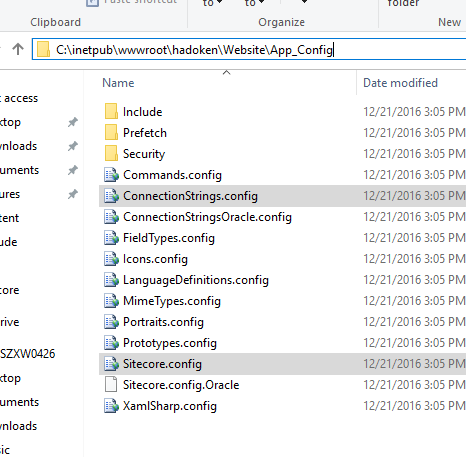
Create App_Config folder in C:\Users\Ricky_Tsao\Desktop\Projects\TIHIDI\Source\TIHIDI.Web\
Copy the ConnectionStrings.config and Sitecore.config from:
C:\inetpub\wwwroot\hadoken\Website\App_Config
in to your visual studio’s (Web project root) > App_Config folder:
C:\Users\Ricky_Tsao\Desktop\Projects\TIHIDI\Source\TIHIDI.Web\App_Config
Back in Visual Studio 2015, include the newly created App_Config folder. If you don’t see the App_Config folder, go to menu Project > Show All Files. Then you should be able to see the App_Config folder.

Also include the copied Global.asax and Web.config.

Add references to the Sitecore.Kernel.dll and Sitecore.Mvc.dll from
C:\Users\Ricky_Tsao\Desktop\Projects\TIHIDI\Dependencies\Sitecore

Open Views\web.config and add the following to the end of the
|
1 |
<add namespace=”Sitecore.Mvc” /> |
Restart Visual Studio 2015 and reopen the solution.
Rebuild solution.
At this point we have everything we need to deploy. Double check to make sure your MVC versions matchup before you deploy to the website. In my case, no additional work needed.
Setup a One Click Publish profile pointing to the website root.
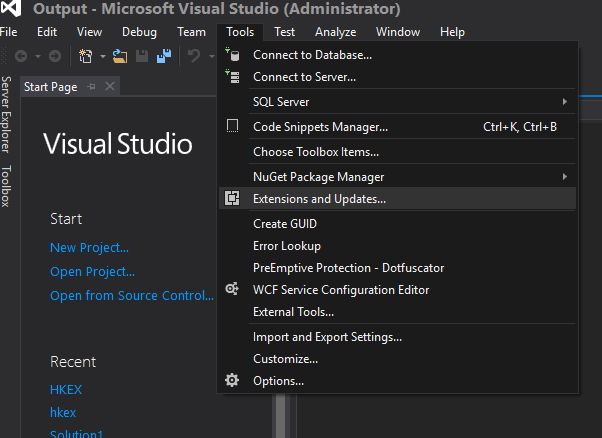
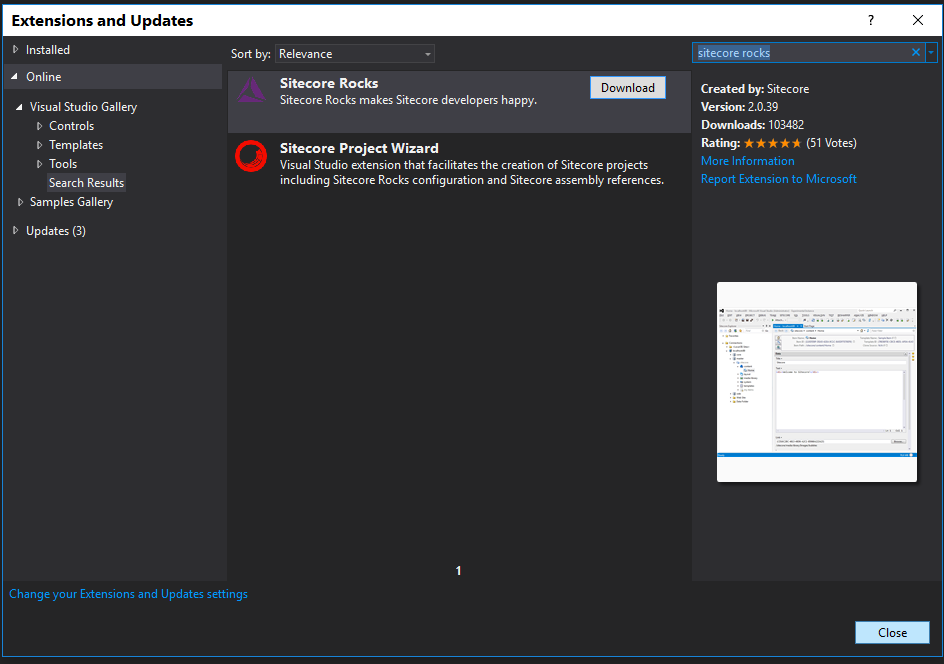
Installing sitecore rocks in Visual Studios 2015

Installing and running mongoDB on windows
Step 1 – general install
https://code.msdn.microsoft.com/Mongo-Database-setup-on-6963f46f
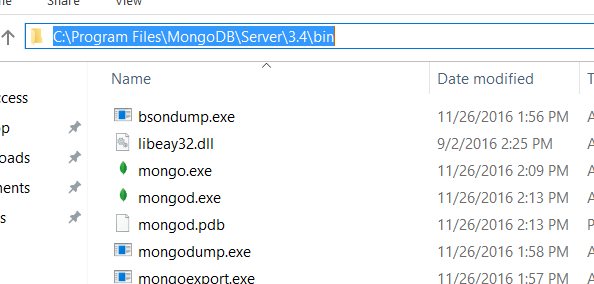
First, download Mongo DB msi file. Double click it and install it onto your machine. Look for the bin folder where all the executables are:
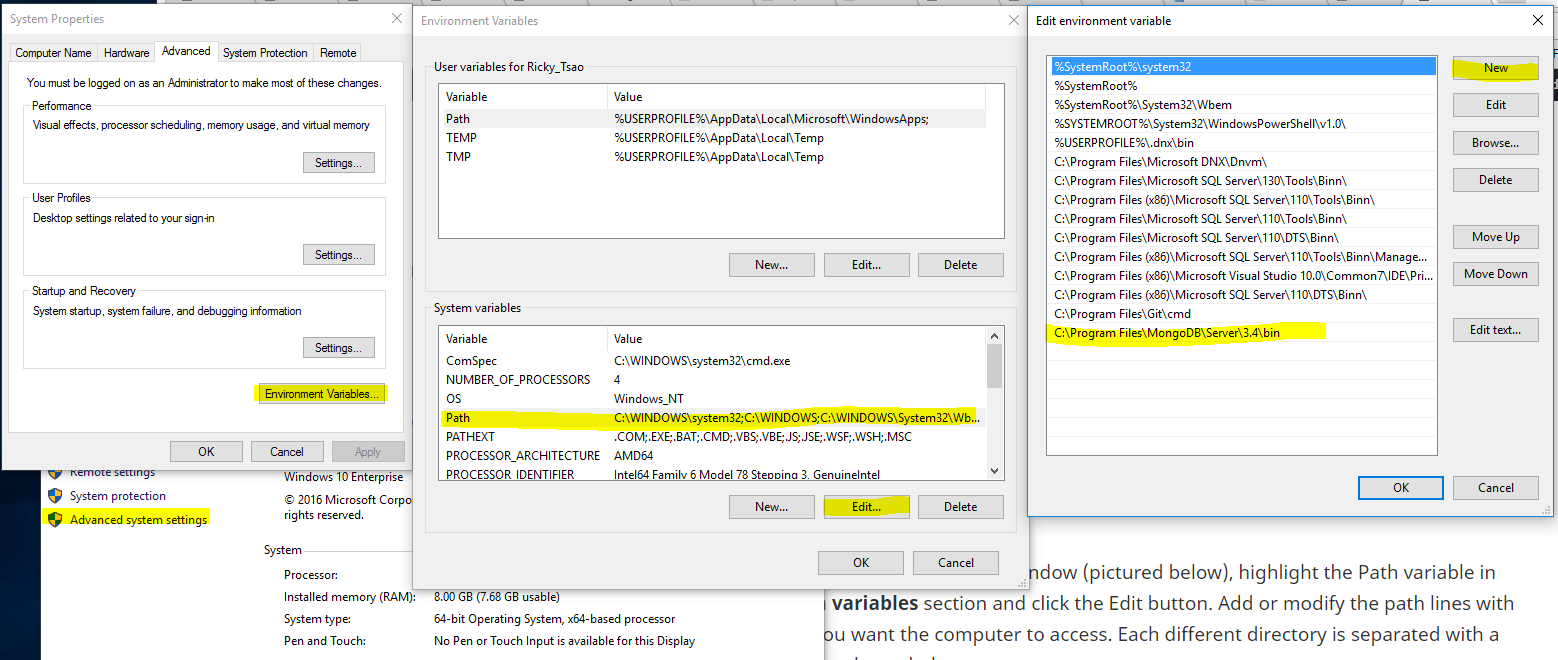
1. From the Desktop, right-click the very bottom left corner of the screen to get the Power User Task Menu.
2. From the Power User Task Menu, click System.
3. Click the “Advanced System Settings” link in the left column.
4. In the System Properties window, click on the Advanced tab, then click the Environment Variables button near the bottom of that tab.
5. In the Environment Variables window (pictured below), highlight the Path variable in the System variables section and click the Edit button. Add or modify the path lines with the paths you want the computer to access. Each different directory is separated with a semicolon as shown below.
Now open up a GitBash and check to see if the system recognizes your mongo installation:
mongo –version
You should then see output of the mongo installation.
Now open command-prompt (administrator) and run the following command to start mongo server
mongod
You’ll see it start up and then checks for
Open another command-prompt (don’t close 1st prompt) and run client command:
mongo
You’ll see an error that says it can’t find a particular directory that it wants to store data/logs to.
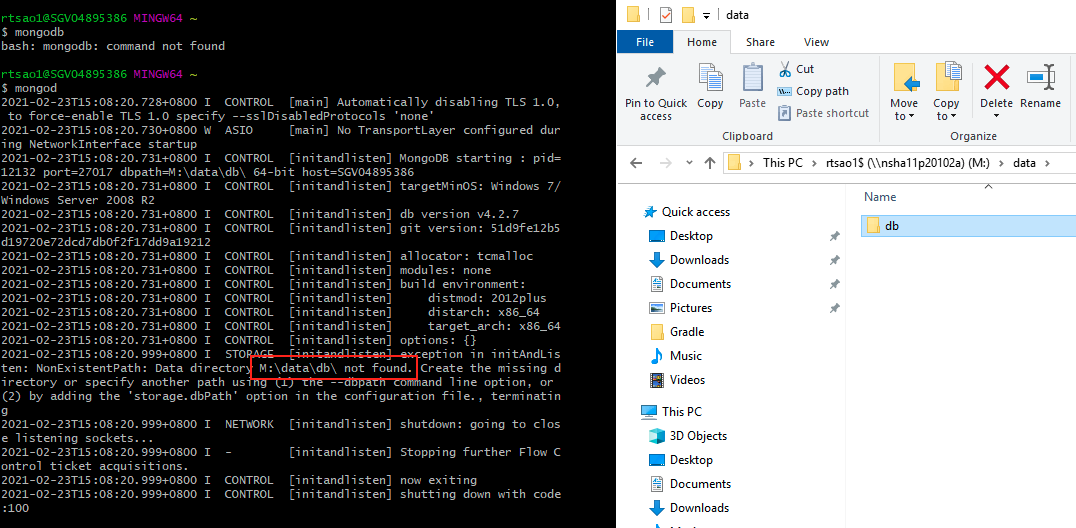
Simply create that directory and mongod again.
Then you’ll see it start up.
Optional – doing a manual run of mongod on a custom path
This basically makes mongod save all data and logs onto a custom path that you like
In order to do this, open up a command prompt and type the command like so:
C:\Users\YOUR USER NAME>mongod –dbpath the location where you want to create the database for example
> mongod –dbpath “c:\Users\your user name\Products\Mongo\database
However, if you want to do it the default way:
http://stackoverflow.com/questions/9647561/how-to-connect-to-mongodb-in-windows/31586020#31586020
Create default db folder.
mkdir c:\data\log
mkdir c:\data\db
to create both folders in your c drive.
Create config file in bin folder of mongo (or you may in save your desired destination)
Use following commands in command-prompt:
echo dbpath=c:\data\db>> “mongod.cfg”
echo logpath=c:\data\log\mongo.log>> “mongod.cfg”
This adds following in text file named “mongod” and save it as
mongod.cfg
dbpath=c:\data\db
logpath=c:\data\log\mongo.log
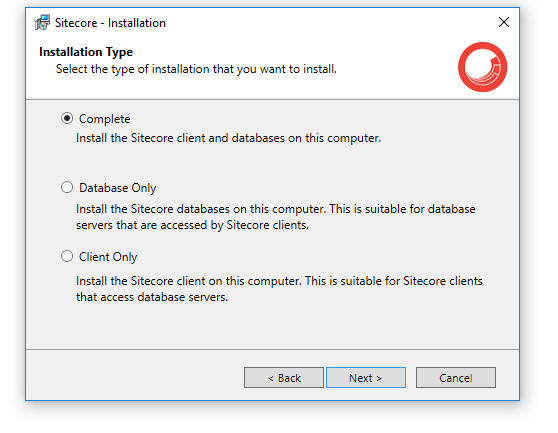
Using exe to create Sitecore
Locate your exe file and double click it.
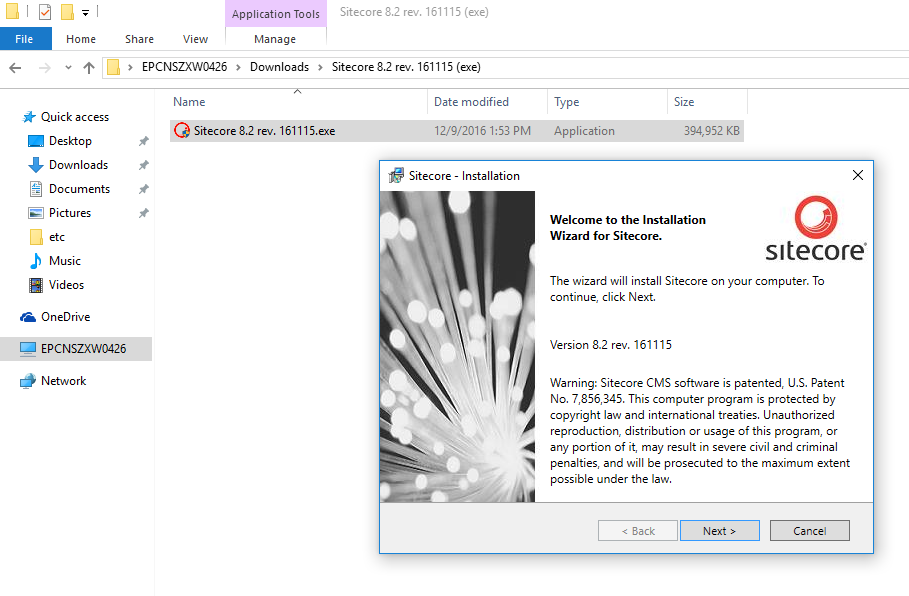
Click through the wizard and say you want a complete installation.
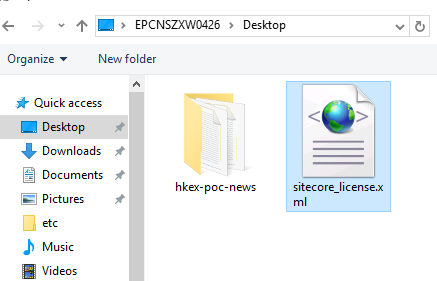
It will then ask you for a license file. Attach the license file.
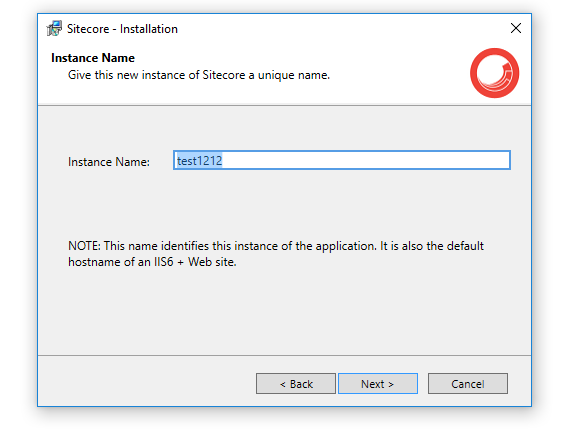
Give a name for your site.
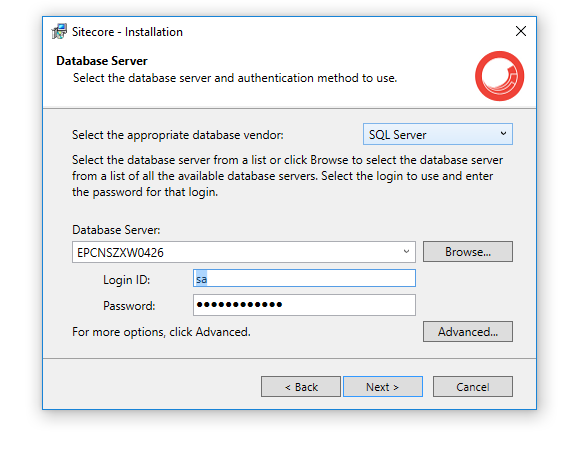
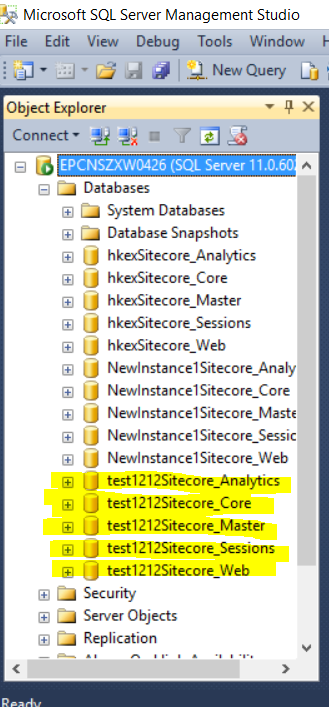
In windows 10, make sure you have MS SQL Server installed. Also make sure you have MS SQL Server Management Studio installed which you can use to view raw table data.
Sitecore uses this server/database to install its tables and insert data.
In the Management Studio, look at the Object Explorer window. Locate and see the name of your server. Type and enter that name into the Database Server textfield for our installation as shown. Your admin should give you an un/pw to connect. You can test the connection of the authentication your admin gives you in your SQL Server Management Studio. If you can click next onto the next step, then the connection is successful. If not, make sure the database name, un/pw is correct.
Remember the install location.
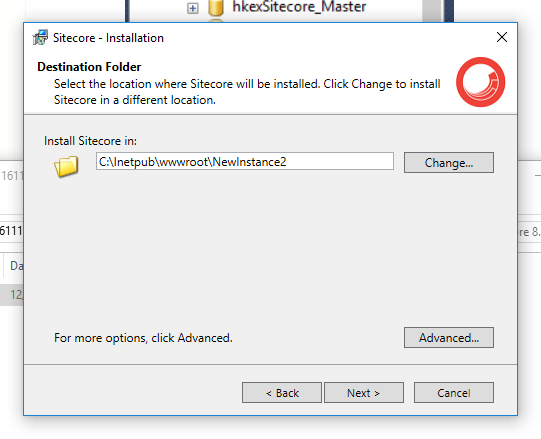
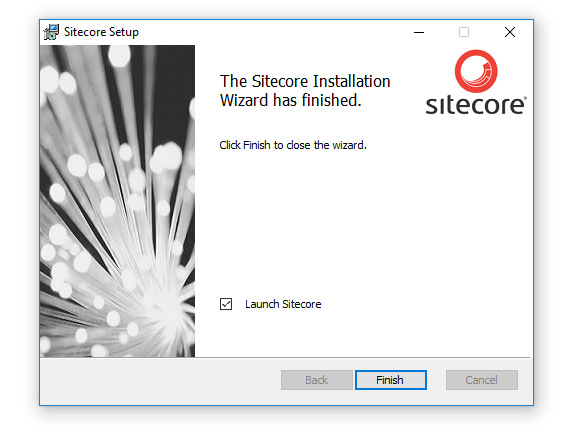
Click next, and finish the installation.
Use your SQL Management studio to verify that Sitecore has created the databases into your server. It will be using these databases to store data in.
So now, just hit up the url in Chrome:
http://test1212/sitecore/login
admin/b
and you should be in the CMS.
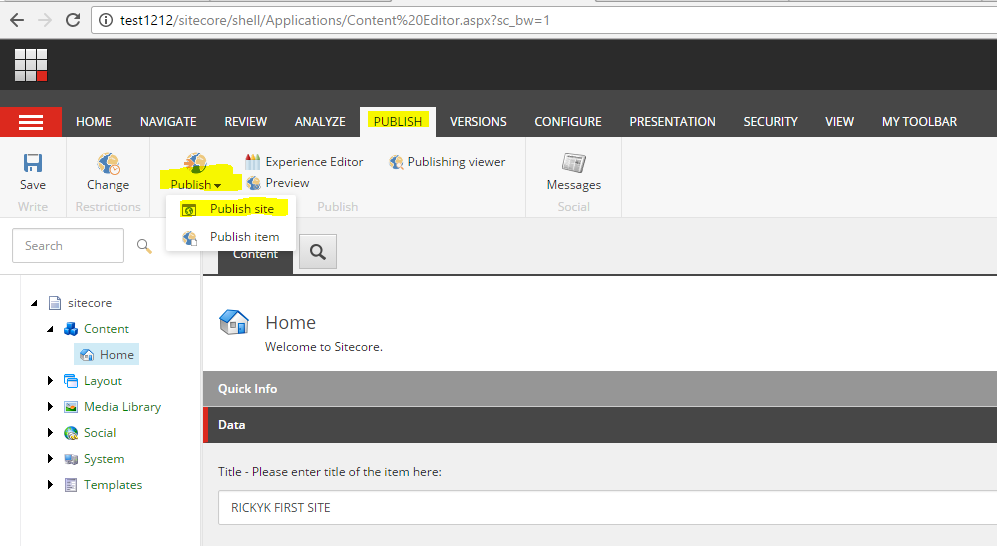
Go to Content Editor > Publish tab
Change the title to Ricky’s First Site. Make sure you save.
Do a smart publish. Leave the other defaults.
Once, its done, go to your browser, type: test1212/
and you’ll see your site and the changes.