ref –
- https://medium.com/@bhagvankommadi/mosquitto-mqtt-2a352bd8f179
- https://github.com/GR34SE/react-typescript-starter
React Project with MQTT client
‘yarn’ to install packages
‘yarn develop’ to run on localhost:8080
Mosquitto is an open source MQTT message broker service. It uses MQTT protocol for device to communicate by sending and receiving messages. Among the message brokers that support MQTT, Mosquitto is a small and light weight implementation of MQTT v3.1/3.1.1.
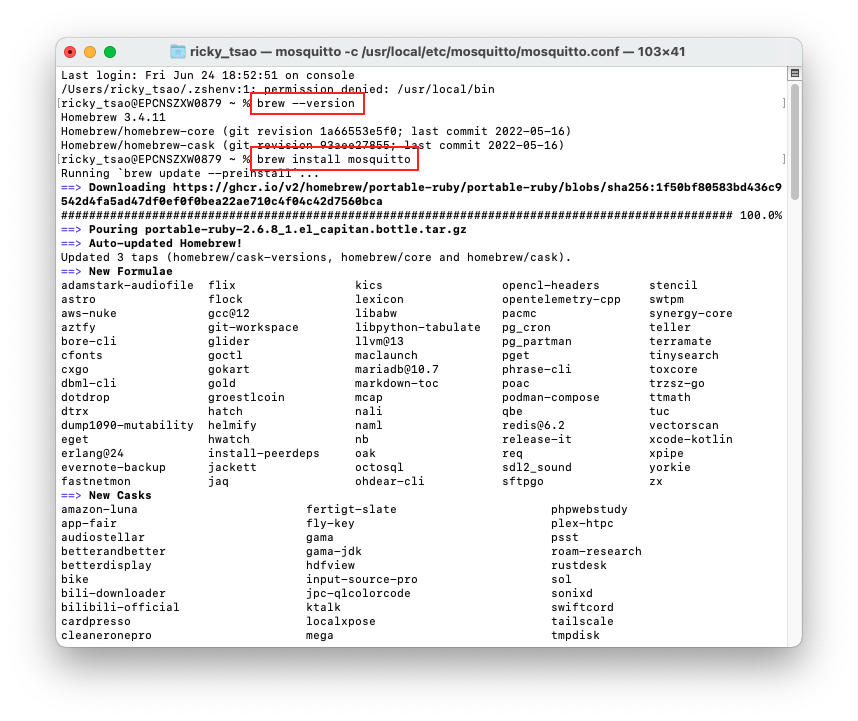
Installing Mosquitto locally on your Mac
make sure you have brew installed. brew –version
Then we install mosquitto. brew install mosquitto
Create a script where we start up mosquitto. We run it by going sh mos.sh

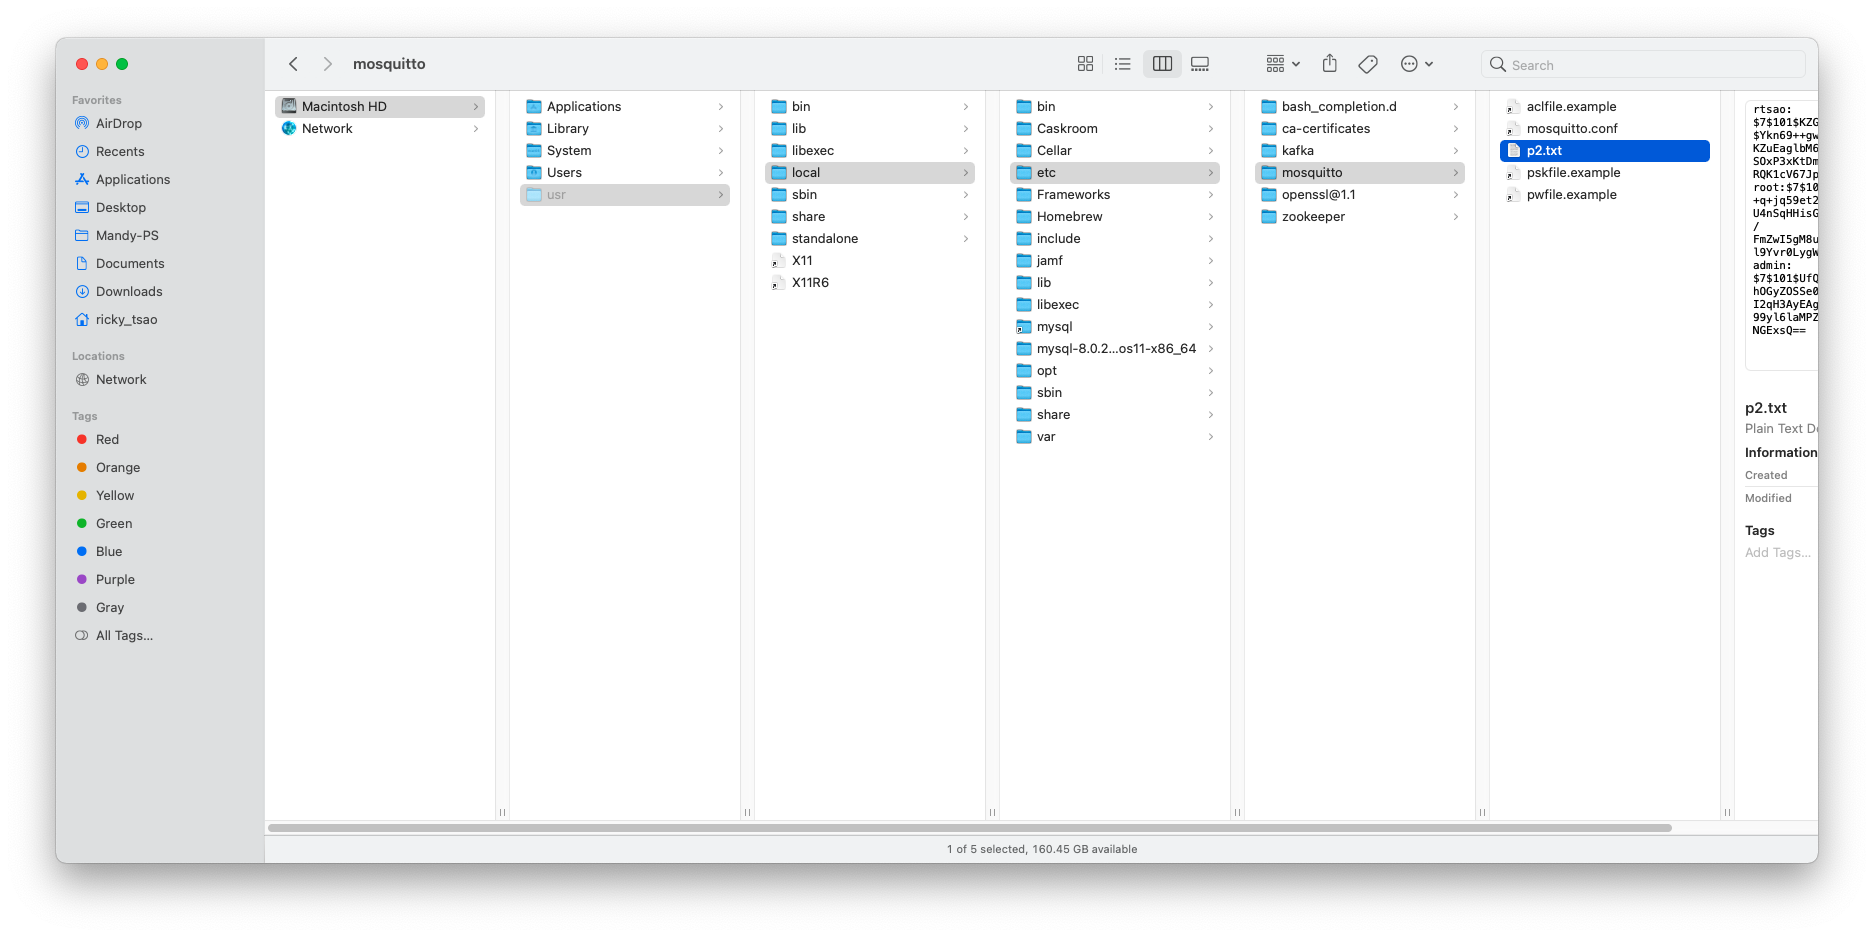
Create password file
create a file called say, p2.txt
enter your username:password like so:
admin/root
root/root
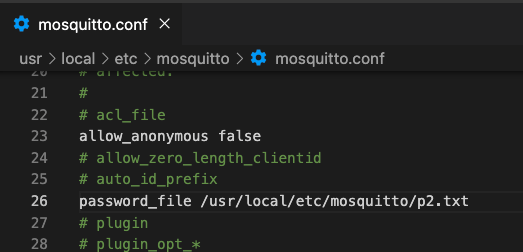
Then place the p2.txt file into /usr/local/etc/mosquitto
Make sure we hash it:
mosquitto_passwd -U passwordfile
Then we edit mosquitto.conf in /usr/local/etc/mosquitto
restart mosquitto and then open MQTTX app.
Setting up MQTTX
MQTT X is a cross-platform MQTT 5.0 client tool open-sourced by EMQ, designed to help develop and debug MQTT services and applications faster.
name: localhost
client ID: auto-generated
username: ‘put the username you inserted into p2.txt’
password: ‘the matching password for the username’
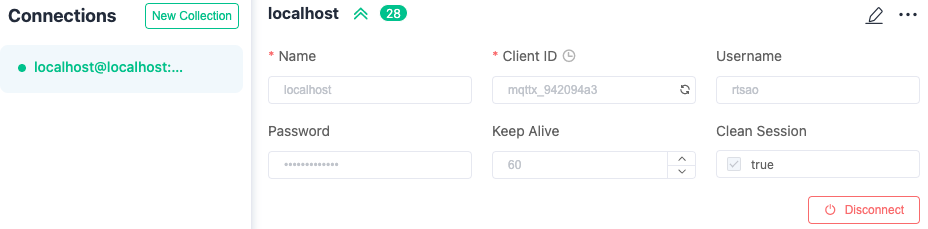
Press connect.
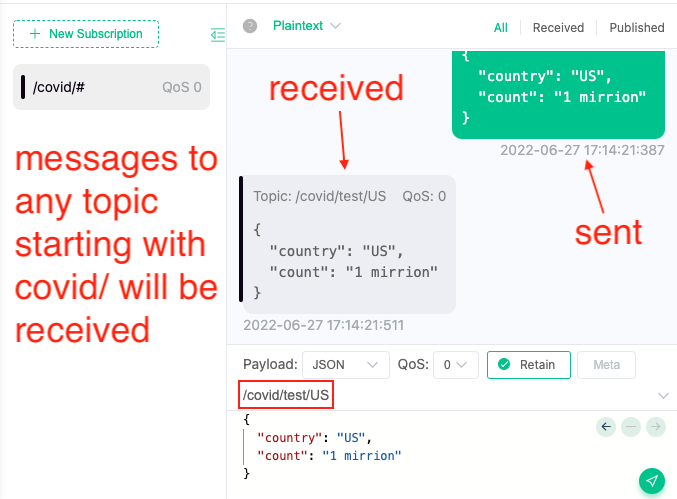
Now that we’re connected, let’s create a topic. Click on ‘New Subscription’.
Let’s type topic as “/covid/#”
By using MQTTX, we send payload for topic “/covid/….” to our local MQTT broker. It will then send to all the MQTT clients that have subscribed to “/covid/….”.
Getting local MQTT broker to work with local MQTT client
Now that our local MQTT broker is working, let’s create a MQTT client.
We start off with a very basic functional component. We create strings for our MQTT broker url, which is ws://localhost:9001. The reason why we use ws here is for web service, which is the way how MQTT clients communicate with brokers. We do this over port 9001, which is reserved for ws.
src/components/HelloWorld/index.tsx
1 2 3 4 5 6 7 8 9 10 11 12 13 14 15 16 17 18 19 20 21 22 |
import React from "react"; import mqtt, {MqttClient} from "mqtt/dist/mqtt"; const MQTT_TAG = "MQTT"; const brokerUrl = "ws://localhost:9001"; const un = "admin"; const pwd = "admin"; const clientId = "mqttx_12345678"; const subscribeToTopic = "/messages/morning/#"; const HelloWorld: React.FC = () => ( <> <h1>Basic MQTT test</h1> <p>broker url: {brokerUrl}</p> <p>username: {un}</p> <p>password: {pwd}</p> <p>topic: {subscribeToTopic}</p> </> ); export default HelloWorld; |
step 1 – create an instance of the MQTT client make sure we are connected
|
|
const PushClient: PushClientType = SingletonMQTTClient(); |
step 2 – we subscribe
|
|
PushClient.subscribe([subscribeToTopic]); |
Step 1 – Functionality
We create an object where we return functionality to:
- subscribe
- unsubscribe
- terminate
So we have something like this
1 2 3 4 5 6 7 8 9 10 11 12 13 14 15 16 17 18 19 20 21 |
const SingletonMQTTClient = () => { const subscribe = (topics: string[]) => { } const unsubscribe = (outDatedTopics: string[]) => { } const terminate = () => { } return { subscribe, unsubscribe, terminate }; } |
Step 2 – Singleton
Note that arrow functions cannot be instantiated, only function constructors can be instantiated. So this arrow function explicitly tells the readers that we intend to work with one instance only. And that this one instance will operate on these three functions. However, if it gets called over and over, it will result in multiple instances being created. So we must implement a singleton in order to ensure we only have one instance.
We create a singleton for this instance, at the top.
We call this singleton client of type InternalClient.
Our interface InternalClient calls for property _instance, which references the mqtt client object itself.
And also getL function instance, where it uses lazy loading to check if _instance is created.
If so, we return _instance. If not, we create it using create(). This ensures a singleton.
src/components/HelloWorld/index.tsx
1 2 3 4 5 6 7 8 9 10 11 12 13 14 15 16 17 18 19 20 21 22 23 |
interface InternalClient { _instance: MqttClient | null; instance: MqttClient; } const SingletonMQTTClient = () => { // private const client: InternalClient = { _instance: null, get instance() { if (this._instance) { return this._instance; } this._instance = create(); return this._instance; } }; // private const create = () => { return initOneMqttClient(); }; } |
In other words, we see that whenever another source uses client, it will try to access instance. The get function ‘instance’ lazy loads _instance. Because it is null initially, it will proceed to create a new mqtt client object.
If it already has created and point to it, then we just return _instance.
Let’s take a look at how a mqtt client object is created.
We first use import npm MQTT package. We need mqtt to execute its connect function in order to return us a client object. We import MqttClient type because that is the client object’s type.
Hence, we call connect and insert our strings as parameters.
Remember that the un and pwd are username passwords we insert into p2.txt earlier into /usr/local/etc/mosquitto
Once we get that client object we simply return it to be used.
src/components/HelloWorld/index.tsx
|
|
import mqtt, {MqttClient} from "mqtt/dist/mqtt"; ... ... const initOneMqttClient = (): MqttClient => { const client = mqtt.connect(brokerUrl, { clientId, username: un, password: pwd }); return client; }; |
Now run the app and make sure the returned object is valid.
|
|
// step 1 - make sure we are connected const PushClient: PushClientType = SingletonMQTTClient(); if (PushClient) { console.log('works'); } |
MQTT event handler
So now that we have a working mqtt client object, we need to implement event handlers so that we know when we are connected, messages come in, etc.
What this means is that say another Node Server acts as a data center. It wants to inform all of us mqtt clients a ‘good morning’ message on topic “/messages/morning/#”. So any mqtt client that subscribes to /messages/morning/{wildcard} will receive it.
So our Node server sends the messages to our local MQTT broker. The MQTT broker will then relay this message to us via the ‘message’ event handler.
Let’s first do event handler for “connect”. When our mqtt client is connected to the MQTT broker, we will arrive here.
|
|
const initOneMqttClient = (): MqttClient => { ... ... client.on("connect", () => { console.log(MQTT_TAG, "connected"); }); |
when we receive message as explained, it will come here:
|
|
const handleIncomingMessage = (topic: string, type: string, data: any) => { console.log("handle it!"); }; client.on("message", (topic: string, message: string, packet: any) => { console.log("topic", topic); console.log("message", message); console.log("packet", packet); handleIncomingMessage(topic, message, packet); }); |
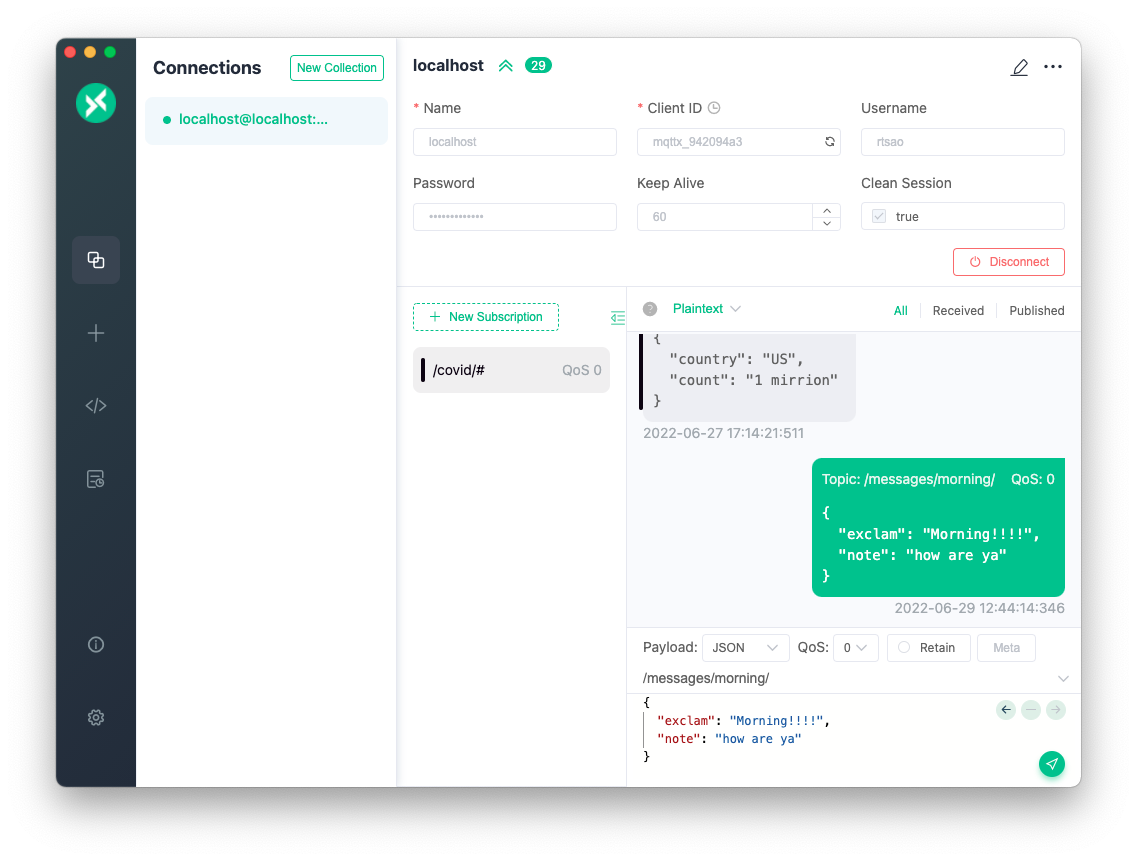
Let’s send a message from our MQTTX test client:
Now, in our event handlers, we see that first, when we start up as an app, we are connected.
Then we receive this message.
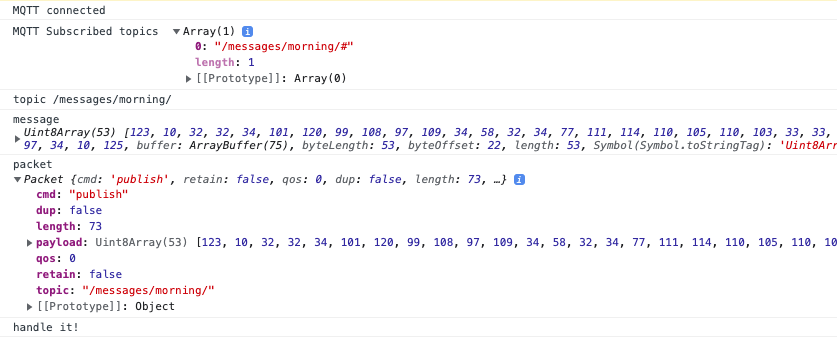
Great! So we know the messages are getting received.
But we see that the packet data come in as a stream of data via Uint8Array…where each integer represents utf-8 data.
We will use Pako to inflate the message.
|
|
const data = pako.inflate(message); |
JSON messages sent by MQTT broker
ref – https://stackoverflow.com/questions/50000744/why-is-a-json-parsed-as-uint8array-by-mqtt-js
All MQTT message payloads are just byte arrays at the transport level. If any client library is automatically converting payloads that look like strings to strings this is most likely based on a default encoding (most likely UTF-8)
That JSON contains UTF-16 chars (“Nuages \u00e9pars d\u00e9butant dans l\u2019apr\u00e8s…”) and I would guess that the UTF-8 decoder is failing so the client library is returning the byte representation you to do your own decoding:
|
|
const handleIncomingMessage = (topic: string, message: any) => { console.log("handle it!"); console.log("topic is", topic); console.log("message is: ", message); }; client.on("message", (topic: string, message: string, packet: any) => { handleIncomingMessage(topic, JSON.parse(new TextDecoder("utf-8").decode(packet.payload))); }); |


