ref – http://swiftdeveloperblog.com/deep-linking-using-custom-url-scheme/
Category Archives: Uncategorized
Localization for swift
Open Xcode and click on File->New->Project… to create a new project, choose Single View Application.
Select Swift for the language project and name it as you want, personally I called it “LocalizationTutorial”
Click on your project icon (the blue icon) in your directory hierarchy on the left hand side, to “Info”.
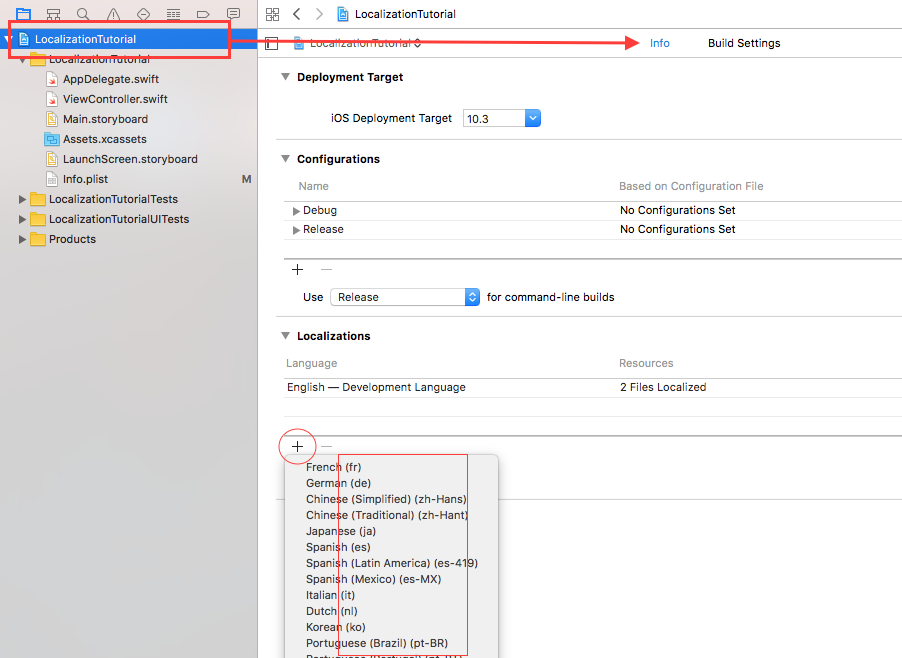
Now click on the “+” button in the “Localizations” section and select the language you want to add to the project.
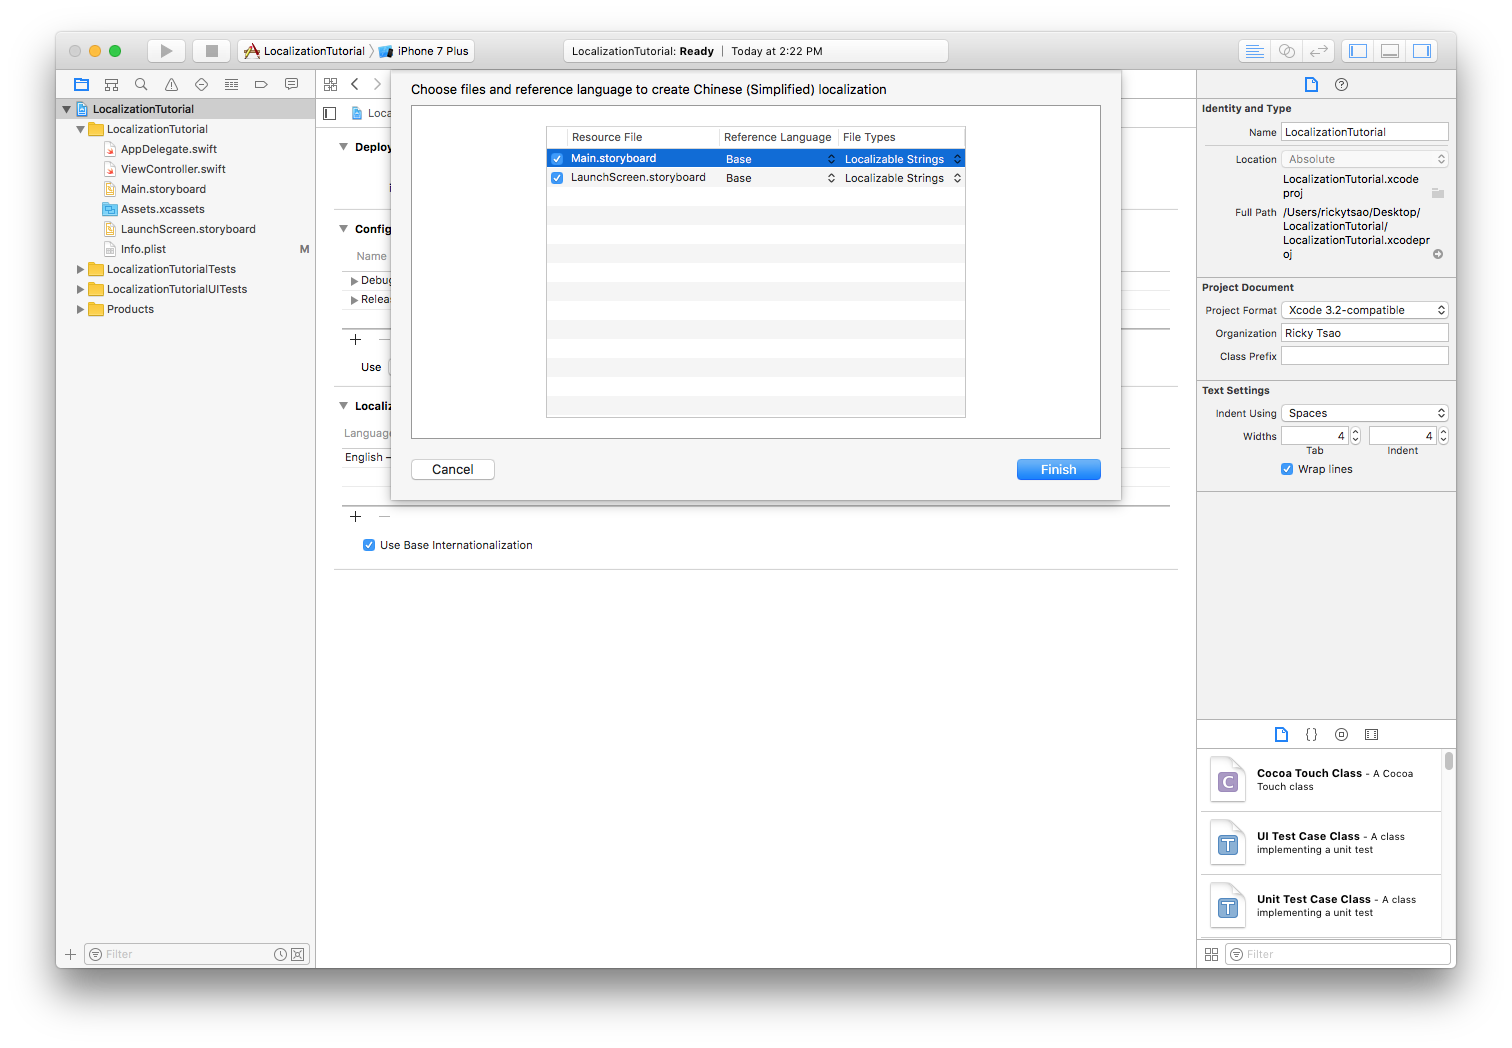
When you got this screen, choose the default files listed and click Finish.
Alright, since now our project is synchronized with different languages, we have to create the files which will contain the different translated copies for our app.
Localizable.strings
Go to File->New->File… and add a new Strings File.
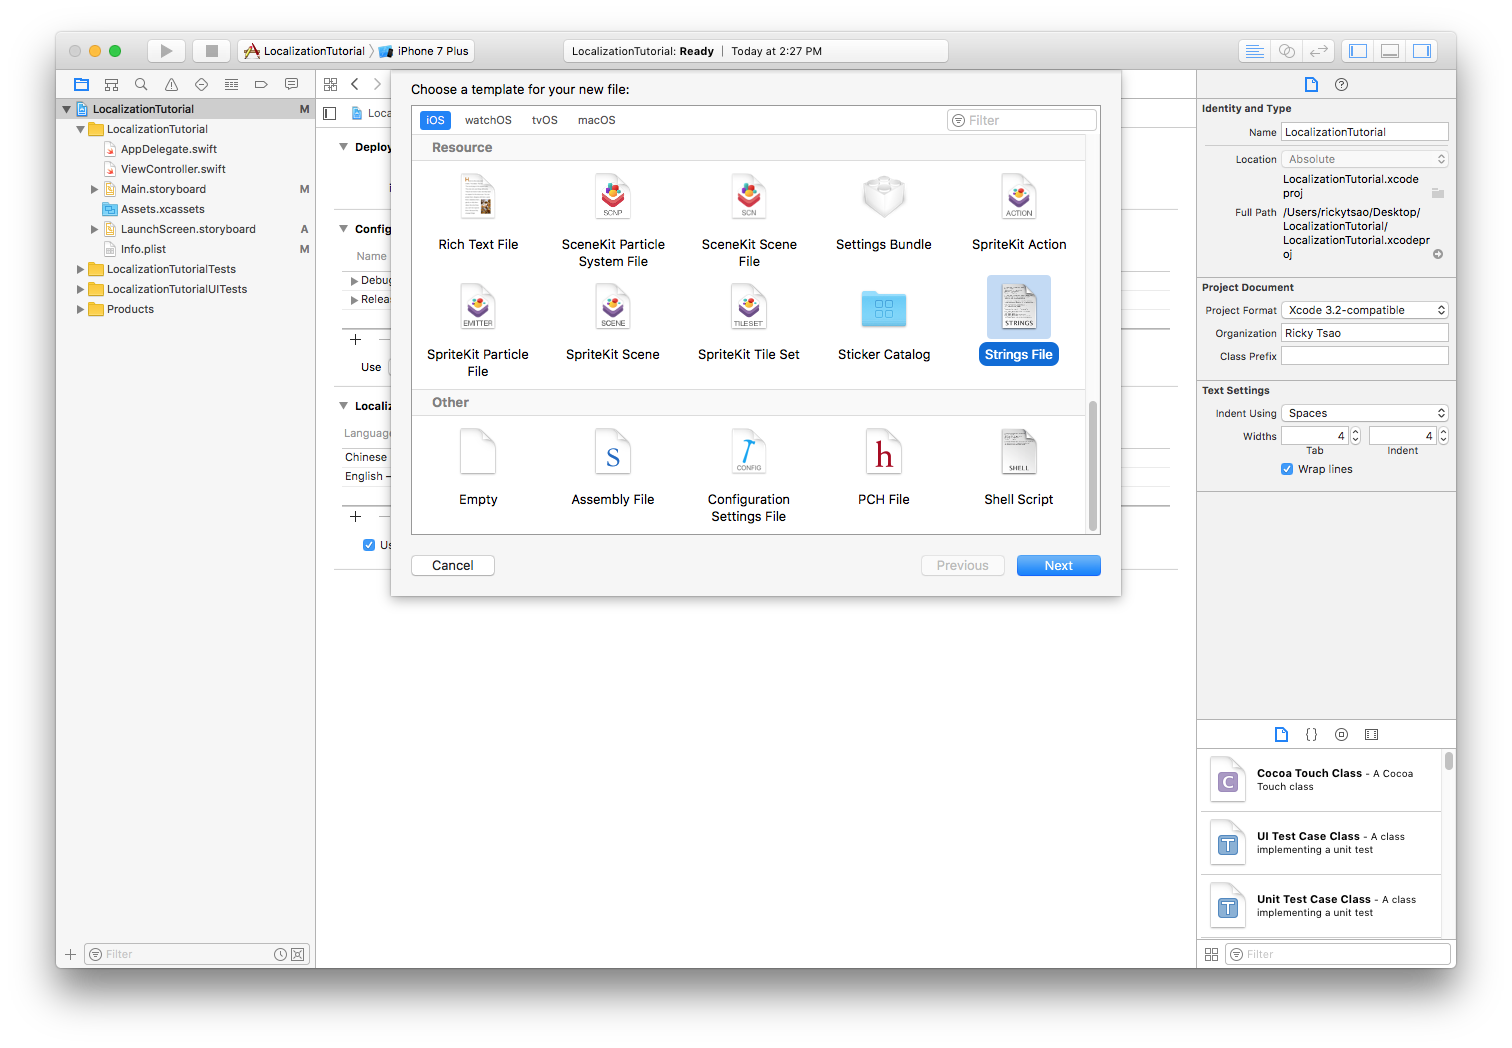
Call this file “Localizable.strings”.
Select this file in the project folder and click on “Localize…” in the Localization section (in the right utility panel).
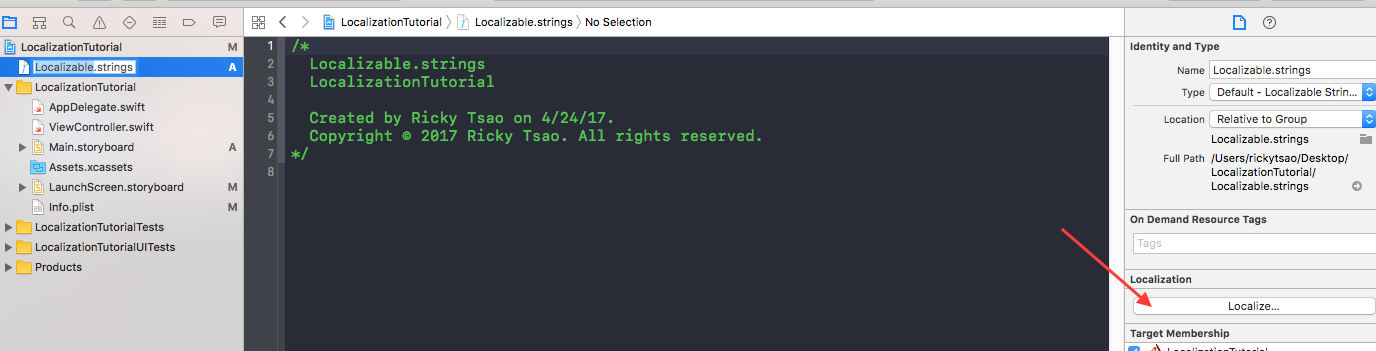
Then, select English in the localization drop down.
Now if you click on the Localizable.strings file you should be able to see that the Localization section has been updated.
Each selected language item will create an alternative version of the file for this language. You got it, you have to select “English” and the other(s) language(s) you want to use in your app.
Localizable.strings (English)
|
1 2 |
"HELLO_WORLD" = "Hello World !"; "GOOD_BYE_WORLD" = "Good bye old world"; |
Localizable.strings (Chinese (Simplified))
|
1 2 |
"HELLO_WORLD" = "世界你好!"; "GOOD_BYE_WORLD" = "再见世界!"; |
Create StringExtension.swift
|
1 2 3 4 5 6 7 8 9 10 11 12 |
import Foundation extension String { func localized(lang:String) -> String { let path = Bundle.main.path(forResource: lang, ofType: "lproj") let bundle = Bundle(path: path!) return NSLocalizedString(self, tableName: nil, bundle: bundle!, value: "", comment: "") } } |
ViewController
|
1 2 3 4 5 6 7 8 9 10 11 12 13 14 15 16 17 18 19 20 21 22 23 24 25 26 27 28 29 30 31 32 33 34 35 36 37 38 39 40 41 42 43 44 45 46 47 48 49 50 51 52 53 54 55 56 57 58 59 60 61 62 63 64 65 66 67 68 69 70 71 72 73 74 75 |
import UIKit class ViewController: UIViewController { var label: UILabel? // automatically initialized with nil var button: UIButton? // automatically initialized with nil var language: String? // automatically initialized with nil // when we need to access them, make sure to use self.---! override func viewDidLoad() { super.viewDidLoad() // Do any additional setup after loading the view, typically from a nib. // eventually be assigned // language self.language = "en" // label // You have to use the correct abbreviation from the Apple Policy Localization // localized returns the string of "HELLO_WORLD" when given abbreviation string of "en" let labelText: String = "GOOD_BYE_WORLD".localized(lang: self.language!) // label is to contain the label text self.label = UILabel(frame: CGRect(x: 0, y: 200, width: self.view.frame.width, height: 50)) self.label!.text = labelText self.label!.textAlignment = .center self.view.addSubview(self.label!) // buttons let buttonTitle: String = "Change Language" self.button = UIButton(frame: CGRect(x: self.view.frame.width/2 - 100, y: 300, width: 200, height: 50)) self.button!.setTitle(buttonTitle, for: .normal) self.button!.backgroundColor = UIColor.blue self.button!.addTarget(self, action: #selector(changeLanguage(sender:)), for: UIControlEvents.touchDown) self.button!.addTarget(self, action: #selector(resetBackgroundColor(sender:)), for: UIControlEvents.touchUpInside) self.view.addSubview(self.button!) } func changeLanguage(sender: AnyObject) { self.button!.backgroundColor = UIColor.gray /* Change Language */ if (self.language == "en") { self.language = "zh-Hans" } else { self.language = "en" } /* Update label language */ let labelText: String = "GOOD_BYE_WORLD".localized(lang: self.language!) self.label!.text = labelText } func resetBackgroundColor(sender: AnyObject) { self.button!.backgroundColor = UIColor.blue } override func didReceiveMemoryWarning() { super.didReceiveMemoryWarning() // Dispose of any resources that can be recreated. } } |
How to Run
Click the button to switch languages and display the Hello World string in different languages.
type inference
the compiler will infer the type of variable or constant, based on what is being assigned to it.
|
1 2 3 4 5 |
// inference var greetingString = "hello" // greetingString variable will infer the type of String //explicit var greetingString : String = "HadooooKen" |
Comments and Quick Help
// MARK: this is viewable in the jump bar
// TODO: Do This
// FIXME: fix this
/// A Quick Help comment
///
/// – warning: integer must be > 0
/// – parameter integer: Integer to square
///
/// – returns ‘integer’ squared
func doSomething() {
}
Value types vs Reference types in swift (advanced)
ref – https://www.raywenderlich.com/112029/reference-value-types-in-swift-part-2
Mixing Value and Reference Types
You’ll often run into situations where reference types need to contain value types, and vice versa. This can easily complicate the expected semantics of the object.
To see some of these complications, you’ll look at an example of each scenario.
Reference Types Containing Value Type Properties
It’s quite common for a reference type to contain value types. An example would be a Person class where identity matters, that stores an Address structure where equality matters.
To see how this may look, replace the contents of your playground with the following basic implementation of an address:
|
1 2 3 4 5 6 |
struct Address { var streetAddress: String var city: String var state: String var postalCode: String } |
All properties of Address together form a unique physical address of a building in the real world. The properties are all value types represented by String; the validation logic has been left out to keep things simple.
Next, add the following code to the bottom of your playground:
|
1 2 3 4 5 6 7 8 9 10 |
class Person { // Reference type var name: String // Value type var address: Address // Value type, own copy init(name: String, address: Address) { self.name = name self.address = address } } |
This mixing of types makes perfect sense in this scenario. Each class instance has its own value type property instances that aren’t shared. There’s no risk of two different people sharing and unexpectedly changing the address of the other person.
To verify this behavior, add the following to the end of your playground
|
1 2 3 4 5 6 7 8 9 10 11 12 |
// 1 let kingsLanding = Address(streetAddress: "1 King Way", city: "Kings Landing", state: "Westeros", postalCode: "12345") let madKing = Person(name: "Aerys", address: kingsLanding) let kingSlayer = Person(name: "Jaime", address: kingsLanding) // 2 kingSlayer.address.streetAddress = "Secret Address where the King can't find him" // 3 madKing.address.streetAddress // 1 King Way kingSlayer.address.streetAddress // Secret Address where the King can't find him |
Value Types Containing Reference Type Properties
Add the following code to your playground to demonstrate a value type containing a reference type:
|
1 2 3 4 |
struct Bill { let amount: Float let billedTo: Person // this one will be shared by numerous Bill instances because it is a reference. } |
Each copy of Bill is a unique copy of the data, but the billedTo Person object will be shared by numerous Bill instances. This simply does not make sense in maintaining the value semantics of your objects.
Using Copy-on-Write Computed Properties
Swift can give you the ability for your value type to spawn its own reference type. That way, when other objects wants to reference your value type’s reference object, it won’t simply point to it…as that would make one data object be changed by 2 or more references.
When other objects point to your value type’s reference object, your value type will spawn (create another instance) of the reference object for others. That way, your value type will have its own reference object with its respective address, and other object would have their reference object with its respective address.
1) declare a reference type
2) create a property (billedToForRead) to get the current reference
3) create another property (billedToCreateNewInstance) which re-assigns the reference to a new heap allocated Person object. When we create a new object on the heap, our property billedTo will re-point to that object. Thus, billedToCreateNewInstance will return a new object with a new address.
In Swift, we need to use the word mutating in order to let the value type know that its property will be changing.
|
1 2 3 4 5 6 7 8 9 10 11 12 13 14 15 16 17 18 19 20 21 22 23 24 25 26 27 28 29 30 31 32 33 34 35 36 37 38 39 40 41 42 43 44 45 46 |
// a value type struct Bill { let amount: Float private var _billedTo: Person // 1, points to reference type, shared by many references // 2, use (property name)ForRead to implement, read operations var billedToForRead: Person { print("-- billedToForRead --") return _billedTo } // 3, use (property name)ForWrite to implement, write operations var billedToCreateNewInstance: Person { // in a value type, if you need to modify the properties of your structure // or enumeration within a particular method, you can opt in to mutating behavior // for that method. // (our case) // Mutating a "member of a value type instance" means mutating the value type instance itself (self). // The address will change. mutating get { print("-- billedToForWrite --") print("\(_billedTo)") _billedTo = Person(name: _billedTo.name, address: _billedTo.address) return _billedTo } } init(amount: Float, billedTo: Person) { print("--- init Bill ---") self.amount = amount _billedTo = Person(name: billedTo.name, address: billedTo.address) } } var ricky = Person(name: "Ricky Tsao", address: "Shenzhen, China") var billOne = Bill(amount: 8.88, billedTo: ricky) var check = billOne.billedToForRead var newPerson = billOne.billedToCreateNewInstance print("------ END --------") |
If you can guarantee that your caller will use your structure exactly as you meant, this approach would solve your issue. In a perfect world, your caller would always use billedToForRead to get data from your reference and billedToCreateNewInstance to make a change to the reference.
However, callers will also make some mistakes in calling your API properties. Hence, what we can do is to hide our properties from the outside and create methods to
Defensive Mutating Methods
So as mentioned, we’ll hide the two new properties from the outside.
|
1 2 3 4 5 6 7 8 9 10 11 12 13 14 15 16 17 18 19 20 21 22 23 24 25 26 27 28 29 30 31 32 33 34 35 36 37 38 39 40 41 42 43 44 45 46 47 48 49 50 51 52 53 54 55 56 57 58 |
// 1) make properties private // 2) create mutating functions // a value type struct Bill { let amount: Float private var _billedTo: Person // make the propertis private private var billedToForRead: Person { print("-- billedToForRead --") return _billedTo } // private var billedToCreateNewInstance: Person { // in a value type, if you need to modify the properties of your structure // or enumeration within a particular method, you can opt in to mutating behavior // for that method. // (our case) // Mutating a "member of a value type instance" means mutating the value type instance itself (self). // The address will change. mutating get { print("-- billedToForWrite --") print("\(_billedTo)") _billedTo = Person(name: _billedTo.name, address: _billedTo.address) return _billedTo } } // mutating means this function will change a property mutating func updateBilledToNewAddress(address: String) { billedToCreateNewInstance.address = address } mutating func updateBilledToName(name: String) { billedToCreateNewInstance.name = name } init(amount: Float, billedTo: Person) { print("--- init Bill ---") self.amount = amount _billedTo = Person(name: billedTo.name, address: billedTo.address) } } var ricky = Person(name: "Ricky", address: "Shenzhen, China") var billOne = Bill(amount: 8.88, billedTo: ricky) billOne.updateBilledToName(name: "Ivan K") billOne.updateBilledToNewAddress(address: "Vision Park, Shenzhen, China") print("------ END --------") |
1) You made both computed properties private so that callers can’t access the properties directly.
2) You also added methods to mutate the Person reference with a new name or address. This makes it impossible for someone else to use it incorrectly, since you’re hiding the underlying billedTo property.
Also, take note that “Cannot use mutating member on immutable value”.
for example:
|
1 2 3 4 5 |
var ricky = Person(name: "Ricky", address: "Shenzhen, China") let billOne = Bill(amount: 8.88, billedTo: ricky) // notice declared with 'let' billOne.updateBilledToName(name: "Ivan K") // error: Cannot use mutating member on immutable value billOne.updateBilledToNewAddress(address: "Vision Park, Shenzhen") // error: Cannot use mutating member on immutable value |
A More Efficient Copy-on-Write
There is only one small problem. Whenever we want to change the Person object’s attributes, we ALWAYS instantiate a Person object:
|
1 2 3 4 |
mutating get { _billedTo = Person(name: _billedTo.name, address: _billedTo.address) return _billedTo } |
As you can see, whenever we get the billedTo attribute, we always return a newly instantiated object.
If another Bill object references this Person object, then yes, we should instantiate a new Person object for our own Bill object to reference, and change data with.
However, what if the Person object has no other references on it? ..and is only referenced by self?
In that case, we do not need to instantiate it. We simply use it as it, and change the attributes.
|
1 2 3 4 5 6 7 8 9 10 11 12 13 14 15 16 17 18 19 20 21 22 23 24 25 26 27 28 29 30 31 32 33 34 35 36 37 38 39 40 41 42 43 44 45 46 47 48 49 50 51 52 53 54 55 56 57 58 59 |
struct Bill { let amount: Float private var _billedTo: Person // make the propertis private private var billedToForRead: Person { print("-- billedToForRead --") return _billedTo } private var billedToCreateNewInstance: Person { mutating get { print(" --- billedToCreateNewInstance --- ") if !isKnownUniquelyReferenced(&_billedTo) { print("Making a copy of _billedTo") _billedTo = Person(name: _billedTo.name, address: _billedTo.address) } else { print("Not making a copy of _billedTo") } return _billedTo } } // mutating means this function will change a property mutating func updateBilledToNewAddress(address: String) { billedToCreateNewInstance.address = address } mutating func updateBilledToName(name: String) { billedToCreateNewInstance.name = name } func getBill() -> Person { return billedToForRead } init(amount: Float, billedTo: Person) { print("--- init Bill ---") self.amount = amount _billedTo = Person(name: billedTo.name, address: billedTo.address) } } var ricky = Person(name: "Ricky", address: "Shenzhen, China") // 1 var billOne = Bill(amount: 8.88, billedTo: ricky) // 2 billOne.updateBilledToName(name: "Ivan K") //3 billOne.updateBilledToNewAddress(address: "Vision Park, Shenzhen") var anotherReference = billOne.getBill() // 4 billOne.updateBilledToName(name: "Stone Z") // 5 billOne.updateBilledToName(name: "Bao'an, Shenzhen, China") print("------ END --------") |
Hence here is what’s happening:
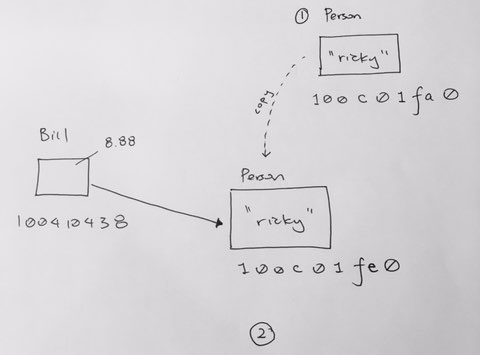
A Person object with “Ricky” (100c01fa0) is allocated on the heap. It is passed into the Bill object (100410438) to be initialized. This initialization is really about the Bill object creating its own instance of Person object (100c01fe0), and setting all its data the same as the passed in “Ricky” Person object. The original “Ricky” Person object created outside is not pointed to, nor affected.
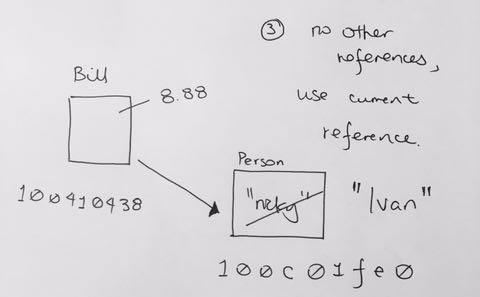
We then want to change the data of our Bill object to Ivan. We do this through the property, and evaluate whether the Person object 100c01fe0 has any other references on it. Uniquely Referenced means it is referenced only by 1 object.
|
1 2 3 |
if !isKnownUniquelyReferenced(&_billedTo) { } |
Thus, we see that IT IS only referenced once, by our Bill object. Thus, we don’t create an instance and just return the Person object. We then proceed to change the data.
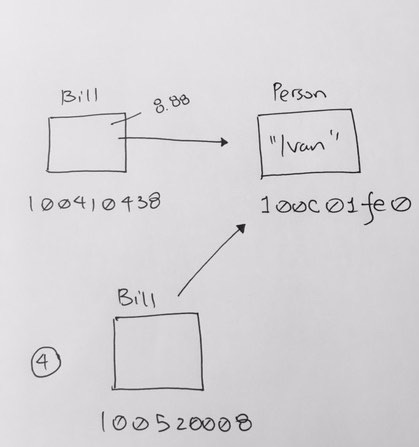
Then say we have another Bill object reference our Person (100520008). Thus, we now have two references pointing to our Person object
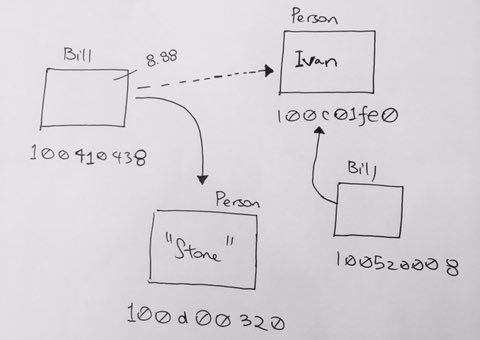
Because we have 2 references on the Person object, isKnownUniquelyReferenced will fail, and we create another Person object. That way, we get our own unique instance of Person.
Value types vs Reference types in swift (basics)
ref – https://www.raywenderlich.com/112027/reference-value-types-in-swift-part-1
Value types keep a unique copy of their data, while reference types share a single copy of their data.
Reference type
Swift represents a reference type as a class. This is similar to Objective-C, where everything that inherits from NSObject is stored as a reference type.
In Objective-C — and most other object-oriented languages — you hold references to objects. In Swift, however, you use class which is implemented using reference semantics.
|
1 2 3 4 5 |
// Reference Types: class Dog { var wasFed = false } |
The above class represents a pet dog and whether or not the dog has been fed. Create a new instance of your Dog class by adding the following:
|
1 |
let dog = Dog() |
This simply points to a location in memory that stores dog. To add another object to hold a reference to the same dog, add the following:
|
1 |
let puppy = dog |
Because dog is a reference to a memory address, puppy points to the exact same address. Feed your pet by setting wasFed to true:
|
1 |
puppy.wasFed = true |
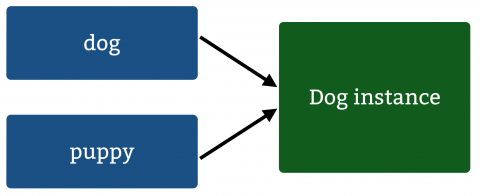
Therefore you’d expect any change in one to be reflected in the other. Check that this is true by viewing the property values in your playground:
|
1 2 |
dog.wasFed // true puppy.wasFed // true |
Changing one named instance affects the other since they both reference the same object. This is exactly what you’d expect in Objective-C.
Value types
There are many kinds of value types in Swift, such as struct, enum, and tuples. You might not realize that Objective-C also uses value types in number literals like NSInteger or even C structures like CGPoint.
|
1 2 3 4 5 6 |
var a = 42 var b = a b+=1 a // 42 b // 43 |
Clearly, a equals 42 and b equals 43. If you’d declared them as reference types instead, both a and b would equal 43 since both would point to the same memory address.
|
1 2 3 4 5 6 7 8 9 10 |
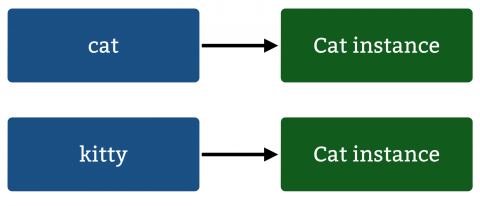
struct Cat { var wasFed = false } var cat = Cat() var kitty = cat // data copied kitty.wasFed = true cat.wasFed // false kitty.wasFed // true |
This shows a subtle, but important difference between reference and value types: setting kitty‘s wasFed property has no effect on cat. The kitty variable received a copy of the value of cat instead of a reference.
Although it’s much faster to assign a reference to a variable, copies are almost as cheap. Copy operations run in constant O(n) time since they use a fixed number of reference-counting operations based on the size of the data.
Mutability
For reference types, let means the reference must remain constant. However, you can still dereference them and change the data. In other words, you can’t change the instance the constant references, but you can mutate the instance itself.
For value types let means the instance must remain constant. No properties of the instance will ever change, regardless whether the property is declared with let or var.
It’s much easier to control mutability with value types. To achieve the same immutability/mutability behavior with reference types, you’d need to implement immutable and mutable class variants such as NSString and NSMutableString.
Which to Use and When
When to Use a Value Type
Generally speaking, use value types in the following instances:
Comparing instance data with == makes sense
“But of course,” you say. “I want every object to be comparable!”. But you need to consider whether the data should be comparable. Consider the following implementation of a point:
|
1 2 3 4 5 6 7 8 |
struct Point: CustomStringConvertible { var x: Float var y: Float var description: String { return "{x: \(x), y: \(y)}" } } |
Does that mean two variables with the exact same x and y members should be considered equal?
|
1 2 |
let point1 = Point(x: 2, y: 3) let point2 = Point(x: 2, y: 3) |
It’s clear that these two Points with the same internal values should be considered equal. The memory location of those values doesn’t matter; you’re concerned about the values themselves.
Therefore, you’d need to conform to the Equatable protocol, which is good practice for all value types. This protocol defines only one function which you must implement globally in order to compare two instances of the object. This means that the == operator must have the following characteristics:
Reflexive: x == x is true
Symmetric: if x == y then y == x
Transitive: if x == y and y == z then x == z
If you have a custom struct, you’d implement the equal sign like so:
|
1 2 3 4 5 6 7 8 9 10 11 12 13 14 15 16 17 18 19 20 |
struct RickyPoint { var x : Float var y : Float var description: String { return "{ x: \(x), y: \(y)}" } } // when you conform to protocol Equatable, you must implement: // public static func ==(lhs: Self, rhs: Self) -> Bool // else, you will get an error that you do not conform to protocol Equatable extension RickyPoint : Equatable { public static func == (lhs: RickyPoint, rhs: RickyPoint) -> Bool { return ((lhs.x == rhs.x) && (lhs.y == rhs.y)) } } |
Copies should have independent state
Structs, being value types, have independent state.
|
1 2 3 4 5 |
struct Shape { var center: Point } let initialPoint = Point(x: 0, y: 0) |
Let’s instantiate two Shape structs.
|
1 2 |
let circle = Shape(center: initialPoint) var square = Shape(center: initialPoint) |
If we are to change their state, it would be unique.
|
1 2 |
square.center.x = 5 // {x: 5.0, y: 0.0} circle.center // {x: 0.0, y: 0.0} |
Each Shape needs its own copy of a Point so you can maintain their state independent of each other.
The data will be used in code across multiple threads
This one’s a little more complex. Will multiple threads access this data? If so, will it really matter if the data isn’t equal across all threads at all times?
To make your data accessible from multiple threads and equal across threads, you’ll need:
1) to use a reference type and
2) implement locking as well
Thus, if threads can uniquely own the data, using value types makes the whole point moot since each owner of the data holds a unique copy rather than a shared reference.
When to Use a Reference Type
Although value types are useful in many cases, reference types are still useful in the following situations:
Comparing instance identity with === makes sense (this is where it compares the reference address)
=== checks if two objects are exactly identical, right down to the memory address that stores the data.
To put this in real-world terms, consider the following: if your cubicle-mate swaps one of your $20 bills with another legitimate $20 bill, you don’t really care, as you’re only concerned about the value of the object.
However, if someone stole the Magna Carta and created an identical parchment copy of the document in its place, that would matter greatly because the inherent identity of the document is not the same at all.
You can use the same thought process when deciding whether to use reference types; usually there are very few times when you really care about the inherent identity — that is, the memory location — of the data. You usually just care about comparing the data values.
You want to create a shared, mutable state
Sometimes you want a piece of data to be stored as a single instance and accessed and mutated by multiple consumers.
A common object with a shared, mutable state is a shared bank account. You might implement a basic representation of an account and person as follows:
|
1 2 3 4 5 6 7 8 9 10 |
class Account { var balance = 0.0 } class Person { let account: Account init(_ account: Account) { self.account = account } } |
If any joint account holders add money to the account, then the new balance should be reflected on all debit cards linked to the account:
|
1 2 3 4 5 6 7 8 9 |
let account = Account() let person1 = Person(account) let person2 = Person(account) person2.account.balance += 100.0 person1.account.balance // 100 person2.account.balance // 100 |
Since Account is a class, each Person holds a reference to the account, and everything stays in sync.
Selector and UIButton in swift
swift 3.0
Given
|
1 2 3 4 |
func tap(gestureReconizer: UITapGestureRecognizer) { ... } |
should now be written as
|
1 |
#selector( tap(gestureReconizer:) ) |
If you were to follow swift 3 guidelines for declaring functions
|
1 2 3 |
func tap(_ gestureRecognizer: UITapGestureRecognizer) { ... } |
in that case, we’ll have to declare our selector like so:
|
1 |
#selector(tap(_:)) |
In a Single View App
|
1 2 3 4 5 6 7 8 9 10 11 12 13 14 15 16 17 18 19 20 21 22 23 24 25 26 27 28 29 30 31 32 |
class ViewController: UIViewController { override func viewDidLoad() { super.viewDidLoad() // Do any additional setup after loading the view, typically from a nib. let actionOne = #selector(sample(sender:)) let button = UIButton(type: UIButtonType.custom) button.addTarget(self, action: actionOne, for: UIControlEvents.touchUpInside) button.frame = CGRect(x: 80, y: 80, width: 200, height: 80) button.titleLabel?.text = "push me" button.backgroundColor = UIColor.red self.view.addSubview(button) } override func didReceiveMemoryWarning() { super.didReceiveMemoryWarning() // Dispose of any resources that can be recreated. } func sample(sender: UIButton) { print("--------- BUTTON --------") print("sender - \(sender)") print("\(sender.buttonType)") print("\(sender.titleLabel!.text!)") print("\(sender.frame)") print("-------------------------") } } |
If you want to pass in additional information into the sample function, you can over-ride UIButton with your custom button class and set a property there.
Then, when you get your button object in sample function, just access that property.
GCD in swift
ref – http://www.appcoda.com/grand-central-dispatch/
Queue
A queue is actually a block of code that can be executed synchronously or asynchronously, either on the main or on a background thread.
Once a queue is created, the operating system is the one that manages it and gives it time to be processed on any core of the CPU.
Multiple queues are managed accordingly, and that management is something that developers don’t have to deal with.
Queues are following the FIFO pattern (First In, First Out), meaning that the queue that comes first for execution will also finish first (think of it like a queue of humans waiting in front of the counter, the first one is served first, the last one is served last).
Work Item
A work item is literally a block of code that is either written along with the queue creation, or it gets assigned to a queue and it can be used more than once (reused). It’s the code that a dispatch queue will run. The execution of work items in a queue also follows the FIFO pattern.
This execution can be synchronous or asynchronous.
In the synchronous case, the running app does not exit the code block of the item until the execution finishes. Thus, when the execution is happening, the running app does not exit, and this results in the UI being frozen for a little while.
On the other hand, when queues are scheduled to run asynchronously, then the running app calls the work item block and it returns at once and continue with its main thread. Thus you will not see pauses on the UI.
Example 1
The sync will process its display of 0 to 10, and you’ll notice that you won’t be able to click on the UI button. That’s because the block of code is being processed by the queue in a sync fashion. You’ll have to wait until it completes. Then you’ll notice that your button presses will take effect.
Result:
–viewDidLoad–
button created
view hieararchy added button
— SLEEP! —
0
— SLEEP! —
1
— SLEEP! —
2
— SLEEP! —
3
— SLEEP! —
4
— SLEEP! —
5
— SLEEP! —
6
— SLEEP! —
7
— SLEEP! —
8
— SLEEP! —
9
Button Clicked
Button Clicked
Button Clicked
Button Clicked
Button Clicked
Button Clicked
Button Clicked
source code
|
1 2 3 4 5 6 7 8 9 10 11 12 13 14 15 16 17 18 19 20 21 22 23 24 25 26 27 28 29 30 31 32 33 34 35 36 37 38 39 40 41 42 |
import UIKit class ViewController: UIViewController { let queue = DispatchQueue(label: "com.appcoda.myqueue") func action(selector:UIButton) { print("Button Clicked") } override func viewDidLoad() { print("--viewDidLoad--") super.viewDidLoad() // Do any additional setup after loading the view, typically from a nib. let button = UIButton(type: UIButtonType.roundedRect) as UIButton button.backgroundColor = UIColor.orange button.addTarget(self, action: #selector(action), for: UIControlEvents.touchUpInside) button.frame = CGRect(x: 80, y: 60, width: 200, height: 80) print("button created") self.view.addSubview(button) print("view hieararchy added button") } override func viewDidAppear(_ animated: Bool) { super.viewDidAppear(animated) queue.sync { // provide code as closure for i in 0..<10 { sleep(1) print(" \(i)") } } } override func didReceiveMemoryWarning() { super.didReceiveMemoryWarning() // Dispose of any resources that can be recreated. } } |
Change sync to async
Now let’s change the sync into an async. You’ll see that your button now has effect while the tasks are being processed.
|
1 2 3 4 5 6 7 |
queue.async { // change sync into async for i in 0..<10 { print("-- SLEEP! --") sleep(1) print(" \(i)") } } |
Output:
–viewDidLoad–
button created
view hieararchy added button
Button Clicked
0
Button Clicked
Button Clicked
Button Clicked
1
Button Clicked
Button Clicked
2
3
Button Clicked
4
5
6
7
Button Clicked
Button Clicked
Button Clicked
Button Clicked
8
Button Clicked
9
The important here is to make clear that our main queue is free to “work” while we have another task running on the background, and this didn’t happen on the synchronous execution of the queue.
Qos – Quality of Service (enum)
|
1 2 3 4 5 6 7 8 9 10 11 12 13 14 15 16 17 18 19 20 21 22 23 24 25 26 27 28 29 30 31 32 33 34 35 36 37 38 39 40 41 42 43 44 45 46 47 48 49 50 51 |
class ViewController: UIViewController { let queue1 = DispatchQueue(label: "com.appcoda.queue1", qos: DispatchQoS.userInitiated) let queue2 = DispatchQueue(label: "com.appcoda.queue2", qos: DispatchQoS.userInitiated) func action(selector:UIButton) { print("Button Clicked") } override func viewDidLoad() { print("--viewDidLoad--") super.viewDidLoad() // Do any additional setup after loading the view, typically from a nib. let button = UIButton(type: UIButtonType.roundedRect) as UIButton button.backgroundColor = UIColor.orange button.addTarget(self, action: #selector(action), for: UIControlEvents.touchUpInside) button.frame = CGRect(x: 80, y: 60, width: 200, height: 80) print("button created") self.view.addSubview(button) print("view hieararchy added button") } override func viewDidAppear(_ animated: Bool) { super.viewDidAppear(animated) queue1.async { for i in 0..<10 { sleep(1) print("Á \(i)") } } queue2.async { for j in 0..<10 { sleep(1) print("Œ \(j)") } } } override func didReceiveMemoryWarning() { super.didReceiveMemoryWarning() // Dispose of any resources that can be recreated. } } |
output:
–viewDidLoad–
button created
view hieararchy added button
Π0
Á 0
Π1
Á 1
Á 2
Π2
Á 3
Π3
Á 4
Π4
Π5
Á 5
Π6
Á 6
Π7
Á 7
Π8
Á 8
Π9
Á 9
It’s easy to say by looking at the above screenshot that both tasks are “evenly” executed, and actually this is what we expect to happen.
Now change priority of queue2 to DispatchQoS.utility
|
1 2 |
let queue1 = DispatchQueue(label: "com.appcoda.queue1", qos: DispatchQoS.userInitiated) let queue2 = DispatchQueue(label: "com.appcoda.queue2", qos: DispatchQoS.utility) |
The first dispatch queue (queue1) will be executed faster than the second one, as it’s given a higher priority. Even though the queue2 gets an opportunity of execution while the first one is running, the system provides its resources mostly to the first queue as it was marked as a more important one. Once it gets finished, then the system takes care of the second queue.
Make sure you change the index i and j to 100, instead of 10. Then run it, you’ll see that are about the same…until when the index gets into the 20s. For my machine, at around index 25, 26, queue1 runs twice, which hints that queue1 gets more of attention.
Now let’s change queue1 to background. Let’s change queue2 back to userInitiated.
|
1 2 |
let queue1 = DispatchQueue(label: "com.appcoda.queue1", qos: DispatchQoS.background) let queue2 = DispatchQueue(label: "com.appcoda.queue2", qos: DispatchQoS.userInitiated) |
If you were to run the code again, you’ll see that queue2 (having the higher priority) will finish a full 6 indexes faster than queue1.
The common thing to all the previous examples is the fact that our queues are serial. That means that if we would assign more than one tasks to any queue, then those tasks would have been executed one after another, and not all together.
Concurrent Queues
There’s a new argument in the above initialisation: The attributes parameter. When this parameter is present with the concurrent value, then all tasks of the specific queue will be executed simultaneously. If you don’t use this parameter, then the queue is a serial one. Also, the QoS parameter is not required, and we could have omitted it in this initialisation without any problem.
We have one concurrent queue (called anotherQueue), and it runs 3 tasks. All three tasks are executed at the same time (concurrently), running through their own perspective for loops.
|
1 2 3 4 5 6 7 8 9 10 11 12 13 14 15 16 17 18 19 20 21 22 23 24 25 26 27 28 29 30 31 32 33 34 35 36 37 38 39 40 41 42 43 44 45 46 47 48 49 50 51 52 53 54 55 56 57 58 59 60 61 62 63 64 65 66 67 68 69 70 71 72 73 74 75 76 77 78 |
class ViewController: UIViewController { // let queue1 = DispatchQueue(label: "com.appcoda.queue1", qos: DispatchQoS.userInitiated) // let queue2 = DispatchQueue(label: "com.appcoda.queue2", qos: DispatchQoS.utility) let anotherQueue = DispatchQueue(label: "com.appcoda.anotherQueue", qos: .utility, attributes: .concurrent) func action(selector:UIButton) { print("Button Clicked") } override func viewDidLoad() { print("--viewDidLoad--") super.viewDidLoad() // Do any additional setup after loading the view, typically from a nib. let button = UIButton(type: UIButtonType.roundedRect) as UIButton button.backgroundColor = UIColor.orange button.addTarget(self, action: #selector(action), for: UIControlEvents.touchUpInside) button.frame = CGRect(x: 80, y: 60, width: 200, height: 80) print("button created") self.view.addSubview(button) print("view hieararchy added button") } override func viewDidAppear(_ animated: Bool) { super.viewDidAppear(animated) anotherQueue.async { for i in 0..<10 { sleep(1) print("Á \(i)") } } anotherQueue.async { for i in 0..<10 { sleep(1) print(" \(i)") } } anotherQueue.async { for i in 0..<10 { sleep(1) print("∏ \(i)") } } // queue1.async { // for i in 0..<100 { // sleep(1) // print("Á \(i)") // } // } // // // queue2.async { // for j in 0..<100 { // sleep(1) // print(" \(j)") // } // } } override func didReceiveMemoryWarning() { super.didReceiveMemoryWarning() // Dispose of any resources that can be recreated. } |
User Activated
The attributes parameter can also accept another value named initiallyInactive. By using that, the execution of the tasks doesn’t start automatically, instead the developer has to trigger the execution.
Delaying the Execution
You can activate when you want your queue to start executing. This is done by creating a dispatch queue, then assigning a property reference to it. Once you do that, you can use the property reference to call the activate method wherever you like in your class.
|
1 2 3 |
if let queue = inactiveQueue { queue.activate() } |
Notice that you assign serial, concurrent, and initiallyInactive characteristics via an array on the attributes property when creating DispatchQueue.
|
1 2 3 4 5 6 7 8 9 10 11 12 13 14 15 16 17 18 19 20 21 22 23 24 25 26 27 28 29 30 31 32 33 34 35 36 37 38 39 40 41 42 43 44 45 46 47 48 49 50 51 52 53 54 55 56 57 58 59 60 61 62 63 64 65 66 67 68 69 70 71 |
import UIKit class ViewController: UIViewController { var inactiveQueue: DispatchQueue! func action(selector:UIButton) { print("Button Clicked") } override func viewDidLoad() { print("--viewDidLoad--") super.viewDidLoad() // Do any additional setup after loading the view, typically from a nib. let button = UIButton(type: UIButtonType.roundedRect) as UIButton button.backgroundColor = UIColor.orange button.addTarget(self, action: #selector(action), for: UIControlEvents.touchUpInside) button.frame = CGRect(x: 80, y: 60, width: 200, height: 80) print("button created") self.view.addSubview(button) print("view hieararchy added button") } override func viewDidAppear(_ animated: Bool) { super.viewDidAppear(animated) print(" Create an Inactive Queue") // if serial //let anotherQueue = DispatchQueue(label: "com.appcoda.anotherQueue", qos: .utility, attributes: .initiallyInactive) // if concurrent let anotherQueue = DispatchQueue(label: "com.appcoda.anotherQueue", qos: .utility, attributes: [.concurrent, .initiallyInactive]) // The use of a class property in that case is necessary, because the anotherQueue is defined // in the concurrentQueues() method and it’s visible only there. The app won’t know about // it when it’ll exit the method, we won’t be able to activate the queue, but most importantl // we’ll get a crash on runtime. print("Ò Assign out inactive Queue reference on this created queue") inactiveQueue = anotherQueue print("∏ Add some code blocks onto the queue") anotherQueue.async { for i in 0..<10 { sleep(1) print(" \(i)") } } anotherQueue.async { for i in 0..<10 { sleep(1) print("Ø \(i)") } } if let queue = inactiveQueue { print("Á property is valid. Let's fire!") queue.activate() } } override func didReceiveMemoryWarning() { super.didReceiveMemoryWarning() // Dispose of any resources that can be recreated. } } |
Accessing the Main and Global Queues
In all the previous examples we manually created the dispatch queues we used. However, it’s not always necessary to do that, especially if you don’t desire to change the properties of the dispatch queue. As I have already said in the beginning of this post, the system creates a collection of background dispatch queues, also named global queues. You can freely use them like you would do with custom queues, just keep in mind not to abuse the system by trying to use as many global queues as you can.
Using or not global queues, it’s almost out of the question the fact that you’ll need to access the main queue quite often; most probably to update the UI.
Global queue let’s you run tasks in the background. Once you are ready to update the UI, do so by using the main thread.
|
1 2 3 4 5 6 7 8 9 10 11 12 13 14 15 16 17 18 19 20 21 22 23 24 25 26 27 28 29 30 31 32 33 34 35 36 37 38 39 40 41 42 43 44 45 46 47 48 49 50 51 52 53 54 55 56 57 58 59 60 61 62 |
import UIKit class ViewController: UIViewController { let globalQueue = DispatchQueue.global() // There are not many properties that you can change when using global queues. // However, you can specify the Quality of Service class that you want to be used: // let globalQueue = DispatchQueue.global(qos: .userInitiated) var button : UIButton? = nil func action(selector:UIButton) { print("Button Clicked") } override func viewDidLoad() { print("--viewDidLoad--") super.viewDidLoad() // Do any additional setup after loading the view, typically from a nib. self.button = UIButton(type: UIButtonType.roundedRect) as UIButton self.button?.backgroundColor = UIColor.orange self.button?.addTarget(self, action: #selector(action), for: UIControlEvents.touchUpInside) self.button?.frame = CGRect(x: 80, y: 60, width: 200, height: 80) self.button?.setTitle("Push Me", for: .normal) print("button created") self.view.addSubview(self.button!) print("view hieararchy added button") } override func viewDidAppear(_ animated: Bool) { super.viewDidAppear(animated) globalQueue.async { for i in 0..<10 { if ( i==8) { DispatchQueue.main.async { self.button?.setTitle("DON'T PUSH", for: .normal) } } sleep(1) print(" - \(i)") } } } override func didReceiveMemoryWarning() { super.didReceiveMemoryWarning() // Dispose of any resources that can be recreated. } } |
WorkItem
A DispatchWorkItem is a block of code that can be dispatched on any queue and therefore the contained code to be executed on a background, or the main thread. Think of it really simply; as a bunch of code that you just invoke, instead of writing the code blocks in the way we’ve seen in the previous parts.
Basically A workItem is a block of code that is executed by a queue. Right before execution it will notify via the notify method any other queues. In our example, we notify the main queue to run a block of code that simply prints out the value.
|
1 2 3 4 5 6 7 8 9 10 11 12 13 14 15 16 17 18 19 20 21 22 23 24 25 26 27 28 29 30 31 32 33 34 35 36 37 38 39 40 41 42 43 44 45 46 47 48 49 50 51 52 53 54 55 56 57 58 59 60 61 62 63 64 65 66 67 68 69 70 71 72 73 74 75 76 77 78 79 80 81 82 83 84 |
import UIKit class ViewController: UIViewController { var button : UIButton? = nil func action(selector:UIButton) { print("Button Clicked") } override func viewDidLoad() { print("--viewDidLoad--") super.viewDidLoad() // Do any additional setup after loading the view, typically from a nib. self.button = UIButton(type: UIButtonType.roundedRect) as UIButton self.button?.backgroundColor = UIColor.orange self.button?.addTarget(self, action: #selector(action), for: UIControlEvents.touchUpInside) self.button?.frame = CGRect(x: 80, y: 60, width: 200, height: 80) self.button?.setTitle("Push Me", for: .normal) print("button created") self.view.addSubview(self.button!) print("view hieararchy added button") } func useWorkItem() { print("--> \(#function)") print("create temp var 'value' ") var value = 10 let workItem = DispatchWorkItem { print("----executing DispatchWorkItem-----") value += 5 print("value is has been changed to: \(value)") } print("DispatchWorkItem.perform()") workItem.perform() // 15 print("get global queue") let queue = DispatchQueue.global(qos: .utility) print("execute DispatchWorkItem via async") queue.async(execute: workItem) // 20 queue.async(execute: workItem) // 25 queue.async(execute: workItem) // 30 queue.async(execute: workItem) // 35 queue.async(execute: workItem) // 40 print("DispatchWorkItem notify queue via main, print out value") // we attach a block of code to run whenever workItem is being executed on the queue // the code specify that whenever workItem is being executed, we run this on the main thread workItem.notify(queue: DispatchQueue.main) { print("workItem about to be executed!, its current value is: ", value) } print("<-- \(#function)") } override func viewDidAppear(_ animated: Bool) { super.viewDidAppear(animated) self.useWorkItem() } override func didReceiveMemoryWarning() { super.didReceiveMemoryWarning() // Dispose of any resources that can be recreated. } } |
output:
–viewDidLoad–
button created
view hieararchy added button
–> useWorkItem()
create temp var ‘value’
DispatchWorkItem.perform()
—-executing DispatchWorkItem—–
value is has been changed to: 15
get global queue
execute DispatchWorkItem via async
DispatchWorkItem notify queue via main, print out value
<-- useWorkItem()
workItem about to be executed!, its current value is: 15
----executing DispatchWorkItem-----
value is has been changed to: 20
----executing DispatchWorkItem-----
value is has been changed to: 25
----executing DispatchWorkItem-----
value is has been changed to: 30
----executing DispatchWorkItem-----
value is has been changed to: 35
----executing DispatchWorkItem-----
value is has been changed to: 40
Arrays (swift)
In Swift, arrays are implemented as structs, making them value types rather than reference types (i.e., classes). When a value type is assigned to a variable as an argument to a function or method, a copy is created and assigned or passed.
Let’s take a look at an example of an Array
|
1 |
let starks: [String] = ["Eddard", "Catelyn", "Robb", "Sansa"] |
Here we have a basic Array, which is of type [String].
The square brackets indicate that this is an array of String objects, rather than just being a single String. As usual, Swift can infer this type data too, just by examining the initial assignment:
|
1 |
let starks = ["Robb", "Sansa", "Arya", "Jon"] |
We can access elements of this array in a variety of ways, such as using an Int index, calling the various collections methods.
|
1 |
let starks = ["Robb", "Sansa", "Arya", "Jon"] |
print( starks[0] )
print( starks[2] )
print( starks.first! ) //if starks.first is optional and has a value, unwrap optional and expose the value
Robb
Arya
Robb
Searching for item in array
not found returns nil
found returns the index
|
1 2 3 4 5 6 7 8 9 10 11 12 13 14 15 16 17 18 19 20 21 |
let array1 = ["a", "b", "c"] let array1Copy = array1.map{$0.copy()} let result = array1Copy.index (where: { (item) -> Bool in let temp = item as? String print ("comparing Array element: \(item), to (z)") if temp == "z" { print("we found!") return true } else { return false } }) print(result) |
If you try to access an index in an array that is not present, your program will fail at runtime! So always check the length of arrays when accessing by index:
|
1 2 3 |
if starks.count >= 4 { print( starks[3] ) } |
Accessing a non-existing element will crash
|
1 2 |
var myArray : [String] = [String]() //default constructor let a = myArray[0] // CRASH! |
Enum in swift
https://appventure.me/2015/10/17/advanced-practical-enum-examples/
http://brettbukowski.github.io/SwiftExamples/examples/enums/
Basics
When creating an enum for use, make sure you declare public. Whatever name labels
you declare do not implicitly map to values. Rather, they are their own values.
When a variable is assigned to an enum’s member, and gets printed, it will literally
print the the enum member.
|
1 2 3 4 5 6 7 8 9 10 |
public enum Example { // the named labels do not implicitly map to values such as 0, 1.. etc. case A // enum members are their own values case B // when printed, it will literally print this value i.e B case C case D case None case Str(String) // you declare other types and their respective values } |
Say we assign a variable to enum’s C.
|
1 2 |
var example = Example.A example = .C // |
..and you print out the enum:
|
1 2 3 4 5 6 7 8 9 10 11 12 13 14 |
switch example { case .A: print("\(example) Hadooo ken!") case .B: print("\(example) Sho Ryu Ken!") // B case .C: print("\(example) Tats Maksen Bukaku!") case .D: print("\(example) You must Defeat....") case .None: print("\(example) ...DO NOTHING...") default: print("\(example) default") } |
output:
C Tats Maksen Bukaku!
It prints C because we assigned our var to Example.C
Assigning other types to your enum values
|
1 2 3 4 5 6 7 |
public enum Example { // the named labels do not implicitly map to values such as 0, 1.. etc. case A // enum members are their own values case None case Str(String) // you declare other enum types along with other types } |
When you print it, you will literally get the enum value, and its type.
|
1 2 3 |
var a = Example.A a = .Str("hehe") print(a) |
output:
Str(“hehe”)
Also, nil cannot be assigned (or initialized) to Example.
|
1 2 |
var a : Example = nil print(a) // error |
Raw Values
Raw values are compile-time set values directly assigned to every case within an enumeration, as in the example detailed below:
|
1 2 3 4 5 |
enum Alphabet: Int { case A = 1 case B case C } |
In the above example code, case “A” was explicitly assigned a raw value integer of 1, while cases “B” and “C” were implicitly assigned raw value integers of 2 and 3, respectively.
To Raw Values
given…
|
1 2 3 4 5 6 7 |
// we declare enumeration 'Example2' of raw-value type String public enum Example2 : String { case GuileMove = "Sonic Boom" case DhalsimMove = "Yoga Fire" case SagatMove = "Tyyguuur!" case None } |
We can declare enum of certain type. This means that the enum values can contain Strings, Ints…etc.
Here, we have a enum that contains Strings. Even though we can simply use the enum values, those enum values also have raw values, which are the strings that we assign them to.
For example, here, have a whole bunch of enum values, they are enough and can be used. However, they also have String values attached to them.
In order to get the string values, you can use rawValue of the enum value.
|
1 2 3 4 5 6 7 8 9 |
// num with type String public enum Example2 : String { case GuileMove = "Sonic Boom" case DhalsimMove = "Yoga Fire" case SagatMove = "Tyyygur!" } var Guile = Example2.GuileMove // get the enum value GuileMove into the variable print(Guile.rawValue) // then access the raw value, outputs 'Sonic Boom' |
From Raw Values
You can also declare the enum with the raw value, and try to get the enum value back.
The enum value returned is an Optional type.
skill contains the enum value name ‘GuileMove’, which is an Optional Type
skill has 2 properties: hashValue, and rawValue.
|
1 2 3 4 |
var skill = Example2(rawValue: "Sonic Boom")! print(skill.hashValue) // 0 print(skill.rawValue) // Sonice Boom print(skill) // GuileMove |
Associated Values
Associated values allow you to store values of other types alongside case values, as demonstrated below:
|
1 2 3 4 5 |
enum Alphabet: Int { case A(Int) case B case C(String) } |
Other Examples
|
1 2 3 4 5 6 |
enum Movement: Int { case Left = 0 case Right = 1 case Top = 2 case Bottom = 3 } |
|
1 2 3 4 5 6 |
enum Constants: Double { case π = 3.14159 case e = 2.71828 case φ = 1.61803398874 case λ = 1.30357 } |
|
1 2 3 |
enum Planet: Int { case Mercury = 1, Venus, Earth, Mars, Jupiter, Saturn, Uranus, Neptune } |
|
1 2 3 4 5 6 7 8 9 |
// You can also map to strings enum House: String { case Baratheon = "Ours is the Fury" case Greyjoy = "We Do Not Sow" case Martell = "Unbowed, Unbent, Unbroken" case Stark = "Winter is Coming" case Tully = "Family, Duty, Honor" case Tyrell = "Growing Strong" } |
Enum conform to Protocol
|
1 2 3 |
protocol CustomStringConvertible { var description: String { get } } |
implement function description.
|
1 2 3 4 5 6 7 8 9 |
enum Trade: CustomStringConvertible { case Buy, Sell var description: String { switch self { case Buy: return "We're buying something" case Sell: return "We're selling something" } } } |
Other examples
|
1 2 3 4 5 6 7 8 9 10 11 12 13 14 15 16 17 18 19 20 21 22 23 24 25 26 27 28 29 30 31 32 33 34 35 36 37 38 39 40 41 42 43 44 45 46 47 48 49 50 51 52 |
enum Months : Int { case Jan = 1, Feb, Mar, Apr, June } print("Months.Jan - \(Months.Jan)") print("Months.Jan.rawValue - \(Months.Jan.rawValue)") enum Trade { case Buy, Sell, Xmas, Thanksgiving // case these enumerations, let it run through a function var anotherFunc: Int { if (self == .Buy) { return 88 } else if (self == .Sell) { return 66 } else if (self == .Xmas) { return 1226 } else if (self == .Thanksgiving) { return 1125 } return -1 } var description: String { switch self { case .Buy: return "We're BUYING something" case .Sell: return "We're SELLING something" case .Xmas: return "Christmas gifts!" case .Thanksgiving : return "Turkey, cranberry sauce, and rice!" } } //description } print("Magic Number - \(Trade.Xmas.anotherFunc)") // 1226 print("Trade.Buy - \(Trade.Buy)") print("Trade.Buy.description - \(Trade.Buy.description)") print("Trade.Buy - \(Trade.Sell)") print("Trade.Buy.description - \(Trade.Sell.description)") |
Multiple cases, one code block
|
1 2 3 4 5 6 7 8 9 10 11 12 13 14 15 16 17 18 19 20 21 22 23 24 25 26 27 |
var someOptional : Int? = 6680 switch someOptional { case 123? : print("its 123") case 6680? : print("its 6680") default: print("ITS NIL :(") } var optionalString : String? = "703" switch optionalString { case "703"?, "702"? : print("----------------") for i in 0 ..< 8 { print(i) } default: print("-----------") } |