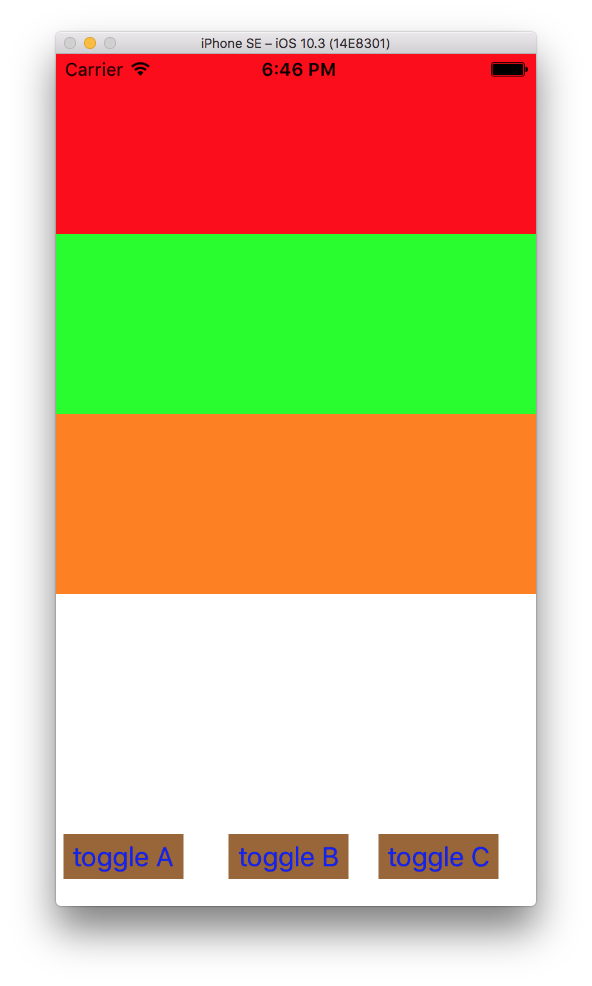
This project demonstrates how to:
– Create a UIStackView
– add uiviews to it
– add constraints to the uiviews
– make each uiview appear and disappear
http://angelolloqui.com/blog/36-Oddities-of-UIStackView
https://developer.apple.com/documentation/uikit/uiview/1622572-translatesautoresizingmaskintoco
Creating a constraint
Say you want to create a constraint. That constraints sits on constraint creation conveniences such as heightAnchor, widthAnchor, topAnchor, leftAnchor, etc. Any property that you can create a constraint on, that property will have an anchor you can access, and thus, create constraints from.
In our case, we want to to set a constraint to our height. Thus there is a heightAnchor. Access that property to create a constraint.
|
1 |
let heightConstraintA = a.heightAnchor.constraint(equalToConstant: 120.0) |
translatesAutoresizingMaskIntoConstraints
From the doc: If you want to use Auto Layout to dynamically calculate the size and position of your view, you must set this property to false, and then provide a non ambiguous, nonconflicting set of constraints for the view.
|
1 |
a.translatesAutoresizingMaskIntoConstraints = false |
By default, the property is set to true for any view you programmatically create.
If you add views in Interface Builder, the system automatically sets this property to false.
Resolving Constraint conflicts using priority
Thus, later on we’ll be hiding our viewA. However there is a constraint on viewA that says its height has to be 120, as stated earlier. In this case, we’ll get a constraint conflict in the log console, because setting aView’s isHidden to true, makes its height to 0. This is a constraint conflict with 120.
Thus, in order to fix this, we need to lower the priority of our 120 height constraint so that when viewA’s height changes to 0 (due to it being hidden), it will see that the 120 height constraint’s priority is lower. This is because any new height constraints has a default priority of 1000. Since 120 has a lower priority, then the constraints engine will allow 0 (which defaults to highest priority of 1000) to be valid.
|
1 2 3 4 |
let heightConstraintA = a.heightAnchor.constraint(equalToConstant: 120.0) heightConstraintA.isActive = true heightConstraintA.priority = 999 a.translatesAutoresizingMaskIntoConstraints = false |
Full Source
|
1 2 3 4 5 6 7 8 9 10 11 12 13 14 15 16 17 18 19 20 21 22 23 24 25 26 27 28 29 30 31 32 33 34 35 36 37 38 39 40 41 42 43 44 45 46 47 48 49 50 51 52 53 54 55 56 57 58 59 60 61 62 63 64 65 66 67 68 69 70 71 72 73 74 75 76 77 78 79 80 81 82 83 84 85 86 87 88 89 90 91 92 93 94 95 96 97 98 99 100 101 102 103 104 105 106 107 108 109 110 111 112 113 114 115 |
import UIKit /* when we set isHidden, the height is changed to 0. ` http://angelolloqui.com/blog/36-Oddities-of-UIStackView Basically, what happens here is that the stack view will automatically set your height to 0 (if vertical layout, or width if horizontal) when you make the view hidden. In the specific example attached above, the arranged view contains a segment control that has some extra padding of 8px by using required autolayout constraints. As a result, when the subview tries to resize to 0, the constraints with the padding can not be satisfied (requires a minimum of 16px size, but the stack wants to set it to 0), resulting in the above error. A way to solve it is to make sure that you have no size constraints like that, or if you need them, lower their priority so the AutoLayout engine will know which one to break (always yours). Have in mind that all the stackview managed constraints are required (priority 1000) */ class ViewController: UIViewController { var hideA = false var hideB = false var hideC = false let stackView = UIStackView() let a = UIView() let b = UIView() let c = UIView() override func viewDidLoad() { super.viewDidLoad() a.backgroundColor = UIColor.red let heightConstraintA = a.heightAnchor.constraint(equalToConstant: 120.0) heightConstraintA.isActive = true heightConstraintA.priority = 999 a.widthAnchor.constraint(equalToConstant: 320).isActive = true a.translatesAutoresizingMaskIntoConstraints = false let heightConstraintB = b.heightAnchor.constraint(equalToConstant: 120.0) heightConstraintB.isActive = true heightConstraintB.priority = 999 b.backgroundColor = UIColor.green b.widthAnchor.constraint(equalToConstant: 320).isActive = true b.translatesAutoresizingMaskIntoConstraints = false let heightConstraintC = c.heightAnchor.constraint(equalToConstant: 120.0) heightConstraintC.isActive = true heightConstraintC.priority = 999 c.backgroundColor = UIColor.orange c.widthAnchor.constraint(equalToConstant: 320).isActive = true c.translatesAutoresizingMaskIntoConstraints = false view.addSubview(stackView) stackView.backgroundColor = UIColor.blue stackView.addArrangedSubview(a) stackView.addArrangedSubview(b) stackView.addArrangedSubview(c) stackView.axis = .vertical stackView.distribution = .fill stackView.translatesAutoresizingMaskIntoConstraints = false let buttonA = UIButton() buttonA.setTitle("toggle A", for: .normal) buttonA.setTitleColor(UIColor.blue, for: .normal) buttonA.backgroundColor = UIColor.brown buttonA.frame = CGRect(x: 5, y: 520, width: 80, height: 30) buttonA.addTarget(self, action: #selector(toggleA(_:)), for: .touchUpInside) self.view.addSubview(buttonA) let buttonB = UIButton() buttonB.setTitle("toggle B", for: .normal) buttonB.setTitleColor(UIColor.blue, for: .normal) buttonB.backgroundColor = UIColor.brown buttonB.frame = CGRect(x: 115, y: 520, width: 80, height: 30) buttonB.addTarget(self, action: #selector(toggleB(_:)), for: .touchUpInside) self.view.addSubview(buttonB) let buttonC = UIButton() buttonC.setTitle("toggle C", for: .normal) buttonC.setTitleColor(UIColor.blue, for: .normal) buttonC.backgroundColor = UIColor.brown buttonC.frame = CGRect(x: 215, y: 520, width: 80, height: 30) buttonC.addTarget(self, action: #selector(toggleC(_:)), for: .touchUpInside) self.view.addSubview(buttonC) } func toggleA(_ sender: Any) { hideA = !hideA UIView.animate(withDuration: 0.3, animations: { self.a.isHidden = self.hideA }) } func toggleB(_ sender: Any) { hideB = !hideB UIView.animate(withDuration: 0.3, animations: { self.b.isHidden = self.hideB }) } func toggleC(_ sender: Any) { hideC = !hideC UIView.animate(withDuration: 0.3, animations: { self.c.isHidden = self.hideC }) } override func didReceiveMemoryWarning() { super.didReceiveMemoryWarning() // Dispose of any resources that can be recreated. } } |
