Category Archives: Uncategorized

Why we can’t receive push notifications from expo after using ‘expo eject’ for iOS standalone

Originally, we wanted to see if using ‘expo eject’ (with option ‘use Expo SDK’) will be able to eject an iOS standalone app where it can successfully receive Expo notifications.

Our trial indicates that is not possible.

In the original RN code where we have Expo API attached, right after we log in, we use Notifications.getExpoPushTokenAsync (imported from expo), to get a valid push token. That is how the Expo Notification server can push towards iOS and Android devices.

However, in the expo ejected iOS client, we ran into an error while trying to get this push token. Specifically the error says “unsupported URL”. This is probably because it does not recognize the url of our iOS client.

Hence, in order to apply native receive push notifications, and then pass that data into RN, we must use:

1) ‘expo detach’
2) use RCTPushNotificationManager for iOS client
3) use PushNotificationIOS library from React Native to retrieve notification data

Security Issues for iOS

Security Issues

2.1.1 (User refresh token located in manifest.json)

All the sensitive data have to be stored in secure manner, for example using encrypted SQL storages, keychain or Secure Enclave.
done in React Native.

2.1.2 (Authentication response cached in database in plain text)

All the sensitive data have to be stored in secure manner, for example using encrypted SQL storages, keychain or Secure Enclave.

not done

2.1.3 (SSL pinning is not implemented)

done

2.1.4 (App screenshot information disclosure)

To protect sensitive data, block caching of application snapshots using API configuration or code.

done

2.1.5 (App Transport Security (ATS) is disabled)


done

2.1.6 Application does not clear cached data after logout

Caching functionality helps to operate application with data more reliable in terms of performance, but have to clear it in certain scenarios, one of them is logout.

done

2.1.7 (Application permissions have to be reviewed)
2.1.8 (Application contains DEV setting plist)

should be done when EXPO is removed

2.1.9 (No source code obfuscation)
2.1.10 (can run on jailbroken phones)

not sure

Remove data in your Cache folder

First let’s look at the contents of your cache folder. Notice the use of NSCachesDirectory macro.

[0] [15:12:53] fsCachedData
[0] [15:12:53] Users
[0] [15:12:53] Cache.db-shm
[0] [15:12:53] Cache.db-wal
[0] [15:12:53] Cache.db

and they are located in:

/Users/rickytsao/Library/Developer/CoreSimulator/Devices/F19D977F-B37C-4DA5-98DA-6C1B2ADCD500/data/Containers/Data/Application/44CF2644-6491-4A4A-9A5C-9DA0F405A45E/Library/Caches/com.rocktree.app/

source code to do this:

Device.h

Device.m

Call the code in React Native

ProfilesDetailsScreen/index.js

Import NativeModules from react native

In the log out handler, call the bridge function.

Thus, when you log out, it bridges to the iOS module. the iOS module manages to access its cached data and remove whatever was saved there.

Snapshots

snapshots:
https://stackoverflow.com/questions/7520076/prevent-ios-from-taking-screen-capture-of-app-before-going-into-background

place overlay image when the app is about to resign. and remove this overlay when its about to become active.

Pros, cons, and hows of React Native

ref – https://hackernoon.com/understanding-react-native-bridge-concept-e9526066ddb8

Does not depend on Webview, uses native APIs

React Native is often presented as a game changer that allows to run JavaScript code inside a mobile environment. Its main strength is that it doesn’t rely on Webviews like other competitors (Phonegap, Ionic, Cordova…), but on the actual real materials provided by the different platforms.

In other words, unlike Cordova, PhoneGap, and other cross-platform frameworks that render code via WebView, React Native renders certain code components with native API’s.

It has built-in access to all the native views and components, and to about 70 specific device APIs by default (you can extend it).

When writing React Native apps, we build native UIs. And that’s the key point, we create UIView instances just like we would have with the iOS platform.

Uses existing compilers to create apps for specific platforms

Currently, there are compilers that target their own specific platform. For example, we have compilers that accept Java / Kotlin code and target Android platform, or Obj-C / Swift targeting iOS platform.

There exists many compilers for different languages and targets. React Native is built in such a way that it uses these existing compilers to create apps for that specific platform.

No only can React Native create apps for mobile platforms such as Android and iOS, it can also use compilers to create apps for Desktop, Virtual Reality, and much more.

How was it done?

React Native deals with two realms, the JavaScript one and the Native one. Both of them are able to share information. They communicate using a “bridge”, which is definitely the very heart of the React Native architecture, the part that offers so much flexibility.

The bridge is the concept that provides a way for bidirectional and asynchronous communications between these two universes. What’s important here is that they are completely written in different technologies, but they are able to communicate.

When two services written in different languages communicate, they do so by using interoperable languages, such as JSON or XML, and relied on an async protocols and a message queue. Service A pushes some commands inside the queue and service B has to execute these commands when possible.

If we want these two services to communicate, we rely on a message queue. The first service pushes some commands inside the queue and the other one has to execute these commands when possible.

React Native behaves the same way. The JavaScript realm sends asynchronous JSON messages describing the action the Native part is supposed to accomplish.

For example, the JavaScript side will send information concerning the views that must be created by the Native side. When the Native side is ready, it will effectively create the views:

In React Native, the bridge endorses the message broker role, handling asynchronous commands between the two different worlds.

The bridge is built in C/C++ and thus, can be run on multiple platforms, OS etc…

It embeds the Apple JavaScriptCore framework in, which exposes APIs for your code to access the actual
Javacript Core VM capabilities.

With this in mind, React Native can inject variables, functions and declare globals to enhance the JavaScript existing code as shown at the first 3 steps here:

Then once the JS code is injected into the API, the C++ platform then queues them for deliver.

On the other side, you’ll see that we have our compiler/platform combinations. As long as the JS code is injected into the C++ platform, and then gets queued, we can switch out the compiler/platform like a puzzle in order to different type of apps.

Other advantages

– Maximum code reuse & cost saving. React Native’s component-based structure allows developers to build apps with a more agile, web-style approach to development than most hybrid frameworks, and without any web at all.

– If you know JavaScript, React Native will be easy to pick-up, allowing most front-end web developer to be a mobile developer. All you need to know is JavaScript, platform APIs, some native UI elements, and any other platform-specific design patterns and you’re set.

– Native look and feel of the app.

– Performance measurements between React Native exported app and the native app are very similar (https://medium.com/the-react-native-log/comparing-the-performance-between-native-ios-swift-and-react-native-7b5490d363e2)

– Native app development usually means inefficiency, slower time to deployment, and less developer productivity. React Native is all about bringing high speed, responsiveness, and agility of web app development along with effectual processing and best user experience to the hybrid space, to provide your users with a native app experience.

Disadvantages

It Lacks the Security Robustness

We know that React Native is a JavaScript library and open-source framework, which creates a gap in the security robustness.

But at times, you need to provide extra security specifically if you are creating banking and financial apps where data is highly confidential. So, in that cases, experts advice not to choose React Native.

React Native is Still New and Immature

React Native is newbie as compared to other Android and iOS programming languages. It is still in its improvement stages.

One of the areas where it lacks consistency is regarding the release of the frequent updates, which at times are confusing for the developers. This is because every time a new update is released, the developers have to make a lot of changes and make regular upgrades. Popular app Airbnb faced a lot of problems in the upgrading.

Latest Native code

Native developers are sometimes required to write the latest native code that we were not updated for that version of React Native.
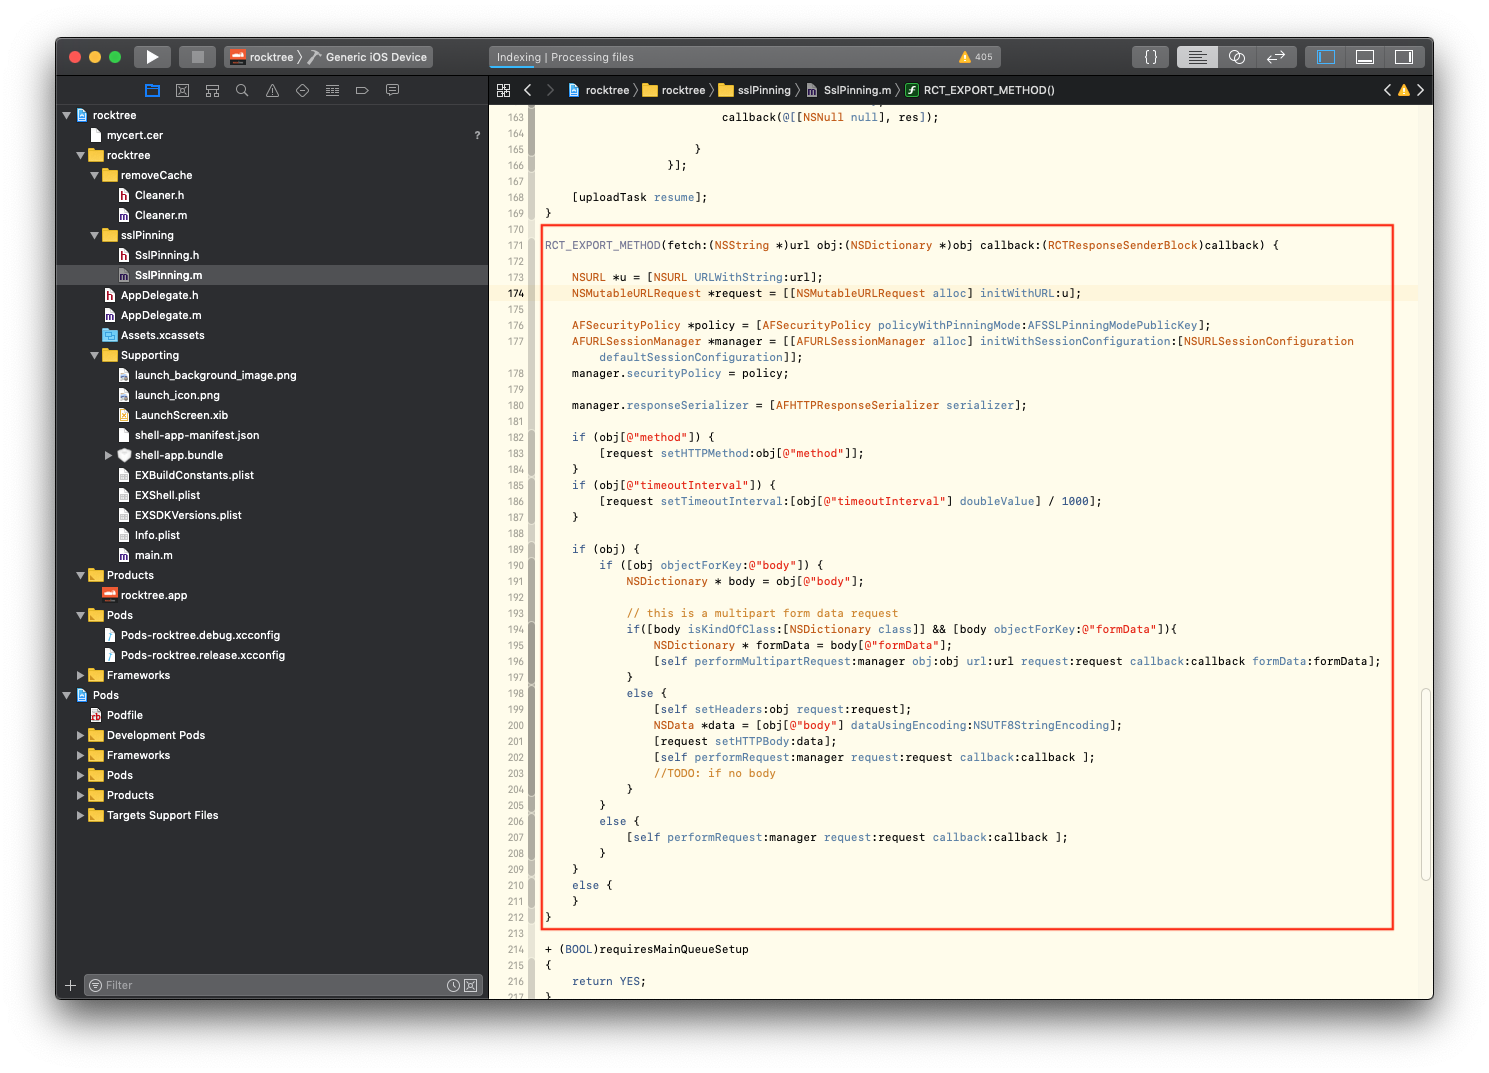
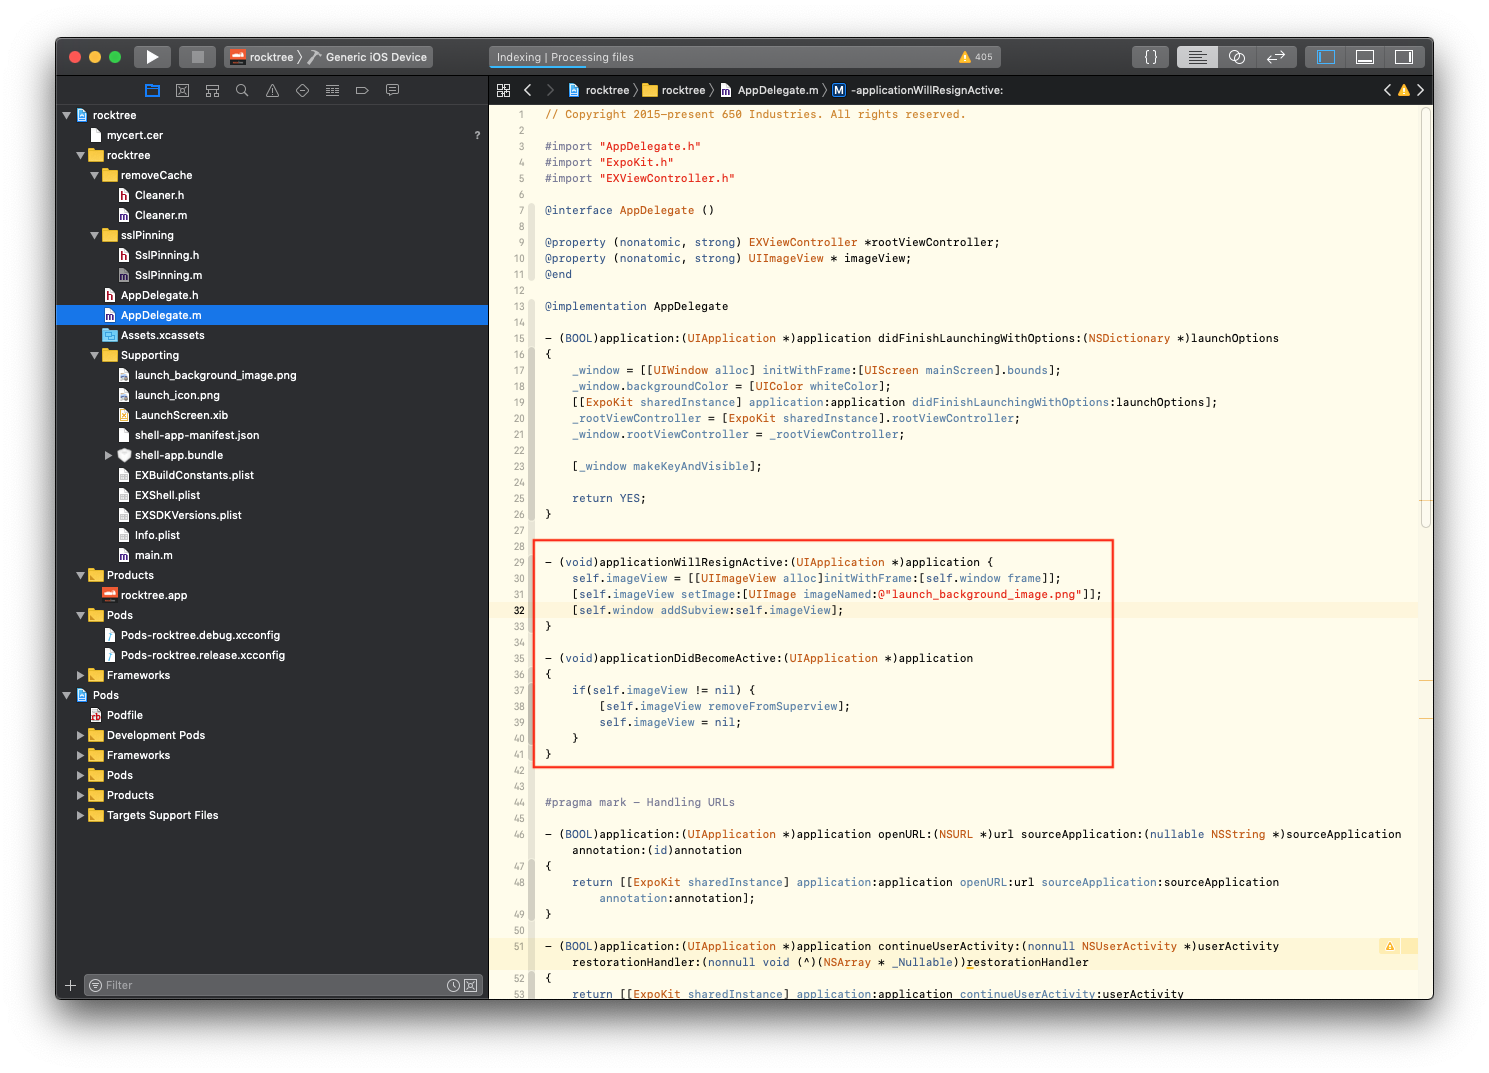
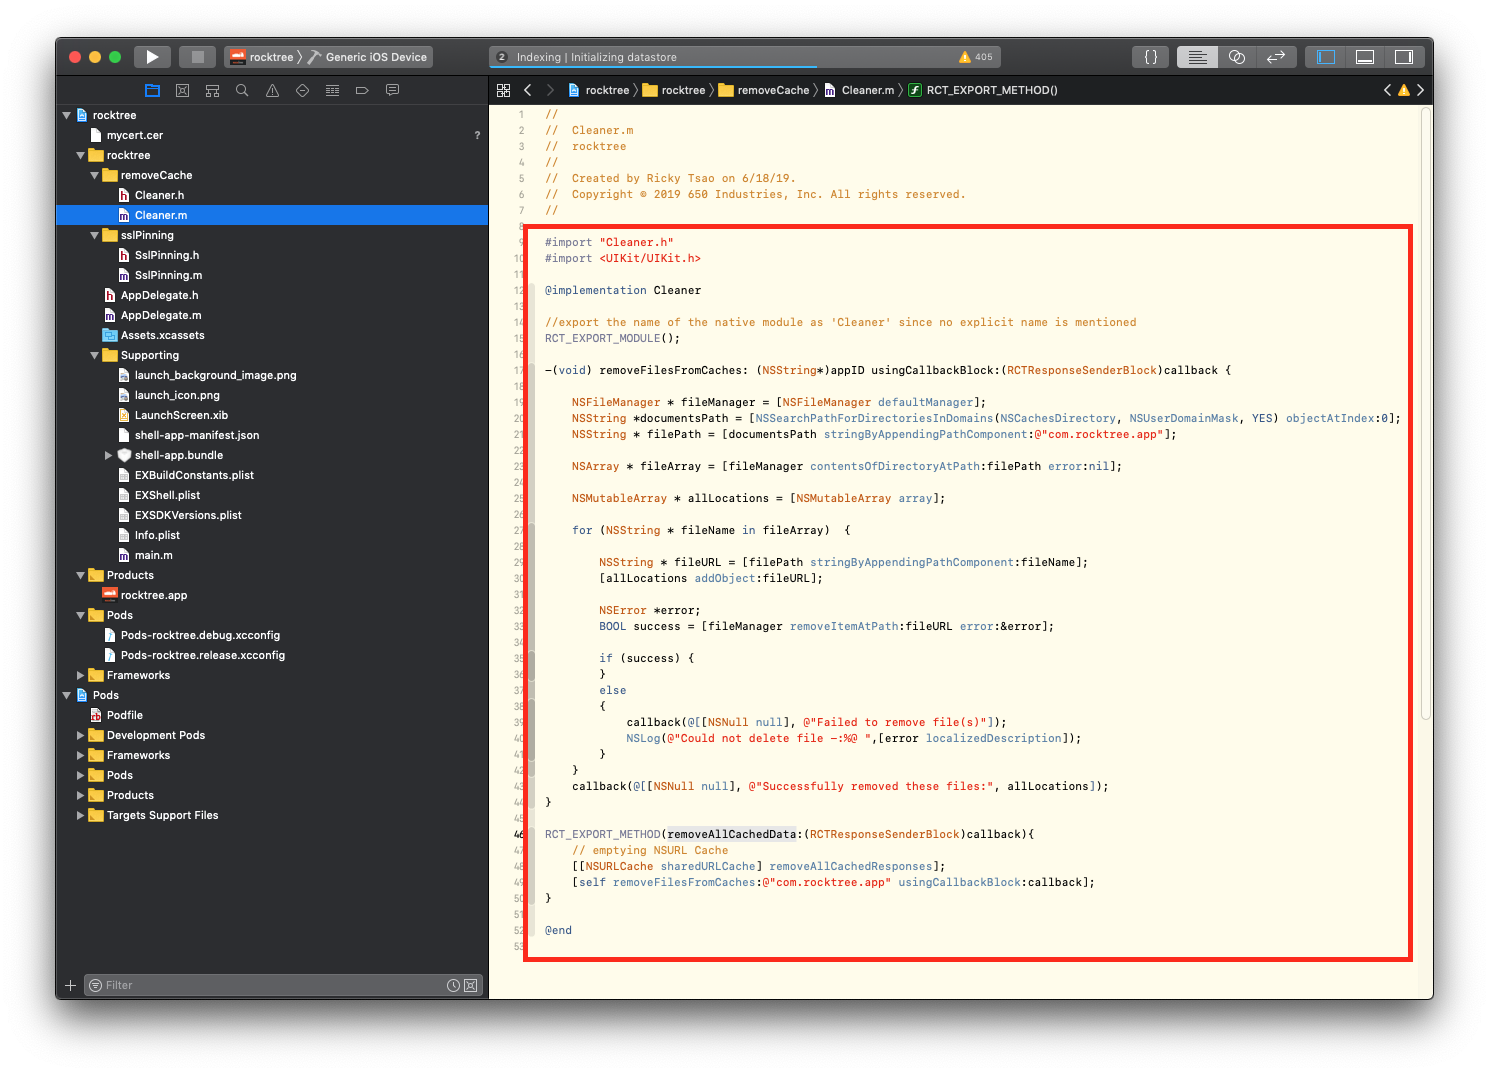
Modules

Despite the constant advancement of RN technology, it does not provide ready-to-use modules that give access to iOS or Android APIs. This forces developers to create so-called Native Modules themselves or develop “bridges” using Java/Kotlin (Android) or Swift/Objective-C (iOS) and severely increases software development time. Native technologies require no such thing. The same goes for native frameworks, libraries or SDKs — if you want to employ Augmented Reality, voice assistants or SDK for mobile payments, again, you’ll need the aforementioned bridges. This will require you to hire three developers instead of two as it was in the case of Airbnb that had to learn about it the hard way.

Recommended Usage

How to create an component

https://facebook.github.io/react-native/docs/navigation
https://reactnavigation.org/docs/en/stack-navigator.html
https://reactjs.org/docs/react-component.html
https://flaviocopes.com/react-state-vs-props/

The Navigation Stack

In App.js, we create a bottom navigator. It takes a parameter of an object where each key is the string title of the tab.
In our case, it is ‘Home’, ‘Contracts’, ‘Schedule’, ‘Reports’.

the keys matches to an object value returned by function createStackNavigator.
createStackNavigator creates a stack navigator where one screen can navigate to the next.

Inside the createStackNavigator, we have two important parameters. One is an object of all the components you want to add to the navigation stack. That way you can navigate from one component to the the next. The other parameter is for styling.

Hence, in our example, for the tab ‘Contracts’, we give is a stack of components, along with a styling called stackDefaultNavigationOptions.

In this stack of components, its first page is ContractScreen. Notice CCTVScreen on the bottom. That is the name of our custom cctv component that we want to navigate from other components.

we import cctv component like so:

Navigating to CCTV

First let’s implement the navigating part. We simply create a handler function. In the implementation, we destructure navigation property from this.props.

Then we use ‘navigate’ and give it the string of the component name ‘CCTVScreen’. Finally, we give it an object of transshipment. Now, this object is written like so: {‘transshipment’ : transshipment}, to designate that the property name is ‘transshipment’, and the value is of object transshipment. We all shorthand it into {transshipment}

Somewhere else, you can have a button or some click UI, and then attach this handler function onCCTVclick to it.

CCTV component

Now we see how the component is implemented.

The only method you must define in a React.Component subclass is called render(). All the other methods described on this page are optional.

When called, it should examine:

1) this.props
2) this.state

Using de-structuring, we extract data from these two objects and use them for display.

In the below example, you can see that we extracted cameraViews from this.props. Then used it in a ScrollView to display Images.

In a React component, props are variables passed to it by its parent component. like this:

In this case, FullPerson component will have these properties in its prop object:

this.prop.firstName
this.prop.lastName
this.prop.age
this.prop.color

State on the other hand is still variables, but directly initialized and managed by the component.

Props can be used to set the internal state based on a prop value in the constructor, like this:

Props should never be changed in a child component, so if there’s something going on that alters some variable, that variable should belong to the component state.

Props are also used to allow child components to access methods defined in the parent component. This is a good way to centralize managing the state in the parent component, and avoid children to have the need to have their own state.

for example, in your ParentComponent, you have a centralized place to process data.

Basically, all data must be processed in function processDataHereOnly. Even when your ChildComponent has data, it should process it in your ParentComponent. In order for us to allow child components to access methods defined in the parent component, we pass in the parent component’s function interface using props property processIt.

Then in your ChildComponent, simply pass in data as a parameter into this.prop.processIt, and execute it.

or

in other words, you are also passing data from the child back to the parent.

To pass data from parent to child, use prop.
To pass data from child to parent, pass a callback to the child via prop. In the child component, pass data as a parameter into the callback, then execute it.

Installing mongodb on Ubuntu

ref – https://www.digitalocean.com/community/tutorials/how-to-install-mongodb-on-ubuntu-18-04

Step 1 — Installing MongoDB

Ubuntu’s official package repositories include an up-to-date version of MongoDB, which means we can install the necessary packages using apt.

First, update the packages list to have the most recent version of the repository listings:

sudo apt update
Now install the MongoDB package itself:

sudo apt install -y mongodb
This command installs several packages containing the latest stable version of MongoDB, along with helpful management tools for the MongoDB server. The database server is automatically started after installation.

Next, let’s verify that the server is running and works correctly.

Step 2 — Checking the Service and Database

The installation process started MongoDB automatically, but let’s verify that the service is started and that the database is working.

First, check the service’s status:

sudo systemctl status mongodb

sending off questions and answers data

Regular Expressions (js)

new style

literal style

test

replace

Found “ryu” at position 6 in string “shooo ryu ken ryu Ryu rYu ryU!”
Found “ryu” at position 14 in string “shooo ryu ken ryu Ryu rYu ryU!”
Found “Ryu” at position 18 in string “shooo ryu ken ryu Ryu rYu ryU!”
Found “rYu” at position 22 in string “shooo ryu ken ryu Ryu rYu ryU!”
Found “ryU” at position 26 in string “shooo ryu ken ryu Ryu rYu ryU!”

After replacement: shooo ryu ken ryu ryu ryu ryu!