- https://apidocs.pingidentity.com/pingone/customer/v1/api/concepts/p1-a_appAuth/
- https://apidocs.pingidentity.com/pingone/customer/v1/api/auth/p1-a_Authorize/
Category Archives: Uncategorized
SSO strategies, Oauth2 and SAML standards
ref – https://www.mutuallyhuman.com/blog/choosing-an-sso-strategy-saml-vs-oauth2/
https://developer.okta.com/blog/2017/06/21/what-the-heck-is-oauth
https://docs.expo.io/versions/latest/sdk/app-auth/?redirected
https://docs.expo.io/versions/latest/sdk/auth-session/
https://stackoverflow.com/questions/1087031/whats-the-difference-between-openid-and-oauth
OAuth-OpenID: You’re Barking Up the Wrong Tree if you Think They’re the Same Thing
What is SSO?
Single sign-on is a property of access control of multiple related, yet independent, software systems. With this property, a user logs in with a single ID and password to gain access to any of several related systems.
In order to provide a user with a single sign-on experience, a developer needs to implement an SSO solution. Over the years there have been many attempts at achieving SSO. One modern and popular choice is 0Auth2.
Client – this is your browser, mobile app, desktop app, or server-side app. It tries to interact with the Resource Server.
Service Provider (Resource Server) – this is the web-server you are trying to access data from.
Identity Provider (Authorization Server) – this is the server that owns the user identities and credentials. It’s who the user actually authenticates and authorizes with.
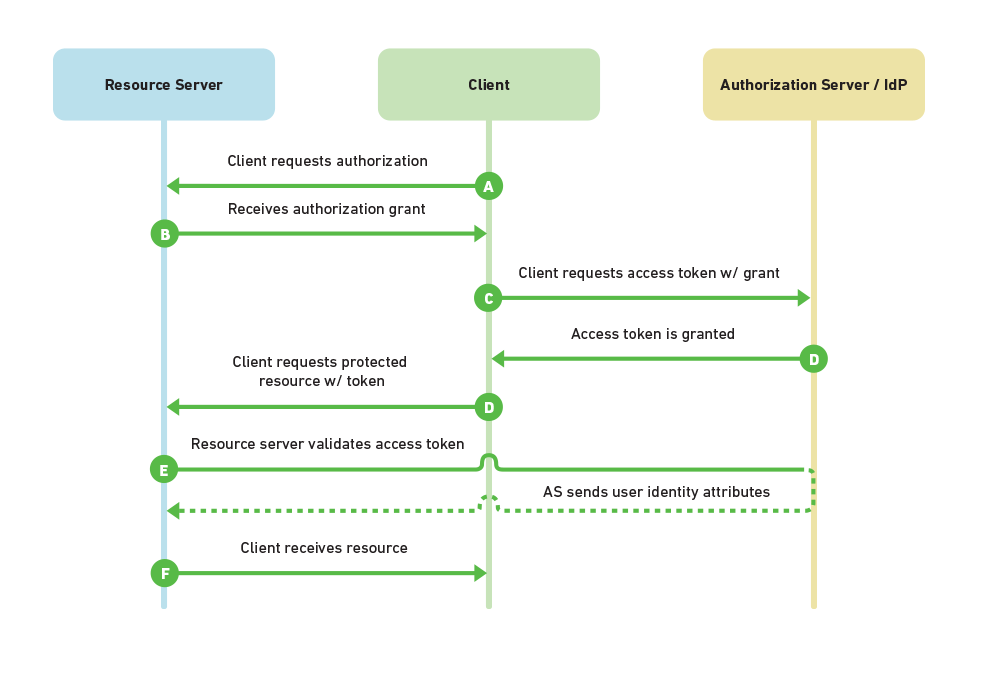
The authorization grant is a temporary code that the client will exchange for an access token.
A – a user opens their web-browser and goes to MyPhotos.com which stores all of their photos.
MyPhotos.com doesn’t handle authentication itself, so the user is redirected to the Authorization Server with a request for authorization. The user is presented with a login form and is asked if they want to approve the Resource Server (MyPhotos.com) to act on their behalf. The user logs in and they are redirected back to MyPhotos.com.
B – the client receives an authorization grant code as a part of the redirect.
C – the Client then uses that authorization grant code to request an access token from the Authorization Server.
D – if the authorization grant code is valid, then the Authorization Server grants an access token. The access token is then used by the client to request resources from the Resource Server (MyPhotos.com).
E – MyPhotos.com receives the request for a resource and it receives the access token. In order to make sure it’s a valid access token, it sends the token directly to the Authorization Server to validate. If valid, the Authorization Server sends back information about the user.
F – having validated the user’s request MyPhotos.com sends the requested resource back to the user.
OAuth2 provides three other flows (or what they call authorization grants) which work for slightly different scenarios, such as single-page javascript apps, native mobile apps, native desktop apps, traditional web apps, and server-side applications where a user isn’t directly involved but they’ve granted you permission to do something on their behalf.
- Authentication means confirming your own identity. Proving who are you.
- Authorization means granting access to data/functionality, without having to deal with original authentication
OAuth could be used in external partner sites to allow access to protected data without them having to re-authenticate a user.
OAuth was created to remove the need for users to share their passwords with third-party applications
OpenID was created for federated authentication, that is, letting a third-party authenticate your users for you, by using accounts they already have
Example
ref – https://dzone.com/articles/sso-login-key-benefits-and-implementation
How SSO Login Works
Let’s look at an ideal scenario before going into the nitty-gritty of how SSO login works. Three apps have been developed separately: App FOO, App BAR, and App BAZ. They are also hosted on three different domains: foo.com, bar.com and baz.com, respectively.
Challenge: Users have to enter different usernames and passwords for the three different apps to gain access to certain resources.
Proposed solution: Eliminate the different login systems that are present. Users should be able to log in to foo.com and then be signed in to bar.com and baz.com automatically without having to re-enter their authentication credentials.
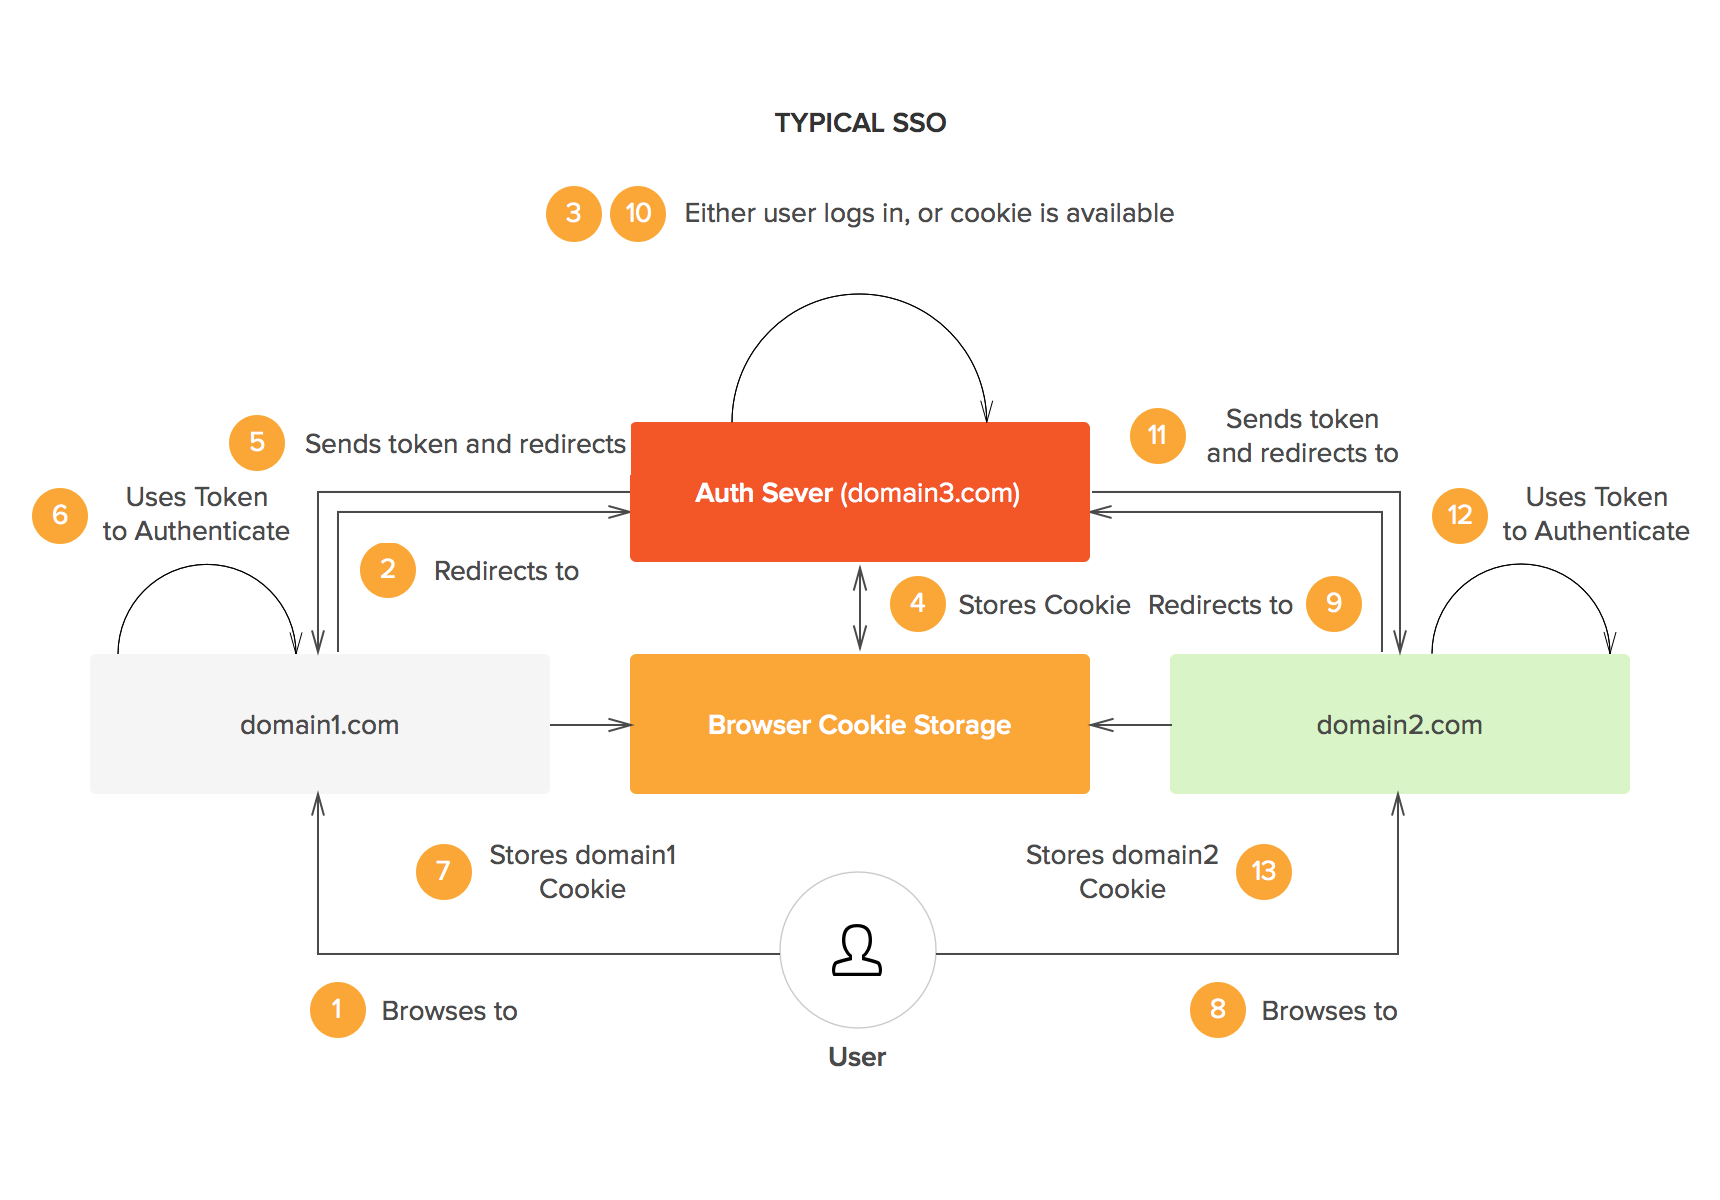
SSO login to the rescue: With SSO login, a central authentication server needs to exist. Let’s call our central authentication server foobarbaz.com. This is how the process flow will look in this scenario:
The user accesses foo.com.
The user is redirected to foobarbaz.com, where an authentication-related cookie is generated.
The user navigates to bar.com.
The user is redirected to foobarbaz.com.
foobarbaz.com checks whether the user already has an authentication-related cookie and redirects the user back to bar.com, providing access to its features and content.
The same process applies to baz.com.
The simple take-away concept is that there is one central domain through which authentication is performed, and then the session is shared with other domains in some secure way e.g., a signed JSON Web Token (JWT).
Node Authentication JWT basics
ref – https://softwareontheroad.com/nodejs-jwt-authentication-oauth/
React lifecycle methods
https://pusher.com/tutorials/lifecycle-methods-react-16
todo
Protected: Setting up and running existing Expo React Native (rstore)
Protected: Running web client (rstore)
Protected: Create endpoints in basic Laravel Project
Protected: Installing XAMPP (php 7.2), Composer, Laravel on Windows 10
DNY client (10 – Profile Photo Upload)
Client side
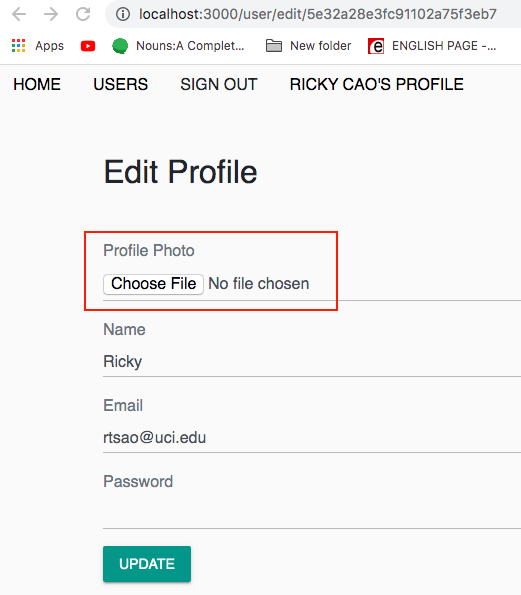
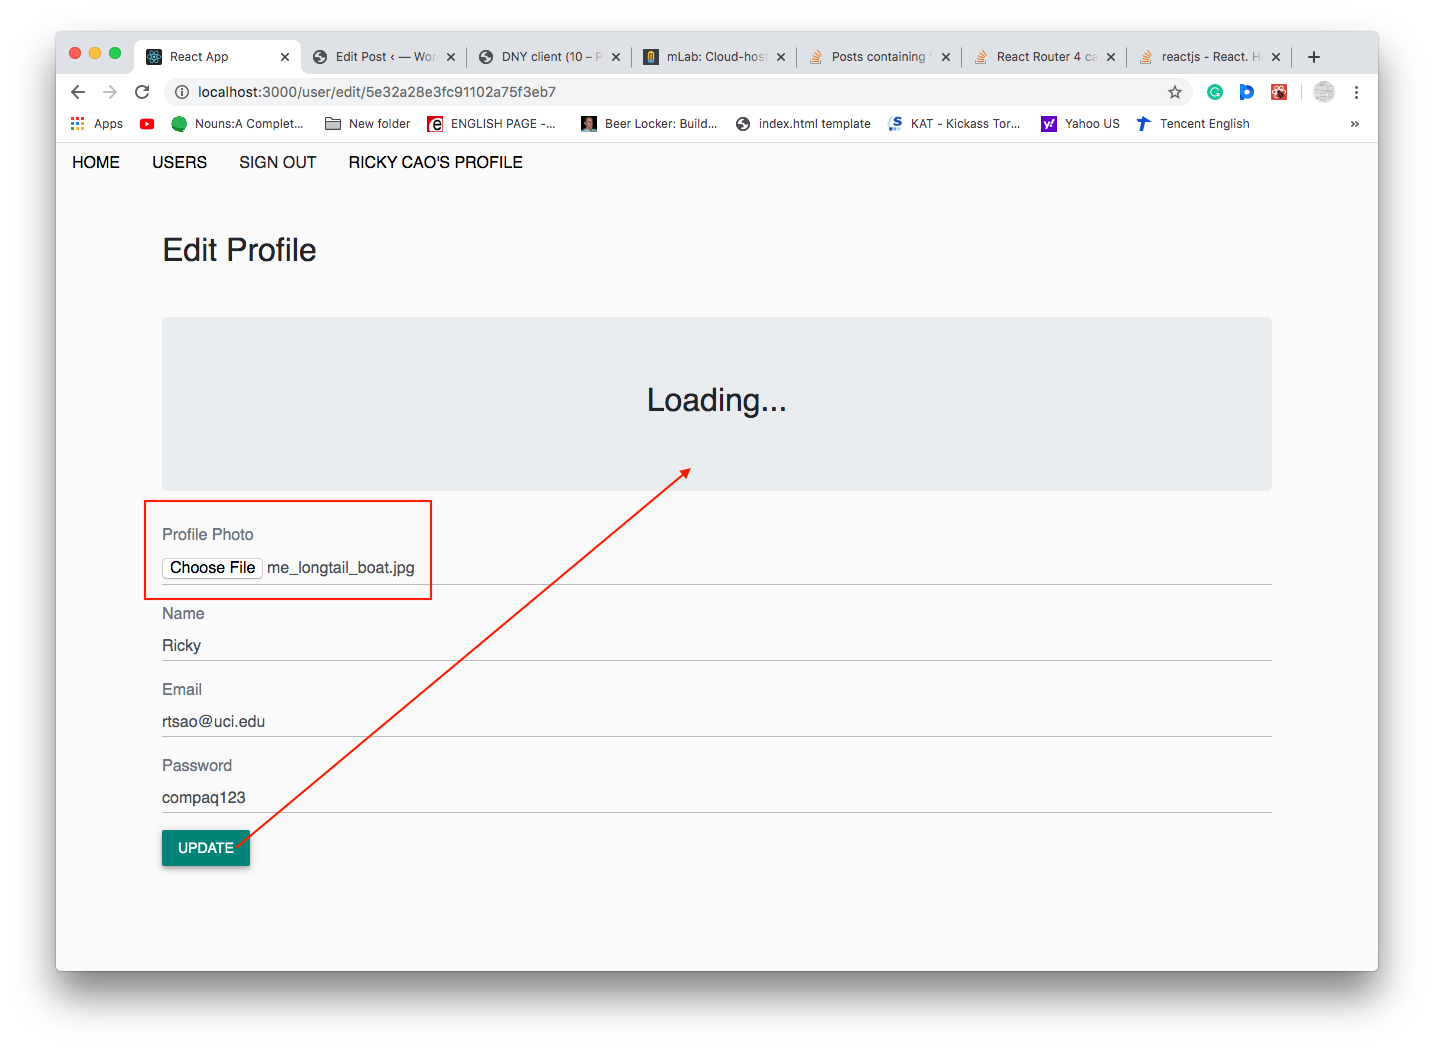
Add the html for an input control that accepts file images
src/user/EditProfile.js
|
1 2 3 4 5 6 7 8 9 10 11 12 13 |
renderEditForm = (name, email, password) => { return (<form> <div className="form-group"> <label className="text-muted">Profile Photo</label> <input onChange={this.handleChange("photo")} type="file" accept="image/*" className="form-control" /> </div> ... } |
Basically, we need to send the form data to the backend.
We need to use browser API called FormData
FormData interface provides a way to easily construct a set of key/value pairs representing form fields and their values.
We update our handleChange to reflect responding to photo file clicks.
src/user/EditProfile.js
|
1 2 3 4 5 |
handleChange = name => event => { const value = name === 'photo' ? event.target.files[0] : event.target.value this.userData.set(name, value) this.setState({ [name] : value }) } |
We need to change our body so that we’re sending the formData, and not a string.
We also need to remove the Content-Type headers because its not json anymore. Its key/value formData
src/user/apiUser.js
|
1 2 3 4 5 6 7 8 9 10 11 12 13 14 15 16 17 18 19 20 21 22 23 24 25 26 27 28 29 |
export const UpdateUser = async (userId, token, user) => { console.log(`UpdateUser, '1) update user info for user id: ${userId} using token ${token}` ) console.log('User Data update:', user) return await fetch(`http://localhost:8080/user/${userId}`, { method: "PUT", mode: "cors", headers: { Accept : "application/json", // "Content-Type": "application/json", // for non-image values // we're sending formData, not json data Authorization: `Bearer ${token}`, 'Access-Control-Allow-Origin':'*' }, // for non-image values // body: JSON.stringify(user) // remember to json stringify this or else, server side can't receive such data // for images, we're sending formData body: user }) .then(response => { console.log('UpdateUser', '3) response received') return response.json() }) .catch(err => { return err }) } |
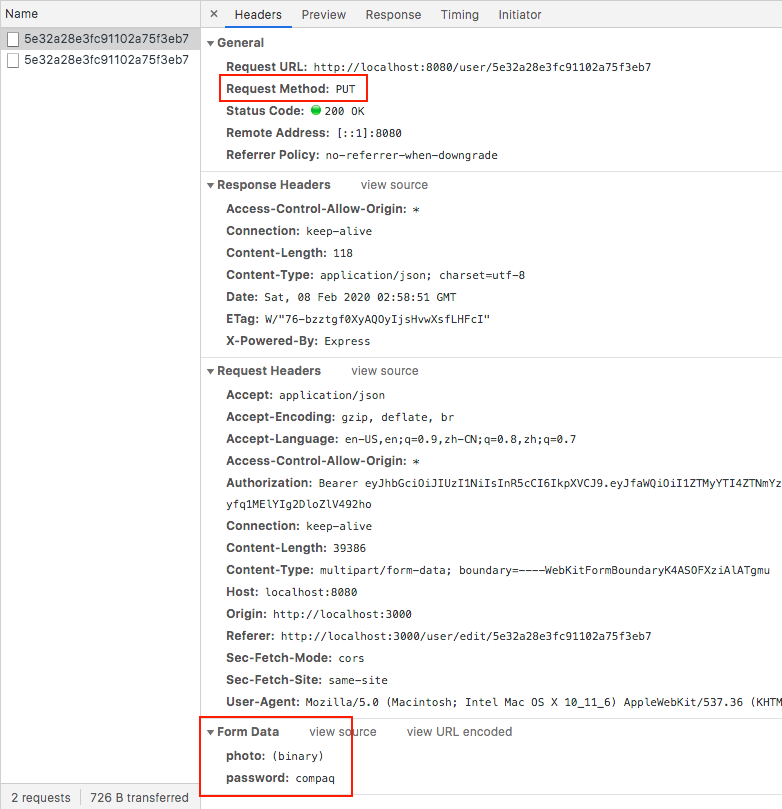
Now, refresh the page and try sending a photo, for the PUT request, look at your FormData, you should see all the data there.
Server side
We comment out the previous updateUser function and write a new one.
controllers/user.js
|
1 2 3 4 5 6 7 8 9 10 11 12 13 14 15 16 17 18 19 20 21 22 23 24 25 26 27 28 29 30 31 32 33 34 35 36 |
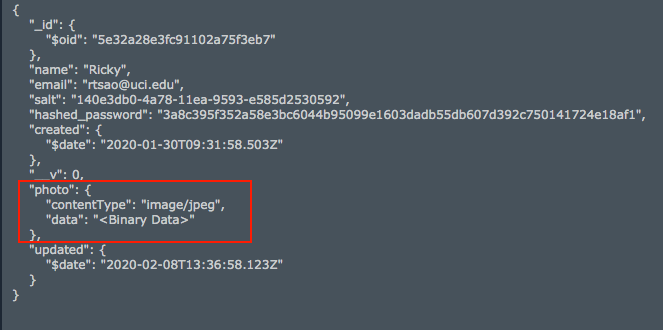
const _ = require('lodash') const User = require('../models/user'); const formidable = require('formidable') const fs = require('fs') ... ... exports.updateUser = (req, res, next) => { let form = new formidable.IncomingForm() form.keepExtensions = true form.parse(req, (err, fields, files) => { if (err) { return res.status(400).json({ error: "Photo could not be uplaoded" }) } // save user let user = req.profile user = _.extend(user, fields) user.updated = Date.now() if (files.photo) { user.photo.data = fs.readFileSync(files.photo.path) user.photo.contentType = files.photo.type } user.save( (err, result) => { if (err) { return res.status(400).json({ error: err }) } user.hashed_password = undefined user.salt = undefined res.json(user); }) }) } |
Now, try to upload the photo.
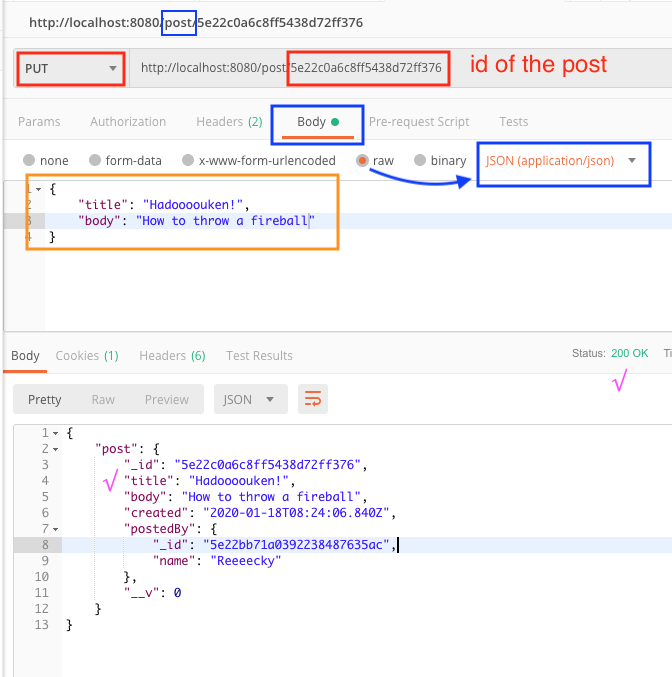
DNY Node API (7 – Posts)
First make sure you have the id of the user by signing in.
Then by GET on url /posts/by/{id of user}, you will get all the posts created by this user.
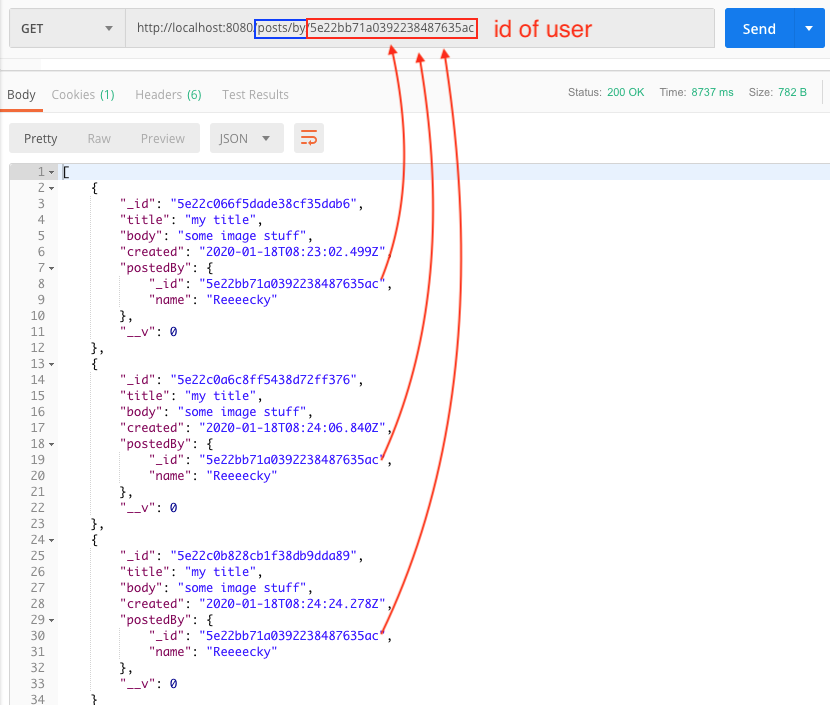
From the result, get the _id of the post you want to change. Then do a PUT on /post/{id of post} with JSON data to specify what you want to change.