Category Archives: Uncategorized
Using Keycloak in React
ref – https://scalac.io/user-authentication-keycloak-1/
Start up your keycloak server and sign into https://localhost:8080/auth/admin
Server configuration
What you’re seeing on the page above is the default (master) realm. A realm is a domain in which several types of entities can be defined, the most prominent being:
Users: basic entities that are allowed access to a Keycloak-secured system.
Roles: a User’s authorization level, such as admin/manager/reader.
Clients: browser apps and web services that are allowed to request a login.
Identity Providers: external providers to integrate with, such as Google, Facebook, or any OpenID Connect/SAML 2.0 based system.
The master realm serves as the root for all of the others. Admins in this realm have permission to view and manage any other realm created on the server instance. Keycloak authors don’t recommend using the master realm to manage your users and applications (it is intended as space for super-admins to create other realms).
So let’s start by creating a new realm for our app named MyDemo.
Make sure that the MyDemo realm is selected. On the left sidebar, go to the Users tab and hit Add users button.
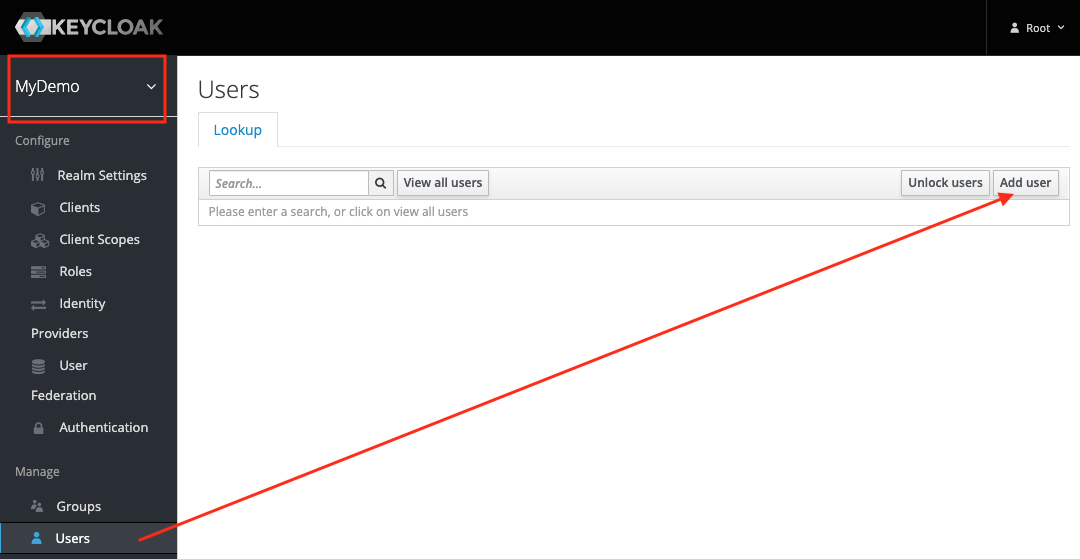
For now, the only thing you’ll need to provide is the username. Let’s call him John.
After creating the user, you’ll need to set up his password.
Go to Credentials tab, enter the new password twice and hit Reset Password.
To check if the new user works, open a new incognito window in your browser. Then go to https://localhost:8080/auth/realms/MyDemo/account and try logging in with the username john and the password you provided earlier.
Since we left the Temporary option turned on when resetting the password, you’ll be asked to provide a new one on the first login. Afterwards, you’ll be taken to your account management panel.
Among other things, this will allow you to provide your profile information (which may or may not be enforced by the admin), change your password, and see all your active login sessions. For now, let’s update the Email, First name and Last name fields with whatever values you like, then get back to the admin window.
Create Client
The final step of the initial server configuration is to create a client. Clients are browser apps and web services that are either allowed to initiate the login process or have been provided with tokens resulting from earlier logins.
Today we’ll be securing a React-based front-end, so let’s go to the Clients tab and hit the Create button:
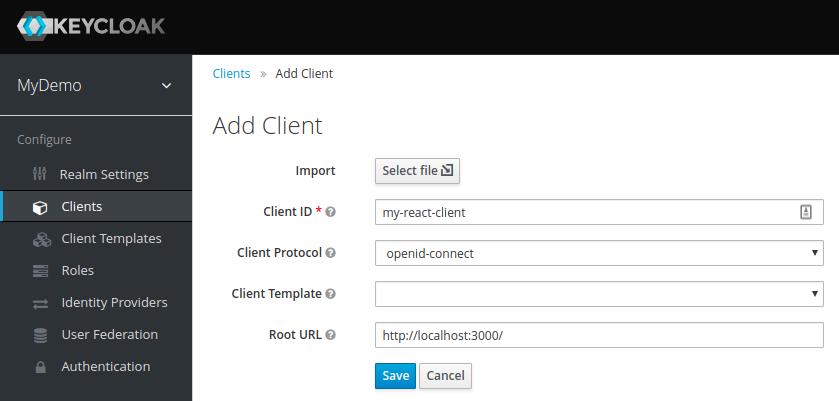
For the Access Type, select public. Since we have no real way of hiding the secret in a JS-based browser app, this is what we need to stick with.
Next comes Valid Redirect URIs – this is the URI pattern (one or more) which the browser can redirect to after completing the login process.
Since we picked public access type for our client (and thus anyone can ask to initiate the login process), this is especially important. In a real app, you will need to make sure you make this pattern as restrictive as possible, otherwise, you could open your system to phishing attacks! However, for dev purposes, you can just leave it at default.
The last of the important options is Web Origins, which governs CORS requests. Again, for dev purposes the default value is fine.
One last thing we’ll need is the client configuration to use with our app. Go to the Installation tab and select Keycloak OIDC JSON as the format:
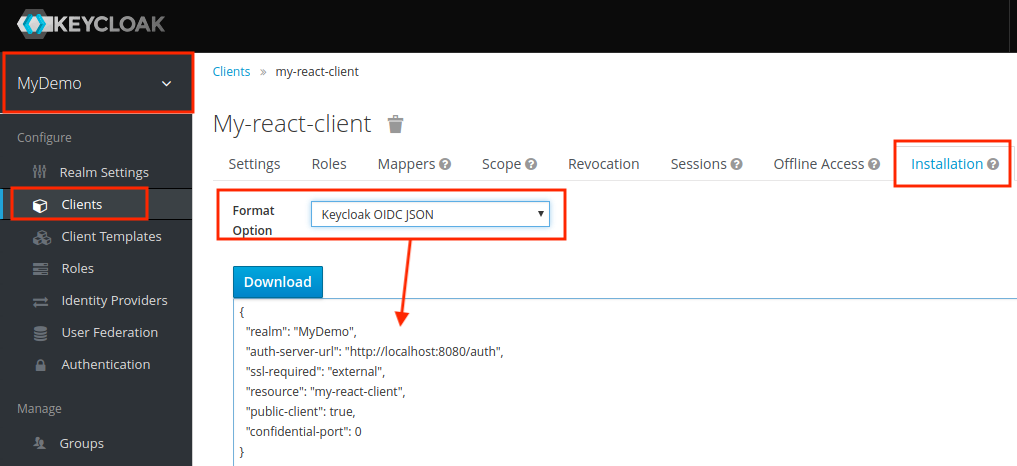
Download this JSON and keep it. We’ll be needing it later.
React App
open up a terminal and make sure create-react-app package is installed.
Now we use it to create a react app called keycloak-react.
create-react-app keycloak-react
Firstly, we’ll need to add some dependencies. Open package.json and add the following two items:
|
1 2 3 4 5 |
"dependencies": { ... "react-router-dom": "^4.2.2", "keycloak-js": "4.0.0-beta.2" } |
Now in your terminal, install all the packages
npm install
Open up the directory with VS Code.
Let’s replace the contents of src/App.js with our skeleton:
|
1 2 3 4 5 6 7 8 9 10 11 12 13 14 15 16 17 18 19 20 21 22 23 24 |
import React, { Component } from 'react'; import { BrowserRouter, Route, Link } from 'react-router-dom'; import Welcome from './Welcome'; import Secured from './Secured'; import './App.css'; class App extends Component { render() { return ( <BrowserRouter> <div className="container"> <ul> <li><Link to="/">public component</Link></li> <li><Link to="/secured">secured component</Link></li> </ul> <Route exact path="/" component={Welcome} /> <Route path="/secured" component={Secured} /> </div> </BrowserRouter> ); } } export default App; |
As you can see, this is just a Router providing navigation between two other components. Let’s add the first of those, src/Welcome.js:
|
1 2 3 4 5 6 7 8 9 10 11 12 |
import React, { Component } from 'react'; class Welcome extends Component { render() { return ( <div className="Welcome"> <p>This is your public-facing component.</p> </div> ); } } export default Welcome; |
Nothing particularly fancy here, just some generic text. The next one should be a bit more interesting – put it at src/Secured.js:
|
1 2 3 4 5 6 7 8 9 10 11 12 13 14 15 16 17 18 19 20 21 22 23 24 25 26 27 28 29 30 31 32 |
import React, { Component } from 'react'; import Keycloak from 'keycloak-js'; class Secured extends Component { constructor(props) { super(props); this.state = { keycloak: null, authenticated: false }; } componentDidMount() { const keycloak = Keycloak('/keycloak.json'); keycloak.init({onLoad: 'login-required'}).then(authenticated => { this.setState({ keycloak: keycloak, authenticated: authenticated }) }) } render() { if (this.state.keycloak) { if (this.state.authenticated) return ( <div> <p>This is a Keycloak-secured component of your application. You shouldn't be able to see this unless you've authenticated with Keycloak.</p> </div> ); else return (<div>Unable to authenticate!</div>) } return ( <div>Initializing Keycloak...</div> ); } } export default Secured; |
Explanation
In the secured component, as soon as the component is mounted into the DOM, we can create the Keycloak object by providing client configuration:
|
1 |
const keycloak = Keycloak('/keycloak.json'); |
Remember the JSON you downloaded from the admin panel? Put it into public/keycloak.json to get the above to work. Alternatively, you could pass a matching JavaScript object to Keycloak directly like so:
|
1 2 3 4 5 6 7 8 |
const keycloak = Keycloak({ realm: "MyDemo", auth-server-url: "http://localhost:8080/auth", ssl-required: "external", resource: "my-react-client", public-client: true, confidential-port: 0 }); |
login-required is one of two possible values to be passed as an onLoad parameter. This will authenticate the client if the user has already logged into Keycloak, or redirect the browser to the login page if he hasn’t. The other option is check-sso: this will only authenticate the client if the user has already logged in, otherwise the client will remain unauthenticated without automatic redirection.
Time to check it out – run npm start and your browser should open automatically. You’ll see that you have a public, and secured component.
Click on the secured one and you’ll be redirected to the login page. Log in as John and you’ll be able to see the text from the secured component.
You’ll find you can now navigate between the two components without having to log in again.
Profile Data and Logout
Let’s expand our app a little bit by adding the logout functionality and some user data extraction. We’ll start with the latter – add the following as src/UserInfo.js:
|
1 2 3 4 5 6 7 8 9 10 11 12 13 14 15 16 17 18 19 20 21 22 23 24 25 26 27 |
import React, { Component } from 'react'; class UserInfo extends Component { constructor(props) { super(props); this.state = { name: "", email: "", id: "" }; this.props.keycloak.loadUserInfo().then(userInfo => { this.setState({name: userInfo.name, email: userInfo.email, id: userInfo.sub}) }); } render() { return ( <div className="UserInfo"> <p>Name: {this.state.name}</p> <p>Email: {this.state.email}</p> <p>ID: {this.state.id}</p> </div> ); } } export default UserInfo; |
This component accepts a Keycloak instance from its parent, then uses the loadUserInfo method to extract the user’s data.
Now for the logout button, place the following in src/Logout.js:
|
1 2 3 4 5 6 7 8 9 10 11 12 13 14 15 16 17 18 19 |
import React, { Component } from 'react'; import { withRouter } from 'react-router-dom' class Logout extends Component { logout() { this.props.history.push('/'); this.props.keycloak.logout(); } render() { return ( <button onClick={ () => this.logout() }> Logout </button> ); } } export default withRouter(Logout); |
Similarly, this accepts a Keycloak instance from the parent, then uses its logout method. Note that it has to be called last – otherwise it would redirect you to the login form again.
Let’s include these new components in src/Secured.js:
|
1 2 3 4 5 6 7 8 9 10 11 12 13 14 15 16 17 18 19 20 21 22 23 24 25 26 27 28 29 30 31 32 33 34 35 36 |
import React, { Component } from 'react'; import Keycloak from 'keycloak-js'; import UserInfo from './UserInfo'; import Logout from './Logout'; class Secured extends Component { constructor(props) { super(props); this.state = { keycloak: null, authenticated: false }; } componentDidMount() { const keycloak = Keycloak('/keycloak.json'); keycloak.init({onLoad: 'login-required'}).then(authenticated => { this.setState({ keycloak: keycloak, authenticated: authenticated }) }) } render() { if(this.state.keycloak) { if(this.state.authenticated) return ( <div> <p>This is a Keycloak-secured component of your application. You shouldn't be able to see this unless you've authenticated with Keycloak.</p> <UserInfo keycloak={this.state.keycloak} /> <Logout keycloak={this.state.keycloak} /> </div> ); else return (<div>Unable to authenticate!</div>) } return ( <div>Initializing Keycloak...</div> ); } } export default Secured; |
As expected, clicking the logout button forces you to have to log in again, the next time you try to access the Secured component.
Basic KeyCloak + Node JS tutorial
ref –
- Install KeyCloak Server – https://huongdanjava.com/install-keycloak-standalone-server.html
- Install and run Node JS with KeyCloak Server -https://medium.com/devops-dudes/securing-node-js-express-rest-apis-with-keycloak-a4946083be51
- demo
Install Keycloak
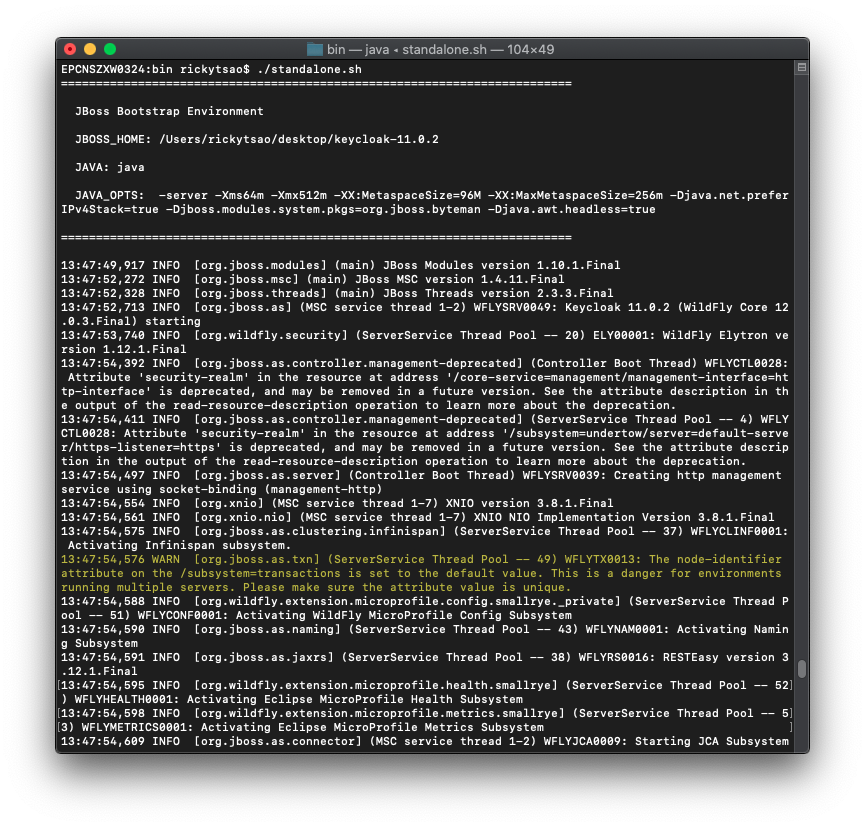
Download Keycloak zip and unzip it onto a directory.
Go into the directory and cd into the bin folder. Then: ./standalone.sh
Open up a browser and go to http://localhost:8080/auth/
We then need to create a new user admin by filling in the Administration Console and then clicking Create button.
I will create a new user using admin/admin.
Go to the admin console http://localhost:8080/auth/admin/ and log in.
Create Realm
A Realm manages a set of users, clients, credentials, roles, and groups. A user belongs to and logs into a realm. Realms are isolated from one another and can only manage and authenticate the users that they control.
Clients are browser apps and web services that are either allowed to initiate the login process or have been provided with tokens resulting from earlier logins.
First, make sure you are logged into the Admin Console.
From the Master drop-down menu, click Add Realm. When you are logged in to the master realm this drop-down menu lists all existing realms.
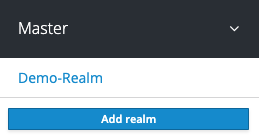
Type Demo-Realm in the Name field and click Create.
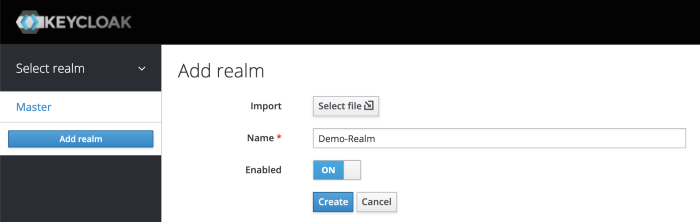
Make sure Demo-Realm is selected for the below configurations. Avoid using the master realm.
Create Client for your Realm
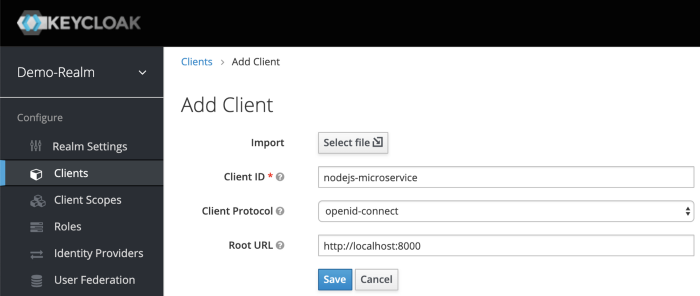
Click on the Clients menu from the left pane. All the available clients for the selected Realm will get listed here.
To create a new client, click Create. You will be prompted for a Client ID, a Client Protocol and a Root URL. A good choice for the client ID is the name of your application nodejs-microservice, the client protocol should be set to openid-connect and the root URL should be set to the application URL of http://localhost:8000
After saving you will be presented with the client configuration page where you can assign a name and description to the client if desired.
Set the Access Type to confidential, Authorization Enabled to ON , Service Account Enabled to ON and click Save.
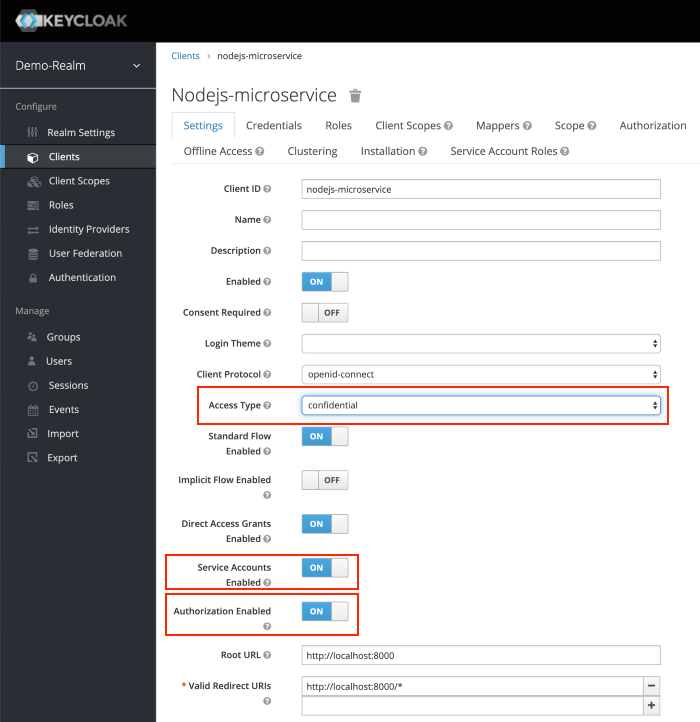
Credentials tab will show the Client Secret which is required for the Node.js Application Keycloak configurations later on.
Creating Client Roles
First, click on Clients > nodejs-microservice > Roles tab.
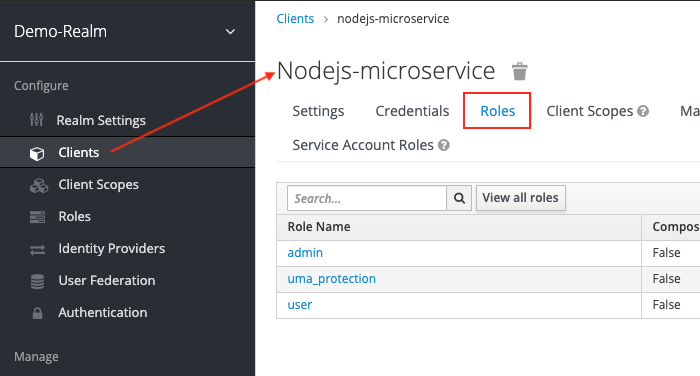
We need to create roles for this.
Do this for user and admin.
After creating those roles, you should be able to see them appear under the Roles tab of Client nodejs-microservice.
Creating Realm Roles
We have applications assign access and permissions to specific roles. Let’s create realm roles to give application access to our user and admin roles.
For example, for user boss, we want it with admin roles to be able to access, so we will create an app-admin realm role to give to this user.
for user rtsao, we want it with user roles to be able to access, so we will create an app-user realm role for this.
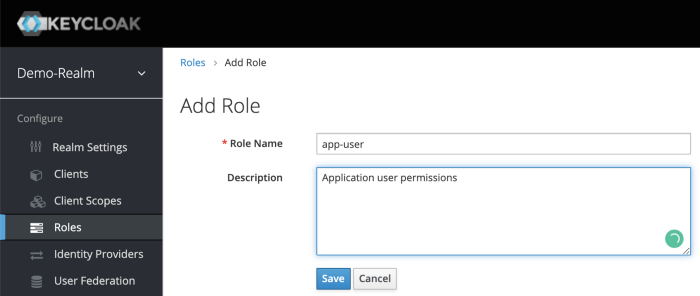
On the left sidebar menu, click on the roles. Click Add Role.
After Save, enabled Composite Roles and Search for nodejs-microservice under Client Roles field. Select user role of the nodejs-microservice and Click Add Selected >.
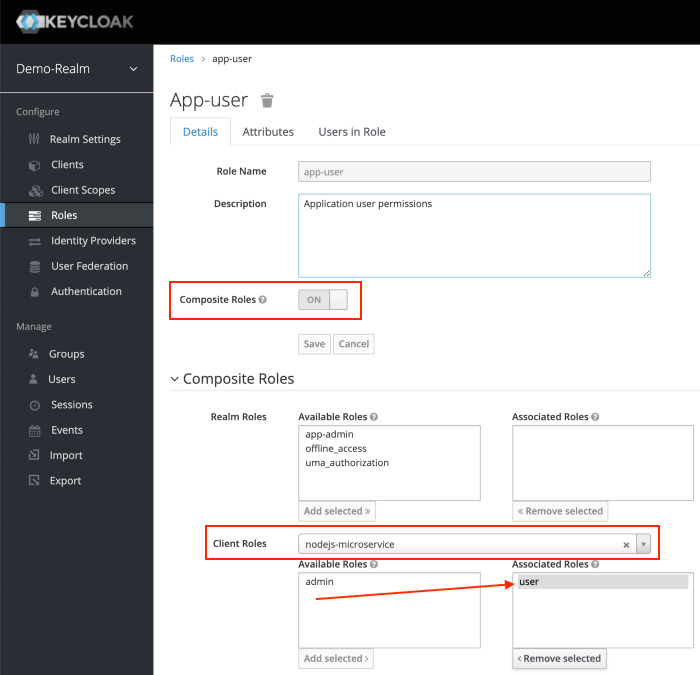
This configuration will assign nodejs-microservice user client role to the app-user realm role. We can also mix and match for more complicated permissions.
Let’s do the same for realm role app-admin.
Creating Users with realm roles
Users are entities that are able to log into your system. We can grant them our realm roles for testing purposes.
Let’s create users:
rtsao – user role only
boss – admin role only
ver – both user and admin role
On the left hand sidebar, click on Users.
On the right side of the empty user list, click Add User to open the add user page.
Enter a name in the Username field; this is the only required field. Flip the Email Verified switch from Off to On and click Save to save the data and open the management page for the new user.
Click the Credentials tab to set a temporary password for the new user.
– Flip the Temporary switch from On to Off
– Type a new password and confirm it, click Reset Password to set the user password to the new one you specified.
For simplicity let’s set the password to mypassword for all the users.
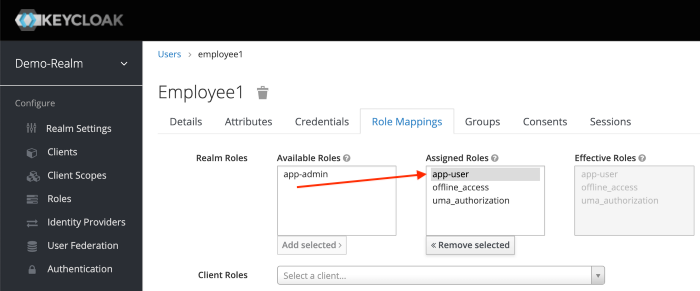
Click the Role Mappings tab to assign realm roles to the user.
Realm roles list will be available in Available Roles list. Select one required role and click on the Add Selected > to assign it to the user.
After role assignment, assigned roles will be available under Assigned Roles list. Role assignments for rtsao should be app-user.
for boss, give it app-admin.
For ver, give it both app-admin and app-user.
Generating Tokens for users to access resource
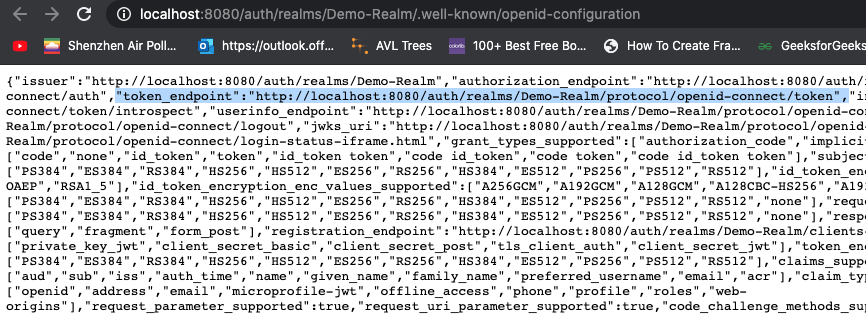
Go to Realm Settings of the Demo-Realm from the left menu and click on OpenID Endpoint Configuration to view OpenID Endpoint details.
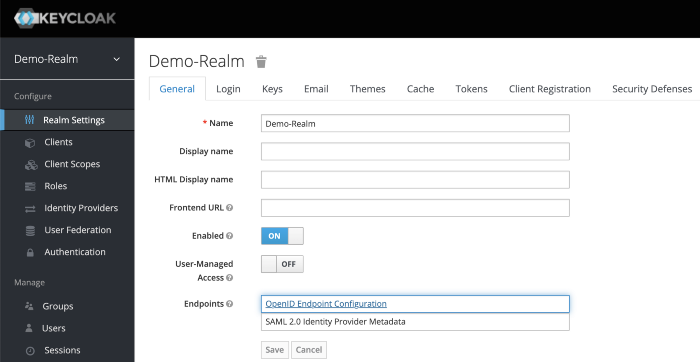
copy the token endpoint.
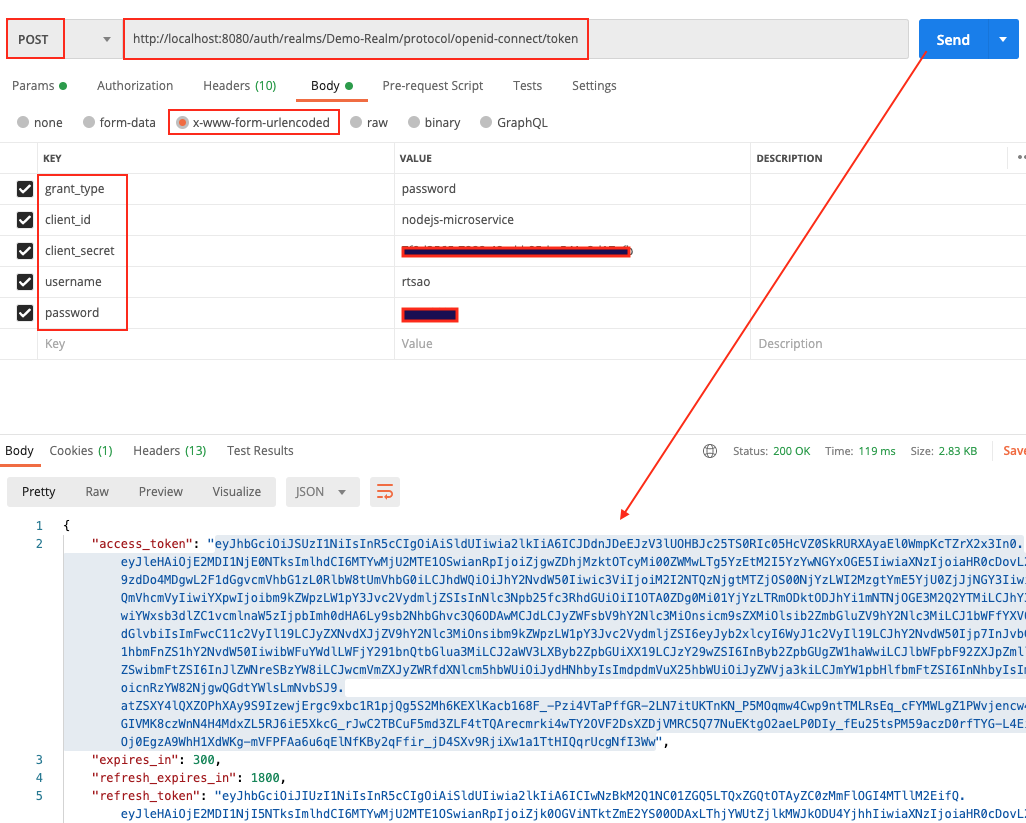
Open up Postman, and put it into the url.
Make sure you put http verb as POST.
Click on Body tab. Click on x-www-form-urlencoded radio button.
They put these key/values
grant_type, password
client_id, nodejs-microservice
client_secret,
username, rtsao
password, *************
This is the basics of getting an access token. With this token, you give it to keycloak’s API later in the tutorial, and it will grant you access to the URL resource.
When you hit send, you should get a status 200 and the token itself.
Copy the token and give it to https://jwt.io/ to verify.
On the right hand side, look at the payload. You should see various information. At the very bottom, you should see ‘signature verified’.
access_token includes the permission details.
realm_access.roles includes app_user realm role.
resource_access.nodejs-microservice.roles include the user client role.
preferred_username includes the username of the user (rtsao)
iat, exp includes the token issued time as well as the token expiry time. Access Token expiry times can be customizable under Realm Settings, Tokens tab. By default, Access Token Lifespan would be set to 5 minutes which can be customized based on your security requirements.
Node JS App
Make sure you have the latest node and npm.
mkdir keycloak-nodejs-microservice
cd keycloak-nodejs-microservice
npm init
It will ask you for the following information. Just keep pressing enter, and enter your name at the “author name” field.
npm install –save express
npm install -g nodemon
Open the project with VS Code.
Create a new file called index.js and with the below content.
|
1 2 3 4 5 6 7 8 |
var express = require('express'); var app = express(); app.get('/', function(req, res){ res.send("Server is up!"); }); app.listen(3000); |
Save the file, go to your terminal and type the following.
nodemon index.js
This will start the server. To test this app, open your browser and go to http://localhost:3000 and Server is up! message will appear in the browser.
Create sub directory Test
We want all of our resource strings to have a sub route of ‘test’. test/route1, test/route2…etc.
Create a new folder controller and create a new file test-controller.js in the created folder with the below content.
|
1 2 3 4 5 6 7 8 9 10 11 12 13 14 15 16 17 18 19 |
var express = require('express'); var router = express.Router(); router.get('/anonymous', function(req, res){ res.send("Hello Anonymous"); }); router.get('/user', function(req, res){ res.send("Hello User"); }); router.get('/admin', function(req, res){ res.send("Hello Admin"); }); router.get('/all-user', function(req, res){ res.send("Hello All User"); }); module.exports = router; |
Import test-controller.js and add the testController router to express in index.js before the app.listen function call.
|
1 2 |
var testController = require('./controller/test-controller.js'); app.use('/test', testController); |
invoke by opening Postman and do a GET on http://localhost:3000/test/{anonymous} (user, admin, all-user)
You should get the response text accordingly because so far, no authorization is applied.
Integrating Keycloak with our Node app
Install keycloak-connect, express-session dependencies to your project.
npm install keycloak-connect –save
npm install express-session –save
npm install express-session –save
Create a new folder config and create a new file keycloak-config.js in the created folder with the below content. Change the keycloakConfig variable content with Keycloak Server URL and nodejs-microservice Client Id.
config/keycloak-config.js
|
1 2 3 4 5 6 7 8 9 10 11 12 13 14 15 16 17 18 19 20 21 22 23 24 25 26 27 28 29 30 31 32 33 34 35 36 37 38 39 |
var session = require('express-session'); var Keycloak = require('keycloak-connect'); let _keycloak; var keycloakConfig = { clientId: 'nodejs-microservice', bearerOnly: true, serverUrl: 'http://localhost:8080/auth', // the keycloak instance that's running realm: 'Demo-Realm', credentials: { secret: '7f0d2565-7888-48ad-b95d-a541e2d17afb' } }; function initKeycloak() { if (_keycloak) { console.warn("Trying to init Keycloak again!"); return _keycloak; } else { console.log("Initializing Keycloak..."); var memoryStore = new session.MemoryStore(); _keycloak = new Keycloak({ store: memoryStore }, keycloakConfig); return _keycloak; } } function getKeycloak() { if (!_keycloak){ console.error('Keycloak has not been initialized. Please called init first.'); } return _keycloak; } module.exports = { initKeycloak, getKeycloak }; |
Apply the Role-Based Access for our API
keycloak.protext() can be used to secure APIs in the routers.
|
1 2 3 4 5 6 7 8 9 10 11 12 13 14 15 16 17 18 19 20 21 22 |
var express = require('express'); var router = express.Router(); const keycloak = require('../config/keycloak-config.js').getKeycloak(); router.get('/anonymous', function(req, res){ res.send("Hello Anonymous"); }); router.get('/user', keycloak.protect('user'), function(req, res){ res.send("Hello User"); }); router.get('/admin', keycloak.protect('admin'), function(req, res){ res.send("Hello Admin"); }); router.get('/all-user', keycloak.protect(['user','admin']), function(req, res){ res.send("Hello All User"); }); module.exports = router; |
Test it all out
Open Postman, and generate another access token like we did before. When generating, let’s use user rtsao. Remember that this user only has user role access.
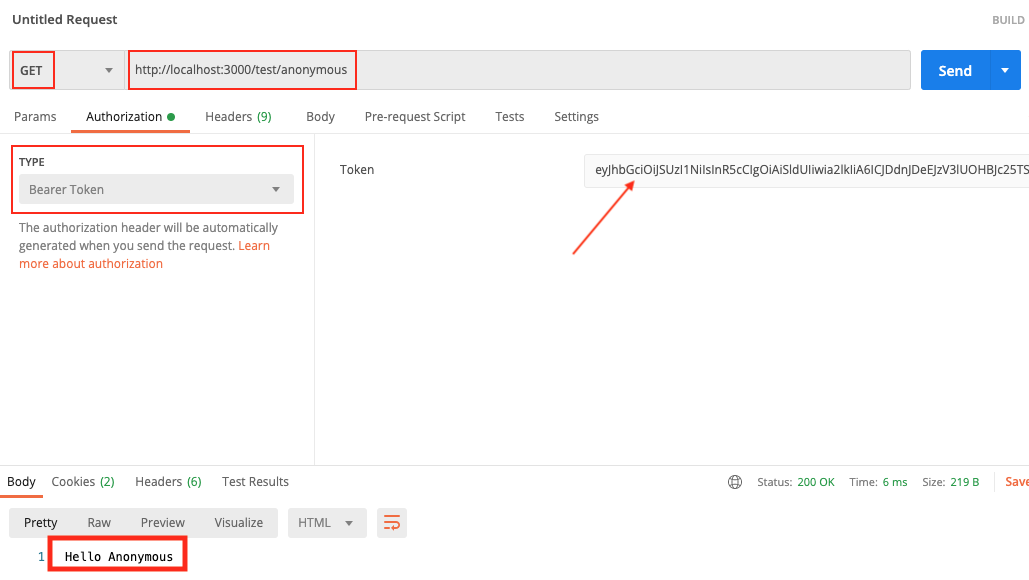
Open up a tab on Postman and put GET as the http verb.
put http://localhost:3000/test/anonymous
Click on Authorization tab, type Bearer Token, then paste the token.
Click on Send. Because the anonymous url is not protected, we always get the response.
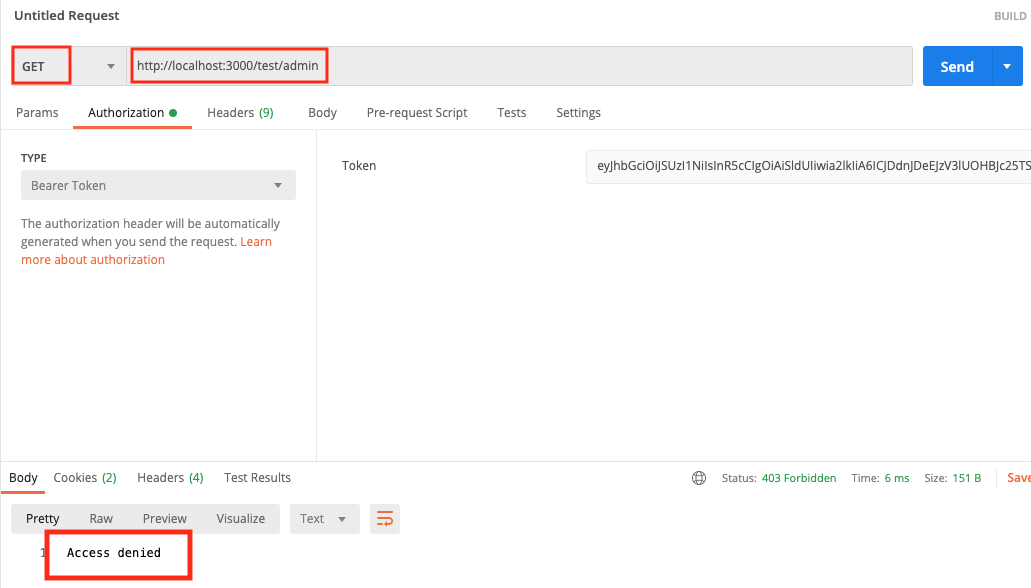
We then test on the admin, we get access denied because the token shows that we’re a user role.
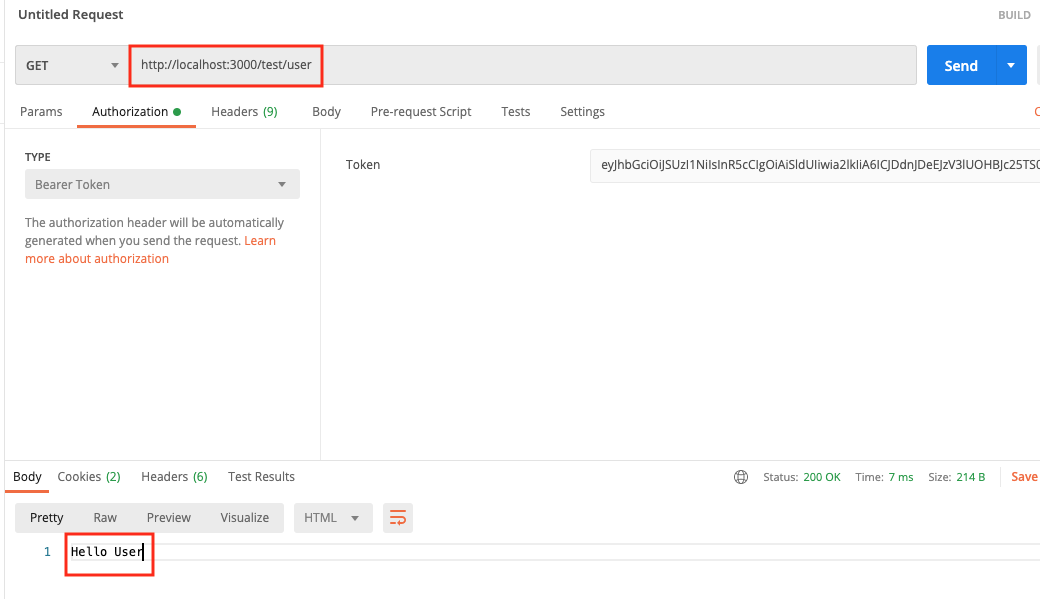
When we test for role user, it all works.
Protected: Programmatically update profile data using Graph API
Using Postman to make changes to signed-in user’s profile
prerequisites:
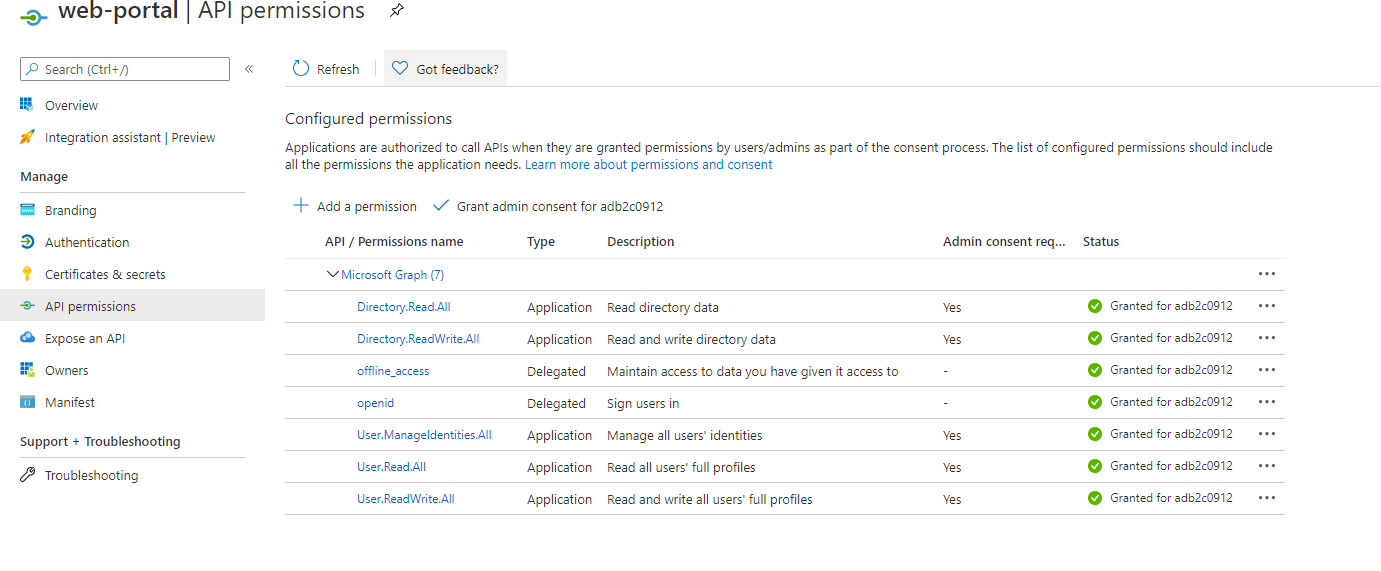
Azure AD B2C has an app.
This app should have these minimum permissions which you need to set:
Set up Postman to query for MS Graph API
ref – https://docs.microsoft.com/en-us/graph/use-postman
Open up Postman app.
Choose File | Import ….
Select Import From Link.
Paste the following two URLs and choose Import after each:
https://raw.githubusercontent.com/microsoftgraph/microsoftgraph-postman-collections/master/Microsoft%20Graph.postman_collection.json
https://raw.githubusercontent.com/microsoftgraph/microsoftgraph-postman-collections/master/Microsoft%20Graph.postman_environment.json
You should now see the Microsoft Graph environment in the top right environment drop down by the eye icon. Now you need to set up your environment.
Set up application API calls
Choose the No environment drop down in top right corner.
Select Microsoft Graph environment.
Choose the eye icon to the right and then choose Edit.
Enter your Microsoft Identity Application in the current (not initial) variables:
ClientID,
ClientSecret
TenantID.
When you created your app, it will have its own clientID and tenantID. For ClientSecret, just generate one like so:
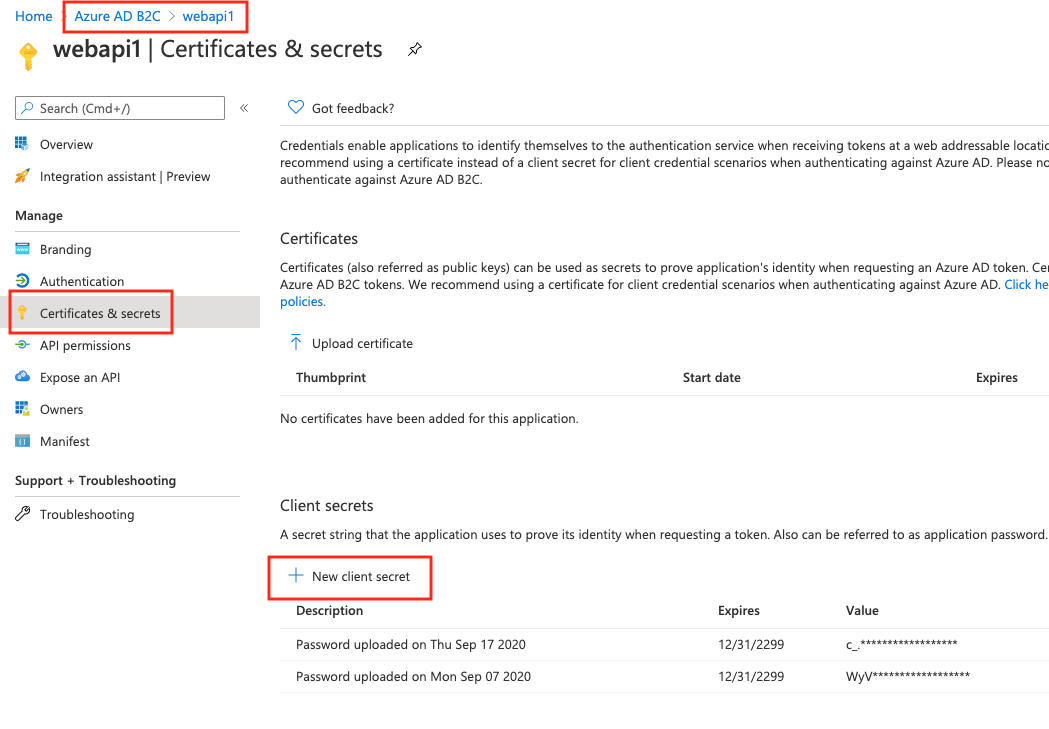
Make sure you copy the secret onto a text, because after refresh, Azure will cover it.
Select Update.
Close the Manage Environments dialog box. In the MicrosoftGraph | Application collection on left side, choose
Get App-only Access Token.
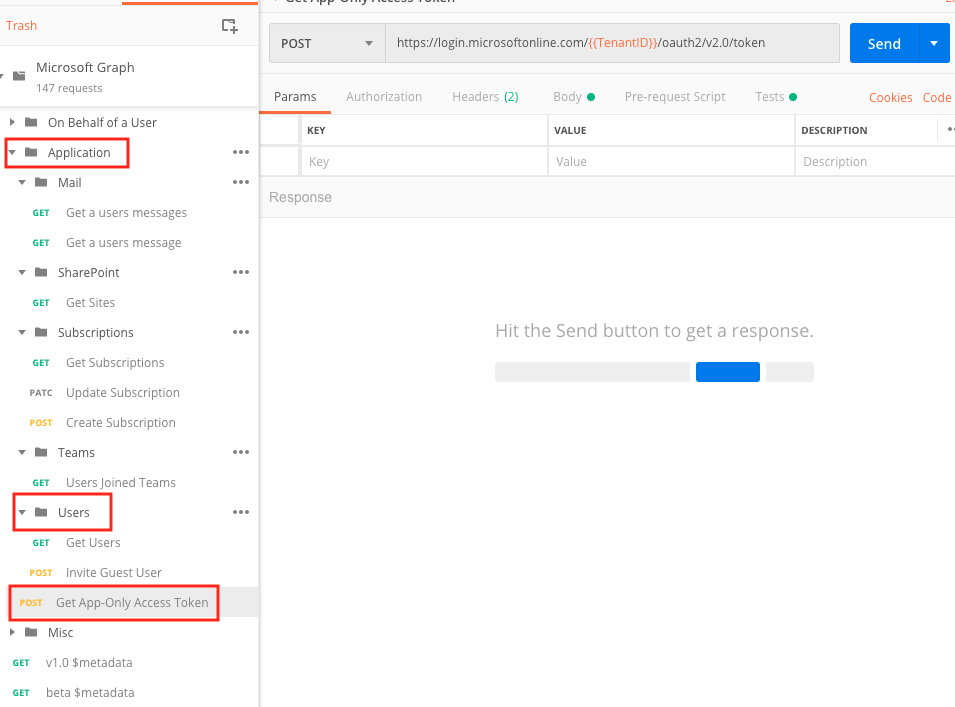
Then choose Send.
You’ll get a App Access Token.
On the left sidebar, under Application, click on Get users. In your environment variables, make sure you copy and paste this App Access Token into the AppAccessToken variable.
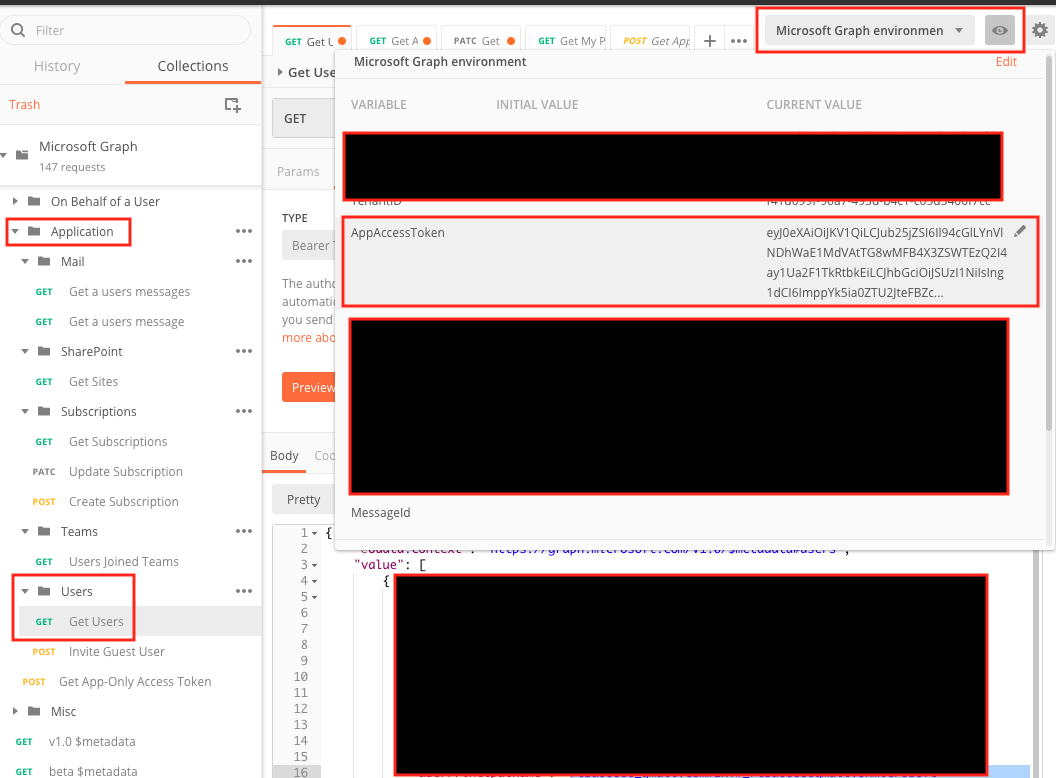
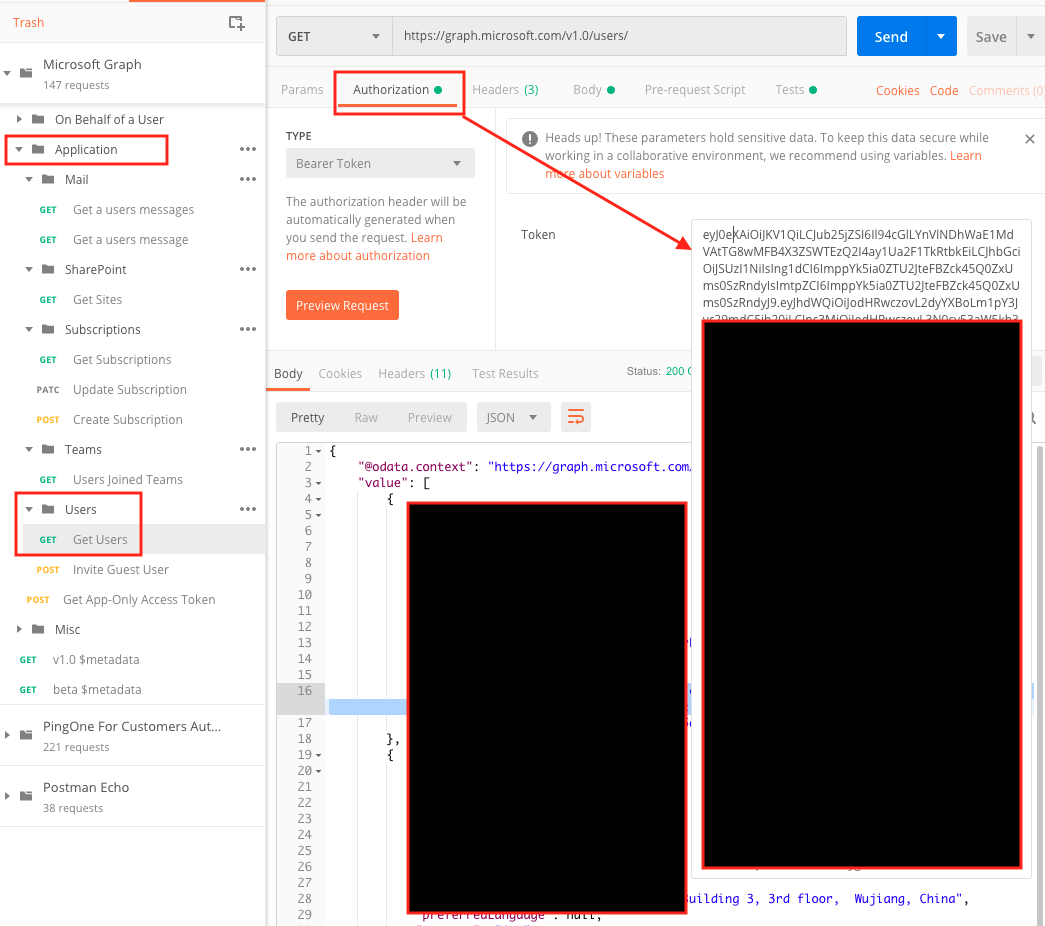
Confirm that it is set under Bearer Token in Authorization tab.
Now you are ready to make changes to the user profile data.
On the left side, under Application | Users folder and choose Get Users.
The URL should be https://graph.microsoft.com/v1.0/users/ the HTTP method should be GET.
Then choose Send.
You’ll get a list of the users. Choose one user, and copy the id.
Changing the profile data
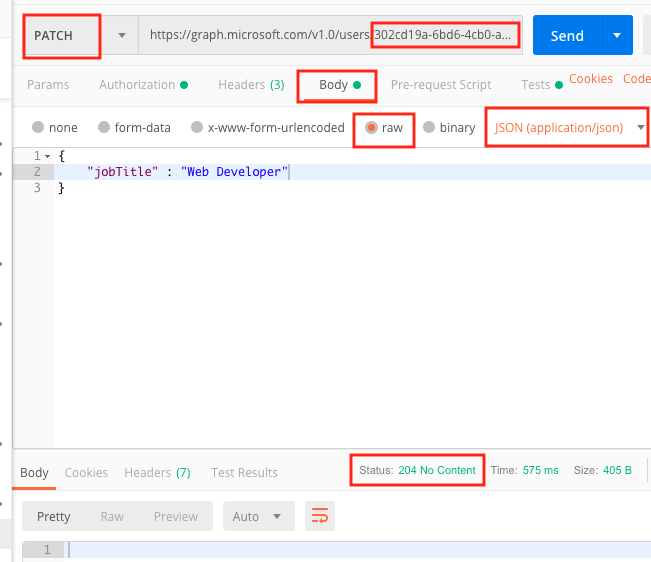
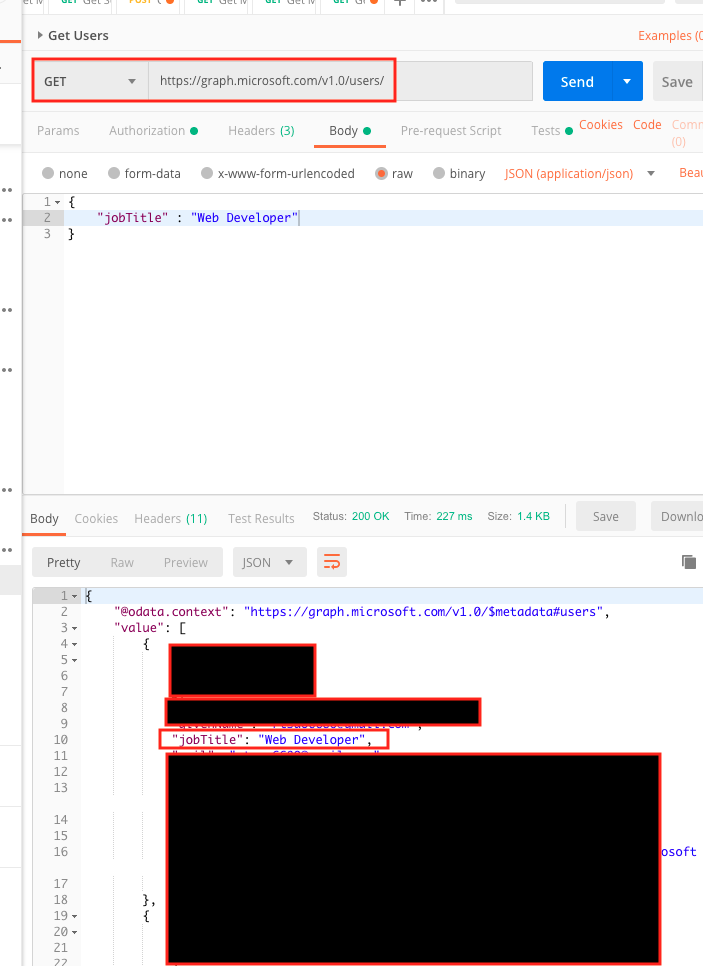
Now, on the top, change the HTTP method to PATCH. copy and paste the id at the end like so:
https://graph.microsoft.com/v1.0/users/302cd19a-6bd6-4cb0-a161-00cf925d8da7
Then choose Body tab. Select the raw radio button. Finally, choose JSON (application/json) for the pull down, which was originally defaulted to text.
Let’s say we want to change property displayName. We use JSON for this:
|
1 2 3 |
{ "jobTitle" : "Web Developer" } |
click send.
Protected: asdf
Protected: Customize login UI for Azure AD B2C
Protected: Azure AD B2C – WebApi and Client setup
Complete binary tree vs full binary tree
ref – https://www.programiz.com/dsa/complete-binary-tree
A complete binary tree is when all nodes are filled, and the leaves are filled from the left.
A full tree is where each node has 0 or 2 children.
A complete binary tree has an interesting property that we can use to find the children and parents of any node.
If the index of any element in the array is i, the element in the index 2i+1 will become the left child and element in 2i+2 index will become the right child. Also, the parent of any element at index i is given by the lower bound of (i-1)/2.
Mosh Ultimate DS and Algo video – hash table answers
|
1 2 3 4 5 6 7 8 9 10 11 12 13 14 15 16 17 18 19 20 21 22 23 24 25 26 27 28 29 30 31 32 33 34 35 36 37 38 39 40 41 42 43 44 45 46 47 48 49 50 51 52 53 54 55 56 57 58 59 60 61 62 63 64 65 66 67 68 69 70 71 72 73 74 75 76 77 78 79 80 81 82 83 84 85 86 87 88 89 90 91 92 93 94 95 96 97 98 99 100 101 102 103 104 105 106 107 108 109 110 111 112 113 114 115 116 117 118 119 120 121 122 123 124 125 126 127 128 129 130 131 132 133 134 135 136 137 138 139 140 141 142 143 144 145 146 147 148 149 150 151 152 153 154 155 156 157 158 159 160 161 162 163 164 165 166 167 168 169 170 171 172 173 174 175 176 177 178 179 180 181 182 183 184 185 186 187 188 189 190 191 192 193 194 195 196 197 198 199 200 201 202 203 204 205 206 207 208 209 210 211 212 213 214 215 216 217 218 219 220 221 222 223 224 225 226 227 228 229 230 231 232 233 234 235 236 237 238 239 240 241 242 243 244 245 246 247 248 249 250 251 252 253 254 255 256 257 258 259 260 261 262 263 264 265 266 267 268 269 270 271 272 273 274 275 276 277 278 279 280 281 282 283 284 285 286 287 288 289 290 291 292 293 294 295 296 297 298 299 300 301 302 303 304 305 306 307 308 309 310 311 312 313 314 315 316 317 318 319 320 321 322 323 324 |
// first, we create a stack class Node { constructor(newData, newNext) { this.next = newNext; this.data = newData; } delete = () => { console.log(`Deleting ${this.data} `); this.next = null; delete this.next; this.data = null; delete this.data; } print = () => { console.log(this.data); } } class LinkedStack { constructor() { var head = null; this.push = (data) => { let tmp = head; while (tmp != null) { let d = tmp.data; if (d.key === data.key) { console.log(`${data.key} already exists, just overwrite value to ${data.value}`); d.value = data.value return data; } tmp = tmp.next; } // no key found we just padd it on head = new Node(data, head); } this.pop = () => { let tmp = head; head = head.next; tmp.delete(); } this.remove = key => { let tmp = head; let trailer = null; while (tmp != null) { let data = tmp.data; if (data.key === key) { if (head === tmp) { head = head.next; } else { trailer.next = tmp.next; tmp.next = null; } return tmp; } else { trailer = tmp; tmp = tmp.next; } } } this.print = () => { console.log('---- printing ------'); if (head == null) { console.log('empty stack'); return; } for (let tmp = head; tmp != null; tmp = tmp.next) { tmp.print(); } } this.getValueFromKey = key => { for (let tmp = head; tmp != null; tmp = tmp.next) { if (tmp.data.key === key) { return tmp.data; } } return null; } this.length = () => { let cur = 0; for (let tmp = head; tmp != null; tmp = tmp.next) { cur++; } console.log(`Length of stac is ${cur}`); return cur; } this.clear = () => { let tmp = head; while (tmp != null) { let eraser = tmp; tmp = tmp.next; eraser.delete(); } head = null; } } // constructor // prototype functions } /* let a = new LinkedStack(); a.push(new KVPair(8, 'dexter')); a.push(new KVPair(28, 'david')); a.push(new KVPair(68, 'ricky')); let r = a.remove(68); console.log(r.data); let r1 = a.remove(8); console.log(r1.data); let r2 = a.remove(28); console.log(r2.data); a.print(); */ // HashTable // put // get // remove // { int, string } // collision --> chaining function KVPair( newKey, newValue) { this.key = (typeof newKey === 'number') ? newKey : -1; this.value = (typeof newValue === 'string') ? newValue : ''; } class MyHash { constructor(tableLength) { let hashTable = new Array(tableLength); this.put = kvPair => { if (kvPair.key !== -1) { let hash = kvPair.key % tableLength; console.log('hash is: ', hash); let n = hashTable[hash]; console.log(n); if (!n) { hashTable[hash] = new LinkedStack(); hashTable[hash].push(kvPair); } else { // don't push yet // take care of same keys n.push(kvPair); } } } // key this.get = key => { let hash = key % tableLength; let stack = hashTable[hash]; if (!stack) return null; let result = stack.getValueFromKey(key); return result ? result.value : null } // key this.remove = key => { let hash = key % tableLength; let stack = hashTable[hash]; if (!stack) return null; let result = stack.remove(key); return result ? result.data : null; } // display each linked list this.showTable = () => { for (let i =0; i < tableLength; i++) { let ht = hashTable[i]; if (ht) { console.log(`printing stack at index ${i}`); ht.print(); } } } } } let h = new MyHash(20); // put h.put(new KVPair(8, 'ricky')); h.put(new KVPair(2, 'david')); h.put(new KVPair(28, 'dexter')); h.put(new KVPair(68, 'neo')); h.put(new KVPair(68, 'NeoGeo')); h.showTable(); console.log(`......................Now using Map`); let s = Symbol('dexter'); let m = new Map(); m.set('ricky', { phone: '123456', age: 40 }); m.set(s, { phone: '6543321', age: 30 }); m.set(6680, { description: 'rickys bday' }); console.log(m.has('ricky')); console.log(m.has(s)); console.log(m.get('ricky')); console.log(m.size); for (let item of m) { console.log(item); }; /* console.log('-------- problem #1 MOST FREQUENT -----------'); let input = [1,2,2,3,3,3,4]; let hashTable = new Map(); for (let i = 0; i < input.length; i++) { let item = input[i]; if (hashTable.has(item)) { console.log(`${item} exists`); let count = hashTable.get(item); hashTable.set(item, ++count); } else { console.log(`${item} does not exist yet, let's add it and set value to 0`); hashTable.set(item, 1); } } let largestValue = 0; let answer = 0; for (let [key, value] of hashTable) { if (value > largestValue) { largestValue = value; answer = key; } console.log(`${key}, ${value}`); } console.log(answer); */ console.log('-------- problem #2 Pairs with Diff of 2-----------'); let input = [1,7,5,9,2,12,3]; let K = 2; let count = 0; for (let i = 0; i < input.length; i++) { for (let j = i; j < input.length; j++) { let value = Math.abs(input[j]-input[i]); if (value === K) { count++; console.log(`diff is ${value} at indexes ${i}, ${j}`); } } } console.log(count); // all operations are O(1) // Hash function // collision handling // - chaining // - probing (linear, quadratic, double hashing) |