ref – https://www.youtube.com/watch?v=Ke90Tje7VS0&t=0s&list=LLJEwHxS-Vsf-N8xSFHeMirw&index=4
Make sure you install Node to use its NPM packaging scheme. You can check the version of your node:
|
1 |
node --version |
Set up
We first use NPM to install package create-react-app (https://www.npmjs.com/package/create-react-app)
|
1 |
$ sudo npm i -g create-react-app |
/usr/local/bin/create-react-app -> /usr/local/lib/node_modules/create-react-app/index.js
+ create-react-app@3.4.1
added 98 packages from 46 contributors in 34.739s
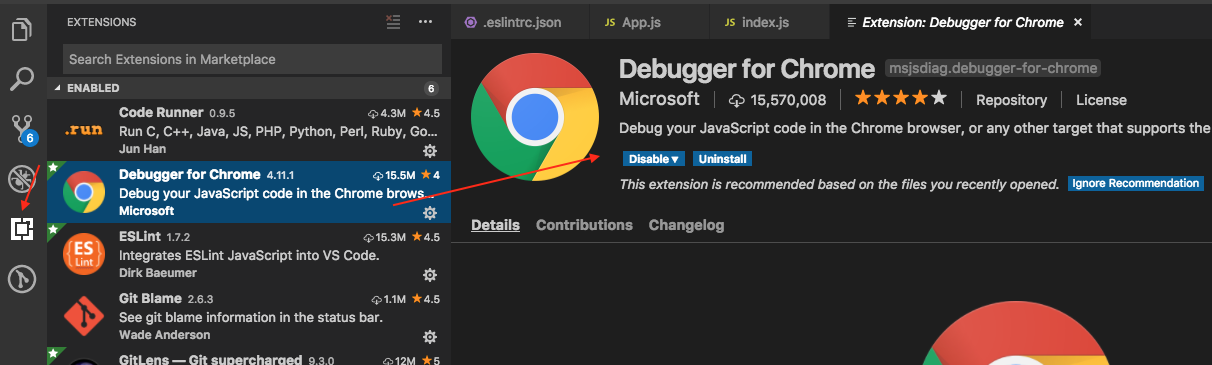
In your Visual Code, go to Extensions and look for Simple React Snippets
Then install Prettier – Code formatter
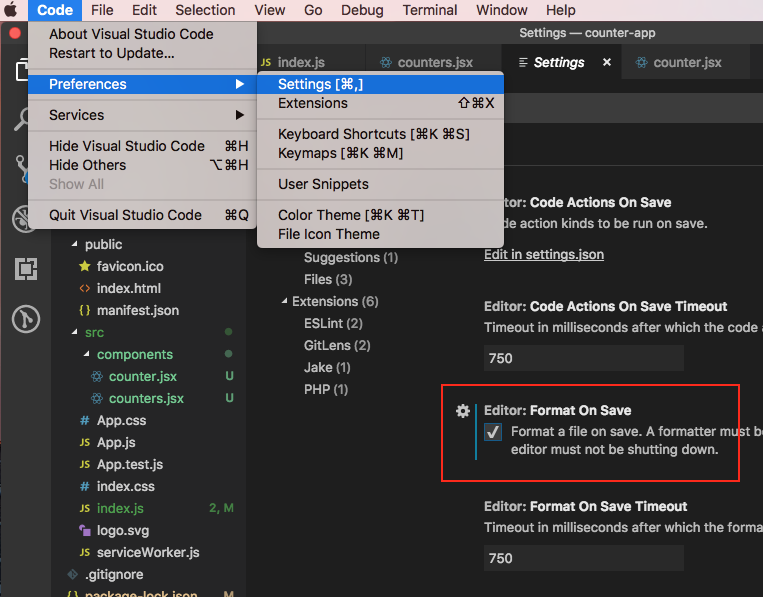
Then search for Format on Save. Check it.
Creating 1st app
|
1 |
create-react-app mosh-react-tut |
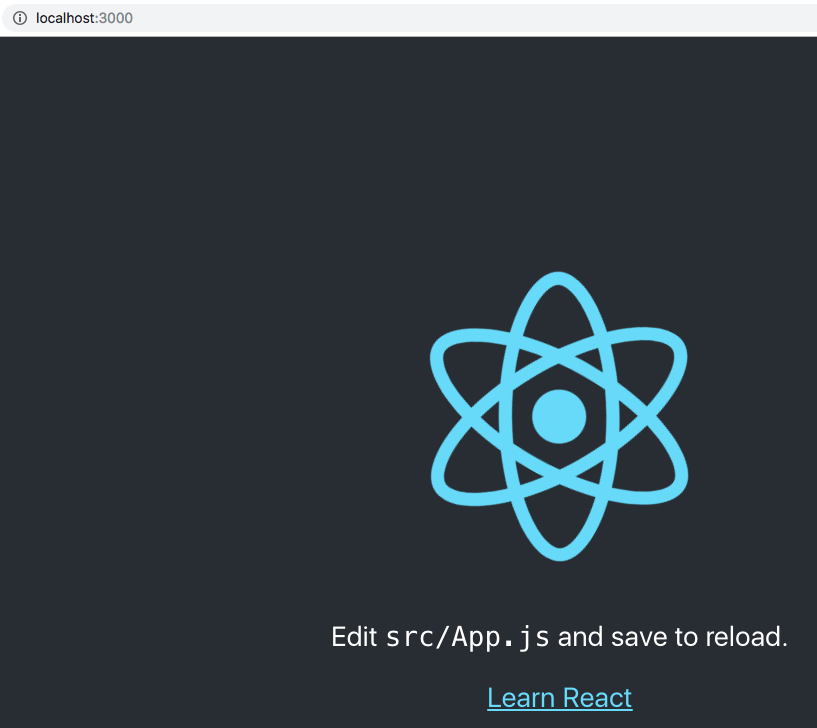
Now we have fully working react app..
|
1 2 |
> cd mosh-react-tut > npm start |
The app would start and run on port 3000.
JSX (javascript XML)
– describe what UI will look like
– Babel – Modern javascript compiler: Babel takes JXS file, convert it to plain javascript code that browsers can understand.
It takes JXS file:
|
1 |
const element = <h1>Hello World</h1>; |
…convert it to javascript code:
|
1 2 3 4 5 6 7 |
"use strict"; var element = React.createElement ( "h1", null, "Hello World" ); |
React’s createElement function would then call DOM functions to create HTML Elements.
ref – babeljs.io/repl
Write React code from scratch
in src, delete all files.
In src folder, Add file index.js
|
1 2 3 4 5 |
import React from 'react'; // import object from module import ReactDOM from 'react-dom'; const element = <h1>Hello World</h1>; // JSX expression console.log(element); |
babel will compile it down to a call to React.createElement.
This is why we need to import React from top.
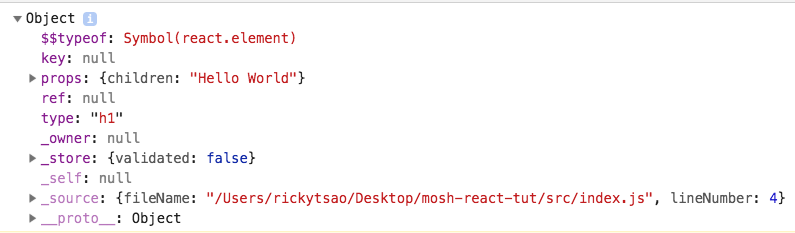
That was the output of a JS expression. Its a React Element.
virtual DOM is a lightweight in memory representation of the DOM.
And our React Element is part of virtual DOM.
Whenever state of this object changes, React will get a new React Element, diff it with the old, and figure out what has changed.
React will then go to the real DOM, and apply those changes.
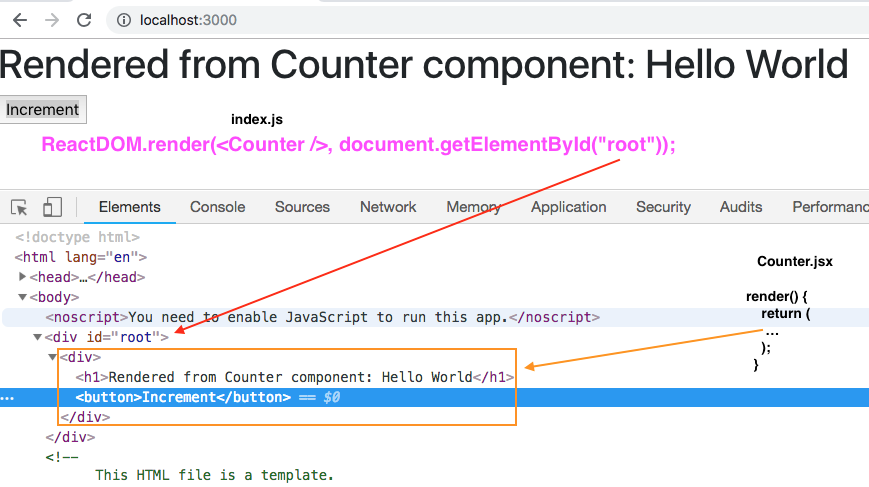
index.js
|
1 2 3 4 5 6 7 |
import React from 'react'; // import object from module import ReactDOM from 'react-dom'; const element = <h1>Hello World</h1>; // render this react element inside of id root element ReactDOM.render(element, document.getElementById('root')); |
Thus, you will get “Hello World” printed with div id root.
In real world, we don’t render elements like this.
We render Components instead.
We also render tree of components, which produce complex markup.
First React Component
We create an basic app:
create-react-app counter-app
Now we install bootstrap. Open up a Terminal. Let’s import bootstrap into our app.
npm i bootstrap@4.1.1
index.js
|
1 2 3 4 5 6 7 8 9 10 11 12 13 14 15 |
import React from 'react'; import ReactDOM from 'react-dom'; import './index.css'; import App from './App'; import * as serviceWorker from './serviceWorker'; // insert this import "bootstrap/dist/css/bootstrap.css"; ReactDOM.render(<App />, document.getElementById('root')); // If you want your app to work offline and load faster, you can change // unregister() to register() below. Note this comes with some pitfalls. // Learn more about service workers: http://bit.ly/CRA-PWA serviceWorker.unregister(); |
After saving, when you look at the web page, you’ll see that the font has turned purple.
In our folder view, under src, create a components folder.
Inside add a new file called counter.jsx
Earlier, we have installed Simple React Snippets…let’s use that now.
imrc + tab // import react component
cc + tab // create class”
counter.jsx
|
1 2 3 4 5 6 7 8 9 10 11 |
import React, { Component } from 'react'; // Component has bunch of methods we are going to inherit into Counter class class Counter extends Component { state = { } // remove render() { return <h1>Rendered from Counter component: Hello World</h1>; // JSX expression, compiled to React.createElement } } export default Counter; |
Notice we’re defining the class above, and exporting it below
|
1 2 3 4 5 |
class Counter extends Component { ... } export default Counter; |
Now, let’s import Counter into our index.js file
|
1 2 3 4 5 6 7 8 9 10 11 12 13 14 15 16 17 |
import React from "react"; import ReactDOM from "react-dom"; import "./index.css"; import App from "./App"; import * as serviceWorker from "./serviceWorker"; import "bootstrap/dist/css/bootstrap.css"; // import the Counter component import Counter from './components/counter'; // put a Counter component into div with id "root" ReactDOM.render(<Counter />, document.getElementById("root")); // If you want your app to work offline and load faster, you can change // unregister() to register() below. Note this comes with some pitfalls. // Learn more about service workers: http://bit.ly/CRA-PWA serviceWorker.unregister(); |
Go back to your web page and you should see the text from Counter component
Embedding Expressions
add button to our Counter component
Note that JSX expressions must have 1 parent element.
JSX get compiled to React.createElement() where its argument is the type of element we want to create, i.e h1.
Thus, we must wrap what we want to display inside of an element, say a div.
counter.jsx
|
1 2 3 4 5 6 7 8 9 10 11 12 13 14 15 |
import React, { Component } from "react"; // Component has bunch of methods we are going to inherit into Counter class class Counter extends Component { state = {}; render() { return ( <div> <h1>Rendered from Counter component: Hello World</h1> <button>Increment</button> </div> ); } } export default Counter; |
*Multi cursor editing – Select piece of code, press cmd + d, you’ll get multiple cursor, and change all instance in one go.
React Fragment
But let’s say you don’t like to wrap everything inside of an all encompassing element. You just want to put your fragmented code in the return expression.
|
1 2 3 4 5 6 7 8 9 10 11 12 13 14 15 |
import React, { Component } from "react"; class Counter extends Component { state = {}; render() { return ( <React.Fragment> <h1>Rendered from Counter component: Hello World</h1> <button>Increment</button> </React.Fragment> ); } } export default Counter; |
Now when you look at the webpage, inspect the element, and you won’t see the div anymore.
You’ll see your html code underneath the id=root div.
Using state for dynamic data
First we override the state property in our Counter component.
We assign a property count to it.
Then in our JSX, we use curly braces and put any js expression inside of it.
save the changes, and you’ll see the results on your web page.
|
1 2 3 4 5 6 7 8 9 10 11 12 13 14 15 16 17 |
import React, { Component } from "react"; class Counter extends Component { // state is a special property in react component state = { count: 0 }; render() { return ( <React.Fragment> <span>{this.state.count}</span> <button>Increment</button> </React.Fragment> ); } } export default Counter; |
In between curly braces, you can write any valid javascript expression.
Hence, let’s implement a method, and use it within our curly braces.
|
1 2 3 4 5 6 7 8 9 10 11 12 13 14 15 16 17 18 19 20 21 22 23 |
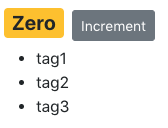
import React, { Component } from "react"; class Counter extends Component { // state is a special property in react component state = { count: 0 }; render() { return ( <React.Fragment> <span>{this.formatCount()}</span> <button>Increment</button> </React.Fragment> ); } // add this function and use it in our expression formatCount() { return this.state.count === 0 ? "Zero" : this.state.count; } } export default Counter; |
Now, you will be able to see the string Zero when our count is 0.
We can also return JSX expression in our JS code.
|
1 2 3 |
formatCount() { return this.state.count === 0 ? <h1>Zero</h1> : this.state.count; } |
JS expression like normal javascript. Pass them to a function, define const, variable…etc.
Setting Attributes
You can put set attributes via your js code as well. Let’s say we add a state property with a string to a url that generates a random image.
We put our ‘imageUrl’ property inside of the curly brace used in JSX and it will work like so:
|
1 2 3 4 5 6 7 8 9 10 11 12 13 14 15 16 17 18 19 20 21 22 23 |
import React, { Component } from "react"; class Counter extends Component { // state is a special property in react component state = { count: 0, imageUrl: "https://picsum.photos/200" // add state property }; render() { return ( <div id="main"> <img src={this.state.imageUrl} alt="" /> <span>{this.formatCount()}</span> <button>Increment</button> </div> ); } formatCount() { return this.state.count === 0 ? "Zero" : this.state.count; } } export default Counter; |
Now, you’ll see the image in your output.
Remember that JSX gets compiled into React create element functions, which then outputs html. Hence, in our JSX, when we’re working with classes, we cannot just use class as attribute. We use ‘className’.
|
1 2 3 4 5 6 7 8 |
render() { return ( <div id="main"> <span className="badge badge-primary m-2">{this.formatCount()}</span> <button className="btn btn-secondary btn-sm">Increment</button> </div> ); } |
When we want to work with styles, we can create properties, which hold CSS data, which then changes dynamically. Those changes will be reflected in our JSX
|
1 2 3 4 5 6 7 8 9 10 11 12 13 14 15 16 17 18 19 20 21 22 |
import React, { Component } from "react"; class Counter extends Component { ... ... // define property to hold styles info. Then use it in our JSX styles = { fontSize: 30, fontWeightz: 'bold' } render() { return ( <div id="main"> <span style={this.styles} className="badge badge-primary m-2">{this.formatCount()}</span> <button className="btn btn-secondary btn-sm">Increment</button> </div> ); } ... } export default Counter; |
inline styles
If you want to use inline styles, you can do another curly brace, and type in your styles like so:
|
1 2 3 4 5 6 7 8 9 10 |
render() { return ( <div id="main"> <span style={{ fontSize: 20 }} className="badge badge-primary m-2"> {this.formatCount()} </span> <button className="btn btn-secondary btn-sm">Increment</button> </div> ); } |
Rendering Classes dynamically
We calculate bootstrap class name depending on if the count is 0 or not.
Then we render this calculation.
|
1 2 3 4 5 6 7 8 9 10 11 12 13 14 15 16 17 18 19 |
// details of calculations should be in a separate method // get boostrap class names dynamically that depends on count getBadgeClasses() { let classes = "badge m-2 badge-"; classes += this.state.count === 0 ? "warning" : "primary"; return classes; } render() { return ( <div id="main"> <span style={{ fontSize: 20 }} className={this.getBadgeClasses()}> {this.formatCount()} </span> <button className="btn btn-secondary btn-sm">Increment</button> </div> ); } |
Thus, every time the page gets rendered, bootstrap’s “badge-warning” will be returned when the count is 0
![]()
and “badge-primary” will be returned when the count is not zero
![]()
Rendering Lists
Let’s render a list of tags.
We add new property of our state object.
JSX is NOT a TEMPLATE ENGINE, no concept of loops.
Its a simple syntax that gets compiled to React elements.
So we do it through javascript expressions via curly braces {…}
|
1 2 3 4 5 6 7 8 9 |
class Counter extends Component { state = { count: 8, tags: ['tag1', 'tag2', 'tag3'], imageUrl: "https://picsum.photos/200" // add state property }; .. ... |
and also in our render function:
|
1 2 3 4 5 6 7 8 9 10 11 12 |
render() { return ( <div id="main"> ... <ul> {this.state.tags.map(function(tag) { return <li>{tag}</li>; })} </ul> </div> ); } |
However, there is an error in the console.
Warning: Each child in an array or iterator should have a unique “key” prop.
The reason why is because it needs to uniquely identify each item in this list.
If the state of this react element changes, React needs to figure out quickly which element is changed.
And where in the DOM it needs to make changes so that it’s in sync with its virtual DOM.
Whenever you’re using the map method to render items, we need to set the ‘key’ attribute for our JSX.
Note that this key just needs to be unique in this list. It does not need to be unique in the entire application.
|
1 2 3 4 5 6 7 8 9 10 11 12 |
render() { return ( <div id="main"> ... <ul> {this.state.tags.map(function(tag) { return <li key={tag}>{tag}</li>; })} </ul> </div> ); } |
Conditional Rendering – use curly braces for js expressions
Let’s spit out a message for when the tags are 0.
If there is some items in the tags array, then we simply display it.
JSX is not a templating engine. We do not have if/else. To put conditional rendering, we need to go back to our javascript.
We can add a helper method i.e renderTags().
Let’s remove our ul with the tags.map and pull it out from render into function renderTags. Update your counter.jsx:
|
1 2 3 4 5 6 7 8 9 10 11 12 13 14 15 16 |
renderTags() { if (this.state.tags.length === 0) return <p>There are no tags</p>; return ( <ul> {this.state.tags.map(function(tag) { return <li key={tag}>{tag}</li>; })} </ul> ); } render() { return <div id="main"> {this.renderTags()} </div>; } |
Another technique is use condition in curly braces
|
1 2 3 4 5 6 |
render() { return <div id="main"> {this.state.tags.length === 0 && 'Please create new tag'} {this.renderTags()} </div>; } |
The first js expression is if the boolean evaluates to true, we display a string.
The second js expression executes renderTags function.