Category Archives: React

react js

How to create an component

https://facebook.github.io/react-native/docs/navigation
https://reactnavigation.org/docs/en/stack-navigator.html
https://reactjs.org/docs/react-component.html
https://flaviocopes.com/react-state-vs-props/

The Navigation Stack

In App.js, we create a bottom navigator. It takes a parameter of an object where each key is the string title of the tab.
In our case, it is ‘Home’, ‘Contracts’, ‘Schedule’, ‘Reports’.

the keys matches to an object value returned by function createStackNavigator.
createStackNavigator creates a stack navigator where one screen can navigate to the next.

Inside the createStackNavigator, we have two important parameters. One is an object of all the components you want to add to the navigation stack. That way you can navigate from one component to the the next. The other parameter is for styling.

Hence, in our example, for the tab ‘Contracts’, we give is a stack of components, along with a styling called stackDefaultNavigationOptions.

In this stack of components, its first page is ContractScreen. Notice CCTVScreen on the bottom. That is the name of our custom cctv component that we want to navigate from other components.

we import cctv component like so:

Navigating to CCTV

First let’s implement the navigating part. We simply create a handler function. In the implementation, we destructure navigation property from this.props.

Then we use ‘navigate’ and give it the string of the component name ‘CCTVScreen’. Finally, we give it an object of transshipment. Now, this object is written like so: {‘transshipment’ : transshipment}, to designate that the property name is ‘transshipment’, and the value is of object transshipment. We all shorthand it into {transshipment}

Somewhere else, you can have a button or some click UI, and then attach this handler function onCCTVclick to it.

CCTV component

Now we see how the component is implemented.

The only method you must define in a React.Component subclass is called render(). All the other methods described on this page are optional.

When called, it should examine:

1) this.props
2) this.state

Using de-structuring, we extract data from these two objects and use them for display.

In the below example, you can see that we extracted cameraViews from this.props. Then used it in a ScrollView to display Images.

In a React component, props are variables passed to it by its parent component. like this:

In this case, FullPerson component will have these properties in its prop object:

this.prop.firstName
this.prop.lastName
this.prop.age
this.prop.color

State on the other hand is still variables, but directly initialized and managed by the component.

Props can be used to set the internal state based on a prop value in the constructor, like this:

Props should never be changed in a child component, so if there’s something going on that alters some variable, that variable should belong to the component state.

Props are also used to allow child components to access methods defined in the parent component. This is a good way to centralize managing the state in the parent component, and avoid children to have the need to have their own state.

for example, in your ParentComponent, you have a centralized place to process data.

Basically, all data must be processed in function processDataHereOnly. Even when your ChildComponent has data, it should process it in your ParentComponent. In order for us to allow child components to access methods defined in the parent component, we pass in the parent component’s function interface using props property processIt.

Then in your ChildComponent, simply pass in data as a parameter into this.prop.processIt, and execute it.

or

in other words, you are also passing data from the child back to the parent.

To pass data from parent to child, use prop.
To pass data from child to parent, pass a callback to the child via prop. In the child component, pass data as a parameter into the callback, then execute it.
How do you consume API in React Native?

https://redux.js.org/api/applymiddleware
https://redux.js.org/api/combinereducers
https://stackoverflow.com/questions/35622588/how-to-reset-the-state-of-a-redux-store
https://react-redux.js.org/using-react-redux/connect-mapstate
https://developer.mozilla.org/en-US/docs/Web/JavaScript/Reference/Operators/Destructuring_assignment
https://redux.js.org/api/store

We consume data the web API and retrieve data through utility function request. We then pass the data through actions and reducers, which are hooked up to our singleton store. This ensures consistency. We finally use and expose this data in our components.

Intro

We use React Redux to store data into a singleton store.
We do this through createStore, which takes two parameters: reducer and a Thunk Middleware.

The idea is that middleware is the suggested way to extend Redux with custom functionality. middleware lets you wrap the store’s dispatch method for custom use. Multiple middleware can be combined together, where each middleware requires no knowledge of what comes before or after it in the chain.

Thunk as Middleware

The most common use case for middleware is to support asynchronous actions. It does so by letting you dispatch async actions in addition to normal actions. In our case, we use a Redux Think as middleware.

First, a thunk is a subroutine used to inject an additional calculation into another subroutine. In the case of a
Redux Thunk, they are functions that wrap expressions in order to delay their evaluation.

This delay is achieved in when an action is called it returns a function. This function that is returned can then be called at a later time.

Here is an example of a thunk action.

A higher order function is just a function that either
1) returns a function
OR
2) takes a function as one of its arguments.

Because this function returns another function that takes dispatch as an argument this is an example of a higher order function. When called at a later time, it passes in dispatch, which the inner function uses.

Hence, when we apply thunk as middleware, and pass this into createStore to signify that when we execute an action, we can have it be applied to the store asynchronously via higher order functions via Redux Thunk.

rootReducers

Now, the thing you’ll see is the rootReducer.
Basically we use the redux function combineReducers to combine all of our reducers into one.

The combineReducers helper function turns an object whose values are different reducing functions into a single reducing function you can pass to createStore.

The resulting reducer calls every child reducer, and gathers their results into a single state object. The state produced by combineReducers() namespaces the states of each reducer under their keys as passed to combineReducers()

The combineReducers function returns a function. That function is a reducer that invokes every reducer inside the reducers object, and constructs a state object with the same shape.

Resetting the store:

store

Hence, this is what our store code looks like.

1) We import what we need from redux
2) We import our custom reducer cctv
3) We group our reducers into combineReducers
4) Then as long as the action type is not ‘USER_LOGOUT’, then we return the appReducer for standard action onto the store state.
5) We apply think to our middleware
6) Then pass everything into createStore.

src/store.js

Custom Action for CCTV

We first start at the action functions. Action functions are imported into Component classes to be executed at certain points. Say you want to read data from an API during the loading up of the component, you’ll execute an action function in its componentDidLoad. You want to do an action after a button press, you’ll execute that action function in the button press’s handler.

The action function is just a function so that it does an action. Let’s take a look at action getCCTV. You’ll see that it takes a parameter transshipment object. We want to manipulate the store asynchronously so we use thunk’s dispatch function. We do this through a higher order function where we return an object. This object is called at a later time by Redux where it executes our commands asynchronously.

We import the function request. We also define macros.

src/services/api/CCTV/action.js

Then we define functions that return action objects, with type property.

src/services/api/CCTV/action.js

In getCCTV, we take a transhipment object first, then we return a function definition with parameter dispatch. This dispatch is provided by Redux, and in which we use it to do asynchronously manipulation in our function definition.

1) Thus, we first pass an action object to signify that we’re loading. We call dispatch on this action object.

Our reducer will receive this action object, where action.type is CCTV_DATA_IS_LOADING.
Then it would update the store state’s property in need.

2) Then, we request data from the web api by calling request.
When it comes back with the result, we create an action object with the retrieved data and then define type to be CCTV_DATA. We call dispatch to apply this data to the store via the reducer object.

In this case, our action.type is CCTV_DATA, and action.data is Data from the web API retrieval. This is what will be sent to the Reducer.
Our reducer checks action.type. Once it matches, it will take care of processing that action. It updates the store on the action.data provided.

src/services/api/CCTV/action.js

Custom Reducer for CCTV

Basically our reducer receives an action object from the action file.
We then check action.type, it will have a string macro.
For every string macro, we take care of that case by updating the store.

src/services/api/CCTV/reducer.js

The return means it updates the store object, which then will be used by our component.

Component

ref – https://react-redux.js.org/api/connect#connect

So we import the CCTV action and then assign it to prop object’s property getCCTVAction.
But first, let’s talk about the connect function.

The connect() function connects a React component to a Redux store.

It provides its connected component with the pieces of the data it needs from the store, and the functions it can use to dispatch actions to the store.

Hence, we first define CCTVScreen component as so:

src/scenes/App/CCTVScreen/index.js

You’ll see that we pass CCTVScreen into the connect function via currying.

The connect function does not modify the component class passed to it; instead, it returns a new, connected component class that wraps the component you passed in.

where definition of connect is:

mapDispatchToProps

first look at the object for the parameter mapDispatchToProps?
We basically define dispatch actions to our prop object. These are basically functions you can call.

mapStateToProps

Now let’s look at mapStateToProps.

It is defined as so:

So it needs to pass in a property, which we de-structure from the store object. Since we’re working with cctv, we de-structure property “cctv” from the store. This is because cctv is the name of the reducer we used in the combineReducers function.

Remember in our reducer we have property cameras and isCCTVLoading, so we access them through the variable cctv.

Putting it all together

Thus, we put all of this together, which brings us to a connect function that
1) maps state to your props object
2) maps dispatch actions to your props object
3) connects all of that to your component

Using your actions and state

Remember that our cameraViews property in our props object is cctv.cameras.
Hence we extract that property via destructuring.

our cameraViews is cctv.cameras, where cameras is an array of camera data.
Each camera data contains URL to the camera image, and so forth.

Hence, now that we have our cameraViews array, we’ll use Javascript’s map function to iterate through this array and display the information.

As each camera is processed, we display an Image, and give the URL of the image to the key. Thus, this will successfully display the camera image.

How to wire react component to redux store

ref – https://eslint.org/docs/rules/object-shorthand

todos

Say we want to add Reporting component to the web app.
We first create the component.
We do a simple return of basic html.

Now that this component exists, we import it into our App file.

You should now see “Testing 1 2 3” in the output.

Adding the reducer

We now add the reducer. The reducer controls the state the data is in. Thus, naturally, we want to have an initial state. We want to say that whatever happens in the app, according to MACROS that gets passed in, we want to return the state of the data.

Thus, we declare the MACROS in the action file. The action file does two things:

1) contain functions that return action objects. Notably, there is a type property in this action object that contains a MACRO. This MACRO describes what kind of action it is.
i.e fetching report has started, fetching report error, fetching report finished.

2) contains the MACRO definition themselves

/src/actions/index.js

and then say if the action type is
this, then we want to return a certain state.

In our case, we have a state where the fetching of the report has just started.
So we want to set the property to certain defaults.

However, notice that the reducer 1st parameter is the initial state. So make sure you set that.

/src/reducers/reportingReducer.js

Add in mapStateToProps and connect

Now we import connect function from redux and use it to connect our component to the store.

Right now, we just simply connected the component to our mapStateToProps.

Hence, when we refresh the web app our output goes in this order:

1) Component initializes with connect function

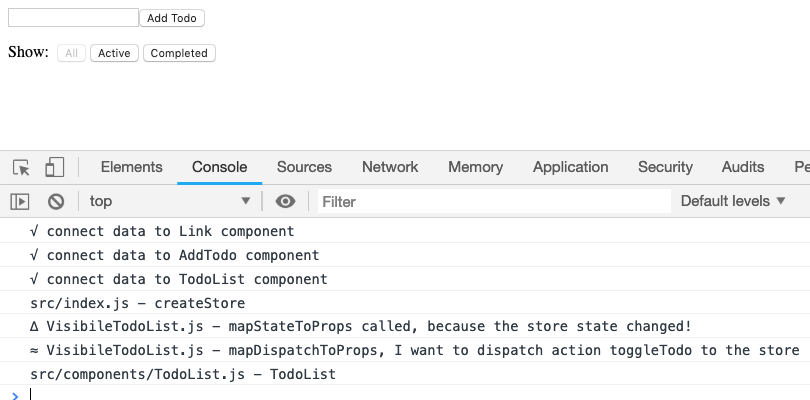
the connect function gets run first. – √ connect data to Reporting component.

2) Initialize all reducers

all reducers will receive a default action object with a system INIT macro string. You won’t have to worry about it. Your reducers should simply return the initial states. This will happen for all reducers like so:

reducers/todos.js

reducers/reportingReducer.js

reducers/visibilityFilter.js

3) combineReducers

Now that all the reducers have been initialized, the next step is that we use Object Literal Shorthand in order to create an object literal and declare its properties and values.

so for example this:

becomes this:

hence, we create an object literal with all the reducers as properties like so:

then insert it into combineReducers:

src/reducers/index.js

In other words, we created a object literal using short hand notation.
We declare property ‘todos’, and point it to object todos.
We declare property ‘visibilityFilter’ and point it to object visibilityFilter.
We declare property ‘reportingReducer’ and point it to object reportingReducer.

4) createStore

We then pass this temporary object into the createStore parameter. As a result, we get a singleton store. What’s in the store will reflect what’s in this object.

Now, in mapStateToProps of our Reporting component, let’s look at

Now that the reducers were initialized, and the store created, the store state gets passed into our mapStateToProps.

It will be logged as:


{
reportingReducer: {reportingData: null, reportingLoading: false, reportingError: null}
todos: []
visibilityFilter: “SHOW_ALL”
__proto__: Object
}

The reason why it has those properties is because earlier we created an temporary object with data from our reducer files, and initialized the store with it.

5. mapStateToProps

Once we reach this function, we’re literally trying to map the store’s data into Reporting component’s this.props.

Thus, the reportingState should have all the data of the store. You can check by logging reportingState as shown. Before the other functions are called, this mapStateToProps will be executed. You can decide what kind of objects are returned. These returned objects will be reflected in your this.props.

Now when the component refreshes itself by calling render and componentDidLoad, check log your this.props. You’ll see that it has been updated with the store data.


dispatch: ƒ dispatch(action)
reportingReducer: {reportingData: null, reportingLoading: false, reportingError: null}
todos: []
visibilityFilter: “SHOW_ALL”
__proto__: Object

Creating a trigger

In your reporting.js, insert this code. We have inserted an object to represent mapDispatchToProps.

Let’s use this dispatch function in our componentDidMount:

We then execute the action of fetching the reports.

output:
——————-> calling fetchReportingAction
index.js:67 actions/index.js – called fetchReporting

An action will trigger all the reducers via the connect function.
Hence, all of our reducers will check to see they handle the action.type.


todos.js:3 — reducers/todos.js —
todos.js:4 received action:
todos.js:5 Object
todos.js:26 todos.js – no action.type found. default return state
visibilityFilter.js:5 — reducers/visibilityFilter.js —
visibilityFilter.js:11 visibliytFilter.js – no action.type found. default return state

Going through todos and visibilityFilter reducers, we do not handle the specific action.type.
However, in reporting reducer, the action.type matches.

Hence, say we want to update reportingData property with: [‘ricky’, ‘joy’, ‘en en’]
We update it by returning a temp object with the new values.

output:

reportingReducer.js:10 — reducers/reportingReducer.js —
reportingReducer.js:12 received action is:
reportingReducer.js:13 Object
reportingReducer.js:18 — action.type found! –FETCH_REPORTING_STARTED
reportingReducer.js:19 returning state object with updated action.data…

Once the store gets updated, mapStateToProps of our Reporting component is called to let us know we can update our component with whatever data we want from the whole store.

Reporting.js

Take note that parameter storeState has data from the whole store. It looks like this:


reportingReducer: {reportingData: Array(3), reportingLoading: true, reportingError: null}
todos: []
visibilityFilter: “SHOW_ALL”

We need to filter what we want. For example, if we only need reportingReducer for our this.props, then we need to return just that part.

Then the this.props in your render and other component functions would only have data like this:


{reportingData: Array(3), reportingLoading: true, reportingError: null, fetchReportingAction: ƒ}
fetchReportingAction: ƒ ()
reportingData: (3) [“ricky”, “joy”, “en en”]
reportingError: null
reportingLoading: true

react redux wiring

ref – https://react-redux.js.org/using-react-redux/connect-mapstate
https://react-redux.js.org/using-react-redux/connect-mapdispatch#connect-dispatching-actions-with-mapdispatchtoprops

Connecting React components with the Redux data store

Implementing reducers for the store

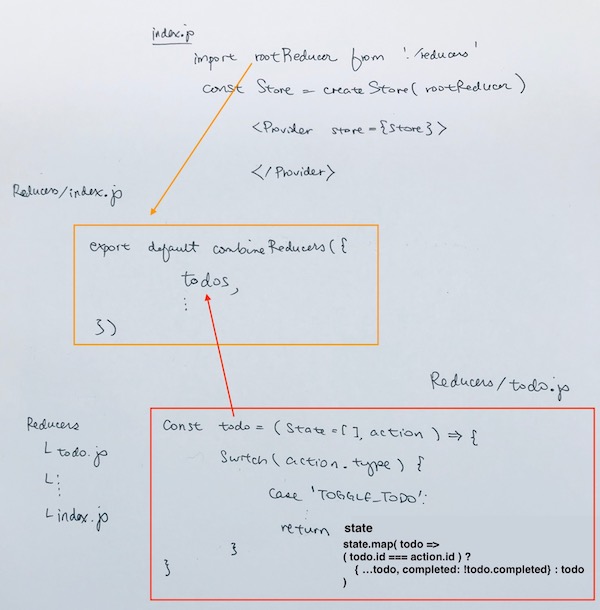
First, we create a reducer directory.
In it, we create reducer/todo.js, where we define global variable todos.
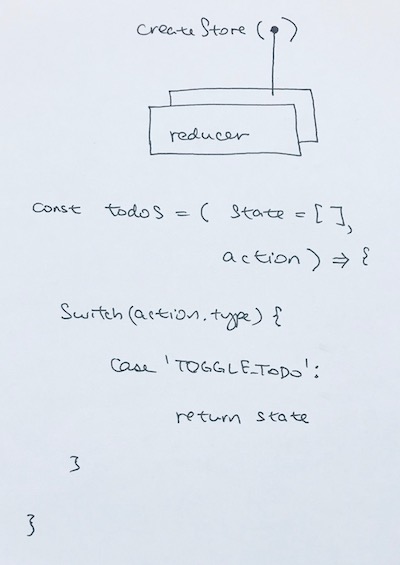
It is a reference to a reducer function with two parameters: a state, and an action object.

The state object holds initialized and current information on store’s state. The action object holds an object with a type property, and other custom properties.

Refresh the page and you’ll see a empty list.

If you want to initialize the list to having existing data, you’d initialize the state object like so:

The reason why we initialize using properties id, completed, and text is described in component TodoList.
It describes the todo property as an array.
This array contains object with attributes like so:

We will get to component TodoList later. Now refresh the page, you’ll see data in the list.

Basically, once a reducer is defined, it is combined with other reducers, and then passed into createStore so that the app can create a singleton store.

The reducer function’s 2nd parameter is an action object, which is sent by an action function, as will be described later. We know which action was triggered by looking at:

action.type

We can then work towards manipulating the state according to that action. Once, we’re done manipulating the state, we return it. This means we have updated the store.

As explained earlier, we have many different reducers, and we combine them all in order to give it to the store.
We do so by using combineReducers

Now that we have all the reducers, we simply insert them into the first parameter of createStore in our main index.js:

Notice createStore function.

redux’s createStore function

ref – https://redux.js.org/api/createstore

createStore(reducer, [preloadedState], [enhancer])

We pass in reducer functions to the createStore, which then creates a singleton store for the app to use.

TodoList component

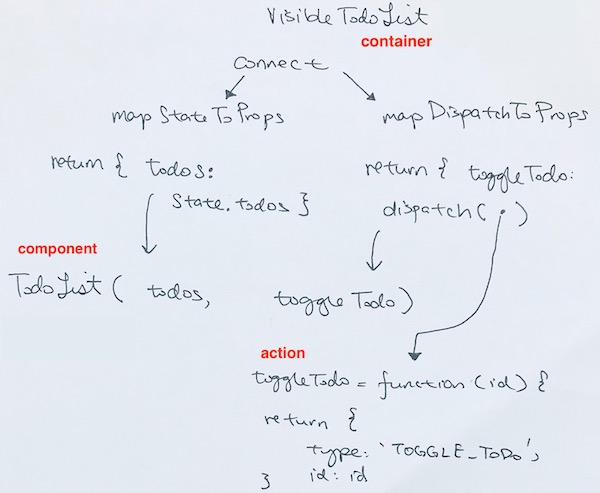
The TodoList component is used by VisibleTodoList container. The container connects the component to the store.

TodoList component returns JSX in order to display data from each individual todo object.
However, before it does, it must define its own properties. Namely:

– todos (array)
– toggleTodo (function)

todos is an array of objects. Those objects have properties id, completed, text. This is the reason why in our reducer function, when we initialized the state object, we must initialize it according to the properties indicated here.

TodoList component has one object initializer parameter. Its properties are todos, and toggleTodo as defined above.

Now, let’s look at mapStateToProps function in container VisibleTodoList:

If a mapStateToProps function is specified (like we have), the TodoList component will subscribe to Redux store updates. This means that any time the store is updated, mapStateToProps in container VisibleTodoList will be called.

Your mapStateToProps functions are expected to return an object. This object, normally referred to as stateProps, will be merged as props to your connected component (TodoList). What gets returned from mapStateToProps is an object that identifies the property we want to change in TodoList component. We’re saying, we want to update property todos’ values.

Thus in mapStateToProps, make sure we return updated property ‘todos’.

Triggering the Action

Let’s create an ‘action’ directory, and an index file: action/index.js.

This is where all of your action functions are. In our case, we have an action function called toggleTodo

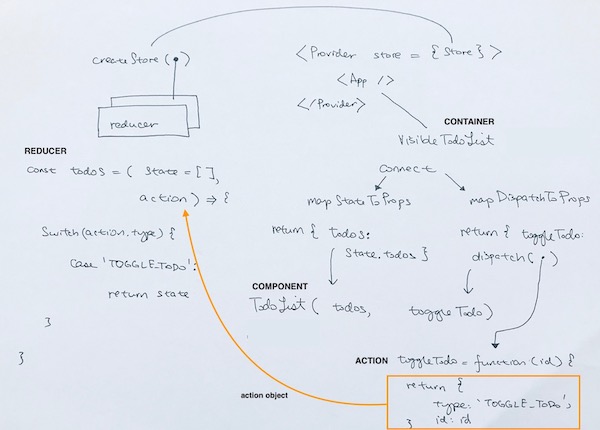
We have connected this function to a click handler in VisibleTodoList.js. Once that click handler has been invoked, we execute this action function. This action function returns an object, and this object gets passed into the ‘dispatched’ function for the store. dispatch is a function of the Redux store. You call store.dispatch to dispatch an action. This is the only way to trigger a state change.

Since we triggered a change in state, it will then execute todos reducer function in reducer/todos.js. This is because in container VisibleTodoList, it has connected the state todos array, to toggleTodo function together. Once click handler has happened for toggleTodo, it will trigger change in the todos array.

Hence, when you click on a text, you’ll see this log:


index.js:43 src/actions/index.js (ACTION) returning object of type TOGGLE_TODO and id: 0
todos.js:14 src/reducers/todo.js – (REDUCER) TOGGLE_TODO!
VisibleTodoList.js:35 src/containers/VisibileTodoList.js – mapStateToProps
TodoList.js:7 src/components/TodoList.js – TodoList
TodoList.js:8 [{…}]
Todo.js:19 src/components/Todo.js – Todo

However, notice that it then calls our connector file VisibileTodoList.js’s mapStateToProps.
This is because it’s trying to propagate updates to all that have been connected to our store.

Now that we have our reducers implemented and in place, let’s see how actions trigger those reducers.

First, in container VisibleTodoList.js, we have two parts:

– TodoList component (UI)
– Redux data store. (data)

this is where we connect our UI to data.

We import the UI component TodoList like so:

Then we connect the UI to the data via connect, mapStateToProps, and mapDispatchToProps function.

..notice the connect function.

The connect function

With React Redux, your components never access the store directly – connect does it for you. React Redux gives you two ways to let components dispatch actions:

As the first argument passed in to connect, mapStateToProps is used for selecting the part of the data from the store that the connected component needs. In our example below, TodoList is the component in need. We call connect on it to make it into a connected component.

The connected component TodoList receives dispatch calls from the action function, and then can dispatch actions onto itself via reducer functions. These reducer functions looks at the returned action object’s type property.

Therefore, we see that the connection function “connects” component TodoList to the two functions. One is to maintain state todos. The other is to dispatch actions via click handler toggleTodo.

Connecting the data

In order to connect the UI to the data store, we need to use Redux store’s dispatch function in order to apply a state change to the store. We pass in an action function into the dispatch parameter to let it know how we want this state to change:

In other words, as the second argument passed in to connect, mapDispatchToProps is used for dispatching actions to the store.

dispatch is a function of the Redux store.

You call store.dispatch to dispatch an action. This is the only way to trigger a state change.

With React Redux, your components never access the store directly – connect does it for you. Our connected TodoList component receives props.dispatch and can dispatch actions onto itself. Hence, that’s why we give toggleTodo function to the dispatch function. Whenever we apply a state change via an action, we want this toggleTodo to be called.

we imported this function from actions:

toggleTodo return an action object with 2 properties and their data.

This action object matches up with the action parameter of a reducer function. A Reducer function will take this action object and evaluate its type.

Once, it sees that the property ‘type’ is of string ‘TOGGLE_TODO’, then it will go ahead and modify the state accordingly. In our case, it evaluates the array of strings in state, to find if the todo object’s id matches up with the id in our action object.

In other words, for every todo object, if the todo.id === action.id, then we flip the completed flag by
doing

All other properties of the todo object stays the same via

Thus, due to our TodoList component being connected to the store in VisibleTodoList.js, our reducers functions are patiently waiting for action objects to be sent from the action functions.

Once the action function fires, our reducers will receive it via its action object, and we then manipulate the state and return it.

jest (basics)

ref – https://medium.com/piecesofcode/testing-javascript-code-with-jest-18a398888838

then in package.json:

make sure the “scripts” key, and its values are there.

Test Custom function

Let’s define a custom function.
concat.js

Then we test that custom function

Make sure you name it yourclass.test.js

This lets Jest know which files to test.

So if in our case, if we’re gunna test for concat.js, we’ll name it concat.test.js

concat.test.js

Open a terminal, and in your folder directory, type: npm test

You’ll then see the result of your tests.

Basically, we use expect(…).toBe(…)

to make sure the returned result from our custom function matches up with what’s in toBe(…).

.toBe() basically just checks that value is what you expect it to be.

Testing custom objects

We can also declare a custom object, and then expect(…).toBe(…) an object.

matchers.test.js

Is the object in question equals given object?

Declare a null. Test if its a null. Test if its defined.

doing addition/subtraction with numerics

Check for elements in an array

Match a character in a string

callback

First we define the function getMessage, where we take a callback object parameter.
In the function getMessage, we pass in a string “go Javascript!”.

Then in our test, we define the callback function. In turn we pass in this callback function into the getMessage.

The way we test for the callback is to expect the value inside the callback function to be the string “go Javascript!”

React-Redux

ref – original github

source, with my comments and logs

The app starts off with ReactDOM.render

where we use redux’s applyMiddleware and createStore to create a store with some combinedReducers:

Pay attention here in that a property is mapped to a reducer. So whatever data the reducer returns will be mapped to that property. And that property is kept in the store.

Our reducers are initialized with starting state

for example, ContactsReducer is imported from:

So this means store’s contacts property now has an array of member names and phones.

These reducers are then run with initial state and type at @@redux/INIT
Then the store is created.

Each component’s mapStateToProps will run first, because we need to map the state from our store onto our component’s props.

The component does this and receives the store’s state.

It takes what it needs and creates contacts property and initializes with our store’s state’s contacts data.

Then component then renders. After finishing rendering, the componentDidMount is called.
Finally, the app’s componentDidMount will be called.

Provider’s prop store let’s children components access . data

Notice that App is within Provider.

or

The makes the Redux store available to any nested components that have been wrapped in the connect() function.

Since any React component in a React Redux app can be connected, most applications will render a at the top level, with the entire app’s component tree inside of it.

Normally, you can’t use a connected component unless it is nested inside of a < Provider >.

Hence, our App will be connected.

components/app.js

App is the main container. It houses two other components. Thus, the store data will be available to all containers.

Namely, these containers are ContactList and ContactDetail.

Mapping Redux store state to Component props

and

The contacts, and activeContact property is now available in our state object.

Now, look at a component’s mapStateToProps. Basically, it gets the store’s state as the parameter, and then extract whatever property we need and return it to the component. i.e contacts

Thus, after mapStateToProps is run, you’ll be able to do use it like so:

such as in renderList().

The important thing here is that once we declared our mapStateToProps function, we map it to the connect function.
Thus, whenever the data changes, it will call our mapStateToProps.

Mapping Action to Component props

In our case, when we return an action object with type and payload properties, they are called Action Creators.

Action creators are exactly that—functions that create actions.

In contact list component, there is an onClick handler like so:

The selectContact is imported from actions/action-select-contact.js

when the handler is clicked, the action function selectContact is called. It returns an object.
Take note that this reducer is mapped to property activeContact in combineReducers


{name: ‘Michael’, phone: ‘0988765553’}

with type CONTACT_SELECTED

This is the action object.

Then, ALL reducer functions are then called to see if this action type CONTACT_SELECTED is theirs.
It happens so that our reducer_active_contacts.js reducer function takes care of this CONTACT_SELECTED.

We see the action being passed in

{type: ‘CONTACT_SELECTED’, payload: {…}}

The reducer returns the payload object. The component will then map this payload to its prop property say ‘contact’ by using mapStateToProps

Now the active contact components will render with the new data.

Using Redux in a React component

This is a react native app. Make sure you have expo installed.

demo

make sure to type ‘npm install’ to install all the packages.

Then type ‘npm start’.

Blogs
We install redux, and then import it for usage.

Comments

We import the store variable from Blogs.

AppContainer

Let’s configure our react navigation.
We also implemented our Blogs and Comments components above. We would use these components.

App.js

React Navigation basic example

Installation

yarn add react-navigation

or

npm install –save react-navigation

Creating Friends page (screen/Friends.js)

We create the Friends page. We navigate to the HomeScreen by using that string as the id.

Creating Home page (screen/Home.js)

Create a home page. Make sure any kind of text is wrapped in Text. We have a button, that upon the onPress event, navigates to our ‘FriendScreen’. This string is dictated by our AppContainer file below and used to navigate to the Friends page.

AppContainer

In the latest react navigation, we create an app container that houses a navigator.
We will be implementing this AppContainer in AppContainer.js:

For the AppNavigator object, notice the properties FriendsScreen and HomeScreen. They will be used as strings ids when other screens need to navigate…like so:

App.js

Passing into AppContainer

As you can see we pass in a prop called screenProp
It is an object, which we put inside of JS expression brackets.

In this object, we pass three properties.

1) current Friends array
2) possible Friends array
3) add Friends function

Retrieving the props data

In home, we retrieve it via this.props.

this.props.screenProps.currentFriends.length

In Friends, we use more of its features

Create a React Native App

ref – https://facebook.github.io/react-native/docs/getting-started.html

Install expo


npm install -g expo-cli

To create new React Project and run it

expo init SimpleApp

Then you’ll see a project is being created:

EPCNSZXW0324:testReactAppWithJest2 rickytsao$ expo init SimpleApp
There is a new version of expo-cli available (2.10.1).
You are currently using expo-cli 2.6.14
Run npm install -g expo-cli to get the latest version
? Choose a template: expo-template-blank
? Yarn v1.13.0 found. Use Yarn to install dependencies? Yes
[11:39:06] Extracting project files…
[11:39:09] Customizing project…
[11:39:10] Initialized a git repository.
[11:39:10] Installing dependencies…
yarn install v1.13.0
info No lockfile found.
[1/4] 🔍 Resolving packages…
[2/4] 🚚 Fetching packages…
[3/4] 🔗 Linking dependencies…
warning “expo > expo-background-fetch@1.0.0” has unmet peer dependency “expo-task-manager-interface@~1.0.0”.


warning “expo > babel-preset-expo > metro-react-native-babel-preset > @babel/plugin-proposal-object-rest-spread > @babel/plugin-syntax-object-rest-spread@7.2.0” has unmet peer dependency “@babel/core@^7.0.0-0”.
[4/4] 🔨 Building fresh packages…
success Saved lockfile.
✨ Done in 108.84s.

Your project is ready at /Users/rickytsao/Desktop/testReactAppWithJest2/SimpleApp
To get started, you can type:

cd SimpleApp
yarn start


cd SimpleApp
npm start

Then in the terminal:


> expo start

At this point, you are starting expo and it will run what you have in the current directory.

There is a new version of expo-cli available (2.10.1).
You are currently using expo-cli 2.6.14
Run npm install -g expo-cli to get the latest version
[13:11:22] Starting project at /Users/rickytsao/Desktop/testReactAppWithJest2/SimpleApp
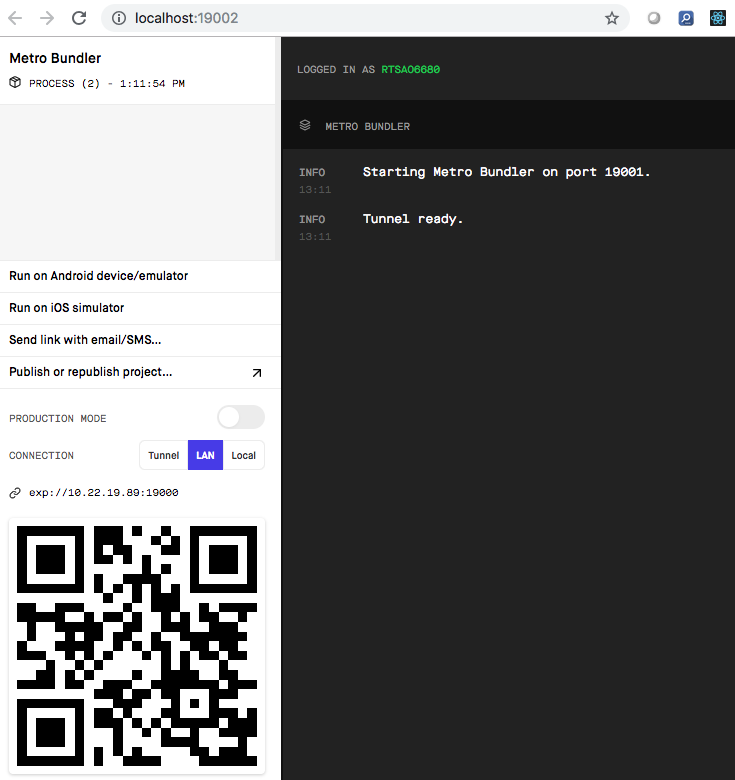
[13:11:26] Expo DevTools is running at http://localhost:19002
[13:11:26] Opening DevTools in the browser… (press shift-d to disable)
[13:11:40] Starting Metro Bundler on port 19001.

exp://10.22.19.89:19000

you’ll also see a QR code image here

To run the app with live reloading, choose one of:
• Sign in as @rtsao6680 in Expo Client on Android or iOS. Your
projects will automatically appear in the “Projects” tab.
• Scan the QR code above with the Expo app (Android) or the Camera app (iOS).
• Press a for Android emulator, or i for iOS simulator.
• Press e to send a link to your phone with email/SMS.

Press ? to show a list of all available commands.
Logs for your project will appear below. Press Ctrl+C to exit.
[13:11:54] Tunnel ready.

A browser will open

On the left sidebar, under connection, “local” is selected.

Mosh React tutorial (part 2)

final source

ref – https://www.youtube.com/watch?v=Ke90Tje7VS0&t=0s&list=LLJEwHxS-Vsf-N8xSFHeMirw&index=4
Starts at 1:01:06 of the video

Handling Events

All those standard DOM events are available via the JSX.

We’ll use onClick and have it respond to our function handleIncrement.
However, when we execute the function, we notice that the this object is undefined.

Its because we need to bind the event handler.

But why is it that in an event handler function, the this object is undefined?

Depending on how a function is called, the ‘this’ changes.

The this reference will always return the calling object.

However, if the function is called as standalone, it will return window object.
If the standalone function is called within ‘strict mode’, it will return undefined.

And that is the reason, our event handler function does not have access to ‘this’.

Notice that handleIncrement is a REFERENCE. We didn’t execute the function yet. If the function was executed right away, then it will correctly call the function, and the function will be able to display this.

But for event handlers, since we pass the handleIncrement function reference, when it is used, it will be used in another function of a different environment. It will not be able have class Counter as its surrounding environment. It will be used in its own environment, namely, as a standalone function. Hence standalone functions (in a ‘strict mode’) will have undefined as the this object.

use ‘bind’ in the constructor

We implement a constructor function. Make sure you call super to initiate its parent class.
Then we bind the current this object to that function. So that when the reference of that function gets passed around, the this will always return to this object, and subsequently, the properties in this classCounter.

Use custom constructor to bind your event handlers to class Counter

Now, this.state.count will be valid.

The reasoning for using bind is explained here

Sometimes we need to pass in objects to our event handlers. In order to do this without having to execute the event handler via syntax, we define an anonymous function. That way, the event handler only executes when you click:

Pass in objects to handle event handlers like so:

or when you’re trying to loop through something and pass in an object to event handlers:

Updating the State

In react, we DO NOT modify the state directly. Instead we use setState, which is a method inherited from the base class Component.

We’re telling React we’re updating the state. It will then diff it with the previous virtual DOM. Finally, it applies the changes to the real DOM.

full code

What happens when State Changes

React state changes, Virtual DOM, reconciliation