Category Archives: React

react js

Mosh Redux part 2 (Starter Redux app)

ref –

  • http://chineseruleof8.com/code/index.php/2019/01/03/functions-are-first-class-objects-js/
  • http://chineseruleof8.com/code/index.php/2019/01/05/currying-js/
  • source code

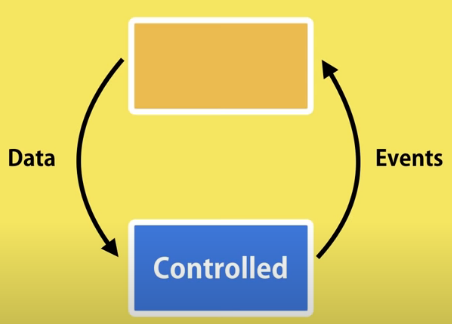
In Redux, we use functional programming paradigm. We use a lot of curry functions like so:

Pure functions

The qualities of a pure function is that there should be:
– no random values
– no current date/time
– no global state (DOM, files, db, etc)
– no mutation of parameters

Benefits are:

– self-documenting
– easily testable
– concurrency
– cacheable

Immutable

Cannot change the objects, but why?

PROS:
Predictability
Faster Change Detection
Concurrency

CONS:
Performance

We use assign to copy contents (properties, values) from one object to another.

There is an easier way is to do this copying of properties one object to another: spread operator.
We use the spread operator here so that person object’s name property and value “John” gets copied to a new literal object. We then add address property and value.
Finally when we log it, we’ll see the

However, it does a shallow copy. Let’s try to copy a object car.
Here when we use the spread operator on person object, it copies the value “John” and property name.
However, it doesn’t copy the object car. Instead, it copies the reference to that object to updated
Therefore, updated only has a reference to the object car.

We can prove this by updating updated.car.carName to “ford”. When we log person.car.carName, it is “ford”

Hence, spread operator does a shallow copy. It simply re-point address key/value to point to the object that person is referencing. So there’s only 1 object, but two references to it.

Create Redux app Tutorial

first, lets install redux: npm i redux@4.0

After installation, know that actions is what drives the store to keep your data.

It looks like this:

So as you can see, its basically an object with properties type and payload.

In order to take actions, we must create reducers.

Creating Reducer

Now that we know how actions are put together, we need to write a function in order to decide how we going to properly receive these actions.

In src, add new file reducer.js. A reducer is a function with parameters state and action. The role of the reducer is to return new state, based on incoming actions.

Hence in our case, we take in the action and look at its type. Depending on the type, we return a certain state.
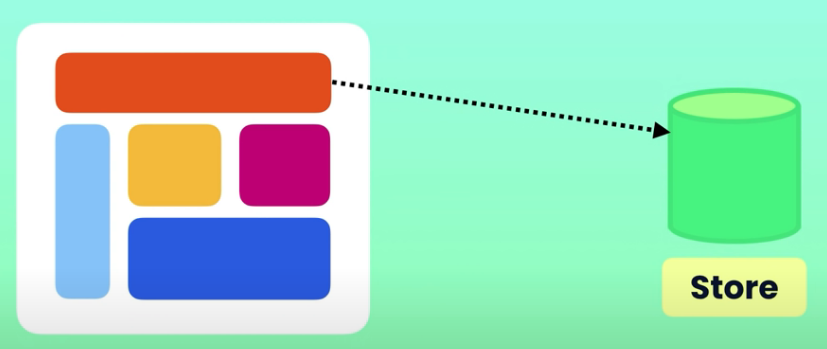
Creating the Store

In src, create new file store.js In our file, we create the store, and then import the reducer because createStore is a first order function that takes in a function (reducer), and returns a store for you to use.

Dispatching Actions

Back in our index, we import our store and analyze its contents.
We use getState function to analyze what is in store in our state.
The initial state is set in our reducer. that is why we see an empty array.

index.js

We dispatch actions by inserting an object with properties type and payload.

Subscribing to the Store

Action Creator

dispatching actions takes all this typing and its too cumbersome. Let’s create an action file that does this for us.

Add new file called actions.js

We create another file to keep tract of the MACROS that we’ll be using.

Here, we create es6 functions that returns these action objects. That way our reducer can analyze these action objects to decide what to do next.

Now, in our reducer, we receives actions like below.

We receive the action object through the action parameter.

As you can see, its always 2 things:

1) analyze action’s type
2) return state with action’s payload

We use dot operator to copy over primitive types into our new state. However, if there are nested objects, then its only a shallow copy and we need to use libraries such as immer to create immutable state.

reducer.js

Mosh Redux part 1 (Introduction)

Redux is a state management library for JS apps

But why?

Keep different parts of the UI in sync.

Data flow one part to another and change. We need to write code to keep everything in sync. How data change? etc. Such issues shows that we need a state management library.

Instead of scattering all app state in various parts of the UI, we store inside a single source of truth. “Database for the Frontend”.

Solves problem of sync-ing data across the UI app.

  • Centralizes application’s state
  • Makes data flow transparent and predictable

Pros

Centralized state across UI
Predictable state changes
Easy debugging via Time travel debugging
Preserve page state
Undo/redo via Log Rocket

Con

Complexity
Verbosity

Mosh React Tutorial (part 6)

Stateless Functional Component

When your class component does not have any state or events, we can turn it into a stateless functional component.
Basically, it’s just a function that returns the render JSX.

Since we turn it from a class to a function, the ‘this’ will not apply because it becomes undefined. What we need to do is put props in the parameter, and React will pass the props in during runtime.

We first define a const NavBar reference to our state function. This reference cannot be re-assigned and must always point to our stateless functional component.

In the body of our arrow function, we return JSX.

So instead of having a class that extends Component, which gives us the usage of lifecycle methods, we simply define a function that returns a React Element.

That’s why we call this stateless. Dealing with simple stateless components, we dont’ always need all that is given to us by classes. We have the option of using stateless components.

shortcut: sfc

Also, notice that in class components, we can use the ‘this’ reference to refer to our component instance, and different calling environment, and context.

However, a stateless component has no state. This means that you can’t reach this. state inside it. It also has no lifecycle so you can’t use componentDidMount and other hooks.

Hence, you must pass props through the parameter. Due to it being an arrow function, the this is the parent context. The parent context of a state component is undefined. You cans imply log ‘this’ outside of your stateless component, and then log it again inside. You will get undefined on both accounts.

For example:

Destructuring Arguments

We can use object destructuring when it comes to props so that we don’t get props.—— all over our state components.

Similarly, we can also do this for prop usage in class components.

Now, anywhere we have this.prop…we can simply replace them with destructured properties.

Lifecycle Hooks

Our component go a through few phases during their life cycle. The first phase is Mounting phase. And this is when an instance of component is created and inserted into the DOM.

There are few special methods that we can add to our components and REACT will automatically call these methods. We’ll refer to these methods as Life Cycle Hooks.

Allow us to hook into certain moments during lifecycle of a component, and do something.

React will call these in order.

1st Lifecycle Phase: MOUNT

  • Constructor
  • Render
  • componentDidMount

This happens when state or props get changed.

2nd Lifecycle Phase: UPDATE

  • render
  • componentDidUpdate

3rd Lifecycle Phase: UNMOUNTING

  • componentWillUnmount

Let’s see them in action

Insert logs in Counter.js, and App.js for constructor and render.
You will see how React calls them in order.


— App constructor —
App render —
Counter constructor —
Counter rendering for Counter 1
Counter constructor —
Counter rendering for Counter 2
Counter constructor —
Counter rendering for Counter 3
Counter constructor —
Counter rendering for Counter 4
Counter constructor —
Counter rendering for Counter 5
App componentDidMount–

Mosh React tutorial (part 5)

to run: npm install, npm start
download source

Multiple Components in Sync

Under components, create a NavBar component.
Make it a basic component with a render and return empty JSX:

Go to getBootstrap, search for NavBar.

Locate a navbar you like and copy the HTML into our NavBar’s JSX.

Change ‘class’ to ‘className’.

Then import this NavBar into App.js to be used.

Finally, update our index.js to use App.js:


Now let’s look at our component tree. There’s no parent child relationship between Counters component and NavBar component.
Look at the diagram. How can we display total number of counters in our NavBar? In situations like this where there is no parent child relationships and you want to keep them in sync.

To solve this, we lift state of Counters component up into App, so that it can pass it to all its children.

Lifting State Up

First, we pull everything out from Counters, and put it in App

App.js

Since we brought the state object here, we can safely put handleIncrement and handleDelete here as well.
We pass in the Counters array to Counters component. In Counters component, we loop through that array, and use props to pass data down into each individual Component.

Notice that Counters have props onReset, onIncrement, and onDelete. These are callback functions that bubble back up to manipulate our parent array.

The callback onReset is passed to Counters to reset everything. The onIncrement and onDelete are passed into individual Counter components. A Counter component passes the component ID back up for us to increase or delete.

counters.jsx

Here in Counters component, we receive the counters array from App via props.
We then loop through each item in the array and pass associated data down to a Counter component.
We basically bubble events upward from Component. And then have App take care of them.

counter.jsx

Here is where we apply a lot of UI via css. Notice we do so by looking at the props object passed down from parent.
We use all the data passed down from the parent in order to draw and display what we want.

This is where we also receive events, and then send it up to our parent by calling function references on the props object.

In order to show that we have all the counters information, we display the # of counters with more than 0 value up in our NavBar:

Mosh React tutorial (part 4) – Single Source of Truths

to run: npm install, npm start
download source

Single Sources of Truth

In Counters, create a checkState to view what your state object looks like:

Let’s initialize your state like so:

Now run your app and click on the check state button. The counters array you see in your log matches.
Now, click on your counters to increase their number.

I increased mine to 6, 6, 8, 8, 8.

Now if you click the check state button again, you’ll see that the state object in Counters is still in its initial values, and not the updated ones you just gave.

The reason why this happens is because when you increment, you are incrementing the state’s count property in Counter. The correct way is to update the counters array in Counters. We shall use Controlled Component to fix this issue.

Controlled Component

Controlled component does not have local state.

ref – http://chineseruleof8.com/code/index.php/2020/06/27/controlled-component/

  • It receives all props by data
  • Raise events whenever data needs to be changed
  • Component is entirely controlled by its parent
  • Cannot have state
counters.jsx

This is where you give data to your child component using prop attributes.
In our case, we give:
– data counter object
– counter.id as key

The two reference functions onDelete and onIncrement is to take care of the events that our child component Counter raises.

First, we handle increment in counters component. We do a deep copy. First we clone the counters array.
We then get the array index of the counter by using indexOf
Then we re-point the reference of that array element to a new literal object with same properties/values.
Then we increment the value.
We then reset our state’s counters property to our cloned counters array.

This way, we don’t use any of the old counters array.

counters.jsx

counter.jsx

Since data is received as prop from our parent Counters, we should not have any state.
All data displayed and used here should be from the prop object.
All button click events are raised to our parent component by callings its prop function references onIncrement and onDelete.

As you can see, everything we do in counter.jsx, as a controlled component, is to use this.props. Through this.props, we use callbacks to tell parent component counters to increment, or decrement. We use other values from this.props to display.

Now when we run the program, we increment our numbers in the components, then look at the state, it reflects what we’ve updated. This is because we tell our parent component to change the one and only data source to change.

Mosh React tutorial (part 3)

final source
to run: npm install, npm start

Composing Components

React App is a tree of components

Add new component in components folder.
Create counters.jsx

In index.js, instead of , we put

index.js

Go to counters.jsx and put the code template there by doing:

imrc + tab
cc + tab

Throw in some Counter components like so:

Then on the screen, you’ll see your multiple counters appear.

However, it’s all hardcoded. Let’s do it via an array instead. We create an array counters with id and value objects. Then we map through this array and pass each object into a component Counter.

That way, each Counter component will have its own id and unique value.

The only thing we didn’t do here is pass the value.
Passing values as parameter takes two steps. One is to create a prop called value, and we pass in the counter.value that way. While we’re at it, let’s create another prop ‘selected’.

The second step is to go to Counters and receive that prop.
counter.jsx

A props is just a plan JS object that includes all attributes in the Component. In your Counters component, put a console log props in the render function. Make sure you put different values in your array in your Counters components

Now when you run the app, look at the console:

You’ll notice that the whatever value we give to the props will be reflected in that Counter component’s JS object props

Now, create lifecycle componentWillMount and assign the props into the state:

counter.jsx

We do this because we want to assign the state property count to have the value from props.
Now you should see the values reflected in our counters.

Children property

Now let’s check out the children’s property in prop object.

In Counters, edit the Counters JSX so that it has a ending tag. Then, insert some JSX within our Counter component

counters.jsx

Then, if we were to look at Counter component’s prop object, we see a children property. Children is a React Element.

counter.jsx


children:
$$typeof: Symbol(react.element)
key: null
props: {children: “Testing 1 2 3”}
ref: null
type: “h4”

Because its a React Element we can put it within our JSX and thus be able to output it into our webpage like so:

counter.jsx

You’ll see the h4 JSX you entered into Counter’s component appear.

Of course, we can keep going and put dynamic data there to make it more useful by adding each counter’s id. That way each Counter component will receive the id as children property and display it.

counters.jsx

Now, we display the counter ID as they appear.

Prop vs State

Prop is data we give to Component. Prop is read-only. We cannot re-assign.
State is data that is local/private to the Component.

Raising and handling Events

In Counter, we put in a delete button. When clicked, we want to delete the data object from counters.
So we throw in handleDelete function for when clicked.

counter.jsx

However, in handleDelete, we want to remove the object from the array in Counters, which is in a another Component altogether! How should we go about doing this?

The component that owns a piece of the state, should be the one modifying it.

In Counter’s onDelete function, we raise an event. And Counters will handle this event.

On the Counters side, we must implement handleDelete() to handle this event.

Counters

In Counters, we first create handleDelete function. We then pass in a reference to this function into a Counter via property onDelete.

Counter.jsx

Whenever the delete button is pushed in Counter, it calls on the reference to Counters’s onDelete via the prop object. Of course, we pass in the id of the Counter we want to delete. Then in Counters, it removes the Counter with that id from its state array.

As you can see, we pass in the id into the Counter component’s prop. So in Counter component, this.props.id is the id of the counter. When we trigger the callback onDelete, we pass this id back to counters, which then filters out the counter object from its state’s array ‘counters’. Thus, successfully removing the counter.

Improvements

If you look at the render function of Counters, we’ll notice we have many props. It gets repetitive

What we can instead is simply pass in a counter object instead. Make sure you keep the key prop. If you don’t, React has no way to keep tract of the items and even though your data is correct, what you see on UI will not be.

Make sure you update your prop access in counter.jsx. Search and find any this.prop, and add a counter behind it.

counter.jsx

DNY client (12 – basic site)

dnyNodeAPI-basic-site
npm install to install all node modules
Then, npm run dev to run the server

dny-client-basic-site
npm install to install all node modules
Then, npm run start to run the client

So far we have a basic site with these functionalities:

Create a user

POST on http://localhost:8080/signup
body: JSON.stringify(user)

src/auth/index.js

src/user/Signup.js

When the user successfully creates an account, we will show a link to sign in.

Authenticate a user

POST on http://localhost:8080/signin
body: JSON.stringify(user)

We first use the email and password to try to get user user data and a token back, which are both packaged into a object called ‘data’. Once we get the data, we pass it into AuthenticateUser, which will store it via localStorage at property ‘jwt’. Thus, we can always access the value at property ‘jwt’. We get this value, which has properties token and user, which we can use.

src/user/Signup.js

Once we get the token and user data successfully into the localStorage, we redirect to the main page.
The main page’s component is Home

Also, we have a Menu for navigation and showing/hiding of links according to authentication.

Menu

Basically, we use IsAuthenticated to read localStorage’s jwt value. If it’s available, we show what we want to show, like the sign-out link, user’s name, id.

User Profile

GET on http://localhost:8080/user/${userId}

The main idea is that we must give the userId so the backend knows which user to fetch. We also need to give a token so that the backend can authenticate it.

There is a situation where if you’re on someone else’s (say tom’s) profile, and you click on the user profile (john) link in the Menu, the Profile’s component render function will be called first, which will fetch and render tom’s data again. But soon after, your click on john’s profile link will trigger john’s data to be fetched also. Hence, there will two fetches.

Edit user profile

PUT on http://localhost:8080/user/${userId}
body: user

Editing is basically about updating the user on the backend.

Once we update the user, we must remember to update the localStorage with the latest retrieved user data.

Delete user profile

removeUser does a fetch for Delete on http://localhost:8080/user/${userId}
where SignOutUser does a fetch for GET on http://localhost:8080/signout

Here, we tell the backend to clear cookie for this particular client. Cookies are stored per-user on the user’s machine. A cookie is usually just a bit of information. Cookies are usually used for simple user settings colours preferences ect. No sensitive information should ever be stored in a cookie.

View all users

GET on http://localhost:8080/users

DNY client (11 – Profile Photo Display)

Server side

First we put in the route

routes/user.js

Then we implement the function responder for when the user goes to /user/photo/:userId

Since we already retrieved the user object at function userById, everything is already in req.profile
We simply check for the image data, and then set the content type.

controllers/user.js

Client Side

we create a photoUrl so that our image control has a src.

src/user/EditProfile.js

However, there is an issue. The browser cache images and when you try to upload another image, and you come back to this page, the browser will be showing the old image.

In this situation, simply give the latest time and append it to the URL

DNY client (9 – Edit Users)

We first create our EditProfile component

src/user/EditProfile.js

Then, we add a Route to our EditProfile component. Whenever this link is clicked, it hits our EditProfile component.
src/MainRouter.js

Make sure we implement UpdateUser fetch operation, which does a PUT operation on the server for a particular user. That way, we can tell the server to update this particular user with this particular data.

Remember that when we give the user data in body, we need to stringify it. The server does not take objects as data. It takes a string.
If you were to send a body, the updateUser function on the server side won’t be triggered and it will be hard to debug. So make sure you always JSON stringify body data.

src/user/apiUser.js

EditProfile component source

Editing forms is about presenting a html form with textfield controls. We then put our state’s value in the textfield’s value property. Our state has already been updated with the latest value from the server via the initUserID function when the component was loaded.

DNY client (8 – Delete Users)

Client Side

removeUser tells the server side to look for the user with the specific ID. Then, remove that user from the database.

user/apiUser.js

auth/index.js

SignOutUser first looks at the client’s local storage. It removes the jwt key/value.
Then it tells the server to clear the cookie for this client.

Cookies are stored per-user on the users machine. A cookie is usually just a bit of information. Cookies are usually used for simple user settings colours preferences ect.

Cookies can be cleared through the browser’s settings via a “clear cookie” button. A cookie file can also be opened by the user when they go through your temporary Internet files history and can locate your cookie there. They can then open it and look at the contents. Hence, No sensitive information should ever be stored in a cookie.

We use server calls for removing the user and clearing the cookie in our DeleteUser functionality. After deleting is complete, we simply redirect the user to the home screen.

user/DeleteUser.js

Server side

controllers/user.js