Handling events in React elements has some syntactic differences:
– React event handlers are named using camelCase, rather than lowercase.
– With JSX you pass a function as the event handler, rather than a string.
Handling events in React elements has some syntactic differences:
– React event handlers are named using camelCase, rather than lowercase.
– With JSX you pass a function as the event handler, rather than a string.
Error boundaries are components that catch JavaScript errors anywhere in their child component tree, log those errors, and display a fallback UI instead of the component tree that crashed.
|
1 2 3 4 5 6 7 8 9 10 11 12 13 14 15 16 17 18 19 20 21 22 23 24 25 |
import React from 'react'; class ErrorBoundary extends React.Component { constructor(props) { console.log('---ErrorBoundary---'); super(props) this.state = { hasError: false } } componentDidCatch(error, info) { this.setState({ hasError: true }) } render() { if (this.state.hasError) { // You can render any custom fallback UI return <h1>{'Something went wrong.'}</h1> } return this.props.children } } export default ErrorBoundary; |
|
1 2 3 4 5 6 7 8 9 10 11 12 13 14 15 16 17 18 19 20 21 22 23 24 25 26 27 28 29 30 31 32 33 34 35 36 37 38 39 40 41 42 43 44 45 46 47 48 49 50 51 52 53 54 55 56 57 58 59 60 61 62 63 64 65 66 67 68 |
import React from 'react'; import './App.css'; import ErrorBoundary from './ErrorBoundary'; class Item extends React.Component { constructor(props) { super(props); } render() { const {name} = this.props; if (name!== '1345577') { throw new Error("ERROR"); } return ( <div className="form-group"> <label className="col-xs-4 control-label">{name}</label> <div className="col-xs-8"> <input type='text' className='form-control' /> </div> </div> ); } } class App extends React.Component { constructor() { super(); this.state = { // array of objects // each object has property name, id list: [] }; this.addItem = this.addItem.bind(this); } //prototype methods run in strict mode. addItem() { const id = new Date().getTime().toString(); this.setState({ list: [ {name: id, id} , ...this.state.list] //list: [...this.state.list, {name: id, id} ] }); } render() { const { list } = this.state; return ( <div className="App"> <ErrorBoundary> <button className='btn btn-primary' onClick={this.addItem}> <b>Add item</b> to the beginning of the list </button> <h3>Better <code>key=id</code></h3> <form className="form-horizontal"> {this.state.list.map((todo) => <Item {...todo} key={todo.id} /> )} </form> </ErrorBoundary> </div> ); } } export default App; |
ref – https://programmingwithmosh.com/javascript/stateful-stateless-components-react/
In a component, state is data we import — typically to show the user — that is subject to change.
Here we have a component Pigeon with a state object that has property pigeons. It is simply an array of pigeons that gets displayed in render. We have state, and we can render things from state.
|
1 2 3 4 5 6 7 8 9 10 11 12 13 14 15 16 17 18 19 20 21 22 |
import React, {Component} from 'react' class Pigeons extends Component { constructor() { super() this.state = { pigeons: [] } } render() { return ( <div> <p>Look at all the pigeons spotted today!</p> <ul> {this.state.pigeons.map(pigeonURL => { return <li><img src={pigeonURL} /></li> })} </ul> </div> ) } } |
Also called:
Container vs Presentation components
Smart vs Dumb components.
The literal difference is that one has state, and the other doesn’t.
That means the stateful components are keeping track of changing data, while stateless components print out what is given to them via props, or they always render the same thing.
|
1 2 3 4 5 6 7 8 9 10 11 |
class Main extends Component { constructor() { super() this.state = { books: [] } } render() { <BooksList books={this.state.books} /> } } |
|
1 2 3 4 5 6 7 8 9 |
const BooksList = ({books}) => { return ( <ul> {books.map(book => { return <li>book</li> })} </ul> ) } |
Notice the stateless component is written as a function. As cool as state is, you should always aim to make your components as simple and stateless as possible, so different components can be reused like Lego pieces, even if you don’t have immediate plans to reuse a component. The stateful ones should feel lucky to be so!
Aim to have a parent component keep all the information, and pass it down to its children stateless components.
|
1 2 3 4 5 6 7 8 9 10 11 12 13 14 15 16 17 |
class Parent extends Component { constructor() { super() this.state = { books: [], favoriteAuthors: [] } } render() { return ( <div> <Books books={this.state.books} /> <FavoriteAuthors favoriteAuthors={this.state.favoriteAuthors} /> </div> ) } } |
Doesn’t that look and feel so neat? Having a parent component pass data down to its children also assures that if there is any debugging needed regarding state management, we can go to the parent component to see what’s up, instead of checking state in each child component. All the children components have to worry about is receiving the information as props properly.
So presentational components can vary depending on what information it receives. The difference is that a stateful component keeps track of the information itself, instead of just taking it via props and outputting it.
We can also have components that render static state:
|
1 2 3 4 5 6 7 8 9 10 11 |
const Rules = () => { return ( <div> <p>The rules are simple and unchanging:</p> <ol> <li>You don’t talk about the rules.</li> <li>You must follow the first rule.</li> </ol> </div> ) } |
Generally, child components render UI and have no state.
|
1 2 3 4 5 6 7 8 9 10 11 12 13 14 15 16 17 18 19 |
class Main extends Component { constructor() { super() this.state = { currentUser: {}, gamesAll: [], gamesMostPopular: [] } } render() { return ( <div> <p>Welcome, {this.state.currentUser}!</p> <AllGames allGames={this.state.gamesAll} /> <MostPopular mostPopular={this.state.gamesMostPopular} /> </div> ) } } |
Create a stateless reusable component like so:
|
1 2 3 4 5 6 7 8 9 10 11 12 |
const List = props => { return ( <div> <div className="coolHeader">{props.title}</div> <ul> {props.list.map(listItem => { <li className="coolListItem"}>{listItem}</li> }) </ul> </div> ) } |
then use it like so:
|
1 2 3 4 5 6 7 8 9 |
render() { return ( <div> <List title=“All games” list={this.state.gamesAll} /> <List title=“Most popular games” list={this.state.gamesMostPopular} /> </div> ) } |
class is a keyword in JavaScript.
JSX is an extension of JavaScript. That’s the reason why React uses className instead of class.
Pass a string as the className prop.
|
1 2 3 |
render() { return <span className={'menu navigation-menu'}>{'Menu'}</span> } |
Context is designed to share data that can be considered “global” for a tree of React components, such as the current authenticated user, theme, or preferred language.
|
1 2 3 4 5 6 7 8 9 10 11 12 13 14 15 16 17 18 19 20 21 22 23 |
class App extends React.Component { render() { return <Toolbar theme="dark" />; } } function Toolbar(props) { // The Toolbar component must take an extra "theme" prop // and pass it to the ThemedButton. This can become painful // if every single button in the app needs to know the theme // because it would have to be passed through all components. return ( <div> <ThemedButton theme={props.theme} /> </div> ); } class ThemedButton extends React.Component { render() { return <Button theme={this.props.theme} />; } } |
Using context, we can avoid passing props through intermediate elements:
|
1 2 3 4 5 6 7 8 9 10 11 12 13 14 15 16 17 18 19 20 21 22 23 24 25 26 27 28 29 30 31 32 33 34 35 36 37 |
// Context lets us pass a value deep into the component tree // without explicitly threading it through every component. // Create a context for the current theme (with "light" as the default). const ThemeContext = React.createContext('light'); class App extends React.Component { render() { // Use a Provider to pass the current theme to the tree below. // Any component can read it, no matter how deep it is. // In this example, we're passing "dark" as the current value. return ( <ThemeContext.Provider value="dark"> <Toolbar /> </ThemeContext.Provider> ); } } // A component in the middle doesn't have to // pass the theme down explicitly anymore. function Toolbar() { return ( <div> <ThemedButton /> </div> ); } class ThemedButton extends React.Component { // Assign a contextType to read the current theme context. // React will find the closest theme Provider above and use its value. // In this example, the current theme is "dark". static contextType = ThemeContext; render() { return <Button theme={this.context} />; } } |
Children is a prop this.prop.children that allow you to pass components as data to other components, just like any other prop you use. Component tree put between component’s opening and closing tag will be passed to that component as children prop.
There are a number of methods available in the React API to work with this prop. These include React.Children.map, React.Children.forEach, React.Children.count, React.Children.only, React.Children.toArray.
A simple usage of children prop looks like this:
|
1 2 3 4 5 6 7 8 9 10 11 12 13 |
const MyDiv = React.createClass({ render: function() { return <div>{this.props.children}</div> } }) ReactDOM.render( <MyDiv> <span>{'Hello'}</span> <span>{'World'}</span> </MyDiv>, node ) |
Component composition
Components use the special children prop to pass children elements directly into their output:
|
1 2 3 4 5 6 7 |
function FancyBorder(props) { return ( <div className={'FancyBorder FancyBorder-' + props.color}> {props.children} </div> ); } |
This lets other components pass arbitrary children to them by nesting the JSX:
|
1 2 3 4 5 6 7 8 9 10 11 12 |
function WelcomeDialog() { return ( <FancyBorder color="blue"> <h1 className="Dialog-title"> Welcome </h1> <p className="Dialog-message"> Thank you for visiting our spacecraft! </p> </FancyBorder> ); } |
You can also specify where you want children props to go. In our case, we can position prop children to be placed in certain areas.
|
1 2 3 4 5 6 7 8 9 10 11 12 13 14 15 16 17 18 19 20 21 22 23 24 |
function SplitPane(props) { return ( <div className="SplitPane"> <div className="SplitPane-left"> {props.left} </div> <div className="SplitPane-right"> {props.right} </div> </div> ); } function App() { return ( <SplitPane left={ <Contacts /> } right={ <Chat /> } /> ); } |
We can even specialize it:
|
1 2 3 4 5 6 7 8 9 10 11 12 13 14 15 16 17 18 19 20 |
function Dialog(props) { return ( <FancyBorder color="blue"> <h1 className="Dialog-title"> {props.title} </h1> <p className="Dialog-message"> {props.message} </p> </FancyBorder> ); } function WelcomeDialog() { return ( <Dialog title="Welcome" message="Thank you for visiting our spacecraft!" /> ); } |
Inversion of Control
It might feel redundant to pass down the user and avatarSize props through many levels if in the end only the Avatar component really needs it. It’s also annoying that whenever the Avatar component needs more props from the top, you have to add them at all the intermediate levels too.
One way to solve this issue without context is to pass down the Avatar component itself so that the intermediate components don’t need to know about the user or avatarSize props:
|
1 2 3 4 5 6 7 8 9 |
function Page(props) { const user = props.user; const userLink = ( <Link href={user.permalink}> <Avatar user={user} size={props.avatarSize} /> </Link> ); return <PageLayout userLink={userLink} />; } |
This inversion of control can make your code cleaner in many cases by reducing the amount of props you need to pass through your application and giving more control to the root components. However, this isn’t the right choice in every case: moving more complexity higher in the tree makes those higher-level components more complicated and forces the lower-level components to be more flexible than you may want.
You’re not limited to a single child for a component. You may pass multiple children, or even have multiple separate “slots” for children, as documented here:
|
1 2 3 4 5 6 7 8 9 10 11 12 13 14 15 16 17 |
function Page(props) { const user = props.user; const content = <Feed user={user} />; const topBar = ( <NavigationBar> <Link href={user.permalink}> <Avatar user={user} size={props.avatarSize} /> </Link> </NavigationBar> ); return ( <PageLayout topBar={topBar} content={content} /> ); } |
ref – http://chineseruleof8.com/code/index.php/2020/02/24/this-context/
https://www.freecodecamp.org/news/this-is-why-we-need-to-bind-event-handlers-in-class-components-in-react-f7ea1a6f93eb/
First, some basics.
In unrestricted, es5 environment:
– when we call a standalone function, the ‘this’ gets dynamically bound to the global object.
– when we call a method of a method, the ‘this’ gets dynamically bound to the global object.
|
1 2 3 4 5 6 7 8 |
function Greetings() { console.log('standalone -----> ', this); // global function haha() { console.log('standalone haha ------> ', this); // global } haha(); } Greetings(); |
If you had an object (or instance) calling the method, you’ll get the ‘this’ gets bound to the object.
|
1 2 3 4 5 6 7 8 9 10 11 12 13 14 15 16 17 18 |
var obj = { hoho: function() { // method //console.log(this); // obj function hehe() { // within method //console.log(this); // global function haha() { // within method console.log(this); // global } haha(); } hehe(); } } obj.hoho(); |
However, if you were to use strict mode, ‘this’ inside functions that are standalone, or within a method, would reference undefined
This happens in React because React uses Modules. Modules are strict by default. Thus, ‘this’ in React is null.
|
1 2 3 4 5 6 7 8 9 10 11 12 13 14 15 16 17 18 19 20 21 22 23 24 25 26 27 28 29 30 31 32 |
'use strict' function Greetings() { function haha() { console.log('standalone haha ------> ', this); // due to strict: undefined } haha(); return { print : function() { // method console.log('print -->', this); // calling instance function hehe () { console.log('hehe', this); // undefined } hehe(); } } } let g = new Greetings(); // create instance g.print(); let outside = g.print; outside(); // print --> undefined // hehe undefined |
Notice how when we have a reference to the prototype function, the calling environment is global. The calling object is actually Global/Window.
Thus, in strict mode, it becomes undefined, rather than displaying the calling instance.
If we don’t use use strict, result would be:
|
1 2 3 4 |
let outside = g.print; outside(); // print --> Window {parent: Window, opener: null, top: Window, length: 0, frames: Window, …} // hehe Window {parent: Window, opener: null, top: Window, length: 0, frames: Window, …} |
We see that the calling object is Global (or Window in Elements)
This also holds true in function of function.
Let’s take a look at an example that simulates an event being passed and our handler being executed:
|
1 2 3 4 5 6 7 8 9 10 11 12 |
class Foo { // simulates a React component constructor(name){ this.name = name } display(){ console.log(this.name); } } var foo = new Foo('Saurabh'); foo.display(); // Saurabh |
We first execute prototype function display. Hence, the ‘this’ gets dynamically bound to the calling instance. It exists, and then looks for property ‘name’, which it finds. That is why we can successfully log Saurabh.
Now let’s look at the React situation. Initially you get something like this:
|
1 2 3 4 5 6 7 8 9 10 11 12 13 14 15 16 17 18 19 20 21 22 |
class Foo extends React.Component{ constructor( props ){ super( props ); } handleClick(event){ console.log(this); // 'this' is undefined } render(){ return ( <button type="button" onClick={this.handleClick}> Click Me </button> ); } } ReactDOM.render( <Foo />, document.getElementById("app") ); |
Notice that when you click, the ‘this’ is undefined. WHY!?
The reason is that when handlClick is executed by the web environment, it is being executed in a different environment, and a reference somewhere points to our instance’s display function.
Let’s simulate it like this:
|
1 2 3 4 5 6 |
// The assignment operation below simulates loss of context // similar to passing the handler as a callback in the actual // React Component var outsideVar = foo.handleClick; outsideVar(); // TypeError: this is undefined |
Notice foo is not executing handleClick. Rather another reference is executing it. And that reference’s environment here is global.
But wait a minute! Shouldn’t the ‘this’ value point to the global object, since we are running this in non-strict mode according to the rules of default binding, ‘this’ in standalone functions should be pointing to the global object?
This is the not the case because because when we have another reference pointing to
– constructors,
– static functions,
-prototype methods,
they are executed in strict mode. Getter and setter functions are also executed in strict mode.
And when this happens in the global environment, they are returned undefined. This is why handlers in React components will dynamically point this to undefined. The function is running in strict mode, and the executing reference is global.
this is why in React class components, we do this:
|
1 2 3 4 |
constructor(props) { super(props); this.handleClick= this.handleClick.bind(this); } |
that way, when the web environment creates references to react component method and executes, its ‘this’ will point to the class itself.
ref – https://medium.com/front-end-weekly/do-i-still-need-to-bind-react-functions-in-2019-6d0fe72f40d7
Use arrow functions. setText function gets returned whenever onClick is executed.
|
1 |
<button onClick={() => this.setText()}>Click me</button> |
Use class field syntax for method declaration:
|
1 2 3 4 5 6 7 |
class MyComponent extends React.Component { ... setText = () => { this.setState({ text: "123" }); } ... } |
Notice that onClick references a curried function. This means whenever the web environment receives a user click, it will execute
|
1 |
() => this.setText() |
whereas setText’s this is already bound to MyComponent via arrow syntax
ref – http://chineseruleof8.com/code/index.php/2020/06/29/why-we-must-bind-prototype-functions-for-event-handlers-in-react/
create-react-app index-list-example
cd index-list-example
npm start
Go your App.js and change the functional component into a class component.
1) add ‘class App extends React.Component’
2) add constructor
3) add a render prototype function
We then add a state property called list. It’s an array to simply display our list of data.
We put code to map through this list in function render:
|
1 2 3 4 5 6 7 8 9 10 11 12 13 14 15 16 17 18 19 20 21 22 23 |
class App extends React.Component { constructor() { super(); this.state = { // array of objects // each object has property name, id list: [] }; } render() { return ( <div className="App"> <h3>Dangerous <code>use index as key</code></h3> <form className="form-horizontal"> {this.state.list.map((todo, index) => )} </form> </div> ); } } |
Now, let’s write a function called Item that will display each item in the list.
As a function component, it takes the prop as a parameter. We use this prop to get each item from the list.
Then display the properties name/id from each item and display it.
|
1 2 3 4 5 6 7 8 9 10 |
function Item(props) { return ( <div className="form-group"> <label className="col-xs-4 control-label">{props.name}</label> <div className="col-xs-8"> <input type='text' className='form-control' /> </div> </div> ) } |
then use this Item component in render:
|
1 2 3 4 5 6 7 8 9 10 11 12 |
render() { return ( <div className="App"> <h3>Dangerous <code>use index as key</code></h3> <form className="form-horizontal"> {this.state.list.map((todo, index) => <Item {...todo} key={index} /> )} </form> </div> ); } |
First, let’s create a button. Remember that standalone functions (due to being referenced in global environment and being run in strict mode), will dynamically
(http://chineseruleof8.com/code/index.php/2020/06/29/why-we-must-bind-prototype-functions-for-event-handlers-in-react/)
set ‘this’ to undefined, we must bind it correctly.
|
1 2 3 4 5 6 7 8 9 10 11 12 13 14 15 |
class App extends React.Component { constructor() { // other code this.addItem = this.addItem.bind(this); } addItem() { const id = new Date().getTime().toString(); this.setState({ list: [...this.state.list, {name: id, id} ] }); } // other code } |
Then in render, we put a button and handler there:
|
1 2 3 4 5 6 7 8 9 |
render() { return ( <div className="App"> <button className='btn btn-primary' onClick={this.addItem}> <b>Add item</b> to the beginning of the list </button> </div> ); } |
First, write your name at the top. Then click the button to add items.
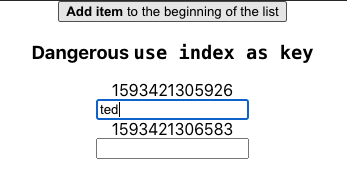
When you first write the name ‘ted’, and assigns the index to the key of that component, React will think that ‘ted’ should always appear at index 0.
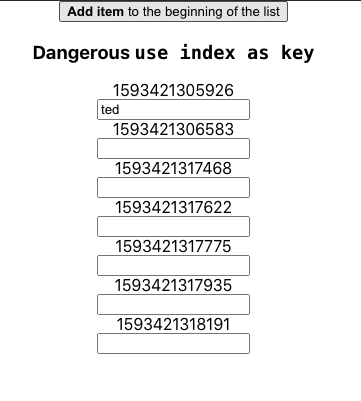
Thus, as you keep adding items, ted stays at index 0.
Make this code change in prototype function addItem:
|
1 2 3 4 5 6 7 |
//prototype methods run in strict mode. addItem() { const id = new Date().getTime().toString(); this.setState({ list: [ {name: id, id} , ...this.state.list] }); } |
Now run it again. We put Mike at the box with timestamp of …940:
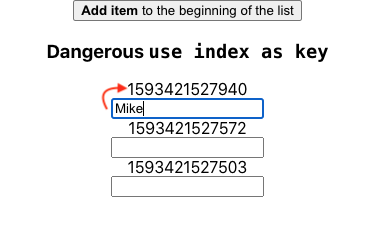
However, when we append more items to the front of the list, the name Mike gets displayed erroneously index 0, instead of the correct textfield at …940.
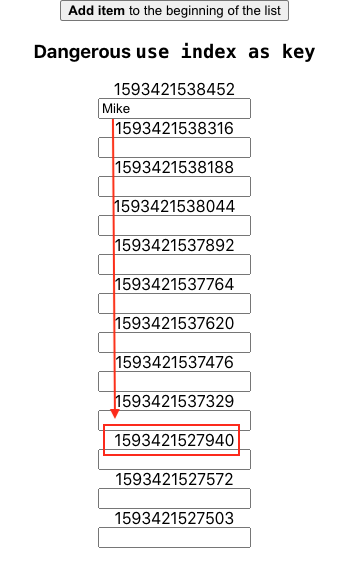
This happens because we erroneously assigned array index to our key. As each Items appear, React will assign different index each time these items are rendered. For example, the first time item1 appears, it gets 0. We append item2 on top, so item2 gets 0, item1 gets 1. See? Their keys have changed. ‘mike’ always gets assigned to key 0, and thus, when item2 appears, it appears in item2, instead of item1.
The solution to this is to use a unique id as key. Notice when we assigned timestamp to our object’s name, we also assign it to id. Timestamp is unique so every entry will be different. This means every entry’s key will be unique. Thus when they get rendered, their respective data will always be matched to the Component Item’s key. Thus, if we were to put ‘ricky’ at an Item1, no matter what kind of Items get appended at anywhere, React will also look for the Component that has the key with the unique ID to insert ‘ricky’ in.
|
1 2 3 4 5 6 7 8 9 10 11 12 13 14 15 16 17 18 19 20 21 22 23 24 25 26 27 28 29 30 31 32 33 34 35 36 37 38 39 40 41 42 43 44 45 46 47 48 49 50 51 |
import React from 'react'; import './App.css'; function Item(props) { return ( <div className="form-group"> <label className="col-xs-4 control-label">{props.name}</label> <div className="col-xs-8"> <input type='text' className='form-control' /> </div> </div> ) } class App extends React.Component { constructor() { super(); this.state = { // array of objects // each object has property name, id list: [] }; this.addItem = this.addItem.bind(this); } addItem() { const id = new Date().getTime().toString(); this.setState({ list: [ {name: id, id} , ...this.state.list] }); } render() { return ( <div className="App"> <button className='btn btn-primary' onClick={this.addItem}> <b>Add item</b> to the beginning of the list </button> <h3>Dangerous <code>use index as key</code></h3> <form className="form-horizontal"> {this.state.list.map((todo, index) => <Item {...todo} key={index} /> // todo is {name: , id: } // we pass it in as its own object )} </form> </div> ); } } export default App; |
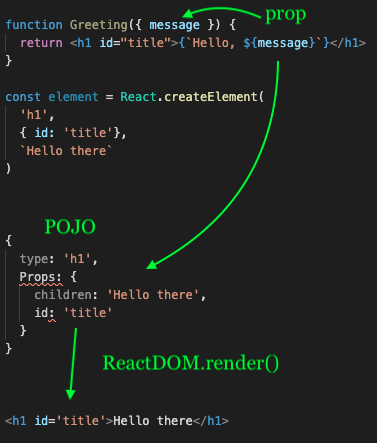
The idea is that Then JSX gets transpiled to Plain Javascript Objects using React.createElement().
Then it compiles those objects down to DOM elements.
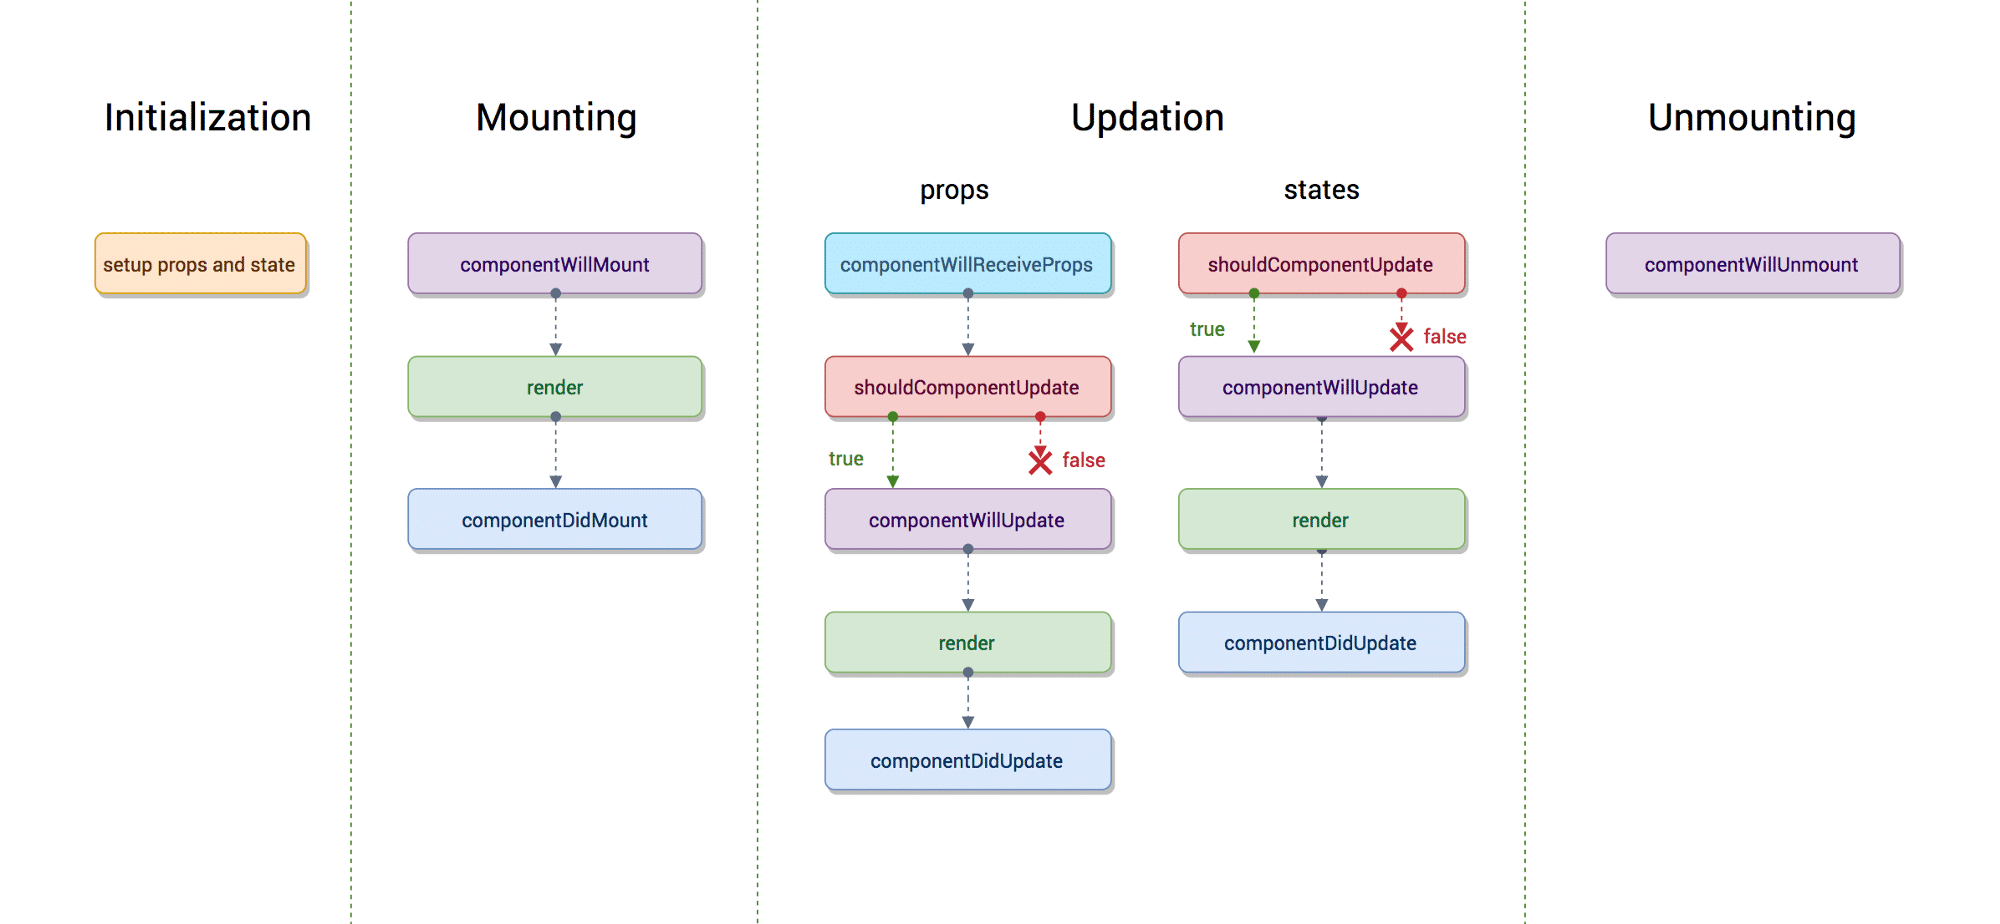
There are four different phases of React component’s lifecycle:
Initialization: In this phase react component prepares setting up the initial state and default props.
Mounting: The react component is ready to mount in the browser DOM. This phase covers componentWillMount and componentDidMount lifecycle methods.
Updating: In this phase, the component get updated in two ways, sending the new props and updating the state. This phase covers shouldComponentUpdate, componentWillUpdate and componentDidUpdate lifecycle methods.
Unmounting: In this last phase, the component is not needed and get unmounted from the browser DOM. This phase include componentWillUnmount lifecycle method.

ref – https://reactjs.org/docs/higher-order-components.html
https://www.codingame.com/playgrounds/8595/reactjs-higher-order-components-tutorial
Whereas a component transforms props into UI, a higher-order component transforms a component into another component.
A HOC doesn’t modify the input component, nor does it use inheritance to copy its behavior. Rather, a HOC composes the original component by wrapping it in a container component. A HOC is a pure function (does not modify outside values, unique input/output) with zero side-effects.
And that’s it! The wrapped component receives all the props of the container, along with a new prop, data, which it uses to render its output. The HOC isn’t concerned with how or why the data is used, and the wrapped component isn’t concerned with where the data came from.
Let’s look at an example. Create a simple React app like so.
npm install -g create-react-app
create-react-app my-app
cd my-app
npm start
It’s only a Higher Order component by definition because it does not modify outside values. It simply take another component as input and renders it.
Let’s create a generic utility component that displays data in a row. It will be used by two other components.
TableRow.js
|
1 2 3 4 5 6 7 8 9 10 11 12 13 14 15 16 17 18 |
import React, { Component } from 'react'; class TableRow extends Component { render() { return ( <tr> <td> {this.props.obj.id} </td> <td> {this.props.obj.name} </td> </tr> ); } } export default TableRow; |
StockList.js
|
1 2 3 4 5 6 7 8 9 10 11 12 13 14 15 16 17 18 19 20 21 22 23 24 25 26 27 28 29 30 31 32 33 34 35 |
import React, { Component } from 'react'; import TableRow from './TableRow'; class StockList extends Component { // now our prop will have the data we need // we use our static data and display it using a very simple TableRow component tabRow() { if(this.props.data instanceof Array){ return this.props.data.map(function(object, i){ return <TableRow obj={object} key={i} />; }) } } render() { return ( <div className="container"> <table className="table table-striped"> <thead> <tr> <td>Stock Name</td> <td>Stock Price</td> </tr> </thead> <tbody> {this.tabRow()} </tbody> </table> </div> ); } } export default StockList; |
Now we use that StockList in our App.
|
1 2 3 4 5 6 7 8 9 10 11 12 13 14 15 16 17 |
// App.js import React, { Component } from 'react'; import StockList from './StockList'; class App extends Component { render() { return ( <div> <StockList></StockList> </div> ) } } export default App; |
Everything is standard. We display a component inside of another component. But let’s say we want to add UserList, which is very very similar to StockList.
|
1 2 3 4 5 6 7 8 9 10 11 12 13 14 15 16 17 18 19 20 21 22 23 24 25 26 27 28 29 30 31 32 33 34 35 36 37 38 39 40 41 42 43 44 45 46 47 48 49 50 51 |
import React, { Component } from 'react'; import TableRow from './TableRow'; class UserList extends Component { constructor(props) { super(props); this.state = { users: [ { id: 1, name: 'Krunal' }, { id: 2, name: 'Ankit' }, { id: 3, name: 'Rushabh' } ] }; } tabRow(){ if(this.state.users instanceof Array){ return this.state.users.map(function(object, i){ return <TableRow obj={object} key={i} />; }) } } render() { return ( <div className="container"> <table className="table table-striped"> <thead> <tr> <td>ID</td> <td>Name</td> </tr> </thead> <tbody> {this.tabRow()} </tbody> </table> </div> ); } } export default UserList; |
It even uses the TableRow component in the same way. Can we somehow refactor these two components into one?
This is where HOC comes into play. We can implement reusability of particular components in multiple modules or components.
Take a look at how we’d factor this. Let’s create an HOC file.
HOC.js
In our HOC, we receive the two components. However, we combine the functionality of passing data to them. Instead of them having its own data state.
Hence, we receive data from the parameter and use prop to pass it into those Wrapped components.
|
1 2 3 4 5 6 7 8 9 10 11 12 13 14 15 16 17 18 19 20 21 22 23 |
import React, {Component} from 'react'; // let's edit our Hoc function so that it caters to both StockList and UserList export default function Hoc( HocComponent, data) { return class extends Component { constructor(props) { super(props); this.state = {data} // assign comp state to passed in data } render() { // we return the passed in component, but we pass our state into it // via prop 'data', those two components (Stock and User) can access this data // of course, we also pass the rest of our props into it for configuration return ( <HocComponent data = {this.state.data} {...this.props} /> ); } } } |
In our redundant components, our this.prop will have the data we need, instead of us keeping the data state in our component.
Thus, we use it right away in our render functions.
StockList.js
|
1 2 3 4 5 6 7 8 9 10 11 12 13 14 15 16 17 18 19 20 21 22 23 24 25 26 27 28 29 30 31 32 33 34 35 36 37 |
// StockList.js import React, { Component } from 'react'; import TableRow from './TableRow'; class StockList extends Component { // now our prop will have the data we need // we use our static data and display it using a very simple TableRow component tabRow() { if(this.props.data instanceof Array){ return this.props.data.map(function(object, i){ return <TableRow obj={object} key={i} />; }) } } render() { return ( <div className="container"> <table className="table table-striped"> <thead> <tr> <td>Stock Name</td> <td>Stock Price</td> </tr> </thead> <tbody> {this.tabRow()} </tbody> </table> </div> ); } } export default StockList; |
In both UserList and StockList, we are doing the same thing.
Just display the stocks and users properties id and name.
So here our component gets passed into our HOC, which then fills our
this.prop with the new data.
We then can display it.
UserList.js
|
1 2 3 4 5 6 7 8 9 10 11 12 13 14 15 16 17 18 19 20 21 22 23 24 25 26 27 28 29 30 31 |
import React, { Component } from 'react'; import TableRow from './TableRow'; class UserList extends Component { tabRow(){ if(this.props.data instanceof Array){ return this.props.data.map(function(object, i){ return <TableRow obj={object} key={i} />; }) } } render() { return ( <div className="container"> <table className="table table-striped"> <thead> <tr> <td>ID</td> <td>Name</td> </tr> </thead> <tbody> {this.tabRow()} </tbody> </table> </div> ); } } export default UserList; |
We pull the data state out. Then pass both data and components into HOC, which creates two different components.
App.js
|
1 2 3 4 5 6 7 8 9 10 11 12 13 14 15 16 17 18 19 20 21 22 23 24 25 26 27 28 29 30 31 32 33 34 35 36 37 38 39 40 41 42 43 44 45 46 47 48 49 50 51 52 53 54 55 56 57 58 59 60 61 62 |
import React from 'react'; import './App.css'; import Hoc from './HOC'; import StockList from './StockList'; import UserList from './UserList'; // so we pull the data out here. And then use it in our HOC const StocksData = [ { id: 1, name: 'TCS' }, { id: 2, name: 'Infosys' }, { id: 3, name: 'Reliance' } ]; const UsersData = [ { id: 1, name: 'Krunal' }, { id: 2, name: 'Ankit' }, { id: 3, name: 'Rushabh' } ]; const Stocks = Hoc( StockList, StocksData ); const Users = Hoc( UserList, UsersData ); // functional component - for display purposes // data configuration and usage separated to elsewhere function App() { return ( <div className="App"> <Stocks></Stocks> <Users></Users> </div> ); } export default App; |
Because Hoc is a normal function, you can add as many or as few arguments as you like. For example, you could accept an argument that configures shouldComponentUpdate, or one that configures the data source. These are all possible because the HOC has full control over how the component is defined.
Like components, the contract between Hoc and the wrapped component is entirely props-based. This makes it easy to swap one HOC for a different one, as long as they provide the same props to the wrapped component. This may be useful if you change data-fetching libraries, for example.
Resist the temptation to modify a component’s prototype (or otherwise mutate it) inside a HOC.
|
1 2 3 4 5 6 7 8 9 10 11 12 13 |
function HOC(InputComponent) { // NO! InputComponent.prototype.componentDidUpdate = function(prevProps) { console.log('Current props: ', this.props); console.log('Previous props: ', prevProps); }; // The fact that we're returning the original input is a hint that it has // been mutated. return InputComponent; } // EnhancedComponent will log whenever props are received const EnhancedComponent = HOC(InputComponent); |
– The input component cannot be reused separately from the enhanced component because it depends on the original functionality of the input component. If you change it in your HOC, then your enhanced component will function differently from the original component.
– If you apply another HOC to EnhancedComponent that also mutates componentDidUpdate, the first HOC’s functionality will be overridden!
– Mutating HOCs are a leaky abstraction—the consumer must know how they are implemented in order to avoid conflicts with other HOCs.
Instead of mutation, HOCs should use composition, by wrapping the input component in a container component. In our example, we create a class component, then implement our componentDidUpdate the way we want, and then wrap our component inside the render via composition.
|
1 2 3 4 5 6 7 8 9 10 11 12 |
function HOC(WrappedComponent) { return class extends React.Component { componentDidUpdate(prevProps) { console.log('Current props: ', this.props); console.log('Previous props: ', prevProps); } render() { // Wraps the input component in a container, without mutating it. Good! return <WrappedComponent {...this.props} />; } } } |
This HOC has the same functionality as the mutating version while avoiding the potential for clashes.
– It works equally well with class and function components.
– Because it’s a pure function, it’s composable with other HOCs, or even with itself.
Container components are part of a strategy of separating responsibility between high-level and low-level concerns. Containers manage things like subscriptions and state, and pass props to components that handle things like rendering UI. HOCs use containers as part of their implementation. You can think of HOCs as parameterized container component definitions.
React’s diffing algorithm (called reconciliation) uses component identity to determine whether it should update the existing subtree or throw it away and mount a new one.
When its analyze the previous and current render, it looks at the previous and current component. If the two components are identical (===), React will leave the subtree be, and continue to update the subtree by diffing it with the new one. If they’re not equal, the previous subtree is unmounted completely.
This means you can’t apply a HOC to a component within the render method of a component because for every render, a new component (object) returned. Hence every compare will be different and thus, the entire subtree will be remount each time.
|
1 2 3 4 5 6 7 |
render() { // A new version of EnhancedComponent is created on every render // EnhancedComponent1 !== EnhancedComponent2 const EnhancedComponent = enhance(MyComponent); // That causes the entire subtree to unmount/remount each time! return <EnhancedComponent />; } |
Remounting a component causes the state of that component and all of its children to be lost also.
Instead, apply HOCs outside the component definition so that the resulting component is created only once. Then, its identity will be consistent across renders. This is usually what how you use it.
In those very rare cases where you need to apply a HOC dynamically, you can also do it inside a component’s lifecycle methods or its constructor.