Category Archives: Projects
Protected: flutter rn poc
Creating a bridge from react native to native iOS
- https://reactnative.dev/blog/2017/03/13/introducing-create-react-native-app
- https://reactnative.dev/docs/next/communication-ios
We first install create-react-native-app module:
npm install -g create-react-native-app
We then create the app:
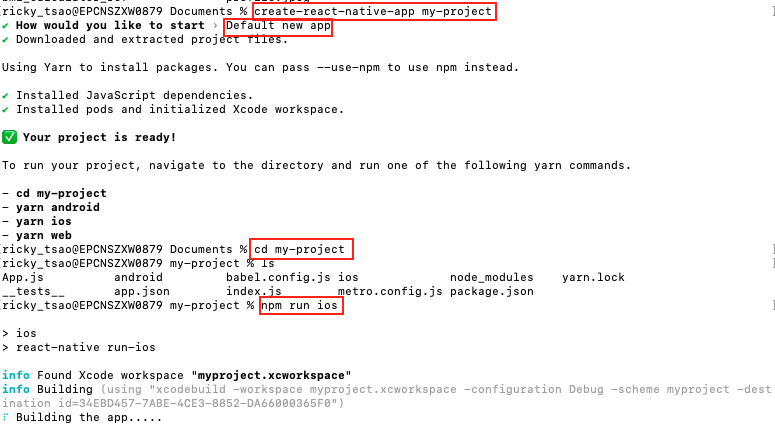
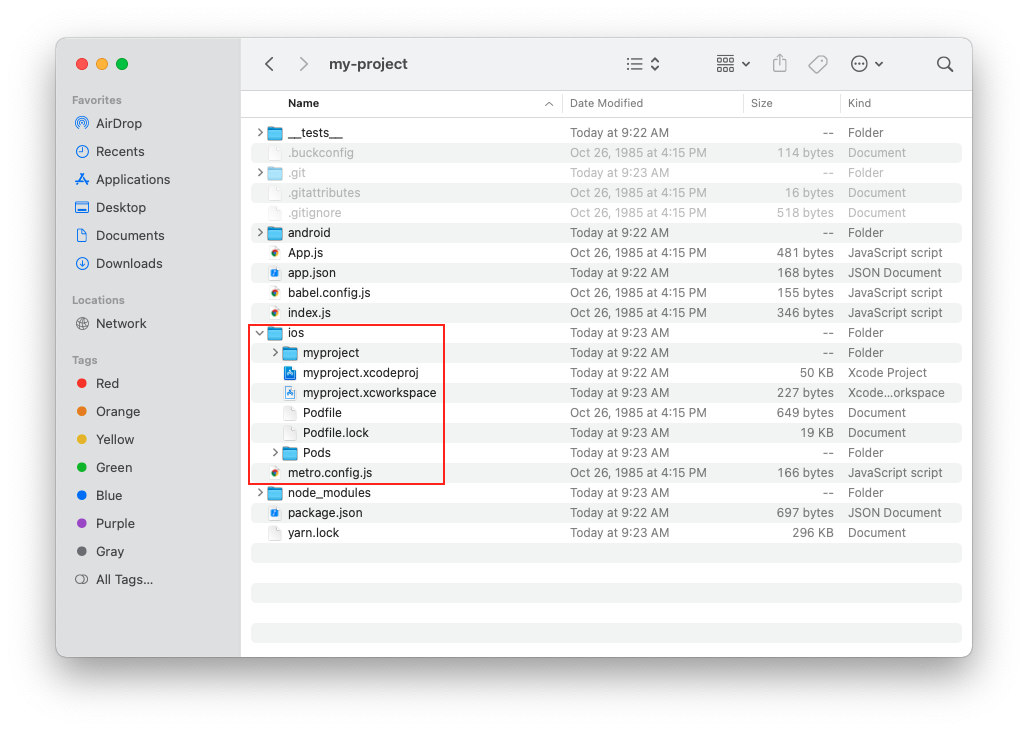
Look at the directory. You’ll see the iOS folder with its xcode files.
Running the iOS simulator
npm run ios
It’ll take a few minutes for the app to build. You’ll see a terminal pop up with the title “Metro.node launcher package”. Then your simulator will start and the app will install and run.
Implementing the app
Features
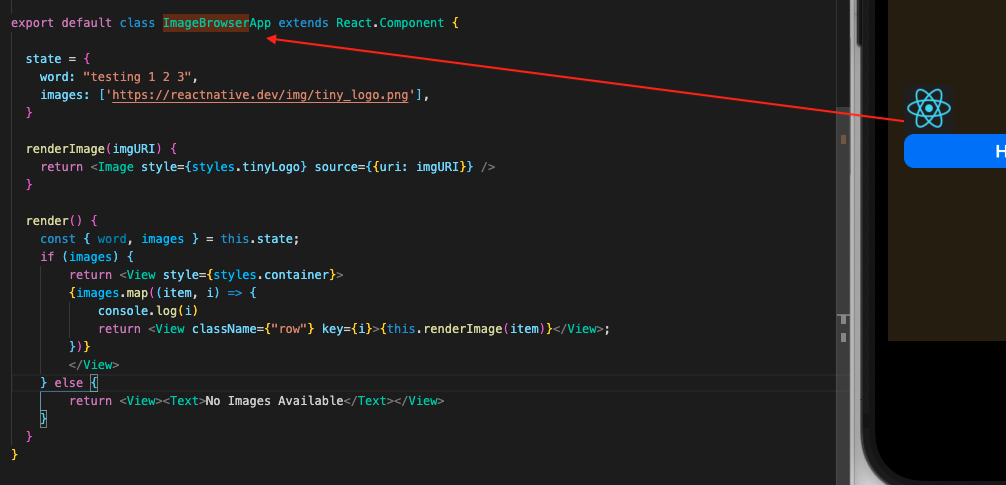
We first create a file called ImageBrowserApp.js
Its a class component, where we simply display an image.
We render this image through JSX Image tag.
If no image URLs are given, we simply return ‘No Images Available’.
|
1 2 3 4 5 6 7 8 9 10 11 12 13 14 15 16 17 18 19 20 21 22 23 24 25 26 27 28 29 30 31 32 33 34 35 36 37 38 39 40 41 42 |
import React from 'react'; import { View, Image, Text, StyleSheet } from 'react-native'; const styles = StyleSheet.create({ container: { paddingTop: 50, }, tinyLogo: { width: 50, height: 50, }, logo: { width: 66, height: 58, }, }); export default class ImageBrowserApp extends React.Component { state = { word: "testing 1 2 3", images: ['https://reactnative.dev/img/tiny_logo.png'], } renderImage(imgURI) { return <Image style={styles.tinyLogo} source={{uri: imgURI}} /> } render() { const { images } = this.state; if (images) { return <View style={styles.container}> {images.map((item, i) => { console.log(i) return <View className={"row"} key={i}>{this.renderImage(item)}</View>; })} </View> } else { return <View><Text>No Images Available</Text></View> } } } |
In index.js, make sure we use AppRegistry to register this component like so:
|
1 2 3 4 5 6 7 8 9 10 11 |
import 'react-native-gesture-handler'; import { registerRootComponent } from 'expo'; import App from './App'; import ImageBrowser from './ImageBrowserApp'; import { AppRegistry } from 'react-native'; // registerRootComponent calls AppRegistry.registerComponent('main', () => App); // It also ensures that whether you load the app in Expo Go or in a native build, // the environment is set up appropriately registerRootComponent(App); AppRegistry.registerComponent( 'ImageBrowserApp', () => ImageBrowser); |
In your App.js, you can use it like so:
App.js
|
1 2 3 4 5 6 7 8 9 10 11 12 13 |
export default function App() { return ( <> <View style={styles.screenContainer}> <ImageBrowser /> <AppButton title="Hey there!" onPress ={() => {...} /> </View> ); } |
When you export it to iOS, it will look like this:
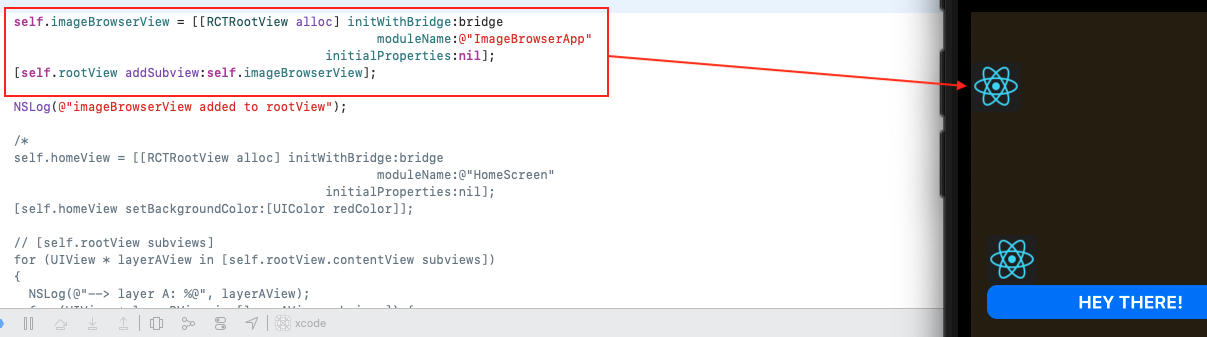
In the native iOS side, we can also instantiate ImageBrowserApp to be used as a view.
This is made possible when we registered the component with the name ImageBrowserApp
So in AppDelegate, we simply create a RCTRootView and initialize the module name to ImageBrowserApp.
Then we add it to the rootView.
iOS side
AppDelegate.h
|
1 2 3 4 5 6 7 8 9 |
#import <Foundation/Foundation.h> #import <EXUpdates/EXUpdatesAppController.h> #import <React/RCTBridgeDelegate.h> #import <UIKit/UIKit.h> #import <UMCore/UMAppDelegateWrapper.h> @interface AppDelegate : UMAppDelegateWrapper <RCTBridgeDelegate, EXUpdatesAppControllerDelegate, RCTBridgeModule> @end |
AppDelegate.m
|
1 2 3 4 5 6 7 8 9 10 11 12 13 14 15 16 17 18 19 20 21 22 23 24 25 26 27 28 29 30 31 32 33 34 35 36 37 38 39 40 41 42 43 44 45 46 47 48 49 50 51 52 53 54 55 56 57 58 59 60 61 62 63 |
#import "AppDelegate.h" #import <React/RCTBridge.h> #import <React/RCTBundleURLProvider.h> #import <React/RCTRootView.h> #import <React/RCTLinkingManager.h> #import <React/RCTDevLoadingView.h> #import <React/RCTLog.h> // Use the RCTLog APIs from React #import <UMCore/UMModuleRegistry.h> #import <UMReactNativeAdapter/UMNativeModulesProxy.h> #import <UMReactNativeAdapter/UMModuleRegistryAdapter.h> #import <EXSplashScreen/EXSplashScreenService.h> #import <UMCore/UMModuleRegistryProvider.h> #if defined(FB_SONARKIT_ENABLED) && __has_include(<FlipperKit/FlipperClient.h>) #import <FlipperKit/FlipperClient.h> #import <FlipperKitLayoutPlugin/FlipperKitLayoutPlugin.h> #import <FlipperKitUserDefaultsPlugin/FKUserDefaultsPlugin.h> #import <FlipperKitNetworkPlugin/FlipperKitNetworkPlugin.h> #import <SKIOSNetworkPlugin/SKIOSNetworkAdapter.h> #import <FlipperKitReactPlugin/FlipperKitReactPlugin.h> ... ... RCT_EXPORT_MODULE(); RCT_EXPORT_METHOD(doSomethingInAppDelegate:(NSString *)msg) { NSLog(@"Xcode (AppDelegate) - %@", msg); } ... ... + (BOOL)requiresMainQueueSetup { return NO; } - (RCTBridge *)initializeReactNativeApp { RCTBridge *bridge = [[RCTBridge alloc] initWithDelegate:self launchOptions:self.launchOptions]; #if RCT_DEV [bridge moduleForClass:[RCTDevLoadingView class]]; #endif self.rootView = [[RCTRootView alloc] initWithBridge:bridge moduleName:@"main" initialProperties:nil]; self.rootView.backgroundColor = [[UIColor alloc] initWithRed:0.8f green:0.6f blue:0.2f alpha:0.2]; self.imageBrowserView = [[RCTRootView alloc] initWithBridge:bridge moduleName:@"ImageBrowserApp" initialProperties:nil]; [self.rootView addSubview:self.imageBrowserView]; UIViewController *rootViewController = [UIViewController new]; rootViewController.view = self.rootView; self.window.rootViewController = rootViewController; [self.window makeKeyAndVisible]; return bridge; } |
Changing your branch name
ref – https://linuxize.com/post/how-to-rename-local-and-remote-git-branch/
git checkout fix/bug-51
You’re now on bug-51
git branch -m fix/bug-52
git branch
SimpRegBtnFix
basic-share
basic-share-api
bug-47
china-locations
connect-to-api
dev
fix/bug-45
* fix/bug-52
functional-screens
integrate-qr
inviter
Locally, you’ve changed your name. Now you gotta reflect it at remote.
git push origin -u fix/bug-52
Total 0 (delta 0), reused 0 (delta 0)
remote:
remote: To create a merge request for fix/bug-52, visit:
remote:
* [new branch] fix/bug-52 -> fix/bug-52
Branch ‘fix/bug-52’ set up to track remote branch ‘fix/bug-52’ from ‘origin’.
delete your old branch
git push origin –delete fix/bug-51
– [deleted] fix/bug-51
Create and Deploy a React App on MS Azure
ref –
- https://css-tricks.com/deploying-a-client-side-rendered-create-react-app-to-microsoft-azure/
- https://stackoverflow.com/questions/57618453/process-for-react-app-deployment-to-azure-web
- download demo
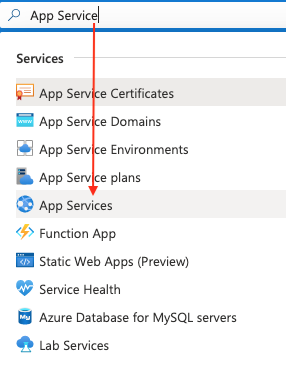
First we search for “App Services”. Then click on the plus button to create one.
Since I”m on free trial, that is the account I belong to. We give it a name for the group that this app belongs to. Stack should be Node. Region should be East Asia.
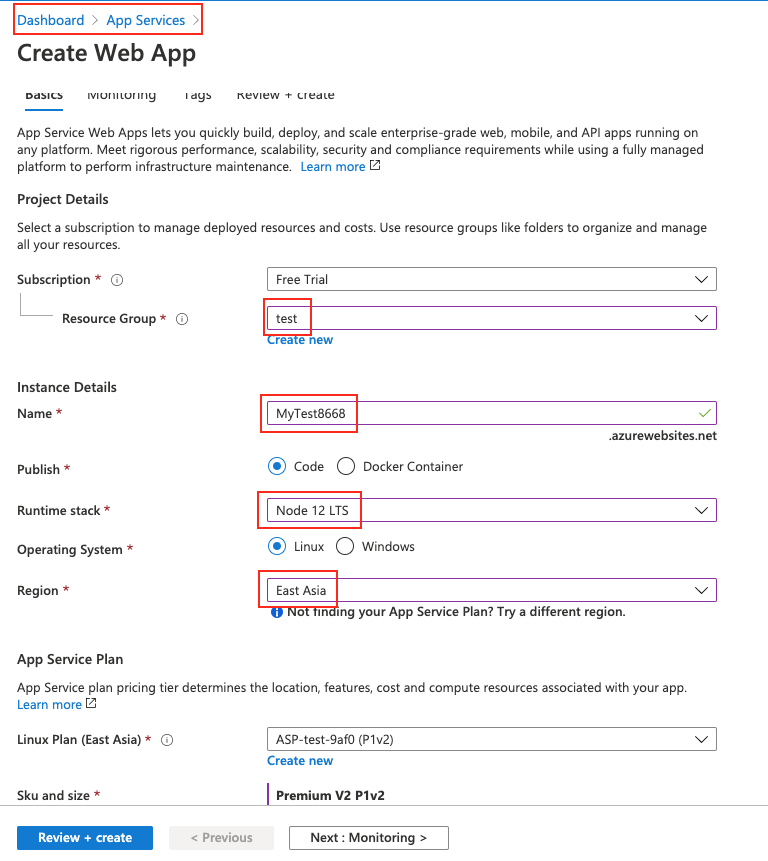
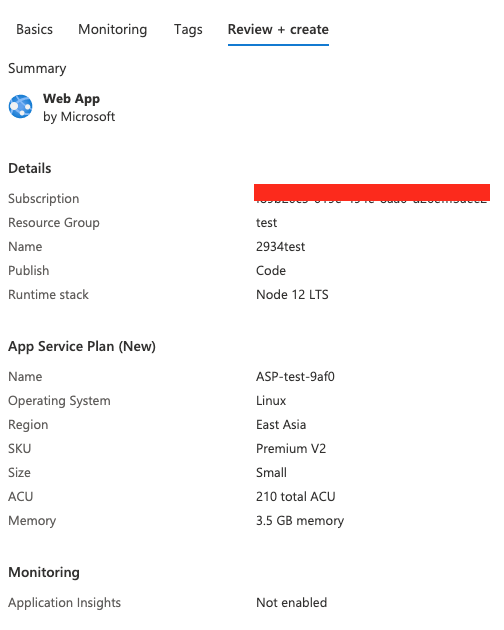
Use default on the rest of the options. Review your changes and click create.
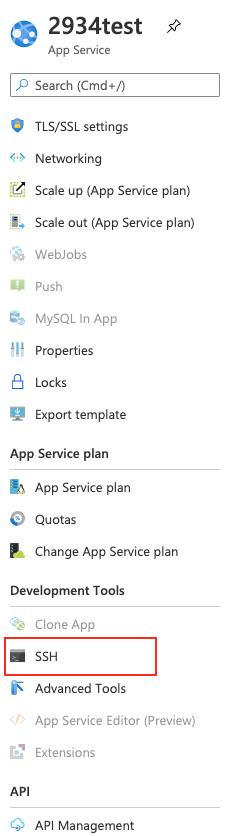
Once it finishes creating, you’ll come back to the dashboard with your newly created Web Service. Click on it and you’ll see the web service’s stats. Notice the URL. Click on it to see your default page. This page is actually serviced from your server’s site/wwwroot/hostingstart.html. You can verify this by clicking on the SSH icon on your left, a window pops up and you’re in your server. cd into site/wwwroot and you’ll be able to see it.
Creating React App locally
We create the app and name it azure-react-demo:
npx create-react-app azure-react-demo
We go into the directory and install react-router-dom for routing features:
cd azure-react-demo
npm i react-router-dom
In your directory, you should now see node_modules, public, src ..etc.
Then create pages folder in src.
src/App.js
|
1 2 3 4 5 6 7 8 9 10 11 12 13 14 15 16 17 18 19 20 21 22 |
import React, { Component } from "react"; import "./App.css"; import Home from "./pages/Home"; import Page1 from "./pages/Page1"; import Page2 from "./pages/Page2"; import { BrowserRouter as Router, Switch, Route } from "react-router-dom"; class App extends Component { render() { return ( <Router> <Switch> <Route exact path="/" component={Home} /> <Route path="/page1" component={Page1} /> <Route path="/page2" component={Page2} /> </Switch> </Router> ); } } export default App; |
src/pages/Home.js
|
1 2 3 4 5 6 7 8 9 10 11 12 13 14 15 16 17 18 19 20 21 22 23 24 25 26 |
import React from "react"; import { Link } from "react-router-dom"; const Home = () => { return ( <div className="flags"> <div className="page page1"> <div className="flagTop" /> <div className="flagCenter"> <h1 className="country">Argentina (PAGE 1)</h1> <Link to="/page1">Click to go to Page 1</Link> </div> <div className="flagBottom" /> </div> <div className="page page2"> <div className="flagTop" /> <div className="flagCenter"> <h1 className="country">Nigeria (PAGE 2)</h1> <Link to="/page2">Click to go to Page 2</Link> </div> <div className="flagBottom" /> </div> </div> ); }; export default Home; |
src/pages/Page1.js
|
1 2 3 4 5 6 7 8 9 10 11 12 13 14 15 16 17 18 19 20 21 |
// Page1.js import React from "react"; import { Link } from "react-router-dom"; const Page1 = () => { return ( <div className="page page1"> <div className="flagTop" /> <div className="flagCenter"> <h1 className="country">Argentina (PAGE 1)</h1> <div className="otherLinks"> <Link to="/page2">Nigeria</Link> <Link to="/">Home</Link> </div> </div> <div className="flagBottom" /> </div> ); }; export default Page1; |
src/pages/Page2.js
|
1 2 3 4 5 6 7 8 9 10 11 12 13 14 15 16 17 18 19 20 |
import React from "react"; import { Link } from "react-router-dom"; const Page2 = () => { return ( <div className="page page2"> <div className="flagTop" /> <div className="flagCenter"> <h1 className="country">Nigeria (PAGE 2)</h1> <div className="otherLinks"> <Link to="/page1">Argentina</Link> <Link to="/">Home</Link> </div> </div> <div className="flagBottom" /> </div> ); }; export default Page2; |
src/App.css
|
1 2 3 4 5 6 7 8 9 10 11 12 13 14 15 16 17 18 19 20 21 22 23 24 25 26 27 28 29 30 31 32 33 34 35 36 37 38 39 40 41 42 43 44 45 46 47 48 49 50 |
/* App.css */ html { box-sizing: border-box; } body { margin: 0; } .page { display: grid; grid-template-rows: repeat(3, 1fr); height: 100vh; } .page1 .flagTop, .page1 .flagBottom { background-color: blue; } .page2 .flagTop, .page2 .flagBottom { background-color: green; } .flagCenter { display: flex; align-items: center; flex-direction: column; justify-content: center; text-align: center; } .page a { border: 2px solid currentColor; font-weight: bold; margin: 0 30px; padding: 5px; text-decoration: none; text-transform: uppercase; } .flags { display: flex; width: 100%; } .flags > .page { flex: 1; } |
run npm start and you should see a simple app with pages. We are going to deploy it to Azure.
Deploy to Azure
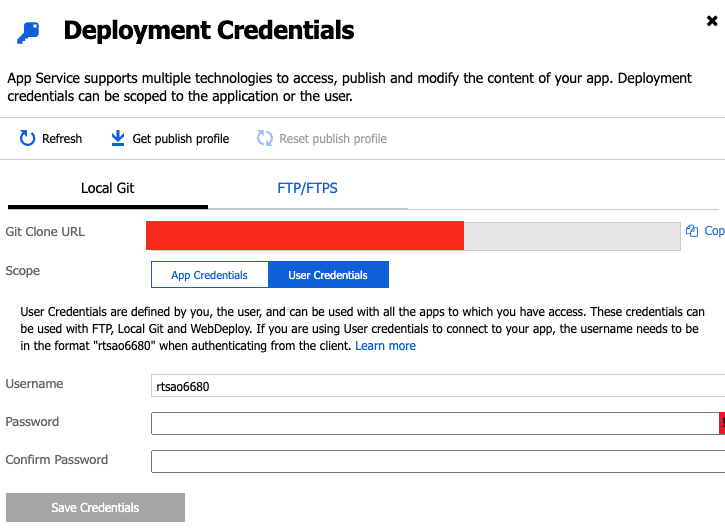
First go to Deployment Credentials
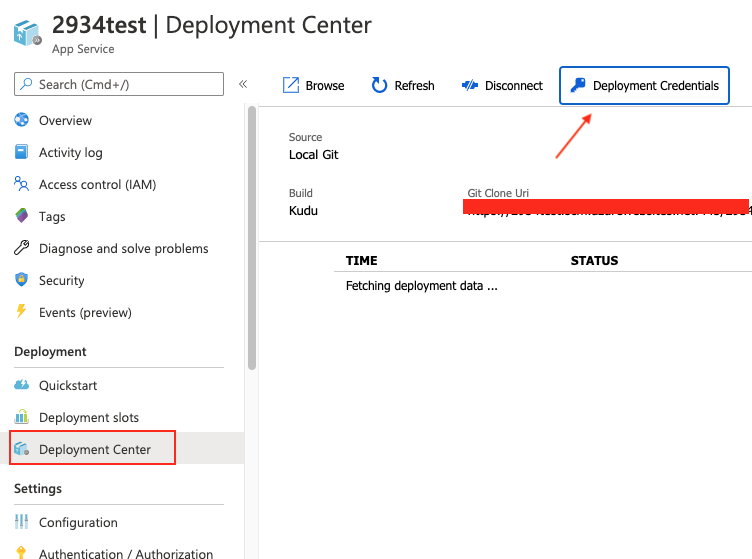
set up credentials for a user.
Now go to the deployment center and set it up for our local project.
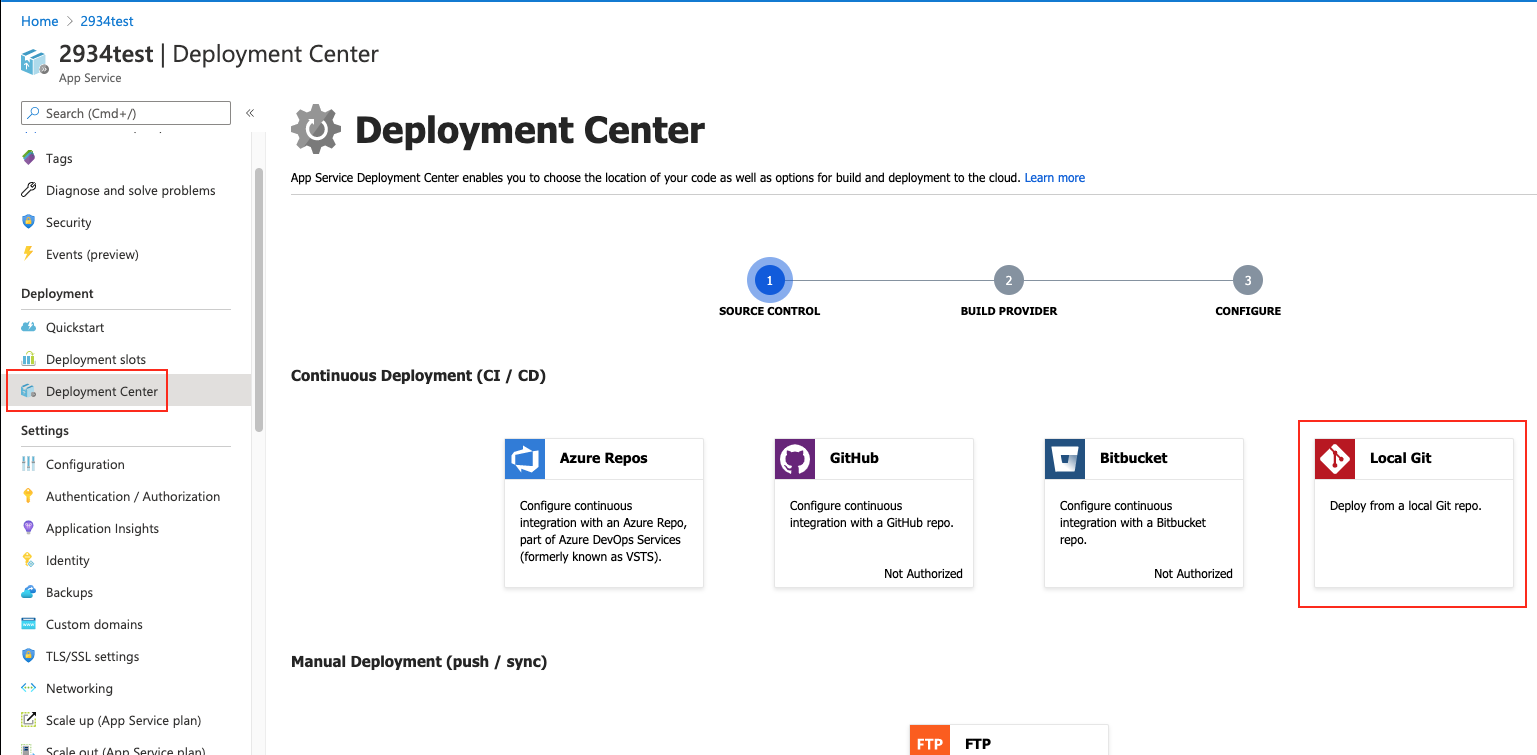
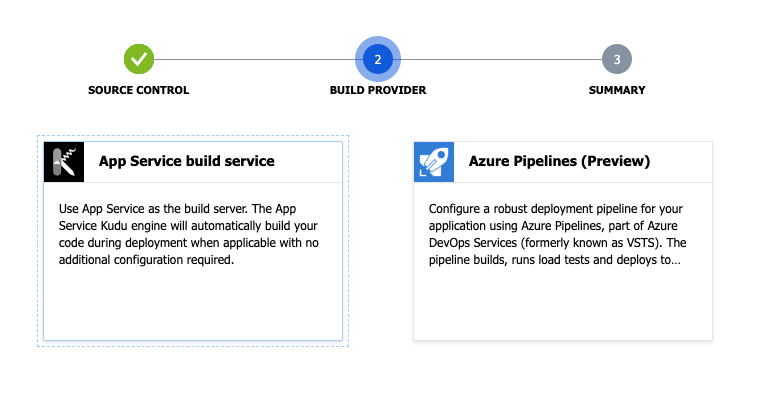
After the third step, Azure generates a local git repo for you. And it gives you a remote link to point your react app to.
something like this: https://YourAppName.scm.azurewebsites.net/YourAppName.git
Create the build folder
Now in our root directory, npm run build
Once the build folder generates, we CD into it:
|
1 2 3 4 5 |
git init git add . git commit -m "Initial Commit" git remote add azure <git clone url> git push azure master |
Make sure you use the git url like this: https://YourAppName.scm.azurewebsites.net/YourAppName.git
And then put in your username and password when it prompts you.
Startup command
If you are using Windows, you’re ready to go. Because we are using Node, we need to do something that would allow Azure to point to our static website.
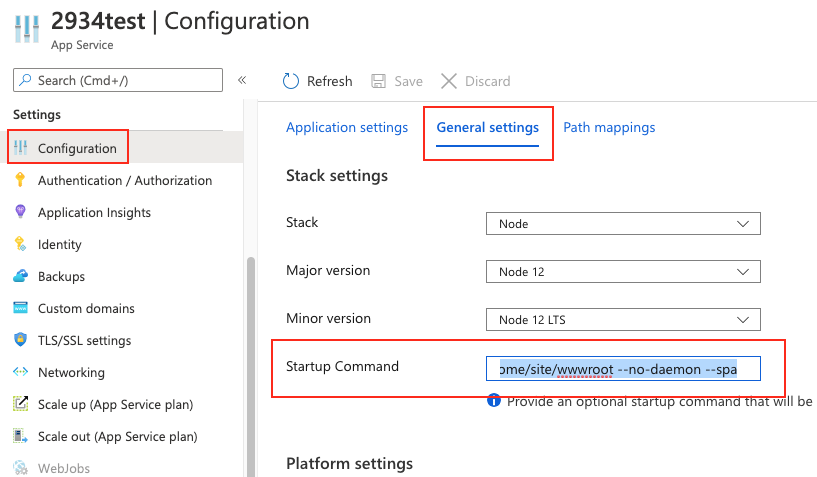
Configuration > General Settings > Startup Command:
pm2 serve /home/site/wwwroot –no-daemon –spa
If you use react-router (which we are using) and wants to make any direct access on custom routes be handled by index.html you need to add –spa option on the same command.
then go to your site and it should work. When you click around, all the links should work. In addition, entering URLs in the browser will work also.

IF you do not put in the Startup command, the site will always display the default page. It will not even run your app.
If you put the startup command WITHOUT the –spa, the site will work, but you can’t access other pages through the URL. Every URL page must be accessed through the front page.
Thus, pm2 serve /home/site/wwwroot –no-daemon –spa solves both problems.
Protected: rstore 3rd party security evaluation
DNY client (6 – Profile Page)
src/user/Profile.js
|
1 2 3 4 5 6 7 8 9 10 11 12 13 14 15 16 17 18 19 20 21 |
import React, { Component } from 'react'; class Profile extends Component { constructor() { super() this.state = { } } render() { return ( <div className="container"> <h2 className="mt-5 mb-5">Profile</h2> </div> ); } } export default Profile |
Notice when we added our Profile page, the path is /user/:userId.
This says whenever we have a URL in that format, we’ll hit the Profile component.
src/MainRouter.js
|
1 2 3 4 5 6 7 8 9 10 11 12 13 14 15 16 17 18 19 20 21 |
import React from 'react' import {Route, Switch} from 'react-router-dom' import Home from './core/Home' import Signup from './user/Signup' import Signin from './user/Signin' import Profile from './user/Profile' import Menu from './core/Menu' const MainRouter = () => ( <div> <Menu /> <Switch> <Route exact path="/" component={Home} /> <Route exact path="/signup" component={Signup} /> <Route exact path="/signin" component={Signin} /> <Route exact path="/user/:userId" component={Profile} /> </Switch> </div> ) export default MainRouter; |
Use the user object you get from localStorage. Inside that object, you’ll get the user object. Access the _id of the user and use it for the url parameter when we click on the profile link.
src/core/Menu.js
|
1 2 3 4 5 |
<li className="nav-item"> <Link to={`user/${IsAuthenticated().user._id}`}> {`${IsAuthenticated().user.name}'s profile`} </Link> </li> |
When fetching data from Server
|
1 2 3 4 5 6 7 8 9 10 11 12 13 14 15 16 17 18 19 20 21 22 23 24 25 26 27 28 29 30 31 32 33 34 35 36 37 38 39 40 41 42 43 44 45 46 47 48 49 50 51 52 53 54 55 56 57 58 59 60 61 62 63 64 65 66 67 68 |
import React, { Component } from 'react'; import { IsAuthenticated} from '../auth'; import { Redirect } from 'react-router-dom'; class Profile extends Component { constructor() { super() this.state = { user: "", redirectToSignin: false } } getUserInfo = async (userId, token) => { console.log(`1) get user info for user id: ${userId}` ) return await fetch(`http://localhost:8080/user/${userId}`, { method: "GET", mode: "cors", headers: { Accept : "application/json", "Content-Type": "application/json", Authorization: `Bearer ${token}`, 'Access-Control-Allow-Origin':'*' } }) .then(response => { console.log('3) response received') return response.json() }) .catch(err => { this.setState({ redirectToSignin: true }) return err }) } componentDidMount() { const userId = this.props.match.params.userId let token = IsAuthenticated().token console.log('0) get user info') this.getUserInfo(userId, token).then(response => { console.log('4) callback for logging and presentation') this.setState({ user: response }) }) console.log('2) finish him!!!') } render() { const { user, redirectToSignin } = this.state if (redirectToSignin) return <Redirect to="/signin" /> return ( <div className="container"> <h2 className="mt-5 mb-5">Profile</h2> <ul> <li>Hi, {user.name}</li> <li>{user._id}</li> <li>{user.email}</li> <li>{`Joined on ${new Date(user.created).toDateString()}`}</li> </ul> </div> ); } } export default Profile |
DNY Node API (4 – sign in using JWT )
npm i jsonwebtoken
npm i cookie-parser
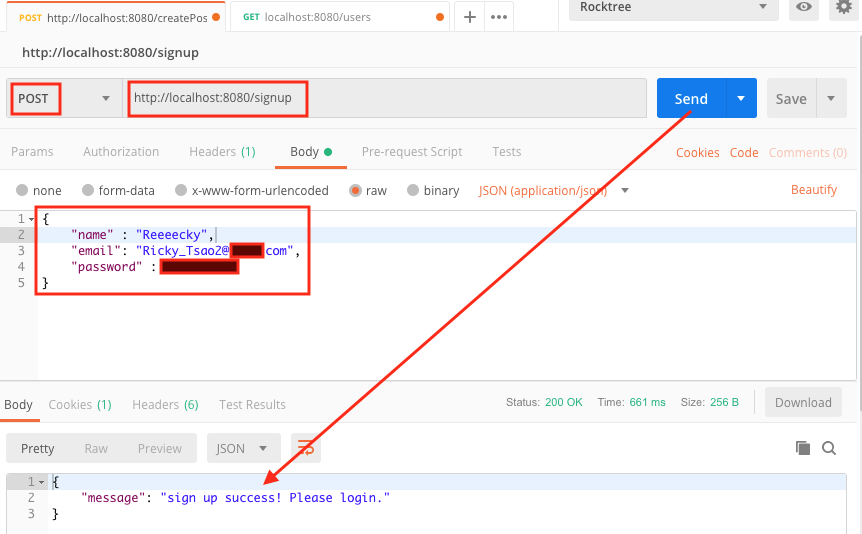
Creating a User
After creating a user correctly, we get a message saying that a user has been created.
Ensuring user creation correctness
In validator/index.js, we have function userSignupValidator function that ensures we check for the format of the data for when user is created.
We use this function as a middleware in
routes/auth.js
|
1 |
router.post('/signup', userSignupValidator, signup) |
This means that userSignupValidator is used to validate the incoming JSON’s properties. Only when it passes do we continue on to signup function.
validator/index.js
|
1 2 3 4 5 6 7 8 9 10 11 12 13 14 15 16 17 18 19 20 21 22 23 24 25 26 27 28 29 30 31 32 33 |
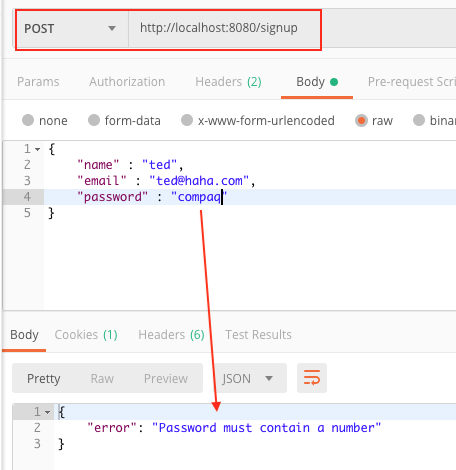
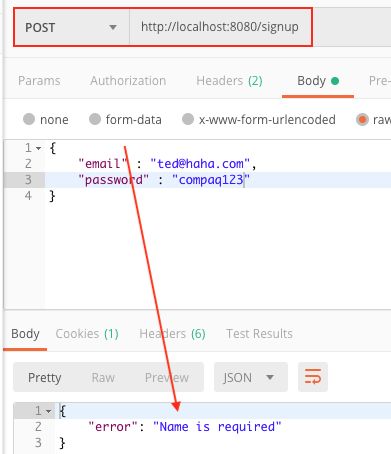
exports.userSignupValidator = (req, res, next) => { console.log(`validator/index.js - userSignupValidator`); req.check("name", "Name is required").notEmpty() console.log(`name is not null and between 4-10 char √`); req.check("email", "Email must be between 3 to 32 characters") .matches(/.+\@.+..+/) .withMessage("email must contain @") .isLength({ min: 4, max: 50 }) console.log(`check for email √`); req.check("password", "Password is required").notEmpty(); req.check('password') .isLength({min: 6}) .withMessage("Password must contain at least 6 characters") .matches(/\d/) .withMessage("Password must contain a number") console.log(`check for password √`); const errors = req.validationErrors() if (errors) { const firstError = errors.map(error => error.msg)[0]; return res.status(400).json({error: firstError}); } console.log(`validator/index.js - no errors, moving on √`) next(); } |
Be sure that you include a number inside your password:
Make sure you include a name when you register for an account:
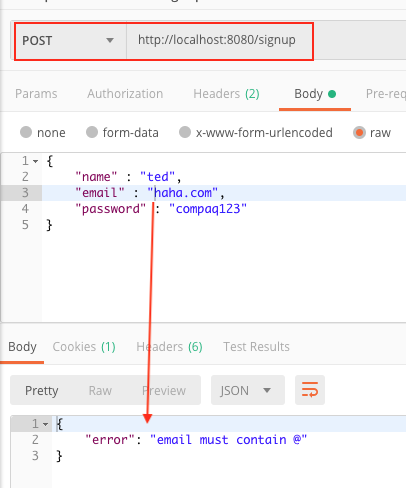
For your email, ensure to have it in an email format:
Successful Signin
In order to sign in, use /signin, then click on tab Body, choose raw and then JSON format.
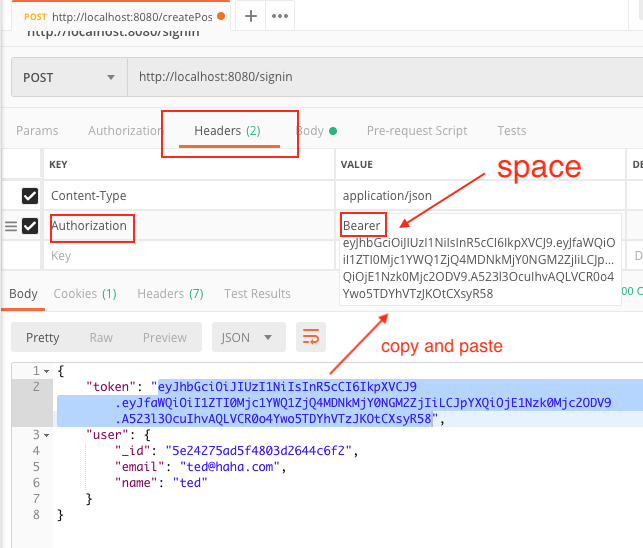
Type in a JSON object with key/value “email” and “password”. Then click send. If your credentials are correct, you’ll get an object back with a token key/value.

Copy and paste the value into Headers. In Headers, create a key called “Authorization”.
In the value, type “Bearer ” with a space at the end. Then copy the token behind it.
You are not set up to create/update/delete posts, get/update/delete your own user data.