Category Archives: Node JS

Passing array json to Server

iOS client

Basically, as we’re constructing our dictionary, our key is flowDates. We use an array of strings as our value.

Server side

The json packet comes to our server via the request object.

In the request object’s body, we use key flowDates to get the array of strings passed in from the iOS client. We loop through this flowDates array to get the strings.

While we loop, we create a temp object called flowDay with keys startDate and endDate, and enter the strings from the array flowDates as their value.

Then we push that object onto an empty array.

Finally, we use that array to create a new user:

Server side code

Node server authenticate for iOS client using token

Authentication – POST for /api/authenticate using parameters ‘name’ and ‘password’

Here’s we authenticate by giving the server a name and password. If the name and password match the ones stored in the database, then we return it a token for the iOS client to use. Whenever that the iOS client needs to access a protected URL, we use that token.

Server side

/config.js

First notice that in the beginning of the file, we use set to have
superSecret name as an application setting name.

/server.js

We set the key ‘superSecret’ to match config.secret which is ‘ilovescotchyscotch’ in /config.js

Later we will use jwt’s sign function on this string along with the user object in order to create a token for the iOS client to use.

We use express’s router function to get variable apiRoutes. We prefix all routes with ‘/api’.

Then for POST on url /authenticate, we use mongoose’s model User to find if the user exist. If it does, it will then run the async method to see if the passwords match.

If the passwords match, then we use jwt’s sign function to return a token for the user to use. We wrap that token along with other string info in a json object and return it via the response object.

iOS client

We create NSDictionary with name and password key. Then we encode it into a NSString.

Notice we then call the URL ‘http://192.168.1.102:8080/api/authenticate’ with POST, and the json string in the body of the request.

After we POST this request, our server will hit the apiRoutes.post(‘/authenticate’, function(req, res) {…}) function, which uses jwt.sign(user, app.get(‘superSecret’)) to return a token for this particular user.

It returns:

res.json({
success: true,
message: ‘Enjoy your token!’,
token: token
});

Hence the server code, we see that the returned json object has 3 keys:
success, message, and token. Use the value from key token in order to authenticate yourself when doing updates and other restricted activities.

Using Token to authenticate itself and access protected URLs

Reading list of users using approved authentication

Now that we have the authentication, we need to use it to read protected data

In your server.js, put this code to protect your URLs:

So that when you hit

http://localhost:8080/api/users

You’ll get:

{“success”:false,”message”:”No token provided.”}

So as you can see a client that does not provide the correct token and user name cannot access that what http://localhost:8080/api/users has to offer.

Thus, we access it by using the token received earlier when we authenticated with our user name and password. We set the token and our username into the header of the request packet.

AppDelegate.m

As you can see, once you log in, use the token string to get info.

GetInfoConnection.h

GetInfoConnection.m

Notice how we set the request’s header with the user name and token value in the method getUserInfo.

These values are then sent to the server where they get processed by apiRoutes.use(function(req, res, next) {…}), which uses jwt.verify to verify if this username and token is valid.

Then the server passes it onto the next middleware layer, namely, apiRoutes.get(‘/users’, function(req, res) {…}) to have the database retrieve the valid user.

Full server code

iOS client consume node js web service

iOS client

Basically keep in mind that when you want to hit a local node js server, the address on the network from the iOS cient’s pov is 192.168.1.102.

You go to System Preferences > Wi-Fi (or Ethernet, or whatever you use to get internet connection ). Then on the right hand side, the status should say ‘connected’ and you’ll see something like “Wi-Fi is connected to TP-LINK_3DF056 and has the IP address 192.168.1.102.”

192.168.1.102 is the network address of the computer that’s running the node js server. Hence when iOS clients look for the server, they will need to hit that address.

We are simply trying to hit a url using GET, and expect json data back.

GET for /

Notice that we use “message” as the key for our json data because in our node code, we are returning a json object using the key “message”.

Node server

POST /setup with parameters ‘name’ and ‘password’

iOS client side

So we use NSDictionary to create dictionary object with keys name and password.
Then, we encode it into a NSUTF8StringEncoding string.

We then use that dictionary string and set it as Http body using setHTTPBody for the request object. We also set our http method to POST using setHTTPMethod on the request object.

Node server side

Checking mongo db via terminal

Open your terminal and type in

mongo

2015-07-05T22:05:14.298+0800 I CONTROL [initandlisten] ** WARNING: soft rlimits too low. Number of files is 256, should be at least 1000
> show dbs
PersonDatabase 0.078GB
local 0.078GB
> use PersonDatabase;
switched to db PersonDatabase
> db.user.count()
3
> db.user.find()

the result is that Shirley Qian has been inserted:

{ “_id” : ObjectId(“55973f3702e8b0094967b544”), “name” : “rtsao”, “password” : “compaq”, “admin” : true, “__v” : 0 }
{ “_id” : ObjectId(“55977f4b06112d75860f9af6”), “name” : “rtsao6680”, “password” : “abcde12345”, “admin” : true, “__v” : 0 }
{ “_id” : ObjectId(“5599cc4ec1fa2c05496b5c34”), “name” : “Shirley Qian”, “password” : “12345678”, “admin” : true, “__v” : 0 }
>

Full server code

MongoError: connect ECONNREFUSED

If you start up your node project (given that it uses mongo to connect to some database) without starting up your mongo db, you’ll get errors.

For example:
Rickys-MacBook-Pro:TODO_url_authentication rickytsao$ gulp
[22:02:09] Using gulpfile ~/Desktop/TODO_url_authentication/gulpfile.js
[22:02:09] Starting ‘default’…
[22:02:09] Finished ‘default’ after 2.12 ms
[22:02:09] [nodemon] v1.3.7
[22:02:09] [nodemon] to restart at any time, enter rs
[22:02:09] [nodemon] watching: *.*
[22:02:09] [nodemon] starting node server.js
Magic happens at http://localhost:8080
connection error: { [MongoError: connect ECONNREFUSED] name: ‘MongoError’, message: ‘connect ECONNREFUSED’ }

Simply open up another terminal and type in:
mongod
Then the database will start up and you’ll see whole bunch of logs…

2015-07-05T22:05:14.166+0800 W – [initandlisten] Detected unclean shutdown – /data/db/mongod.lock is not empty.
2015-07-05T22:05:14.182+0800 I JOURNAL [initandlisten] journal dir=/data/db/journal
2015-07-05T22:05:14.182+0800 I JOURNAL [initandlisten] recover begin
2015-07-05T22:05:14.187+0800 I JOURNAL [initandlisten] recover lsn: 29046914
2015-07-05T22:05:14.187+0800 I JOURNAL [initandlisten] recover /data/db/journal/j._0
2015-07-05T22:05:14.188+0800 I JOURNAL [initandlisten] recover skipping application of section seq:0 < lsn:29046914 2015-07-05T22:05:14.189+0800 I JOURNAL [initandlisten] recover skipping application of section seq:15301820 < lsn:29046914 2015-07-05T22:05:14.224+0800 I JOURNAL [initandlisten] recover cleaning up 2015-07-05T22:05:14.224+0800 I JOURNAL [initandlisten] removeJournalFiles 2015-07-05T22:05:14.252+0800 I JOURNAL [initandlisten] recover done 2015-07-05T22:05:14.297+0800 I JOURNAL [durability] Durability thread st

Setup Node/Express/Git on ubuntu

To install Node.js, open a terminal and type the following command:


curl -sL https://deb.nodesource.com/setup_10.x | sudo -E bash –
sudo apt-get install -y nodejs

and then use n or nvm module to manage version.

Update: You should uninstall older version before installing newer version


sudo apt-get purge nodejs
sudo apt-get autoremove

Create a symbolic link for “node” as many Node.js tools use this name to execute.
/usr/bin/node is an executable:


ubuntu@VM-0-7-ubuntu:/usr/bin$ file node
node: ELF 64-bit LSB executable, x86-64, version 1 (GNU/Linux), dynamically linked, interpreter /lib64/ld-linux-x86-64.so.2, for GNU/Linux 2.6.18, BuildID[sha1]=7ecea95928ab854a79f9e5ca6d4b22df939620f6, not stripped

Hence, we want to create a symbolic link to our node executable like so:

sudo ln -s /usr/bin/nodejs /usr/bin/node

Now we should have both the node and npm commands working:

$ node -v
v0.10.25
$ npm -v
1.3.10

Install Express.js

Installing

Assuming you’ve already installed Node.js, create a directory to hold your application, and make that your working directory.

$ mkdir myapp
$ cd myapp

Use the npm init command to create a package.json file for your application. For more information on how package.json works, see Specifics of npm’s package.json handling.

$ npm init

This command will prompt your for a number of things such as the name and version of of your application. For now, you can simply hit RETURN to accept the defaults for most of them, except for:

entry point: (index.js)

Enter app.js or whatever you want the name of the main file to be. If you want it to be index.js, hit RETURN to accept the suggested default file name.

Now install Express in the app directory and save it in the dependencies list:

$ npm install express –save

To install Express temporarily, and not add it to the dependencies list, omit the –save option:

$ npm install express

installing mongoose

npm install mongoose –save-dev

Authenticate web service urls part 2

ref – https://scotch.io/tutorials/authenticate-a-node-js-api-with-json-web-tokens

In part 1, we set up a simple project where we let a client create a user through a public URL /setup, then display all the users via /api/users.

Next, let’s make sure that we can authenticate a user and then protect those routes using Express route middleware and requiring a token.

Authenticating and Creating a Token

We then use Postman to query it like so

POST_authen_create_user

why – form-urlencoded vs form-data

To summarize, form-urlencoded has a low fixed cost, but high variable for special characters, so application/x-www-form-urlencoded is good for short messages like those found in most basic web forms. On the other hand, form-data has a high fixed costs due to the additional MIME headers prepended to each message chunk, but low variable cost for special characters, so multipart/form-data is good for long messages such images or large files.

Now, copy that whole token string somewhere to be used later.

Protecting URLS

Now let’s protect /api and /api/users by forcing clients to provide the token whenever they need to access these urls.

So for our var apiRoutes that we get from express.Routes(), we have that routing variable use a function to process requests.

We make it run a middleware function by using .use on it. We basically check the requests’ headers to see if the key x-access-token has a valid value. That value should be the token value we received earlier. If the token is valid, everything checks through via the next(), and we run to the apiRoutes.get(‘/users’, function(req, res) {}); function definitions which gets the user from the database and gives it back as a json response.

For example, if you were to hit http://localhost:8080/api/ or http://localhost:8080/api/ it will run this function definition first….see that x-access-token has not been defined in the headers and return you an error json message.

When the tokens are valid, you’ll see the valid json data returned. If you are to use POSTman, here’s what it should look like:

x-access-token_get_user

Authenticate web service urls part 1

ref – https://scotch.io/tutorials/authenticate-a-node-js-api-with-json-web-tokens

We’ll build a quick API using Node and Express and we’ll be using POSTman to test it.

Create an application directory, then in your mac terminal:

$ npm install express body-parser morgan mongoose jsonwebtoken –save

  • express is the popular Node framework
  • mongoose is how we interact with our MongoDB database
  • morgan will log requests to the console so we can see what is happening
  • body-parser will let us get parameters from our POST requests
  • jsonwebtoken is how we create and verify our JSON Web Tokens

The –save modifier will also save these packages to our package.json file.

After all the packages have been downloaded, you will see a node_modules folder. The packages are installed inside there.

User Model (/models/user.js)

In your project directory, create models folder. Then inside that models folder, you create user.js file.

The user model that we define will be used when creating and getting users. To create a Mongoose model, let’s create the file app/models/user.js

Now let’s create a configuration file to store configuration settings for our application.

config.js (/config.js)

Basically, the database is hosted on our local machine.

  • secret: used when we create and verify JSON Web Tokens
  • database: the URI with username and password to your MongoDB installation

Note: You should be running GULP for your working environment so that when you make changes, it will automatically help you save. In your gulpfile.js, make sure that gulp.task, script has the string “server.js”.

server.js

Set up all the package variables and db connections

Then we have our app use body parser for POST, morgan for throwing logs to console outputs, and set our config file’s object secret to web token’s super secret key.

public URL for home

Let’s create public URL for the home page and then start the server

Open up a browser and go to

http://localhost:8080/

You’d get the json response:

{“message”:”(GET http://localhost:8080/)”}

If you look at your mac terminal, you’ll also see morgan’s log outputs.

Finally, we put a url where the server creates and inserts a new user along with a password into the database.

Public URL to create a user

Open up a browser and put in

http://localhost:8080/setup

You will get the json data back:

{“success”:true}

This means that you have successfully inserted the user rtsao with pw compaq.

Showing Users through public URL

Put the following code above our routes:

What this means is that the variable apiRoutes always has url start with /api.

Whatever url we specify for a certain request, its always /api/url paired with GET or POST..etc.

Hence in apiRoutes.get(‘/users’…) function definition, it just means for (GET http://localhost:8080/api/users) we will return all the users from the database.

So now when we hit:

http://localhost:8080/api/users

we get:

[{“_id”:”55973f3702e8b0094967b544″,”name”:”rtsao”,”password”:”compaq”,”admin”:true,”__v”:0},{“_id”:”55977f4b06112d75860f9af6″,”name”:”rtsao6680″,”password”:”abcde12345″,”admin”:true,”__v”:0}]

Full Code

/config.js

/server.js

/models/user.js

custom collection name

pass the collectionName as the third argument

OR

var UserInfo = new Schema({
username : String,
password : String
}, { collection: ‘userinfo’ });

Using mongoose

1-n, 1-1

https://stackoverflow.com/questions/32038793/one-to-one-relationship-with-mongoose

First of all, there is a huge difference between relationships in MongoDB and those in SQL based datastores (you need to be clear about this from the get-go).

Relationships in MongoDB are just representations of related data. There is no mechanism which maintains the integrity of these relationships.

What mongoose does with refs is just use the field having the ref option to query the _id field of documents in the referenced collection. This is used for operations like populate (which internally calls findById queries on the target collection and replaces the referenced field with the documents).

This being cleared, you can store one or many IDs for the referenced collection in the field, thus creating one-to-one or one-to-many “relationships”.

Add the event

Open up postman. select POST. In the the url, type in http://localhost/events

In Node express code, we have stated that for post verbs at url /events, we want it to hit create_event function. And create_event function is where we implement getting the data from the body object, and saving it into the database.

body:
postman-add-event

Then check the database to verify.

Look at the object id 5a2f3f9b8f4a4a4367dbf59e. We use this as the event id that we will be adding attendees to.

Add attendee(s) to the event (1 to n)

In order to register the attendee, we use postman.
given the route code:

we do the following.

web verb: POST
url: http://localhost/events/5a2f3f9b8f4a4a4367dbf59e

Notice that the last param is a phoneId. We just give a phone number like so:

url: http://localhost/events/5a2f3f9b8f4a4a4367dbf59e/13510083852

When the user put this in the browser, it will hit the registerAttendee function in node express. The registerAttendee function will look for name and phone in its request object’s body:

Hence, as we can see, it gets the properties phone and name from the body, create an object out of it, and pushes it onto the attendees’ array property.

So in your post man, click on body, highlight x-www-form-urlencoded, and enter key/values:

name: Hannah Hong
phone: 135103483252

Essentially, we are entering the properties that are needed by the eventAttendee schema:

Once you press Send on postman, the attendee should be in. Check the database:

> db.funEvents.find()

result:

{ “_id” : ObjectId(“5a2f3f9b8f4a4a4367dbf59e”),
“Event_Title” : “Super Badminton”,
“Event_Description” : “Play some badminton with fellow friends”,
“Author” : “Ricky T”,
“attendees” : [ { “phone” : “135103483252”, “name” : “Hannah Hong”, “registered” : false, “_id” : ObjectId(“5a2f405a8f4a4a4367dbf59f”) } ],
“Created_Date” : ISODate(“2017-12-12T02:31:55.180Z”),
“Event_Location” : null,
“Event_Date” : ISODate(“2017-12-12T02:31:55.180Z”), “__v” : 1 }

You will see that the attendees array now has the user Hannah Hong.

You can add as many users as you like as this is 1 to n. One event, many users.

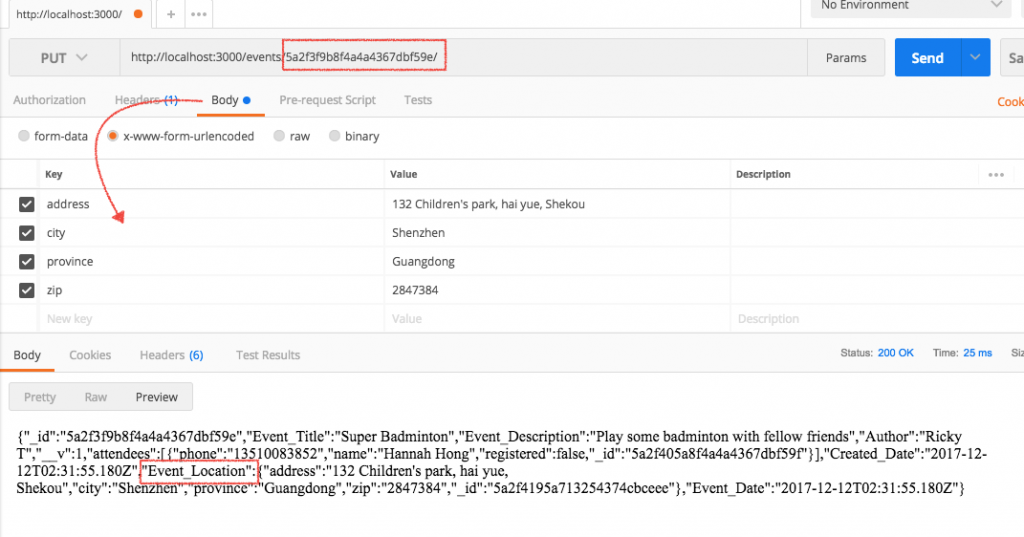
Adding the location (1 to 1)

Adding the location to our event involves hitting the url at /events/:eventId
with a PUT verb:

eventListRoutes.js

We put the event id at the end of the url like so: http://localhost/events/5a2f3f9b8f4a4a4367dbf59e

web verb: PUT
url: http://localhost/events/5a2f3f9b8f4a4a4367dbf59e

postman-add-location

We add the information for the location via the body through

body => x-www-form-urlencoded:

address:132 Children’s park, hai yue, Shekou
city:Shenzhen
province: Guangdong
zip: 2847384

hit the “Send” button.

Finally, check your database:

> db.funEvents.find()

result:

{ “_id” : ObjectId(“5a2f3f9b8f4a4a4367dbf59e”),
“Event_Title” : “Super Badminton”,
“Event_Description” : “Play some badminton with fellow friends”,
“Author” : “Ricky T”,
“attendees” : [ { “phone” : “13510083852”, “name” : “Hannah Hong”, “registered” : false, “_id” : ObjectId(“5a2f405a8f4a4a4367dbf59f”) } ],
“Created_Date” : ISODate(“2017-12-12T02:31:55.180Z”),
“Event_Location” : { “_id” : ObjectId(“5a2f4195a713254374cbceee”), “zip” : “2847384”, “province” : “Guangdong”, “city” : “Shenzhen”, “address” : “132 Children’s park, hai yue, Shekou” },
“Event_Date” : ISODate(“2017-12-12T02:31:55.180Z”), “__v” : 1 }

Further References

Installing Mongoose


npm install mongoose –-save

Everything in Mongoose starts with a Schema. Each schema maps to a MongoDB collection and defines the shape of the documents within that collection.

/model/person.js

/app.js

Find all People

Find one person

Removing Users

Using Gulp and Nodemon


npm init

then insert project info


npm install express

touch app.js

Let’s install it where it save info into the project json file:


npm install gulp –save
npm install gulp -g
npm install gulp-nodemon

for using nodemon to restart the server whenever you make a change:

npm install -g nodemon

Installing nodemon basically means you can start your server like so:
“nodemon app.js”,
and whenever you save a change, it will restart your server for you.

Go to your root directory, then create a file called gulpfile.js with the code like below:

touch gulpfile.js

shortcut for starting your server

Whenever you run the project, usually people would do “node app.js”. But it can get annoying. So instead, we can shortcut it with start. So next time, all you gotta do to start the server is to type: npm start.

Remeber to use nodemon app.js as the command. Or else, you won’t get the capabilities of nodemon.

So now, you can simply go npm start, and your server will start.