Category Archives: Node JS
Azure: Create Node JS App and link it from GitHub to Azure Local Git
Assume you have a project on GitHub. We first use Azure, and create a LOCAL GIT. What this means is that we have a local git repository running on Azure. We then push our project from GitHub into the Azure local git.
make sure your code is simple.
|
1 2 3 4 5 6 7 |
var http = require('http'); var port = process.env.PORT || 1337; http.createServer(function(req, res) { res.writeHead(200, { 'Content-Type': 'text/plain' }); res.end('Hello World\n'); }).listen(port); |
Create Node JS Website, push it to GitHub, and clone it onto your Mac
https://github.com/Azure/azure-content/blob/master/articles/app-service-web/web-sites-nodejs-develop-deploy-mac.md
Select Local GIT. This means that are going to push our project from GitHub, have a remote git here in Azure. Azure will provide us a git location via a GIT URL. We just put our files into that URL, and that’s it.
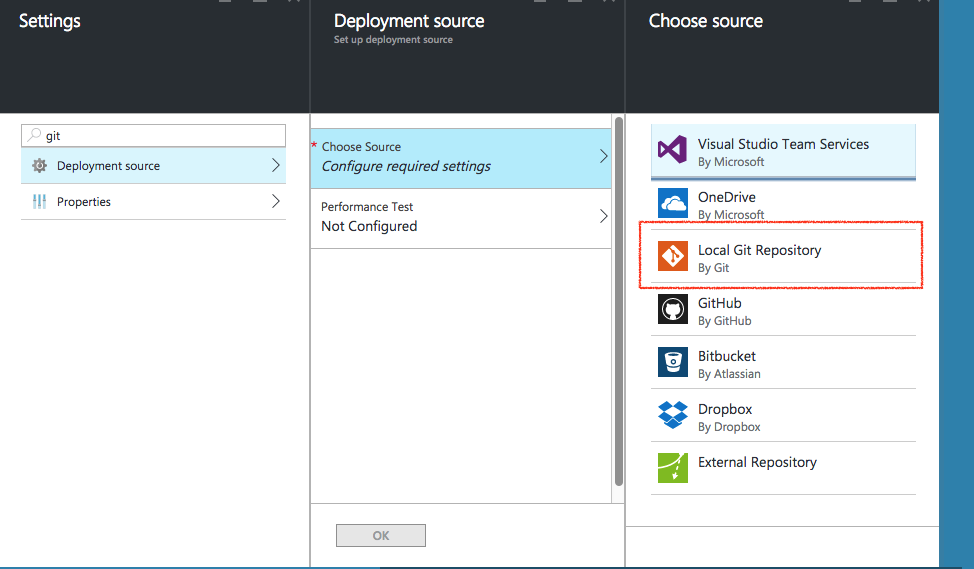
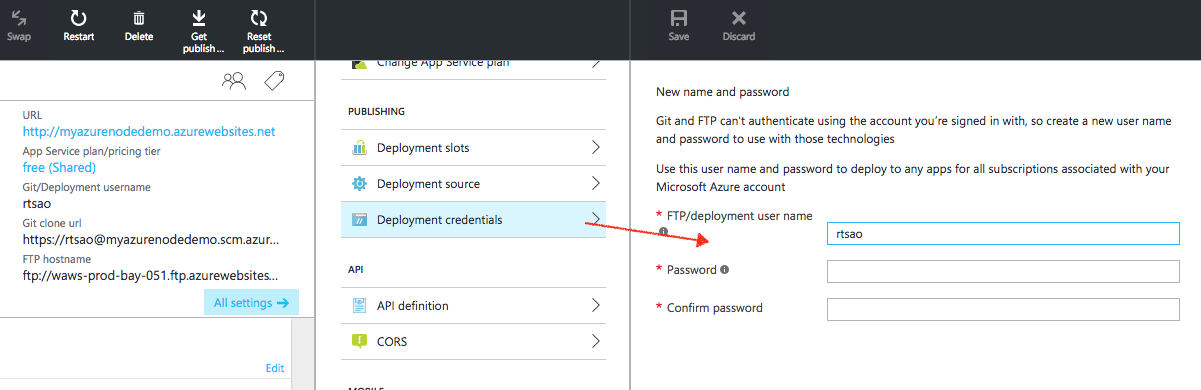
Make sure we create credentials for when we push our files from our local Mac, up into Azure’s local git.
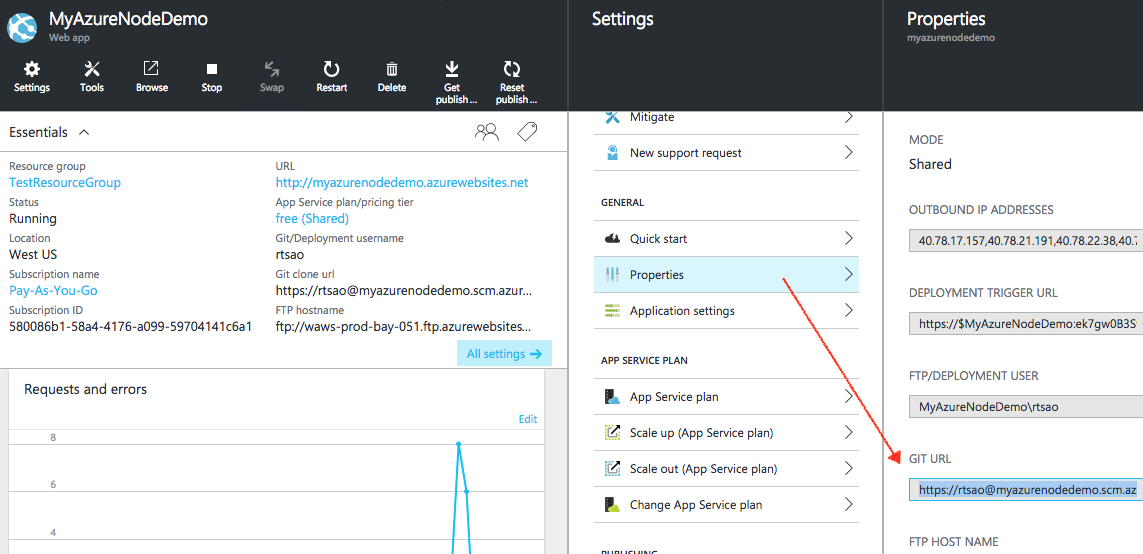
Get the GIT URL
In our Mac’s local repository, we create a remote git location called ‘azure’. This means that we are to push our files/changes to that GIT location.
Make sure you are in your Mac’s local project directory (the where the .git folder is):
rickytsao$ git remote remove azure
rickytsao$ git remote add azure https://rtsao@myazurenodedemo.scm.azurewebsites.net:443/MyAzureNodeDemo.git
rickytsao$ git push azure master
Password for ‘https://rtsao@myazurenodedemo.scm.azurewebsites.net:443’:
Counting objects: 83, done.
Delta compression using up to 4 threads.
Compressing objects: 100% (79/79), done.
Writing objects: 100% (83/83), 13.19 MiB | 1.06 MiB/s, done.
Total 83 (delta 7), reused 0 (delta 0)
remote: Updating branch ‘master’.
remote: Updating submodules.
remote: Preparing deployment for commit id ‘fda61c8b1c’.
remote: Generating deployment script.
..you’ll also see it copying the files, then telling you the deployment is successful
remote: Copying file: ‘controllers\users\PUT_bbt~email.js’
remote: Copying file: ‘controllers\users\PUT_sign~email.js’
remote: Copying file: ‘controllers\users\PUT_~email.js’
remote: Copying file: ‘models\user.js’
remote: Looking for app.js/server.js under site root.
remote: Using start-up script server.js
remote: Generated web.config.
remote: The package.json file does not specify node.js engine version constraints.
remote: The node.js application will run with the default node.js version 4.2.3.
remote: Selected npm version 3.5.1
remote: …….
remote: npm WARN book_api@0.0.0 No repository field.
remote: Finished successfully.
remote: Running post deployment command(s)…
remote: Deployment successful.
To https://rtsao@myazurenodedemo.scm.azurewebsites.net:443/MyAzureNodeDemo.git
* [new branch] master -> master
Creating SQL Database
https://azure.microsoft.com/en-us/documentation/articles/sql-database-get-started/
Node Code
|
1 2 3 4 5 6 7 8 9 10 11 12 13 14 15 16 17 18 19 20 21 22 23 24 25 26 27 28 29 30 31 32 33 34 35 36 37 38 39 40 41 42 43 44 45 46 47 48 49 50 51 52 53 54 55 56 57 58 59 60 61 62 63 64 65 66 67 68 69 70 71 72 73 74 75 76 77 78 79 80 81 82 83 84 85 86 87 88 89 90 91 92 93 94 95 96 97 98 99 100 101 102 103 104 105 106 107 108 109 110 111 |
// ======================= // get the packages we need ============ // ======================= var express = require('express'); var app = express(); var bodyParser = require('body-parser'); var morgan = require('morgan'); var mongoose = require('mongoose'); var config = require('./config'); // get our config file var port = 8080; // used to create, sign, and verify tokens app.set('superSecret', config.secret); // secret variable // use body parser so we can get info from POST and/or URL parameters app.use(bodyParser.urlencoded({ extended: false })); app.use(bodyParser.json()); app.use(require('./controllers')); // use morgan to log requests to the console app.use(morgan('dev')); app.listen(port); console.log('web services now exposed at http://localhost:' + port); var strVar = "Ricky"; var strVar1 = "6680"; var strVar2 = "Ricky"; var strVar3 = ""; var intVar = 6680; //jdbc:sqlserver://azurenodedemo.database.windows.net:1433;database=azurenodedemo;user=rtsao@azurenodedemo;password={your_password_here};encrypt=true;trustServerCertificate=false;hostNameInCertificate=*.database.windows.net;loginTimeout=30; var tedConfig = { userName: 'rtsao@azurenodedemo', password: 'Tsao6680', server: 'azurenodedemo.database.windows.net', // If you are on Microsoft Azure, you need this: options: {encrypt: true, database: 'azurenodedemo'} }; var Connection = require('tedious').Connection; //create new connection var connection = new Connection(tedConfig); connection.on('connect', function(err) { if (err) return console.error(err); console.log("Connected!!"); executeStatement(); }); var Request = require('tedious').Request; var TYPES = require('tedious').TYPES; function executeStatement() { var createStmt = "CREATE TABLE Persons ( PersonID int, LastName varchar(255), FirstName varchar(255), Address varchar(255), City varchar(255) );"; var getAllTableNames = "SELECT name FROM sys.tables"; var showColumnNames = "select name from syscolumns where id=object_id('Persons')"; request = new Request(showColumnNames, function(err) { if (err) { console.log(err);} }); var result = ""; //Node.js is evented, thus listening for events // listen for 'row' event request.on('row', function(columns) { columns.forEach(function(column) { //console.dir(column); if (column.value === null) { console.log('server.js - column value is NULL'); } else { result += column.value + ", "; } }); console.log(result); result ="\n\n"; }); // listen for 'done' event request.on('done', function(rowCount, more) { console.log("server.js - ALL DONE"); console.log(rowCount + ' rows returned'); }); console.log("server.js - EXECUTE SQL"); connection.execSql(request); } exports.app = app; |
Further samples on SQL manipulation:
https://msdn.microsoft.com/library/mt715784.aspx
run “Node server.js” in a terminal
If you run your node app, you’ll see that your connection may have a problem because:
|
1 2 3 |
{ [ConnectionError: Cannot open server 'azurenodedemo' requested by the login. Client with IP address '202.65.196.242' is not allowed to access the server. To enable access, use the Windows Azure Management Portal or run sp_set_firewall_rule on the master database to create a firewall rule for this IP address or address range. It may take up to five minutes for this change to take effect.] message: 'Cannot open server \'azurenodedemo\' requested by the login. Client with IP address \'202.65.196.242\' is not allowed to access the server. To enable access, use the Windows Azure Management Portal or run sp_set_firewall_rule on the master database to create a firewall rule for this IP address or address range. It may take up to five minutes for this change to take effect.', code: 'ELOGIN' } |
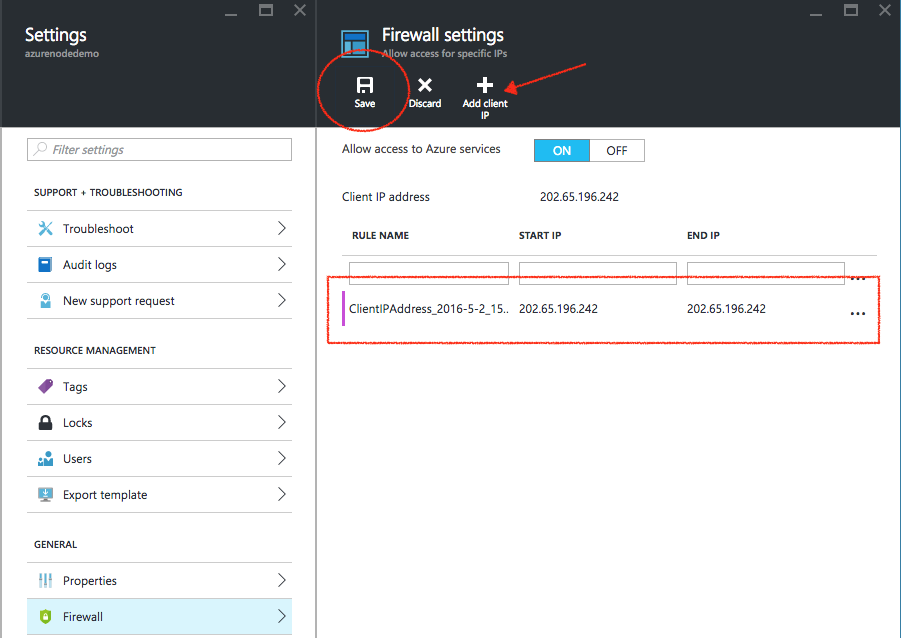
Basically, you have to go to your SQL server, and have the firewall allow access to your ip address like so:
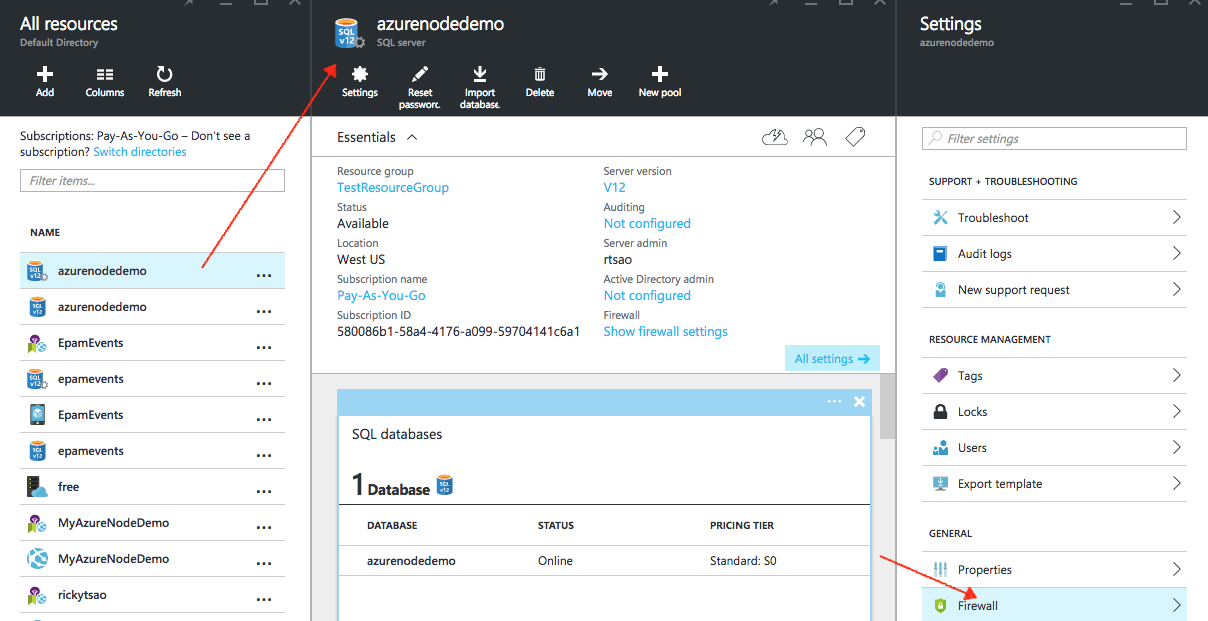
Protected: Node JS Connect to Azure SQL database
Using Postman to query Node endpoints
|
1 2 3 4 5 6 7 8 9 10 11 12 13 14 15 16 17 18 19 20 21 22 23 24 25 26 27 28 29 30 31 32 33 34 35 36 37 38 39 40 41 42 43 44 45 46 47 48 49 50 51 52 53 54 55 56 |
// Load required packages var express = require('express'); var mongoose = require('mongoose'); var bodyParser = require('body-parser'); // Connect to the beerlocker MongoDB mongoose.connect('mongodb://localhost/beerlocker'); var db = mongoose.connection; db.on('error', console.error.bind(console, 'connection error:')); db.once('open', function (callback) { console.log('mongoose db connected'); }); // Create our Express application var app = express(); app.use(bodyParser.urlencoded({ extended: false })); app.use(bodyParser.json()); // Use environment defined port or 3000 var port = process.env.PORT || 3000; // Create our Express router var router = express.Router(); // http://localhost:3000/api GET router.get('/', function(req, res) { console.log("GET /api/ "); //console.dir(req.body); //console.dir(req.params); console.dir(req.query); // when using GET and key/value is attached to the url res.json({ message: 'You are running dangerously low on beer!' }); }); // http://localhost:3000/api POST router.post('/', function(req, res) { console.log("POST /api/ "); console.dir(req.body); //make sure you use x-www-form-urlencoded //console.dir(req.params); //console.dir(req.query); res.json({ message: 'You are running dangerously low on beer!' }); }); // Register all our routes with /api app.use('/api', router); // Start the server app.listen(port); console.log('Insert beer on port ' + port); |
start up your server
> node server.js
Then the output from the terminal would be like this:
Insert beer on port 3000
mongoose db connected
Use postman to send data
Make sure you select POST as your request verb.
type in the test url:
http://localhost:3000/api/
Select Body, because we are using POST data from a web form.
The body data comes from a x-www-form-urlencoded
For application/x-www-form-urlencoded, the body of the HTTP message sent to the server is essentially one giant query string — name/value pairs are separated by the ampersand (&), and names are separated from values by the equals symbol (=). An example of this would be:
MyVariableOne=ValueOne&MyVariableTwo=ValueTwo
This query string is stored in the BODY of the message packet.
So in POSTMAN, just put test as the key, and please work as the value.
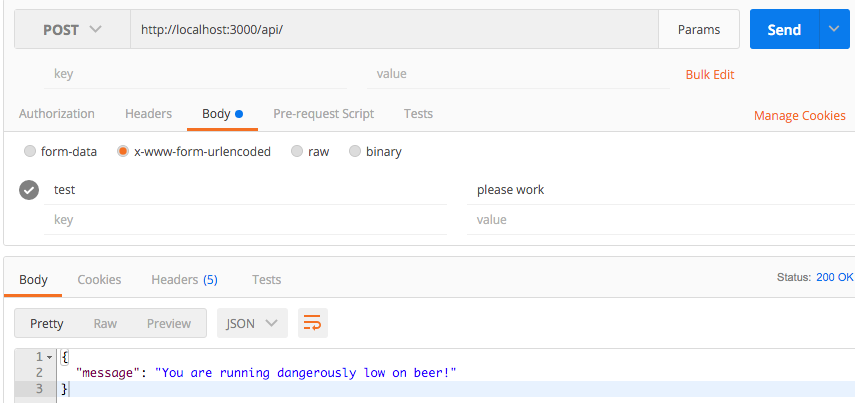
When you press “Send” in POSTMAN, you should see the output from your node terminal like so:
POST /api/
{ test: ‘please work’ }
{}
{}
As you can see, the results appear in req.body
Sending file from html to node server (multer)
ref – https://dzone.com/articles/upload-files-or-images-to-server-using-nodejs
client side
Server side – index.js
Make sure you create the folder Images at the the directory your index.js is at.
|
1 2 3 4 5 6 7 8 9 10 11 12 13 14 15 16 17 18 19 20 21 22 23 24 25 26 27 28 29 30 31 32 33 34 35 36 37 38 39 40 41 42 43 44 45 46 47 48 49 50 51 52 53 54 55 |
var express = require('express') var app = express() var port = process.env.PORT || 8080 var multer = require('multer'); var bodyParser = require('body-parser'); app.use(function(req, res, next) { res.header("Access-Control-Allow-Origin", "*"); res.header("Access-Control-Allow-Headers", "Origin, X-Requested-With, Content-Type, Accept"); res.header('Access-Control-Allow-Methods', 'PUT, POST, GET, DELETE, OPTIONS'); next(); }); // bodyParser app.use(bodyParser.urlencoded({ extended: true })); app.use(bodyParser.json()); // image storage var Storage = multer.diskStorage({ destination: function(req, file, callback) { callback(null, "./Images"); }, filename: function(req, file, callback) { console.log("---The file name is---"); console.log(file.fieldname); console.log("---The original name is---"); console.log(file.originalname); callback(null, file.fieldname + "_" + Date.now() + "_" + file.originalname); } }); // multier takes the requst object var upload = multer({ storage: Storage }).array("imgUploader", 1); //Field name and max count console.log("index.js - file upload ready at http://localhost:8080/api/Upload for POST requests"); app.post("/api/Upload", function(req, res) { console.log("POST request on api/Upload, you are trying to upload an image"); upload(req, res, function(err) { if (err) { console.log("----error uploading file----"); console.log(err); return res.end("Something went wrong!"); } return res.end("File uploaded sucessfully!."); }); }); app.listen(port); console.log(' pictorial list RESTful API server on: ' + port); |
However, our solution always jumps to another page.
In order to do it without any jump, we do it without a form
non-form way
First, we create a file uploader, and button control
|
1 2 |
<input type="file" name="imgUploader" id="imgUploader" /> <button name="submit" id="btnSubmit" onclick="uploadImage()">upload image</button> |
For the button, whenever we press it, we will run function uploadImage
In this function, we first get the file object via the files property. The files property is an array, and we simply get the first element.
Once we have this file, we create a FormData object, append our file to it. Make sure to call it “imgUploader” as that’s what our multer code from the server side is expecting.
Assign the form data object to body and that’s it.
|
1 2 3 4 5 6 7 8 9 10 11 |
function uploadImage() { var image = document.getElementById("imgUploader").files[0]; console.dir(image); var formData = new FormData(); formData.append('imgUploader', image); fetch('http://localhost:8080/api/Upload', { method:'POST', body: formData }); } |
execute unix command using node js
https://dzone.com/articles/execute-unix-command-nodejs
NPM notes
A node project has its source files, and its modules. The modules take up a lot of space, hence, we have package.json to let the project know which modules is required by the source code. Hence, when you are sending the project around, you can remove the modules and just send the source code.
When the receiver gets the project, all they see is the package.json and the source. A package.json file in your node directory is to let you know which packages to install when you want to run it on a server.
npm install
then it’ll start downloading and installing the modules:
Rickys-MacBook-Pro:MM-CRM rickytsao$ npm install
npm WARN package.json node-api@ No description
npm WARN package.json node-api@ No repository field.
npm WARN package.json node-api@ No README data
npm WARN package.json node-api@ No license field.
npm WARN deprecated jsonwebtoken@1.3.0: Critical vulnerability fix in v5.0.0. See https://auth0.com/blog/2015/03/31/critical-vulnerabilities-in-json-web-token-libraries/
npm WARN deprecated jws@0.2.6: Security update: Versions below 3.0.0 are deprecated.
/
> bson@0.2.22 install /Users/rickytsao/Documents/Angular/MM-CRM/node_modules/mongoose/node_modules/mongodb/node_modules/bson
> (node-gyp rebuild 2> builderror.log) || (exit 0)
CXX(target) Release/obj.target/bson/ext/bson.o
SOLINK_MODULE(target) Release/bson.node
SOLINK_MODULE(target) Release/bson.node: Finished
> kerberos@0.0.11 install /Users/rickytsao/Documents/Angular/MM-CRM/node_modules/mongoose/node_modules/mongodb/node_modules/kerberos
> (node-gyp rebuild 2> builderror.log) || (exit 0)
CXX(target) Release/obj.target/kerberos/lib/kerberos.o
CXX(target) Release/obj.target/kerberos/lib/worker.o
….
morgan@1.5.3 node_modules/morgan
├── basic-auth@1.0.3
……
└── on-finished@2.2.1 (ee-first@1.1.0)
jsonwebtoken@1.3.0 node_modules/jsonwebtoken
└── jws@0.2.6 (jwa@0.0.1, base64url@0.0.6)
body-parser@1.9.3 node_modules/body-parser
├── bytes@1.0.0
…….
└── type-is@1.5.7 (mime-types@2.0.14)
express@4.10.8 node_modules/express
├── merge-descriptors@0.0.2
…….
└── accepts@1.1.4 (negotiator@0.4.9, mime-types@2.0.14)
mongoose@3.8.34 node_modules/mongoose
├── regexp-clone@0.0.1
……
└── mongodb@1.4.38 (readable-stream@2.0.2, bson@0.2.22, kerberos@0.0.11)
This will create the node_modules directory (if one doesn’t exist yet), and will download the modules to that directory. Then the project will work.
Node: Passing client side data to server side (Async)
req.query is the query string sent to the server, example:
req.query will return a JS object after the query string is parsed.
for example:
/user?name=tom&age=55 – req.query would yield {name:”tom”, age: “55”}
req.param is the parameters passed to the handler.
app.get(‘/user/:id’, handler);, going to /user/blah,
req.param.id would return blah;
In the example, we have a contact form where there are textfields and a button.
The button id is #send_email, which we bind a click event to it.
Once that button is clicked, we come to the ‘click’ event handler for #send_email and then get all the value from the textfields by using val().
Once that’s done, we want to give the contact data to the server and GET us a response saying the data has been sent to an email box. Hence we use jQuery’s GET function where:
1) we give it the URL we want to access
2) the object with the data
3) completion function definition
We check to see if the result says ‘sent’. If it does, we know that the server have successfully sent it. If not, we know something went wrong and it has not been sent.
.html file
|
1 2 3 4 5 6 7 8 9 10 11 12 13 14 15 16 17 18 19 20 21 22 23 24 25 26 27 28 29 30 31 32 33 34 35 36 |
$(document).ready(function(){ var from,to,subject,text; $("#send_email").click(function(){ console.log('send mail clicked'); from = $("#from").val(); subject = $("#subject").val(); text = $("#content").val(); $("#message").text("Sending E-mail...Please wait"); $.get("http://localhost:3000/send", //URL {from:from,subject:subject,text:text}, //object with data function(data) { //completion function definition console.log('response data: ' + data); if(data=="sent") { $("#message") .empty() .html("Message received. We'll get right back to you within 24 hrs"); } else { $("#message") .empty() .html("oops, something went wrong: " + text); } }); //get }); //click event }); </script> |
Once the $.get method fires in the .html file, we come to the ‘GET’ handler in our server code.
From there you access the object data that’s been sent by the client’s jQuery $.get method by using req.query.—-, where —- is the key.
server.js
|
1 2 3 4 5 6 7 |
app.get('/send',function(req,res){ console.log('from: ' + req.query.from); console.log('subject: ' + req.query.subject); console.log('text: ' + req.query.text); ......... ......... |
….
….
somewhere after you do your processing, you need to send back a confirmation. We do this using res.end() and whatever object you use will be checked by your client’s jQuery’s $.get completion function definition(3), as listed above.
|
1 2 3 4 5 6 7 |
if(error){ console.log(error); res.end("error"); } else { console.log("Sending str sent back to .get function on client"); res.end("sent"); } |
Note req.end:
With http.request() one must always call req.end() to signify that you’re done with the request – even if there is no data being written to the request body.
Using HTML template in Node JS
If you want to use the standard HTML templates in your Node JS app without Jade, you use path to get the location of where you are located.
Then use __dirname to get your root directory name, the one where your project resides. Then we simply append our folder locations.
Also be sure to use express.static to append folder so that you can access them. They are public.
|
1 2 3 4 5 6 7 8 9 10 11 12 13 14 15 16 17 18 19 20 21 22 23 24 25 26 27 28 29 30 31 32 33 |
var express = require("express"); var app = express(); var path = require("path"); app.use(express.static(__dirname + '/View')); //Store all HTML files in view folder. app.use(express.static(__dirname + '/Script')); //Store all JS and CSS in Scripts folder. app.get('/index',function(req,res){ console.log('path is: ' + path); console.log(path.join(__dirname + '/View/index.html')); res.sendFile(path.join(__dirname + '/View/index.html')); }); app.get('/contact',function(req,res){ console.log('path is: ' + path); console.log(path.join(__dirname + '/View/contact.html')); res.sendFile(path.join(__dirname + '/View/contact.html')); }); app.listen(3000); console.log("Running at Port 3000"); |
Update model in mongodb using NodeJS/express
Server side
First we use findOne to find the user.
Then we update the user with an assignment to a new value with an assignment.
We want to to let the database know of this update to the variable user,
so we use the save function.
|
1 2 3 4 5 6 7 8 9 10 11 12 13 14 15 16 17 18 19 20 21 22 23 24 25 26 27 28 29 30 31 32 33 34 35 36 37 38 39 40 41 42 43 44 |
//data to change is stored in x-www-form-urlencoded POST key/value // route to authenticate a user (POST http://localhost:8080/api/:user_email) apiRoutes.put('/:user_email', function(req, res) { console.log('req.params.user_email: ' + req.params.user_email); console.log('req.body.modelKey: ' + req.body.modelKey); console.log('req.body.modelValue: ' + req.body.modelValue); //change the model's value by its key User.findOne({ email: req.params.user_email }, function(err, user) { if (err) throw err; if (!user) { res.json({ success: false, message: 'User not found.' }); } else if (user) { //found valid user, let's change the value console.log('user.name: ' + user.name); console.log('user.email: ' + user.email); console.log('user.password: ' + user.password); console.log('user.admin: ' + user.admin); console.log('user[req.body.modelKey]: ' + user[req.body.modelKey]); user[req.body.modelKey] = req.body.modelValue; user.save(function(err){ if(err) res.send(err); else res.json({message:'updated key' + req.body.modelKey + ' with value ' + req.body.modelValue}); }); } // if/else }); // findOne }); //put |
Client side
PUT http://localhost:8080/api/rtsao@uci.edu
Headers
x-access-token eyJ0eXAiOiJKV1QiLCJhbGciOiJIUzI1NiJ9
x-access-email rtsao@uci.edu
Body
x-www-form-urlencoded
modelKey name
modelValue Ricardo