Category Archives: Node JS
Protected: Apply Theme in React (part 2) – Translating HTML to React Components
install nvm and upgrade to latest node version
https://www.codementor.io/mercurial/how-to-install-node-js-on-macos-sierra-mphz41ekk
Chat Room using Node
ref – https://socket.io/get-started/chat
setup
Assuming you have node, npm, nodemon/gulp installed.
First, make a directory called DesktopApp. Then start the process of creating a node project.
npm init
Enter your information for the package.json file.
Install Express:
npm install –save express@4.15.2
Server can push messages to clients. Whenever you write a chat message, the idea is that the server will get it and push it to all other connected clients.
implementing the feedTheKraken
Get the project running
Download the source code onto your computer
download v1.0
cd into the directory, and install all packages
npm install
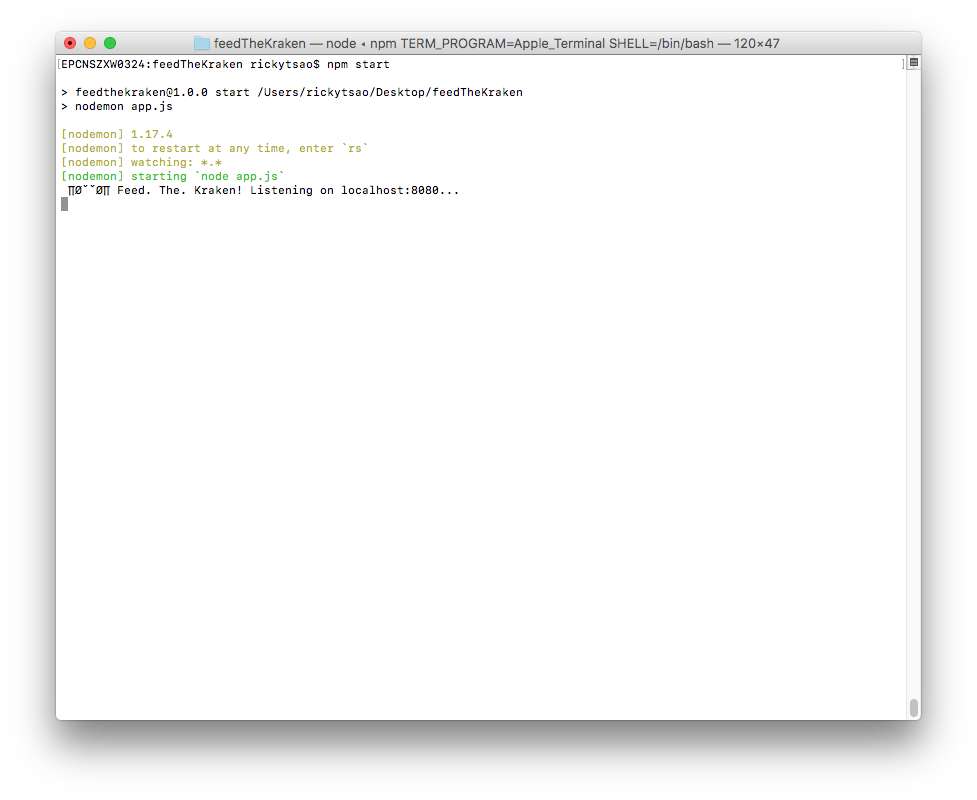
Then start the server:
npm start
You should see the server starting up.
In the directory, there is an index.html file. Double click it.
You’ll see the web page.
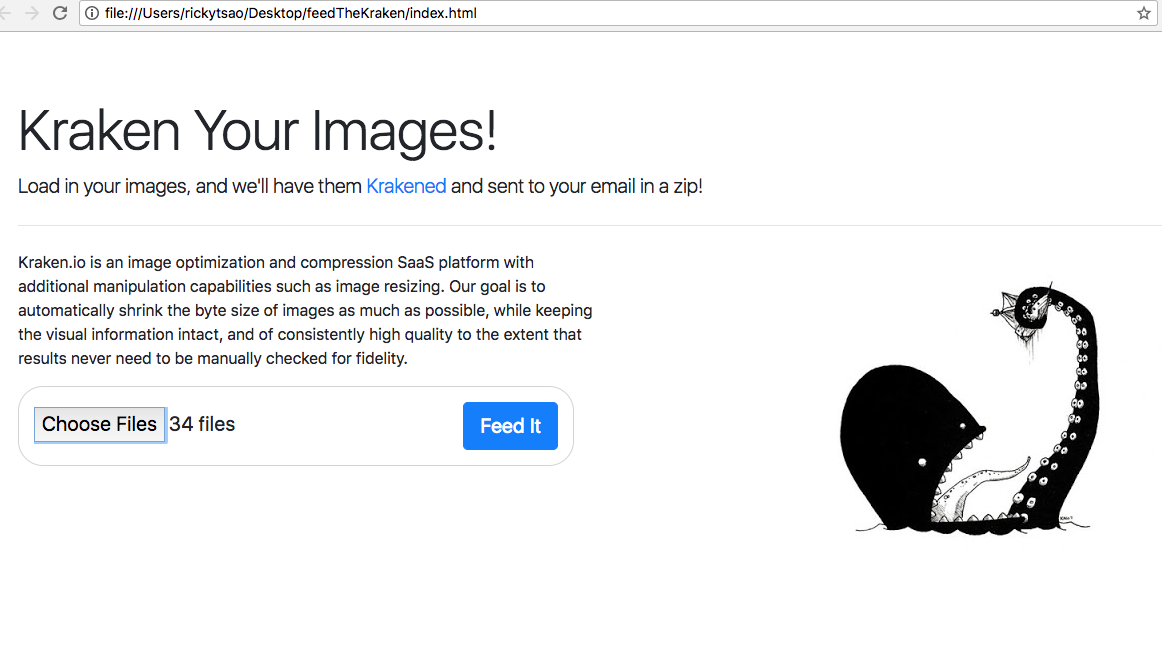
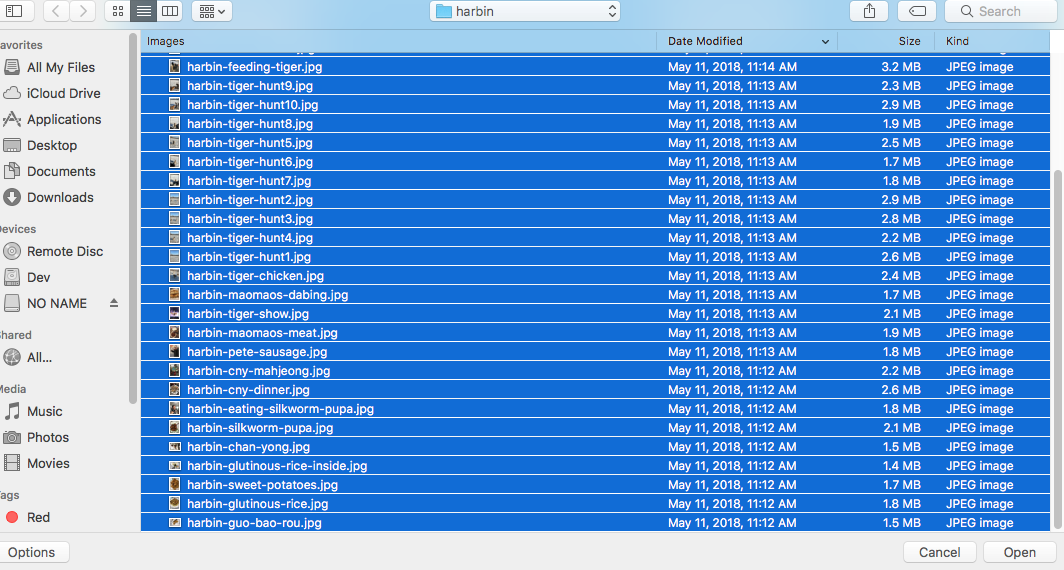
Go ahead and starting using it. Click on the browse button and select images you want to kraken.
Then click the “Feed it” button. This sends all your images to the server.
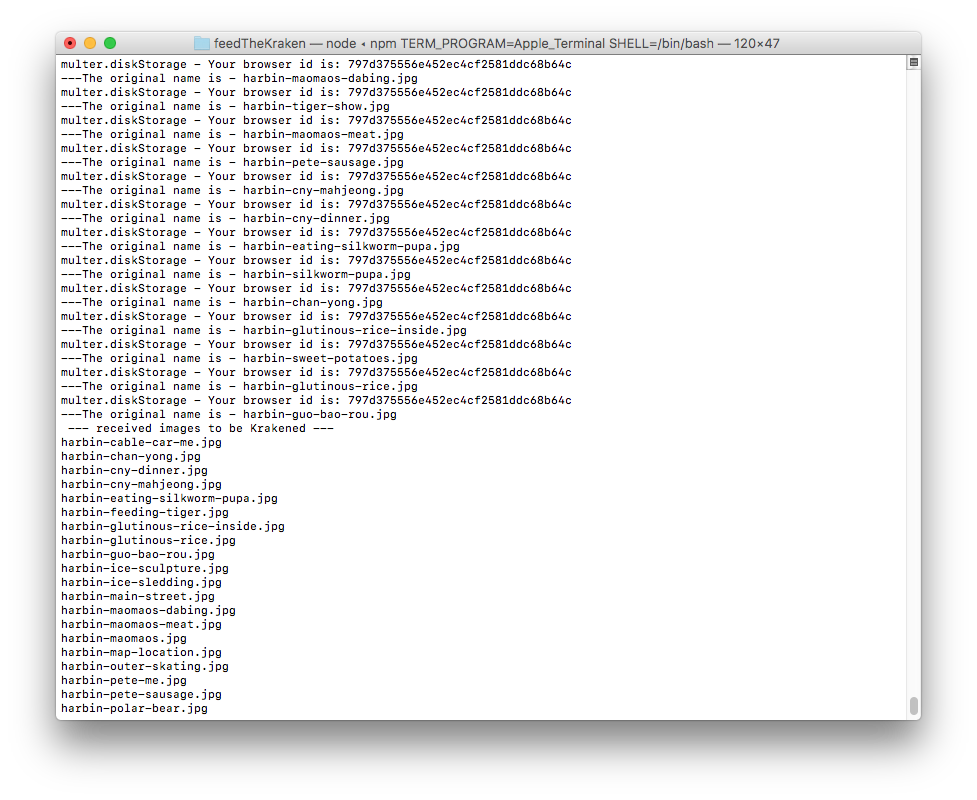
The server will then download these images into an ‘unprocessed’ folder that is unique to your browser.
Once the images are in that folder, it sends the images to Kraken.io to be processed. You will see the images being processed in your terminal.
Once processed, Kraken.io will return urls that contains the finished image. The server takes those url and downloads these finished image into a ‘processed’ folder.
Then it zips the processed folder and will log out the finishing steps.
Starting the project from scratch
set up a basic project with gulp:
ref – http://chineseruleof8.com/code/index.php/2015/06/30/starting-gulp/
You should now have a functioning server going with nodemon as work flow.
install body parser
npm install express body-parser –save
edit your app.js
We implement the server to be a bit more detailed, and standard.
|
1 2 3 4 5 6 7 8 9 10 11 12 13 14 15 16 17 18 19 20 21 22 23 24 25 26 27 28 29 30 31 |
'use strict'; const express = require('express'); const bodyParser = require('body-parser'); const PORT = 8080; const HOST = 'localhost'; const app = express(); app.use(function(req, res, next) { res.header("Access-Control-Allow-Origin", "*"); res.header("Access-Control-Allow-Headers", "Origin, X-Requested-With, Content-Type, Accept"); res.header('Access-Control-Allow-Methods', 'PUT, POST, GET, DELETE, OPTIONS'); next(); }); app.use(bodyParser.urlencoded({ extended: false })); app.use(bodyParser.json()); // post example app.post("/upload", function(req, res) { console.log("reached /upload..."); res.end("We will send you a zip with your Krakened images soon..."); }); app.listen(PORT, HOST); console.log(' ∏ØˇˇØ∏ Feed. The. Kraken! Listening on %s:%d...', HOST || '*', PORT); module.exports = app; |
Creating the index.html
in your project directory, touch index.html
First, we have an file input control that takes in multiple files.
Second, we have a button right underneath it. This button will execute a js function. The JS function will proceed to pass the file information onto a url that hits our server.
First, let’s see the skeleton. Notice we have included boostrap css. This is so that we have some ready
made CSS to use.
|
1 2 3 4 5 6 7 8 9 10 11 12 13 14 15 16 17 18 19 20 21 22 23 24 25 26 27 28 29 30 31 32 33 34 35 36 37 38 39 40 41 42 |
<!DOCTYPE html> <html lang="en"> <head> <meta charset="utf-8"> <meta name="viewport" content="width=device-width, initial-scale=1.0" /> <title>Kraken your images! Feed it</title> <link rel="stylesheet" type="text/css" href="style.css"> <link rel="stylesheet" href="https://maxcdn.bootstrapcdn.com/bootstrap/4.0.0/css/bootstrap.min.css" integrity="sha384-Gn5384xqQ1aoWXA+058RXPxPg6fy4IWvTNh0E263XmFcJlSAwiGgFAW/dAiS6JXm" crossorigin="anonymous"> <script> function uploadImage() { } </script> </head> <body> <div id="page" class="jumbotron"> <h1 class="display-4">Kraken Your Images (limit 80)</h1> <p class="lead">Load in your images, and we'll have them <a href="https://kraken.io/">Krakened</a> and sent to your email in a zip!</p> <hr class="my-4"> <p id="intro">Kraken.io is an image optimization and compression SaaS platform with additional manipulation capabilities such as image resizing. Our goal is to automatically shrink the byte size of images as much as possible, while keeping the visual information intact, and of consistently high quality to the extent that results never need to be manually checked for fidelity. </p> <img id="kraken" src="images/kraken.jpg" ondrop="drop(event)" ondragover="allowDrop(event)" /> <div> <p id="uploaderSection" class="lead"> <input type="file" name="imgUploader" id="imgUploader" multiple=""/> <button class="btn btn-primary btn-lg" name="submit" id="btnSubmit" onclick="uploadImage()">Feed It</button> </p> </div> </div> </body> </html> |
Fingerprint2
Make sure you include this in your script area
|
1 |
<script src="https://cdnjs.cloudflare.com/ajax/libs/fingerprintjs2/1.8.0/fingerprint2.min.js"></script> |
Multiple browsers will be hitting our servers. Hence, all the unprocessed and processed images are to be kept in a folder for that browser only. There will be many folders that match up to each browser via a unique string id. As the browsers make their requests, images will be kept in those folders. That is how we know which image belong to which browsers. Fingerprint2 basically distinguishes browsers by returning a unique id for that browser.
|
1 2 3 |
new Fingerprint2().get(function(result, components) { // where result is the browser id }); |
Using axios to send files to node server
Make sure you include this in your script area
|
1 |
<script src="https://unpkg.com/axios/dist/axios.min.js"></script> |
Keep in mind that in order to distinguish ourselves from the other browsers, we throw in the browser id in the url parameter. That way, when we save our images into a folder on the server, the server will keep track of it via our browser id.
1) first, we get the array of images received from the “file” control.
2) Then we create a FormData class that collects.
3) We include the browser id in the url parameter, and pass in the FormData in the parameter
4) We receive response from server
|
1 2 3 4 5 6 7 8 9 10 11 12 13 14 15 16 17 18 19 20 21 22 23 24 25 26 27 28 29 30 31 32 33 34 35 36 37 38 39 40 41 42 43 |
function uploadImage() { new Fingerprint2().get(function(result, components) { console.log("uploading images...."); // 1) var images = document.getElementById("imgUploader").files; var arrayOfImages = Array.from(images); // 2) let data = new FormData(); for (let i = 0; i < arrayOfImages.length;i++) { console.log(`appending image ${arrayOfImages[i].name} to FormData`); data.append('file', images[i], images[i].fileName); } console.log("viewing FormData"); for (var pair of data.entries()) {console.log(pair)} // 3) axios.post("http://localhost:8080/upload?browserIdentity="+result, data, { headers: { 'accept': 'application/json', 'Accept-Language': 'en-US,en;q=0.8', 'Content-Type': `multipart/form-data; boundary=${data._boundary}` } }) .then((response) => { // 4 console.log(`received response from server....${response.data}`); let a = document.createElement('a'); var linkText = document.createTextNode("download"); a.href = response.data; document.getElementById("downloadLink").appendChild(a); }) .catch((error) => { }); }) // new fingerprint2 } // function |
Don’t forget to implement upload for POST requests on the server. The point is that we have different browsers uploading images. We keep track of each browser’s image by creating a “unprocessed-${browser id}” folder. It holds all uploaded images from that browser that is not current processed by Kraken.
|
1 2 3 4 5 6 7 8 |
app.post("/upload", function(req, res) { console.log("reached upload...") return res.status(200).send({ result: "good" }); }); |
You should then be able to see the response back to index.html with result: “good”.
Installing Multer
In your directory, install multer:
npm i multer
|
1 |
var multer = require('multer'); |
Create a function called processImagesFromClientPromise and implement it like so.
|
1 2 3 4 5 6 7 8 9 10 11 12 13 14 15 16 17 18 19 20 21 22 23 24 25 26 27 28 29 30 31 |
obj.processImagesFromClientPromise = function(req, res) { let p = new Promise((resolve, reject) => { var Storage = multer.diskStorage({ destination: function(req, file, callback) { console.log("multer.diskStorage - Your browser id is: "+req.query.browserIdentity); // we create a folder like so callback(null, `./${obj.unprocessedFolderName}`); }, filename: function(req, file, callback) { console.log(`---The original name is - ${file.originalname}`); callback(null, file.originalname); } }); var upload = multer({ storage: Storage }).array("file", 86); if (upload) { upload(req, res, function(err) { console.log("√ Finished receiving image(s) from client"); if (err) { console.log("----error uploading file----"); console.log(err); return res.end("Something went wrong!"); } console.log("processImagesFromClientPromise: resolving saving images using Multer..."); resolve(obj.unprocessedFolderName); }); } }); return p; } |
make sure you implement createFolderForBrowser because as the images come in, you’ll need a place to store them.
|
1 2 3 4 5 6 7 8 9 10 11 12 13 14 15 16 17 18 19 20 21 22 |
const UNPROCESSED_FOLDER_NAME = "unprocessed"; const PROCESSED_FOLDER_NAME = "processed"; ... ... function KrakenClass(browserIdentity) { // private function function createFolderForBrowser(folderAlphaString) { let folderWithBrowserIDName = `${folderAlphaString}-${browserId}`; if (!fs.existsSync(folderWithBrowserIDName)){ fs.mkdirSync(folderWithBrowserIDName); } return folderWithBrowserIDName; } // public properties obj.unprocessedFolderName = createFolderForBrowser(UNPROCESSED_FOLDER_NAME); obj.processedFolderName = createFolderForBrowser(PROCESSED_FOLDER_NAME); return obj; } |
Zipping a folder
After krakening all the images, we place it in the “processed” folder.
In the future, we may want to send all these images via email, or a link so the user can download it.
Its best if we can zip all these images together. We use the archiver to do this.
First, we install archiver:
npm install archiver –save
This is how we implement it. However, in the future, we want to place it inside of a Promise for refactoring.
|
1 2 3 4 5 6 7 8 9 10 11 12 13 14 15 16 |
obj.saveAsZip2 = function(fileName, fromDirectoryName, response) { console.log("-- saveAsZip2 --"); let fullFileName = `/${fileName}.zip` var output = fs.createWriteStream(__dirname + fullFileName); var archive = archiver('zip'); output.on('close', function() { var file = __dirname + `${fullFileName}`; resolve(`file to download from: ${file}`); }); archive.on('error', function(err) { throw err; }); archive.pipe(output); archive.directory(`${fromDirectoryName}/`, false); archive.finalize(); } |
Downloading the Krakened image from provided url
something like this:
https://dl.kraken.io/api/83/b0/37/75905b74440a18e6fe315cae5e/IMG_1261.jpg
We provide the link string via uri.
We give it a filename such as “toDownload”
Then we provide a callback for once it is done.
|
1 2 3 4 5 6 7 |
var downloadProcessedImages = function(uri, filename, callback){ request.head(uri, function(err, res, body){ console.log('content-type:', res.headers['content-type']); console.log('content-length:', res.headers['content-length']); request(uri).pipe(fs.createWriteStream(filename)).on('close', callback); }); }; |
used like so:
|
1 2 3 4 5 |
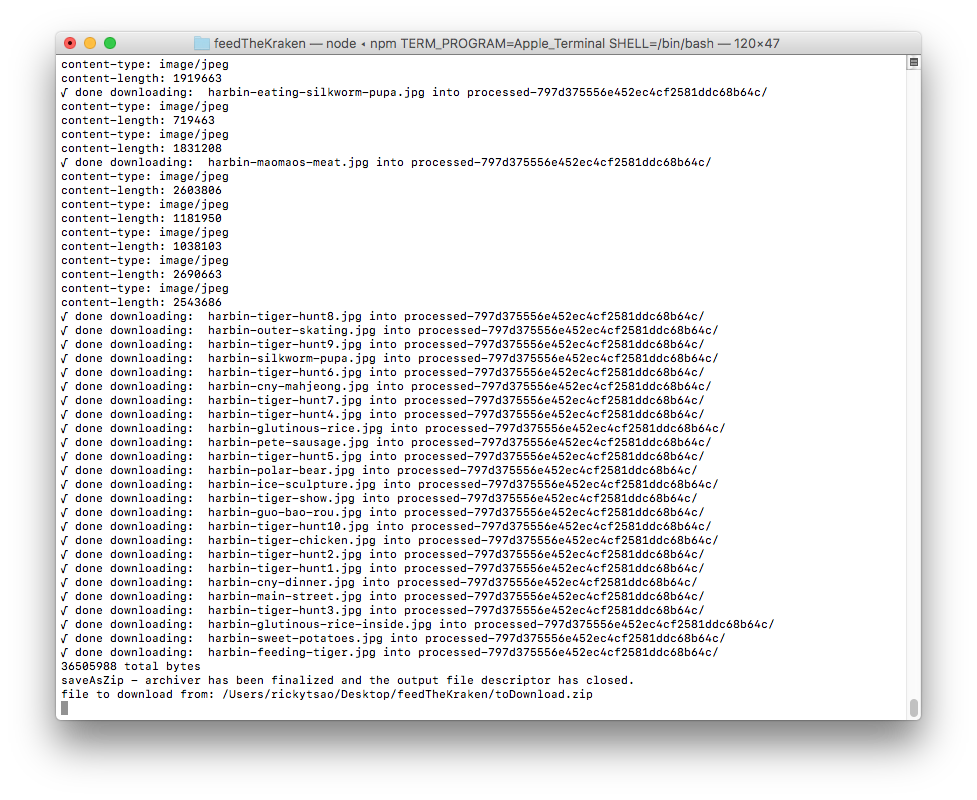
downloadProcessedImages(status.kraked_url, `${obj.processedFolderName}/${fileName}`, function(){ console.log(`√ done downloading: ${fileName} into ${obj.processedFolderName}/`); resolve(status.kraked_url); }); |
Function setup
|
1 2 3 4 5 6 7 8 9 10 11 12 13 14 15 16 17 18 19 20 21 22 23 24 25 26 27 28 29 30 31 32 33 34 35 36 37 38 39 40 41 42 43 44 45 46 47 48 49 50 51 52 53 54 55 56 57 58 59 60 61 62 63 64 65 66 67 68 69 70 71 72 73 74 75 76 77 78 79 80 81 82 83 84 85 86 87 88 89 90 91 92 93 94 95 96 97 98 99 100 101 102 103 104 105 106 107 108 109 110 111 112 113 114 115 116 117 118 119 120 121 122 123 124 125 126 127 128 129 130 131 132 133 134 135 136 137 138 139 140 141 142 143 144 145 146 147 148 149 150 151 152 153 154 155 156 157 158 159 160 161 162 163 164 165 166 167 168 169 170 171 172 173 174 175 176 177 178 179 180 181 182 183 |
'use strict'; var Kraken = require('kraken'); var kraken = new Kraken({ 'api_key': '...', 'api_secret': '...' }); var fs = require('fs'); const express = require('express'); const bodyParser = require('body-parser'); var multer = require('multer'); var archiver = require('archiver'); // for saving images into a zip var request = require('request'); // for downloading from urls const PORT = 8080; const HOST = 'localhost'; const app = express(); const UNPROCESSED_FOLDER_NAME = "unprocessed"; const PROCESSED_FOLDER_NAME = "processed"; app.use(function(req, res, next) { res.header("Access-Control-Allow-Origin", "*"); res.header("Access-Control-Allow-Headers", "Origin, X-Requested-With, Content-Type, Accept"); res.header('Access-Control-Allow-Methods', 'PUT, POST, GET, DELETE, OPTIONS'); next(); }); app.use(bodyParser.urlencoded({ extended: false })); app.use(bodyParser.json()); // using functional inheritance function KrakenClass(browserIdentity) { console.log("Kraken Construction: √ create stack object to be returned"); var obj = {}; // the object itself console.log(`√ Creating private vars...`); var browserId = browserIdentity; console.log("√ Creating private functions..."); function uploadToKrakenAndDownloadResult(urlString, browserId) { return new Promise((resolve, reject) => { kraken.upload(urlString, function (status) { if (status.success) { let fullURL = status.kraked_url let indexOfSlash = fullURL.lastIndexOf("/") let fileName = fullURL.substring(indexOfSlash+1, fullURL.length); downloadProcessedImages(status.kraked_url, `${obj.processedFolderName}/${fileName}`, function(){ console.log(`√ done downloading: ${fileName} into ${obj.processedFolderName}/`); resolve(status.kraked_url); }); } else { console.log('ø Failed! Error message: %s', status.message); reject(status.message); } }); // kraken upload }); // Promise } function createFolderForBrowser(folderAlphaString) { let folderWithBrowserIDName = `${folderAlphaString}-${browserId}`; if (!fs.existsSync(folderWithBrowserIDName)){ fs.mkdirSync(folderWithBrowserIDName); } return folderWithBrowserIDName; } function readyKrakenPromises(unprocessedDirectory, req, res) { let unprocessedImagesArr = []; // read file names from unprocessedDirectory const testFolder = `./${unprocessedDirectory}/`; fs.readdirSync(testFolder).forEach(file => { unprocessedImagesArr.push(file); }) let paramArray = []; for (let i = 0; i < unprocessedImagesArr.length; i++) { paramArray.push({ file: `${unprocessedDirectory}/${unprocessedImagesArr[i]}`, wait: true, lossy: true }); } // now let's get the unprocessed images and have it Krakened! const krakenPromises = []; for (let i = 0; i < paramArray.length; i++) { krakenPromises.push(uploadToKrakenAndDownloadResult(paramArray[i], browserId)); } runAllKrakenPromises(krakenPromises, req, res); } function saveAsZip(fileName, fromDirectoryName, response) { let fullFileName = `/${fileName}.zip` var output = fs.createWriteStream(__dirname + fullFileName); var archive = archiver('zip'); output.on('close', function() { console.log(archive.pointer() + ' total bytes'); console.log('saveAsZip - archiver has been finalized and the output file descriptor has closed.'); var file = __dirname + `${fullFileName}`; console.log(`file to download from: ${file}`); }); archive.on('error', function(err) { throw err; }); archive.pipe(output); archive.directory(`${fromDirectoryName}/`, false); archive.finalize(); } function runAllKrakenPromises(promises, req, res) { Promise.all(promises).then(function(output) { saveAsZip("toDownload", obj.processedFolderName, res); }); } var downloadProcessedImages = function(uri, filename, callback){ request.head(uri, function(err, res, body){ console.log('content-type:', res.headers['content-type']); console.log('content-length:', res.headers['content-length']); request(uri).pipe(fs.createWriteStream(filename)).on('close', callback); }); }; console.log("√ Creating public functions...") obj.processImagesFromClient = function(req, res) { // image storage var Storage = multer.diskStorage({ destination: function(req, file, callback) { console.log("multer.diskStorage - Your browser id is: "+req.query.browserIdentity); // we create a folder like so callback(null, `./${obj.unprocessedFolderName}`); }, filename: function(req, file, callback) { console.log(`---The original name is - ${file.originalname}`); callback(null, file.originalname); } }); // multier takes the requst object var upload = multer({ storage: Storage }).array("file", 86); if (upload){ upload(req, res, function(err) { console.log("√ Finished receiving image(s) from client"); if (err) { console.log("----error uploading file----"); console.log(err); return res.end("Something went wrong!"); } // resolve here readyKrakenPromises(obj.unprocessedFolderName, req, res); }); } } console.log("√ Creating public vars") obj.unprocessedFolderName = createFolderForBrowser(UNPROCESSED_FOLDER_NAME); obj.processedFolderName = createFolderForBrowser(PROCESSED_FOLDER_NAME); console.log(`constructed folders: ${obj.unprocessedFolderName}, ${obj.processedFolderName}`) return obj; // return it } app.post("/upload", function(req, res) { console.log("reached /upload..."); console.log("browserIdentity: " + req.query.browserIdentity); res.end("We will send you a zip with your Krakened images soon..."); var krakenInstance = KrakenClass(req.query.browserIdentity); krakenInstance.processImagesFromClient(req, res); }); app.listen(PORT, HOST); console.log(' ∏ØˇˇØ∏ Feed. The. Kraken! Listening on %s:%d...', HOST || '*', PORT); module.exports = app; |
However, the problem is that all of that deteriorates down to pyramid of Doom. Each task does something asynchronous, and we wait until it is done. When it’s complete, inside of the callback, we call the next task.
Hence our tasks list is something like this:
- processImagesFromClient
- readyKrakenPromises
- runAllKrakenPromises
- saveAsZip
Some of the functionalities are run inside of a callback. Some of them are run at the end of the functions, hence at the end, we get this complicated chain that no one wants to follow.
|
1 2 3 4 5 6 7 8 9 |
processImagesFromClient upload(req, res, function() { ... readyKrakenPromises(obj.unprocessedFolderName, req, res) { ... runAllKrakenPromises(krakenPromises, req, res) { ... saveAsZip } |
Hence, let’s use Promises to fix it.
Promises version
ref – http://chineseruleof8.com/code/index.php/2017/10/03/promise-js/
…with promises, it looks much prettier:
|
1 2 3 4 5 6 7 8 |
var krakenInstance = KrakenClass(req.query.browserIdentity); krakenInstance.processImagesFromClientPromise(req, res) .then(unprocessedFolderName => krakenInstance.readyKrakenPromises2(unprocessedFolderName, req, res)) .then(krakenPromises => krakenInstance.runAllKrakenPromises2(krakenPromises, req, res)) .then(processedFolderName => krakenInstance.saveAsZip2(`${req.query.browserIdentity}-download`, processedFolderName, res)) .then(function(result) { console.log(result); }); |
full source promises version
Basically we group code inside a new Promise. Then return that promise. Whatever variable we return, shall be passed inside of resolve. Resolve indicates that we move on to the next Promise.
Also, whatever parameter that gets passed into resolve, will appear in the .then parameter. You may then pass that parameter on to the next function.
|
1 2 3 4 5 6 7 8 9 10 11 12 13 14 15 16 17 18 19 20 21 22 23 24 25 26 27 28 29 30 31 32 33 34 35 36 37 38 39 40 41 42 43 44 45 46 47 48 49 50 51 52 53 54 55 56 57 58 59 60 61 62 63 64 65 66 67 68 69 70 71 72 73 74 75 76 77 78 79 80 81 82 83 84 85 86 87 88 89 90 91 92 93 94 95 96 97 98 99 100 101 102 103 104 105 106 107 108 109 110 111 112 113 114 115 116 117 118 119 120 121 122 123 124 125 126 127 128 129 130 131 132 133 134 135 136 137 138 139 140 141 142 143 144 145 146 147 148 149 150 151 152 153 154 155 156 157 158 159 160 161 162 163 164 165 166 167 168 169 170 171 172 173 174 175 176 177 178 179 180 181 182 183 184 |
// using functional inheritance function KrakenClass(browserIdentity) { console.log("Kraken Construction: √ create stack object to be returned"); var obj = {}; // the object itself console.log(`√ Creating private vars...`); var browserId = browserIdentity; console.log("√ Creating private functions..."); function readFileNamesFromDirectory(fileSystem, directoryName) { let directoryContentNames = []; const folder = `./${directoryName}/`; fileSystem.readdirSync(folder).forEach(file => { directoryContentNames.push(file); }) return directoryContentNames; } function createParamArrayForKrakenService(unprocessedArr, unprocessedDirectory) { let paramArray = []; for (let i = 0; i < unprocessedArr.length; i++) { paramArray.push({ file: `${unprocessedDirectory}/${unprocessedArr[i]}`, wait: true, lossy: true }); } return paramArray; } function assembleKrakenServicesIntoPromises(paramArray, browserId) { const krakenPromises = []; for (let i = 0; i < paramArray.length; i++) { krakenPromises.push(uploadToKrakenAndDownloadResult(paramArray[i], browserId)); } return krakenPromises; } function uploadToKrakenAndDownloadResult(urlString, browserId) { return new Promise((resolve, reject) => { kraken.upload(urlString, function (status) { if (status.success) { let fullURL = status.kraked_url let indexOfSlash = fullURL.lastIndexOf("/") let fileName = fullURL.substring(indexOfSlash+1, fullURL.length); downloadProcessedImages(status.kraked_url, `${obj.processedFolderName}/${fileName}`, function(){ console.log(`√ done downloading: ${fileName} into ${obj.processedFolderName}/`); resolve(status.kraked_url); }); } else { console.log('ø Failed! Error message: %s', status.message); reject(status.message); } }); // kraken upload }); // Promise } function createFolderForBrowser(folderAlphaString) { let folderWithBrowserIDName = `${folderAlphaString}-${browserId}`; if (!fs.existsSync(folderWithBrowserIDName)){ fs.mkdirSync(folderWithBrowserIDName); } return folderWithBrowserIDName; } var downloadProcessedImages = function(uri, filename, callback){ request.head(uri, function(err, res, body){ console.log('content-type:', res.headers['content-type']); console.log('content-length:', res.headers['content-length']); request(uri).pipe(fs.createWriteStream(filename)).on('close', callback); }); }; console.log("√ Creating public functions...") obj.saveAsZip2 = function(fileName, fromDirectoryName, response) { console.log("-- saveAsZip2 --"); let p = new Promise((resolve, reject) => { let fullFileName = `/${fileName}.zip` var output = fs.createWriteStream(__dirname + fullFileName); var archive = archiver('zip'); output.on('close', function() { var file = __dirname + `${fullFileName}`; resolve(`file to download from: ${file}`); }); archive.on('error', function(err) { throw err; }); archive.pipe(output); archive.directory(`${fromDirectoryName}/`, false); archive.finalize(); }); return p; } obj.runAllKrakenPromises2 = function(promises, req, res) { console.log("-- runAllKrakenPromises2 --"); let p = new Promise((resolve, reject)=> { Promise.all(promises).then(function(output) { console.log(output); console.log("runAllKrakenPromises2: resolving all kraken promises..."); console.log(obj.processedFolderName); resolve(obj.processedFolderName); }); }); return p; } obj.processImagesFromClientPromise = function(req, res) { let p = new Promise((resolve, reject) => { var Storage = multer.diskStorage({ destination: function(req, file, callback) { console.log("multer.diskStorage - Your browser id is: "+req.query.browserIdentity); // we create a folder like so callback(null, `./${obj.unprocessedFolderName}`); }, filename: function(req, file, callback) { console.log(`---The original name is - ${file.originalname}`); callback(null, file.originalname); } }); var upload = multer({ storage: Storage }).array("file", 86); if (upload) { upload(req, res, function(err) { console.log("√ Finished receiving image(s) from client"); if (err) { console.log("----error uploading file----"); console.log(err); return res.end("Something went wrong!"); } console.log("processImagesFromClientPromise: resolving saving images using Multer..."); resolve(obj.unprocessedFolderName); }); } }); return p; } obj.readyKrakenPromises2 = function(unprocessedDirectory, req, res) { let p = new Promise(function(resolve, reject) { let unprocessedImagesArr = readFileNamesFromDirectory(fs, unprocessedDirectory); let paramArray = createParamArrayForKrakenService(unprocessedImagesArr, unprocessedDirectory); let allKrakenPromises = assembleKrakenServicesIntoPromises(paramArray, browserId); resolve(allKrakenPromises); }) return p; } console.log("√ Creating public vars") obj.unprocessedFolderName = createFolderForBrowser(UNPROCESSED_FOLDER_NAME); obj.processedFolderName = createFolderForBrowser(PROCESSED_FOLDER_NAME); console.log(`constructed folders: ${obj.unprocessedFolderName}, ${obj.processedFolderName}`) return obj; // return it } app.post("/upload", function(req, res) { console.log("reached /upload..."); console.log("browserIdentity: " + req.query.browserIdentity); res.end("We will send you a zip with your Krakened images soon..."); var krakenInstance = KrakenClass(req.query.browserIdentity); krakenInstance.processImagesFromClientPromise(req, res) .then(unprocessedFolderName => krakenInstance.readyKrakenPromises2(unprocessedFolderName, req, res)) .then(krakenPromises => krakenInstance.runAllKrakenPromises2(krakenPromises, req, res)) .then(processedFolderName => krakenInstance.saveAsZip2(`${req.query.browserIdentity}-download`, processedFolderName, res)) .then(function(result) { console.log(result); }); }); app.listen(PORT, HOST); console.log(' ∏ØˇˇØ∏ Feed. The. Kraken! Listening on %s:%d...', HOST || '*', PORT); module.exports = app; |
Encapsulation
However, make sure we encapsulate the functionalities. We don’t want outside to be able to use functions such as readyKrakenPromises, runAllKrakenPromises, and saveAsZip.
So we change these functions to be private functions. Then create a public function that does the Promise calls like so:
|
1 2 3 4 5 6 7 8 9 10 11 12 13 14 15 16 17 18 19 |
function KrakenClass(browserIdentity) { ... ... // create public function obj.krakenTheImages = function(req, res, callback) { processImagesFromClientPromise(req, res) .then(unprocessedFolderName => readyKrakenPromises(unprocessedFolderName, req, res)) .then(krakenPromises => runAllKrakenPromises(krakenPromises, req, res)) .then(processedFolderName => saveAsZip(`${req.query.browserIdentity}-download`, processedFolderName, res)) .then(function(result) { callback(result); }); } return obj; // return it } |
used like so:
|
1 2 3 4 |
var krakenInstance = KrakenClass(req.query.browserIdentity); krakenInstance.krakenTheImages(req, res, function(result){ console.log(result); }); |
app.js full source
|
1 2 3 4 5 6 7 8 9 10 11 12 13 14 15 16 17 18 19 20 21 22 23 24 25 26 27 28 29 30 31 32 33 34 35 36 37 38 39 40 41 42 43 44 45 46 47 48 49 50 51 52 53 54 55 56 57 58 59 60 61 62 63 64 65 66 67 68 69 70 71 72 73 74 75 76 77 78 79 80 81 82 83 84 85 86 87 88 89 90 91 92 93 94 95 96 97 98 99 100 101 102 103 104 105 106 107 108 109 110 111 112 113 114 115 116 117 118 119 120 121 122 123 124 125 126 127 128 129 130 131 132 133 134 135 136 137 138 139 140 141 142 143 144 145 146 147 148 149 150 151 152 153 154 155 156 157 158 159 160 161 162 163 164 165 166 167 168 169 170 171 172 173 174 175 176 177 178 179 180 181 182 183 184 185 186 187 188 189 190 191 192 193 194 195 196 197 198 199 200 201 202 203 204 205 206 207 208 209 210 211 212 213 214 215 216 217 218 219 220 |
'use strict'; var Kraken = require('kraken'); var kraken = new Kraken({ 'api_key': '。。。', 'api_secret': '。。。' }); var fs = require('fs'); const express = require('express'); const bodyParser = require('body-parser'); var multer = require('multer'); var archiver = require('archiver'); // for saving images into a zip var request = require('request'); // for downloading from urls const PORT = 8080; const HOST = 'localhost'; const app = express(); const UNPROCESSED_FOLDER_NAME = "unprocessed"; const PROCESSED_FOLDER_NAME = "processed"; app.use(function(req, res, next) { res.header("Access-Control-Allow-Origin", "*"); res.header("Access-Control-Allow-Headers", "Origin, X-Requested-With, Content-Type, Accept"); res.header('Access-Control-Allow-Methods', 'PUT, POST, GET, DELETE, OPTIONS'); next(); }); app.use(bodyParser.urlencoded({ extended: false })); app.use(bodyParser.json()); // using functional inheritance function KrakenClass(browserIdentity) { console.log("Kraken Construction: √ create stack object to be returned"); var obj = {}; // the object itself console.log(`√ Creating private vars...`); var browserId = browserIdentity; console.log("√ Creating private functions..."); function readFileNamesFromDirectory(fileSystem, directoryName) { let directoryContentNames = []; const folder = `./${directoryName}/`; fileSystem.readdirSync(folder).forEach(file => { directoryContentNames.push(file); }) return directoryContentNames; } function createParamArrayForKrakenService(unprocessedArr, unprocessedDirectory) { let paramArray = []; for (let i = 0; i < unprocessedArr.length; i++) { paramArray.push({ file: `${unprocessedDirectory}/${unprocessedArr[i]}`, wait: true, lossy: true }); } return paramArray; } function assembleKrakenServicesIntoPromises(paramArray, browserId) { const krakenPromises = []; for (let i = 0; i < paramArray.length; i++) { krakenPromises.push(uploadToKrakenAndDownloadResult(paramArray[i], browserId)); } return krakenPromises; } function uploadToKrakenAndDownloadResult(urlString, browserId) { return new Promise((resolve, reject) => { kraken.upload(urlString, function (status) { if (status.success) { let fullURL = status.kraked_url let indexOfSlash = fullURL.lastIndexOf("/") let fileName = fullURL.substring(indexOfSlash+1, fullURL.length); downloadProcessedImages(status.kraked_url, `${obj.processedFolderName}/${fileName}`, function(){ console.log(`√ done downloading: ${fileName} into ${obj.processedFolderName}/`); resolve(status.kraked_url); }); } else { console.log('ø Failed! Error message: %s', status.message); reject(status.message); } }); // kraken upload }); // Promise } function createFolderForBrowser(folderAlphaString) { let folderWithBrowserIDName = `${folderAlphaString}-${browserId}`; if (!fs.existsSync(folderWithBrowserIDName)){ fs.mkdirSync(folderWithBrowserIDName); } return folderWithBrowserIDName; } var downloadProcessedImages = function(uri, filename, callback){ request.head(uri, function(err, res, body){ console.log('content-type:', res.headers['content-type']); console.log('content-length:', res.headers['content-length']); request(uri).pipe(fs.createWriteStream(filename)).on('close', callback); }); }; console.log("√ Creating public functions...") function saveAsZip(fileName, fromDirectoryName, response) { console.log("-- saveAsZip --"); let p = new Promise((resolve, reject) => { let fullFileName = `/${fileName}.zip` var output = fs.createWriteStream(__dirname + fullFileName); var archive = archiver('zip'); output.on('close', function() { var file = __dirname + `${fullFileName}`; resolve(`file to download from: ${file}`); }); archive.on('error', function(err) { throw err; }); archive.pipe(output); archive.directory(`${fromDirectoryName}/`, false); archive.finalize(); }); return p; } function runAllKrakenPromises(promises, req, res) { let p = new Promise((resolve, reject)=> { Promise.all(promises).then(function(output) { console.log(output); console.log("runAllKrakenPromises: resolving all kraken promises..."); console.log(obj.processedFolderName); resolve(obj.processedFolderName); }); }); return p; } function processImagesFromClientPromise(req, res) { let p = new Promise((resolve, reject) => { var Storage = multer.diskStorage({ destination: function(req, file, callback) { console.log("multer.diskStorage - Your browser id is: "+req.query.browserIdentity); // we create a folder like so callback(null, `./${obj.unprocessedFolderName}`); }, filename: function(req, file, callback) { console.log(`---The original name is - ${file.originalname}`); callback(null, file.originalname); } }); var upload = multer({ storage: Storage }).array("file", 86); if (upload) { upload(req, res, function(err) { console.log("√ Finished receiving image(s) from client"); if (err) { console.log("----error uploading file----"); console.log(err); return res.end("Something went wrong!"); } console.log("processImagesFromClientPromise: resolving saving images using Multer..."); resolve(obj.unprocessedFolderName); }); } }); return p; } function readyKrakenPromises(unprocessedDirectory, req, res) { let p = new Promise(function(resolve, reject) { let unprocessedImagesArr = readFileNamesFromDirectory(fs, unprocessedDirectory); let paramArray = createParamArrayForKrakenService(unprocessedImagesArr, unprocessedDirectory); let allKrakenPromises = assembleKrakenServicesIntoPromises(paramArray, browserId); resolve(allKrakenPromises); }) return p; } obj.krakenTheImages = function(req, res, callback) { processImagesFromClientPromise(req, res) .then(unprocessedFolderName => readyKrakenPromises(unprocessedFolderName, req, res)) .then(krakenPromises => runAllKrakenPromises(krakenPromises, req, res)) .then(processedFolderName => saveAsZip(`${req.query.browserIdentity}-download`, processedFolderName, res)) .then(function(result) { callback(result); }); } console.log("√ Creating public vars") obj.unprocessedFolderName = createFolderForBrowser(UNPROCESSED_FOLDER_NAME); obj.processedFolderName = createFolderForBrowser(PROCESSED_FOLDER_NAME); console.log(`constructed folders: ${obj.unprocessedFolderName}, ${obj.processedFolderName}`) return obj; // return it } app.post("/upload", function(req, res) { console.log("reached /upload..."); console.log("browserIdentity: " + req.query.browserIdentity); res.end("We will send you a zip with your Krakened images soon..."); var krakenInstance = KrakenClass(req.query.browserIdentity); krakenInstance.krakenTheImages(req, res, function(result){ console.log(result); }); }); app.listen(PORT, HOST); console.log(' ∏ØˇˇØ∏ Feed. The. Kraken! Listening on %s:%d...', HOST || '*', PORT); module.exports = app; |
index.html full source
|
1 2 3 4 5 6 7 8 9 10 11 12 13 14 15 16 17 18 19 20 21 22 23 24 25 26 27 28 29 30 31 32 33 34 35 36 37 38 39 40 41 42 43 44 45 46 47 48 49 50 51 52 53 54 55 56 57 58 59 60 61 62 63 64 65 66 67 68 69 70 71 72 73 74 75 76 77 78 79 80 81 |
<!DOCTYPE html> <html lang="en"> <head> <meta charset="utf-8"> <meta name="viewport" content="width=device-width, initial-scale=1.0" /> <title>Kraken your images! Feed it</title> <link rel="stylesheet" type="text/css" href="style.css"> <link rel="stylesheet" href="https://maxcdn.bootstrapcdn.com/bootstrap/4.0.0/css/bootstrap.min.css" integrity="sha384-Gn5384xqQ1aoWXA+058RXPxPg6fy4IWvTNh0E263XmFcJlSAwiGgFAW/dAiS6JXm" crossorigin="anonymous"> <script src="https://cdnjs.cloudflare.com/ajax/libs/fingerprintjs2/1.8.0/fingerprint2.min.js"></script> <script src="https://unpkg.com/axios/dist/axios.min.js"></script> <script> function uploadImage() { new Fingerprint2().get(function(result, components) { console.log("uploading images...."); var images = document.getElementById("imgUploader").files; var arrayOfImages = Array.from(images); let data = new FormData(); for (let i = 0; i < arrayOfImages.length;i++) { console.log(`appending image ${arrayOfImages[i].name} to FormData`); data.append('file', images[i], images[i].fileName); } console.log("viewing FormData"); for (var pair of data.entries()) {console.log(pair)} axios.post("http://localhost:8080/upload?browserIdentity="+result, data, { headers: { 'accept': 'application/json', 'Accept-Language': 'en-US,en;q=0.8', 'Content-Type': `multipart/form-data; boundary=${data._boundary}` } }) .then((response) => { console.log(`received response from server....${response.data}`); let a = document.createElement('a'); var linkText = document.createTextNode("download"); a.href = response.data; document.getElementById("downloadLink").appendChild(a); }) .catch((error) => { }); }) // new fingerprint2 } // function </script> </head> <!-- execute a script once a web page has completely loaded all content (including images, script files, CSS files, etc.). --> <body> <div id="page" class="jumbotron"> <h1 class="display-4">Kraken Your Images (limit 80)</h1> <p class="lead">Load in your images, and we'll have them <a href="https://kraken.io/">Krakened</a> and sent to your email in a zip!</p> <hr class="my-4"> <p id="intro">Kraken.io is an image optimization and compression SaaS platform with additional manipulation capabilities such as image resizing. Our goal is to automatically shrink the byte size of images as much as possible, while keeping the visual information intact, and of consistently high quality to the extent that results never need to be manually checked for fidelity. </p> <img id="kraken" src="images/kraken.jpg" ondrop="drop(event)" ondragover="allowDrop(event)" /> <div> <p id="uploaderSection" class="lead"> <input type="file" name="imgUploader" id="imgUploader" multiple=""/> <button class="btn btn-primary btn-lg" name="submit" id="btnSubmit" onclick="uploadImage()">Feed It</button> </p> </div> </div> </body> </html> |
localhost Mongo set up and usage for Slideshow-Backend
https://github.com/redmacdev1988/SlideShow-Backend
Running your backend locally
1) open terminal and type “mongod” in order to start your mongo db.
2) pull down the project SlideShow-Backend onto your desktop
3) open a new terminal and cd into the SlideShow-Backend directory
4) then type “npm start”
5) you will the server starting up:
[nodemon] 1.14.11
[nodemon] to restart at any time, enter rs
[nodemon] watching: *.*
[nodemon] starting node index.js
Serving up files in ‘views’ folder
Serving up files in ‘Images’ folder
index.js – created model loading here
index.js – mongoose instance connection url connection
index.js – routes speicfied
pictorial list RESTful API server on: 8080
6) Open a browser and go to: http://localhost:8080/
You should see the list of image strings appear as an array on the browser. This list of image names are images that were included in the project directory under SlideShow-Backend/Images/your-image.jpg
for example:
SlideShow-Backend/Images/railay-ocean.jpg
SlideShow-Backend/Images/tiantian-buddha.jpg
In your local environment, set up mongo. Then use a terminal and set up your mongo db with database “PictorialDB”.
> show dbs
BadmintonSubscriberDatabase 0.000GB
EventsDB 0.000GB
PictorialDB 0.000GB
admin 0.000GB
local 0.000GB
Start up your mongo database
EPCNSZXW0324:~ $ mongod
2018-03-30T16:25:09.506+0800 I CONTROL [initandlisten] MongoDB starting : pid=17616 port=27017 dbpath=/data/db 64-bit host=EPCNSZXW0324.princeton.epam.com
2018-03-30T16:25:09.507+0800 I CONTROL [initandlisten] db version v3.4.10
2018-03-30T16:25:09.507+0800 I CONTROL [initandlisten] git version: 078f28920cb24de0dd479b5ea6c66c644f6326e9
sign into your mongo db
Last login: Fri Mar 30 16:23:35 on ttys002
EPCNSZXW0324:~ rickytsao$ mongo
MongoDB shell version v3.4.10
connecting to: mongodb://127.0.0.1:27017
MongoDB server version: 3.4.10
create pictorial db
> use PictorialDB
switched to db PictorialDB
Inserting data through code
First create a Schem for our pictorial. Then add it to module.exports for global usage.
PictorialModel.js
Once we make this model, whenever we insert into the database, we’ll see the row data there.
|
1 2 3 4 5 6 7 8 9 10 11 12 13 14 15 16 17 18 19 20 |
var mongoose = require('mongoose'); var Schema = mongoose.Schema; var PictorialSchema = new Schema({ name: { type: String, unique: true, required: true, dropDups: true }, fileName : String, description: String, Created_date: { type: Date, default: Date.now } }); module.exports = mongoose.model('Pictorial', PictorialSchema); |
Then in your SlideShow-Backend app, implement create_a_pictorial where:
1) you get data from the body
2) Insert data into Pictorial
3) Finally, call the function “save” on the schema.
pictorialController.js
|
1 2 3 4 5 6 7 8 9 10 11 12 13 |
Pictorial = mongoose.model('Pictorial'); exports.create_a_pictorial = function(req, res) { console.log("--- pictorialController.js - create_a_pictorial ---"); var new_pictorial = new Pictorial(req.body); new_pictorial.save(function(err, pictorial) { if (err) res.send(err); console.log("--- pictorialController.js - saved successfully --"); console.log(JSON.stringify(new_pictorial, null, 2)); res.render( 'admin/pictorial-created.html', { status: "successfully uploaded"} ); }); }; |
Then, check in your mongo db to verify:
> db.pictorials.find()
{ “_id” : ObjectId(“59fc081ff6cf8a0970256c38”), “name” : “railay-ocean”, “fileName” : “railay-ocean.jpg”, “description” : “I long to back here to swim”, “Created_date” : ISODate(“2017-11-03T06:09:35.515Z”), “__v” : 0 }
{ “_id” : ObjectId(“59fc0ca4f6cf8a0970256c39”), “name” : “tiantian-buddha”, “fileName” : “tiantian-buddha.jpg”, “description” : “It was a gray cloudy day, but was fun!”, “Created_date” : ISODate(“2017-11-03T06:28:52.385Z”), “__v” : 0 }
Check Images
1) Make sure you copy images into the Images folder at “SlideShow-Backend/Images”. i.e railay-ocean.jpg, tiantian-buddha.jpg, etc.
2) Now you can access images at http://localhost:8080/ImageName. This is where the app will go in order to retrieve images.
Using Mocha and Chai for unit tests in Node JS projects
ref – https://ubuverse.com/introduction-to-node-js-api-unit-testing-with-mocha-and-chai/
https://scotch.io/tutorials/test-a-node-restful-api-with-mocha-and-chai
https://gist.github.com/yoavniran/1e3b0162e1545055429e#mocha
https://gist.github.com/yoavniran/1e3b0162e1545055429e#chai
Creating the Directory
mkdir mocha-chai-demo
cd mocha-chai-demo
Setting up the package.json
in directory /mocha-chai-demo:
npm init
use defualt for all the options.
You will then have a package.json file created, which looks something like this:
package name: (mocha-chai-demo) tdd-for-node
version: (1.0.0)
description: test driven dev for node
entry point: (index.js)
test command:
git repository:
keywords: tdd chai mocha node js
author: ricky
license: (ISC)
About to write to /Users/xxxxxxxxx/Desktop/mocha-chai-demo/package.json:
{
“name”: “tdd-for-node”,
“version”: “1.0.0”,
“description”: “test driven dev for node”,
“main”: “index.js”,
“scripts”: {
“test”: “echo \”Error: no test specified\” && exit 1″
},
“keywords”: [
“tdd”,
“chai”,
“mocha”,
“node”,
“js”
],
“author”: “ricky”,
“license”: “ISC”
}
Is this ok? (yes) yes
EPCNSZXW0324:mocha-chai-demo rickytsao$ ls
package.json
Open it with text editor by typing:
open -a TextEdit package.json
and you’ll see your typical specs laid out for your node project.
Whenever you run the project, usually people would do “nodex index.js”. But it can get annoying. So instead, we can shortcut it with start. So next time, all you gotta do to start the server is to type: npm start
You should also edit the test script for mocha.
|
1 2 3 4 5 6 7 8 9 10 11 12 13 14 15 16 17 |
{ "name": "krakentest", "version": "1.0.0", "description": "test for using Kraken io", "main": "index.js", "scripts": { "start": "node index.js", // <-- start the server "test": "mocha --recursive" // <-- testing the server }, "keywords": [ "kraken", "io", "image" ], "author": "ricky", "license": "ISC" } |
Under scripts, the value for the key “test” should be: “mocha –recursive”
Implementing the server
in directory /mocha-chai-demo:
touch index.js
Then copy the code below into the index.js
That file will run as our server.
|
1 2 3 4 5 6 7 8 9 10 11 12 13 14 15 16 17 18 19 20 21 22 23 24 25 26 27 28 29 30 31 32 33 34 35 36 37 38 39 40 41 42 43 44 45 46 47 48 49 50 51 52 53 54 55 56 57 58 59 |
'use strict'; const express = require('express'); const bodyParser = require('body-parser'); const PORT = 8080; const HOST = 'localhost'; const DEFAULT_COLORS = ['RED', 'GREEN', 'BLUE']; const app = express(); app.use(bodyParser.json({ limit: '100k', })); /** * Array holding color values */ let colors = [].concat(DEFAULT_COLORS); /** * Returns a list of colors * Response body (JSON): {results: [....]} */ app.get('/colors', function(req, res, next) { res.json({ results: colors }); }); /** * Inserts new color in the 'colors' array * Request body (JSON): {color: ...} */ app.post('/colors', function(req, res, next) { if (req.is('application/json') && typeof req.body.color === 'string') { let color = req.body.color.trim().toUpperCase(); if (color && colors.indexOf(color) < 0) { colors.push(color); // 201 Created return res.status(201).send({ results: colors }); } } res.status(400).send(); // 400 Bad Request }); app.listen(PORT, HOST); console.log('Listening on %s:%d...', HOST || '*', PORT); /** * Export the Express app so that it can be used by Chai */ module.exports = app; |
|
1 2 |
$ npm install express body-parser --save $ npm install mocha chai chai-http --save-dev |
Then run node index.js to see the server in action
If you were to run the app:
node index.js
You’ll see the confirmation messages.
Open up a browser, type: http://localhost:8080/colors
you’ll get {“results”:[“RED”,”GREEN”,”BLUE”]}
Creating the tests
The recommended way to organize your tests within your project is to put all of them in their own /test directory.
By default, Mocha checks for unit tests using the globs ./test/*.js and ./test/*.coffee. From there, it will load and execute any file that calls the describe() method.
In mocha-chai-demo:
mkdir test
cd test
you should now be in /mocha-chai-demo/test
touch test.js
then copy the below test code
|
1 2 3 4 5 6 7 8 9 10 11 12 13 14 15 16 17 18 19 20 21 22 23 24 25 26 27 28 29 30 31 32 33 34 35 36 37 38 39 40 41 42 43 44 45 46 47 48 49 50 51 52 53 54 55 56 57 58 59 60 61 62 63 64 65 66 67 68 69 70 71 72 73 74 75 76 |
'use strict'; const chai = require('chai'); const expect = require('chai').expect; chai.use(require('chai-http')); const app = require('../index.js'); // Our app describe('API endpoint /colors', function() { this.timeout(5000); // How long to wait for a response (ms) before(function() { }); after(function() { }); // GET - List all colors it('should return all colors', function() { return chai.request(app) .get('/colors') .then(function(res) { expect(res).to.have.status(200); expect(res).to.be.json; expect(res.body).to.be.an('object'); expect(res.body.results).to.be.an('array'); }); }); // GET - Invalid path it('should return Not Found', function() { return chai.request(app) .get('/INVALID_PATH') .then(function(res) { throw new Error('Path exists!'); }) .catch(function(err) { expect(err).to.have.status(404); }); }); // POST - Add new color it('should add new color', function() { return chai.request(app) .post('/colors') .send({ color: 'YELLOW' }) .then(function(res) { expect(res).to.have.status(201); expect(res).to.be.json; expect(res.body).to.be.an('object'); expect(res.body.results).to.be.an('array').that.includes( 'YELLOW'); }); }); // POST - Bad Request it('should return Bad Request', function() { return chai.request(app) .post('/colors') .type('form') .send({ color: 'YELLOW' }) .then(function(res) { throw new Error('Invalid content type!'); }) .catch(function(err) { expect(err).to.have.status(400); }); }); }); |
Save the file.
Then in the test directory, just type:
npm test
You’ll see that we have 4 passed tests.
Details
ref – http://chaijs.com/api/bdd/
Expect
The BDD style is exposed through expect or should interfaces. In both scenarios, you chain together natural language assertions.
|
1 2 3 4 5 6 7 8 |
var expect = require('chai').expect , foo = 'bar' , beverages = { tea: [ 'chai', 'matcha', 'oolong' ] }; expect(foo).to.be.a('string'); expect(foo).to.equal('bar'); expect(foo).to.have.lengthOf(3); expect(beverages).to.have.property('tea').with.lengthOf(3); |
The should style allows for the same chainable assertions as the expect interface, however it extends each object with a should property to start your chain. This style has some issues when used with Internet Explorer, so be aware of browser compatibility.
Differences between expect and should
First of all, notice that the expect require is just a reference to the expect function, whereas with the should require, the function is being executed.
The expect interface provides a function as a starting point for chaining your language assertions. It works on node.js and in all browsers.
The should interface extends Object.prototype to provide a single getter as the starting point for your language assertions. It works on node.js and in all modern browsers except Internet Explorer.
Create restful service with node js
https://www.codementor.io/olatundegaruba/nodejs-restful-apis-in-10-minutes-q0sgsfhbd
Protected: How to get User Data with minimal access to “management AAD portal”
about Json Web Tokens (JWT)
todo –
https://www.freecodecamp.org/news/securing-node-js-restful-apis-with-json-web-tokens-9f811a92bb52/
https://medium.com/swlh/a-practical-guide-for-jwt-authentication-using-nodejs-and-express-d48369e7e6d4
https://scotch.io/tutorials/the-anatomy-of-a-json-web-token
The reason why JWT are used is to prove that the sent data was actually created by an authentic source.
JSON Web Tokens work across different programming languages: JWTs work in .NET, Python, Node.js, Java, PHP, Ruby, Go, JavaScript, and Haskell. So you can see that these can be used in many different scenarios.
JWTs are self-contained: They will carry all the information necessary within itself. This means that a JWT will be able to transmit basic information about itself, a payload (usually user information), and a signature.
JWTs can be passed around easily: Since JWTs are self-contained, they are perfectly used inside an HTTP header when authenticating an API. You can also pass it through the URL.
What is a JWT
Since there are 3 parts separated by a ., each section is created differently. We have the 3 parts which are:
- header
- payload
- signature

header
The header carries 2 parts:
declaring the type, which is JWT
the hashing algorithm to use (HMAC SHA256 in this case)
|
1 |
{"alg":"HS256","typ":"JWT"} |
Now once this is base64encode, we have the first part of our JSON web token!
eyJhbGciOiJIUzI1NiIsInR5cCI6IkpXVCJ9
{“alg”:”HS256″,”typ”:”JWT”} is treated as a string, which encodes to eyJhbGciOiJIUzI1NiIsInR5cCI6IkpXVCJ9
If you were to chop off some string, for example {“alg”:”HS256″,, it will encode to eyJhbGciOiJIUzI1NiIs.
What is base64encode?
http://stackoverflow.com/questions/201479/what-is-base-64-encoding-used-for
Encoding transforms data into another format using a scheme that is publicly available so that it can easily be reversed. Hence, it is for maintaining data usability and uses schemes that are publicly available.
When you have some binary data that you want to ship across a network, you generally don’t do it by just streaming the bits and bytes over the wire in a raw format.
Why?
– because some media are made for streaming text.
– some protocols may interpret your binary data as control characters (like a modem)
– your binary data could be screwed up because the underlying protocol might think that you’ve entered a special character combination
So to get around this, people encode the binary data into characters. Base64 is one of these types of encodings. Why 64? Because you can generally rely on the same 64 characters being present in many character sets, and you can be reasonably confident that your data’s going to end up on the other side of the wire uncorrupted.
How does base64 work?
https://en.wikipedia.org/wiki/Base64
Another example:
A quote from Thomas Hobbes’ Leviathan (be aware of spaces between lines):
Man is distinguished, not only by his reason, but by this singular passion from
other animals, which is a lust of the mind, that by a perseverance of delight
in the continued and indefatigable generation of knowledge, exceeds the short
vehemence of any carnal pleasure.
is represented as a byte sequence of 8-bit-padded ASCII characters encoded in MIME’s Base64 scheme as follows:
TWFuIGlzIGRpc3Rpbmd1aXNoZWQsIG5vdCBvbmx5IGJ5IGhpcyByZWFzb24sIGJ1dCBieSB0aGlz
IHNpbmd1bGFyIHBhc3Npb24gZnJvbSBvdGhlciBhbmltYWxzLCB3aGljaCBpcyBhIGx1c3Qgb2Yg
dGhlIG1pbmQsIHRoYXQgYnkgYSBwZXJzZXZlcmFuY2Ugb2YgZGVsaWdodCBpbiB0aGUgY29udGlu
dWVkIGFuZCBpbmRlZmF0aWdhYmxlIGdlbmVyYXRpb24gb2Yga25vd2xlZGdlLCBleGNlZWRzIHRo
ZSBzaG9ydCB2ZWhlbWVuY2Ugb2YgYW55IGNhcm5hbCBwbGVhc3VyZS4=
In the above quote, let’s take the example of the word ‘Man’.
How to encode ‘Man’ into ‘TWFu’
General idea:
Encoded in ASCII, the characters M, a, and n are stored as the bytes 77, 97, and 110, respectively.
They are also the 8-bit binary values 01001101, 01100001, and 01101110.
These three values are joined together into a 24-bit string, producing 010011010110000101101110.
Groups of 6 bits (6 bits have a maximum of 2 to the 6 = 64 different binary values) are converted into individual numbers from left to right (in this case, there are four numbers in a 24-bit string), which are then converted into their corresponding Base64 character values.
In detail:
Say our text content is “Man”
Originally, the 3 values in bits are:
01001101 01100001 01101110
We split this into 6 bits of 4 index integers
010011 010110 000101 101110
where
010011 –> 19
010110 –> 22
000101 –> 5
101110 –> 46
Put these integers through the Base64 index table, would give us
TWFu
Payload
The payload will carry the bulk of our JWT, also called the JWT Claims. This is where we will put the information that we want to transmit and other information about our token.
There are multiple claims that we can provide. This includes registered claim names, public claim names, and private claim names.
REGISTERED CLAIMS
Claims that are not mandatory whose names are reserved for us.
These include:
- iss: The issuer of the token
- sub: The subject of the token
- aud: The audience of the token
- exp: This will probably be the registered claim most often used. This will define the expiration in NumericDate value. The expiration MUST be after the current date/time.
- nbf: Defines the time before which the JWT MUST NOT be accepted for processing
- iat: The time the JWT was issued. Can be used to determine the age of the JWT
- jti: Unique identifier for the JWT. Can be used to prevent the JWT from being replayed. This is helpful for a one time use token.
PUBLIC CLAIMS
These are the claims that we create ourselves like user name, information, and other important information.
PRIVATE CLAIMS
A producer and consumer may agree to use claim names that are private. These are subject to collision, so use them with caution.
For example
|
1 2 3 4 5 6 |
{ "iss": "scotch.io", "exp": 1300819380, "name": "Chris Sevilleja", "admin": true } |
This will encode64 to:
eyJpc3MiOiJzY290Y2guaW8iLCJleHAiOjEzMDA4MTkzODAsIm5hbWUiOiJDaHJpcyBTZXZpbGxlamEiLCJhZG1pbiI6dHJ1ZX0
Signature
The third and final part of our JSON Web Token is going to be the signature. This signature is made up of a hash of the following components:
- the header
- the payload
secret
This is how we get the third part of the JWT:
|
1 2 3 |
var encodedString = base64UrlEncode(header) + "." + base64UrlEncode(payload); HMACSHA256(encodedString, 'secret'); |
The secret is the signature held by the server. This is the way that our server will be able to verify existing tokens and sign new ones.
This gives us the final part of our JWT:
03f329983b86f7d9a9f5fef85305880101d5e302afafa20154d094b229f75773
Thus, our JWT is now:
eyJhbGciOiJIUzI1NiIsInR5cCI6IkpXVCJ9.eyJpc3MiOiJzY290Y2guaW8iLCJleHAiOjEzMDA4MTkzODAsIm5hbWUiOiJDaHJpcyBTZXZpbGxlamEiLCJhZG1pbiI6dHJ1ZX0.03f329983b86f7d9a9f5fef85305880101d5e302afafa20154d094b229f75773
The JSON Web Token standard can be used across multiple languages and is quickly and easily interchangeable.
You can use the token in a URL, POST parameter, or an HTTP header. The versatility of the JSON Web Token let’s us authenticate an API quickly and easily by passing information through the token.