Standard Example
1 2 3 4 5 6 7 8 9 10 11 12 13 14 15 16 17 18 19 20 21 22 23 24 25 26 27 28 29 |
function Pasta() { this.price = 0; } Pasta.prototype.getPrice = function() { return this.price; }; function Penne() { this.price = 8; } Penne.prototype = Object.create(Pasta.prototype); function SauceDecorator(pasta) { this.pasta = pasta; } SauceDecorator.prototype.getPrice = function() { return this.pasta.getPrice() + 5; }; function CheeseDecorator(pasta) { this.pasta = pasta; } CheeseDecorator.prototype.getPrice = function() { return this.pasta.getPrice() + 3; }; module.exports = [Penne, SauceDecorator, CheeseDecorator]; |
test
|
|
var penne = new Penne(); var penneWithSauce = new SauceDecorator(penne); var penneWithSauceAndCheese = new CheeseDecorator(penneWithSauce); expect(penne.getPrice()).to.equal(8); expect(penneWithSauce.getPrice()).to.equal(13); expect(penneWithSauceAndCheese.getPrice()).to.equal(16); |
Decorator example 1 – Dressing up a Hero
ref – https://kickoff.tech/2019/07/26/mau-thiet-ke-huong-doi-tuong-decorator-pattern/
First, we define the hero. We give it two properties:
– strength: a characteristic of this hero.
– decorators: an array of references that point to things that we want to “decorate” the hero with.
|
|
function Hero(strength) { this.strength = strength this.decorators = [] } |
Each decorator item that the Hero wears will give him extra strength. Thus, we basically add up how much strength he has by how each item bestow their strengths.
|
|
Hero.prototype.getStrength = function() { var totalStrength = this.strength for (var decorator of this.decorators) { totalStrength += decorator.getPercentStrengthen() * this.strength } return totalStrength } |
In order to see what our Hero is wearing, we’ll implement a render function that basically iterates through the list of decorators and returns the string names.
|
|
Hero.prototype.render = function() { var decoratorsName = this.decorators.map(function(o) {return o.getName()}) console.log('Hero with ', decoratorsName.join(',')) } |
Finally, we have decorate list. It’s like an inventory list. It keeps track of the items the hero wears.
|
|
Hero.prototype.decorate = function(decorator) { this.decorators.push(decorator) } |
Now, we implement Hero Decorator. It is a class that does an action to put and use the items onto the Hero.
We first keep a hold on the name and strength attribute of the item we’re adding. For example, “gloves”, which gives us strength percent of say 10.
Then we just have the get functions that return those data.
|
|
function Item(name, percentStrengthen) { this.name = name this.percentStrengthen = percentStrengthen } Item.prototype.getPercentStrengthen = function() { return this.percentStrengthen } Item.prototype.getName = function() { return this.name } |
Let us create an item Hat. Now, we use Item to call and use its property initialization with our Hat object.
Thus, we get property name, percentStrengthen for our Hat object. We also inject our values name, 10 to initialize those properties.
|
|
function Hat(name) { Item.call(this, name, 10) } |
In order to have our Hat be able to use Item functions getName and getPercentStrengthen, we must create an object with its __proto__ pointing to Item.prototype. This object will act has Hat’s prototype object.
Then we point Hat.prototype to this Hat prototype object. At this point, we have successfully connected the chain.
Then for verification and correctness, we must point Hat’s prototype object’s constructor reference back to our Hat.
That way, when we use typeof for our object, it will say ‘Hat’, instead of ‘function’.
|
|
Hat.prototype = Object.create(Item.prototype) Hat.prototype.constructor = Hat |
Now let’s create Ring. We need to have basic properties created using Item because we are trying to be a child object. We initialize those properties with our name, and 20 strength. Then we connect our Ring to the prototype chain of our Item.
|
|
function Ring(name) { Item.call(this, name, 20) } Ring.prototype = Object.create(Item.prototype) Ring.prototype.constructor = Ring |
1) Now we create a hero with 5 strength. We automatically have an empty decorator property list ready to hold items that we pick up along the way.
2) We put a Mage Hat into the decorator list.
3) We put a Ring into the decorator list.
4) We then execute Hero’s render function, which goes through each item in decorator list and logs.
Then we calculate total strengths. Similarly, we iterate through the decorator list and append each value to our total strengths.
|
|
var hero = new Hero(5) hero.decorate(new Hat("Mage Hat")) hero.decorate(new Ring("Fire Ring")) hero.render() // Hero with a Mage Hat, and Fire Ring console.log(hero.getStrength()) // 130 |
So as you can see the concept here is that:
1) We use parent class Item to tell us what properties we want to use. Then, other detailed items such as gloves or rings, are created from this Item parent class.
2) On the Hero himself, we use a list to keep track of all the items.
3) Now, when we want to render the Hero’s status, or look at its strength gauge, we iterate through this list to get the info we need.
Decorator example 2 – Validate a Form
ref – https://robdodson.me/javascript-design-patterns-decorator/
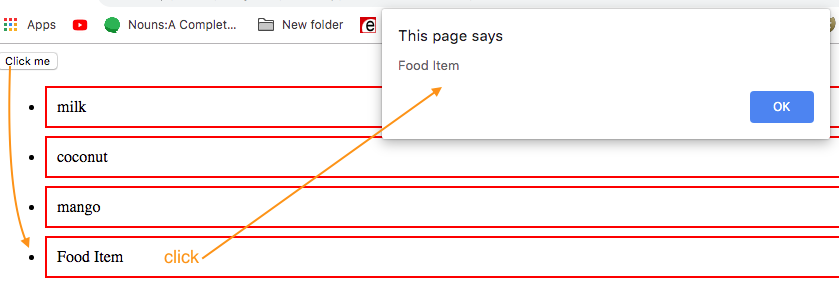
Here we want to validate a form by using a list of properties.
We do this by using JS’s associative array (dictionary) properties characteristics.
What I mean by that is there are two ways to access an element:
|
|
object.strName object['strName'] |
They both do the same thing, and will give you the same value.
Thus, we can use this technique to use String to pick what properties we want to access.
The other important thing is that after accessing said property, we simply call ‘validate’.
If each of these properties implement a validate function, we can simply loop through all those properties and call validate.
For example, let’s create a Validator constructor function that has an errors property list to hold errors.
We also have a decorator list to keep track of what we want to validate.
|
|
function Validator () { this.errors = []; this.decoratorsList = []; console.log(`√ Validator created`); } Validator.prototype.decorate = function(name, args) { this.decoratorsList.push({ name: name, args: args }); }; |
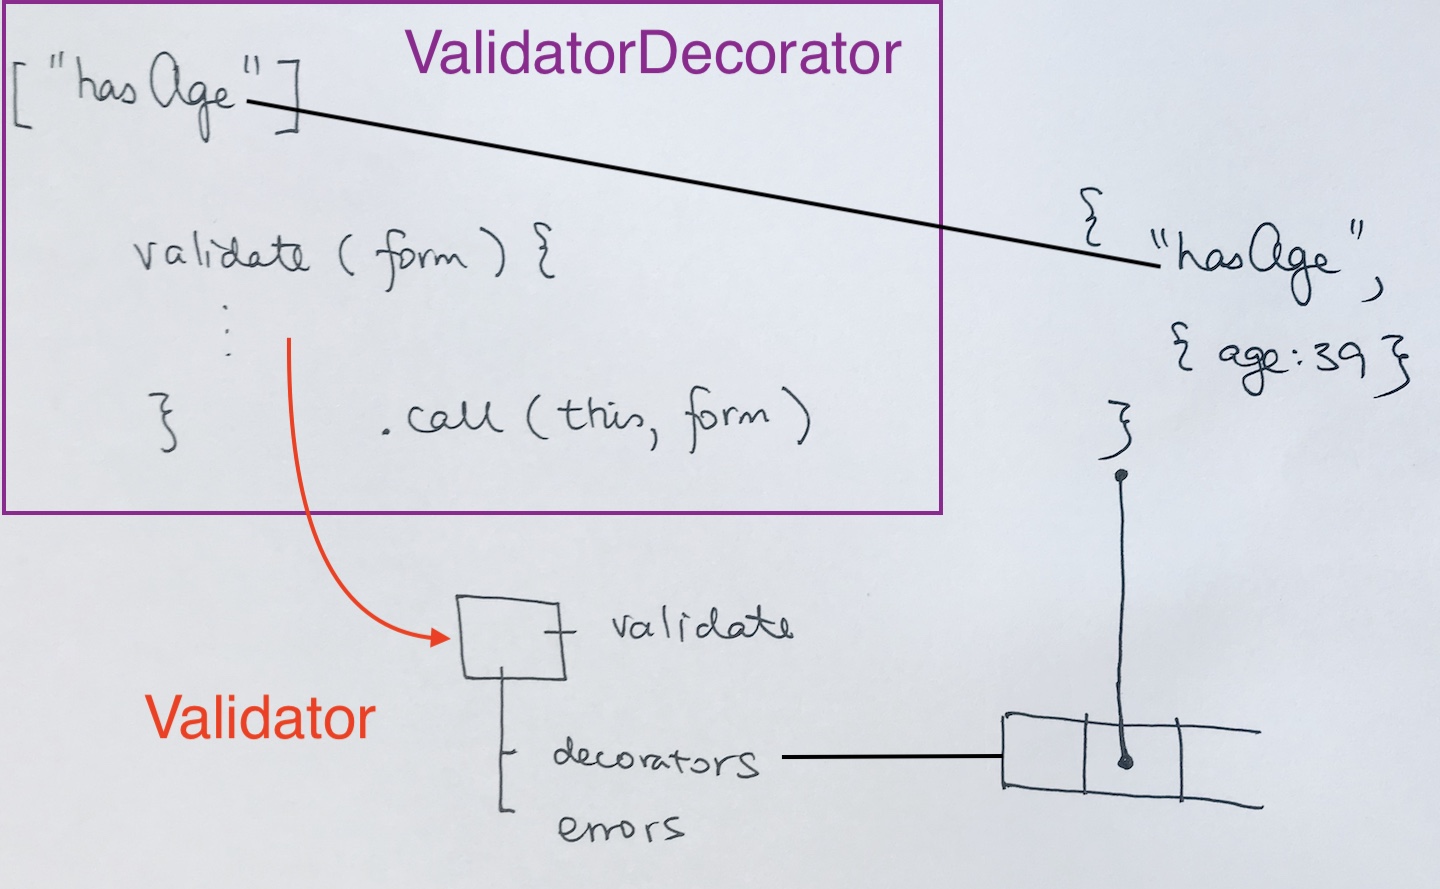
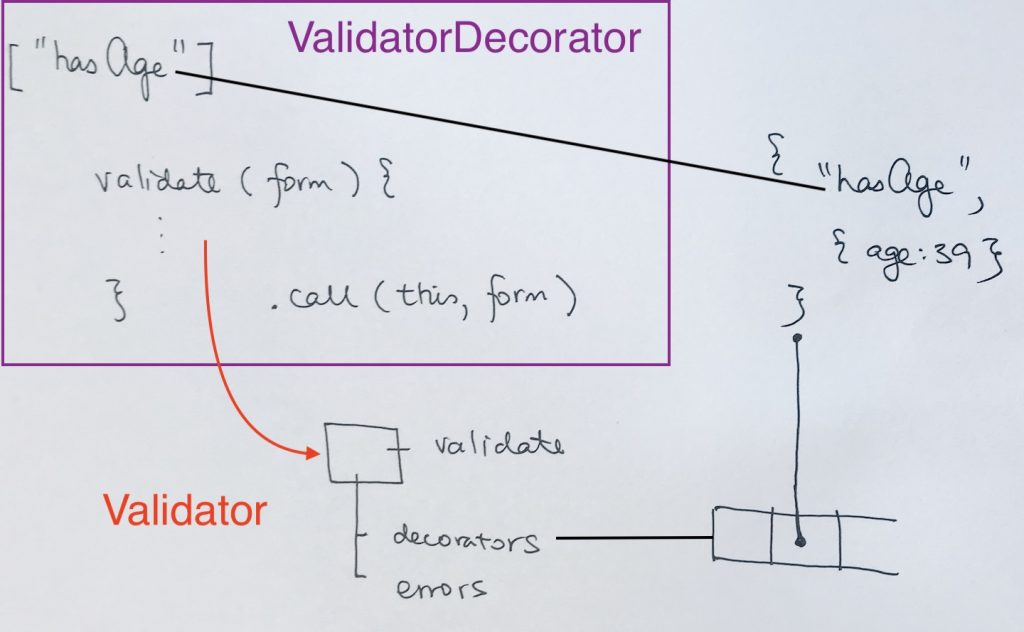
Then we create a ValidatorDecorator constructor function. It will be used for our Validator object to call so that it can use ValidatorDecorator’s functionality, but using its own Validator ‘this’ object. The ‘validate’ functionality that ValidatorDecorator can be applied to our Validator instance. Whatever error, messages, and logic gets calculated, we store in our Validator instance’s error list.
1 2 3 4 5 6 7 8 9 10 11 12 13 14 15 16 17 18 19 20 21 22 23 24 25 26 27 28 29 30 31 32 33 |
function ValidatorDecorator () { return { hasName: { validate: function(form, args) { const { name } = form; if (name === args.name) { console.log(`√ name checked successful`); } else { this.errors.push('error - name does not match'); } } }, hasAge: { validate: function(form, args) { console.log(`lets validate the Age`); const { age } = form; if (age === args.age) { console.log(`√ age checked successful`); } else this.errors.push('error - age does not match'); } }, hasZipCode: { validate: function(form, args) { console.log(`lets validate the zip code`); const { zipcode } = form; if (zipcode === args.zipcode) { console.log(`√ zip code checked successful`); } else this.errors.push('error - zipcode does not match'); } } } } |
So the way how its done is like this:
let tmp = new ValidatorDecorator();
tmp[‘hasName’].validate will then get you the validate function of property hasName
tmp[‘hasAge’].validate will then get you the validate function of property hasAge
tmp[‘hasZipCode’].validate will then get you the validate function of property hasZipCode
When we execute validate, we use call to use the current ‘this’ Validator object.
In our Validator’s validate function, we pass in the form.
Then, depending on how we decorated our checks, we would run our form through those checks. For example, say I want to check for name, age, and zip code.
So initially I would add those to my decorate list like so:
|
|
let validator = new Validator(); validator.decorate('hasName', { name: 'ricky' }); validator.decorate('hasAge', { age: 39 }); validator.decorate('hasZipCode', 218000); |
Now I am ensured that whatever form comes through, I will check for if:
– the name is ricky
– the age is 39
– the zip code is 218000
Now, let’s implement the validate function.
For our ‘form’ parameter, we loop through all of the validators to check for name, age, and zipcode.
We access each check’s property by using the string ‘name’, where ‘name’ is hasName, hasZipCode..etc.
Since each of these properties have a function called validate, we simply execute it with our ‘this’ object.
1 2 3 4 5 6 7 8 9 10 11 12 13 14 15 16 17 18 19 20 21 22 23 24 25 |
Validator.prototype.validate = function(form) { var i, checkFeature, name, args; this.form = form; let vd = new ValidatorDecorator(); for (i = 0; i < this.decoratorsList.length; i++) { checkFeature = this.decoratorsList[i]; name = checkFeature.name; args = checkFeature.args; vd[name].validate.call(this, form, args); }; }; var validator = new Validator(); validator.decorate('hasName', { name: 'ricky' }); validator.decorate('hasAge', { age: 39 }); validator.decorate('hasZipCode', { zipcode: 215000 }); // we insert form here validator.validate({ name: 'ricky', age: 32, zipcode: 91776 }); // we'll just use a blank object in place of real form data console.log(validator.errors); |
note: Validator’s property decorators in the picture refers to decoratorList in our sample code.
Supplement
you can also use a static property like so
1 2 3 4 5 6 7 8 9 10 11 12 13 14 15 16 17 18 19 20 21 22 23 24 25 26 27 28 29 30 |
// name would be "hasZipCode", or "hasName"...etc // Validator.decorators[name].validate.call(this, form, args); ... // static decorators Validator.decorators = { hasName: { validate: function(form, args) { console.log(`Code to verify presence of name`); // If no name found... if (args && args.name) {} else this.errors.push('no name!'); } }, hasAge: { validate: function(form, args) { console.log(`Code to verify presence of age...`); // If no age found... if (args && args.age) {} else this.errors.push('no age!'); } }, hasZipCode: { validate: function(form, args) { console.log(`Code to verify presence of zip code...`); // If no age found... if (args && args.zipCode) {} else this.errors.push('no zip code!'); } } }; // static decorators |
Decorator example 3 – Create a lunch bowl
Here, we use call again to use inheritance to create and initialize properties.
First, we create a Bowl, with parameters for customer name, bowl name, and price of the bowl.
Then we have an items list to hold what we want applied to the bowl.
we also have a print function that simply logs the attributes of this bowl.
|
|
function Bowl(customerName, bowlName) { this.customerName = customerName; this.bowlName = bowlName; this.totalCost = 1; // 1 rmb for the packaging this.items = []; } Bowl.prototype.print = function() { console.log(`${this.customerName} have ordered ${this.bowlName}`); console.log(`Total cost of bowl is ${this.totalCost}`); console.log(`-- items in this bowl --`); console.log(this.items); } |
Now, we create a parent class called SideDish. It has the properties price and name.
|
|
function SideDish(nameOfSideDish, price) { this.cost = price; this.name = nameOfSideDish; } |
Now, in our Hero examples, we have a Hero that uses a list called decorators. Then it has Items | Hat as parent/child object. We add the children objects into Hero’s decorators and then the Hero would iterate through that decorator to update its data. Hence, the Hero object references the Items. It’s one way from Hero to Items.
Then in our Validator example, we have Validator, that also uses a list called decorators. It uses a ValidatorDecorator function along with Object.call. The Validator object iterate through the list of decorators, executes validate functions in ValidatorDecorator via associative property strings. Those validate functions uses the Validator object to access its errors list to update its data. Hence Validator object and ValidatorDecorator object reference each other.
Now, in our Bowl example, we have a BowlDecorator that acts as child of SideDish. It holds a reference to the Bowl. Then it uses Object.call to initialize data about the side dish. Once that’s done, it calls updateBowl to update the bowl’s data. It acts as a middle man where its parent class is the side dish, and it literally puts the parent class data into a bowl.
|
|
function BowlDecorator(bowl, nameOfSideDish, price) { // add property 'cost' // add property 'name' SideDish.call(this, nameOfSideDish, price); this.bowl = bowl; this.updateBowl(); } BowlDecorator.prototype = Object.create(SideDish.prototype); BowlDecorator.prototype.updateBowl = function() { this.bowl.totalCost = this.cost + this.bowl.totalCost; this.bowl.items.push(this.name); } |
Let’s look at an example. Say we have Oxtail. We make it a child of BowlDecorator and use Object.call with a bowl.
What this means is that Oxtail have properties:
– cost
– name
– bowl
Then we include Oxtail in BowlDecorator’s prototype chain. This allows us to call BowlDecorator’s prototype functions i.e updateBowl.
|
|
function Oxtail(bowl) { // add property 'cost' // add property 'name' // add property 'bowl' BowlDecorator.call(this, bowl, 'Stewed Grassfed Oxtail', 50); } // in order for us to use updateBowl() in BowlDecorator, we must // connect our chain Oxtail.prototype = Object.create(BowlDecorator.prototype); |
We do the same for JasmineRice and Carrots
|
|
function JasmineRice(bowl) { BowlDecorator.call(this, bowl, 'Jasmine Rice', 5); } JasmineRice.prototype = Object.create(BowlDecorator.prototype); function Potatos(bowl) { BowlDecorator.call(this, bowl, "Buttered Idaho Potatos", 15); } Potatos.prototype = Object.create(BowlDecorator.prototype); function Carrots(bowl) { BowlDecorator.call(this, bowl, "Oregeno Sauteed Carrots", 15); } Carrots.prototype = Object.create(BowlDecorator.prototype); |
Now, let’s see how it will be used. We allocate a Bowl.
|
|
// start my order with a bowl let myBowl = new Bowl('ted','Hearty Oxtail'); |
Once that bowl has been created, we can simply create new Side Dishes and pass in the bowl.
The bowl will be updated by the Side Dish’s call to BowlDecorator.call(…)
BowlDecorator will then do its job of decorating the bowl with the Side Dish information via its prototype updateBowl function.
|
|
// then add oxtail new Oxtail(myBowl); new JasmineRice(myBowl); new Potatos(myBowl); new Carrots(myBowl); myBowl.print(); |
output
ted have ordered Hearty Oxtail

Total cost of bowl is 86

-- items in this bowl --

[ 'Stewed Grassfed Oxtail',

  'Jasmine Rice',

  'Buttered Idaho Potatos',

  'Oregeno Sauteed Carrots' ]