Category Archives: javascript

forEach vs map

ref – https://programmingwithmosh.com/javascript/whats-the-difference-between-foreach-and-map-in-javascript/

Array.prototype.forEach

Anytime you want to iterate through the items in an array, the first thing that comes to our mind in any programming language is the for loop. forEach() in JavaScript is an interesting alternative to the regular for loops.
The forEach() iterates through the elements in the array. It calls a provided callback function once for each element in the array in ascending order.
The callback function accepts three arguments:
value of the element
index of the element
array object
Let’s take a look at an example to see how forEach() works.

Array.prototype.map

The map() method creates a new array with the results of calling a provided function on every element in the calling array. map() calls a provided callback function once for each element in an array, in order, and constructs a new array from the results.

The callback accepts three arguments:

  • value of the element
  • index of the element
  • array object

You may have used the map() function before. It qualifies as a higher-order function, because it takes in a callback function as an input argument.

In the example above, we have an array of numbers and creating a new array using the map(). The map() takes a function as an argument. The argument item within the function will automatically be assigned from each element of the array as map() loops through the original array.

What is the difference?

If you notice closely, although they look very similar there is a fundamental difference between forEach() and map() functions.

  • forEach() changes the original array
  • whereas map() returns a new array, without mutating the original array.

So which one should you pick? It depends on what you are trying to do with the array.
Note: I always prefer to use map() over forEach().
If you are looking to make changes to the array, map() is preferable. map() ensures that it doesn’t change/mutate the original array, and returns a new array instead.
forEach() is used when you want to iterate through the array and allows a callback function that mutates the original array unlike map(). If you are not looking to transform the array items, but just need to iterate through it and print them or do other actions with them, then forEach() could can be used.

Which one is faster

?
So which one is faster? There seems to be a very small difference between forEach() and map() with respect to speed. map() is faster, but these are so miniscule that it shouldn’t affect your application’s performance significantly. You can almost always use map() and other array methods like filter() and reduce() instead of using forEac

Which is better?

The original array that the map() function iterates through is immutable. This means it cannot be changed, and the map() has to return a new array with the updated items. This is a big benefit since your original array is guaranteed to remain the same and not change after the iteration. Incase your code needs the original array elsewhere, map() will be the best option.
h().

Forkify Web app (part 1 – setting up your environment)

download the forkify starter files.

Install Node

download node via command line or an executable/dmg file from Node’s website.

check if node is installed correctly:

node -v

Go into the forkify folder and you’ll see folders:
– dist
– src

This is where our source files are.

Go ahead and make this into a project: npm init

Go ahead and fill it in. The output should look something like this:


bogon:starter$ npm init
This utility will walk you through creating a package.json file.
It only covers the most common items, and tries to guess sensible defaults.

See npm help json for definitive documentation on these fields
and exactly what they do.

Use npm install afterwards to install a package and
save it as a dependency in the package.json file.

Press ^C at any time to quit.
package name: (starter) forkify
version: (1.0.0)
description: forkify project
entry point: (index.js)
test command:
git repository:
keywords:
author: ricky t
license: (ISC)
About to write to /Users/*****/Desktop/complete-javascript-course/9-forkify/starter/package.json:

{
"name": "forkify",
"version": "1.0.0",
"description": "forkify project",
"main": "index.js",
"scripts": {
"test": "echo \"Error: no test specified\" && exit 1"
},
"author": "ricky t",
"license": "ISC"
}

Is this OK? (yes) yes

Once you’re done, go back to the directory, and you’ll see a package.json.

Now let’s install webpack: npm install webpack –save-dev

It will save webpack as a development dependency. Now go back and look at your packpage.json, you’ll see that webpack has been added.

Your packpage.json should look something like this:

Now let’s install jQuery: npm install jquery –save

It will save jQuery not as a dev dependency, but as dependency.
You can also uninstall jQuery like so: npm uninstall jQuery –save

Let’s install local web server: npm install live-server –global

If you get an error, make sure you use ‘sudo’ to give permission:

sudo npm install live-server –global

when you install globally, you can run it anywhere by typing:
live-server

In main directory, create file webpack.config.js:

The entry point is where we want to start running the project. Create a file: /src/js/index.js

Basically, we have a value/component in test.js, and we export it to index.js.

Create file: /src/js/test.js

The output means that after we package all of our js files together, we want to export the resulting file into ‘dist/js’ with the name ‘bundle.js’.

This bundle.js will have all of our code, which can be easily run in the browser. It literally packs everything for the web to run. If you were to look inside the bundle.js file, you’ll see our js code of test and index.

Install webpack client: npm install webpack-cli –save-dev

Another thing you should look at is change your package.json when you run the scripts. Make sure we’re running the webpack conversion using development or production.

Your package.json should look like this:

Now, when you go: npm dev run, webpack should convert our web files into a bundle.js.


Built at: 12/15/2019 6:23:26 PM
Asset Size Chunks Chunk Names
bundle.js 1020 bytes 0 [emitted] main
Entrypoint main = bundle.js
[0] ./src/js/index.js + 1 modules 143 bytes {0} [built]
| ./src/js/index.js 92 bytes [built]
| ./src/js/test.js 51 bytes [built]

However, we need to put this bundle into an html file so we can see it:

create index.html in distr/

Then in index.html, type ‘!’, then press ‘tab’.

you’ll get the typical html template. Then in body tag, put:

your index.html should look like this:

Open the index html file dist/index.html and when you see the html load, it will also load the bundle.js file. You’ll see the test.js and index.js print out the results.Make sure your web server is running by typing live-server.

Development Server

Let’s install this so we don’t have to run webpack manually everytime.

package.json

webpack.config.js

now run:

npm run start

you’ll get a browser up and running with the code. Now, when you make changes to your code, you will get live compiling of the files. You don’t need to go to your terminal and run “npm run dev” every single time. Every save you make will automatically compile and rerun the server.

That you can go straight to the webpage to see the updates.

Now we try to run it with the given css from the css folder

remove index.html in distr/js

make sure to install html-webpack-plugin:

webpack.config.js

we alter our webpack.config.js like so:

however, u won’t see it because it’s not saving it on disk.
It simply injects the script.

If you want to save it to disk, run:

npm run dev

At this point, your files should look something like this:

forkify_lesson_7

Installing Babel

lesson8 – source

Babel is a JS compiler, in order to use next generation JS.

npm install babel-core babel-preset-env babel-loader –save-dev

check out package.json file to make sure you’ve installed.

Loaders allow us to import all different kind of files and process them. Convert es6 to es5. Or convert less to sass.

We need to babel loader to do the conversion.
There are certain rules to do these loading. So in our webpack.config.js, we need to define rules. It is an array.

Async/Await usage vs Promises

Difference between Async/Await and Promises

Async Await functions works similar to Promises, with minor differences.

When you use a Promise, the single thread asynchronously executes your async operation and then continues and executes the next line of code.

Whereas in Async/Await, it will execute all of the Await first, before moving on.

Example – Async/Await vs Async/Promise

We have a getWebcast function that is going to wait 2 seconds of wait time and then returns data. This simulates a fetch operation that goes to a server, retrieves some data and returns it.

The execution of a Promise is always asynchronous.

The result is:

— F —
— getWebcast —
Promise {}
— result of fetch in F —
using Promises — end of F —
end of script…

You see that the function execute. The returned Promise returned by F() is a pending Promise and no one is using it. It executes line by line down the list.

In order to solve this asynchronous issue, we use .then on the returned Promise object.

So now, you’ll see that the single thread will execute getWebcast’s returned Promise a bit,
then continue execution and log. Goes back and process Promise a bit, then keep going on to the next execution.
Eventually, when the Promise in F is done, the thread goes into the then and then logs.

Hence, note that the execution continues right after the start execution of our Promise.

results:
— F —
— getWebcast —
using Promises — end of F —
end of script…

wait 2 seconds

— result of fetch in F —
{data: “payload”}

Using async/await

Now that we’ve seen how Promises work, let’s look at async await.

await is only valid in async function

In order to use await, you must wrap it inside of an async function. You can also use Promises in async functions.
However, there is a minor difference. With async/await, the execution will stop at ‘await’ within the async function.
Execution will continue in the async If and Only If the await has been executed.

However, execution OUTSIDE of the async function will be asynchronously processed. Let’s take a look at an example.


— F —
getWebcast —
end of script…

wait 2 seconds

result of fetch in F —
{data: “payload”}
using Await — end of F —

So as you can see in the async function F, the execution actually stops at getWebcasts()
It does not go onto the three logs.

But when function F does execute it, the thread will asynchronously execute the log ‘end of script…’ after F().
This is obvious in the output as it is printed to the console, and then we simulate the 2 second wait.

After the 2 second wait, we then see the rest of the code (AFTER await in the async function) get executed.

If you want everything to run top down, without the thread running down the execution line on printing “end of script…” when its waiting for the 2 seconds…then simply put await in front of F:

This ensures that we will always wait until an async operation is done before we move on.

This applies also to when we use then also.


output:
— F —
— getWebcast —
end of script…

wait 2 seconds

result of fetch in functionalityOne —
{data: “payload”}
using Await — end of F —

In an Async function, execution must finish on Await, before it moves on to the rest of the async function code. However, it will continue asynchronous code outside of the Async function.

…in other words, await BLOCKS the code execution WITHIN the async function.

Additional Example

If you do not return a Promise, async function will return a Resolved Promise

As for async operations, it won’t work here because the Promise here is resolved already.
If you want to do a future resolve, make sure to create your own Promise, and resolve where you want.

Promises (udemy)

What is a Promise?

A promise is an object that keeps track whether an Asynchronous event happened or already. Then how it gets handled in the future.

Promise can have different states:
pending – when the final value is not available yet. This is the only state that may transition to one of the other two states.

resolved – Fulfills the associated promise with the specified value, or propagates the state of an existing promise. If the associated promise has already been resolved, either to a value, a rejection, or another promise, this method does nothing.

fufilled – when and if the final value becomes available. A fulfillment value becomes permanently associated with the promise. This may be any value, including undefined.

rejected – if an error prevented the final value from being determined. A rejection reason becomes permanently associated with the promise. This may be any value, including undefined, though it is generally an Error object, like in exception handling.

We make an instance of Promise by using ‘new’. Once an instance is made, we need to insert an executor function. This executor function will be processed by the Promise object asynchronously and it will pass two callback functions to you: resolve, and reject.

Once the process is done inside of your executor function, you execute the callbacks to let the Promise object know that you have received the data you wanted.

The Executor takes in two callback functions: resolve and reject.
It is used to inform the promise of whether the event is handling whether it is successful or not.

If success, call resolve.
If not successful, call reject.

You can wrap a function outside of the promise. But make sure that you call a then for the returned Promise object.

Look at runPromise(). It executes innerPromise(), which returns a new Promise object. We then wrap a then() to it and thus, it will wait for the data to return.

Ultimately, we want to give the result to outside most function. When we executed runPromise(), we get the Promise object from innerPromise(). We must take care of this returned Promise object, so we chain a then() in runPromise() and we’ll get the data.

Therefore, it’s all about chaining .then() to the returned Promise object.


-- runPromise --
-- innerPromise --
-- start the executor --

2 seconds later...

data fetched from server!
innerPromise()'s then - data returned
runPromise()'s then - data returned
lots and lots of important data

Using reject

Now, let’s replace resolve with reject.

When you run the code, after two seconds, we get an error in the console:


Uncaught (in promise)

This is because we have nothing to catch those errors. Let’s chain a catch:


-- runPromise --
index.html:29 -- innerPromise --
index.html:31 -- start the executor --
index.html:33 data fetched from server!
index.html:51 HTTP 503 Error Code - Server down

Chaining Promises

We first have a fetchOrder function that returns a Promise object. This Promise object simulates getting an order via GET operation on a web server:

We then create a sendOrder function. It simulates sending data to another server using PUT/POST. It’s supposed to put the order into that server.

Finally, let’s chain these Promises together. We do so by doing the standard procedure of getting the first Promise and then chain a then() to it. The trick is to return another Promise object here so that we can continue chaining then to it.

Note that we can also return primitive values here, which JS will automatically wrap a Promise object around it and return it. Thus enabling us to keep chaining away. However, to be precise and clear, you should return functions that return Promise objects.

spread and rest operators

Usually, when we execute such functions, we have to put in the parameters one by one…

or

In es5, we would use the apply function to do this:

By definition, function prototype apply takes in all the parameters as an array. Hence we make use of the apply function to pass in parameters using an array.

However in es6, you can simply use the spread operator:

Rest Parameters

Every function has an object called arguments.
It is an array-like object that keeps track of all dynamic number of parameters throw into the function.

An array-like object simply means that the object holds:

1) numerical property either in string or integer
2) has length property

You can convert Array-like Objects to their Array counterparts using Array.prototype.slice

This is so that we can convert arguments object into an array.

1) We know that slice creates a new array, with shallow data.
2) We also know that there is a Function prototype called call.

functionName.call(value of this, arg1, arg2…)When using call, we go someFunctiono.call(PersonObj), and it would execute function DisplayInfo using PersonObj as ‘this’

We want to execute function Array.prototype.slice usinga function’s arguments object as ‘this’:
– Array.prototype.slice.call(arguments)


tmp5
Array(10) [ undefined, "hohoho merry xmas", "happy new year", undefined, undefined, undefined, undefined, undefined, undefined, "testing 1 2 3" ]

arguments.slice() does not work.

arguments is an array-like object. And js objects do not have the prototype function slice().

Thus, in our example, we simply use Array.prototype.slice.call to create a new array shallowly from the arguments object.
Once we get that array, we simply iterate through it and do what we like.

call isFullAge5 with various parameters


[ 1980, 1990, 2000, 2019 ]
true
true
true
false

es6

Using spread operator is same as let arr = Array.prototype.call(arguments) where arguments is an object.

Even better is if we put variables in front. Doing so put the first parameter into ‘limit’. And then mask the
rest of the parameters into array years.

es6 Arrays

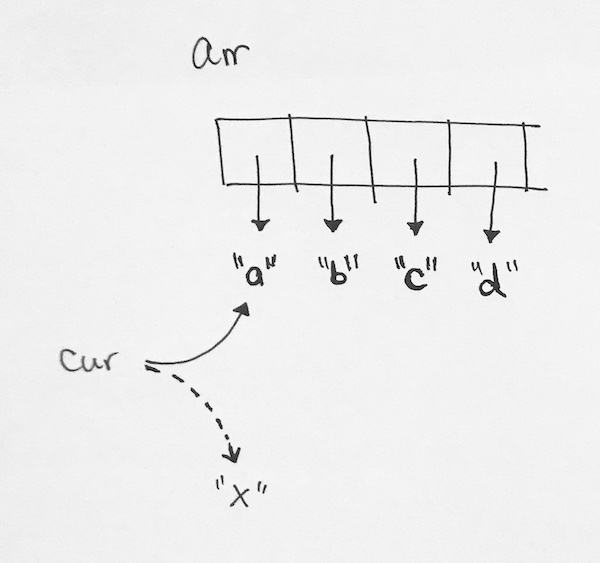
Arrays are a list of references

An array element is a reference that is pointing to something (string literal, object, etc)


Array(4) [ "a", "b", "c", "d" ]


Array(4) [ "a", "b", "c", "d" ]

Wuw what happened!?

So our array is a list of references that are pointing to the string literals.
When we use a callback function, the parameter of the callback function ‘cur’, is actually just a reference that happens to point to the string literals.
It does not re-point the array element reference. Hence, when we re-point the cur, it just points to ‘x’, and our arr (having nothing to do with cur) stays the same.

Grabbing those Array Elements

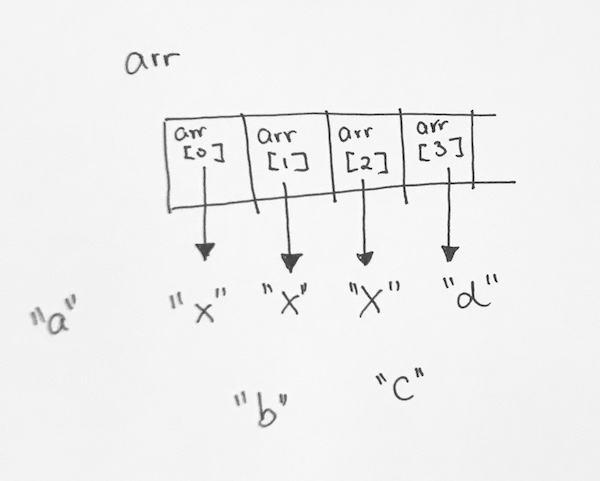
In order to re-point our array element references, we must access the array element reference itself.


Array(4) [ "x", "x", "x", "d" ]

And now you have used arr[x] to access those reference themselves, you successfully re-point them to different string literals.

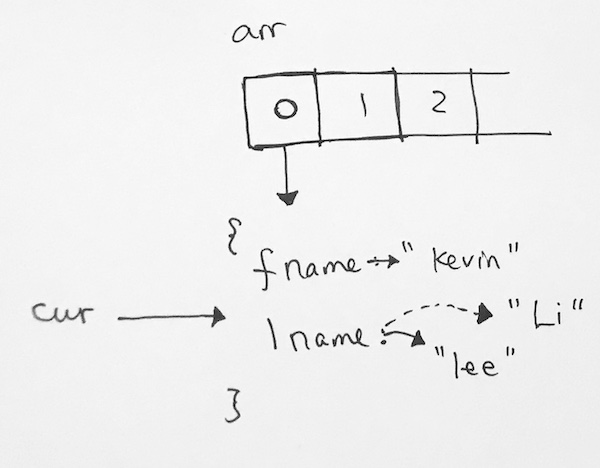
Objects can be manipulated

However, when we’re dealing with objects, we can use cur to manipulate it. This is because we’re not trying to re-point arr[x] to another object.

Rather, we’re just dereferencing the object itself, and changing its values.


0: Object { fname: "kevin", lname: "Li" }
1: Object { fname: "rick", lname: "Li" }
length: 2 : Array []

es6

In es6, we can use from to create another array. Then use forEach to loop over it. For each person in the people array, we do the assignment.

Legal example


(8) [true, true, true, false, false, false, false, false]


24 is leeeegal ;)
45 is leeeegal ;)
35 is leeeegal ;)

lexical this

In a web page, say we create an object that adds event listeners to certain elements on the DOM. Specifically we want to add a click event to a li element.

So we create an object with a function called addGreenClickEvent. This function uses document to select our li element via class name green and proceeds to add the click handler.
In this handler, we attempt to access some data in the other function addGreenClickEvent because that is where we can access color and position by using this.

Note that when a function is within an object, the ‘this’ in that function will reference that object.
If its a standalone function, the ‘this’ within the function will reference the global object.

So now when you run the web page, in your console, you get:

box5 - clickMe executed
green
1

Now when you click on the li element, you’ll get this:


you clicked on green!
This box has color undefined, with position undefined

As you can see in the handler function, the properties color and position is undefined. If you try to log the ‘this’, you’ll see the HTML element you clicked on:

Obviously this isn’t what we want. What we’re trying to do is to get the ‘this’ reference in addGreenClickEvent.

self hack

The ‘self’ hack basically declares a self property and point it to addGreenClickEvent ‘this’ reference.
By using scope, we call self in the event handler function and it works.

output:

This box has color green, with position 1

arrow function

If you use the arrow function, it uses the parent context, which is the ‘this’ inside the method addGreenClickEvent.
Since addGreenClickEvent is a method of object eventAdder, its ‘this’ correctly points to eventAdder.
Hence by using arrow function here, we point the ‘this’ inside the anonymous function to the parent context, which is the ‘this’ inside method addGreenClickEvent, that points to eventAdder obj.

Double Arrow

But what we made the outer function into an arrow function?

You’ll see that our properties are undefined again.

The reason why this is, is because arrow functions points to the parent context. We’re not taking about the calling object anymore, which is what function does. We’re using the arrow function, which looks for the parent ‘this’. The parent context, in this case (‘this’ of eventAdder) is the windows object.

All you have to do is log the ‘this’ reference in addGreenClickEvent function and you’ll see that the Window object gets printed. Here’s why.
When we use the arrow function at addGreenClickEvent, it applies the self hack in the background like so:

So as you can see by using the arrow function for addGreenClickEvent, the this references in that function becomes the global object.
Naturally, the handler function with the arrow function will also apply the self hack, which results in getting the global object for the ‘this’ reference as well.

Hence, in this situation, the right thing to do is to make sure the topmost function’s ‘this’ reference is correct. Then you can keep using arrow functions and it will chain correctly.
But when in doubt, start from the top and use self hack methodology to see what is assigned to each function.

Double function

We first create a function constructor.

We then attach a function called myFriends to its prototype object.
We iterate over an array and then call map on that array. We supply a function for it.

Then we run it.

The problem you will see is that even though our prototype function myFriends has its ‘this’ reference pointing to instance p.
Then when we run myFriends function, we get:


(3) [" is friends with Bob", " is friends with Jane", " is friends with Mark"]

We see that this.name does not display. Let’s simply log the this reference to check.
We see that the ‘this’ reference supplied to map is of the window object.

This is a behavior of es5, where if a function is not attached to an object, it automatically gets set to the global object.

As mentioned earlier, you can simply change the inner function to an arrow function and it will work.

But in our case, we can also use bind:

Unlike call or apply, bind does not execute the function. It simply binds an object to the function for future calls.
When in the future the inner function gets executed by map, its object bound to it will be the ‘this’ in myFriends function.

Budgety

Synopsis

We have the Controller that acts as the middleman between a data controller (budgetCtrl) and UI controller (UICtrl).
In the Controller, we declare click events for user actions. Once that click event happens, the Controller takes in data and stores it into a data structure.

In the case of adding an item, the Controller takes data from the DOM by using function querySelector and gives it to budgetCtrl to store and manipulate.

Once it finishes, it calls budgetCtrl’s related getXXXXXXX() function and gets the data it needs to display. It passes that data to the UICtrl to be displayed.

BudgetController

The budget controller holds data that stores expenses and incomes.

Specifically, it will store individual expenses and incomes via array:

It then stores a total for all the expenses and incomes.

It also has:

Leftover Budget – incomes – expenses
total percentage – expenses / income

And thus, our budgetController keeps track and hold data. Naturally, it will have functions that manipulate these data.

Let’s look at the simple functionality of adding an item.

On the data side, we want three things:
– type (income or expense)
– description of the income or expense
– value of the income or expense

Then we simply use the string ‘inc’ or ‘exp to act as the property name inc/exp.

Thus we are able to dynamically use arrays data.allItems.inc or data.allItems.exp simply by using data.allItems[type] where type is “inc” or “exp”.
This is how we get the array we want to use.

The idea is for adding items is that we append it to the end.
So we first have to assign an ID for the item. The ID is simply the index of the next available element.

For example, if the array is empty, then the ID for our item should be 0. If the index of the next available item is 2, then the ID we assign to our item should be 2:

We then create a newItem according to the type. If its a ‘exp’, we simply create a new Expense. If its ‘inc’, then we create income object.

After that, we stick the item into the respective array.

Controller

In the controller, we first set up some basic key press features for when user enters their data.
We do this in setupEventListener function.

We add a click event listener to when the user clicks on the button which has id/class of DOM.INPUT_BUTTON.
In our case, the button has class ‘.add__button’. When the element with that class is clicked, we call on ctrlAddItem.

We store the DOM elements’ classes and ids strings into an object literal.

By using querySelector along with these macros, querySelector will go into the DOM, find the elements with those strings as id/class and retrieve data.

So continuing on, when the button was clicked, it executes ctrlAddItem. In ctrlAddItem, we first get data from three elements and put them into an object called ‘input’.
The three data is type, description, and value, which represents the item you are inserting.

Then we do an error check for the data stored in object input. If everything checks through then we have enough information to feed our budgetCtrl’s addItem function.
After adding the data into our budgetCtrl (data container), we then have our UI controller add it into our UI.
Then we clear fields.

Notice the last updateBudget and updatePercentages.

Once we have new data stored in our arrays, we need to call those functions to calculate what we need.

updateBudget

We have access to budgetCtrl and UICtrl. So the main idea is for budgetCtrl to calculateitself. Then get the data we want, i.e budget.
Once we have the budget data, we just pass to the UICtrl to be displayed.

updatePercentages

Same goes for updating percentages. The main idea is that we calculate data in budgetCtrl, and then using getXXXXXX() we get the needed data from budgetCtrl.
We pass this data into the UICtrl, which then takes care of displaying the changed data onto the UI.

Notice updatePercentages operates the same way. We first have budgetCtrl, which keeps track of all our data, to calculate what it needs. Specifically the percentages of the expenses in relation to the income. We then extract the percentage array from budgetCtrl.

Using that array, we insert it into the UI controller to be displayed.

UIController

The data gets calculated many times in budgetCtrl, and we must make sure that change gets reflected in our UI. The UI controller does exactly this by making use of document.querySelector A LOT.

querySelector takes an argument of a string which represents the element’s class or id name. In our case, for the type, we want to get what was selected.

We first create an object to keep tract of these classes and ids.
Notice class add__type. We will store it as a macro in DOMStrings object.

We see that we have a select control in HTML. When the user makes a selection on the web page, the string ‘+’ or ‘-‘ will be given to the select tag. By using querySelector function to retrieve that value, we can then store it into a property called selectedType. Same goes for the description and amount.
Now we want to add this item to the UI. We do this by first getting two objects. First is the parameter type so we know whether to add the data to the income div or expense div.
When we know whether to add expense or income, we can safely get the parameter obj and literally just do a data dump.

Full Source code

Build a Library with es5

IIFE

First, we use an IIEF because we want to invoke a function immediately. This puts the function onto the execution stack. We put parameters are global, and $ because we want to attach properties to the global variable. The $ is jQuery.

Hence, our function looks like this:

We want to execute it immediately so that it gets processed and data gets attached to the global variable. Hence we execute it as a function expression and pass in the window object, and jQuery.

Factory Function

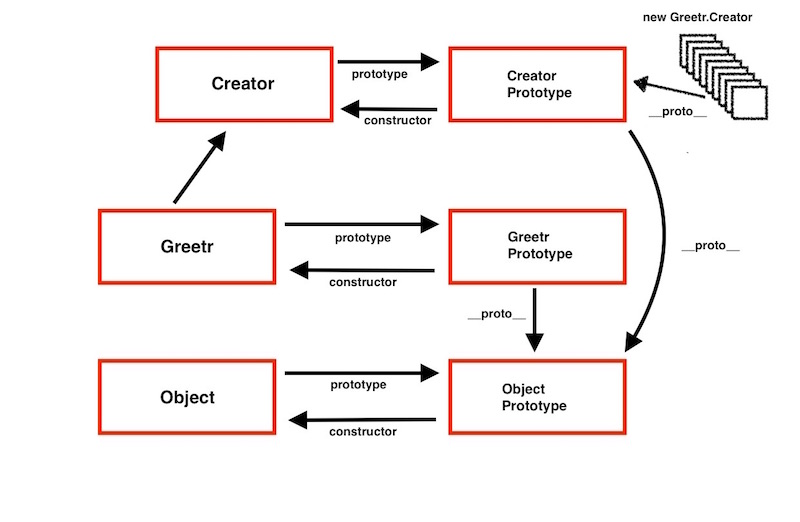
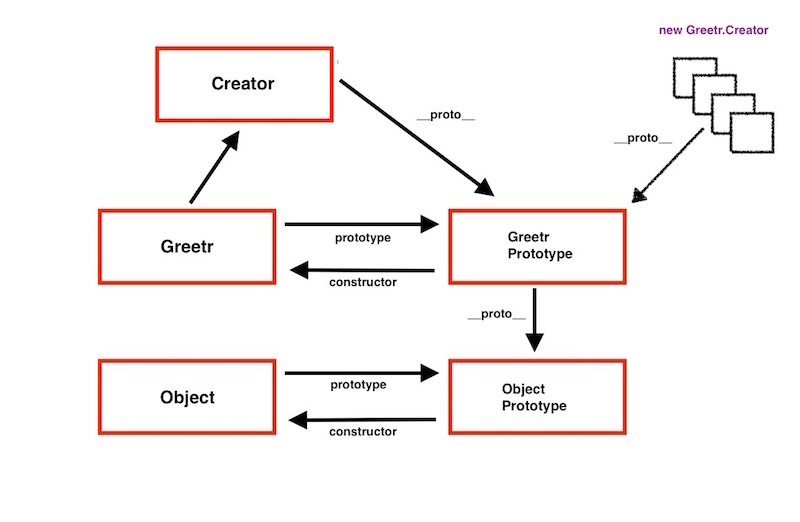
We then create Greetr as a function where we use a utility function called Creator to return instances.

Say we do it this way:

We have a special Creator function that returns instances. However, take note that Greetr is a function with its own prototype object. Creator is a reference to a function. Creator has its own prototype object like this:

So when we get a new Greetr.Creator(…), the instances are pointing to Greetr.Creator’s prototype object.

Now, this is fine and dandy in situations if we were to implement prototypal functions/properties for our Creator prototype, and Greetr prototype separately.

But in our case, we just want to implement prototypal functions/properties for Greetr prototype only. We want all other functions to inherit from our Greetr. Thus, that’s is why we must point our Greetr.Creator’s prototype to Greetr.prototype. That way, any instances created from new Greetr.Creator will inherit from Greetr’s prototype object.

Add our Greetr function to the global object so we can use it

Finally, we attach our Greetr function as a property to the global object so we can use it like so:

Now, let’s show that our diagram and our code match up.

Adding functionality and exposing them

Add private variables

First we add private objects with properties en and zh. This is so that we can assoiative key/value access like so dictionary[“key”] –> value

We want to use it like this:

then get the string phrases back.
Hence we do it like this:

Expose them publicly via prototype object

What we just declared has private access. We expose them by using them in Greetr’s prototype object.

This way, you are declaring function properties for prototype objects. And as we know, all instances and objects that inherit from our prototype objects can access its functionality. Therefore, when we do

we create instances that inherit from Greetr.prototype, and thus, can access its functions/properties
like so:

Source

Chaining

We can also do chaining where we check the language, then just log all the greetings altogether like this:


√ valid language
ni hao, ricky
Nin hao wo de peng you, ricky cao

Simply add the setLang function to update the this.language property, and then change doGreeting and doFullGreeting function where they return the ‘this’ reference. That way, you get the instance object back and then can call another function on that instance.