Category Archives: javascript

array sorting (js)

by default, when we use sort, it compares by string, which is what we don’t want.

Custom Sorting

Thus, we use custom sorting

do it like so…

you can also see the ordering of integers by subtracting them. positive means left number is larger. negative means left number is smaller.

get maximum

get 2nd max

get minimum

Sorting Objects

Heaps (Binary Tree, priority queues)

code – https://github.com/redmacdev1988/binaryHeap

Another type of Binary tree is the Heap.

A Heap is a binary tree that must have these two properties:

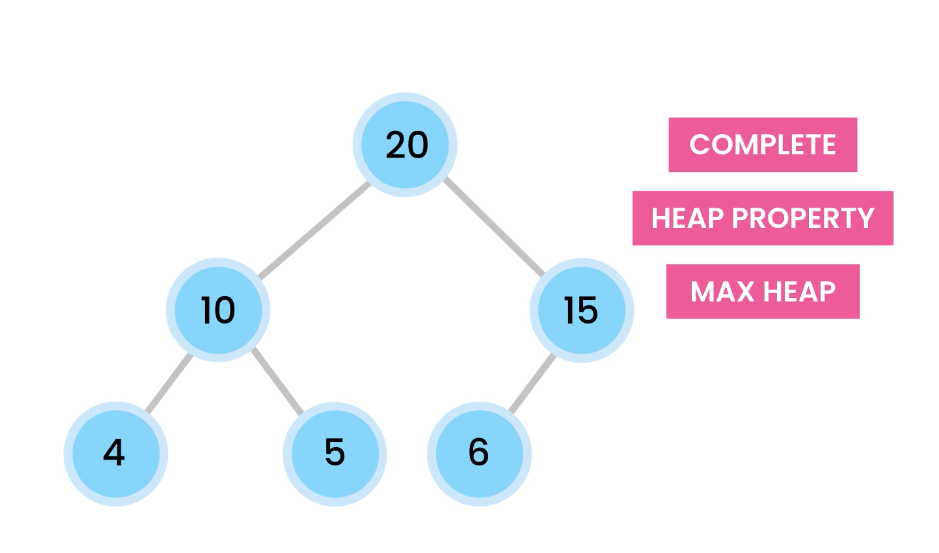
1) A complete binary tree is a binary tree in which every level, except possibly the last, is completely filled, and all nodes are as far left as possible.

Also, nodes are inserted from the left to right.

For example, these are complete trees:

Not complete, because because one of the leafs has a hole in it.

2) Heap property – The value of the parent node is greater than or equal to its children.

A heap is a complete binary tree that satisfies the heap property.

When the largest values start from the root, it’s called a max heap.

The opposite of that, is the min heap, where the smallest value is at the root.

Applications of Heaps

  • sorting (Heap sort)
  • graph algorithms (Shortest Path)
  • Priority Queues
  • Finding the k-th smallest or largest value

Operations of Heap

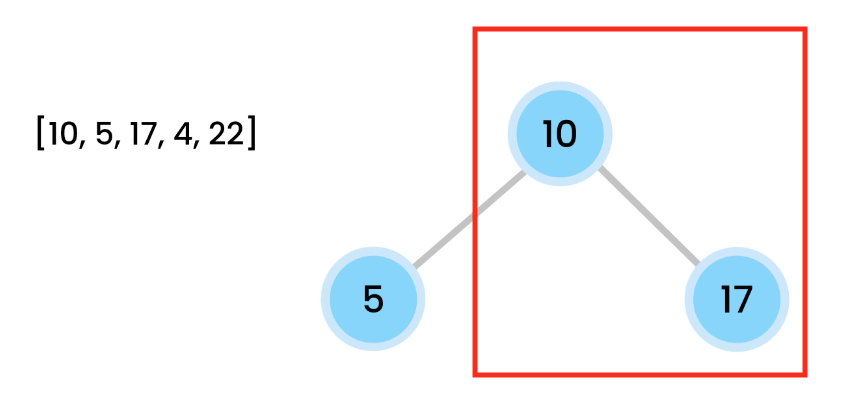
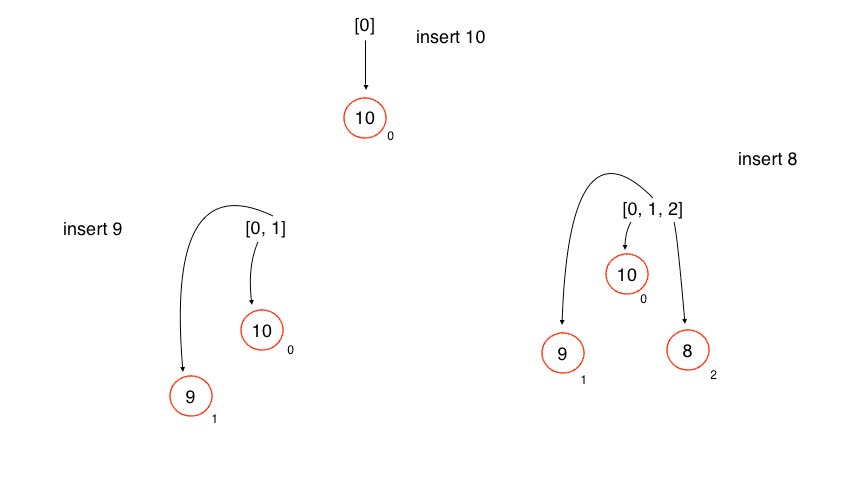
[10, 5, 17, 4, 2]

We add 10 the tree as the root.

Then add 5 from the left.

From left to right, we add, so we then add 17.

However, here 17 violates the max heap rule because parents should be larger or equal to children.

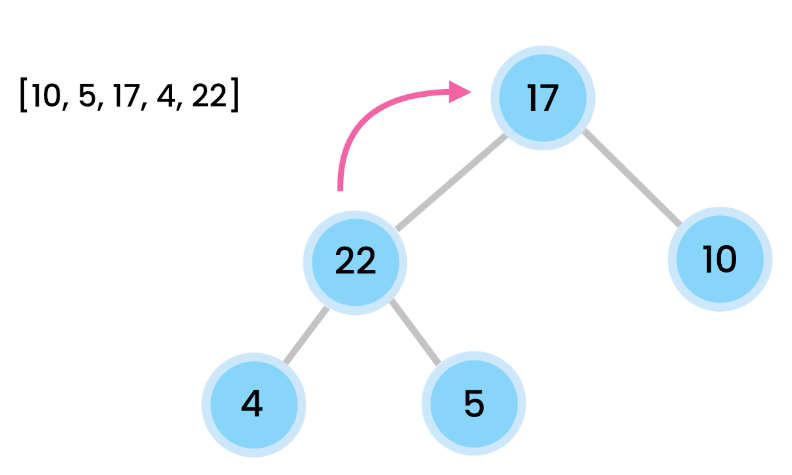
We then bubble the 17. We switch their positions and now 17 is at the root. 5 is on the left. 10 is on the right.

The heap (max heap example)

A max heap has the rule that the parent node must always have a higher priority than its child.

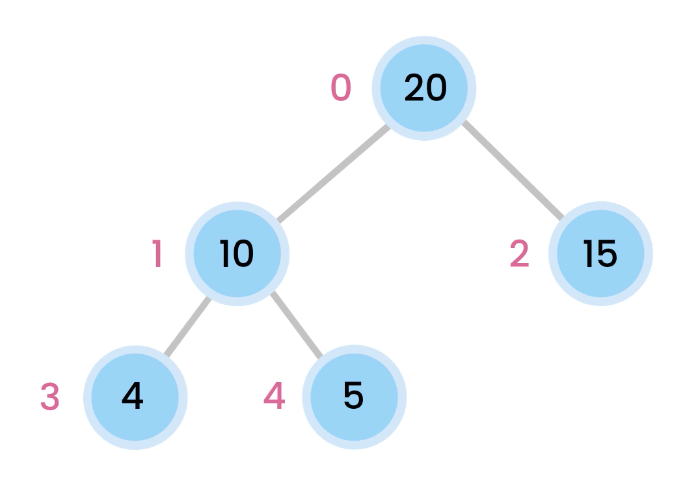
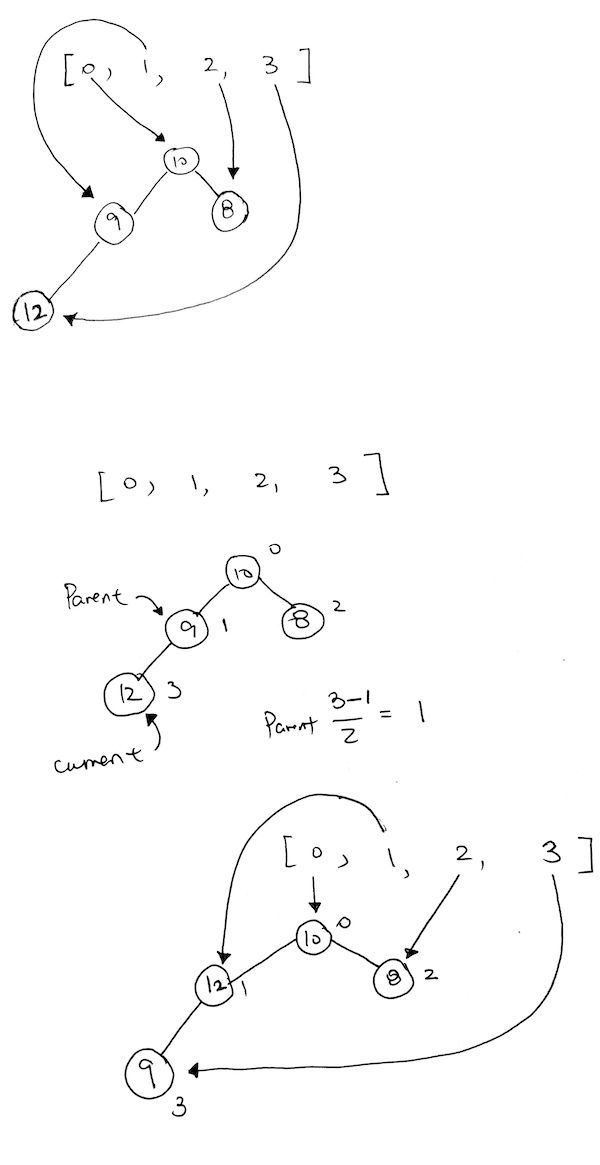
Each node is placed like a tree, however, take caution that there is no left/right references. Everything is accessed via index of the array. If we do want to access children of the node, its children will be indexed like so:

for the left child: 2x + 1
for the right child: 2x + 2

Inserting a node with a larger priority

Let’s say we insert a node with a higher priority than its parent. In the example below, we try to insert 12. Obviously, 12 is larger than 8, and thus, we need to readjust.

First, we check to see if its parent (index 1) is valid. It is, so we have the array reference that WAS pointing to the parent, re-point to the the new node.

Then, have the array reference (with index 3) that was originally pointing to the new node, point to the parent.

We add 4, it satisfies heap property.

We then add 22. Oops, violation.

Then then swap 22 with 5. And then swap 22 with 17.

When largest values would bubble up.

The longest a value can travel is the height of the tree.
O(log n).

height = log(n).
O(log n).

In heaps, we can only delete the root node. And then fill it in with another value that maintains the heap property.

To do this, we move the last value on the heap (5) to the root. We fix the heap properties by bubbling 5 down and moving 17 up.
We pick larger child and swap.

Time complexity is O(log n) – removing value from heap
Finding max/min value is O(1) – root

Implementation

Store everything in array. Start from root, where index is 0.

left node’s index = parent node index * 2 + 1
right node’s index = parent node index * 2 + 2

index of parent of node = Math.floor((node’s index-1)/2)

Additional Material

We have an array property in the constructor called heap. By definition, this array is contiguous memory, and can be indexed, starting from 0.

When we insert a node to the heap array, we allocate a new Node object in memory. Then the 0th index will contain a reference to that Node. When we insert the next node, another node will be allocated in memory, and we then have the 1st index reference that node.

Every node created will be inserted this way.

Thus, the latest current node will always have index heap.length – 1.

Then we add 12. However 12 violates the heap property.

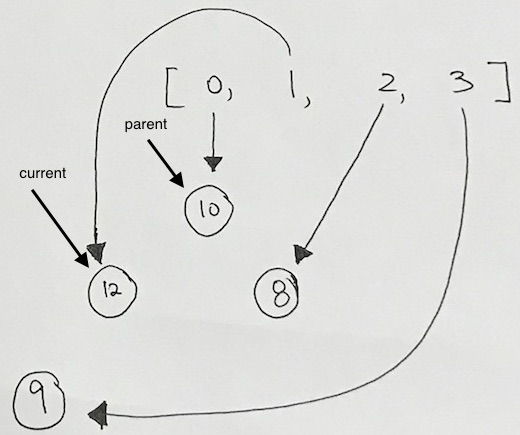
Now, we recalculate the current node index and the parent node index. We want to move one level up so we can calculate index like so:

The easiest way for us to move up the tree is to simply have the current index take on the parent index. Then, recalculate the parent index via:

Math.floor((currentNodeIdx-1)/2)

As you see here, we have a violation. 12, being the child of 9, is larger than its parent. So we must bubble 12 up.

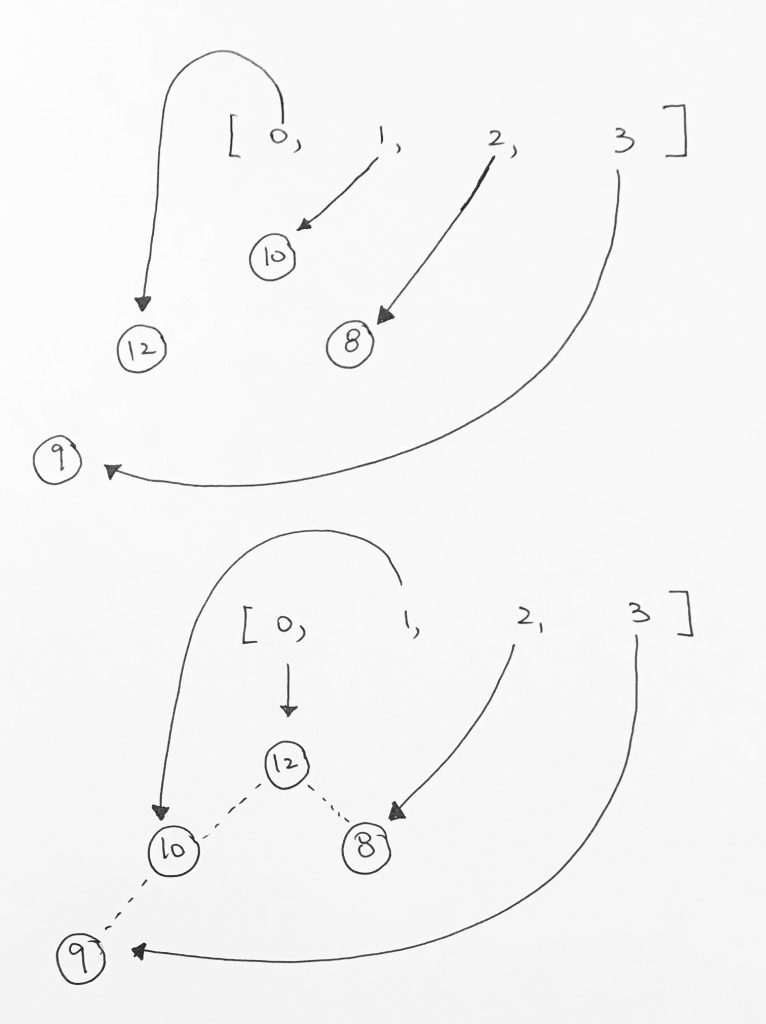
After the first bubble, we still have a violation because 12 is larger than its parent 10.
So now we just repeat what we did above.
Is the parent node valid? Yes.
Is the priority of the current node larger than the parent? Yes.

We then have the parent index’s reference point to the larger valued node. And have the current indexed element reference the smaller node. Our nodes gets reshuffled for ease of viewing, but the concept stands. Index 0 is now pointing to the node with the largest value. And all heap properties hold.

insertion code

Note that Math.floor(currentNodeIdx-1/2) is same as Math.ceil(currentNodeIdx-2/2). It gets the parent node’s index.

Heap Removal O( log n )

1) Removal means we pop the root node and process it.
2) Then we get the last element and copy it over to the root node.
3) Use top bottom to push it down if needed.

First, we copy the last value in the tree ( last element of the array ) onto the root. Then remove the last element, and decrease the heap size counter.

From there we recursively push the root value down the tree so that it satisfies the heap property of where key(parent) >= key(child) if its max heap, and <= if its min heap. We decide on which child node to go down by comparing the two child nodes. We switch the parent value with the largest of the 2 child nodes.

Full Source Code

Tests

Heap Sort

[5, 3, 10, 1, 4, 2];

add them into max Heap object.

If we keep popping…they will come out descending order.

if we use min Heap and remove them, it will come out ascending order.

Returning inside of a callback

When you return something inside of a callback function, it gets returned directly from the callback of the function you executed.

For example,

1) we provide a function definition for func1’s callback parameter.

2) func1 runs its implementation and then executes the callback.

3) goes into the callback and executes code

4) we return a string inside of the callback function.

5) it gets returned from the callback inside of func1

Generator

Diving Deeper With ES6 Generators


https://codeburst.io/what-are-javascript-generators-and-how-to-use-them-c6f2713fd12e

Generators are functions that you can use to control the iterator. They can be suspended and later resumed at any time.

Declaring generators

However, we cannot create a generator using the arrow function.

We can create generators like this:

code version

generator version

But the most significant change is that it does not ring immediately. And this is the most important feature in generators — we can get the next value in only when we really need it, not all the values at once.

Yield

It’s a bit like return, but not. Return simply returns the value after the function call, and it will not allow you to do anything else after the return statement.

with yield, we save the result of the executing line.

Yield returns a value only once, and the next time you call the same function it will move on to the next yield statement.

Also in generators we always get the object as output. It always has two properties value and done. And as you can expect, value – returned value, and done shows us whether the generator has finished its job or not.

Naturally, it will obey the laws of execution. If we have a return, anything after it will never be executed.

Yield delegator

Yield with asterisk can delegate it’s work to another generator. This way you can chain as many generators as you want.

A great example would be in recursive functions. In order to call yourself, you need to yield delegate it

return

Try Catch

You can wrap generators in try catch functions.
Whenever crash/error happens inside of the generator, our outside try/catch will take care of it.

You can also put yield in your generator function. When you have your generator variable, you can call throw on it, and it will throw the error right at where your yield is.

If you throw(..) an error into a generator, but no try..catch catches it, the error will (just like normal) propagate right back out (and if not caught eventually end up as an unhandled rejection).

Generator calling other generators

Receive return value

Distinction between yield and yield*:
– with yield, the result is whatever is returned at the current expression,
– but with the yield* expression, it iterates through generator function’s yields.

The Pause

A characteristic of using next is that the generator runs code up to the point of the yield. You will get the value where yield is. Then, the code pauses there.

In the below example, it shows this.

We first create a generator “foo”.
Then we create another generator “bar”.

1) We call next on the generator variable “it”, and the generator starts executing the code.
It hits the first yield, which gives 1.

The code pauses here.

2) Then our generator variable call the next next function.

The code continues from the first yield and continues executing.
It moves into foo and then hits the 2nd yield, where it gives 2 as value.

the code pauses.

3) We log we’re about to throw error.

4) We get the generator variable “it” and call “throw”.

At this point, we continue from the last yield, which is at line “yield 2” in the foo function. That is where the generator code has paused.

5) We catch the error in foo, and log it.

There is no yield so we DO NOT pause. Hence we continue execution.

6) We log at 6. Then we see a yield. Hence we pause, and return the execution to the generator variable.

7) We continue with execution on the generator variable “it”. We then call the next function again on the generator variable “it”.

It continues execution from where we left off in the generator, which was an empty yield.
It continues execution and we get to a throw “Oops”. The throw propogate to bar’s catch and gets caught.

It logs the bar catch, and bar finishes running.

Algorithm examples

Shellsort’s skip mechanism


output:

Now jumping 2 across the array
3
5
7
9
Now jumping 5 across the array
1
6

Divide and Conquer concept


output:

—1st next—
divideAndConquer – start: 0, end: 3
mid is 1
LEFT recursion: [0, 0]
divideAndConquer – start: 0, end: 0
reached end
√ 8
—2nd next—
continuing…!
mid needs to be printed.
√ 99
—3rd next—
RIGHT recursion: [2, 3]
divideAndConquer – start: 2, end: 3
mid is 0
LEFT recursion: [0, -1]
divideAndConquer – start: 0, end: -1
left recursion NOT AVAILABLE X
mid needs to be printed.
√ 8
—4th next—
RIGHT recursion: [1, 3]
divideAndConquer – start: 1, end: 3
mid is 1
LEFT recursion: [0, 0]
divideAndConquer – start: 0, end: 0
reached end
√ 8

immediate functions

ref – https://blog.kevinchisholm.com/javascript/javascript-immediate-functions-basics/

In JavaScript, the immediate function pattern is a way of executing a function as soon as it is defined. In this article, I will explain the syntax and explore some of the advantages of using it. This syntax can also be referred to as a closure.

An example of an immediate function:

Basically, it is a function expression which is executed immediately.

The function has to be wrapped in brackets:

without the brackets, it is a function declaration

Hence, after we declare the function to be an expression, we execute it immediately by using ()

Alternatively, you can also do it where you have an function declaration, call it by using (), and wrap the whole thing in (…) as an expression.

Why do we do this?

Immediate functions traditionally have two usages:

– defining a function on page load by a conditional
– or for creating a new scope

For example, jQuery plugins commonly use the following syntax:

This is to avoid conflicts with other libraries that use the $ variable. When the jQuery variable is passed to the function as an argument, it is defined as $ in the new scope. And you start using the ‘$’ inside the function to do your code.

In the old scope, the $ is left unchanged.

Let’s Look at an Example

first we have some js that gets all the a tags in the page. We store it as an array into variable anchors.

Then we loop through each ‘a’, and assign a function handler to its click event.

html

javascript

The problem is that the var i declared in the for loop is scoped globally. Because in JS, we do not scope to blocks. We only scope to functions. So var i has been hoisted to the top. Thus, when the function is assigned to the ‘click’ handler, it accesses the i as an outer i, like so:

whenever we click on a link, it’ll log the i as 6. Because we’re always accessing the global i.

solution

This can be solved by using an immediate function.

We create a closure by implementing a function around it, with a parameter to pass in the variable i.
This is done by creating a function expression, then executing it right away (IFEE), for each index.

Thus, there will be 6 closures. Each closure holds a different i.
A closure’s respective handlers inside, will access that i.

Now it will work as expected.

Additional Examples

The function is assigned to a variable, and that is it. We have only the function declaration here, but we never call the function. But if you were to add the line “myFunc();” to this code and run it, the output would be: “I am a simple function”.

In order to turn this function into an immediate function, we add the open/close parentheses after the closing curly bracket and then wrap the entire function in parentheses. After we do this, we run the code and whatever happens in that function is executed immediately after the function declaration is complete.

We first declare a variable called “myName” before declaring our function. When declaring our immediate function, we take one argument: “thisName”. At the end of the immediate function declaration, the open/close parentheses pass the variable “myName” to our immediate function. So, not only does this set of open/close parentheses execute the function, it also allows you to pass an argument to that function.

implementing the feedTheKraken

Get the project running

Download the source code onto your computer
download v1.0

cd into the directory, and install all packages
npm install

Then start the server:
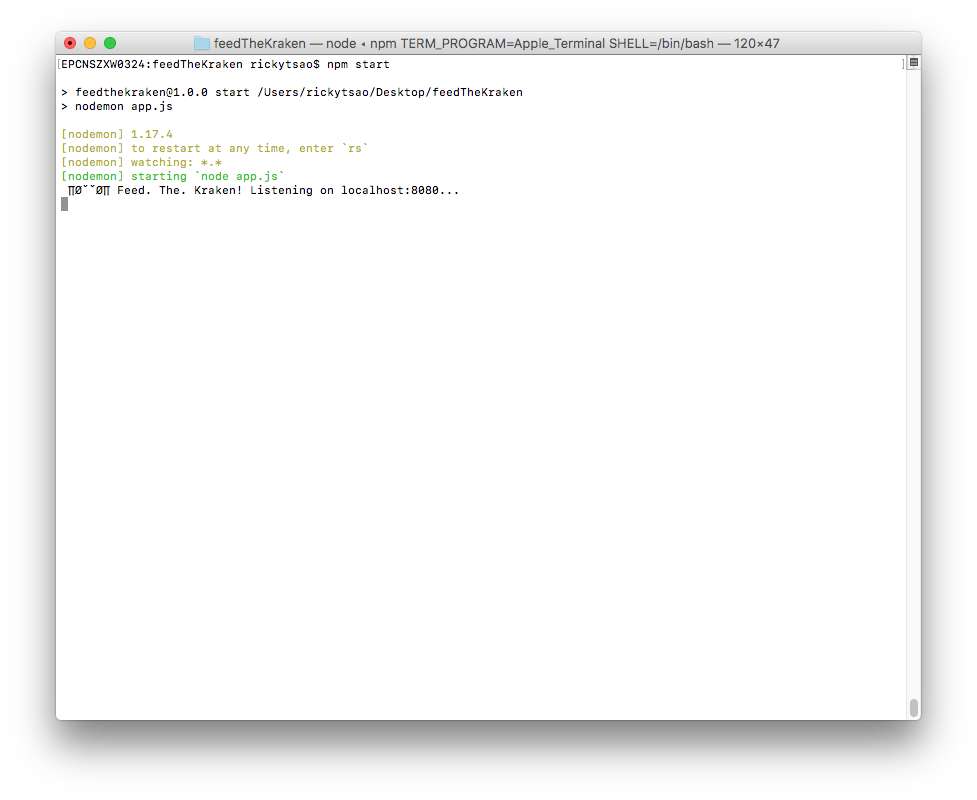
npm start
You should see the server starting up.

In the directory, there is an index.html file. Double click it.

You’ll see the web page.

Go ahead and starting using it. Click on the browse button and select images you want to kraken.

Then click the “Feed it” button. This sends all your images to the server.
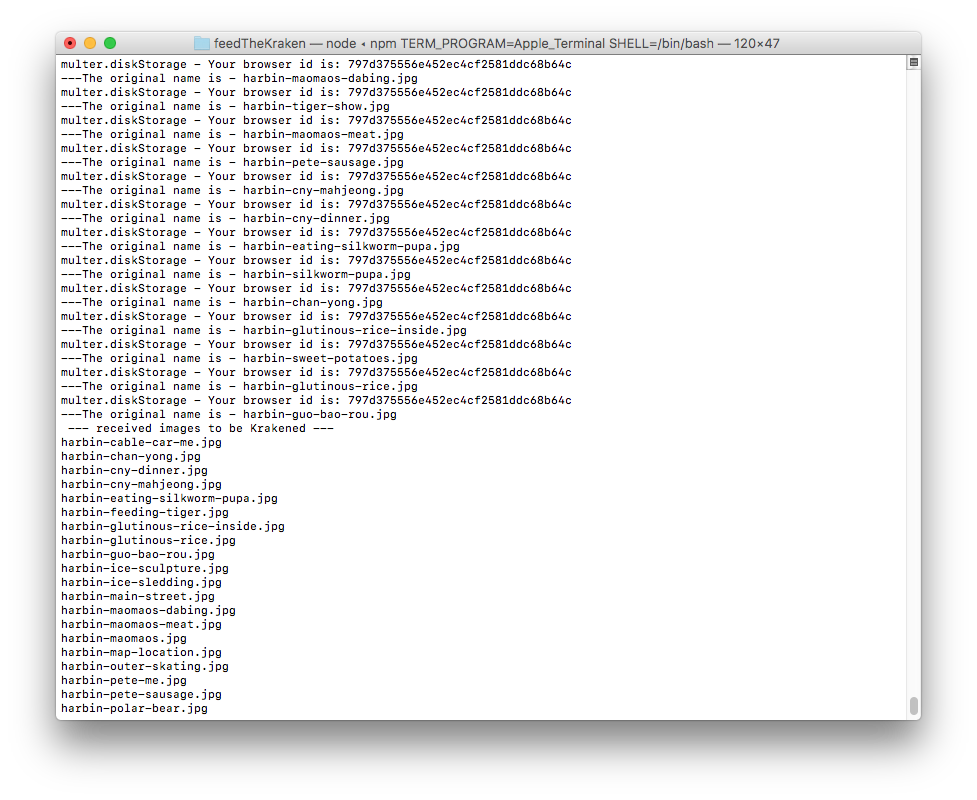
The server will then download these images into an ‘unprocessed’ folder that is unique to your browser.

Once the images are in that folder, it sends the images to Kraken.io to be processed. You will see the images being processed in your terminal.

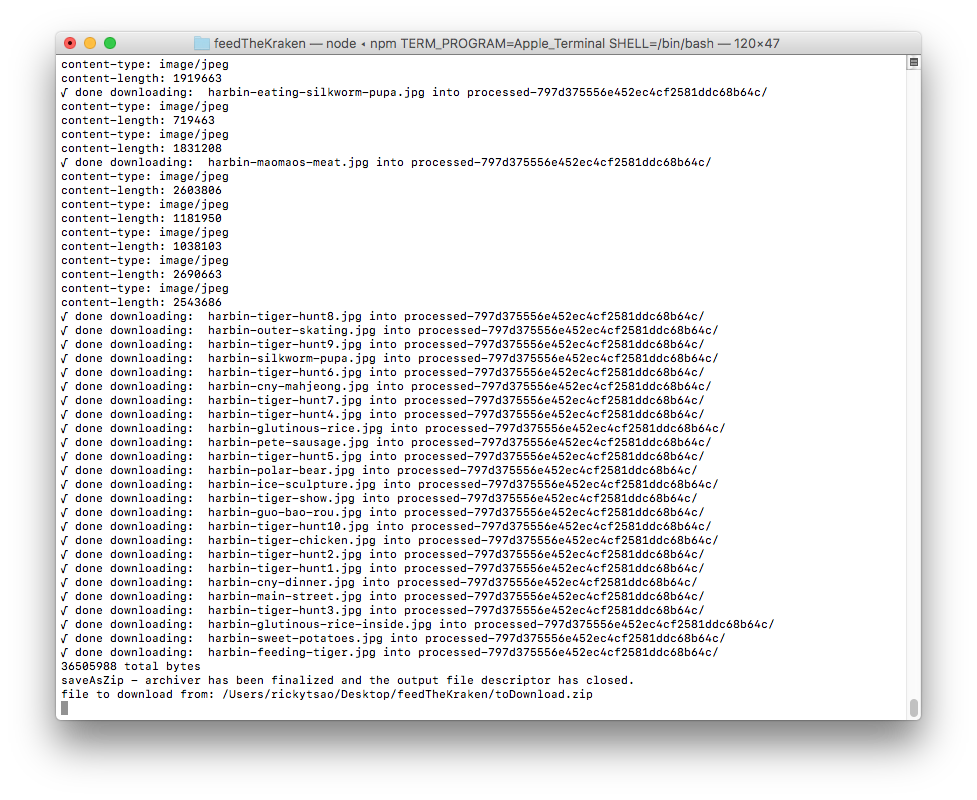
Once processed, Kraken.io will return urls that contains the finished image. The server takes those url and downloads these finished image into a ‘processed’ folder.

Then it zips the processed folder and will log out the finishing steps.

Starting the project from scratch

set up a basic project with gulp:

ref – http://chineseruleof8.com/code/index.php/2015/06/30/starting-gulp/

You should now have a functioning server going with nodemon as work flow.

install body parser

npm install express body-parser –save

edit your app.js

We implement the server to be a bit more detailed, and standard.

Creating the index.html

in your project directory, touch index.html

First, we have an file input control that takes in multiple files.
Second, we have a button right underneath it. This button will execute a js function. The JS function will proceed to pass the file information onto a url that hits our server.

First, let’s see the skeleton. Notice we have included boostrap css. This is so that we have some ready
made CSS to use.

Fingerprint2

Make sure you include this in your script area

Multiple browsers will be hitting our servers. Hence, all the unprocessed and processed images are to be kept in a folder for that browser only. There will be many folders that match up to each browser via a unique string id. As the browsers make their requests, images will be kept in those folders. That is how we know which image belong to which browsers. Fingerprint2 basically distinguishes browsers by returning a unique id for that browser.

Using axios to send files to node server

Make sure you include this in your script area

Keep in mind that in order to distinguish ourselves from the other browsers, we throw in the browser id in the url parameter. That way, when we save our images into a folder on the server, the server will keep track of it via our browser id.

1) first, we get the array of images received from the “file” control.
2) Then we create a FormData class that collects.
3) We include the browser id in the url parameter, and pass in the FormData in the parameter
4) We receive response from server

Don’t forget to implement upload for POST requests on the server. The point is that we have different browsers uploading images. We keep track of each browser’s image by creating a “unprocessed-${browser id}” folder. It holds all uploaded images from that browser that is not current processed by Kraken.

You should then be able to see the response back to index.html with result: “good”.

Installing Multer

In your directory, install multer:

npm i multer

Create a function called processImagesFromClientPromise and implement it like so.

make sure you implement createFolderForBrowser because as the images come in, you’ll need a place to store them.

Zipping a folder

After krakening all the images, we place it in the “processed” folder.
In the future, we may want to send all these images via email, or a link so the user can download it.
Its best if we can zip all these images together. We use the archiver to do this.

First, we install archiver:


npm install archiver –save

This is how we implement it. However, in the future, we want to place it inside of a Promise for refactoring.

Downloading the Krakened image from provided url

something like this:

https://dl.kraken.io/api/83/b0/37/75905b74440a18e6fe315cae5e/IMG_1261.jpg

We provide the link string via uri.
We give it a filename such as “toDownload”
Then we provide a callback for once it is done.

used like so:

Function setup

However, the problem is that all of that deteriorates down to pyramid of Doom. Each task does something asynchronous, and we wait until it is done. When it’s complete, inside of the callback, we call the next task.

Hence our tasks list is something like this:

  1. processImagesFromClient
  2. readyKrakenPromises
  3. runAllKrakenPromises
  4. saveAsZip

Some of the functionalities are run inside of a callback. Some of them are run at the end of the functions, hence at the end, we get this complicated chain that no one wants to follow.

Hence, let’s use Promises to fix it.

Promises version

ref – http://chineseruleof8.com/code/index.php/2017/10/03/promise-js/

…with promises, it looks much prettier:

full source promises version

Basically we group code inside a new Promise. Then return that promise. Whatever variable we return, shall be passed inside of resolve. Resolve indicates that we move on to the next Promise.

Also, whatever parameter that gets passed into resolve, will appear in the .then parameter. You may then pass that parameter on to the next function.

Encapsulation

However, make sure we encapsulate the functionalities. We don’t want outside to be able to use functions such as readyKrakenPromises, runAllKrakenPromises, and saveAsZip.

So we change these functions to be private functions. Then create a public function that does the Promise calls like so:

used like so:

app.js full source

index.html full source

Automatic type conversion, implicit data types conversion

ref – https://www.sitepoint.com/automatic-type-conversion/
http://www.discoversdk.com/blog/data-type-conversion-in-javascript
https://www.digitalocean.com/community/tutorials/how-to-convert-data-types-in-javascript

As a programming language, JavaScript is very tolerant of unexpected values. Because of this, JavaScript will attempt to convert unexpected values rather than reject them outright. This implicit conversion is known as type coercion.

Type Checking

In JavaScript you can check the type of an object or data contained in a variable at runtime. To check the type of some variable, object, or literal value use the typeof operator with the variable, value, or object as the argument to the operator. This operator returns the type as a string.

Note: typeof in JavaScript is not a function—it an operator. But, you can use it like a function. In this case () is not used as a calling operator, but rather as an encapsulation for some code on a single line.

typeof in JavaScript is not a function—it an operator

Implicit Conversion

JavaScript provides automatic type conversions.

But that doesn’t mean that you can sit idle and do nothing explicitly.

Again, it is a best practice to convert data types explicitly to avoid bugs in your program. Often, for automatic or implicit conversion you will not get your expected result.

JavaScript is a forgiving language. It will not reject the values directly and will not stop further execution. It will convert them automatically and provide you with some result. That means JavaScript coerces data types to be converted when they need to be in another form. Look at the examples below to see why it is bad to fall back to automatic type conversion or automatic coercion.

2+”2″=”22″

2 is a number and “2” is a string. If we add them together with the + operator JavaScript will try to coerce them to one type and then apply the operation. If JavaScript converts both of them to number then we get 4, but if JavaScript coerces them to string then we get a string “22”.

What do you see as a result? It provided us with ’22’. But that behavior is not always expected or tolerated. In the example above it can be assumed that in JavaScript mathematical operations on a mix of numbers and strings will return a string. Wrong! That is not always the case.

2 * “2” = 4

This time it returned a number instead of string.

Without just assuming, let’s check with the typeof operator the type of the output.


typeof (2 * “2”)
Outputs: ‘number’

So, automatic type conversion or type coercion is not always a good thing.

But, in many places inside JavaScript environments we only need the string value and we can easily understand what the result is gonna be.

For example, in a browser environment calling alert() with some value inside, it will convert the value to a string and display it to the user. After evaluating the lines of code or the statements, alert() gets a single value at the end. So, it is safe to convert a single value to a string without worrying unless otherwise warned or specified.

Explicit Conversion

As discussed in the previous section, explicit conversion is the best and safest way to go. In this section we will see different ways of converting different types of values.

Strings

String is the most widely used type to which we convert different data. To send data over the network or to save it into a file we cannot send or write it as a pure original JavaScript type. We need to convert it to a string and the receiving system can optionally convert it to bytes or resort to that system’s native type system.

To convert other data to string data type we can call String() with the value or variable of that data. Let’s say we want to convert number 100 to a string. Below are demonstration of the both ways described above.

When we have a object, we call the toString() method on that variable or object

String(a) calls toString on object a like this a.toString().
When this happens, it will get object a’s highest __proto__, which is Object.

Let’s set up the example. We have a literal object a given like so:

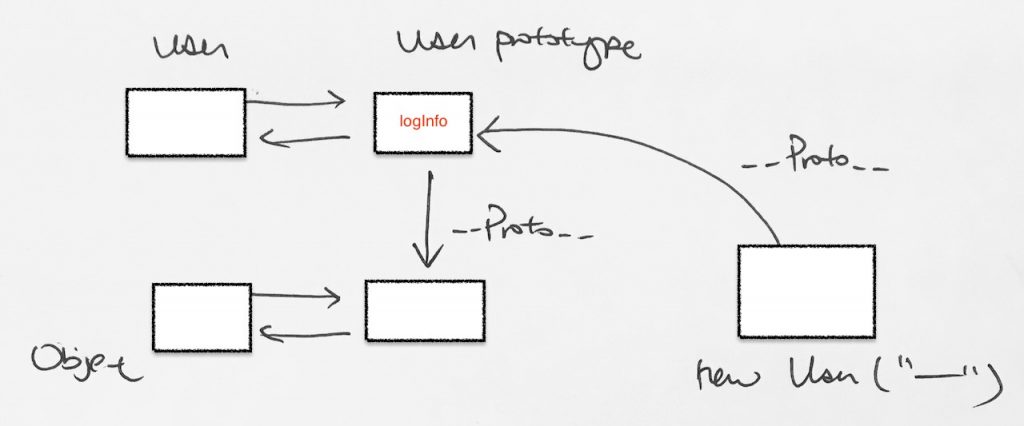
When we have a User constructor function. It has a User.prototype object
our literal object a’s __proto__ is then assigned to it.
We call toString() on it. String(a), also does the same thing.

Via prototype hierarchy, it looks at object a and does not find a toString.
It then goes to a’s __proto__, (User.prototype), and does not find toString there either.
It goes up User.prototype’s __proto__, (Object.prototype), and sees the default toString().
Hence, it calls Object.prototype’s toString().

This is because Object is the top most base that all objects in javascript derives from.
We need to over-ride it in order to return something more useful. Say our object a’s __proto__ references User.prototype

Now, when you call a.toString(), it’ll look at object a. does not exist, then it’ll go up to a’s prototype (User.prototype) and finds it there.

Numbers

Boolean

JavaScript is a “loosely typed” language, which means that whenever an operator or statement is expecting a particular data-type, JavaScript will automatically convert the data to that type.

JavaScript values are often referred to as being “truthy” or “falsey”, according to what the result of such a conversion would be (i.e. true or false). The simplest way to think of it is like this:

a value is truthy unless it’s known to be falsey; and in fact there are only six falsey values:

false

undefined

null

0 (numeric zero)

“” (empty string)

NaN (Not A Number)

Notable exceptions are “0” (string zero) and all types of object — which are truthy —

Remember, for strings, any non-empty strings are true. the empty string “”, is false.

The Condition Shortcut

The if() converts its expression to a boolean, and since objects always evaluate to true while null evaluates to false, we can use a condition like that to test for the existence of DOM elements:

That will always work reliably when dealing with DOM elements, because the DOM specification requires that a non-existent element returns null.

However, other cases are not so clear-cut, like this example:

Conditions like that are frequently used to mean “if the foo argument is defined”, but there are several cases where that would fail — namely, any cases where foo is a falsey value. So if, for example, an empty string:

then the conditional code would not be executed, even though foo is defined.

This is what we want instead:

like so:

Arguments (and other variables) which have not been defined, have a data-type of “undefined”. So we can use the typeof comparator to test the argument’s data-type, and then the condition will always pass if foo is defined at all. The if() expression is still evaluating a boolean, of course, but the boolean it’s evaluating is the result of that typeof expression.

The Assignment Shortcut

Logical operators do not return a boolean, but they do still expect a boolean, so the conversion and evaluation happens internally. If foo evaluates to true then the value of foo is returned, otherwise the value of bar is returned. This is immensely useful.

This expression is commonly seen in event-handling functions, where it’s used to define an event argument according to the supported model:

So e is evaluated as a boolean, and that will be truthy (an event object) if the event-argument model is supported, or it will be falsey (undefined) if not; if it’s truthy then e is returned, or if not then window.event is returned.

However..!

But expressions like this are equally prone to failure, in cases where the truthy-ness of the data isn’t known. For example, another common use-case is to define defaults for optional arguments, but this is not good:

Now if you know for sure that foo will always be either a string or undefined, and assuming that an empty string should be treated as undefined, then that expression is safe. But if not, it will need to be re-defined to something more precise, like this for example:

By testing the type against “string” we can handle multiple cases — where foo is undefined, and also where it’s mis-defined as a non-string value. In that case we also allow an empty string to be valid input, but if we wanted to exclude empty strings, we’d have to add a second condition.

1) if its not a type string, we move forward and assign it a string default value
2) if variable is a string but empty, we move forward and assign it a string default value

Another example

Here, we’re first checking to see if timestamp has value, if not, then assign it a new Date.
However, it would fail if the input is 0, because 0 is a falsey value. However, 0 is also a valid timestamp.
It just means 1/1/1970.

Mixin

ref – https://javascript.info/mixins

a mixin provides methods that implement a certain behavior, but we do not use it alone, we use it to

add to the behavior to other classes

.

In other words, mixins are used to extend the behavior of objects by providing a set of reusable functions.

It is used to modularize functionality. For example, if you have a class with all sorts of functionalities, it will become messy and unmanageable. But if you use mixins, you can modularize the functionality and thus, making it much easier to maintain.

The simplest way to make a mixin in JavaScript is to make an object with useful methods. This acts as a prototype object. We then can create other literal objects and extend from this object. This adds additional functionalities to it. In essence, we are “mixing in” additional methods. Finally, we take this hierarchy of a prototype object, and can easily merge them into a prototype of any class.

Creating a mixin

First, we’ll create a literal object “sayMixin”. It will act as a base prototype.

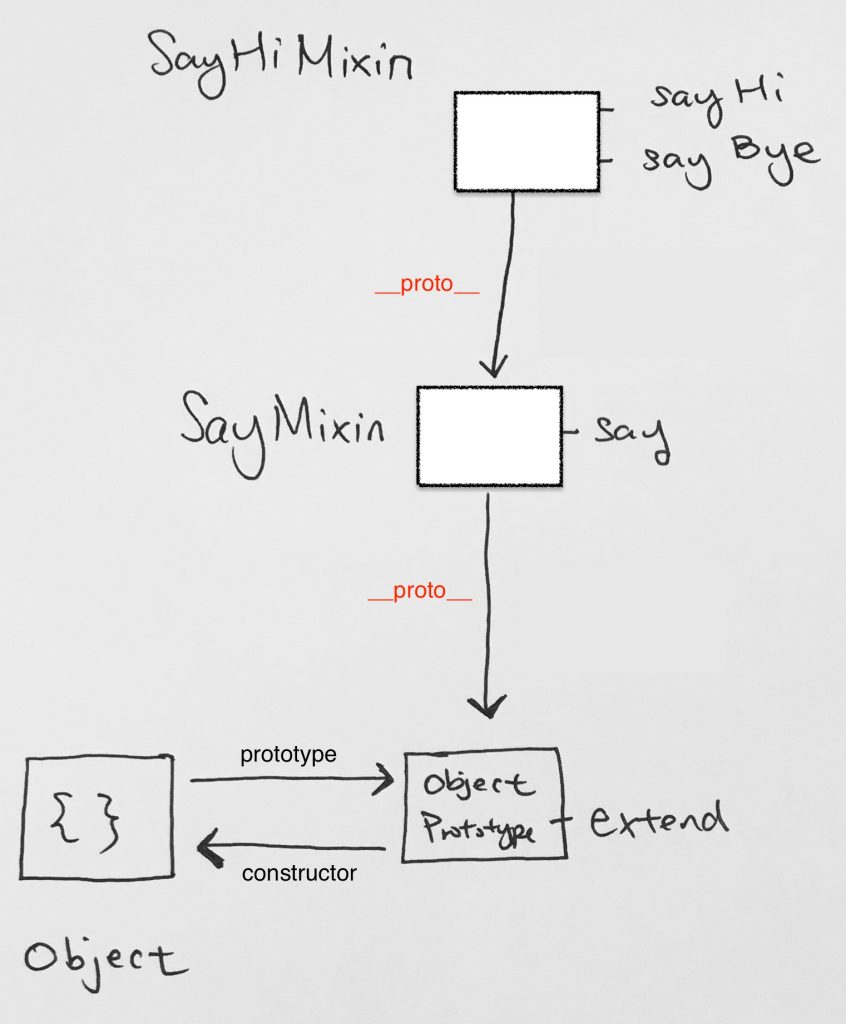
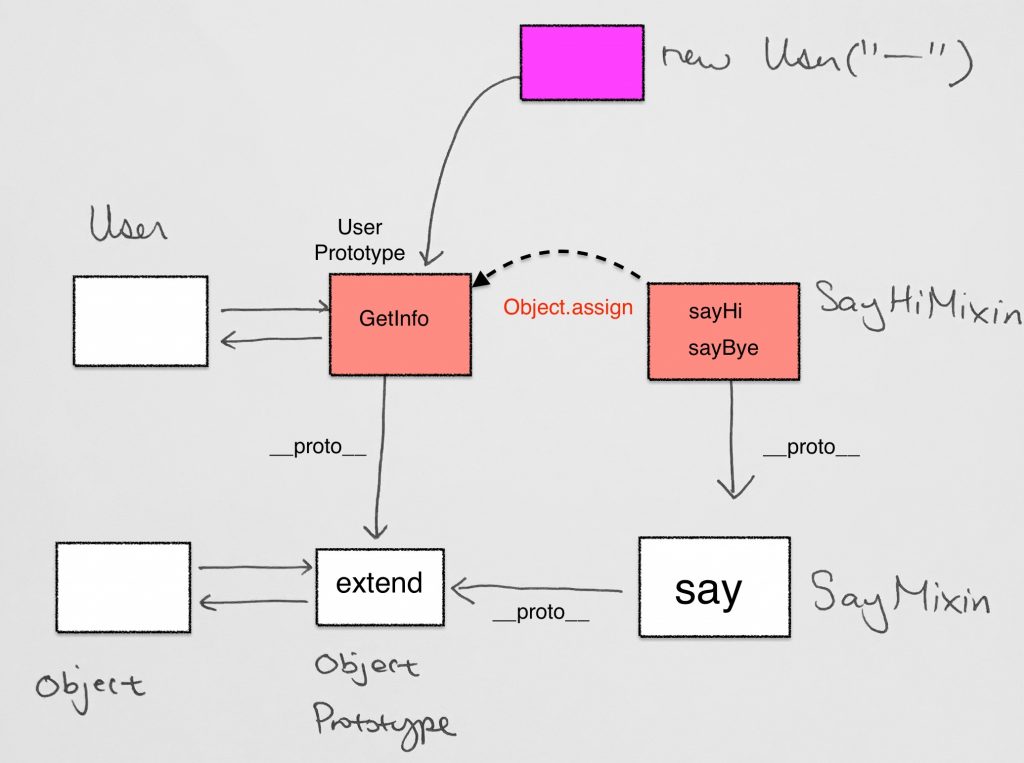
Note that all objects derive from “Object”. When we create our literal object, its __proto__ will automatically be referencing Object Prototype. In the diagram, you’ll notice “extend” in Object Prototype. That’s simply a function defined in a previous example:

So whatever functionality you add to Object prototype will be inherited by all objects you create.

On to the example…

Thne, we want to extend from sayMixin. So we create another literal object. A literal object has a __proto__ property. In order to extend this object from another, we point the __proto__ to the base object “sayMixin”.

Then, we define our functionality, and in order to call the base object, we use super. Then we simply access the functions/properties of super.

The digram of the hierarchy looks like this:

Using the Mixin

Now that we have our mixin prototype object created, we want to use start using it!

So first, we create a constructor function User.

Then we add functionality to its prototype like so:

“new” will be used to instantiate it.

So diagram wise, it looks like this:

in order to add our mixin prototype features into it, we use Object.assign to carry all owned properties and functions over to User. This is so that you don’t over-ride anything in User’s prototype object, such as logInfo.

By definition

The Object.assign() method only copies enumerable and own properties from a source object to a target object.

Thus, we created a base prototype object in sayMixin, extended it to sayHiMixin, and finally, copied all its traits to User’s prototype object.

Hence, bringing over a new prototype object into User’s current available prototype object, and “mixin” them via Object.assign is what this is all about.

Thus, now we have successfully “mixed in” another prototype into User’s prototype.


output:

User { name: ‘Dude’ }

User {
logInfo: [Function],
sayHi: [Function: sayHi],
sayBye: [Function: sayBye]
}

Dude, is a cool person!
Hello Dude
Bye Dude

Mixins can make use of inheritance inside themselves

First, we set up the skeleton code.

We create a literal object with function properties. Each function takes a string for the event name, and a function handler so that we have a reference to the function.

Then we make a class called Menu. This class has a function called choose. When executed, calling “choose” will make whatever object it owns to call trigger.

Now, the idea is that an object should have a method to “generate an event” when something important happens to it, and other objects should be able to “listen” to such events.

full source

Now, you see, when the menu gets selected, we can notify other objects via callbacks.

JavaScript does not support multiple inheritance, but mixins can be implemented by copying them into the prototype.

We can use mixins as a way to augment a class by multiple behaviors, like event-handling as we have seen above.

Mixins may become a point of conflict if they occasionally overwrite native class methods. So generally one should think well about the naming for a mixin, to minimize such possibility.

BluePrints for mixins

Sometimes however mixins require private state. For example the eventEmitter mixin would be more secure if it stored its event listeners in a private variable instead of on the “this” object.

To recap, we created a menu like so:

we created an object menu, with its prototype having properties from eventMixin.

When we register an object for an event say “select”:

the on function has lazy loaded the property _eventHandlers, which is object of “string : array” index value pairs.

at this point if you were to analyze the _eventHandlers property:


output:

{ select:
[ [Function: sendOff],
[Function: openPage],
[Function: sendEmail] ] }

It would show that the “select” value would match up to three handlers.

This public access of this property is bad, and this is what we’re trying to solve. However mixins have no create function to encapsulate private state. Hence we create “blueprints” of mixins to create closures. Blueprints may look like constructor functions but they are not meant to be used as constructors.

A blueprint is used to extend an object via concatenation after it’s created.
In the create function, you then use the allocated object in rectangle.extend (self), and use .call on it for eventEmitter.
At that step, you then append all functionalities in eventEmitter onto the allocated object from rectangle.create.call.

That way, private variable events stay in eventEmitter. And eventEmitter’s functions stay public for the allocated object form rectangle.extend.

Blueprints are unique to JavaScript. They are a powerful feature. However they have their own disadvantages. The following table compares the advantages and disadvantages of mixins and blueprints:

mixins
They are used to extend prototypes of objects. Hence objects share the same blueprint functions.
No private state due to lack of an encapsulating function.
They are static prototypes and can’t be customized.

blueprints
They are used to extend newly created objects. Hence every object has its own set of blueprint functions.
They are functions, and hence they encapsulate private state.
They can be passed arguments to customize the object.

Prototypal Inheritance in Javascript

ref – http://aaditmshah.github.io/why-prototypal-inheritance-matters

execute as constructor function vs standard function

In javascript, we have the “new” keyword, which is used with functions in order to use it as a constructor function.
If you use it without the “new” keyword, you are simply calling it as a standard function.

Problem with using “new”

We create a function Person. Then use new to call it as a “constructor” function.

But there’s a problem. We can’t use any of Function’s prototype functions such as “apply”, “call”, etc.

If we do make “new” into a function, then we can use “apply”, “call”…etc:

JS has prototypal inheritance, so its possible to implement “new” as a function:

“new” cannot be used in conjunction with functional feature.
“new” masks true prototypal inheritance in JS.

JS is a prototypal language, try not to use “new”

Create objects “out of nothing”

Cloning Existing Object

a)

There is an existing object.

We create an empty object where its prototype is that of the existing object.

b)

We create an empty object that has __proto__ pointing to Object’s prototype.
Then we attach a property called “area” as a function.

Extending a Newly Created Object

In the above example, we cloned the rectangle object and called it rect, but before we may use the area function of rect we need to extend it with width and height.

We add properties width and height and initialize numbers to the properties.
Then, we are able to call the “area” function.

However, this way is not good because we need to manually define width and height on every clone of rectangle

It would be nice to have a function create a clone of rectangle and extend it with width and height properties for us.

Prototypal Pattern

Notice the create function. It uses Object.create(this). This allocates a new empty object, that has __proto__ pointing to rectangle.
This newly created object is referenced by self.
Then, self attaches properties height and width to it, and initialize them to the parameters width/height.

It returns the newly allocated object. Thus, when you use the create function, you literally create a new object with its __proto__ pointing to rectangle. That way, your allocated object can call function area via prototype.

Then can call prototype functions.

Prototypal Pattern vs Constructor Pattern

What we had previous is a Prototypal pattern.

We we have here, is a constructor pattern:

In order to make JavaScript look more like Java, the prototypal pattern was inverted to yield the constructor pattern.

Hence every function in JavaScript has a prototype object and can be used as a constructor.

In addition, it clones the prototype of the constructor and binds it to the “this” pointer of the constructor, returning this if no other object is returned.

Both the prototypal pattern and the constructor pattern are equivalent

Hence you may wonder why anybody would bother using the prototypal pattern over the constructor pattern. After all the constructor pattern is more succinct than the prototypal pattern. Nevertheless the prototypal pattern has many advantages over the constructor pattern, enlisted in the following table:

Constructor Pattern

  • Functional features (call, apply…etc) can’t be used in conjunction with the new keyword
  • Forgetting to use new leads to unexpected bugs and global variables
  • Prototypal inheritance is unnecessarily complicated and confusing. (http://chineseruleof8.com/code/index.php/2018/02/06/prototype-and-inheritance-in-js-non-class/)
  • Prototypal Pattern

  • Functional features (call, apply…etc) can be used in conjunction with create
  • Since create is a function the program will always work as expected
  • Prototypal inheritance is simple and easy to understand
  • The last point may need some explanation.

    The underlying idea is that prototypal inheritance using constructors is more complicated than prototypal inheritance using prototypes.

    prototypal inheritance using prototypes

    First we create a clone of rectangle and call it square.

    Next we override the create function of square with a new create function.

    Finally we call the create function of rectangle from the new create function and return the object is returns.

    prototypal inheritance using constructors

    Using Square as a constructor function, we must call Rectangle.call in order to initialize “this” like a super object.
    That way, when we use new to create it, we’ll work off of a Rectangle object as a super object. Then we can implement whatever we want
    additionally at Square as the child object.

    You can read in detail at http://chineseruleof8.com/code/index.php/2018/02/06/prototype-and-inheritance-in-js-non-class/ (scroll to the very bottom and see “custom example”)

    Sure, the constructor function becomes simpler. However it becomes very difficult to explain prototypal inheritance to a person who knows nothing about it.
    It becomes even more difficult to explain it to a person who knows classical inheritance.

    When using the prototypal pattern it becomes obvious that one object inherits from another object. When using the constructor pattern this is not so obvious because you tend to think in terms of constructors inheriting from other constructors.

    Combining Object Creation and Extension

    First, we want something like this:

    We want to create a new object (with its default functionalities as “this”), but extend it with the properties as mentioned.

    so we pass the extension like so:

    into the extend function. Notice extend function is attached to Object.prototype.
    This is because we want all objects to have this functionality.

    We then log to look at the extension. It is as expected. We see that the extension we passed in has the properties height and width, and initiated to 10, and 5.
    The default functionalities are all in “this”, aka, rectangle.

    We then use default Object’s hasOwnProperty, which says:

    The hasOwnProperty() method returns a boolean indicating whether the object has the specified property as its own property (as opposed to inheriting it).

    Hence, we just have a reference to it to transfer properties from the extension over. And not touch any inherited ones.

    Then, we create a new empty object, with its __proto__ pointing to “this”. Which is rectangle.
    As you can see, the object created is empty, with its proto pointing to the Rectangle “this”.


    output:

    —- allocated object —-
    object:
    {}
    object.__proto__:
    { create: [Function: create], area: [Function: area] }

    In the next step, we’re gunna assign all the properties from the extension object over to our allocated object.

    1) We loop over all the properties in the extension. We’ll get height, width, extend. height and width were the original properties owned by the “extension” object we passed into the extend function. We’ll also get extend, which is the function we attached to Object.prototype

    We call the hasOwnProperty, which decides whether the property is owned the extension object. Properties width and height are. However, extend is not owned. It it extend via Object.prototype.


    output:
    –|height|–
    true
    –|width|–
    true
    –|extend|–
    false

    2) Hence, if the property is owned by the extension object, and it does not exist in the allocated object, then we simply attach it.

    Here, we have the full code. What is returned is a newly allocated object that has the extension properties transferred over. With its __proto__ pointing to “this”, which is rectangle.

    Hence in order to use it, we’ll have rectangle’s create function implement it like so:

    Then use it like so:

    Hence, as you can see, the properties from the extension object is copied over to the allocated object. The allocated object’s __proto__ points to rectangle.


    output:

    { height: 10, width: 5 }
    { create: [Function: create], area: [Function: area] }
    50

    Some of you may have noticed that the object returned by the extend function actually inherits properties from two objects, and not one – the object being extended and the object extending it. In addition the way in which properties are inherited from these two objects is also different.

    In one part, case we inherit properties via delegation. In another, we case we inherit properties via concatenation.

    Differential Inhereitance

    It operates on the principle that most objects are derived from other, more general objects, and only differ in a few small aspects; while usually maintaining a list of pointers internally to other objects which the object differs from.

    Prototypal inheritance in JavaScript is based on differential inheritance. Every object in JavaScript has an internal pointer, called [[proto]], which points to the prototype of that object. The [[proto]] property of objects created “out of nothing” point to null. This forms a chain of objects linked via the internal [[proto]] property (hence called a prototype chain), which ends in null.

    When you try to access a property of an object the JavaScript engine first searches for that property on the object itself. If it cannot find the property on the object then it delegates the property access to the prototype of the object. In this way the property access traverses up the prototype chain until the property is found (in which case it’s returned) or the chain ends in null (in which case undefined is returned).

    TODO – put diagram of hero hierarchy here. put reference here

    Cloning or Concatenate Inheritance

    Most JavaScript programmers would argue that copying the properties of one object to another is not truly a form of inheritance because any modifications to the original object are not reflected on the clone.

    However, modifications to the original object can be propagated to its copies to achieve true prototypal inheritance.

    Concatenation and delegation both have their advantages and disadvantages. They are listed in the following table:

    Delegation

    In JavaScript, an object may have a link to a prototype for delegation. If a property is not found on the object, the lookup is delegated to the delegate prototype, which may have a link to its own delegate prototype, and so on up the chain until you arrive atObject.prototype, which is the root delegate. This is the prototype that gets hooked up when you attach to a Constructor.prototype and instantiate withnew. You can also use Object.create() for this purpose, and even mix this technique with concatenation in order to flatten multiple prototypes to a single delegate, or extend the object instance after creation.

    Any changes to the prototype are automatically reflected on all its clones.
    TODO – use picture

    Property access is slower because it may need to traverse up the prototype chain.
    TODO – use picture

    Objects may only delegate to a single prototype in JavaScript.
    TODO – use picture

    Concatenative Inheritance

    Concatenative inheritance is the process of combining the properties of one or more source objects into a new destination object. Believe it or not, it is the most commonly used form of inheritance in JavaScript.

    Any changes to the prototype need to be propagated to all its clones.
    Property access is faster because inherited properties are copied.
    Objects may copy properties from any number of prototypes.

    Inheriting from Multiple Prototypes

    This is an important feature because it proves that prototypal inheritance is more powerful than classical inheritance in Java and as powerful as classical inheritance in C++. To implement multiple inheritance in the prototypal pattern you only need to modify the extend function to copy the properties of multiple prototypes:

Functional Inheritance

ref –
http://julien.richard-foy.fr/blog/2011/10/30/functional-inheritance-vs-prototypal-inheritance/
https://medium.com/javascript-scene/3-different-kinds-of-prototypal-inheritance-es6-edition-32d777fa16c9
http://therealmofcode.com/posts/2012/11/functional-inheritance-javascript.html

https://stackoverflow.com/questions/2800964/benefits-of-prototypal-inheritance-over-classical

Functional Inheritance

The properties you attach to the returning object are class public interface. Functions and properties you define inside function, but not as a part of the returning object, are private members accessible because of closure and invisible because they were not returned.

1) In the parent function, we first create an object on the local stack.

2) We then create private properties.

3) Create public functions and properties. Can access the private properties previously created by scope.

4) Do custom construction with your properties

5) return the stack object

In the child class, we inherit from the parent by:

1) Creating an instance of the parent.

over-ride parent function by:

2) over-ride parent function by having a reference to it, super_functionName

3) Then adding a property function of the same name to obj

4) In that function, call the reference super_functionName

5) add custom implementation after that

Now that you have created the parent and child, when using them, simply call the child function
and have it return you an object.

Execute the public properties by calling their names on that object.

Protected properties between parent and child

Pros

– SIMPLICITY: This pattern is very straightforward and easy for beginners to learn.

– Offers truly private and protected members.

– Protects against common javascript pitfalls, specifically if you forget to specify “new” keyword during class creation or if you are using “this” keyword inside functions.

Cons

Requires more memory than Pseudoclassical inheritance pattern. With every new instance of a class memory is reserved for all functions and fields inside that class.

– Types cannot be tested using “instanceof” keyword.

– Javascript minimizers might not perform as good as with Pseudoclassical pattern as there is no way for minimizer to safely rename members of parent class.

Benefits of Prototypal over Functional Inheritance

Prototypal inheritance is all about objects. Objects inherit properties from other objects. That’s all there is to it. There are two ways of creating objects using prototypal inheritance:

Create a brand new object

for example, create object, add properties.

We can calculate the area and the circumference of the circle from its radius:

Now I want to create another circle of radius 10. We create a brand new object by using functionality from our circle object.

Clone an existing object and extend it

JavaScript offers two ways to clone an object:

1) delegation

– Any changes to the prototype are automatically reflected on all its clones.
– Property access is slower because it may need to traverse up the prototype chain.
– Objects may only delegate to a single prototype in JavaScript.

How do we do clone an object via delegation?

Where a is an empty object, and its __proto__ is “someObj”, which will act as the prototype literal object of a.

ref – http://chineseruleof8.com/code/index.php/2018/04/13/object-create/

2) concatenation

– Any changes to the prototype need to be propagated to all its clones.
– Property access is faster because inherited properties are copied.
– Objects may copy properties from any number of prototypes.

How do we do clone an object via concatenation?

ECMAscript 6 introduced Object.assign() to achieve this natively in Javascript.

The Object.assign() method is used to copy the values of all enumerable own properties from one or more source objects to a target object. It will return the target object.

example here:

Object.assign

But how is this simple?

We have to call Object.create or Object.assign, and do all these assignment ourselves. Its bother some. The key is to implement creation functions for you like so:

… even better …


— circle —
{ radius: 10 }
{ radius: 5,
create: [Function: create],
area: [Function: area],
circumference: [Function: circumference] }
10