Category Archives: javascript

Chat Room using Node

ref – https://socket.io/get-started/chat

setup

Assuming you have node, npm, nodemon/gulp installed.

First, make a directory called DesktopApp. Then start the process of creating a node project.


npm init

Enter your information for the package.json file.

Install Express:

npm install –save express@4.15.2

Server can push messages to clients. Whenever you write a chat message, the idea is that the server will get it and push it to all other connected clients.

Number of Lines

github source

What does it do

Calculate how many lines are there when you put a long string into a div/span that has a width.

Getting Started

First, let’s set it up. We create a div with id para. We limit it to 68px so we can see the effects of the word break.

html

js

Getting the width of a string involves first putting test text into your div #para. Then,

1) We need to the get element object of #para first. It will contain all the information you need about this element object. We will be using it in the next step to get font and font size info.

2) By using the global window object, we use getComputedStyle of an element object to get style information such as font-size, font-family, background-color…etc.
We do this by calling getPropertyValue on the style object that’s returned. We specify which style attribute we want to get by inserting the style name.

3) then the font size

4) Using JQuery, create a span in your DOM.
Using jQuery, insert your text, apply the font and font size, and call width on it.
It will give you the pixel width on it.

The $.fn is an alias for jQuery.prototype which allows you to extend jQuery with your own functions.
We create our own function textWidth. It takes a paragraph, font, and a fontSize. Then it returns you
the width in pixels.

We first check to see if there’s a property placeholderEl. If it doesn’t exist, we attach the property
to our function. We then create a span element object and append it to the document’s body. We attach the
property placeholderEl to that span object.

We then insert the text into the span, and apply the font and font size to the text using css function.
then we call width on the span object to get the pixel.

thus, so far, you should have something like this in your JS file:

Logic

Now that we can get an accurate width of a paragraph with applied font, let’s take a look at how we’re going to tackle the issue.
note: limit means the end of the width.

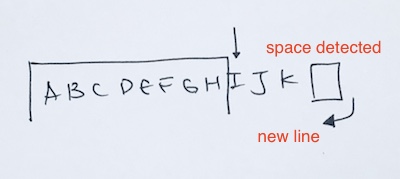
A) no-space long word past limit

In the first basic situation, the long word will stay as is. This is because the browser do not break a word. It will only break a sentence, when it detects a space, but will never break a word in half.

B) long word past limit, then space

The second situation is that our long word goes past the limit. Then it has a space. In this case, we have two parts.
– The string left of the space.
– The string right of the space.

The right part of the space then gets broken and starts at the next line. The space is the last character of the first line.

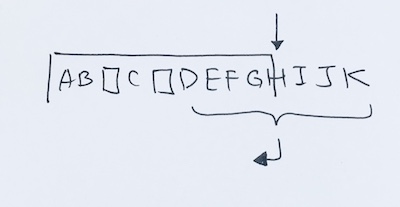
C) long word past limit, with a previous space

When we reach the limit, but there was a previous space. Thus, we have two parts again.
– The string left of the space.
– The string right of the space.

The string to the right of the space gets broken and start at line two. The string left of the space, remains at line 1.

D) long word past limit, with previous multiple spaces

Sometimes, there will be multiple spaces previously. So when we hit the limit, how do we break it? The answer is that we find the last space. We don’t care any previous spaces. All we care about is the last space because we need to see how to break the substring that just went past the limit.

Implementation

We’ll do this in es5.

We first create a function to be new-ed later. It will contain the object’s property and data. We need the basic things such as:
– text (string)
– the width function we’re going to use to calculate string widths on the browser (function)
– font (string)
– fontSize (string)

We also pass in the div element’s id so that we can get the width.

Then, let’s implement a function in the prototype so that all instances will use it.

We can easily get the width of the text by using our textWidth function. However, when you use space ‘ ‘, you’ll get 0. So we do a workaround by giving the strings ‘a’. Then a space a, (‘a a’). That way, we know the width of a. And then, can calculate the width of space.

We calculate the width of the string. If the string is a space, then we simply give it the width of space, which we pass in.
However, if not a space, then we calculate it by passing our text, our font, and font size. We then pass the result into a callback to be processed by others.

The Logic

Given a long text, we run through each character.

1) get width of the char
2) append the width onto a total width.

For every add of a width, we check to see if our total text has passed the limit.

Thus,

using our prototype function getCharWidth. Also, notice “holder”. Holder basically holds the added character so far.
Another thing to notice is that there is a bool to check to see if a previous space exist.

The key is to check for situations when we hit past the limit.
If after passing the limit, and we detect a space, then we gotta save the left side of the string.

In order to do this, we use a ‘holder’ string to hold everything. Also, notice we have calculated the width of the space also.

– passed the limit
– no previous space was detected
– current char is a space

Thus, we save the everything that was held up to now. But where do we save it to?

We simply save it into an array that will represent the formatting of our paragraph.
First sentence is array[0], second array[1]…etc.

Thus, in our constructor function:

now..back to our calcNumOfLines.

where

Basically, if we pass the limit, but no space is found, we just save it. This will satisfy A).
As each additional character is processed, and we find that the current processed character is a space (assuming no previous space), then we simply store it.
This resolves B).

else if we’re past the limit and the character is NOT a space, and there was a previous space, then we resolve cases
C) and D)

full source
https://github.com/redmacdev1988/NumberOfLines

Mustache templating for displaying data (JS)

ref –
https://github.com/janl/mustache.js/
https://medium.com/@koalamango/javascript-templating-with-mustache-js-b50919cb4f57
https://www.elated.com/articles/easy-html-templates-with-mustache/

Templates are a great way to separate your website’s code from its design.

Mustache is a logic-less template syntax. It can be used for HTML, config files, source code – anything.

It works by expanding tags in a template using values provided in a hash or object

One of Mustache’s big plus points is that is logic-less, which means it keeps your templates very neat and tidy. There are no messy if … then or looping constructs embedded within a Mustache template; it’s all just markup and simple Mustache tags. All the logic is hidden away inside your data objects (and the code that creates or fetches them).

A mustache template is a string that contains any number of mustache tags.

Tags are indicated by the double mustaches that surround them.
{{person}} is a tag, as is {{#person}}

Using mustache basics

  • First, we’ll include mustache js file
  • Second, we’ll create a template with tags
  • Then, we’ll use a object’s values provided by its properties
  • Finally, we’ll see the output from the template + object by using Mustache.render

include the mustache js file in your header

Create the template

The template is a string.
For example: “{{name}} is a {{occupation}}

The tags are:
{{name}}
{{occupation}}

It expands the tags by using object view.
It looks inside this object for properties name and occupation. Then it would expand the tags with the values occupied at properties name, and occupation.

Load the template

Then, simply execute our tags, templates, objects, and render them.
Id person for paragraph p is to hold the result.

Another Example

This time, we introduce the concept of sections.

Sections render blocks of text one or more times, depending on the value of the key in the current context. A section begins with a hashtag and ends with a slash:

template:

The behavior of the section is determined by the value of the key:

object:

Since the object property is true, we display what’s between Robot tags.

My name is Pinocchio!

Your output when you run the web file is:

Hello Pinocchio You live in the woods! Well, you are friends with animals

Inverted Sections

An inverted section begins with a caret (hat) and ends with a slash.

Inverted section means when its false, it displays. When true, it won’t display.

template:

object:

Since Robot is false, let’s display what’s in between the Robot tags because this is an inverted section.

No content!

Another Example

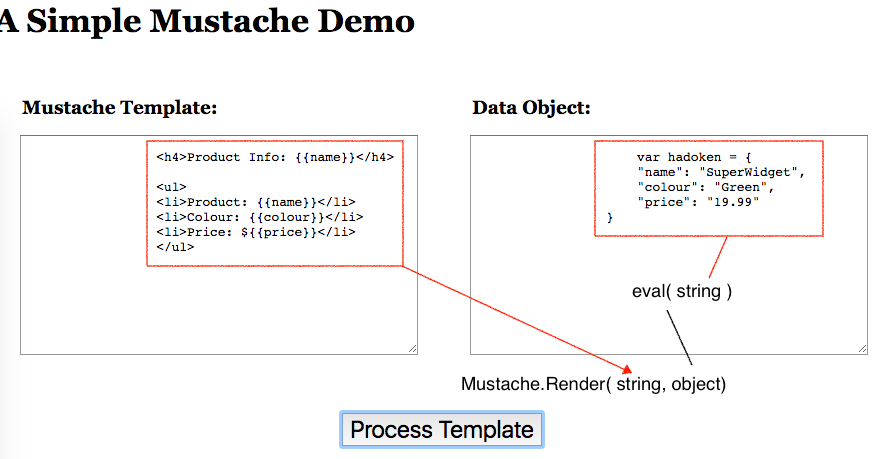
In this next example, we’ll first use textarea to hold strings that can represent our templates and data objects. You can specify the strings in your html code, or simply have the user enter them via the web page.

In html, you can put the contents of the textarea in between textarea tags. Thus, that is the text that will be appear when the textarea tags are rendered on the web page. In our case, we put the template string inside the textarea with id template.

When we’re processing the code, we need to get whatever the input is from the textarea “template”. Thus, we get the string from the textarea via javascript like so:

In, Mustache.Render(template, object), the template parameter needed is a string. Thus, our templateStr can simply be passed in.

The string we pass into the textarea “data” is the object. However, the object must be a code evaluation. In other words, we have to convert the string into code. We can use javascript’s eval function.

Remember that whatever variable you decide to use for the object in dataStr must be used in code.

In our case, it is “hadoken”.

In our js, we basically get the data from the textareas. Then pass them into Mustache.render function. It returns the result that we need.

And we finally throw that result into the html.

js

Source Code

html

css

js

new (js)

ref – https://stackoverflow.com/questions/1646698/what-is-the-new-keyword-in-javascript
https://developer.mozilla.org/en-US/docs/Web/JavaScript/Reference/Operators/new

Prototype and Inheritance in JS (non-class)

Creating a user-defined object requires two steps:

1) Define the object type by writing a function.

2) Create an instance of the object with new.

To define an object type, create a function for the object type that specifies its name and properties. An object can have a property that is itself or another object.

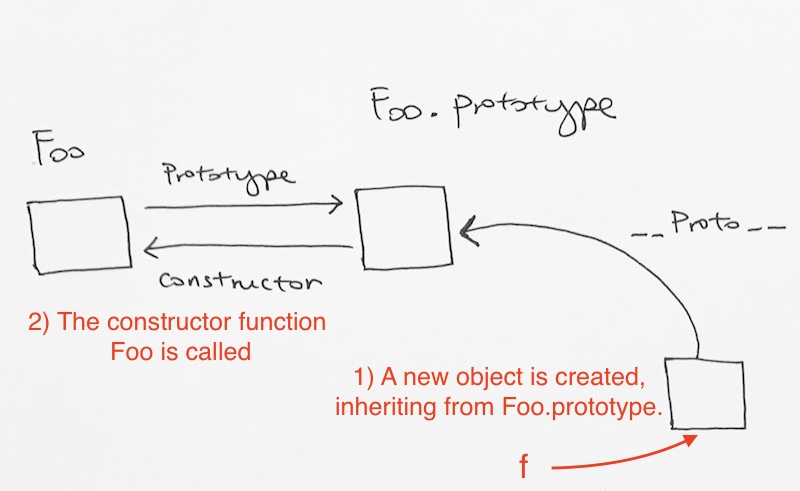
When the code new Foo(…) is executed, the following things happen:

1) A new object is created, inheriting from Foo.prototype.

2) The constructor function Foo is called with the specified arguments, and with this bound to the newly created object. new Foo is equivalent to new Foo(), i.e. if no argument list is specified, Foo is called without arguments.

3) Normally constructors don’t return a value.

If the constructor function doesn’t explicitly return an object, the object created in step 1 is used instead.
However, sometimes, they can choose to do so if they want to override the normal object creation process of using step 1.
If they do return an object in the constructor function, then the object returned by the constructor function becomes the result of the whole new expression. Reference p would then point to this returned object.

Built in Methods (js)

ref – https://medium.com/@_bengarrison/javascript-es6-exploring-the-new-built-in-methods-b62583b0a8e6
https://stackoverflow.com/questions/33164725/confusion-between-isnan-and-number-isnan-in-javascript
https://ponyfoo.com/articles/es6-number-improvements-in-depth

Use Object.assign to assign properties of objects over to your destination object.

Using Object.assign, if there already exist a property/value, and you assign a new property that has the same name over, then the existing property/value gets replaced.

Using Object.assign, we can also do a deep copy of an object.

find and findIndex both find elements for you. It is important to note that find() will return the FIRST element in the Array that satisfies the provided testing function.

Use find to see if ‘d’ exists.


find – looping: a
find – looping: b
find – looping: c
find – looping: c
find – looping: d
res: d

Use findIndex to see if ‘c’ exists.


findIndex – looping: a
findIndex – looping: b
findIndex – looping: c
2

Number.isNaN

The reason isNaN() is “broken” is because, ostensibly, type conversions aren’t supposed to happen when testing values.

That is the issue Number.isNaN() is designed to address.

In particular, Number.isNaN() will only attempt to compare a value to NaN if the value is a number-type value.

Any other type will return false, even if they are literally “not a number”, because the type of the value NaN is number.

You can also think of it as anything that’s not NaN when passed to Number.isNaN will return false, while passing NaN into it will yield true.

The ES5 global.isNaN method, in contrast, casts non-numeric values passed to it before evaluating them against NaN, using Number(…)

That produces significantly different results. The example below produces inconsistent results because, unlike Number.isNaN, isNaN casts the value passed to it through Number first.

Number.isNaN will return false immediately if the argument is not a Number

while isNaN first converts the value to a Number

For isNaN():

then it does a NaN === NaN comparison, which results to true.

for Number.isNumber() , as mentioned earlier, we check to see the type of the argument is a Number. If its not a Number, it returns false immediately!

Infinity is actually NOT infinity, it a numeric value that represents Infinity. The actual value is 1.797693134862315E+308. The same for -Infinity, -1.797693134862315E+308

static and non-static (js)

ref – https://medium.com/@yyang0903/static-objects-static-methods-in-es6-1c026dbb8bb1

Static methods, like many other features introduced in ES6, are meant to provide class-specific methods for object-oriented programming in Javascript.

Static methods are often used to create utility functions for an application.

Static methods are called without instantiating their class…

thus, when we call static “triple”, you will won’t see the log in the constructor executed.

Static methods…are also not callable when the class is instantiated.

Since these methods operate on the class instead of instances of the class, they are called on the class.

Say we have a subclass to a parent class, any static methods that we declared are available to the subclasses as well

using ‘add class’ to switch from grid to list

Make sure to have jQuery and bootstrap CSS installed

the HTML

First, we create two buttons.

– One is to indicate list form. The id of this button is list.
– The second button is to indicate grid form. The id of the button is grid

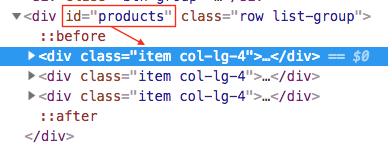
We place the buttons inside a container, with class btn-group. The sibling div has an id of products. This is where we place our contents. Hence, we have a div for out buttons. And another div to maintain our contents

In our content div, the default situation is that we have grids, with content inside them. We create grids by using class col-lg-4 in order to control width. col-lg-4 says we have the grid to have a with of 4 parts, while the total is 12 parts. This means we have three grids for each row. In other words, we want the width to be 33.3333%.

We then fill in the contents with an image, a title, and some text.

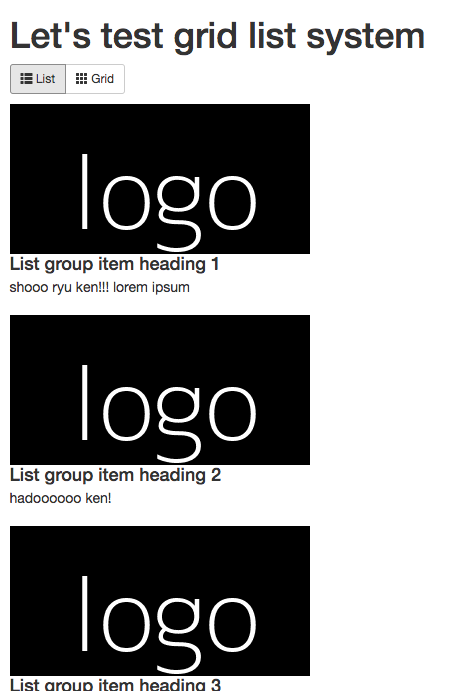
Finally, we have something like so:

this will give us a starting point looking like this.

jQuery

The whole trick to making it go from grid to list is to add a class. Then let CSS take over to change the display according to the class.

Hence, the first step is to simply add a class name. Let’s add list-group-item for when the user clicks on the list button. And remove this class when the user clicks on the grid button.

We use jQuery to do this. We simply grab the id of the buttons. Then process the click event. We implement the handler for when the button is clicked. We say, when the buttons is clicked, for each div.item under #products, we want to add a class list-group-item to that div.

When we click on button #list, we add class list-group-item. Thus you’ll dynamically see the class name appear in the DOM. This enables us to use CSS to give it a new look on the fly.

When we click on the button again, the class disappears. Visually, we can use CSS to return it to its default appearance.

the CSS

Now, we get to the part where we change the appearance.

First, we include the style.css in your header

Now, let’s say we want to give appearances of a green border for the grid. And make this green border disappear when its list.

Now when you click the grid list

you add the class to the div. Via CSS, it will know that for that class, we should put a green border on that div. When you click the list button, the class “list-group-item will disappear, and naturally the CSS of green border will not apply anymore. In fact, the CSS for .item, is no border.

The biggest difference between grid and list is that our grid is 33.33%. But a list should take up 100% width. So that’s what we’ll do:

Thus, you’ll be able to toggle it like so:

Basically, that’s all there is to it.

Other stuff

Say I want add a red border around the image when its list form. And clean up some margin spacing issues:

Then I want to put the word list before the list items.

As you can see, just make sure to put CSS for .item.list-group-item because you’re drawing for list form.

Whatever CSS you applied to list-group-item will be gone when you remove the class.

() surrounding the function

  • https://stackoverflow.com/questions/1634268/explain-the-encapsulated-anonymous-function-syntax
  • https://stackoverflow.com/questions/440739/what-do-parentheses-surrounding-an-object-function-class-declaration-mean

The Problem

In javascript, we implement twoPlusTwo.

You can also create an anonymous function and assign it to a variable:

You can encapsulate a block of code by creating an anonymous function, then wrapping it in brackets and executing it immediately:

However, this does not work:

Why?

Answer

doesn’t work because:

is being parsed as a Function Declaration, and the name identifier of function declarations is mandatory.

Also,

is same as

The reason this wouldn’t work is that the JavaScript engine interprets this as a function declaration followed by a completely unrelated grouping operator that contains no expression, and grouping operators must contain an expression.

Surrounding it with a parentheses

Now, when you surround it with parentheses like so:

it is evaluated as a Function Expression, and function expressions can be named or not.

i.e:

…and thus, wrapping parenthesis around it, it gets the result of that expressions in the same way having a variable assigned to the result:

The only difference is that we assigned function f to a variable. But we didn’t assign the anonymous function anywhere.
Let’s try assigning it to a variable so we can see the similarities:

or simply

as an Immediately Invoked Function Expression

The Function Expression used in this term is directly to indicate anonymous function expression.
The Immediately Invoked used in this term is the ( … ) that gets the function expression, which is pushed onto the local stack. We don’t see it because we did not assign any named reference variables to it. Just know that it is pushed onto the local stack.
Then this function expression is executed via ().

Further Information

The ‘()’ surrounding the anonymous function is the ‘grouping operator’ as defined in section 11.1.6 of the ECMA spec: http://www.ecma-international.org/publications/files/ECMA-ST/Ecma-262.pdf.

Taken verbatim from the docs:

11.1.6 The Grouping Operator

The production PrimaryExpression : ( Expression ) is evaluated as follows:

Return the result of evaluating Expression. This may be of type Reference.
In this context the function is treated as an expression.

module pattern (js)

ref – https://toddmotto.com/mastering-the-module-pattern/

1 – create IIFE

The module pattern’s basic premise is that a IIFE is created, and thus, creates a closure.

In other words, it declares a function, which then calls itself immediately.
These are also known as Immediately-Invoked-Function-Expressions

The function creates a new scope, and thus, privacy.

JavaScript doesn’t have privacy, but creating new scope emulates this when we wrap all our functional logic inside them.

The idea then is to return only the parts we need, leaving the other code out of the global scope.

2 – namespace

After creating new scope, we need to namespace our code so that we can access any methods we return. Let’s create a namespace for our anonymous Module.

We then have Module declared in the global scope, which means we can call it wherever we like, and even pass it into another Module.

3 – private methods

Private methods are anything you don’t want users/devs/hackers to be able to see/call outside the scope they’re in.

To make our methods inaccessible outside of that scope:

The privateMethod is declared inside the new scope. If we were to attempt calling it anywhere outside of our module, we’ll get an error thrown and our JavaScript program will break!

Another example. We declare function expression variable privateMethod. Then a function expression variable publicMethod. publicMethod’s anonymous function definition involves calling privateMethod.

Then it gets returned in an object.

…of course, you can use these public methods to manipulate private properties.

4 – giving access to outside using “return”

The object literal syntax goes something like this:

Using the same syntax, we want to return an object so that others can access whatever we decide to give them.
The methods bound to the Object will be accessible from the Module’s namespace.

One way to do this is via

anonymous Object Literal return

And hence we provide access to functionality like so:

..and thus, if you have a private method somewhere, you’ll have to use the public method to access that private

Locally Scoped Object

Another way is to locally create an object. Then set this object up by adding function attributes to it. Finally, when its complete, we return this object

1) create empty literal object on the local stack
2) add properties to it that are functions and variables
3) return this literal object

Stacked locally Scoped Object Literal

1) create object literal referenced by variable name.
2) declare attributes inside this object literal
3) return object literal by returning its variable reference.

Revealing Module Pattern

1) declare function expression variables that references anonymous functions
2) return object literal with properties that references the function expression varaibles.

In this way, we reveal public pointers to methods inside the Module’s scope.
Declare functions via named references so that you don’t get hoisting mixups. Then, return an object with named properties to those references.
This again, can create a really nice code management system in which you can clearly see and define which methods are shipped back to the Module.

Augmenting Modules

Say you have a really nice revealing pattern going like so:

You got your function expressions declared. You return a nice literal object with properties referencing your expressions.
But…what if you want to extend this module? But from a third-party, and not add anything into it anymore.

In other words, we want to add a “thirdMethod”, but not mess with the current Module implementation.

Solution:

Let’s create another Module named ModuleTwo, and pass in our Module namespace, which gives us access to our Object to extend:

Hence, its basically creating a singleton, and passing in another singleton via injection. We then add a property for a function expression. Then we simply return Module.

You’ll notice I’ve passed in Module || {} into my second ModuleTwo, this is incase Module is undefined – we don’t want to cause errors now do we ;). What this does is instantiate a new Object, and bind our extension method to it, and return it.

Private Naming Conventions

make sure to label private properties with underscore

functions (and different ways of defining them in js)

ref – https://dmitripavlutin.com/6-ways-to-declare-javascript-functions/
https://www.davidbcalhoun.com/2011/different-ways-of-defining-functions-in-javascript-this-is-madness/

A function is a parametric block of code defined one time and called any number of times later.

1) function declaration

A function declaration is made of function keyword. It is followed by an obligatory function name, a list of parameters in a pair of parenthesis (para1, …, paramN) and a pair of curly braces {…} that delimits the body code.

The function declaration creates a variable in the current scope with the identifier equal to function name. This variable holds the function object.

The function variable is hoisted up to the top of the current scope, which means that the function can be invoked before the declaration

Which practically means that, yes, you can call the functions before they’re written in your code. It won’t matter, because the entire function gets hoisted to the top of its containing scope. (This is contrasted with variables, which only have their declaration hoisted, not their contents, as we’ll see in the next section).

Function Expression

A function expression is determined by a function keyword, followed by an optional function name, a list of parameters in a pair of parenthesis (para1, …, paramN) and a pair of curly braces { … } that delimits the body code.

This function object can:
– be referenced by a local variable you declare.
– assigned to a method name on an object
– be used as a callback function

2) unnamed function expression

function expression used as a method name on an object:

Will be executed as this:

Therefore, with functions, the order of setting and calling is important:

function expressions with parenthesis

Here again, we’ll see that if we declare an anonymous function, the function’s name property will be valid to use inside the function. In other words, the function name is only accessible within the function. However, globally, we’ll have to use the reference name.

In the case below, reference name D must be used globally. The function name foo can be used inside the function.

Useful for Recursion
Because the function’s name is accessible in the function itself, this turns out to be useful for recursive functions, much more useful than the plain old anonymous function.

Here’s a trivial recursive function to illustrate calling itself from within the named function expression:

IIFE

first, lets look at a standard example:

Useful for debugging
As a few have pointed out, giving previously anonymous functions names helps in debugging, since the function name shows up on the call stack.

3) Named function Expression

the function object has a property name, which displays the name of the function. It is assigned to a variable. The variable is used in the current scope. But inside the function body, the function name is used.

Also, a named function is created, the “name” property holds the function name.

Inside the function body a variable with the same name holds the function object. The function name (funName) is available inside the function. However, outside, it is not. Outside, it recognizes the variable name which the function was assigned (getType).

4) Shorthand Method definitions

short hand method definitions are used in object literal construction like so:

add() and get() methods in collection object are defined using short method definition. These methods are called as usual: collection.add(…) and collection.get(…).

but why?
The short approach of method definition has several benefits over traditional property definition with a name, colon : and a function expression like so:

– A shorter syntax is easier to read and write
– Shorthand method definition creates named functions, contrary to a function expression. It is useful for debugging.

5) Arrow Functions

An arrow function is defined using a pair of parenthesis that contains the list of parameters (param1, param2, …, paramN), followed by a fat arrow => and a pair of curly braces {…} that delimits the body statements.

note: When the arrow function has only one parameter, the pair of parenthesis can be omitted. When it contains a single statement, the curly braces can be omitted too.

The function declared using a fat arrow has the following properties:

– The arrow function does not create its own execution context, but takes it lexically (contrary to function expression or function declaration, which create own this depending on invocation)

– The arrow function is anonymous: name is an empty string (contrary to function declaration which have a name)
– arguments object is not available in the arrow function (contrary to other declaration types that provide arguments object)

this keyword is one of the most confusing aspects of JavaScript (check this article for a detailed explanation on this).
Because functions create their own execution context, often it is hard to catch the flying around this.

ECMAScript 6 improves this usage by introducing the arrow function, which takes the context lexically. This is nice, because from now on is not necessary to use .bind(this) or store the context var self = this when a function needs the enclosing context.

short callbacks

The parenthesis pairs and curly braces are optional for a single parameter and single body statement. This helps creating very short callback functions.

Originally, given an array, we use Array’s prototype function some to see if there exist a zero in the array. The some() method tests whether at least one element in the array passes the test implemented by the provided function.
If it exists, return 0, if it does not, return false.

However, since there’s only a single parameter, and a single body statement, we can do it shorthand like so:

5) Generator functions

Function declaration

standard declaration of a generator function:

Function expressions

now we assign an anonymous function generator definition to an expression variable. Execute the expression, and call the methods on it.

shorthand

In all 3 cases the generator function returns the generator object g. Later g is used to generated series of incremented numbers.

6 – new Function

Function objects created with the Function constructor are parsed when the function is created. This is less efficient than declaring a function with a function expression or function statement and calling it within your code because such functions are parsed with the rest of the code.

All arguments passed to the function are treated as the names of the identifiers of the parameters in the function to be created, in the order in which they are passed.

Functions created with the Function constructor do not create closures to their creation contexts; they always are created in the global scope. When running them, they will only be able to access their own local variables and global ones, not the ones from the scope in which the Function constructor was called. This is different from using eval with code for a function expression.