Category Archives: iOS

Creating a bridge from react native to native iOS

  • https://reactnative.dev/blog/2017/03/13/introducing-create-react-native-app
  • https://reactnative.dev/docs/next/communication-ios

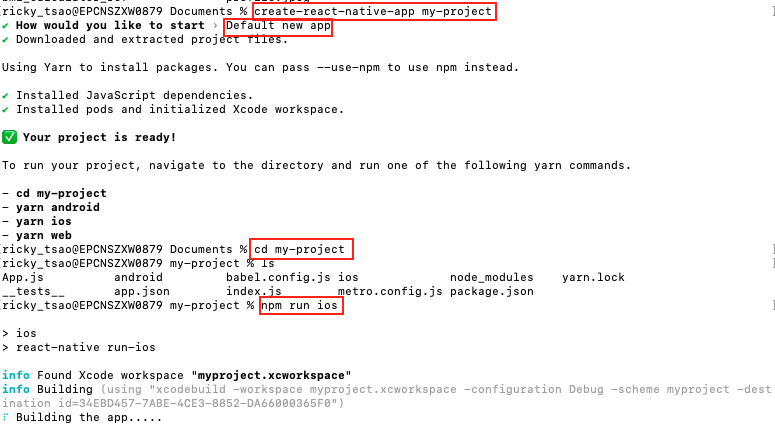
We first install create-react-native-app module:

npm install -g create-react-native-app

We then create the app:

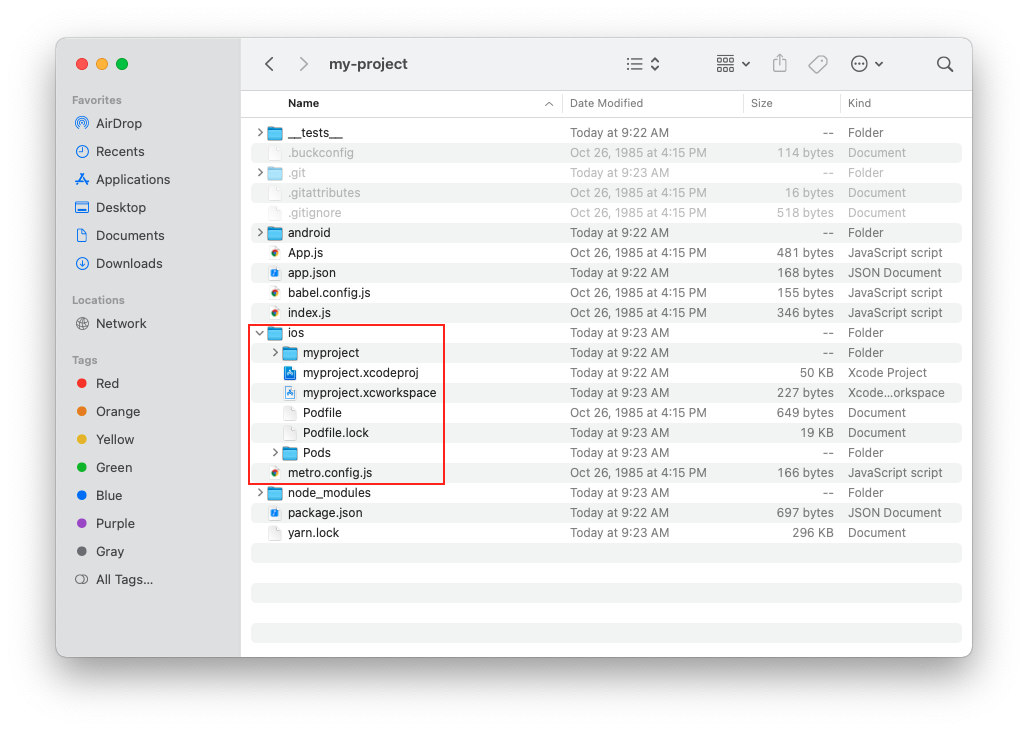
Look at the directory. You’ll see the iOS folder with its xcode files.

Running the iOS simulator

npm run ios

It’ll take a few minutes for the app to build. You’ll see a terminal pop up with the title “Metro.node launcher package”. Then your simulator will start and the app will install and run.

Implementing the app

Features

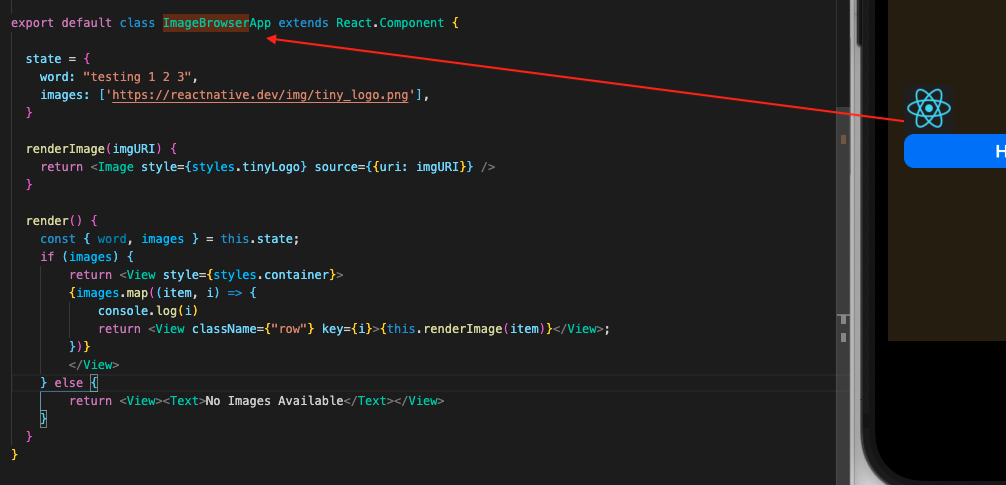
We first create a file called ImageBrowserApp.js

Its a class component, where we simply display an image.
We render this image through JSX Image tag.
If no image URLs are given, we simply return ‘No Images Available’.

In index.js, make sure we use AppRegistry to register this component like so:

In your App.js, you can use it like so:

App.js

When you export it to iOS, it will look like this:

In the native iOS side, we can also instantiate ImageBrowserApp to be used as a view.
This is made possible when we registered the component with the name ImageBrowserApp

So in AppDelegate, we simply create a RCTRootView and initialize the module name to ImageBrowserApp.
Then we add it to the rootView.

iOS side

AppDelegate.h

AppDelegate.m

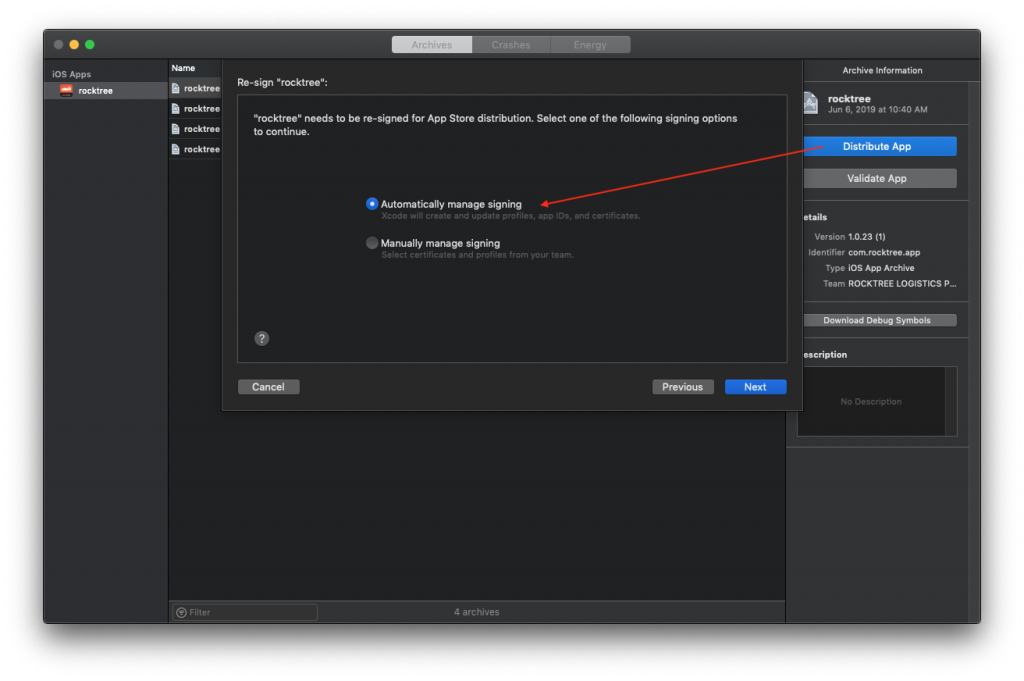
Distribute IPA file to the Apple app store

ref – https://appmanager.io/blog/tips-and-tricks/uploading-an-ios-app-to-the-app-store-updated/
https://help.swiftic.com/hc/en-us/articles/201697821-Install-the-Application-Loader-on-Your-Computer

Client Side upload app to the Store

…after receiving the IPA file from your developer, go to your Apple account.

Log in, and choose the Agreements, Tax, and Banking section. Before publishing an app you’ll have to accept some of those agreements and set up your banking info so you can get paid. You’ll also need to set up tax info, depending on your country.

If you already have an App Store Connect account, make sure that your role is Admin, Technical, App Manager, or Developer. Only those roles can upload a build.

When your app is ready to upload, you can add the app to App Store Connect. (You should probably tag it in your version control first.)

In App Store Connect go to the My Apps section and hit the plus sign on the left side to create a new app. You’ll get a little form to fill out with your app’s info:

Hit Create andApp Store Connect will create a record for your app. Look on the left hand side and select the 1.0 release under iOS App. Scroll down to the build section. This is where you’ll be able to see your uploaded app.

You can use Application Loader to submit your app for review if you’re getting a build from a developer (in ipa format) and don’t have Xcode installed. You’ll still need a Mac since that’s the only operating system Application Loader runs on.

If you want to try out Application Loader and don’t have Xcode installed, get it from Resources and Help section of App Store Connect.

When you have found the Application Loader from the Resources > Help Section, simply install it and upload your ipa file. Then, you are done.

However, if you do have Xcode installed, you can access Application Loader under the Xcode -> Open Developer Tool menu.

Uploading the Build – Since we already set up the app in App Store Connect and Xcode knows about our dev account, it’ll know where to put it when we upload it.

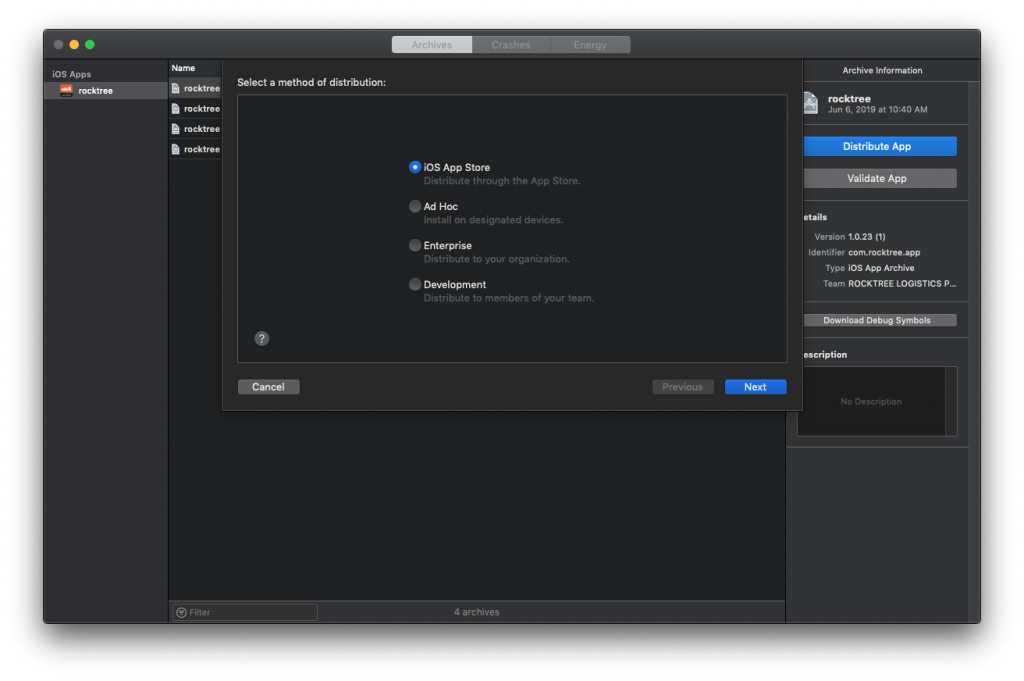
Open your project in Xcode. Select Archive in the Product menu. Choose Save for iOS App Store Distribution. That’ll create the build to be submitted.

To upload your app, click on the big blue Upload to App Store button on the right side. You’ll have to confirm for Xcode that it’s going to upload the app to the right place. If you’re on multiple iOS dev teams, you’ll have to pick the one it should use. When Xcode has it all figured out, it’ll show you a summary screen. Click the Upload button.

Developer upload app

Another way to upload the app is through a developer.

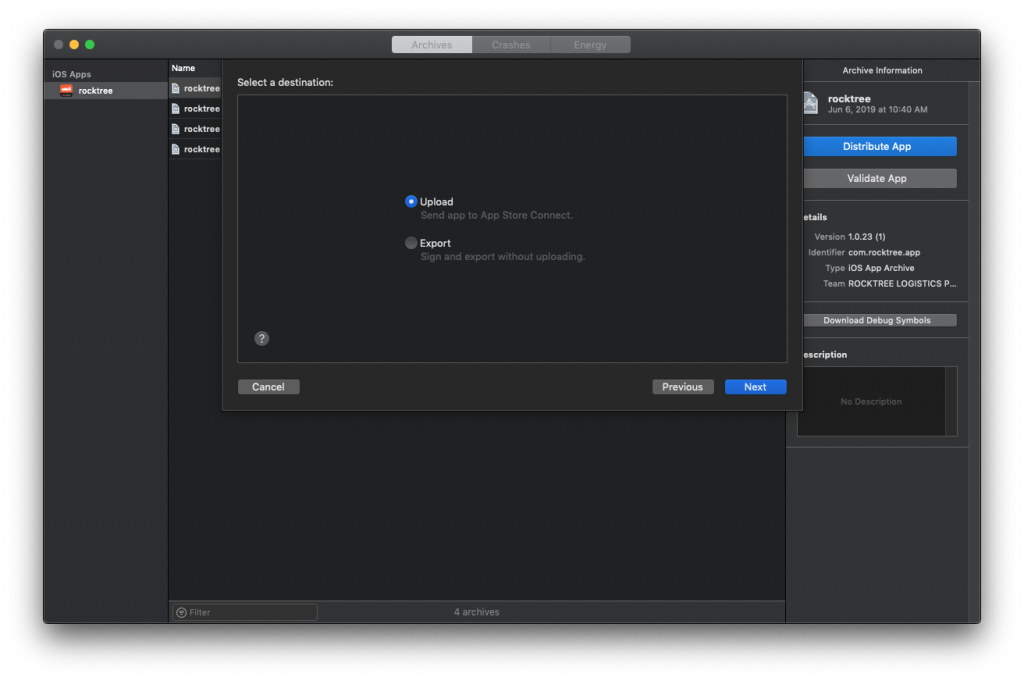
First make sure to create an archive. After that you should see the archive on your list. Select the archive from the list and click the Upload to App Store… button on the right. The application binary is then uploaded to Apple’s servers.

During this process, your application is also validated. If an error occurs during the validation, the submission process will fail. The validation process is very useful as it will tell you if there is something wrong with your application binary that would otherwise result in a rejection by the App Store review team.

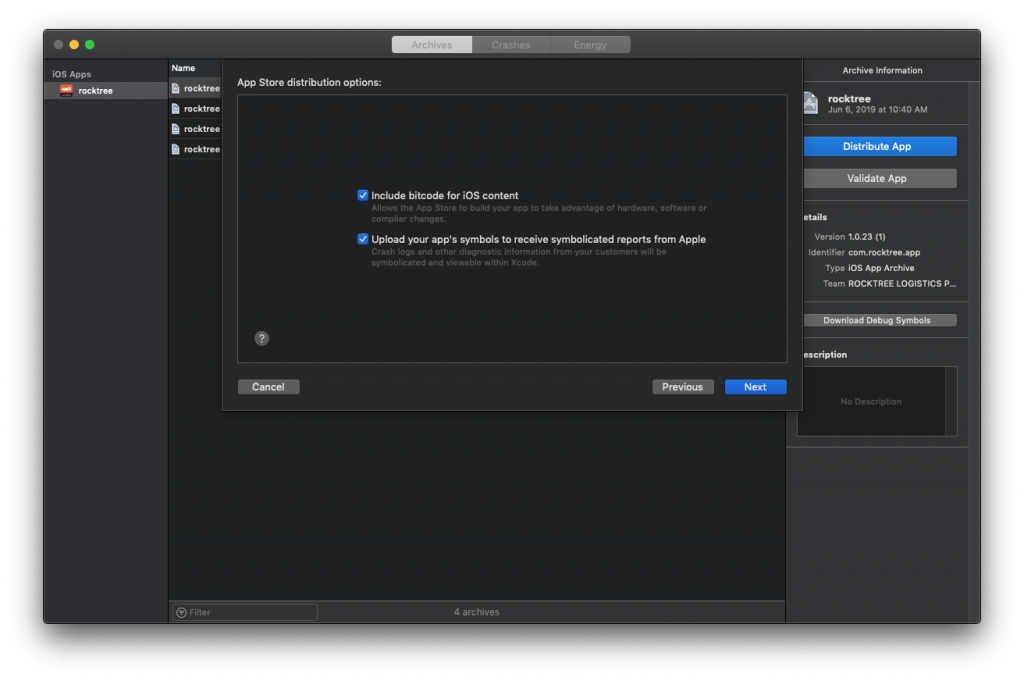
Just go with the default values…

Certificate

If the certificate associated with the app does not align with your computer, there will be an error. You can request from that user to get a public certificate for you to use.

If you want to create your own certificate from your computer and generate your own provisioning profile, then on:

In your Apple account, when you get provisioning profiles, you need to register a certificate first. Certificates are files generated by your computer’s Key chain.

You will need to create this Certificate (CSR file) to give to Apple.

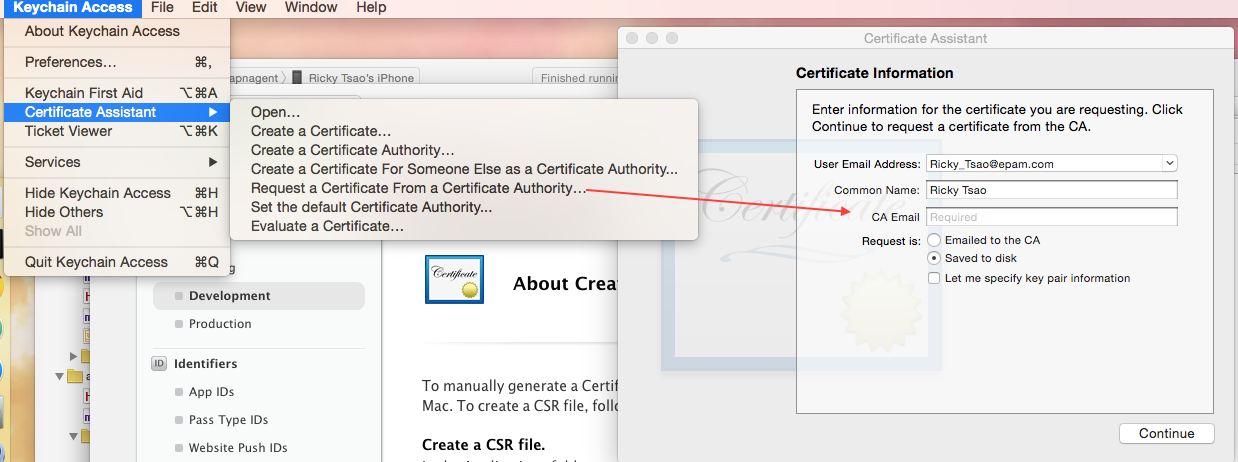
To manually generate a Certificate, you need a Certificate Signing Request (CSR) file from your Mac. To create a CSR file, follow the instructions below to create one using Keychain Access.

Create a CSR file, copy and pasted from wizard page
In the Applications folder on your Mac, open the Utilities folder and launch Keychain Access.

Within the Keychain Access drop down menu, select Keychain Access > Certificate Assistant > Request a Certificate from a Certificate Authority.

In the Certificate Information window, enter the following information:
In the User Email Address field, enter your email address.
In the Common Name field, create a name for your private key (e.g., John Doe Dev Key).
The CA Email Address field should be left empty.
In the “Request is” group, select the “Saved to disk” option.
Click Continue within Keychain Access to complete the CSR generating process.

Once, you’ve successfully created it, save the .certSigningRequest file on your computer.

On the next screen, then you will see Generate your Certificate page. Upload the .certSigningRequest file, and click Generate.

You will then see that your Certificate is ready.

Name: Apple Development iOS Push Services: com.rtsao.deleteTestPush
Type: APNs Development iOS
Identifier ID: deleteTestPush
Expires: Dec 01, 2016

Click download and you should see a .cer file

That’s about it. When you’ve reached to the end of the wizard, you’ll have a chance to turn the app in and then wait about 2 weeks for the approval.

Should IBOutlet be weak or strong?

https://stackoverflow.com/questions/7678469/should-iboutlets-be-strong-or-weak-under-arc/7729141#7729141

…the outlets to subviews of the view controller’s view can be weak, because these subviews are already strongly owned by the top-level object of the nib file.

However, when an Outlet is defined as a weak pointer and the pointer is set, ARC calls the runtime function:

This adds the pointer (object) to a table using the object value as a key. This table is referred to as the weak table. ARC uses this table to store all the weak pointers of your application. Now, when the object value is deallocated, ARC will iterate over the weak table and set the weak reference to nil.

Alternatively, ARC can call:

Then, the object is unregistered and objc_destroyWeak calls again:

This book-keeping associated with a weak reference can take 2–3 times longer over the release of a strong reference. So, a weak reference introduces an overhead for the runtime that you can avoid by simply defining outlets as strong.

loading and showing images for Tables and Collections in swift

https://github.com/DigitalLeaves/FlawlessTablesAndCollectionViews

Flawless UICollectionViews and UITableViews


https://medium.com/capital-one-developers/smooth-scrolling-in-uitableview-and-uicollectionview-a012045d77f

Image flashes demo (The problem)
no flashes demo (The solution)

First, some background

tableView:cellForRowAtIndexPath: and collectionView:cellForItemAtIndexPath: are called whenever a new cell has to be displayed

The cells have an NSIndexPath[section-row] to identify its position.
In order to get the NSIndexPath of the cell, use

There is an array that stores the data to be displayed for the cells.

data_table

Cells, unlike data in the array, are re-used for efficiency. Thus, they do not stay in place. When a cell with data is about to be displayed, cells are dequeued ( or allocated when there is no cells ). The table will assign the current IndexPath to it, then set data onto it.
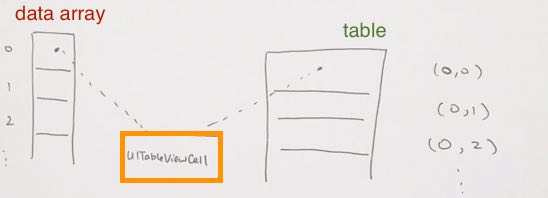
data_cell_table

In detail, the cells are kept in a pool where they are dequeued and served as they are needed.
When you ask for a cell with dequeueCellWithReuseIdentifier: a new one is created if and only if there’s no previous created cell that can be served.

Objective C version

In objective C, as you can see, we first ask the pool to return us a cell to use.
If its nil, which means the pool does not have spare ones, we need to allocate and create our own.
Once created, we can start settings it properties, and then return it to the class to be displayed.

Swift version

In swift, it combines the re-use or creating a new one in one method call of dequeueReusableCell.

Example

So, let us go ahead and see how it all starts out. When the table or collection view first start out, it sees that the the visible rows needs to be displayed.
First, it looks at the first row at index (section 0, row 0), and that it needs to display that cell.

It goes into delegate method cellForRow and tries to dequeue a cell. Because we are just starting out, our cell pool will be empty. Thus, get a new freshly allocated cell for us to use. We assign its display properties (namely, text, color, etc). In our case we simply assign the text property to something. Say, a string “one”.
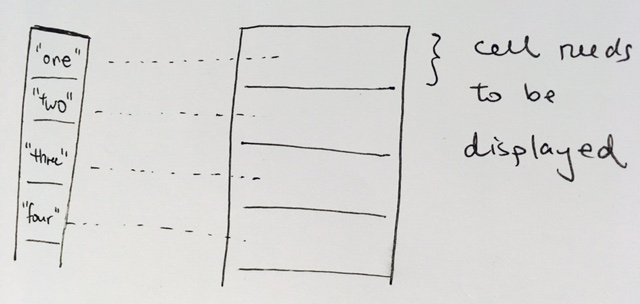
display_cell_1-4

It then goes to the second row at index (section 0, row 1) and does the same thing. It will see that the cell pool is empty, and thus creates a new cell. We assign its display properties, and give it a strong “two”.

This applies for the rest of the cells that needs to be drawn on the table. Say if 8 cells are showing, usually table will allocate a few more cells, say 10. Take note that even though cells 9 and 10 are allocated, its indexPath will be nil because it is not shown by the table yet Once they are shown, their indexPath will be assigned an IndexPath.

Scrolling up, reusing those cells

At this point, we have successfully created table view cells, set their properties, and have displayed the data in the table.

The cell pool is still empty because we are currently using all of the cells. In other words, they are on display.

Now, the user uses their finger and swipes up. The whole table scrolls up one page.
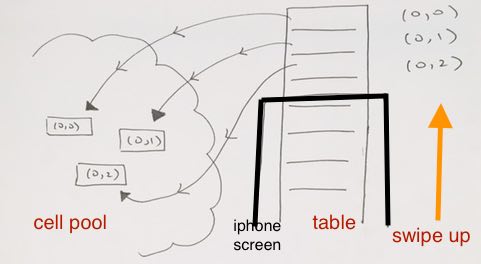
swipe_up_recollect_cells

At this point, the first row at index (section 0, row 0), disappears off the screen. The cell object representing that row gets queued into the cell pool.
then the second row at index (section 0, row 1), disappears off the screen. It also gets queued into the cell pool…
As each on display cell disappears off screen, they get “re-collected” into the cell pool.

But! As each row disappears, new rows from the bottom appears right!?

We need to make sure they are drawn. So at this point, say, (section 0, row 4) starts to appear and it needs display.

It runs through delegate method cellForRow for (section 0, row 4) and tries to dequeue a cell.

It gets a cell object that (section 0, row 1) was previously using.
(section 0, row 1) have disappeared off screen and is not using its cell anymore. It has returned its cell back to the cell pool.

Take note that when the cell (which was previously used by row 0) is dequeued for (section 0, row 4), the tableView will changes the cell’s indexPath to (0,4). Thus, this signifies that this cell now represents for tableView’s section 0, row 4 now.

Hence the cell variable we get back is a valid object with our designated IndexPath of (0, 4)
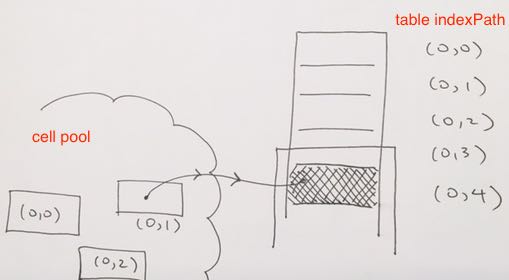
dequeue_cells

Even though the cell’s IndexPath now is (0,4), its data has not been “cleaned” or “zeroed”, so it has the same configuration it had. In other words, that cell’s property text still has the previous string in it. And thus, as we dequeue that cell object for row 4, we over-write the text property with whatever row 4’s string is.

Then we properly return the cell object.

Note that the disappearing and appearing of the cells are determined by the TableView or Collection class. It may enqueue a bunch of disappearing cells first into the cell pool, then allow appearing cells to dequeue them. Or they may simply do it one by one.

The Problem
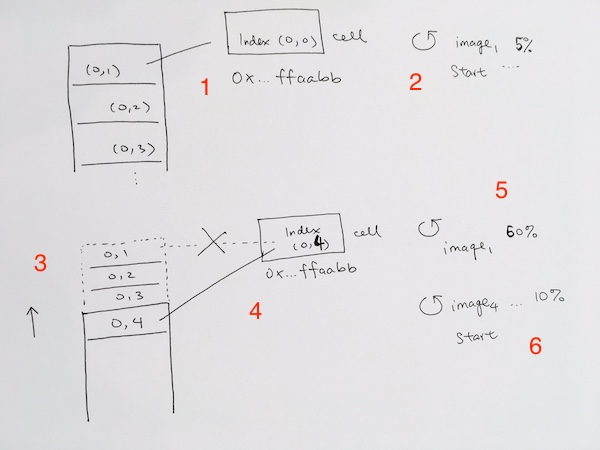
problem_1

1) When the first cell is loaded, it uses dequeueReusableCellWithIdentifier and gets a fresh cell object with address 0x…ffaabb.

2) It then uses the singleton ImageManager and starts doing a async download operation for image 1.

3) The user then swipes up. This makes the cell go out of display, and thus, the cell objects gets put into the cell pool, with its indexPath assigned to nil.

4) As the first row disappears, the 4th row appears, it uses dequeueReusableCellWithIdentifier cell and gets the cell object 0x…ffaabb from the cell pool. This cell was JUST used by row 1.

5) At this point, image 1 download progresses to 50%.

6) Due to 4) with its cell visible, it starts another async image download operation in singleton ImageManager. Image 4’s download progresses to 10%.
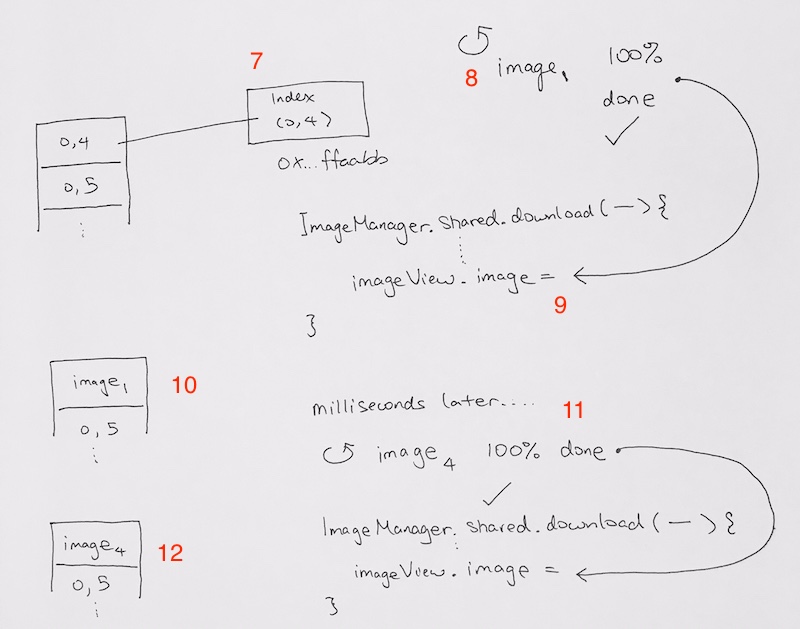
problem_2

7) With row 4 fully visible, it now has the cell object, and is downlading Image 4.

8) Image 1 finishes downloading.

9) Our closure in the cellForRow method points to the cell 0x…ffaabb. It then assigns cell 0x…ffaabb’s imageView.image to image1.

10) Now, for a split second, the image on row 4 is of image1.

11) Then a second later, image 4 finishes downloading, and thus in the same manager as 9), the closure code from cellForRow assigns 0x…ffaabb’s imageView.image to image 4.

12) Even though row 4 now correctly depicts image4 as intended, steps 9) to 11) creates a flash of of image 1 switching to image 4. The user can see it, depending on how slow the download speed is, and thus, is the problem we’re trying to solve.

Async Operations and when they complete

So, instead of doing instantaneous data assignments, we need to do async operations that may take a few seconds. Then after a certain amount of seconds is over, it comes back and updates our UI.

1) cellForRow hits dequeue cell and gets cell 0x…9aa00

2) Each row of the table matches up to the index of the URL array that gives us a string URL to download an image. cellForRow’s indexPath provides the index and we use that index to get the url from the data array.

we will be using this imageURL and use the Downloader singleton to download that image

3) The Downloader singleton uses the url and literally downloads the image. When its done, it hits up a closure to update the table UI

4) This here is the most important part. Once the download is done. It hits a closure. The closure references
the cell (that was dequeued for this table row), and the table IndexPath.
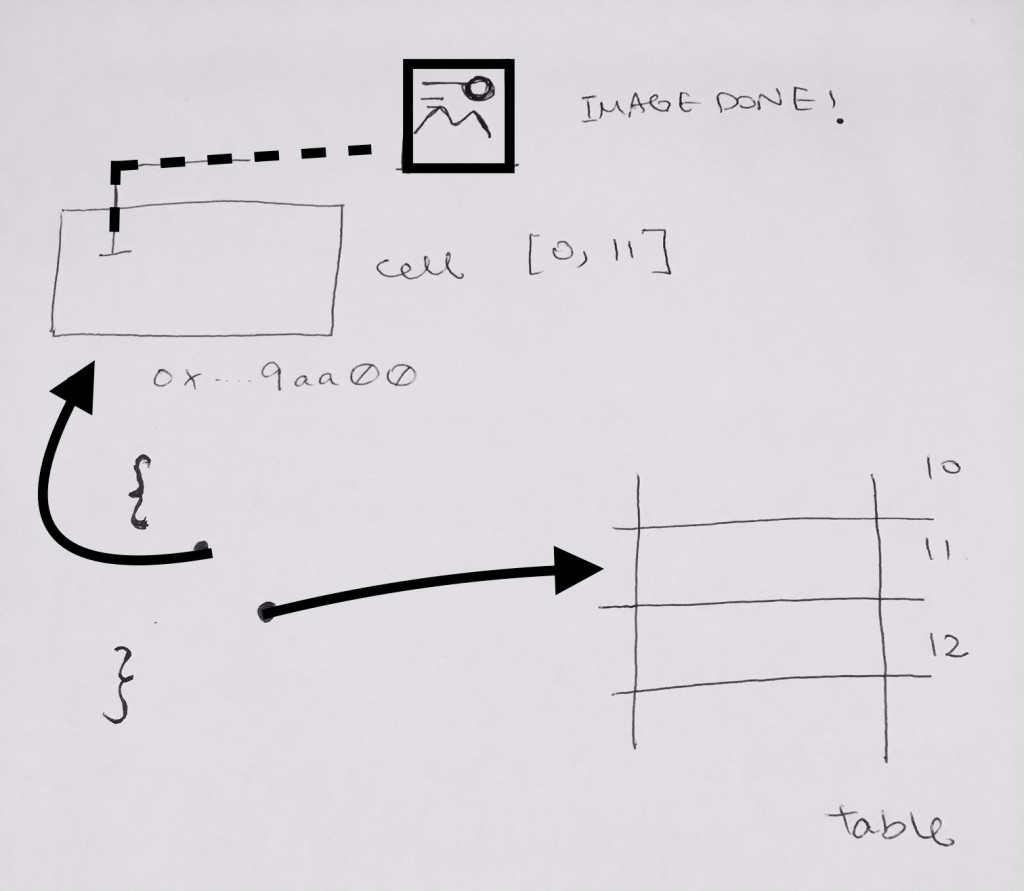
async_operation_tableview

It references the cell because we want to see which indexPath it is representing

It references the table IndexPath to know which row index was assigned to this operation.

Code is below:

Now in normal circumstances, the cell dequeued for say table row 11 has IndexPath [0, 11]. Table view IndexPath is [0, 11].

The Downloader finishes downloading the image, puts it in cache, and then calls our closure for completion.
It sees that IndexPath of the cell that’s we’re referencing is valid and is [0, 11]. This means as far as the cell is concerned, it is on display for row 11.
(If the IndexPath is nil, it means even though the cell is alive, it is not used by any table rows and not on display yet)

Furthermore, the indexPath of the table is [0, 11]. This means we’re currently processing for that row. Hence, due to:

1) cell’s IndexPath is representing and on display for row 11
2) cellForRow delegate method is called for table row 11

we can safely assign the downloaded image onto this cell.

Start download, cell scrolls off screen, download finishes

Let’s say we’re on row 11 and it starts to download an image.

It gets an URL from data[11]
Uses that URL and starts downloading image 11.

Then all of a sudden, the user scrolls row 11 out of view.
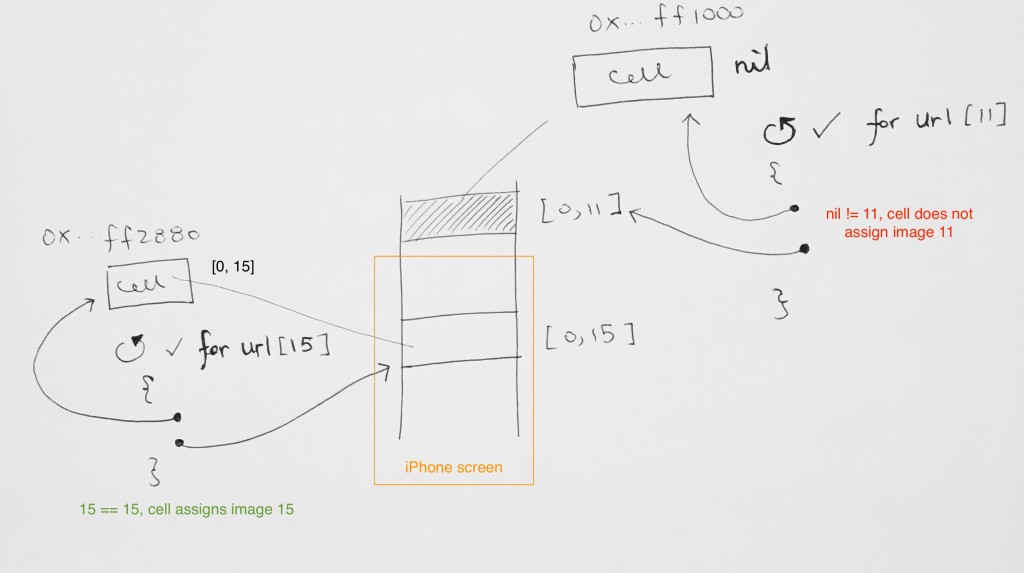
cell_scroll_off_screen

At this point 2 things happen:

1) cell for row 11’s indexPath gets set to nil because it is not on display anymore
2) row 15 appears, and dequeues a cell for usage.

1)

the download for image 11 completes! It runs to the closure. Notice 2 things. The closure references 2 important things:

– the cell that just before represented row 11. Its IndexPath is now nil because it is not only display anymore.
– the index of the cellForRow that is calling this closure (11)

We do a comparison and see that nil != 11, thus we don’t assign image 11 to cell’s imageView.

2)

On the other hand, row 15 appeared and dequeues a cell. It starts downloading the image, the image finishes and hits the closure. The closure references 2 things:

– the cell with IndexPath [0, 15] because it is visible
– the index of the cellForRow that is calling this closure (15)

We do a comparison and see that 15 == 15. Thus, we assign the JUST downloaded image for cell with IndexPath [0, 15].

Not visible offscreen cell gets taken by a row that is now visible
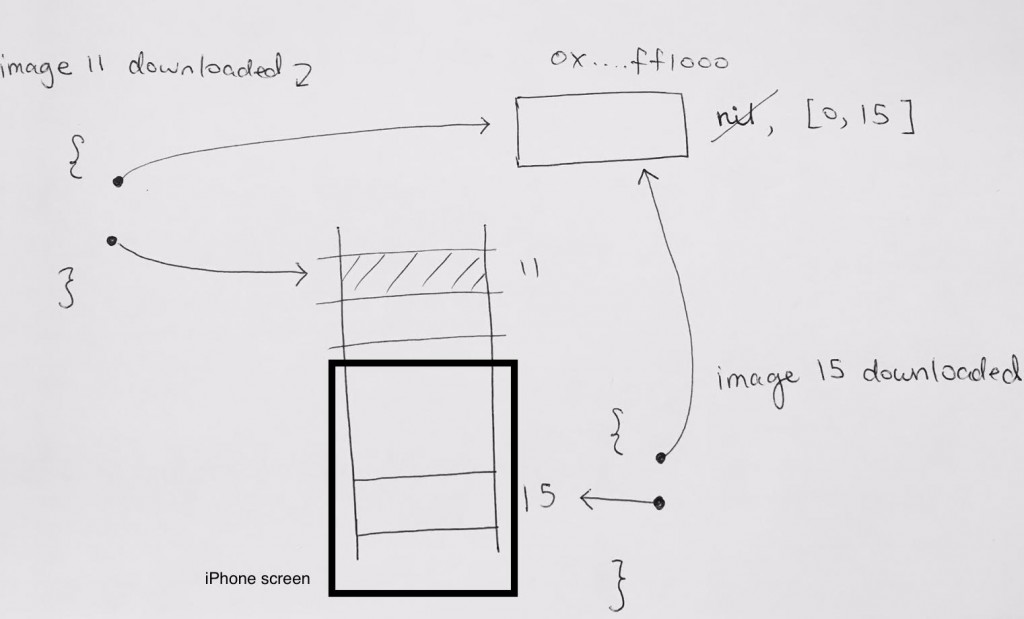
two_rows_use_one_cell

There is another situation where when we scroll off screen, the cell for index 11 (0x…ff1000) nows has indexPath of nil.

The downloader for image 11 is going on.

Row 15 appears on screen. It gets dequeued the cell (0x…ff1000) that was previously used by row 11. This is because row 11 disappeared and not using the cell anymore. Then, cellForRow at index 15 starts downloading image 15.

Hence cell 0x…ff1000 now has IndexPath of 15 because it is representing visible row 15.

downloader for image 11 finishes, and runs its closure. It references 0x…ff1000, but wait, the IndexPath for that is now [0, 15]!!
The index of the cellForRow that is calling this closure is 11. Thus, 15 != 11, and we do not assign image 11 to this cell.

image 15 finishes downloading, and runs its closure. It references 0x…ff1000 and the IndexPath for it is [0, 15].
The index of the cellForRow that is calling this closure is 15. Thus 15 == 15 is valid, and it goes ahead and assigns image 15 to
the cell’s imageView.image.

After everything has been downloaded

After everything is downloaded, all images should be instantaneously retrieved from the dictionary cache (url: Image). Once it gets the image, it would use the main queue to update our table.

In your cellForRowAt, the cellIndex and tableIndex check should succeed much more now because there is no more delay. The image retrieval is instantaneous and then calls the closure right away.

Background Tasking

http://stackoverflow.com/questions/12071726/how-to-use-beginbackgroundtaskwithexpirationhandler-for-already-running-task-in
http://stackoverflow.com/questions/28993628/how-to-pass-background-task-identifier-to-completion-handler
http://www.raywenderlich.com/29948/backgrounding-for-ios

The Problem

When you do an update, an add of an event, or whatever feature that you would like to update on the Azure, it will take anywhere from 1 to maybe a few long seconds to sync the data over the network.

This will cause a problem if the user hits the home button and causes our app to process in the background. iOS will give the app 5 seconds to do what it needs to do before it suspends it.

But what if our network task takes longer!? How to make sure whatever network task we have runs completes safely?

Solution

Apple introduced a feature where you get to background your task for a full 3 minutes. If it can’t finish after 3 minutes, then you’re out of luck and it will suspend your app. But for some network task where we’re synching user data/actions against an Azure server, etc…3 minutes is plenty!

How it Works

When a network task happens, we create a timer to check on the application state for the lifetime of that network task.

For example, when the network starts, we create a timer that calls on method evaluate every 1 second to check on the application state like so:

For the whole duration of the network task, we need to check if the APP is in active state UIApplicationStateActive, or not. If its in the active state, then do nothing, and let the app continue its network task.

Say while the network task is processing, the user presses the Home button. Our app gets backgrounded, and the (UIApplicationStateActive) STATE would the be false. When this happens, the App’s singleton backgroundTimeRemaining will start counting down.

We simply log out to see what the remaining time is. We have a full 180 seconds.

The logs will let you know that as you’re processing this network task, the backgroundTimeRemaining will decrease while the app is in the background.

If the user clicks on the app again within the 3 minutes, your backgroundTimeRemaining will reset.

When the 3 minutes are up, it will call an expiration handler that your property

points to like this:

Working with UITableViewDelegate and UITableViewDataSource methods

iOS Tutorial: Editing TableViews

xCode 7.3 demo

Basics

  1. Declare an Array data structure
  2. numberOfSectionsInTableView
  3. numberOfRowsInSection
  4. cellForRowAtIndexPath
1. Declare an Array data structure

The table always matches an array(s) of some sort to represent data.
Each row matches up to an element in the array.

2. numberOfSectionsInTableView

The first order things is to let the table know how many sections we will represent. Each table can contain m sections.
Each sections can contain n rows. For simplicity purposes, we’ll designate only 1 section for our table.

Usually, use one array to represent one section. Each section will have n number of rows, which matches up to n number of elements in that array.

3. numberOfRowsInSection

Now, we simply specify the number of rows for each section. Each section usually represent an array, where n elements in that array
matches up to n number of rows in that section.

4. cellForRowAtIndexPath

The concept here is that the UITableView keeps a list of reusable cells.

At first, before showing the rows, it will have nothing. So dequeueReusableCellWithIdentifier will return nil. If you run the app, you’ll see the log show that it creates the cell:


-[RootViewController tableView:cellForRowAtIndexPath:] – Creating new cell
row 0 setting text
[RootViewController tableView:cellForRowAtIndexPath:] – Creating new cell
row 1 setting text
-[RootViewController tableView:cellForRowAtIndexPath:] – Creating new cell
row 2 setting text

In the case of UITableView building new cells for displaying the rows, we get the cell variable reference and point it to a newly created
UITableViewCell object allocated on the heap. We only do this if the cell returned is nil.

Once it creates the cell, it will set the cell’s properties.

Notice there is no ‘else’. That’s because whenever dequeueReusableCellWithIdentifier return a valid cell to be displayed, we always want to make sure the properties are correct, by assigning them.

Always reset all content when reusing a cell

https://developer.apple.com/library/ios/documentation/UserExperience/Conceptual/TableView_iPhone/TableViewCells/TableViewCells.html

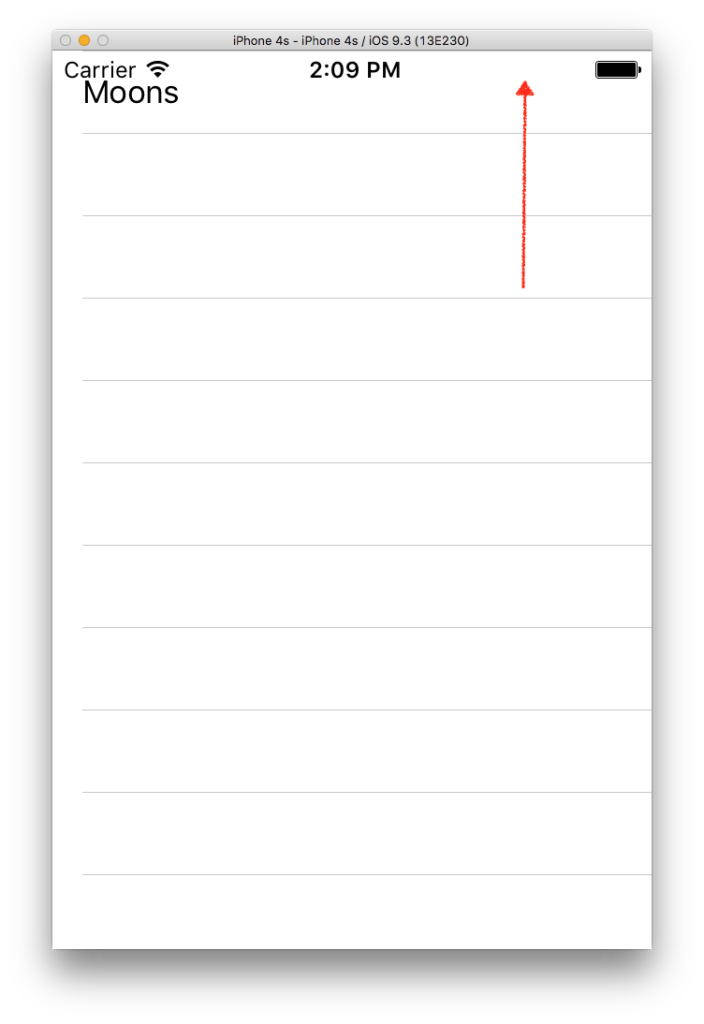
An example of this is if you pull the table up and the rows disappear from the screen.

pull-up-table

Once the table bounces back on the visible screen, you’ll see logs like this:

row 0 setting text
row 1 setting text

That’s because when dequeueReusableCellWithIdentifier returns valid cells, you need to always reset the contents of the cell when the reusable cell is returned.

Cells and Table View Performance

The proper use of table view cells, whether off-the-shelf or custom cell objects, is a major factor in the performance of table views. Ensure that your application does the following three things:

Reuse cells. Object allocation has a performance cost, especially if the allocation has to happen repeatedly over a short period—say, when the user scrolls a table view. If you reuse cells instead of allocating new ones, you greatly enhance table view performance.
Avoid relayout of content. When reusing cells with custom subviews, refrain from laying out those subviews each time the table view requests a cell. Lay out the subviews once, when the cell is created.
Use opaque subviews. When customizing table view cells, make the subviews of the cell opaque, not transparent.

Select Row

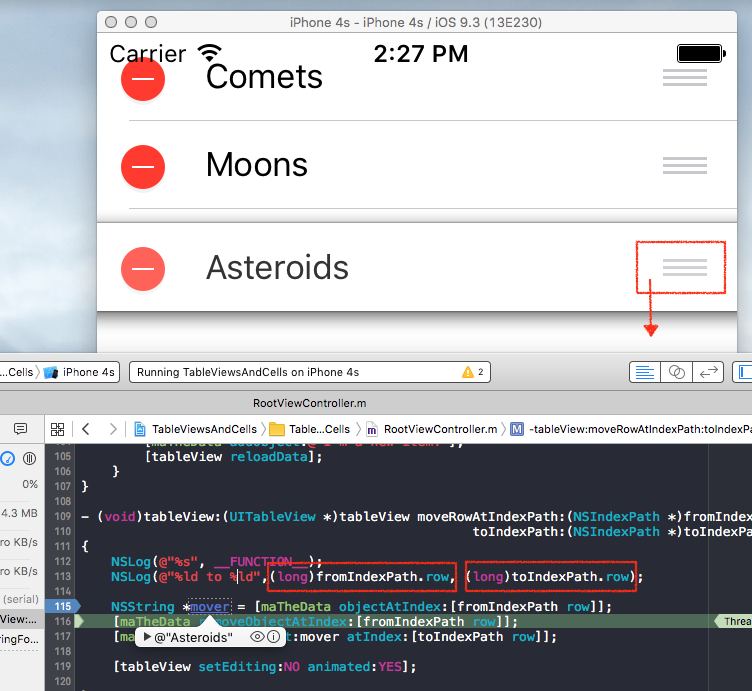
When you click on a row, this method will be triggered. Then call method setEditing on the table view object. Once you set it to YES, the row will animate its set settings where your deletion option appears on the left, and the move row button appears on the right.

Click and drag the first row’s move icon for a row and move it to the very bottom. Basically we’ll be switching the topmost row with the bottom most row.

uitableview-move-rows

You can see that by using the fromIndexPath.row, we can get the string by our data array. We use the NSArray’s methods to manipulate the data so that it reflects what’s happening on the UI.

Namely, use removeObjectAtIndex at from index path, and then insertObject on the row string at index toIndexPath.row.
Finally, we use a NO on setEditing to tell the tableView to finish.

Commit your Edit

Once in edit mode, you will commit on a task. A common one is to delete the row. Once you click on the Delete button, you’ll hit the commitEditingStyle:forRowAtIndexPath method in which you commit your deletion.

When the delete button is selected, it will hit commitEditingStyle:forRowAtIndexPath: method where the editingStyle is UITableViewCellEditingStyleDelete.
From there, its the same as moving rows, where you manipulate your array. You remove the object at the data source, then call deleteRowsAtIndexPaths on the UI tableview object.

Once the deletion takes place, the tableview will redraw all the rows, thus, it will go through numberOfSectionsInTableView: and tableView:numberOfRowsInSection: to recalculate how many elements of the array it should show.

Adding a Insertion Row

Adding an insertion row involves 3 steps

1. Return Insert macro for Row

We want to add a row specifically for entering data and inserting that data into our table. Hence, let’s just designate the first row for that. Hence,
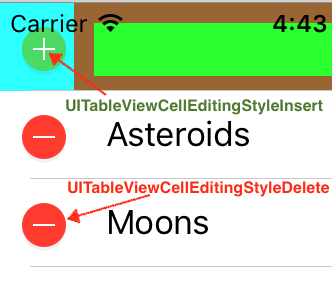
we specify in method editingStyleForRowAtIndexPath, where we return the insert macro for the 0th row to tell the table view to show an “Insert” button when the edit mode is on.

For all other rows, show the delete button when the edit mode is on.

editing_styles

Then in your commitEditingStyle:forRowAtIndexPath method, use an option where if the editing style is for insertion
we add a property NSString where it points to the string to be added

2. Setting up a Custom Row to receive data

One easy way to do this is to create a custom cell with a textfield in there that receives a string.

3. ViewController observe UITextFieldTextDidChangeNotification messages from UITextField

Insert a property InsertionCell, where it will point to the 0th row of type InsertionCell.

You assign it in cellForRowAtIndexPath, where when after 0th cell is created, you simply
assign a reference to it so we can keep track of it.

Then, we register for the UITextFieldTextDidChangeNotification notifications on
textfield of the insertion Cell:

This means that whenever the user enter a character, the UITextfield will send UITextFieldTextDidChangeNotification,
in which the ViewController will observer.

It will run textUpdated: method, like so:

The notification message will contain the UITextField with its text. Hence we just have a NSString property point to that text.

When the green plus button is clicked, it will run to commitEditingStyle:forRowAtIndexPath:, check that editingStyle is UITableViewCellEditingStyleInsert and add the string to the data source array. Then it refresh the data by calling the table view’s reloadData method method.

NSFetchedResultsController

frc-basic-demo

The signatures of the delegate methods reveal the true purpose of the NSFetchedResultsController class. On iOS, the NSFetchedResultsController class was designed to manage the data displayed by a UITableView or a UICollectionView. It tells its delegate exactly which records changed, how to update the user interface, and when to do this.

Creating the Fetch Results Controller

First, create a NSFetchedResultsController property

Make sure to synthesize it

Create the accessor.

NSFetchedResultsController takes:

  • NSFetchRequest, which must set inject a sort descriptor
  • Managed Object Context

In your accessor, you’ve set the fetchResultsController’s delegate to self. This means
it’ll be delegating messages to us and we have to take care of it. Thus, we do so by conforming to that delegate and implementing its methods.

In your class extension, conform to NSFetchedResultsControllerDelegate:

Finally, perform the fetch in your viewDidLoad:

Basic FRC delegate methods

Adding some Data

First, we get the MOC that’s connected to our fetch results controller.
Then, we set inject that MOC into NSEntityDescription’s insertNewObjectForEntityForName method, which returns us an Managed Object “Hero”.

We then set the properties of that Hero object and have the MOC call save.

Finally, let’s have our fetch results controller do a performFetch. We see that it now has objects.

When you add additional data and have your MOC save, it’ll call the FRC’s didChangeObject: method, which in turn inserts data into your table view by calling insertRowsAtIndexPaths:withRowAnimation.

Making the Results show up

Use your fetch controller for data display instead of NSArray in your cellForRowAtIndexPath.

Do the same for numberOfRowsInSection

Adding objects in a loop

We loop through creating a bunch of Managed Objects. We set the properties to milliseconds to give them unique data.
Then after the loop is done, we simply tell the MOC to save.

Once, you save, you’ll see that our FRC will animate all the adding of the newly added objects into our table.

frc-add
Its output is:

As you can see FRC’s delegate methods will and did change content are always wrapped around insertions, deletions, changes, etc.


ADDING GROUP OF PEOPLE

-[ViewController controllerWillChangeContent:]

-[ViewController controller:didChangeObject:atIndexPath:forChangeType:newIndexPath:]
tableView insertRowsAtIndexPaths:withRowAnimation:


-[ViewController controller:didChangeObject:atIndexPath:forChangeType:newIndexPath:]
tableView insertRowsAtIndexPaths:withRowAnimation:

-[ViewController controllerDidChangeContent:]

Deleting Objects

We delete objects by clicking on the delete button in edit mode. In order to get into edit mode, we need to set TRUE for editing on a table row.

Let’s make the table view editable when we click on a row:

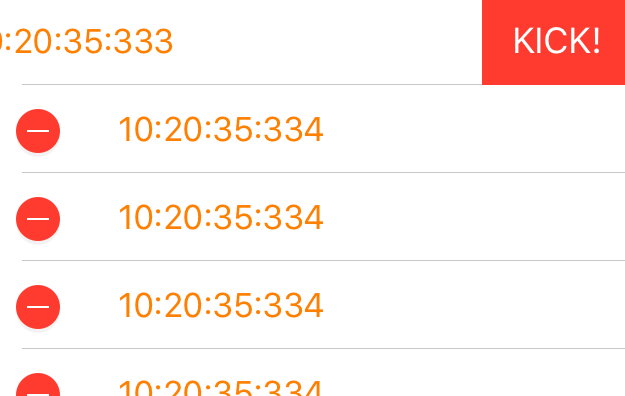
When the edit mode is on, let’s use the default delete button style, which is a rectangular red button.

We can also set the string of the button. Instead of the standard Delete, let’s use “Kick!” instead:

frc-delete

output:

— DELETING OBJECT —
-[ViewController controllerWillChangeContent:]

-[ViewController controller:didChangeObject:atIndexPath:forChangeType:newIndexPath:]
tableView deleteRowsAtIndexPaths:withRowAnimation:

-[ViewController controllerDidChangeContent:]

As you can see, the deletion is animated in our table view!

Click and re-click to get in/out of editing mode

When a table is in edit mode, by default, it does not allow you to re-click or re-select rows. However, if you set the property allowsSelectionDuringEditing to YES, then you can.

Let’s say you want the user to be able to go back to non-edit mode by clicking the table again. Look at property isEditing to see if you’re in edit mode. If so, just simply set the tableview back to NO for setEditing.

Core Data – Child save context, propogate up to Parent

xCode 7.3 demo

Parent-Child Contexts

An important point that you need to get a good grip on is that contexts can be chained such that one is the child of another.

CoreDataStack.h

CoreDataStack.m

We create a private (child) and parent context.
The parent is what connects to the Persistent Store Coordinator.
The child is connected to the parent context through the parentContext property.
The child DOES NOT connect to the PSC.

If and when you do this, you have to realize that:

  • Changes saved in a child context are pushed to the parent, not to the persistent store.
  • The parent context behaves as the child’s persistent store.
  • Changes saved in a parent are not pushed down to the child.
  • Changes saved in a sibling are not pushed to other siblings.

This means that changes only propagate one level up in a context hierarchy. If the context you are saving is several levels away from the persistent store, you will need to save each parent context in the hierarchy until you reach the context that saves to the persistent store to actually persist your changes.

Demo – Changes saved in an child context are pushed to the parent

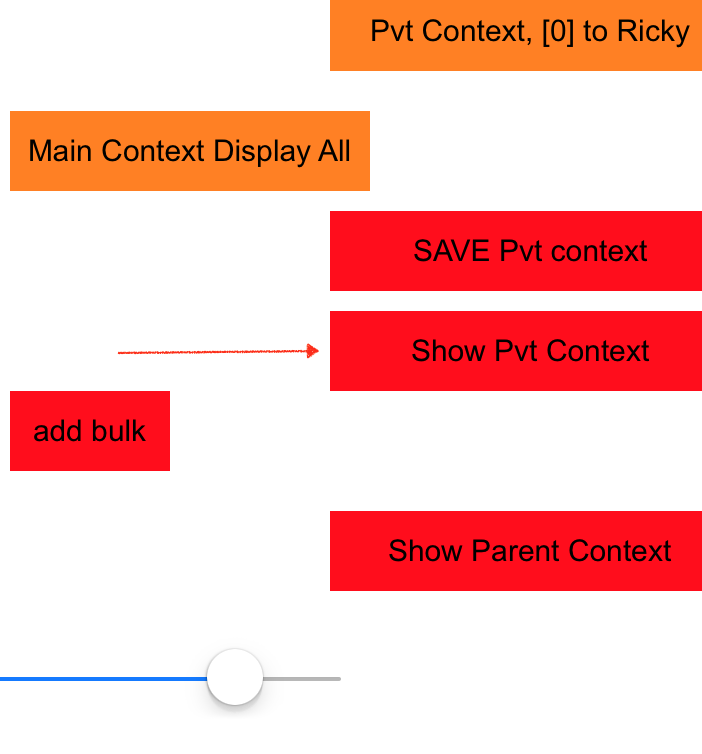
First click the Show Private Context Button.

show_pvt_context


output:
(PRIVATE CONTEXT) – no people found

Do the same for “Show Parent Context” and you’ll get the same output.

Hence, we know that both child/parent contexts do not have any data so far.

Okay, Let’s first add some objects.

We first put a block task onto the private context. Its basically adding three Person objects.
Once those objects are initialized, we tell the context to save.

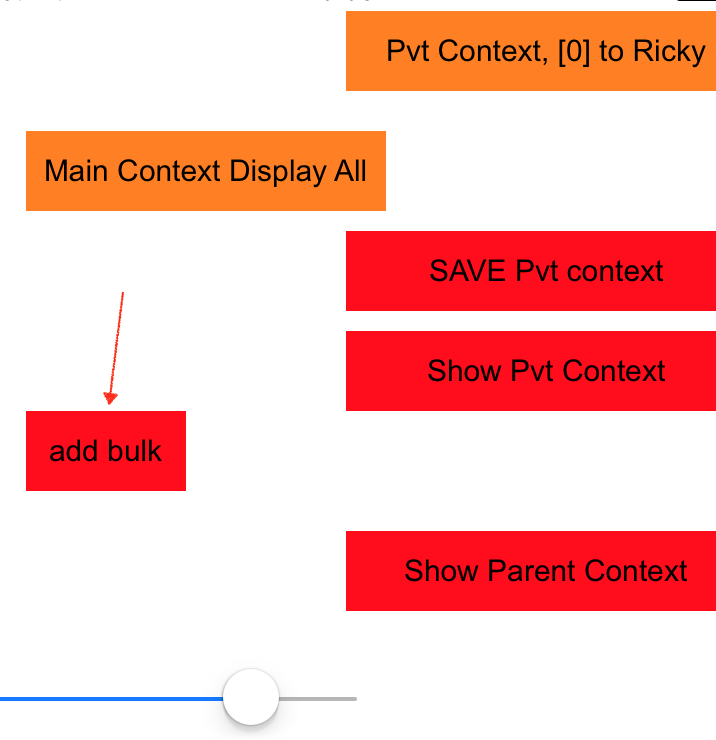
Press the ‘add bulk’ button do add the objects.

add_bulk


output:
——– ADD BULK PEOPLE ———–
added remark: 1472782237.562826 1472782237.562826
added remark: 1472782237.563077 1472782237.563077
added remark: 1472782237.563318 1472782237.563318
PRIVATE CONTEXT save success!

Now, if you click the “Show Pvt Context” button and “Show Parent Context” button, you’ll see that they both show data. This is because when the private context saves its data, it pushes it up to the parent automatically.


output:

(PRIVATE CONTEXT) —— RESULTS ————
There are 3 number of entries so far
0 —————-
firstName = remark: 1472782941.371055
lastName = 1472782941.371055
object address is: 0x7f835bf95af0

(PARENT CONTEXT) —— RESULTS ————
There are 3 number of entries so far
0 —————-
firstName = remark: 1472782941.371055
lastName = 1472782941.371055
object address is: 0x7f835bf11150
….

What happens to the parent context if child does not save?

Let’s edit the first object by pressing the “Pvt Context, [0] to Ricky” button.
We put a task block onto the private context. It gets the first object, and changes
the first name to “Ricky”


output:

PRIVATE CONTEXT — CHANGE FIRST PERSON TO RICKY… ————

Then have the private context display its results. You will see that Ricky appears.


output:

(PRIVATE CONTEXT) —— RESULTS ————
There are 3 number of entries so far

0 —————-
firstName = RICKY
lastName = 1472783378.062207
object address is: 0x7f8bc161d400

But if you display the PARENT CONTEXT, you will not see it. The reason why is because you need to save the private context in order
to propagate the changes up the parent.

Try clicking on the “Save Pvt context” button. You’ll see this:
PRIVATE CONTEXT save success!

Then click the “Show Parent Context” button and you’ll see Ricky in the results:


output:

(PARENT CONTEXT) —— RESULTS ————
There are 3 number of entries so far

0 —————-
firstName = RICKY
lastName = 1472783378.062207
object address is: 0x7f8bc161b390

Now, press the “Main Context Display All”, you’ll see that its empty:

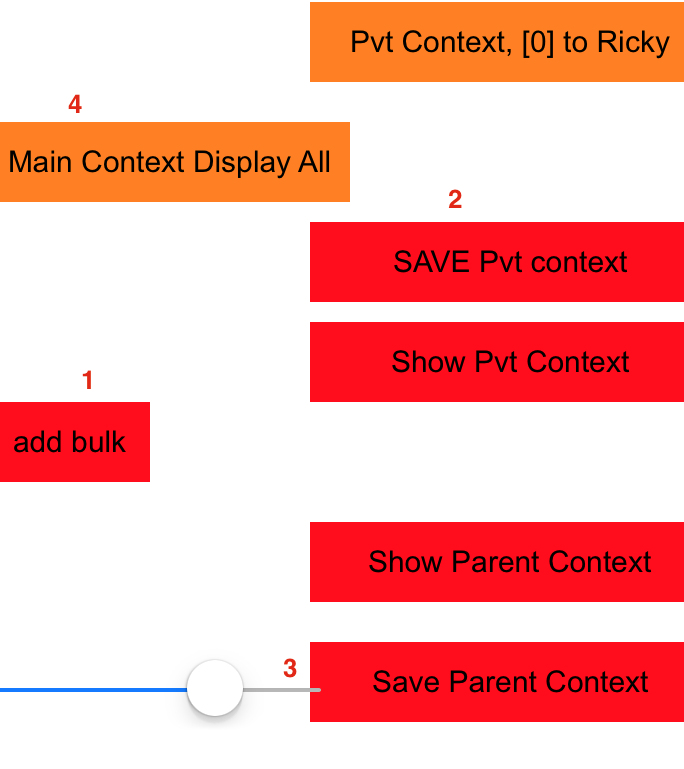
That’s because each save only propagate up one level. Thus, in order for the changes to be saved into the PSC, 2 points must hold:

1) The context must be connected to the PSC
2) The context’s parent context must be nil.

Our parent context satisfies both.

Click on “Main Context Display All”. You’ll still get:

There are no people in the data store yet. We need to make sure each context saves to propagate the changes up.

propagate

Now, save the parent context by clicking on “Save Parent Context”.

Due to the parentContext’s PSC is set, and that its parent context is nil, its saves will reflect to the PSC.

Thus, whatever context that’s connected to the PSC will be able to see the results.
Click on “Main Context Display All” and you’ll see that our main context now has the results:


(MAIN CONTEXT) —— RESULTS ————
There are 3 number of entries so far

firstName = RICKY
lastName = 1472784795.060829
object address is: 0x7fac7acbbeb0

Async Fetch Request – part 1

xCode 7.3 demo, AsyncFetchRequestEx1

Setting up the Stack

We create the core data stack called BNRCoreDataCoordinator.

Then we set up the PSC and MOC…

1) Set up lazy loading accessor for NSPersistentStoreCoordinator
2) Set up lazy loading accessor for NSManagedObjectContext

Notice that the MOC is connected to the PSC:

MOC Saving

Inserting Data

We throw a task block on our MOC’s private background queue. That task to simply initialize an Entity object
n number of times. Core Data returns ready objects for us to initialize. Once all the Entity objects are set up,
we tell the MOC to save context.

The caller of this method will get a completion block to signify that our Entity insertions have been done.
We throw this completion block onto the main queue visual reply.

How To Use

In your ViewController, import the core data coordinator, and implement a lazy loading accessor.

Let’s insert the data when it first appears. As you can see, when the insertion have completed,
we can do something on the UI, or just log a completion message.