Category Archives: flutter
State Management (no cubic, bloc)
We start off with Page 1. Page 1 has two containers with blue. We go to Page 2 in order to change these colors via radio buttons. When we come back to Page 1, the colors have changed. This is how state is shared between two pages.
main.dart
|
1 2 3 4 5 6 7 8 9 10 11 12 13 14 15 16 17 18 19 20 21 |
import 'package:flutter/material.dart'; import 'page1.dart'; void main() { runApp(MyApp()); } class MyApp extends StatelessWidget { @override Widget build(BuildContext context) { return MaterialApp( theme: ThemeData.dark(), home: Scaffold( appBar: AppBar( title: Text('Page 1'), ), body: PageOne(), ), ); } } |
Now, in Page 1, we have two properties. firstSquareColor and secondSquareColor. They are both set to false.
page1.dart
|
1 2 3 4 5 6 7 8 9 10 11 12 13 14 |
import 'package:flutter/material.dart'; import 'page2.dart'; class PageOne extends StatefulWidget { @override _PageOneState createState() => _PageOneState(); } class _PageOneState extends State<PageOne> { bool firstSquareColor = false; bool secondSquareColor = false; ... ... ... |
We have Containers that display blue or pink depending on this bool. For false, we display blue for both booleans. We look to Page2’s radio edits in order to know how to color our Containers.
|
1 2 3 4 5 |
Container( height: 150, width: 150, color: firstSquareColor == false ? Colors.blue : Colors.pink ), |
At the very bottom of page 1, we have a button that goes to page2 in order to change radio btns:
|
1 2 3 4 5 6 |
RaisedButton( ... onPressed: () { _navigateNextPageAndretriveValue(context); } ), |
It calls _navigateNextPageAndretriveValue in order to use Navigator to navigate to page 2.
Now look at this function _navigateNextPageAndretriveValue:
|
1 2 3 4 5 6 7 8 9 10 11 12 |
_navigateNextPageAndretriveValue(BuildContext context) async { print('_navigateNextPageAndretriveValue'); print('...awaiting Navigator.push ....'); final List nextPageValues = await Navigator.push( context, MaterialPageRoute(builder: (_) => PageTwo()), ); // waits right here for nextPageValues to be populated by Page2 // other code } |
Basically its an async function because we wait for the results that returns from when the next page (page2) pops.
So let’s see what happens when at page2.
We have two properties to maintain the bools.
page2.dart
|
1 2 3 4 5 6 7 8 9 10 11 12 |
class PageTwo extends StatefulWidget { @override _PageTwoState createState() => _PageTwoState(); } class _PageTwoState extends State<PageTwo> { bool firstValue = false; bool secondValue = false; ... .. ... } |
So we have a switch that takes this value. When the user clicks on the radio button to switch bool, firstValue and secondValue will be updated due to setState.
page2.dart
|
1 2 3 4 5 6 7 8 9 10 |
CupertinoSwitch( value: firstValue, onChanged: (bool value) { setState( () { firstValue = value; }, ); }, ), |
Now, when you’re ready, you push the save button. Remember in Page1 where we have the _navigateNextPageAndretriveValue function?
That function is currently awaiting Navigator.push(…). Our page2 is the result of that. And once we Navigator.pop here, with our list of firstValue and secondValue, this list will be returned to _navigateNextPageAndretriveValue.
|
1 2 3 4 5 6 7 8 9 10 11 12 13 14 |
RaisedButton( elevation: 15, color: Colors.grey[700], child: Text( '<- Save temporarily and go to previous Page', textAlign: TextAlign.center, style: TextStyle(color: Colors.black, fontSize: 15), ), onPressed: () { Navigator.pop(context, [ firstValue, secondValue ]); //multiple values are passed using a list }), |
Now these two bools will be in nextPageValues.
|
1 2 3 4 5 |
final List nextPageValues = await Navigator.push( //list to store multiple popped values context, MaterialPageRoute(builder: (_) => PageTwo()), ); |
Then in Page 1, we simply set its properties to the values presented in nextPageValues array.
|
1 2 3 4 5 6 |
setState(() { firstSquareColor = nextPageValues[ 0]; //zero index for 1st popped value of first container secondSquareColor = nextPageValues[ 1]; //first index for 2nd popped value of second container }); |
Source
main.dart
|
1 2 3 4 5 6 7 8 9 10 11 12 13 14 15 16 17 18 19 20 21 |
import 'package:flutter/material.dart'; import 'page1.dart'; void main() { runApp(MyApp()); } class MyApp extends StatelessWidget { @override Widget build(BuildContext context) { return MaterialApp( theme: ThemeData.dark(), home: Scaffold( appBar: AppBar( title: Text('Page 1'), ), body: PageOne(), ), ); } } |
page1.dart
|
1 2 3 4 5 6 7 8 9 10 11 12 13 14 15 16 17 18 19 20 21 22 23 24 25 26 27 28 29 30 31 32 33 34 35 36 37 38 39 40 41 42 43 44 45 46 47 48 49 50 51 52 53 54 55 56 57 58 59 60 61 62 63 64 65 66 67 68 69 70 |
import 'package:flutter/material.dart'; import 'page2.dart'; class PageOne extends StatefulWidget { @override _PageOneState createState() => _PageOneState(); } class _PageOneState extends State<PageOne> { bool firstSquareColor = false; bool secondSquareColor = false; _navigateNextPageAndretriveValue(BuildContext context) async { print('_navigateNextPageAndretriveValue'); //this takes the values popped from page2 screen, using async and await print('...awaiting Navigator.push ....'); final List nextPageValues = await Navigator.push( //list to store multiple popped values context, MaterialPageRoute(builder: (_) => PageTwo()), ); print(nextPageValues); print('Now that we have nextPageValues, we setState for the color values'); setState(() { firstSquareColor = nextPageValues[ 0]; //zero index for 1st popped value of first container secondSquareColor = nextPageValues[ 1]; //first index for 2nd popped value of second container }); } @override Widget build(BuildContext context) { return Center( child: Column( mainAxisAlignment: MainAxisAlignment.spaceEvenly, children: [ Container( height: 150, width: 150, color: firstSquareColor == false ? Colors.blue : Colors.pink), Container( height: 150, width: 150, color: secondSquareColor == false ? Colors.blue : Colors.pink), Container( height: 50, width: 150, child: RaisedButton( elevation: 15, color: Colors.grey[700], child: Text( 'Next Page ->', style: TextStyle(color: Colors.black, fontSize: 17), ), onPressed: () { _navigateNextPageAndretriveValue(context); }), ), SizedBox( height: 120, ), ], ), ); } } |
page2.dart
|
1 2 3 4 5 6 7 8 9 10 11 12 13 14 15 16 17 18 19 20 21 22 23 24 25 26 27 28 29 30 31 32 33 34 35 36 37 38 39 40 41 42 43 44 45 46 47 48 49 50 51 52 53 54 55 56 57 58 59 60 61 62 63 64 65 66 67 68 69 70 71 72 73 74 75 76 77 78 79 80 81 82 83 84 85 86 87 88 89 90 91 |
import 'package:flutter/material.dart'; import 'package:flutter/cupertino.dart'; class PageTwo extends StatefulWidget { @override _PageTwoState createState() => _PageTwoState(); } class _PageTwoState extends State<PageTwo> { bool firstValue = false; bool secondValue = false; //NOTE: values will default back unless stored in device storage using shared preferences @override Widget build(BuildContext context) { return Scaffold( appBar: AppBar( title: Text('Page 2'), automaticallyImplyLeading: false, //to disable going back when swiped since that will not setState ), body: Column( mainAxisAlignment: MainAxisAlignment.spaceEvenly, children: [ Row( mainAxisAlignment: MainAxisAlignment.center, children: [ Text( 'Flip to change first square color ', textAlign: TextAlign.center, ), Container( child: CupertinoSwitch( value: firstValue, onChanged: (bool value) { setState( () { firstValue = value; }, ); }, ), ), ], ), Row( mainAxisAlignment: MainAxisAlignment.center, children: [ Text( 'Flip to change second square color ', textAlign: TextAlign.center, ), Container( child: CupertinoSwitch( value: secondValue, onChanged: (bool value) { setState( () { secondValue = value; }, ); }, ), ), ], ), Container( height: 60, width: 170, child: RaisedButton( elevation: 15, color: Colors.grey[700], child: Text( '<- Save temporarily and go to previous Page', textAlign: TextAlign.center, style: TextStyle(color: Colors.black, fontSize: 15), ), onPressed: () { Navigator.pop(context, [ firstValue, secondValue ]); //multiple values are passed using a list }), ), SizedBox( height: 120, ), ], ), ); } } |
Protected: Log In Animation POC
Log In Animation v0
ref –
- http://chineseruleof8.com/code/index.php/2021/05/06/15084/
- http://chineseruleof8.com/code/index.php/2021/05/02/fade-and-slide-transition-in-flutter/
- Download Source
- result
We start off at main.dart. Its just a standard Scaffold that Navigates a SecondPage (stateful widget) class onto the screen.
When SecondPage appears, we need to keep track of state because we need an AnimationController called _transitionUpAndFadeInCtrller to do some animation. We use a Timer to wait 100 milliseconds before we execute our animationController. Hence, this means that the animation is executed when the screen appears.
SecondPage.dart
|
1 2 3 4 5 6 7 8 9 10 11 |
@override void initState() { _transitionUpAndFadeInCtrller = AnimationController( vsync: this, duration: Duration(milliseconds: 1000)); // wait 500 milli before we execute our animation print("Execute animation!!!"); Timer(Duration(milliseconds: 100), () => _transitionUpAndFadeInCtrller.forward()); super.initState(); } |
We then pass the _transitionUpAndFadeInCtrller into another child class Bottom that we want to animate.
SecondPage.dart
|
1 |
Bottom(introAnimateCtrller: this._transitionUpAndFadeInCtrller), |
In that child class we’re going to animate a Slide Transition. We specify how it will animate by saying it will begin at 20% from the bottom (0, 0.2). In this case, positive number at Y moves it down. Negative number moves it up.
example:
1 Y means we start from below the x-axis.
so 0.5 means we push 50% of the height down. Halfway of the box is on x-axis.
and then we end up with full height of 280 after animation.
-1 Y means we start from TOP of the x-axis.
so -0.5 means we start from above the x-axis.
We animate the container up to the original position at (0,0).
Bottom.dart
|
1 2 3 4 5 6 7 8 9 10 11 12 13 14 15 16 17 18 19 20 |
class _BottomState extends State<Bottom> with SingleTickerProviderStateMixin { final AnimationController introAnimateCtrller; ... ... textAndButtonsContainer() { return Container(...); } @override Widget build(BuildContext context) { ... SlideTransition( position: Tween<Offset>( begin: Offset(0, 0.2), // ANIMATE DOWN 20% end: Offset(0, 0), // end at full height of 280 ).animate(this.introAnimateCtrller), child: textAndButtonsContainer(), ) .. } |
So the animation controller specified that the animation duration will be 1 second. The animation itself is a SlideTransition that tweens from (0, 0.2) to (0,0) on a container with text and buttons.
Let’s also add a fade transition to it. We put the fade transition as a child of the slide transition. We give the animation controller as opacity because it would animate opacity 0 to 1 in the duration specified by the animation controller.
Bottom.dart
|
1 2 3 4 5 6 7 8 9 10 |
SlideTransition( position: Tween<Offset>( begin: Offset(0, 0.2), // ANIMATE DOWN 20% end: Offset(0, 0), // end at full height of 280 ).animate(animationController), child: FadeTransition( opacity: this.introAnimateCtrller, child: textAndButtonsContainer(), ) ); |
So when the screen appears, we do the slide Transition along with the fade transition for a container that has text and buttons.
Adding in an Animation for future usage
So we have a nice animation going when the screen appears. Now we want to add animation so that in the future, we can animate the container of text and buttons off the screen like this:
The way to do this is to first create a separate animation controller. We then initialize it to AnimationController with vsync referencing this, and a duration in milliseconds.
Bottom.dart
|
1 2 3 4 5 6 7 8 9 10 11 12 13 14 15 16 17 18 19 20 21 22 23 24 25 26 |
class _BottomState extends State<Bottom> with SingleTickerProviderStateMixin { bool bPushed = false; AnimationController animateEnterPwdController; _BottomState({@required this.introAnimateCtrller}); void initState() { animateEnterPwdController = AnimationController( vsync: this, duration: Duration(milliseconds: NEXT_SCREEN_DURATION)); animateEnterPwdController.addStatusListener(animationStatusListener); super.initState(); } void animationStatusListener(AnimationStatus status) { if (status == AnimationStatus.completed) { print('animation complete!'); setState(() { bPushed = true; }); this.introAnimateCtrller.reverse(); } else if (status == AnimationStatus.dismissed) { print('animation dismissed!'); } } ... ... } |
bPushed and animationStatusListener
a) the boolean bPushed
b) and animateEnterPwdController.addStatusListener(animationStatusListener).
The status listeners tells us when the slide away animation has completed. It will work together with bPushed. So what ends up happening is that when the button in our container is pushed, we will animate the container with the text and button OFF SCREEN using animateEnterPwdController. When the animation is complete, our bPushed will be set to true. Once it’s true, we create the stagger animation list.
Bottom.dart
|
1 |
bPushed ? staggerAnimationList() : Container(), |
Remember that when state is changed, the whole instance is refreshed. Thus, the build function will run, and we get to re-draw this part of the DOM tree with the stagger animation list.
The slide away animation using animateEnterPwdController
We wrap animation AROUND the UI container.
Bottom.dart
|
1 2 3 4 5 6 7 8 9 10 |
SlideTransition( position: Tween<Offset>( begin: Offset(0.0, 0), // ANIMATE LEFT 100% end: Offset(-1, 0), ).animate(this.animateEnterPwdController), child: FadeTransition( opacity: this.introAnimateCtrller, child: textAndButtonsContainer(), ), ), |
Notice that there is two animations wrapped around textAndButtonsContainer:
1) introAnimateCtrller
2) animateEnterPwdController
Understand that the contents are visible because introAnimateCtrller animated them onto the screen. It has executed already and is finished. We then use animateEnterPwdController to animate this container OFF the screen. This is the simple logic to it. The animation itself is very straightforward as it uses a Tween on a SlideTransition to move the container off screen to the left.
Once the container animates off screen, our listener will trigger:
|
1 2 3 4 5 6 7 |
if (status == AnimationStatus.completed) { print('animation complete!'); setState(() { bPushed = true; }); this.introAnimateCtrller.reverse(); } |
We simply do two things. Set bPushed to true so that state has changed. This means our build function will be called again with the bPushed of true, which then draws the staggered animation:
|
1 2 3 4 5 6 |
@override Widget build(BuildContext context) { return Stack(alignment: Alignment.bottomCenter, children: <Widget>[ bPushed ? staggerAnimationList() : Container(), ... ... |
Notice
|
1 |
this.introAnimateCtrller.reverse(); |
We’re basically reversing the intro animation, which will then move toward and fade away from opacity 1 to 0.
Flutter Staggered Animations
ref – https://pub.dev/packages/flutter_staggered_animations/
In your pubspec.yaml file, include
|
1 2 3 4 |
dependencies: .... flutter_staggered_animations: "^1.0.0" ... |
We use AnimationConfiguration.toStaggeredList with a duration of Duration(milliseconds: 1375).
We then fill in the childAnimationBuilder, which is the specified way on how to animate each widget in the List. The idea here is that we wrap this widget with FadeInAnimation and SlideAnimation. It’s a combination effect.
|
1 2 3 4 5 6 |
childAnimationBuilder: (widget) => SlideAnimation( horizontalOffset: 100.0, child: FadeInAnimation( child: widget, ), ), |
Hence, what we’ve stated in childAnimationBuilder is that for each child widget, we want to apply the slide and fade in animation to each widget.
|
1 2 3 4 5 6 7 8 9 10 11 12 13 14 15 16 17 18 19 20 21 22 23 24 25 26 27 28 29 30 31 32 33 34 35 36 37 38 39 40 41 42 43 |
import 'package:flutter/material.dart'; import 'package:flutter_staggered_animations/flutter_staggered_animations.dart'; class Exercise1 extends StatelessWidget { static final title = 'Exercise 1'; static final routeName = '/exercise1'; const Exercise1({Key key}) : super(key: key); _buildBlock(height, color) { return Container( height: height, decoration: BoxDecoration( color: color, ), ); } @override Widget build(BuildContext context) { return Scaffold( body: SingleChildScrollView( child: AnimationLimiter( child: Column( children: AnimationConfiguration.toStaggeredList( duration: const Duration(milliseconds: 1375), childAnimationBuilder: (widget) => SlideAnimation( horizontalOffset: 100.0, child: FadeInAnimation( child: widget, ), ), children: <Widget>[ Container(child: _buildBlock(320.0, Colors.red)), Container(child: _buildBlock(320.0, Colors.blue)), Container(child: _buildBlock(320.0, Colors.orange)) ]), ), ), ), ); } } |
This is for fade in on lists.
|
1 2 3 4 5 6 7 8 9 10 |
AnimationConfiguration.staggeredList( position: index, duration: const Duration(milliseconds: 375), child: SlideAnimation( verticalOffset: 50.0, child: FadeInAnimation( child: _buildItem(context, index), ), ), ); |
Full Code
|
1 2 3 4 5 6 7 8 9 10 11 12 13 14 15 16 17 18 19 20 21 22 23 24 25 26 27 28 29 30 31 32 33 34 35 36 37 38 39 40 41 42 43 44 45 46 47 48 49 50 51 52 53 54 55 56 57 58 59 60 61 62 63 64 65 66 67 68 69 70 71 72 73 74 75 76 77 78 79 80 81 82 83 84 85 86 87 88 89 90 91 92 93 94 95 96 97 98 99 100 101 102 103 104 105 106 107 108 109 110 111 112 113 114 115 116 117 118 119 120 121 122 123 124 125 126 127 128 129 130 131 132 133 134 135 136 137 138 139 140 141 142 143 144 145 146 147 |
import 'package:flutter/material.dart'; import 'package:flutter_staggered_animations/flutter_staggered_animations.dart'; class Exercise1 extends StatelessWidget { static final title = 'Exercise 1'; static final routeName = '/exercise1'; const Exercise1({Key key}) : super(key: key); _buildBlock(height, color) { return Container( height: height, decoration: BoxDecoration( color: color, ), ); } _buildItem(BuildContext context, int index) { return Container( margin: EdgeInsets.all(10.0), width: 320.0, decoration: BoxDecoration( color: Colors.white, borderRadius: BorderRadius.circular(15.0), border: Border.all( width: 1.0, color: Colors.grey[200], )), child: Row( mainAxisAlignment: MainAxisAlignment.spaceBetween, children: <Widget>[ Expanded( child: Row( children: [ Expanded( child: Container( margin: EdgeInsets.all(12.0), child: Column( mainAxisAlignment: MainAxisAlignment.center, crossAxisAlignment: CrossAxisAlignment.start, children: <Widget>[ Text('index $index', style: TextStyle( fontSize: 18.0, fontWeight: FontWeight.bold, ), overflow: TextOverflow.ellipsis), SizedBox( height: 4.0, ), Text('Item # $index', style: TextStyle( fontSize: 16.0, fontWeight: FontWeight.w600), overflow: TextOverflow.ellipsis), SizedBox( height: 4.0, ), Text(DateTime.now().toString(), style: TextStyle( fontSize: 16.0, fontWeight: FontWeight.w600), overflow: TextOverflow.ellipsis), ]), ), ), ], ), ), Container( margin: EdgeInsets.only(right: 20.0), width: 48.0, decoration: BoxDecoration( color: Theme.of(context).primaryColor, borderRadius: BorderRadius.circular( 30.0) // makes the Container circular ), child: IconButton( icon: Icon(Icons.add), // the + sign iconSize: 30.0, color: Colors.white, onPressed: () {})), ], ), ); } @override Widget build(BuildContext context) { return Scaffold( body: SingleChildScrollView( child: AnimationLimiter( child: Column( children: AnimationConfiguration.toStaggeredList( duration: const Duration(milliseconds: 1375), childAnimationBuilder: (widget) => SlideAnimation( horizontalOffset: 100.0, child: FadeInAnimation( child: widget, ), ), children: <Widget>[ Container(child: _buildBlock(320.0, Colors.red)), Container(child: _buildBlock(320.0, Colors.blue)), Container(child: _buildBlock(320.0, Colors.orange)) ]), ), ), ), ); } } /* // original answer ListView.builder( physics: BouncingScrollPhysics(), scrollDirection: Axis.vertical, itemCount: 3, itemBuilder: (BuildContext context, int index) { print(index); if (index == 0) { return _buildBlock(heightOfBlock, Colors.green); } if (index == 1) { return _buildBlock(heightOfBlock, Colors.yellow); } if (index == 2) { return _buildBlock(heightOfBlock, Colors.red); } return _buildBlock(heightOfBlock, Colors.red); }) */ /* // staggered animation on ListView items AnimationConfiguration.staggeredList( position: index, duration: const Duration(milliseconds: 375), child: SlideAnimation( verticalOffset: 50.0, child: FadeInAnimation( child: _buildItem(context, index), ), ), ); */ |
Fade and Slide transition in Flutter
ref – https://www.youtube.com/watch?v=xIX9Bo_yjvo
https://medium.com/codechai/flutter-animation-basics-explained-with-stacked-cards-9d34108403b8
First we have to refactor our class into a StatefulWidget.
1) extends StatefulWidget
2) @override createState()
3) extends State
4) with SingleTickerProviderStateMixin
When you add your SingleTickerProviderStateMixin, it tells Flutter that there is some animation in this widget and this widget needs to notified about the animation frames of flutter.
|
1 2 3 4 5 6 7 8 9 |
class SecondPage extends StatefulWidget { @override _SecondPageState createState() => _SecondPageState(); } class _SecondPageState extends State<SecondPage> with SingleTickerProviderStateMixin { ... } |
Animation controller is one of the basic things necessary for creating magic in flutter. You can imagine this as the dictator of the animation on screen. It contains the duration of the animation and so it will split out values between 0 to 1 based on the duration and the ticker value.
Controller value is 0 -> Start of your animation
Controller value is 1 -> End of your animation
|
1 2 3 4 5 6 7 8 9 10 11 12 13 14 15 |
class _SecondPageState extends State<SecondPage> with SingleTickerProviderStateMixin { AnimationController _animationController; @override void initState() { _animationController = AnimationController( vsync: this, duration: Duration(milliseconds: 1500)); _animationController.forward(); // get it running! super.initState(); } ... ... } |
vsync property is related to the Ticker and if the stateful widget has the Mixin, you can pass this to this property.
Animation with just the controller is possible when your animated value is also from just 0 to 1. You can pass the controller value to the widget and start the animation by calling controller.forward()
Tween
Short for in-betweening, the process of generating intermediate frames between two images to give the appearance that the first image evolves smoothly into the second image.
|
1 2 3 4 |
Tween<Offset>( begin: Offset(-1, 0), // -1 left side (x, y) START end: Offset.zero, ).animate(animationController) |
Creating the in-between values is the responsibility of Tween. Tween takes a begin ,end, properties and to create a Animation
When you call animation.forward() it will produce a smooth animation from the begin Offset value to end Offset value.
Fading in a Text
|
1 2 3 4 5 |
Text('An interesting title', style: TextStyle( fontSize: 24, ), ), |
Wrap some padding around it using a Container
|
1 2 3 4 5 |
Container( padding: EdgeInsets.all(16.0), alignment: Alignment.centerLeft, child: // Our Text Widget here ); |
Now let’s start a fade transition. We pass in our animation Controller for the opacity. Our animation controller has an animation time of 1500 milliseconds. Thus, it will animate the opacity from -1 to 0 in 1500 milliseconds.
|
1 2 3 4 |
FadeTransition( opacity: animationController, child: // Our Container Text here ); |
Run the project and you’ll the text have this fade effect.
Transition the Text
Let’s remove the fade transition from our Text Container. Our Text container should simply be:
|
1 2 3 4 5 6 |
Container( padding: EdgeInsets.all(16.0), alignment: Alignment.centerLeft, child: Text('An interesting title', style: TextStyle(fontSize: 24)), ), |
We wrap a SlideTransition like so:
|
1 2 3 4 5 6 7 |
SlideTransition( position: Tween<Offset>( begin: Offset(-1, 0), // -1 left side (x, y) START end: Offset.zero, ).animate(animationController), child: // Our Text Container here ); |
child class
So in order to make this work, we have a child class and that houses Text and an Image.
|
1 2 3 4 5 6 7 |
class TextAndImage extends StatelessWidget { final AnimationController animationController; TextAndImage({@required this.animationController}); ... ... } |
As you can see, it references an injected animation controller. The animation controller in the parent class holds state:
SlideTransition – for position property we assign it a Tween. The tween takes the animationController in order to animate.
|
1 2 3 4 |
Tween<Offset>( begin: Offset(-1, 0), // -1 left side (x, y) START end: Offset.zero, ).animate(animationController) |
FadeTransition – for opacity, we stick in the animation controller, which says duration should be 1.5 seconds.
However, we decide to forgo this feature and just use transition.
|
1 2 3 4 5 6 7 8 9 10 11 12 13 14 15 16 17 18 19 20 21 22 23 24 25 26 27 28 29 30 31 32 33 34 35 36 37 38 39 40 41 42 43 44 45 46 47 48 |
class TextAndImage extends StatelessWidget { final AnimationController animationController; TextAndImage({@required this.animationController}); @override Widget build(BuildContext context) { return Padding( padding: const EdgeInsets.only(top: 50.0), child: SafeArea( child: Column( children: <Widget>[ SlideTransition( position: Tween<Offset>( begin: Offset(-1, 0), // -1 left side (x, y) START end: Offset.zero, ).animate(animationController), child: Container( padding: EdgeInsets.all(16.0), alignment: Alignment.centerLeft, child: Text( 'An interesting title', style: TextStyle( fontSize: 24, ), ), ), ), Padding( padding: const EdgeInsets.all(8.0), child: ClipRRect( borderRadius: BorderRadius.all(Radius.circular(15)), child: Align( heightFactor: 0.826, alignment: Alignment.topLeft, child: Image.network( 'https://images.pexels.com/photos/320014/pexels-photo-320014.jpeg?auto=compress&cs=tinysrgb&dpr=2&h=400', fit: BoxFit.fitWidth, ), ), ), ), ], ), ), ); } } |
In the parent class, we use it like so:
|
1 2 3 4 5 6 7 8 9 10 11 12 13 14 15 |
@override Widget build(BuildContext context) { return Scaffold( appBar: AppBar( title: Text('Second Page'), centerTitle: true, ), body: Stack( children: <Widget>[ TextAndImage(animationController: this._animationController), Bottom(animationController: this._animationController), ], ), ); } |
Now when the animation starts, the text will transition from the left and come in towards the right.
Moving the button up
So now using the same tactic, we create another class called Bottom, that will reference the parent class animationController. It will have some static UI widgets which we will animate.
|
1 2 3 4 5 6 7 8 9 |
class Bottom extends StatelessWidget { final AnimationController animationController; Bottom({ @required this.animationController, }); ... ... } |
For its build function, we return a slide Transition.
|
1 2 3 4 5 6 7 8 |
@override Widget build(BuildContext context) { return SlideTransition( position: ... ... ) } |
The position needs a Tween. We want it to come from bottom off screen
|
1 2 3 4 |
Tween<Offset>( begin: Offset(0, 1), // x, y end: Offset.zero, ).animate(animationController) |
So we know that it will slide something from offscreen (x is 0, y is 1) up to original position.
That something is a container that holds text:
|
1 2 3 4 5 6 7 8 9 10 11 12 13 14 15 16 17 18 19 20 21 22 23 |
Container( padding: EdgeInsets.all(10), height: 180, color: Theme.of(context).primaryColor, child: Row( mainAxisSize: MainAxisSize.max, mainAxisAlignment: MainAxisAlignment.center, children: <Widget>[ Text('Nice Kitty!', style: TextStyle( fontSize: 22, color: Theme.of(context).primaryTextTheme.headline5.color, shadows: [ Shadow( color: Colors.black, offset: Offset(1, 1), blurRadius: 2) ], ), ), ], ), ), |
hm 3 references
1) Fetching Random Name from API using Dio and Bloc
https://blog.usejournal.com/flutter-http-requests-with-dio-rxdart-and-bloc-da325ca5fe33
original source – https://github.com/jhomlala/randomuser
2) Carousel
ref – https://pub.dev/packages/carousel_slider
First, we have an array of image URLs where images are located.
code for imgList
|
1 2 3 4 5 6 7 8 |
final List<String> imgList = [ 'https://images.unsplash.com/photo-1520342868574-5fa3804e551c?ixlib=rb-0.3.5&ixid=eyJhcHBfaWQiOjEyMDd9&s=6ff92caffcdd63681a35134a6770ed3b&auto=format&fit=crop&w=1951&q=80', 'https://images.unsplash.com/photo-1522205408450-add114ad53fe?ixlib=rb-0.3.5&ixid=eyJhcHBfaWQiOjEyMDd9&s=368f45b0888aeb0b7b08e3a1084d3ede&auto=format&fit=crop&w=1950&q=80', 'https://images.unsplash.com/photo-1519125323398-675f0ddb6308?ixlib=rb-0.3.5&ixid=eyJhcHBfaWQiOjEyMDd9&s=94a1e718d89ca60a6337a6008341ca50&auto=format&fit=crop&w=1950&q=80', 'https://images.unsplash.com/photo-1523205771623-e0faa4d2813d?ixlib=rb-0.3.5&ixid=eyJhcHBfaWQiOjEyMDd9&s=89719a0d55dd05e2deae4120227e6efc&auto=format&fit=crop&w=1953&q=80', 'https://images.unsplash.com/photo-1508704019882-f9cf40e475b4?ixlib=rb-0.3.5&ixid=eyJhcHBfaWQiOjEyMDd9&s=8c6e5e3aba713b17aa1fe71ab4f0ae5b&auto=format&fit=crop&w=1352&q=80', 'https://images.unsplash.com/photo-1519985176271-adb1088fa94c?ixlib=rb-0.3.5&ixid=eyJhcHBfaWQiOjEyMDd9&s=a0c8d632e977f94e5d312d9893258f59&auto=format&fit=crop&w=1355&q=80' ]; |
We take that array and for each item, we create a Container, with another Container as the child.
|
1 2 3 |
final List<Widget> imageSliders = imgList.map((item) => Container( child: Container(....) )).toList(); |
The child Container has a ClipRRect, which has a Stack.
|
1 2 3 4 5 6 7 8 |
ClipRRect( borderRadius: BorderRadius.all(Radius.circular(5.0)), child: Stack( children: <Widget>[ Image(...), Positioned(...) .. ..)) |
This Stack means it contains an Image, with a Positioned Widget.
The Positioned widget has a Container and fits text inside of some padding.
|
1 2 3 4 5 |
Container( BoxDecoration(...), Padding(...), Text(...) ); |
Thus, this completes our List of Widgets.
The code for imageSliders
|
1 2 3 4 5 6 7 8 9 10 11 12 13 14 15 16 17 18 19 20 21 22 23 24 25 26 27 28 29 30 31 32 33 34 35 36 37 38 39 |
final List<Widget> imageSliders = imgList.map((item) => Container( child: Container( margin: EdgeInsets.all(5.0), child: ClipRRect( borderRadius: BorderRadius.all(Radius.circular(5.0)), child: Stack( children: <Widget>[ Image.network(item, fit: BoxFit.cover, width: 1000.0), Positioned( bottom: 0.0, left: 0.0, right: 0.0, child: Container( decoration: BoxDecoration( gradient: LinearGradient( colors: [ Color.fromARGB(200, 0, 0, 0), Color.fromARGB(0, 0, 0, 0) ], begin: Alignment.bottomCenter, end: Alignment.topCenter, ), ), padding: EdgeInsets.symmetric(vertical: 10.0, horizontal: 20.0), child: Text( 'No. ${imgList.indexOf(item)} image', style: TextStyle( color: Colors.white, fontSize: 20.0, fontWeight: FontWeight.bold, ), ), ), ), ], ) ), ), )).toList(); |
We then stick this list of Widgets to the items property of CarouselSlider.
code for CarouselSlider
|
1 2 3 4 5 6 7 8 9 |
CarouselSlider( options: CarouselOptions( aspectRatio: 2.0, enlargeCenterPage: true, scrollDirection: Axis.vertical, autoPlay: true, ), items: imageSliders, ) |
Then in your class, you use it like so:
VerticalSliderDemo class
|
1 2 3 4 5 6 7 8 9 10 11 12 13 14 15 16 17 18 19 |
class VerticalSliderDemo extends StatelessWidget { @override Widget build(BuildContext context) { return Scaffold( appBar: AppBar(title: Text('Vertical sliding carousel demo')), body: Container( child: CarouselSlider( options: CarouselOptions( aspectRatio: 2.0, enlargeCenterPage: true, scrollDirection: Axis.vertical, autoPlay: true, ), items: imageSliders, ) ), ); } } |
3) Navigating from one page to another
ref – https://flutter.dev/docs/cookbook/navigation/navigation-basics
|
1 2 3 4 5 6 7 8 9 10 11 12 13 14 15 16 17 18 19 20 21 22 23 24 25 26 27 28 29 30 31 32 33 34 35 36 37 38 39 40 41 42 43 44 45 46 47 48 49 |
import 'package:flutter/material.dart'; void main() { runApp(MaterialApp( title: 'Navigation Basics', home: FirstRoute(), )); } class FirstRoute extends StatelessWidget { @override Widget build(BuildContext context) { return Scaffold( appBar: AppBar( title: Text('First Route'), ), body: Center( child: ElevatedButton( child: Text('Open route'), onPressed: () { Navigator.push( context, MaterialPageRoute(builder: (context) => SecondRoute()), ); }, ), ), ); } } class SecondRoute extends StatelessWidget { @override Widget build(BuildContext context) { return Scaffold( appBar: AppBar( title: Text("Second Route"), ), body: Center( child: ElevatedButton( onPressed: () { Navigator.pop(context); }, child: Text('Go back!'), ), ), ); } }, |
Cubit and Bloc simple example
ref –
- https://resocoder.com/2020/08/04/flutter-bloc-cubit-tutorial/
- https://medium.com/flutterando/cubit-a-simple-solution-for-app-state-management-in-flutter-66ab5279ef73
- http://chineseruleof8.com/code/index.php/2021/04/14/beginning-bloc-for-flutter/
- http://chineseruleof8.com/code/index.php/2021/04/15/working-with-flutter-bloc/
- https://github.com/irvine5k/cubit_movies_app/
A Cubit is the base for Bloc (in other words Bloc extends Cubit).
Cubit is a special type of Stream which can be extended to manage any type of state .
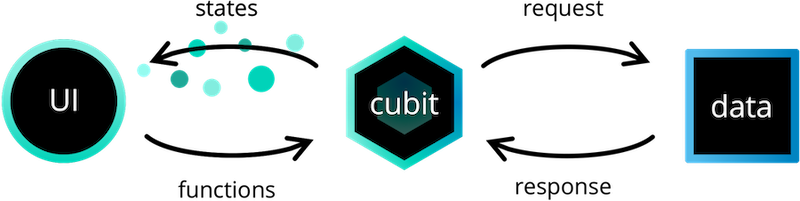
A functions is generally that something you create to do some orders as you want and this function will be achieved my orders when I would CALLING IT so it can’t achieve anything without any call from me . something like when I call KFC to order some food the function here is calling the restaurant to order my food because the restaurant can’t order food to me without calling it.
It replaces events in the bloc architecture. Originally, UI actions create events. Events get mapped to State. And we return certain state to update the data to be drawn in the UI.
However, instead of mutating individual fields, we emit whole new MyState objects. Also, the state is in a class separate from the one responsible for changing the state.
Importing Cubic
pubspec.yaml
|
1 2 3 4 5 |
dependencies: flutter: sdk: flutter bloc: ^6.0.1 flutter_bloc: ^6.0.1 |
State
A rule of thumb is to always build out the state class(es) first. So, what kind of WeatherState do we want to have?
We have the abstract class WeatherState to denote top of hierarchy.
We then create different Weather States that implements this abstraction. In our case:
WeatherInitial – This WeatherInitial state will indicate that no action has yet been taken by the user and that we should display an initial UI
WeatherLoading – we are waiting for the weather to arrive from its web api
WeatherLoaded – the data has arrived!
WeatherError – internet connection broke somehow.
|
1 2 3 4 5 6 7 8 9 10 11 12 13 14 15 16 17 18 19 20 21 22 23 24 25 26 27 28 29 30 31 32 33 34 35 36 37 38 39 40 41 42 43 |
part of 'weather_cubit.dart'; @immutable abstract class WeatherState { const WeatherState(); } class WeatherInitial extends WeatherState { const WeatherInitial(); } class WeatherLoading extends WeatherState { const WeatherLoading(); } class WeatherLoaded extends WeatherState { final Weather weather; const WeatherLoaded(this.weather); @override bool operator ==(Object o) { if (identical(this, o)) return true; return o is WeatherLoaded && o.weather == weather; } @override int get hashCode => weather.hashCode; } class WeatherError extends WeatherState { final String message; const WeatherError(this.message); @override bool operator ==(Object o) { if (identical(this, o)) return true; return o is WeatherError && o.message == message; } @override int get hashCode => message.hashCode; } |
We also override annotation operator ==. This is because UI updates when state are different. Flutter will do a comparison between different states. If the states are different, update the UI. If they are the same, don’t do anything. Thus, for our Weather state, we need to override this to let flutter do the comparison.
|
1 2 3 4 |
bool operator ==(Object o) { if (identical(this, o)) return true; return o is WeatherLoaded && o.weather == weather; } |
If the two states are identical, then UI won’t do anything.
If the incoming object is of the same state (say WeatherLoaded) and the state’s weather object is the same, then we return true and UI won’t update.
But if either:
– the Object o is of another state
– the weather has changed
then we return false, to let Flutter know that the state have changed.
Always override equality of the state classes. Bloc will not emit two states which are equal after one another.
Thus, if we do not override equality, Bloc will ALWAYS update the UI and it degrades performance.
Cubit
Having finished our work on the state, let’s implement the WeatherCubit that will perform logic such as getting the weather from the WeatherRepository and emit states.
So we extend from Cubit
|
1 2 3 |
class WeatherCubit extends Cubit<WeatherState> { ... } |
We ctrl + click Cubit to see what’s going on underneath. We see that it’s an abstract class that uses a StreamController. This is mentioned in our earlier tutorials on basic blocs and stream:
- http://chineseruleof8.com/code/index.php/2021/04/14/beginning-bloc-for-flutter/
- http://chineseruleof8.com/code/index.php/2021/04/15/working-with-flutter-bloc/
|
1 2 3 4 5 6 7 |
abstract class Cubit<State> extends Stream<State> { Cubit(this._state); // notice this state final _controller = StreamController<State>.broadcast(); State _state; ... ... |
A stream can only take one type, and we see that Cubit takes on the state that we specify in the type bracket.
The StreamController instance then broadcasts it and it will be sink.add, or stream.listen accordingly. But when using Cubic, all that details are hidden away.
Do take note of the constructor. It takes a state as parameter.
Hence that is why in our initialization code, we put WeatherInitial() instance because it assigns the initial state to Cubit.
|
1 2 3 4 5 |
class WeatherCubit extends Cubit<WeatherState> { final WeatherRepository _weatherRepository; WeatherCubit(this._weatherRepository) : super(WeatherInitial()); ... } |
We then have our a weatherRepository instance that gets the data from a web api.
Notice that we don’t need to override mapEventToState here like we do in bloc architecture.
That is because in Cubit, there is no events. We only have functions that trigger state change.
Hence, in our case, we call getWeather to asynchronously get data. But before it does, we first emit a WeatherLoading state instance. This state is to trigger a circular indicator in our UI, as will be shown later.
|
1 2 3 4 5 6 7 8 9 |
Future<void> getWeather(String cityName) async { try { emit(WeatherLoading()); final weather = await _weatherRepository.fetchWeather(cityName); emit(WeatherLoaded(weather)); } on NetworkException { emit(WeatherError("Couldn't fetch weather. Is the device online?")); } } |
Then we do the async operation and get the weather data. After receiving this data, we emit that state to be loaded, along with the weather data itself.
The states then get reflected on the UI through BlocBuilder:
weather_search_page.dart
|
1 2 3 4 5 6 7 8 9 10 11 12 13 14 15 16 17 18 19 20 21 22 23 24 25 26 27 28 29 30 |
Container( padding: EdgeInsets.symmetric(vertical: 16), alignment: Alignment.center, child: BlocBuilder<WeatherCubit, WeatherState>( builder: (context, state) { print('state: $state'); if (state is WeatherInitial) { print( 'weather_search_page.dart - WeatherInitial state --> returning buildInitialInput() UI'); return buildInitialInput(); } else if (state is WeatherLoading) { print( 'weather_search_page.dart - WeatherLoading state --> returning buildLoading() UI'); return buildLoading(); } else if (state is WeatherLoaded) { print( 'weather_search_page.dart - WeatherLoaded state --> returning buildColumnWithData() UI'); return buildColumnWithData(state.weather); } else { // (state is WeatherError) print('weather_search_page.dart - ERROR! go back to initial UI'); return buildInitialInput(); } }, // builder ), // BlockBuilder ) // Container |
Running the App
In the very beginning, we have this:
|
1 2 3 4 5 6 7 |
class WeatherSearchPage extends StatefulWidget { @override _WeatherSearchPageState createState() { return _WeatherSearchPageState(); } } |
It’s a class that extends StatefulWidget. We need to override StatefulWidget’s abstract method createState. createState returns State. Thus, we need to create a class that extends from State. We name it WeatherSearchPageState. The type of State is WeatherSearchPage.
|
1 2 3 |
class _WeatherSearchPageState extends State<WeatherSearchPage> { ... } |
We then override the build function, which is used to build the UI.
When we run the app, we get the log messages like so:
flutter: weather_search_page.dart – WeatherSearchPage – createState
flutter: weather_search_page.dart – state: Instance of ‘WeatherInitial’
flutter: weather_search_page.dart – WeatherInitial state –> returning buildInitialInput() UI
We get WeatherInitial state because in WeatherCubit, we initialized state it WeatherInitial():
|
1 |
WeatherCubit(this._weatherRepository) : super(WeatherInitial()); |
The way how the UI is implemented is. Our UI is organized in such a way that whenever a state is such, we return the proper UI widgets.
Then when we put in a city for weather, we start at the cubit. It uses the weather repo to do its async operation. Once its done, it emits a state. This state then is caught in the UI where weather_search_page.ldart sees that its a WeatherLoading.
flutter: weather_cubit.dart – weather is loading…
flutter: weather_repository.dart – getting weather for shanghai
flutter: weather_search_page.dart – state: Instance of ‘WeatherLoading’
flutter: weather_search_page.dart – WeatherLoading state –> returning buildLoading() UI
Then few seconds later, in weather_cubit, we receive weather data. It will emit WeatherLoaded.
Now, Cubit will do a comparison between WeatherLoading and WeatherLoaded in its operator overloaded ==.
flutter: weather_cubit.dart – received weather data!
flutter: weather_state.dart – WeatherLoaded – comparing Instance of ‘WeatherLoading’ and Instance of ‘WeatherLoaded’
flutter: weather_state.dart – DIFFERENT state, update UI NOW!
When the states are different, we update UI.
flutter: weather_search_page.dart – state: Instance of ‘WeatherLoaded’
flutter: weather_search_page.dart – WeatherLoaded state –> returning buildColumnWithData() UI
Working with Flutter Bloc
ref – https://pub.dev/packages/flutter_bloc
Events
Events are triggered due to some user action from the UI layer. Events can be represented via hierarchy by using abstract classes.
For example, in the app we are going to build today, there are three events, FetchWeatherEvent, ResetWeatherEvent, RefreshWeatherEvent. They all extend from WeatherEvents.
|
1 2 3 4 5 6 7 8 9 10 11 12 13 14 15 16 17 18 19 20 21 22 23 24 |
abstract class WeatherEvents extends Equatable { const WeatherEvents(); } class FetchWeather extends WeatherEvents { final String city; FetchWeather({@required this.city}) : assert(city != null); @override List<Object> get props => [city]; } class RefreshWeather extends WeatherEvents { final String city; const RefreshWeather({@required this.city}) : assert(city != null); @override List<Object> get props => [city]; } class ResetWeather extends WeatherEvents { @override List<Object> get props => null; } |
They are triggered in WeatherView. In our UI, say we have a handler called onRefresh. When the refresh button is clicked, it will execute it like so:
|
1 2 3 4 5 6 7 8 9 10 11 |
... ... onPressed: () { if (_formKey.currentState.validate()) { BlocProvider.of<WeatherBloc>(context) .add(FetchWeather(city: weatherCityController.text)); } }, ... ... ) |
Notice that it uses BlocProvider to add our Event to the event stream’s sink. This is essentially what’s happening when we call BlockProvider.of
RefreshWeather extends from WeatherEvents, as are other classes.
Thus, on the UI layer, we put events on the event stream in such ways.
When the event arrives on the event stream, we have BlocObserver.
The idea is that we pass the Bloc and Event into our BlocObserver.
BlocObserver will then call weatherBloc’s mapEventToState with this particular event.
|
1 2 3 4 5 6 7 8 9 10 11 12 |
class SimpleBlocObserver extends BlocObserver { @override void onEvent(Bloc bloc, Object event) { print('simpleBlocObserver.dart - event:'); print(event); // FetchWeather, an Event print('simpleBlocObserver.dart - bloc:'); print(bloc); // instance of WeatherBloc. Will give the yield...etc super.onEvent(bloc, event); } ... } |
mapEventToState is an abstract function in our weatherBloc, which yield states to this particular event. Yielding state means we are sending the state in the counter stream back to the UI layer.
|
1 2 3 4 5 6 7 8 9 10 11 12 13 14 15 16 17 18 19 20 21 22 23 24 |
class WeatherBloc extends Bloc<WeatherEvents, WeatherStates> { ... ... ... @override Stream<WeatherStates> mapEventToState(WeatherEvents event) async* { print('weatherBloc.dart - incoming event is:'); print(event); if (event is FetchWeather) { print('weatherBloc.dart - YIELD WeatherLoading instance'); yield WeatherLoading(); try { final Weather weather = await weatherRepository.getWeather(event.city); yield WeatherLoaded(weather: weather); } catch (error) { print(error); yield WeatherError(); } } } // mapEventToState } // class |
Notice that we await a weather repo to get the weather from a web API. Then we have received it, we just yield the state class WeatherLoaded with the weather data. Of course we can yield instances of other state classes that implements the State abstract class, which is used to put up say an indicator or stop an indicator.
weatherState.dart
|
1 2 3 4 5 6 7 8 9 10 11 12 13 14 15 16 17 |
abstract class WeatherStates extends Equatable { const WeatherStates(); @override List<Object> get props => []; } class WeatherEmpty extends WeatherStates {} class WeatherLoading extends WeatherStates {} class WeatherLoaded extends WeatherStates { final Weather weather; WeatherLoaded({@required this.weather}) : assert(weather != null); @override List<Object> get props => [weather]; } class WeatherError extends WeatherStates {} |
Notice WeatherLoaded has a weather property that holds on to this new data.
We also override props because our abstract class WeatherStates extends Equatable.
In order to see if this instance is equal to another, we need to put our weather object in the props array
so Equatable can do the comparison
Okay, so now from the WeatherBloc, we have yielded the WeatherLoaded instance along with the weather data, now what?
We come back to simpleBlocObserver and hit the onTransition.
SimpleBlocObserver.dart
|
1 2 3 4 5 6 7 8 |
@override void onTransition(Bloc bloc, Transition transition) { print('---simpleBlocObserver.dart - onTransition----'); print(bloc); // instance of WeatherBloc print('simpleBlocObserver.dart - onTransition, transition:'); print(transition); // { currentState: WeatherEmpty, event: FetchWeather, nextState: WeatherLoading } super.onTransition(bloc, transition); } |
So this means that we’re currently on the WeatherEmpty state
The event passed in is fetchWeather
Because Event FetchWeather, weatherBloc yields WeatherLoading…that is why our nextState is WeatherLoading.
When the data arrives the state will be WeatherLoaded. But first! Let’s see what happens to the UI when we our state is on WeatherLoading.
In our weather.dart, our BlocConsumer’s listener will be activated.
BlocConsumer
BlocConsumer exposes a builder and listener in order react to new states.
BlocConsumer is analogous to a nested BlocListener and BlocBuilder but reduces the amount of boilerplate needed.
BlocConsumer should only be used when it is necessary to both rebuild UI and execute other reactions to state changes in the bloc.
BlocConsumer takes a required BlocWidgetBuilder and BlocWidgetListener and an optional bloc, BlocBuilderCondition, and BlocListenerCondition.
If the bloc parameter is omitted, BlocConsumer will automatically perform a lookup using BlocProvider and the current BuildContext.
|
1 2 3 4 5 6 7 8 |
BlocConsumer<BlocA, BlocAState>( listener: (context, state) { // do stuff here based on BlocA's state }, builder: (context, state) { // return widget here based on BlocA's state } ) |
in our case, look aa builder property. In it, its if-else has a condition where if state is WeatherLoading, then it returns an instance of a Center Widget. In it, it has a CircularProgressIndicator which will then run on the UI.
weather.dart
|
1 2 3 4 5 6 7 8 9 10 11 12 13 14 15 16 17 18 19 20 21 22 23 |
BlocConsumer<WeatherBloc, WeatherStates>( listener: (context, WeatherStates state) { if (state is WeatherLoaded) { print('weather.dart - State is Weather Loaded'); _refreshCompleter?.complete(); _refreshCompleter = Completer(); } }, builder: (context, WeatherStates state) { if (state is WeatherEmpty) { return EnterCity(); } else if (state is WeatherLoading) { print('weather.dart - WeatherLoading state...return Indicator'); return Center( child: CircularProgressIndicator(), ); } else if (state is WeatherLoaded) { .... .. ) |
So now our circular indicator is running, we’re also fetching data from the web api.
weatherBloc.dart
|
1 2 3 4 5 6 7 8 9 10 |
if (event is FetchWeather) { yield WeatherLoading(); // indicator will appear in our UI try { final Weather weather = await weatherRepository.getWeather(event.city); yield WeatherLoaded(weather: weather); // indicator removed. Weather data gets displayed } catch (error) { print(error); yield WeatherError(); } } |
Once the data comes back, we yield WeatherLoaded with the data. The BlocConsumer’s state changed to WeatherLoaded and it simply updates the UI.
In our particular case, we update our refresh control, and give it a ListView where it calls DisplayWeather to put all the text and new data onto the screen.
|
1 2 3 4 5 6 7 8 9 10 11 12 13 14 15 16 |
else if (state is WeatherLoaded) { final weather = state.weather; return RefreshIndicator( onRefresh: () { BlocProvider.of<WeatherBloc>(context) .add(RefreshWeather(city: weather.location)); return _refreshCompleter.future; }, child: ListView( children: <Widget>[ DisplayWeather( weather: weather, ), ], ), ); |