Category Archives: Database

Azure: Create Node JS App and link it from GitHub to Azure Local Git

Assume you have a project on GitHub. We first use Azure, and create a LOCAL GIT. What this means is that we have a local git repository running on Azure. We then push our project from GitHub into the Azure local git.

make sure your code is simple.

Create Node JS Website, push it to GitHub, and clone it onto your Mac

https://github.com/Azure/azure-content/blob/master/articles/app-service-web/web-sites-nodejs-develop-deploy-mac.md

add_client_ip_firewall

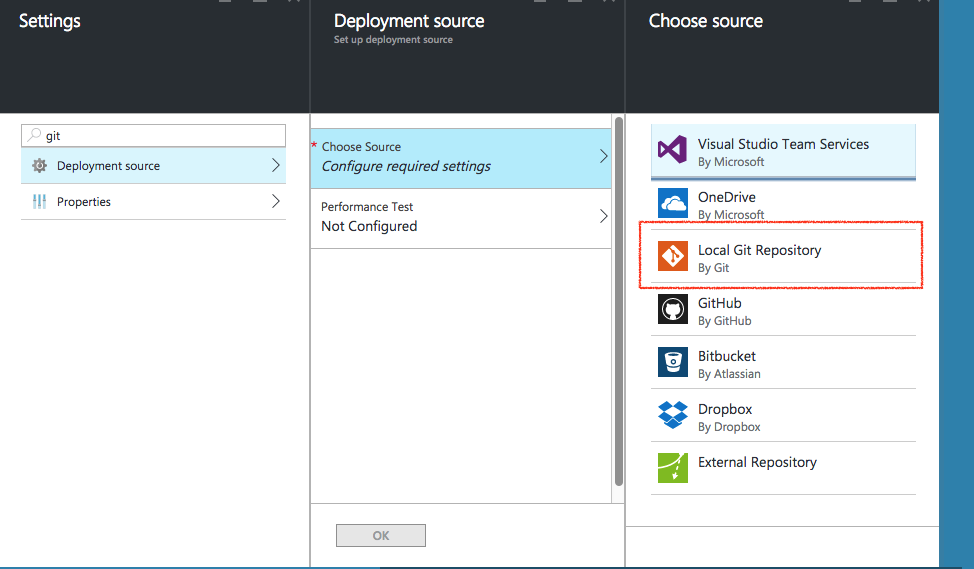
Select Local GIT. This means that are going to push our project from GitHub, have a remote git here in Azure. Azure will provide us a git location via a GIT URL. We just put our files into that URL, and that’s it.

local-git

Make sure we create credentials for when we push our files from our local Mac, up into Azure’s local git.

deployment_credentials

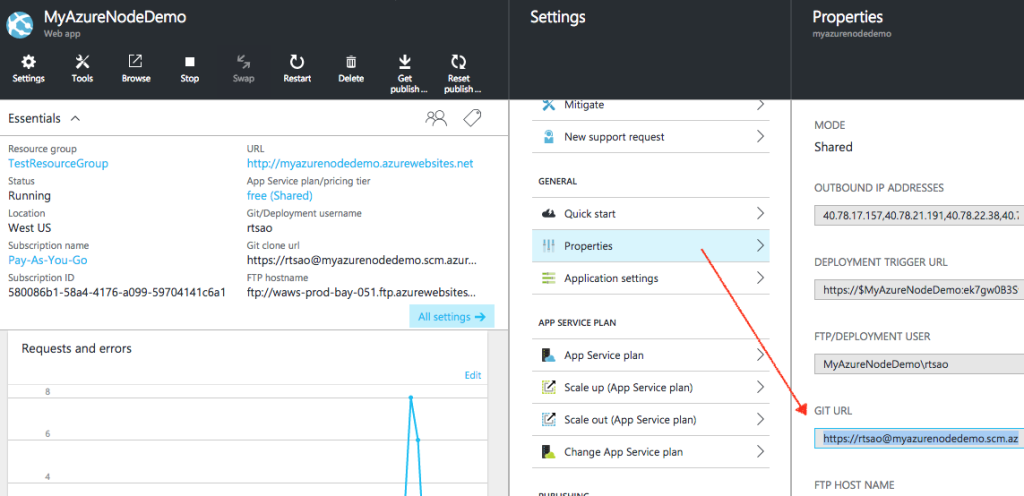
Get the GIT URL
git_url

In our Mac’s local repository, we create a remote git location called ‘azure’. This means that we are to push our files/changes to that GIT location.

Make sure you are in your Mac’s local project directory (the where the .git folder is):

rickytsao$ git remote remove azure
rickytsao$ git remote add azure https://rtsao@myazurenodedemo.scm.azurewebsites.net:443/MyAzureNodeDemo.git
rickytsao$ git push azure master
Password for ‘https://rtsao@myazurenodedemo.scm.azurewebsites.net:443’:
Counting objects: 83, done.
Delta compression using up to 4 threads.
Compressing objects: 100% (79/79), done.
Writing objects: 100% (83/83), 13.19 MiB | 1.06 MiB/s, done.
Total 83 (delta 7), reused 0 (delta 0)
remote: Updating branch ‘master’.
remote: Updating submodules.
remote: Preparing deployment for commit id ‘fda61c8b1c’.
remote: Generating deployment script.

..you’ll also see it copying the files, then telling you the deployment is successful


remote: Copying file: ‘controllers\users\PUT_bbt~email.js’
remote: Copying file: ‘controllers\users\PUT_sign~email.js’
remote: Copying file: ‘controllers\users\PUT_~email.js’
remote: Copying file: ‘models\user.js’
remote: Looking for app.js/server.js under site root.
remote: Using start-up script server.js
remote: Generated web.config.
remote: The package.json file does not specify node.js engine version constraints.
remote: The node.js application will run with the default node.js version 4.2.3.
remote: Selected npm version 3.5.1
remote: …….
remote: npm WARN book_api@0.0.0 No repository field.
remote: Finished successfully.
remote: Running post deployment command(s)…
remote: Deployment successful.
To https://rtsao@myazurenodedemo.scm.azurewebsites.net:443/MyAzureNodeDemo.git
* [new branch] master -> master

Creating SQL Database

https://azure.microsoft.com/en-us/documentation/articles/sql-database-get-started/

Node Code

Further samples on SQL manipulation:
https://msdn.microsoft.com/library/mt715784.aspx

run “Node server.js” in a terminal

If you run your node app, you’ll see that your connection may have a problem because:

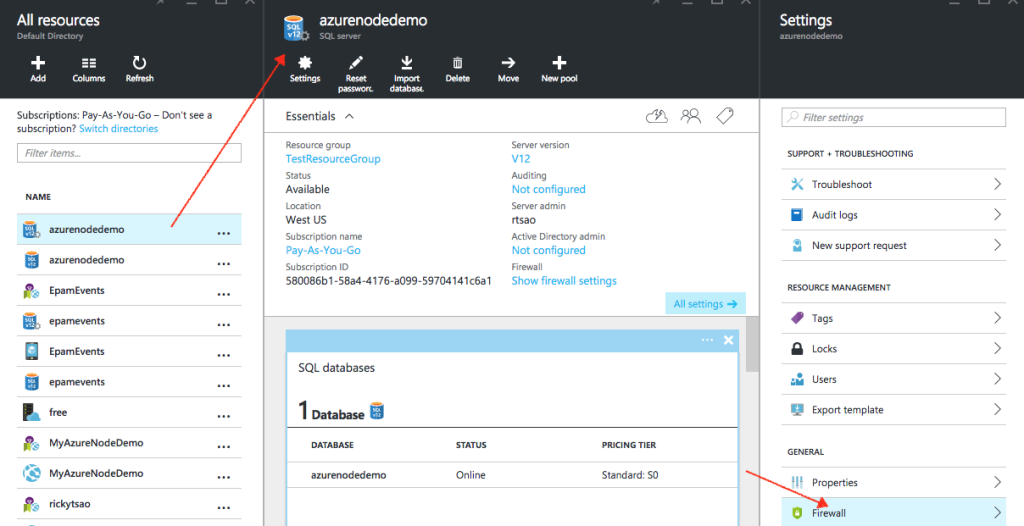
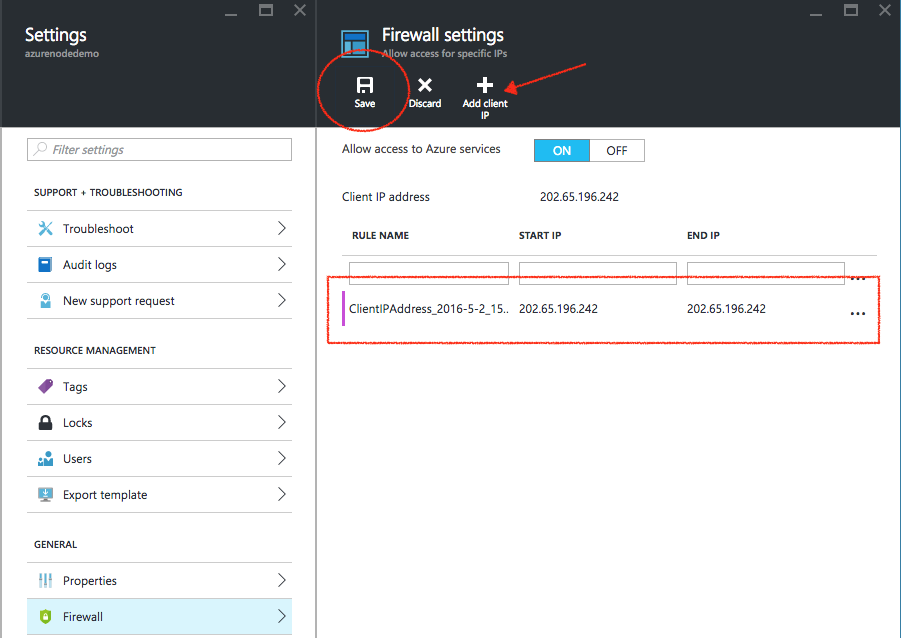
Basically, you have to go to your SQL server, and have the firewall allow access to your ip address like so:
sql_server_firewall

Mac: Install MySQL and use Terminal to use it

ref – http://www.cyberciti.biz/faq/mysql-command-to-show-list-of-databases-on-server/

Determine Kernal bit 32 or 64 for Mac


See whether you have the 32 or 64 bit processor

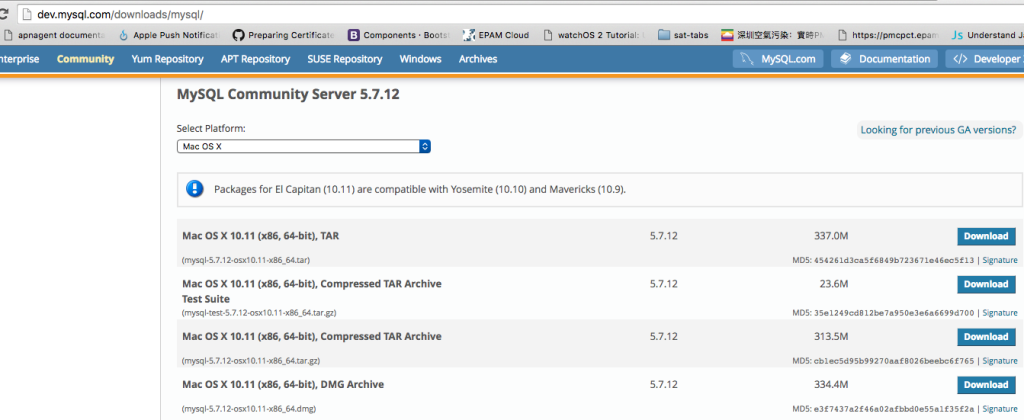
Go download the mysql dmg file from mysql’s developer page:

http://dev.mysql.com/downloads/mysql/

dmg_file_install

Locate the DMG file compatible for your machine and download it

mysql_mac

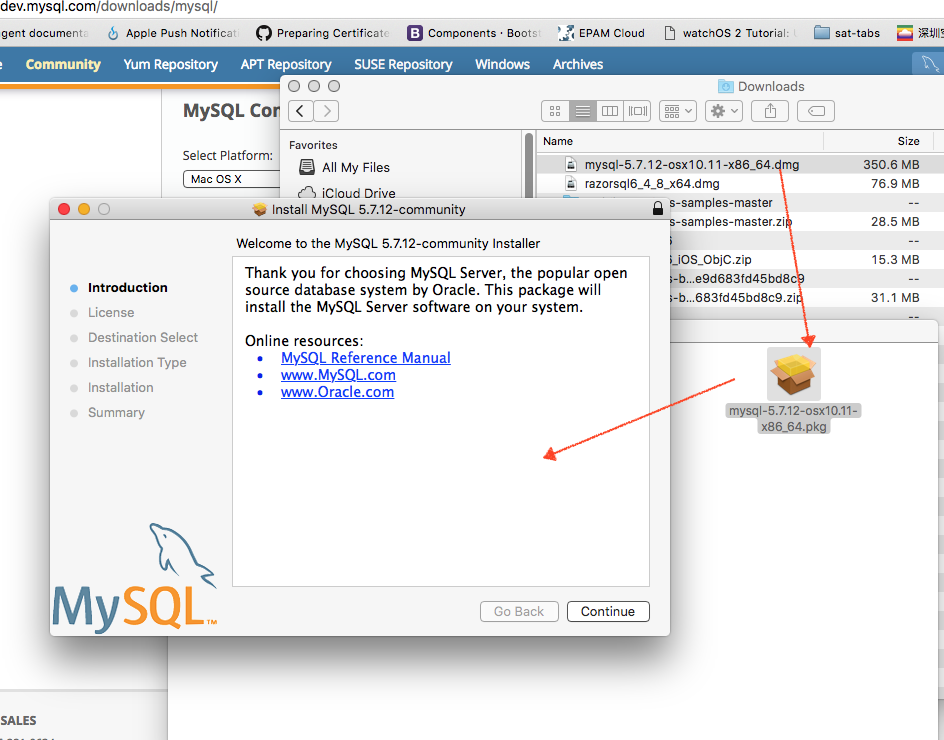
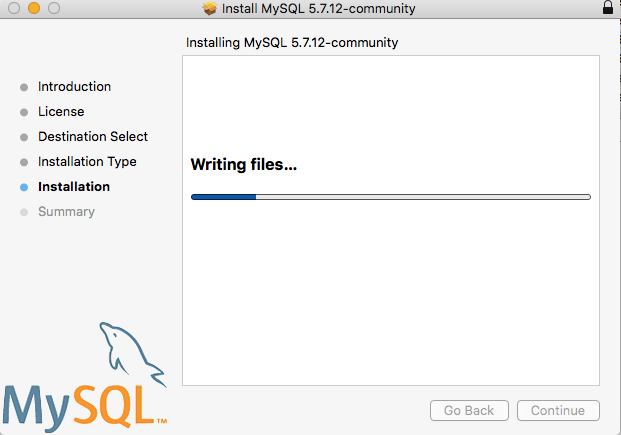
Let’s double click on the .dmg file, and double click the .pkg file to install it. Leave all the default options and continue through the installation wizard.

sql_installing

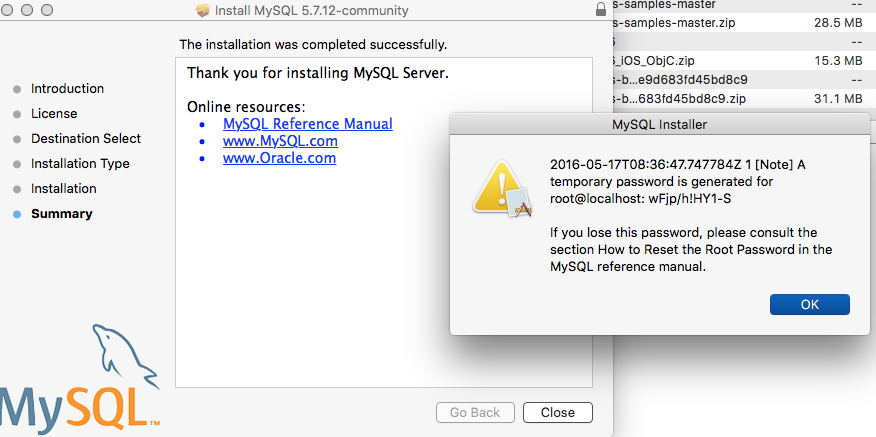
At a certain point, you’ll be given a default password. copy and paste it into a note editor because you’ll need it for the first log in, later in time.

Once you logged in the first time, you will be prompted to create a new password.

default_pwd

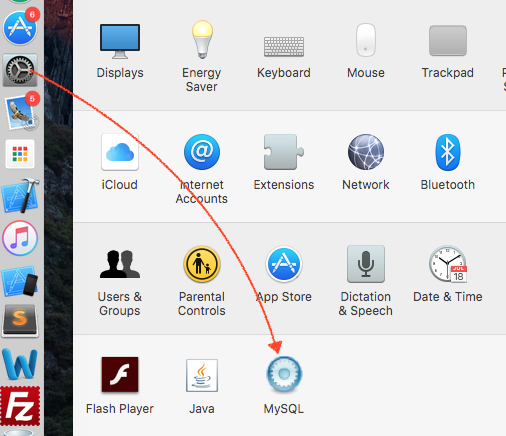
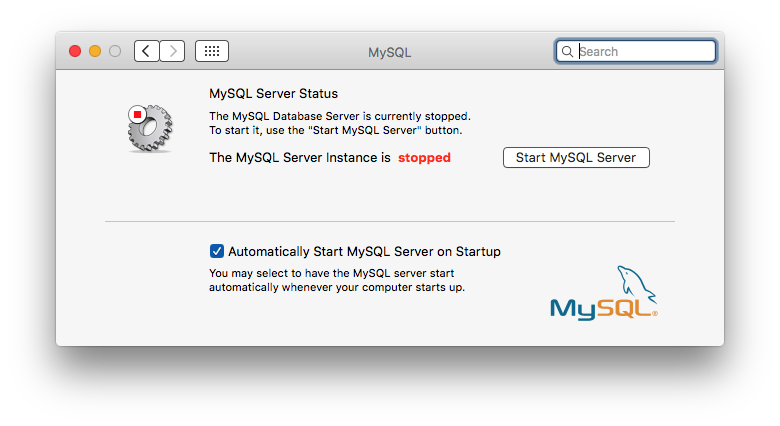
Go to your preferences, and you’ll see the SQL icon. Click on it and start the SQL server

preferences_mysql

start_mysql

Working with SQL in terminal

Open up the terminal.
Then go to the location:


cd /usr/local/mysql/bin

You’ll see all your mysql run commands in there.


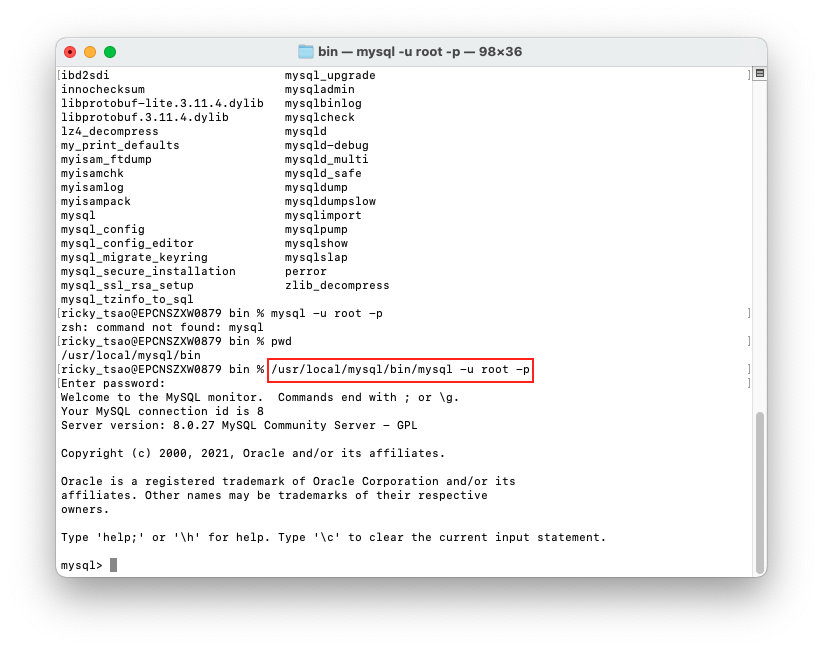
/usr/local/mysql/bin/mysql -u root -p

enter your password

Showing all Database(s)

Let’s see all the databases in the SQL server.

mysql> show databases;

+——————–+
| Database |
+——————–+
| information_schema |
| mysql |
| performance_schema |
| sys |
+——————–+
4 rows in set (0.00 sec)

mysql>

Switch to Database

There are 4 databases so far. Let’s choose one and see what kind of tables are in there.

mysql> use mysql
Database changed
mysql> show tables;

Create a Database

But, we want to create our own custom database. Let’s do so.

mysql> CREATE DATABASE MyLocalDB;
Query OK, 1 row affected (0.03 sec)

Then create a table inside of our database

mysql> use MyLocalDB
Database changed

mysql> CREATE TABLE Persons
-> (
-> PersonID int,
-> LastName varchar(255),
-> FirstName varchar(255),
-> Address varchar(255),
-> City varchar(255)
-> );
Query OK, 0 rows affected (0.35 sec)

Insert a row into your table

mysql> insert into Persons (PersonID, LastName, FirstName, Address, City) values (‘123’, ‘Saor’, ‘Rick’, ‘132 Nowhere street’, ‘Liberty Hall’);
Query OK, 1 row affected (0.07 sec)

mongo dump

Say you want to do a dump of your mongo database onto your desktop.

You’d go:


mongodump -d DumpFolderName -o /location/of/your/directory

mongodump1

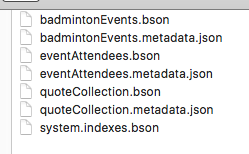
Once it makes a dump, you’ll see the DumpFolderName folder with various files in there. It contains the data of your database.

mongodump3

When you want to make the restore, copy the DumpFolderName to that machine. Make sure MongoDB is installed. Then just type


mongorestore DumpFolderName

mongodump2

Installing mongodb on Ubuntu

ref – http://www.mkyong.com/mongodb/how-to-install-mongodb-on-ubuntu/

This guide shows you how to install MongoDB on Ubuntu.

Ubuntu 12.10
MongoDB 2.2.3

1. Add 10gen package to source.list.d

Ubuntu 12 comes with a “mongo” package, but not the latest version.

$ sudo apt-cache search mongodb
mongodb
mongodb-clients
mongodb-dev
mongodb-server

It’s recommended to add 10gen package to /etc/apt/sources.list.d, as it contains the latest stable MongoDB. Create a /etc/apt/sources.list.d/mongo.list file, and declared the 10gen distro.

$ sudo vim /etc/apt/sources.list.d/mongo.list

/etc/apt/sources.list.d/mongo.list

##10gen package location

deb http://downloads-distro.mongodb.org/repo/ubuntu-upstart dist 10gen

2. Add GPG Key

10gen package required GPG key, imports it :

$ sudo apt-key adv –keyserver keyserver.ubuntu.com –recv 7F0CEB10

If you didn’t imports the GPG key, apt-get update will hits following error message :

GPG error: http://downloads-distro.mongodb.org dist Release:
The following signatures couldn’t be verified because the public key is not available: NO_PUBKEY 9ECBEC467F0CEB10

3. Update package

Update your apt-get list.

$ sudo apt-get update

Search “mongodb” again, a new 10gen package is appearing now. Get the “mongodb-10gen“, it contains the latest stable MongoDB.

$ sudo apt-cache search mongodb
mongodb
mongodb-clients
mongodb-dev
mongodb-server

mongodb-10gen
mongodb18-10gen
mongodb20-10gen

4. Install mongodb-10gen

Everything is ready, now you can Install MongoDB :

note see (http://stackoverflow.com/questions/12480935/install-mongodb-10gen-failed-with-apt-get) if you get an overwrite error.

$ sudo apt-get install mongodb-10gen

5. Where is MongoDB?

MongoDB is installed and started.

$ ps -ef | grep mongo
mongodb 5262 1 0 15:27 ? 00:00:14 /usr/bin/mongod –config /etc/mongodb.conf
mkyong 5578 3994 0 16:29 pts/0 00:00:00 grep –color=auto mongo

$ mongo -version
MongoDB shell version: 2.2.3

All MongoDB executable files are stored at /usr/bin/

$ ls -ls /usr/bin | grep mongo
4220 -rwxr-xr-x 1 root root 4317928 Feb 2 08:11 mongo
10316 -rwxr-xr-x 1 root root 10563336 Feb 2 08:11 mongod
10320 -rwxr-xr-x 1 root root 10563664 Feb 2 08:11 mongodump
10284 -rwxr-xr-x 1 root root 10526736 Feb 2 08:11 mongoexport
10324 -rwxr-xr-x 1 root root 10567768 Feb 2 08:11 mongofiles
10296 -rwxr-xr-x 1 root root 10539056 Feb 2 08:11 mongoimport
10272 -rwxr-xr-x 1 root root 10514544 Feb 2 08:11 mongooplog
10272 -rwxr-xr-x 1 root root 10518512 Feb 2 08:11 mongoperf
10320 -rwxr-xr-x 1 root root 10563632 Feb 2 08:11 mongorestore
6644 -rwxr-xr-x 1 root root 6802848 Feb 2 08:11 mongos
10312 -rwxr-xr-x 1 root root 10556560 Feb 2 08:11 mongostat
10272 -rwxr-xr-x 1 root root 10515856 Feb 2 08:11 mongotop

The “mongodb control script” is generated at /etc/init.d/mongodb

$ ls -ls /etc/init.d | grep mongo
0 lrwxrwxrwx 1 root root 21 Feb 2 08:11 mongodb -> /lib/init/upstart-job

The MongoDB config file is at /etc/mongodb.conf
/etc/mongodb.conf

# mongodb.conf

# Where to store the data.

# Note: if you run mongodb as a non-root user (recommended) you may
# need to create and set permissions for this directory manually,
# e.g., if the parent directory isn’t mutable by the mongodb user.
dbpath=/var/lib/mongodb

#where to log
logpath=/var/log/mongodb/mongodb.log

logappend=true

#port = 27017

#……

6. Controlling MongoDB

Some commands to control the MongoDB.

Starting MongoDB

$ sudo service mongodb start

Stoping MongoDB

$ sudo service mongodb stop

Restarting MongoDB

$ sudo service mongodb restart

Install MongoDB on Mac

ref – http://www.mkyong.com/mongodb/how-to-install-mongodb-on-mac-os-x/

Moving files

First download the mongo database file from its website. Be default, your mac should put it into your ~/Download folder. Then open up a terminal.

You cd into the download directory. Then you unzip the tgz file. Then you move the folder into directory /usr/local/mongdb


cd ~/Download
$ tar xzf mongodb-osx-x86_64-2.2.3.tgz
$ sudo mv mongodb-osx-x86_64-2.2.3 /usr/local/mongodb

You should now see the mongodb folder with bin and data in the directory /usr/local/mongdb.

data/db folder

By default, MongoDB write/store data into the /data/db folder, you need to create this folder manually and assign proper permission. We make the directory, then check who the current User is. Then give permission to the current user for directory /data/db


$ sudo mkdir -p /data/db
$ whoami

rickytsao

$ sudo chown rickytsao /data/db

Now, the directory /data/db is ready for mongodb data writes.

.bash_profile file

Now we need to open up our .bash_profile and add a PATH entry. This is so that we can run mongod, and mongo from the /usr/local/mongodb/bin directory without having to type out the whole path.


$ cd ~
$ pwd
/Users/rickytsao
$ touch .bash_profile
$ vim .bash_profile

Then type in the following into the .bash_profile file:

export MONGO_PATH=/usr/local/mongodb
export PATH=$PATH:$MONGO_PATH/bin

restart terminal, then:


$ mongo -version

MongoDB shell version: 2.2.3

In terminal 1:

$ mongod

MongoDB starting : pid=34022 port=27017 dbpath=/data/db/ 64-bit host=mkyong.local
//…
waiting for connections on port 27017

In terminal 2:

$ mongo

MongoDB shell version: 2.2.3
connecting to: test

> show dbs

local (empty)

If you happen to get a “rlimits warning”, just type just type “ulimit -n 2048” or use something higher.

Using Mongoose


npm install mongoose –save

update column data where its NOT LIKE

update column Birthday with randoms

if length of birthday string is less than 9

set nationality using LOOR RAND()

Update Code, which is a VARCHAR(40)

Gender

mysql basic commands

ref: http://www.informit.com/articles/article.aspx?p=30875&seqNum=4
The SHOW statement can be used to obtain information about several aspects of your databases and tables:

List the databases managed by the server:

List the tables in the current database or in a given database:

Note that SHOW TABLES doesn’t show TEMPORARY tables.
Display information about columns or indexes in a table:

The DESCRIBE tbl_name and EXPLAIN tbl_name statements are synonymous with SHOW COLUMNS FROM tbl_name.

Display descriptive information about tables in the current database or in a given database:

This statement was introduced in MySQL 3.23.0.

Display the CREATE TABLE statement that corresponds to the current structure of a table:

This statement was introduced in MySQL 3.23.20.

Several forms of SHOW take a LIKE ‘pat’ clause allowing a pattern to be given that limits the scope of the output. ‘pat’ is interpreted as a SQL pattern that can include the ‘%’ and ‘_’ wildcard characters. For example, the following statement displays the names of tables in the current database that begin with ‘geo’:

To match a literal instance of a wildcard character in a LIKE pattern, precede it with a backslash. Generally, this is done to match a literal ‘_’, which occurs frequently in database, table, and column names.

The mysqlshow command provides some of the same information as the SHOW statement, which allows you to get database and table information from the shell:

List databases managed by the server:

List tables in the named database:

Display information about columns in the named table:

Display information about indexes in the named table:

Display descriptive information about tables in the named database:

The mysqldump utility allows you to see the structure of your tables in the form of a CREATE TABLE statement (much like SHOW CREATE TABLE). When using mysqldump to review table structure, be sure to invoke it with the –no-data option so that you don’t get swamped with your table’s data!

If you omit the table name, mysqldump displays the structure for all tables in the database.

For both mysqlshow and mysqldump, you can specify the usual connection parameter options (such as –host or –user.)
Determining Which Table Types Your Server Supports

ISAM is the only type available before MySQL 3.23. From 3.23 on, MyISAM, MERGE, and HEAP are always available, and availability of the other types can be assessed by means of an appropriate SHOW VARIABLES statement:

If the output from the query shows that the variable has a value of YES, the corresponding table handler is enabled. If the value is something else or there is no output, the handler is unavailable. The use of the pattern have_inno% to determine InnoDB availability matches both have_innodb and have_innobase. (The latter form was used in MySQL 3.23.30 to 3.23.36 before being renamed to have_innodb.)

You can use table type information to determine whether your server supports transactions. BDB and InnoDB are the two transaction-safe table types, so check whether their handlers are enabled as described in the preceding discussion.

As of MySQL 4.1, the list of table types is available directly through the SHOW TABLE TYPES statement:

+——–+———+———————————————————–+
| Type | Support | Comment |
+——–+———+———————————————————–+
| MyISAM | DEFAULT | Default type from 3.23 with great performance |
| HEAP | YES | Hash based, stored in memory, useful for temporary tables |
| MERGE | YES | Collection of identical MyISAM tables |
| ISAM | YES | Obsolete table type; Is replaced by MyISAM |
| InnoDB | YES | Supports transactions, row-level locking and foreign keys |
| BDB | YES | Supports transactions and page-level locking |
+——–+———+———————————————————–+

The Support value is YES or NO to indicate that the handler is or is not available, DISABLED if the handler is present but turned off, or DEFAULT for the table type that the server uses by default. The handler designated as DEFAULT should be considered available.
Checking a Table’s Existence or Type

It’s sometimes useful to be able to tell from within an application whether or not a given table exists. You can use SHOW TABLES to find out:

If the SHOW statement lists information for the table, it exists. It’s also possible to determine table existence with either of the following statements:

Each statement succeeds if the table exists and fails if it doesn’t. The first statement is most appropriate for MyISAM and ISAM tables, for which COUNT(*) with no WHERE clause is highly optimized. (It’s not so good for InnoDB or BDB tables, which require a full scan to count the rows.) The second statement is more general because is runs quickly for any table type. Use of these queries is most suitable for use within application programming languages, such as Perl or PHP, because you can test the success or failure of the query and take action accordingly. They’re not especially useful in a batch script that you run from mysql because you can’t do anything if an error occurs except terminate (or ignore the error, but then there’s obviously no point in running the query at all).

To determine the type of a table, you can use SHOW TABLE STATUS as of MySQL 3.23.0 or SHOW CREATE TABLE as of MySQL 3.23.20. The output from both statements includes a table type indicator. For versions older than 3.23.0, neither statement is available; but then the only available table type is ISAM, so there is no ambiguity about what storage format your tables use.