Category Archives: Dart

Dart programming language

Decorator pattern using Dart

ref –

  • https://dart.academy/structural-design-patterns-for-dart-and-flutter-decorator/
  • https://medium.com/flutter-community/flutter-design-patterns-16-decorator-bf0dd711f093
  • Pizza Example

Decorator pattern provides a flexible way to add attributes or behavior to an object at runtime

…as an alternative to creating new classes to cover every combination of traits an object may need.

Here we create a square first. It has its basic methods and attributes for use.

But what if we’re not satisfied with its basic functionalities and properties? Say we don’t just want to draw it. We also want to give it a color.

So we then create something like GreenShapeDecorator(square) to let it know that we want to color our square green:

..or blue

Extends an object’s functionality by wrapping it in an object of a Decorator class, leaving the original object intact without modification.

How to do it

Let’s create an abstract class called Shape. (It cannot be instantiated because we want real shapes to implement according to its interface)
It says you must implement draw function.

Hence, when we declare a Shape, for example Square or Triangle, it implements Shape,
and we

We define the Shape interface using an abstract class, so that it can’t be directly instantiated. In this simplified example, the draw() method will return a string appropriate to the shape’s type. Because Square and Triangle implement Shape, they are required to provide an implementation of the draw() method. This means client code can create variables of type Shape that can be assigned any of the shape classes.

In order to add attributes to our Shape, we first create an parent abstract class called ShapeDecorator

1) use constructor to reference a shape, and pass it in using constructor
2) Satisfy implements by declaring it again.
3) Use ‘implements’ to say we’re simply wrapping abstract Shape.

We basically wrapped abstract Shape by passing in the Shape, and keeping the interface draw.

Now, we create concrete decorator class by extending our ShapeDecorator.
Let’s say we want to add color green. We over-ride the draw function and implement it, thus satisfying the interface ShapeDecorator. Inside its implementation, we use green to color the Shape.

1) We use an abstract class to define the interface all shape decorators should adhere to.

2) ShapeDecorator implements Shape, so all classes that extend ShapeDecorator are interface compatible with shape classes.

This is key, because it means we can instantiate a decorator, pass it a shape, and then use the decorator as though it were the shape.

That’s the essence of the Decorator pattern.

Pizza Example

We first declare an interface. It says, all pizzas that implements this must have a description property, a function to get the description, and a function to get the price.

We then have to create a concrete base where it implements our Pizza interface. In order to conform to the interface, we use declaration for properties and override for functions. Being a concrete implementation, don’t forget the constructor.

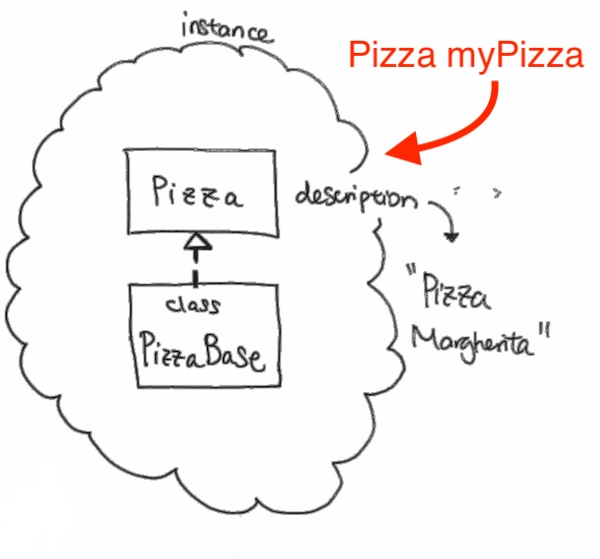
So, as long as a class implements an interface that is Pizza (or extends from Pizza), we can have a reference of type Pizza and point to the instantiation of that class. This is shown in the picture above.

Now that our base is complete, we are to do the same for an interface for decorating our Pizza base.

Because PizzaDecorator needs to be abstract and needs to extend from abstract Pizza, we simply use extends
It just means we extend the abstract properties from Pizza.

We have a property where its of type Pizza. This means any property that implements Pizza is valid here.
This is because we are going to use it in our overriden getDescription and getPrice functions.
Also, a constructor that injects an instance of pizza is required.

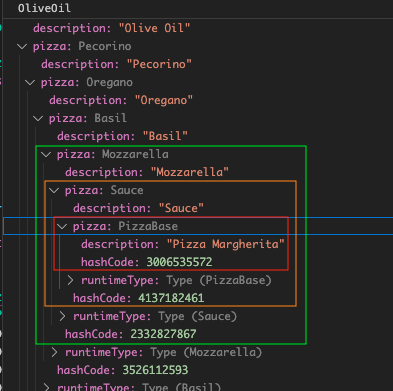
As you can see, we have Pizza pizzaInt, which can reference either our PizzaBase object or a Sauce object. This is because at the top of the abstract class, we have Pizza.

Also notice that in abstract PizzaDecorator, we have a Pizza pizza reference that points to PizzaBase.

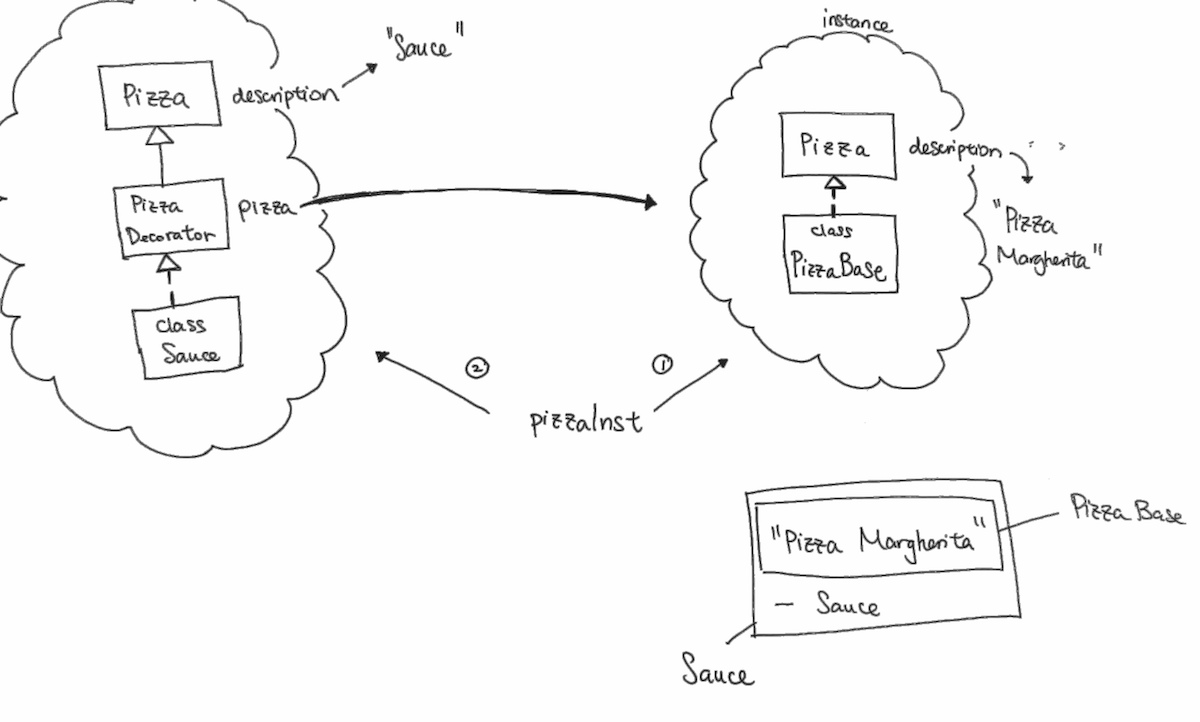
On the right side, we instantiate a PizzaBase object. We have a reference pizzaInst point to it.

We then pass the reference inside of Sauce.

Sauce is depicted on the left side. Its abstract class Decorator has a property Pizza pizza, which points to abstract Pizza. This means, it can point to PizzaBase, Sauce, or any condiments (which must extend from abstract Pizza).

Notice getDescription.

To get the whole pizza’s description of the name, and toppings, it first looks at reference pizza, which is pointing to the PizzaBase. It calls its getDescription, which gets “Pizza Margherita”.

Then we return the interpolated string with our own description.

Thus

“Pizza Margherita” <-- PizzaBase's getDescription "- Sauce" <-- Sauce's getDescription

If were to keep going with toppings like Mozzarella

it would be the same concept. Mozzarella’s Pizza pizza reference would point to Sauce.
When we call getDescription, it would call

Mozzarella’s

Sauce’s

PizzaBase

Thus, in the end the output would be:

Flutter Food Delivery App – part 3 (Recent Orders)

Recent Orders

Put recent orders as the next item in the widget array.

home_screen.dart

Create our basic RecentOrders class by typing: stl + tab. Then enter RecentOrders for the class name.

We then return an instance of a column.
We create an array of widgets and assign it to the children property.
Our first widget will be Text, which says Recent order. We give it some Text styling.

Creating list and filling it with the user’s food data

We then want to create a ListView and fill it with some basic text. Like so:

Making it horizontal and having clipped Rounded Corner Images

Putting text in and spacing them correctly

Putting in the Add button

Push Our button to the right

Now in order to push the add button all the way to the right side, we need to wrap:
1) our image
2) our column of texts

in a row widget.

Then, we can use the property of our main axis alignment for our larger row container.

Text Overflow

Wrap our Texts Container, and outer Row Container in a widget called Expanded

Flutter Food Delivery App – part 1 (setup)

We start off with the basic template here

Its UI for food delivery.

Notice that it has the main.dart, and the models.

Let’s make the basic changes of changing some colors. We then remove the default MyHomePage class and change the instance to HomeScreen.

We then create a new folder screens under lib, with home_screen.dart

In the home_screen.dart file, stf + tab and type in HomeScreen. Remember to import Material.dart.

Instead of the default Container, we use Scaffold to take advantage of Material design.
We create an instance of the AppBar and assign it to property appBar. Then under title, put ‘food delivery’.

Hot reload should show something like:

We then use property actions. It is a List of Widgets. Thus, we create an array of type Widget.
We then insert a TextButton in there. It will represent the Cart button.We then specify the leading button as an IconButton.

home_screen.dart

Flutter Dev Portfolio – part 3 (Header Body)

Developer Portfolio Header Section

In the header_view.dart, under headerView, let’s extract the content. So the text, images, logo, etc.
All of that content is the Expanded child of the Row. let’s click on ‘Column’ of the Expanded child and Extract Widget

Then you’ll see that it has been extracted as the HeaderBody, and we instantiate it where our old code was. Notice that the logo is outside of our HeaderBody.

Now let’s put it inside our HeaderMobileView.

Now run the app, make it into mobile size and we see our header’s contents. Notice that our FlutterLogo is NOT shown because we did not include it in our HeaderBody.

We need to add some padding, logo and what not. So we need to wrap our HeaderBody inside of a column. That way, we can add padding, put a logos, and what not as children.

The code should look like this:

And now we see the logo in mobile view.

Now let’s add some padding.

Adding Auto Size Text

ref – https://pub.dev/packages/auto_size_text/install

Let’s add auto size text wdiget to our pubspec.yaml file. It is a Flutter widget that automatically resizes text to fit perfectly within its bounds. So say we specify that we want want our sentence to fit in two lines. Normally, when we start typing out the sentence, if it doesn’t fit, it’ll appear on line 2, then line 3. But with auto size text, the font size of the text will decrease so that it fits within two lines. And if we keep typing, and the widget sees that the text will start to overflow to line 3, it’ll decrease the font size some more so that our sentence will only fit in those two lines.

Installing auto size text

Flutter will then install it.

Once installed, let’s change Text to AutoSizeText like so:

isMobile property

In HeaderBody, add property isMobile by cmd + dot.

Then let’s specify that whenever we’re on mobile, we give it a smaller font or size.

In HeaderView, find the HeaderBody and pass in isMobile boolean from size object.

In HeaderMobileView, since its a mobile view, let’s always give it a true value for HeaderBody

Flutter Dev Portfolio – part 2 (Header)

Let’s download Responsive Builder.

Open up pubspec.yaml and put it right under dependencies like so:

Flutter will then attempt to install it. Once done, go to header_view.dart and double click on the Container in build function.
Wrap with widget, and type ResponsiveBuilder.

Once you typed ResponsiveBuilder, it’ll say that the property is erroneous. Naturally, there is no child property.
If you cmd + click on ResponsiveBuilder, it’ll give us this:

We see that there is a property called builder that is of type Function. And we instantly know that when we initialize a constructor for ResponsiveBuilder, we need to pass in a function for property builder. It has a named constructor property which takes in a function like so:

We need to provide a function to draw for when size is a certain height or width. Notably, if its isMobile, then we return a certain Container with its text, buttons, boxes, etc. And if its web, then we return a certain container with other laid out text, buttons, boxes, etc.

The reason why we need to provide it is because ResponsiveBuilder overrides a build function. Inside this build function, it accesses the builder property and then execute it and passes the context and sizingInformation data in. Hence, we’re providing a function for property builder. Builder then executes our provided function and passes in data for us to use.

Let’s change the property to builder by using cmd + dot.

Once it becomes builder property, let’s change the provided parameter to a function by providing two parameters. We’re not going to use context, but we will use sizingInformation. Thus, we just give ‘_’ as the context.

Its an arrow function so it returns the container automatically. We do not want that. We want to put code before returning so that we can use the size information and figure out whether we’re on mobile or web.

Thus, highlight the arrow and cmd + dot.

We analyze size object to see if it isMobile. If it is. We want to return a Container instance.

We then cmd + dot and select extract Widget. Give it the name HeaderMobileView().

Let’s specify the size of the Container for the mobile header view by saying we want it to be 90% of the mobile height. Remember that in MediaQuery, it will return width and height for when the app is resized to mobile sizes. Height will then be 9.0 of that height, and width stays the same.

The event loop, async operation, and Isolate in Dart

ref –

  • https://medium.com/dartlang/dart-asynchronous-programming-isolates-and-event-loops-bffc3e296a6a
  • https://stackoverflow.com/questions/63707220/how-to-pass-arguments-besides-sendport-to-a-spawned-isolate-in-dart
  • https://medium.com/@lelandzach/dart-isolate-2-way-communication-89e75d973f34
  • https://www.javatpoint.com/dart-isolates

The Event Loop

Event loops is what makes async code possible.

In the lifetime of an app, we can’t predict when I/O, clicks, etc will happen. We don’t know when or in what order these events will happen.

Hence, a Dart or JS app needs to handle them with a single thread.
It uses an event loop. It grabs the oldest event from the event queue, and process it. Then it processes the next one..until the event queue is empty.

Taps, downloading, timer goes off…event loop processes these events one at a time. When there’s nothing left, the thread waits for the next event, or triggers the Garbage collector…etc.

In order for developers to work with the event loop, we use a Future. A Future represents a potential value, or error, that will be available at some time in the future.

Common asynchronous operations include:

– fetching data over network
– reading data from a database
– reading data from a file

Let’s take a look at a simple example.

We run down the program synchronously. W first print Begin Program. We create a Future that will return a value of 14. This Future is incomplete and is queued onto the event loop.
When this Future completes later on, it will take the then callback and process it.
Then we naturally come to print End Program.

At this point, our Future value of 14 is being processed on the event loop. It finishes and returns it to the then. We then print 14.


output:
Begin Program
Instance of ‘_Future
End Program
14

So we synchronously run the main program. If there is a Future, it is put on the event loop. The event loop starts processing after the main app. That’s why we get 14 after End Program.

In order to make sure we wait for 14 value to arrive, before hitting the end, we can use await. Remember that all awaits must be inside of an async function. Thus we add async to main.


output:
Begin Program
14
End Program

Async calls are divided into multiple parts. What comes after an await is not executed immediately because we need to wait for the Future to finish. What it happens is that the main function gets split. “Splitting Function” calls is fundamental because it avoids events on the queue to wait for the futures to finish.

i.e IF the main were executed entirely, the event loop would have been blocked until Future completed.

Let’s describe the situation with another piece of code:

We see that we have getRequest that returns a Future. This Future will return a string. Thing is, we need o wait for this Future to complete. Essentially this is whats happening:

output:
Begin Program
printName() start

When we call printName(), we print the start msg. It is an async operation so we put it on the event loop. However, because there is an await, we only place the code up to the await onto the event loop like so:

It will take the code below await and save it for later.

We then continue our execution:


output:
Begin Program
printName() start
time is 18472847387
End Program

Our program finishes executing and now we’re just waiting around while nothing is happening. However, we’re not blocking the event queue. If others have an event and gets added to the event queue, they will be processed. Our program is just waiting on getRequest to finish.

So in this way, we don’t block, and give other events a chance to be executed. Once getRequest returns, we then add the saved code (that was below await in printName()) onto the event loop. It receives the name ‘Hadoken!’, prints it and then prints that printName function has ended.


output:
Begin Program
printName() start
time is 18472847387
End Program
Hadoken!
printName() end

Future in loops

As you can see from the output, our index.dart gets processed first with all the prints. The longRunningOperation(int i) for i 0, 1, 2 gets placed onto the event loop.
Then the event loop senses that there are item on the loop, will start processing. It executes i 0, 1, and finally 2.


output:
— start main —
— procesing 0 —–
Instance of ‘Future
— procesing 1 —–
Instance of ‘Future
— procesing 2 —–
Instance of ‘Future
— end program —
longRunningOperation 0: 0
longRunningOperation 0: 10000000
longRunningOperation 0: 20000000
longRunningOperation 0: 30000000
longRunningOperation 0: 40000000
longRunningOperation 0: 50000000
longRunningOperation 0: 60000000
longRunningOperation 0: 70000000
longRunningOperation 0: 80000000
longRunningOperation 0: 90000000
done with operation 0
longRunningOperation 1: 0
longRunningOperation 1: 10000000
longRunningOperation 1: 20000000
longRunningOperation 1: 30000000
longRunningOperation 1: 40000000
longRunningOperation 1: 50000000
longRunningOperation 1: 60000000
longRunningOperation 1: 70000000
longRunningOperation 1: 80000000
longRunningOperation 1: 90000000
done with operation 1
longRunningOperation 2: 0
longRunningOperation 2: 10000000
longRunningOperation 2: 20000000
longRunningOperation 2: 30000000
longRunningOperation 2: 40000000
longRunningOperation 2: 50000000
longRunningOperation 2: 60000000
longRunningOperation 2: 70000000
longRunningOperation 2: 80000000
longRunningOperation 2: 90000000
done with operation 2

Long Running Tasks

But! Here’s a problem. A long running task on the event loop will block all the events. On a Flutter app, you can try press the other controls for an event. They won’t be processed.

In this case, we should use Isolate. The Isolate works differently in comparison of Thread. The isolates are independent workers that do not share memory, but instead interconnect by passing message over channels. Since isolates completes its task by passing message thus it need a way to serialize a message. The communication between the isolates is done by the message passing as a client and server. It helps the program to take advantage of multicore microprocessor out of the box.

In other words, Dart allows a programmer to execute a function asynchronously in a separate thread! This can be done using the Isolate class, which is in a native Dart library. A Dart Isolate is an object that executes a specific function in a newly spawned thread. The second thread can communicate with the main thread continuously.

Isolate

An Isolate have its own event loop, and memory area.
Dart Concurrent programming uses Isolates: independent workers that are similar to threads but don’t share memory, communicating only via messages.

The Isolate class was designed for message passing between threads using a non-broadcast streaming object called a ReceivePort. You first declare ReceivePort like so:

Then we create an Isolate we make use of .spawn() method in Dart. In our ReceivePort object, there is a property called sendPort. We give it to the long running function so that it can signal to us when it is done. We give the reference of sendPort inside the param array:

We use our ReceivePort instance to listen for messages. ReceivePort can be listened to just once.

When the long running function is done, it uses the reference to sendPort to send whatever data and a message to the listening receivePort that we are done.

Example

function downloadAndCompressTheInternet

main.dart

So when we start executing and executes synchronously. We spawn an Isolate that processes downloadAndCompressTheInternet. As you can see we then print ‘Future is Bright’. So this proves that our Isolate is executing already. After ‘Future is Bright’, our main Isolate will process longRunningOperation2. Then longRunningOperation1, then longRunningOperation2. So our main Isolate and spawned Isolate are running in parallel. We have a long running task that is being executed in parallel with a long running task on main Isolate.

When our spawned Isolate is done, we then send a message to main Isolate, where we created a ReceivePort, and listened for events.


output:

— start main —
— downloadAndCompressTheInternet —
longRunningOperation1: 0
Future is Bright
longRunningOperation2: 0
longRunningOperation1: 10000000
longRunningOperation2: 10000000
longRunningOperation1: 20000000
longRunningOperation1: 30000000
longRunningOperation2: 20000000
longRunningOperation1: 40000000
longRunningOperation2: 30000000
longRunningOperation1: 50000000
longRunningOperation2: 40000000
longRunningOperation1: 60000000
longRunningOperation1: 70000000
longRunningOperation2: 50000000
longRunningOperation1: 80000000
longRunningOperation2: 60000000
longRunningOperation1: 90000000
done with operation 1
[SendPort, 3]
longRunningOperation2: 70000000
longRunningOperation2: 80000000
longRunningOperation2: 90000000
done with operation 2
— end program —
— received message —
45

Async and Await

  • Use await to wait until a Future completes
  • Use multiple awaits to run Futures in sequences
  • await is only allowed inside async functions
  • use try/catch to handle exceptions
  • async/await + try/catch is a great way of working with Futures in Dart

Another Example

Futures, then, catchError, whenComplete

A Future represents a value or an error that will be available in the future. This generic class should be used whenever you’re working with time-consuming functions returning a result after a notable amount of time.

Cascade Operator

Give a ClosedPath class like so:

In the main, we call its functions to draw a shape, you’ll do something like so:

However, using the cascade operator, we can simply it to this:

Notice there is no semi-colon in the end. Instead, we use .. operator to depict calling another function on the same instance.

Factory Constructor

We create an abstract Shape. We force class that conforms to this abstraction a getArea() and name.
In order to generate instances according to json data, we implement a factory constructor called fromJson.

It takes in a JSON object, and then returns a Square, or a Circle.

Factory constructors can return instances of the subclass.
But standard constructors can ONLY return instances of the current class.

Notice that in the abstract class Shape below, we actually can return subclass Square and Circle.

shape.dart

We conform to Shape by implementing name and getArea().
We then create a constructor with required param side.

Circle.dart

We conform to Shape by implementing name and getArea.
We then create a constructor by having required param side.

Square.dart

Finally, we use it like so: