Category Archives: Configurations
Protected: iOS Apple Push Notification with Node JS (iOS client side)
Committing projects up to Github
ref – http://stackoverflow.com/questions/17291995/push-existing-project-into-github
ref – https://help.github.com/articles/fork-a-repo/
Create the repo
Make sure you have created a repository on Github via
https://github.com/new
Enter a repository name, then check the box where it creates a readme file.
Click ok.
Fork
Then fork it locally, directions below are taken from the url here: https://help.github.com/articles/fork-a-repo/
Directions
On GitHub, navigate to your fork of your repository.
Clone URL buttonIn the right sidebar of your fork’s repository page, click
to copy the clone URL for your fork.
Open Terminal (for Mac users) or the command prompt (for Windows and Linux users).
Type git clone, and then paste the URL you copied in Step 2. It will look like this, with your GitHub username instead of YOUR-USERNAME:
|
1 |
$git clone https://github.com/YOUR-USERNAME/REPO-NAME |
Press Enter. Your local clone will be created and the output from your terminal will be something like this:
Rickys-MacBook-Pro:Desktop rickytsao$ git clone https://github.com/redmacdev1988/face-recognizer.git
Cloning into ‘face-recognizer’…
remote: Counting objects: 3, done.
remote: Total 3 (delta 0), reused 0 (delta 0), pack-reused 0
Unpacking objects: 100% (3/3), done.
Checking connectivity… done
Clone a single branch
git clone https://your_name@gitcn.company.com:1234/hehe-haha/hehe-haha.git –branch dev
Clone with username
|
1 |
git clone https://username:password@github.com/username/repository.git |
List branches of the the repository
(double dash next to “heads”)
git ls-remote –heads https://git.yourcompany.com/some_person/project_name.git
Change working branch :
Create the branch on your local machine and switch in this branch :
$ git checkout -b [name_of_your_new_branch]
Change working branch :
$ git checkout [name_of_your_new_branch]
Push the branch on github :
$ git push origin [name_of_your_new_branch]
Uploading Project
Then, you’ll see the project folder on your desktop. Copy your source files into the folder. And to upload it to Github you do:
note – The project url can be found on the repo page on the righthand side bar. It should have a little paste icon next to it. Its the HTTPS clone URL…you should be able to just copy and paste to the terminal window
If the system tell you that origin already exists, keep going with the instructions.
Make sure you are in the directory of the folder that Git created on your computer. Then within the folder (which should have a git file) you go:
|
1 2 3 4 5 |
git init git add . git commit -m "Initial commit" git remote add origin <project url> git push -f origin master |
Rickys-MacBook-Pro:holistic-element rickytsao$ git push -f origin master
It will then ask you for your username and password:
Username for ‘https://github.com’: redmacdev1988
Password for ‘https://redmacdev1988@github.com’:
result:
Counting objects: 651, done.
Delta compression using up to 4 threads.
Compressing objects: 100% (645/645), done.
Writing objects: 100% (650/650), 130.74 MiB | 1.45 MiB/s, done.
Total 650 (delta 19), reused 0 (delta 0)
To https://github.com/redmacdev1988/holistic-element.git
0ddae45..a74a112 master -> master
If you want to remove files, delete the files in your directory.
Then in the same directory, go:
git commit -a -m “removed fluff”
git push origin master
Pulling (cloning) the project onto your machine
git clone https://git.epam.com/ricky_tsao/badmintoneventsapp.git
src refspec does not match any ERROR
If you try pushing to a certain branch and it gives you a src refspec error, it means you are not on that branch. You need to switch to that branch first, THEN, push to it.
git checkout -b Ricky_Tsao
Switched to a new branch Ricky_Tsao
git commit -a -m “cleaned up stuff”
git push origin Ricky_Tsao
Cloning Single Branch
git clone learned –single-branch option to limit cloning to a single branch;
tags that do not point into the history of the branch are not fetched.
|
1 |
git clone -b mybranch --single-branch git://sub.domain.com/repo.git |
git clone -b branch_name –single-branch (double dash in front of “single”) https://gitcn.epam..com:1234/your_name/project_name.git
Merge current local branch with remote
$ git stash
$ git pull origin release/1.0.1
// fix conflicts
// git add, git commit
$ git stash pop
// git add, git commit, git push
See the list of files that have changes between your local and remote
$ git status
On branch dev
Your branch is up-to-date with ‘origin/dev’.
Changes to be committed:
(use “git reset HEAD
modified: Src/Project/Website/Code/global/css/product.css
modified: Src/Project/Website/Code/global/standalonesim.html
Stash
$ git stash save “—–”
$ git stash list
$ git stash apply stash@{0}
Delete local branch
$ git branch -d feature/login
Pushing new files onto your branch
$ git add .
$ git reset build/config (or whatever path to folder you want to exclude)
$ git commit -m “Add existing file”
$ git push -f origin Your_Branch
Using mongo via terminal for DB manipulation
$ mongo
MongoDB shell version: 3.0.4
connecting to: test
> show dbs
bookAPI 0.078GB
local 0.078GB
my_database_name 0.078GB
CREATE A DATABASE
Don’t worry about “connecting to” … that’s just the default database Mongo decides to use if you don’t specify one on the command line, which we didn’t because it’s not important right now. It doesn’t actually even create the “test” database unless you add a record. It’d be totally fine to just work in that database for right now, but let’s make one of our own. In your Mongo console, type the following:
|
1 |
use test1 |
Now we’re using the database “test1.” Nothing actually exists yet. To make the database exist, we have to add some data. We’re going to start off by doing that right inside of the Mongo client.
ADD SOME DATA
MongoDB uses JSON for its structure.
Let’s add a record to our collection. Note that we are currently ‘on’ database test1. So whatever we insert will be into database ‘test1’. Our data format will thus look like this:
|
1 |
db.usercollection.insert({ "username" : "testuser1" }) |
Something important to note here: that “db” stands for our database, which as mentioned above we’ve defined as “test1”. The “usercollection” is the name of our collection in this database. Its kind of like ‘table’ in a SQL database. Every JSON we insert is like a row. Note that there wasn’t a step where we created the “usercollection” collection. That’s because the first time we add to it, it’s going to be auto-created. OK, Hit enter. Assuming everything went right, you should see … nothing. That’s not very exciting, so type this:
|
1 |
db.usercollection.find().pretty() |
Showing all data from table
You access the table name by saying ‘db’ for current database, then db.tableName, which in our case is users, so it would be db.users. Finally, we use find() to display all data so in the end it would be:
db.users.find()
output:
{ “_id” : ObjectId(“559261a6250879f91747a6a5”), “name” : “MODULUS ADMIN”, “age” : 42, “roles” : [ “admin”, “moderator”, “user” ], “__v” : 0 }
>
Find where age > “—“
> db.users.find( { age: { $gt: 25 } } )
{ “_id” : ObjectId(“559261a6250879f91747a6a5”), “name” : “MODULUS ADMIN”, “age” : 42, “roles” : [ “admin”, “moderator”, “user” ], “__v” : 0 }
> db.users.find( { age: { $gt: 43 } } )
>
Clear out a Collection
|
1 |
db.yourCollection.remove( { } ) |
Removing objects where name is “—“
> db.users.remove({name:”MODULUS ADMIN”})
WriteResult({ “nRemoved” : 1 })
> db.users.find()
>
counting how many are in a table
> db.users.count()
0
Insert
If the collection does not exist, the insert() method creates the collection.
> db.users.insert( { name: “ricky”, age: 35, roles:”admin” } )
Dropping Collections
db.{collection name}.drop()
Dropping Database
use my_database_name
switched to db my_database_name
> db.dropDatabase()
{ “dropped” : “my_database_name”, “ok” : 1 }
Viewing contents of a database
first show all database
> show dbs;
PersonDatabase 0.078GB
local 0.078GB
Then pick a database to use
> use PersonDatabase;
switched to db PersonDatabase
Then show all collections inside that database
> show collections
people
system.indexes
Then do db.{collection name}.find()
> db.people.find()
{ “_id” : ObjectId(“55939a0800f3e7343974a41f”), “name” : “Ricky-dude”, “username” : “rtsao”, “password” : “compaq”, “admin” : true, “__v” : 0 }
{ “_id” : ObjectId(“55939adc2b0f71473b38b3d6”), “name” : “Ricky-dude”, “username” : “hadoken”, “password” : “compaq”, “admin” : true, “__v” : 0 }
{ “_id” : ObjectId(“55939b81648f93fd3bb1f4f1”), “name” : “Ricky-dude”, “username” : “shoryuken”, “password” : “compaq”, “admin” : true, “__v” : 0 }
inserting dates via terminal
db.badmintonEvents.insert({ “attendee_name” : “badminton_2-18-2016”, “date” : ISODate(“2016-02-18T00:00:00Z”), “description” : “8:00pm at baishizhou” })
debugging with xCode (pt 5) – conditional debugging
Conditional
As you’re debugging your app, it may take in user input, for example, a gift name that’s a string.
Hence, code wise we want to say “if gift.name is equal to ‘xbox'”.
If you want to break whenever this string is equal to say “xbox”, you can do so using conditional debugging.
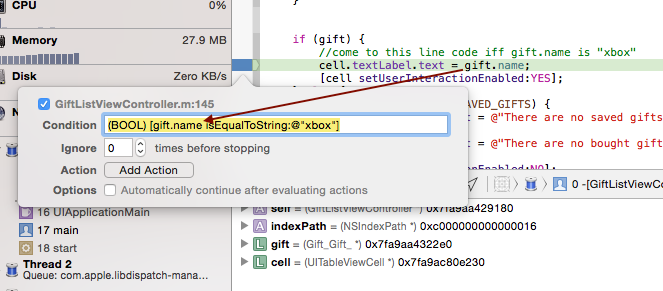
Edit the breakpoint and at the Condition textbox input the code:
|
1 |
expr (BOOL) [gift.name isEqualToString:@"xbox"] |
The expression must evaluate to something so we simply cast it to BOOL.
Now, if you were to go back to your app and input xbox into the gift.name textfield, the runtime compiler will break to this line.
set
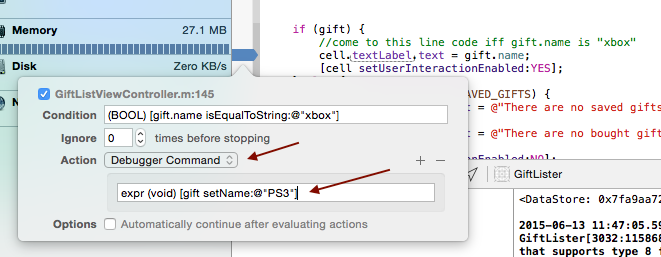
So now that the user have just entered “xbox”, we reach to this breakpoint. Let’s say we want to set this variable to something else instead, say “ps3”.
You simply add in an Action with the Debugger Command and insert the expression:
|
1 |
expr (void) [gift setName:@"PS3"] |
Again, we’re telling the debugger this is an expression and thus must evaluate to something. Since its a set command, we just cast it void.
Therefore, we’re basically saying if the user enters a string gift.name that matches “xbox”, we want to change gift.name to “ps3” instead.
use the code’s setter method to set gift.name to ps3 in Action >> Debugger Command‘s textfield
|
1 |
expr (void) [gift setName:@"ps3"] |
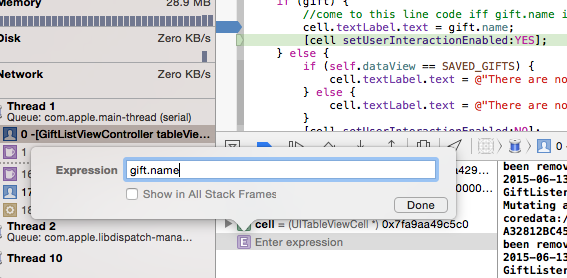
Now when you start the app and input “xbox”, it’ll jump to that breakpoint. While the program is paused, in your variable section, right click and select “Add Expression”. Put gift.name.
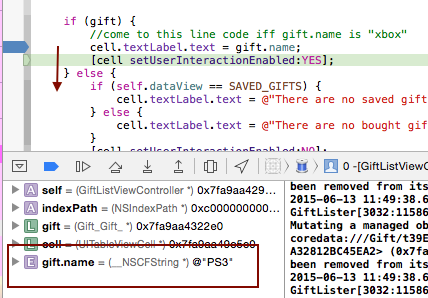
Then, have the debugger step down 1 line (fn + F6) so that you process the line of code. In your variable section, you will see that our expression gift.name was indeed changed to “ps3”.
debugging with xCode (pt 4) – Warning and Errors
Usually, adding a lot of ‘todo’ comments is not a good idea because it will rarely be seen by others.
Hence we use #warning to throw a warning for our message when the developer compiles.
|
1 |
#warning add validation code |
If you want it to be an error:
|
1 |
#error fix your code |
Playing a sound using Breakpoint
You can also put sounds in your code by first adding a break point to where you want the sound to happen. Then:
Edit Breakpoint >> Action >> Sound >> choose a sound file.
Playing a sound is a good way to know if a certain code path has been reached without having to look through the logs. You can also provide your own custom sounds in case you want to play an explosion for a particular bad crash.
To do so, just drop your sound files in this folder:
YOUR_HOME_DIRECTORY/Library/Sounds
debugging with xCode (pt 3) – Logging with break points
Logging with Breakpoints
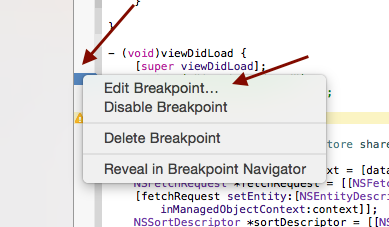
Say at a certain line in your code, you want to log some statements. You do so by first adding a breakpoint by clicking on the vertical strip of space on the left side of your source file. Then you right click on your breakpoint and select ‘edit break point’.
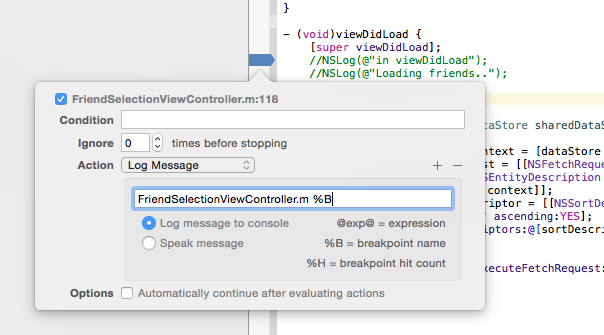
For option Action, select Log Message and type in some message you would like to appear. For example, the name of the file would be a good choice. Also, the name of the method you’re in is also another great choice. You do so by using %B.
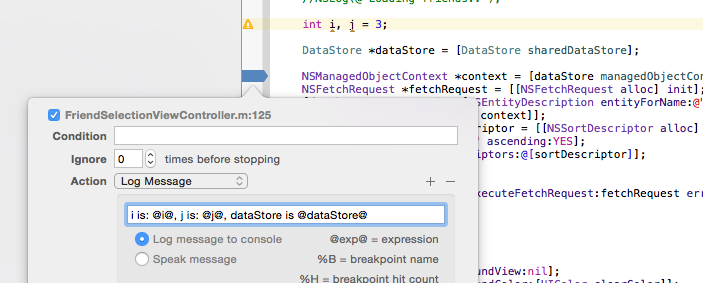
You can also log custom variables by putting variables in between %%
Now, execution will stop at your breakpoint and print out your log messages
However, say you want the execution to keep going. You’d check the “Automatically continue…” checkbox so that you get the logging and all that, but execution continues.
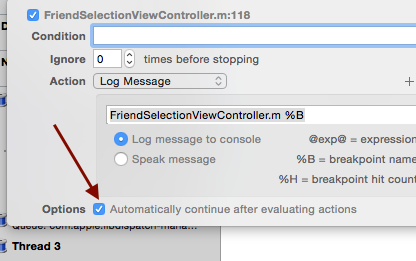
Now it just uses your breakpoint to do whatever Action you intended and continues on to the next one.
Voice Logging
Next to Action, there is a + and – button. Use the + button to add more actions. Select Log Message and there is a Speak Message option. Select it and it will voice your logs.
Debugger Command
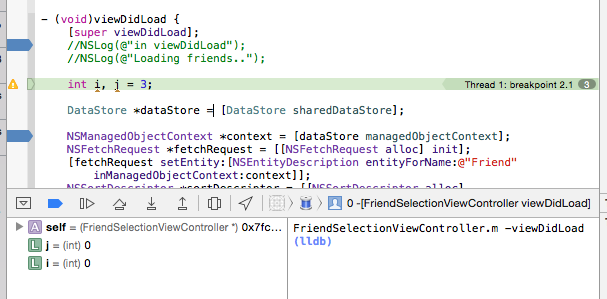
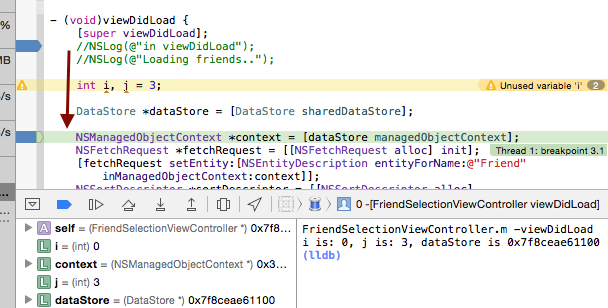
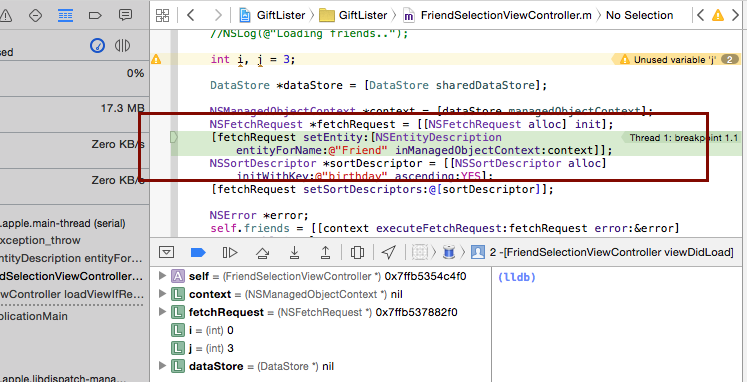
Add a breakpoint on a line right beneath a variable say:
|
1 2 3 |
int i, j=3; DataStore *dataStore = [DataStore sharedDataStore]; //add the breakpoint here |
Control click or right click the breakpoint, click ‘Edit Breakpoint’, then select select “Debugger Command” from the dropdown. In the text field type the follow:
|
1 |
po yourVariableName |
po is a debugger command that will print out the contents of an object. You can keep adding Actions >> Debugger Command and po-ing variables.
Logging with Date
Action >> Debugging command
|
1 |
expr (void)NSLog(@"dataStore: %@", dataStore) |
The expr command will evaluate an expression in real time. The expression command needs to know the actual type of the returning value, so a cast is necessary. Since there is no return type for NSLog, the return type is cast to a void value. Build and run.
You should now see the following:
2012-12-20 08:57:39.942 GiftLister[1984:11603] dataStore:
Being able to add NSLog messages via. breakpoints means you no longer have to stop the program just to log important data, there’s no chance of introducing new bugs because you are not touching the code, but best of all, there’s no last minute scrambles to remove all your debug statements the night before release.
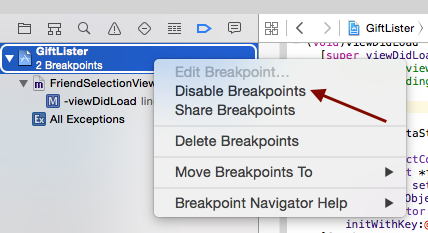
Disabling breakpoints before a release
Say you’re ready to turn in a release and you want to disable all the breakpoint logging. Simply go to your navigator and press the debug section. Then select ‘Disable breakpoints’ and that’s it. Now your code will run without all the breakpoint logging.
debugging with xCode (pt 2) – stopping at exceptions
Stopping at Exceptions
By default, when you run into an error, you’ll get a SIGART error that really does not tell us anything.
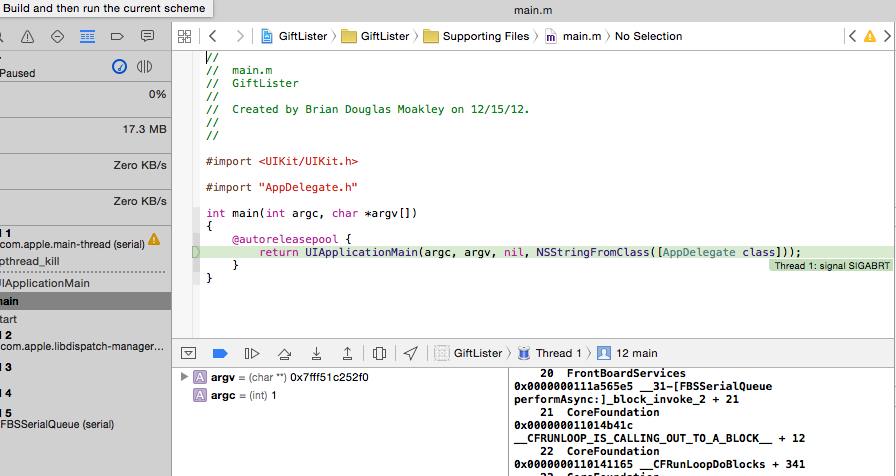
Currently, you cannot see the source of the compile error. To find it, you need to add an exception breakpoint to track down the source of the error.
So switch to the breakpoint navigator as shown below
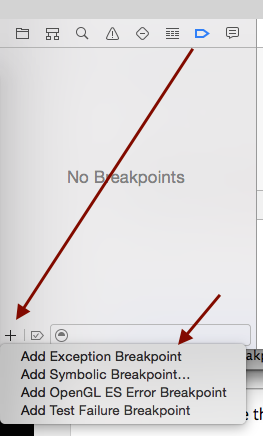
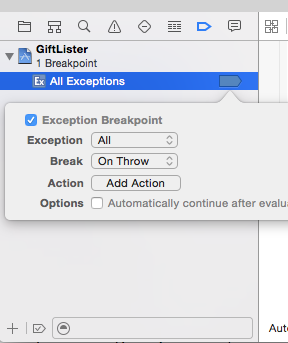
The Exception field gives you the option of activating the breakpoint in Objective-C, C++, or All. Keep the default option of All.
The Break field in the dropdown allows you to pause execution on whether an error is thrown or caught. Keep it selected on thrown. If you are actually making use of exception handling in your code, then select ‘On Catch’. For the purposes of this tutorial, leave it ‘On Throw’.
Now you’ll be able to see where the error occured.
Changing java version on mac terminal
recently had an issue where an application I wanted to run on Mountain Lion needed Java 7 as the default JVM on the machine. The install for the app in question worked without errors, but the issue was highlighted when trying to run the app.
Here’s how I fixed the problem.
Firstly, open Terminal and find out the current default Java version on your machine:
java -version
Download the Java 7 JDK from the Java SE site (http://www.oracle.com/technetwork/java/javase/downloads/index.html)
Run the installer. Now, for me this still didnt ensure that the updated Java version was the current one used by the system.
In Terminal, navigate to the following location:
cd /System/Library/Frameworks/JavaVM.framework/Versions/
The CurrentJDK symlink in this directory was still pointing to an older Java version. To resolve this, remove the symlink and create a new one pointing to the new Java 7 JDK (you may need to use sudo to run these commands):
rm CurrentJDK
ln -s /Library/Java/JavaVirtualMachines/jdk1.7.0_21.jdk/Contents/ CurrentJDK
This fixed it for me. To confirm, check the Java version once again in Terminal:
java -version
You should now see java version “1.7.0_21” (or similar).