Category Archives: C/C++/Objective-C

Variable Scope

All about braces

variable scope – the places from which a variable is accessible once it has been declared

Block Scope

Objective-C code is divided into sequences of code blocks and files that define the structure of a program. Each block, referred to as a statement block, is encapsulated by braces ({}). For example, a for loop typically contains a statement block:

In the above example, variable j is declared within the statement block of the for loop and as such is considered to be local to that block. This means that the variable can be accessed from within the for loop statement block but is essentially invisible and inaccessible to code anywhere else in the program code. Any attempt to access variable j outside the for loop will result in a compile error. For example:

2 j’s, different scope

An interesting side effect of variable scope within this context is that it enables us to have more than one variable with the same name as long as they are in different scopes. For example, we can have a variable named j declared outside the for loop and a variable named j declared inside the for loop. Although these variables have the same name they occupy different memory locations and contain different values. This can be illustrated using a simple application that contains two j variables:

For methods, pass it in, or declare it locally

In terms of variable scope, functions are really little more than statement blocks in that they are encapsulated in braces and variables declared within those braces are local to that function block.

The following example is intended to illustrate this concept and contains two functions named main() and multiply() respectively.

The reason for this error is that variables j and k are declared in the main() function and are, therefore, local to that function. As such, these variables are not visible to the multiply() function resulting in an error when we try to reference them. If we wanted to have access to the values of those variables we would have to pass them through as arguments to the multiply function, or specify them locally or globally.

Find Minimum recursive details

Code

Explanations

find_min_1

1) Original FindMin with parameter node of data 10 gets pushed onto the call stack.

2) is the node NULL? nope

3) does the node have a left ? Yes! Hence…

4) Let’s recursively call and go down the left side of the tree by using node->left as its parameter. We will return whatever we find down there.

5) Therefore, we push another FindMin function with parameter node->left onto the stack.
The node->left evaluates to node with data 5.

find_min_2

1) for function FindMin with parameter node of data 5, we evaluate if the node is NULL. nope

2) does the node have a left? yes! Hence…

3) Let’s recursively call another FindMin and go down the left side of the tree by using node->left as the parameter. We will return whatever we find down there. node->left evaluates to node with data 1.

4) We push FindMin function onto the call stack with node with 1.

find_min_3

1) In FindMin function with node data 1, node is not NULL.

2) FindMin with node data 1 block node data 1’s node->left points to NULL, hence we need to return this node of data 1.

This means that we’ve reached the far end of the left side of the balanced sorted binary tree. A sorted binary tree just means that it keeps its smallest items at the left most, and largest item on its rightmost. It does this by comparing its current node, and shifting all larger nodes to the right, and shifting all smaller nodes to its left.

3) FindMin with node data 1 block returns node with data 1’s address.

4) FindMin with node data 1 block pop this FindMin with parameter NULL

5) FindMin with node data 5 block return node with data 1.

6) FindMin with node data 5 block pop FindMin with node data 5.

7) FindMin with node data 10 block return node data 1. See 5)

8) FindMin with node data 10 block pop FindMin with node data 10.

Insert Node recursion steps

First we are given the tree at node 5
insert_node_1

1) We push function insert onto the stack with the parameter of a node with data 5.

2) We check to see if the node with data 5 is NULL or not. It is not, so we move on.

3) the data we want to insert is less than 5

4) thus we go down the left side of the tree because the data we want to insert, 2, is less than the current node’s data of 5. We travel left down the node tree by pushing another insert function with the parameter of the left side of our node, which is node->left.

The call^r means we call the insert function recursively. The insert function returns the node that it represents, which is also a node tree. Hence we need to point our node->left to whatever node tree the recursion function returns.

5) node->left evaluates to node with data 1. Hence, we push function insert onto the stack with the parameter of a node with data 1.

insert_node_2

1) Once function insert with node data 1 gets pushed onto the stack, we then evaluate to see if that node is NULL. Obviously, it is not.

2) The data we want to insert, 2, is bigger than current node data of 1.

3) Thus, we want to travel towards right. We go down the right side of the tree by pushing another insert function with the parameter of the right side of our current node, which is node->right.

The call^r means we call the insert function recursively. The insert function returns the node that it represents, which is also a node tree. Hence we need to point our node->right to whatever node tree the recursion function returns.

We need to assign node->right to whatever node tree the recursion function returns.

4) node->right evaluates to NULL. We push function insert with parameter NULL onto the stack.

5) We see that the parameter is NULL, which means we reached to the end and is ready to place our insertion data 2 here. We create a new node of data 2.

6) We return this newly created node.

insert_node_4

1) Then we pop the insert function with parameter NULL.

2) We now continue where we left off from insert function with parameter node of data 1. We had its right point to whatever the recursive insert returns. The recursive insert function returned newly created node of data 2. Thus, we assign the parameter node of data 1’s right to the newly created node of data 2.

3) We then continue execution and return the current node of data 1.

4) We pop insert function with node of data 1.

insert_node_3

1) We now continue where we left off at insert function with parameter node of data 5. We had our left point to whatever the recursive insert returns. The recursive insert function returned node of data 1’s address and we have our current node 5’s left point to it.

2) Then we reach the end of the function definition by returning the current node with data 5.

3) Finally the original insert function starting with node of data 5 gets popped off the call stack.

doll recursive function

Code

1

a) function doll(10) gets pushed onto the stack.
b) evaluates that 10 != 0
c) outputs 10
d) calls recursive function doll(10-1). Thus doll(9) gets pushed onto the stack.

3

WE keep going in the same manner until we hit to doll(1)
a) we push doll(1)
b) evaluates that 1!=0
c) prints 1
d) calls recursive function doll(1-1)
e) doll(0) gets pushed onto the stack
f) evaluates that 0==0
g) thus prints “reached 0”
h) execution runs to end, pops doll(0)

4

a) doll(0) pops from the return. Remember, a function pops whenever we hit the end of code, or returns.
b) We then arrive at where we left off at the recursive call in doll(1).
c) we come to end of function in doll(1), so we pop doll(1).

2

We continue popping in the same manner until we get to doll(8-1)…

a) execution runs to end of doll(8), we pop doll(8)
b) we continue where we left off at doll(9-1)
c) we run to end of function for doll(9), we pop doll(9)
d) we continue where we left off at doll (10-1)
e) we run to end of function at doll(10), we pop doll(10)

printnum recursion details

The Function

printnum

a) the first printnum with a parameter of 1, printnum(1), gets pushed onto the stack.
b) prints 1
c) evaluates the if statement that 1 < 9 d) calls recursion method printnum(1+1) printnum1

a) printnum(2) gets pushed onto the stack
b) method prints 2
c) evaluates the if statement that 2 < 9 d) calls recursion method printnum(2+1) printnum2

we continue in this manner until printnum(1) to printnum(8) gets pushed onto the stack…and their corresponding couts get printed in the console.

a) printnum(9) gets pushed onto the stack.
b) print start 9
c) the if statement evaluates to false.
d) Then the next statement is to print ‘end: 9’

printnum3

a) After the printing of ‘end: 9’, our execution arrow hits the end of the function. Thus, printnum(9) gets popped off the stack.
b) We then resume execution at the recursive call that happened at printnum(8)
c) execution arrow moves down and prints ‘end: 8’
d) execution arrow hits end of function at printnum(8). printnum(8) gets popped off the stack

printnum4

a) printnum(8) gets popped off stack
b) resume execution at recursion call inside of printnum(7)
c) execution arrow moves down and prints ‘end: 7’.
d) execution arrow hits end of function at printnum(7). printnum(7) gets popped off stack

printnum6

So we keep going until…

a) we come to the recursive call in printnum(2) function.
b) execution arrow moves down and prints ‘end:2’
c) execution arrow hits end of function printnum(2). Thus, printnum(2) gets popped off the stack.
d) resumes execution at recursive call inside of printnum(1)
e) execution arrow move down and prints ‘end: 1’.

using @synchronize to solve Mutual Exclusion

ref – http://stackoverflow.com/questions/28005734/making-a-class-thread-safe-in-ios

mutual exclusion refers to the requirement of ensuring that no two concurrent processes[a] are in their critical section at the same time; it is a basic requirement in concurrency control, to prevent race conditions.

A race condition or race hazard is the behavior of an electronic, software or other system where the output is dependent on the sequence or timing of other uncontrollable events. It becomes a bug when events do not happen in the order the programmer intended. The term originates with the idea of two signals racing each other to influence the output first.

Example using @synchronized:

member variables

method definitions

applicationDidFinishLaunch

result:
2015-04-05 11:30:38.080 YonoApp[336:27030] incrementing player A gems
……
2015-04-05 11:30:38.084 YonoApp[336:27030] incrementing player A gems
2015-04-05 11:30:38.084 YonoApp[336:27030] decrementing player B gems
….
2015-04-05 11:30:38.091 YonoApp[336:27030] decrementing player B gems
2015-04-05 11:30:38.091 YonoApp[336:27030] transferToPlayerA – player A now has 120 gems
2015-04-05 11:30:38.091 YonoApp[336:27030] transferToPlayerA – player B now has 80 gems

2015-04-05 11:30:38.093 YonoApp[336:27031] decrementing player A gems
……..
2015-04-05 11:30:38.099 YonoApp[336:27031] decrementing player A gems
2015-04-05 11:30:38.099 YonoApp[336:27031] incrementing player B gems
……
2015-04-05 11:30:38.106 YonoApp[336:27031] incrementing player B gems
2015-04-05 11:30:38.107 YonoApp[336:27031] transferToPlayerB – player A now has 100 gems
2015-04-05 11:30:38.107 YonoApp[336:27031] transferToPlayerB – player B now has 100 gems

Using self.mutex, if thread 1 is running transferToPlayerA locking on self.mutex, thread 2 cannot run transferToPlayerB because it sees that self.mutex is locked.

Once thread 2 finishes running, it will unlock self.mutex, in which thread 2 can then lock on it and run transferToPlayerB.

This behavior allows thread 1 to modify both playerAGems and playerBGems atomically, that is, without someone else mucking around in between. When thread 1 is done, @synchronize unlocks the self.mutex, which then allows thread 2 to continue running with it holding the lock on the mutex.

Thread safety means that the data can be accessed and/or modified by multiple threads without becoming corrupt.

If you were to take away the @synchronize, you’d be getting both threads changing self.playerAGems and self.playerBGems at the same time, which is by definition, is a race condition where the output (number of gems) is dependent on the sequence or timing of other uncontrollable events such as the speed execution of our threads and how it runs.

Safe Queue

One simple and classic approach is to use Objective-C’s @synchronized capability.

In this case, @synchronized(self.data) around all of your accesses to the array will ensure that only a single thread can access the array at a time.

Even though length doesn’t modify the array, you still need to protect its access because another thread could potentially modify the array –

Using Block in Objective C by example

Overview

Say we have a class called SPFPriceFetcher that uses JCDHTTPConnection.

SPFPriceFetcher
|
|—JCDHTTPConnection

JCDHTTPConnection uses NSURLConnection connection where any data, finish loading, or response received would have to give feedback BACK to SPFPriceFetcher. We give feedback by retaining and using block definitions passed in from SPFPriceFetcher.

Passing block definitions from parent (SPFPriceFetcher) to child (JCDHTTPConnection)

Basically what happens is that SPFPriceFetcher provides block definitions for JCDHTTPConnection to retain and use:

SPFPriceFetcher — OnSuccess block definition —-> JCDHTTPConnection
SPFPriceFetcher — OnFailure block definition —-> JCDHTTPConnection
SPFPriceFetcher — OnDidSendData block definition —-> JCDHTTPConnection

where the block interface is defined in JCDHTTPConnection.h as:

Using blocks

1) When you declare a method interface that takes such block definitions, you need to have the block interface as defined by the typedefs above.

JCDHTTPConnection.h

Then in your block definition, you would use the block definitions as a variable. In our definition, we retain them:

JCDHTTPConnection.m

Now when the NSURLConnection runs to connectionDidFinishLoading, we use our retained block definitions and call them:

For example, self.onSuccess will call the block definitions you retained that was passed in from SPFPriceFetcher earlier. It will pass the needed parmaters NSHTTPURLResponse (self.response) and NSString * (self.body) in for it to process.

In SPFPriceFetcher.m, we pass in the block definition like so:

As you can see, when we provide block definitions, we simply use “^” to denote that its a block, and then use the block interface and continue with the code implementation. We just have to make sure to match the block interface.

For example, in our case we know that OnSuccess block takes is defined as:

OnSuccess block definition

and thus, we first denote “^” as a block, then match the block interface by having the parameters be NSHTTPURLResponse and NSString. We then write the method implementation.

OnSuccess block definition we pass in:

OnFailure block definition

Same thing with the OnFailure block definition.
We first note “^” to denote that its a block definition. Then we provide the interface needed by the OnFailure block definition as shown:

OnFailure block definition we pass in:

copy and mutableCopy of NSMutableString

For NSMutableString AND NSString

say we have:

If you use

it will return you an immutable object (NSString*) with its own address. This means you cannot change the data.
Hence, even if you declare a NSMutableString pointer, and use setString to change the data, the compiler will give you an exception.

if you use [temp mutableCopy], it will return an mutable object (NSMutableString*) with its own address.
However, be sure that you declare a NSMutableString * so that you can use setString to change the data and see the difference.

Shallow and deep copy of NSArray

copying NSArray

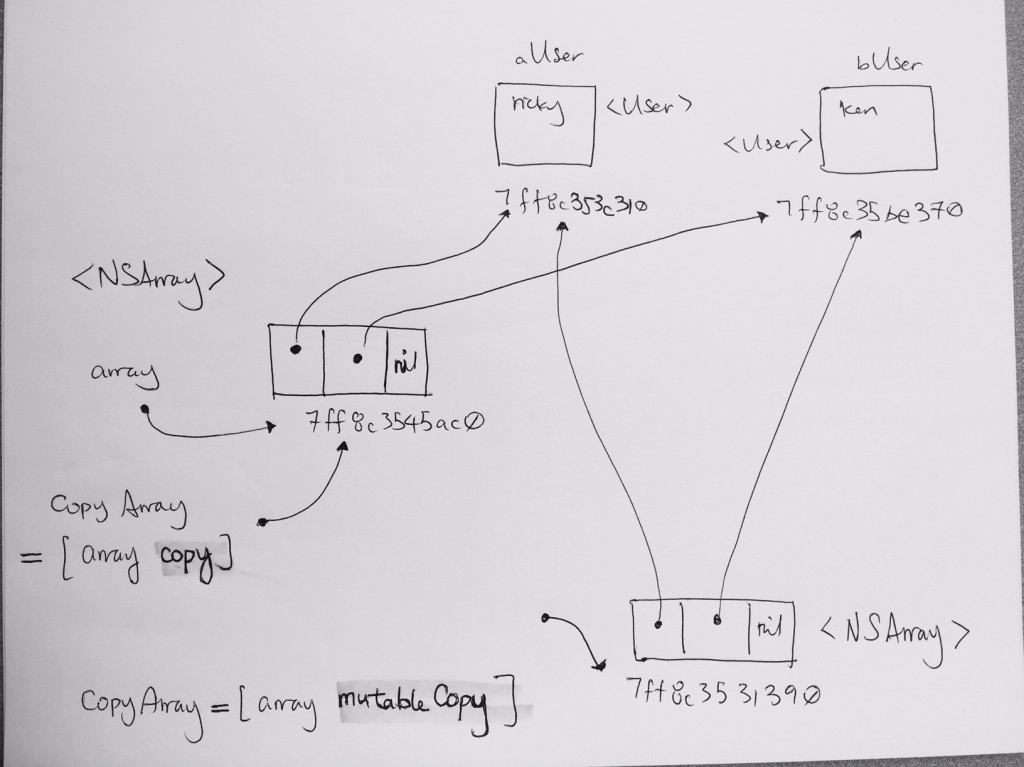
If we are to use [NSArray copy]. The source array and copy array are pointing to the same address.

If we are to use [NSArray mutableCopy]. The source array and copy array have created their own NSArray, and thus have different addresses.

However, the User pointers inside the copy array points to the same Users pointed to by the source array. This is shown in the image. Thus, after using [NSArray mutableCopy], array and copyArray may have different array objects, but they all point to the same User objects.

Simple pointing

Run the source code and debug it. Analyze the the variables and their addresses.

Basically, this is what’s going on:

nsarray_copy

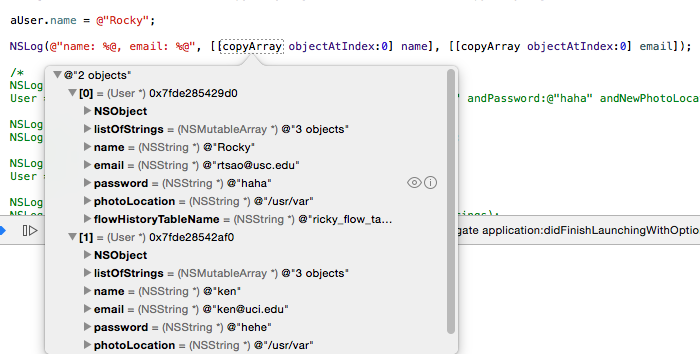
When we’re doing a shallow copy, changing the name ‘ricky’ to ‘rocky’ will also reflect in the copyArray. Because the source array and copyArray are pointing to the same Users.

Shallow Copy

If you want a shallow copy, change copying to mutable copy

In mutable copy, copyArray will have its own array. Look at the bottom portion of the image above. So if you use a NSMutabeArray to receive the return value from mutableCopy, you can add and remove objects. In our image, I used NSArray, and since its immutable, I won’t be able to add or remove array data. Its up to you to decide which one to use.

In other words, you end up with two distinct arrays, so if you were to remove or add items from one array, it wouldn’t affect the other array. However, the items in the two arrays are identical right after the copy.

Therefore, notice that the Users the source array and its mutable copy array pointing to are the same:

Screen-Shot-2015-03-17-at-7.41.46-PM

Screen-Shot-2015-03-17-at-7.41.55-PM

In order to do a deep copy, you would have to make a new array, and each element of the new array would be a deep copy of the corresponding element of the old array.

Deep Copy

Now, if you were to look at the User’s addresses. They are all different in the 2 distinct arrays. Changing the User at index 0 in array 1, will not affect the User at index 0 in array 2.

Screen-Shot-2015-03-17-at-7.34.40-PM

implementing NS Copying

REF: http://stackoverflow.com/questions/4089238/implementing-nscopying

User.m