https://github.com/DigitalLeaves/FlawlessTablesAndCollectionViews
Flawless UICollectionViews and UITableViews
https://medium.com/capital-one-developers/smooth-scrolling-in-uitableview-and-uicollectionview-a012045d77f
Image flashes demo (The problem)
no flashes demo (The solution)
First, some background
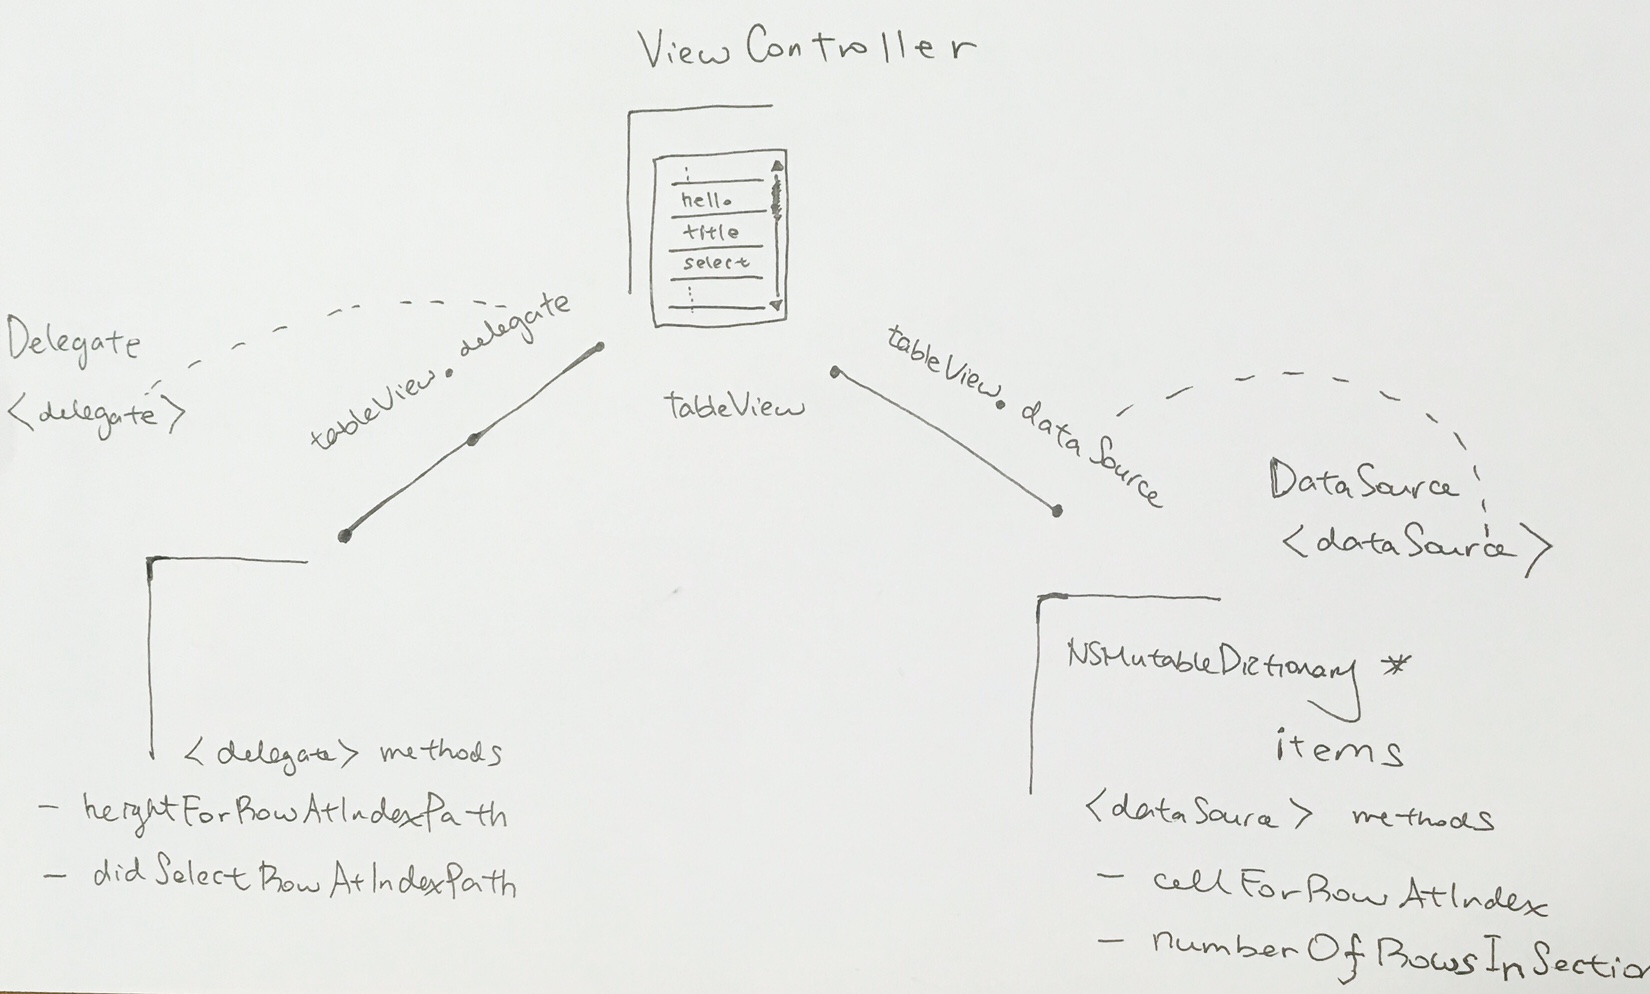
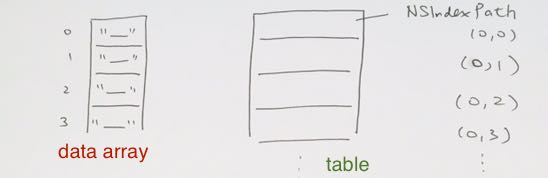
tableView:cellForRowAtIndexPath: and collectionView:cellForItemAtIndexPath: are called whenever a new cell has to be displayed
The cells have an NSIndexPath[section-row] to identify its position.
In order to get the NSIndexPath of the cell, use
|
|
tableView.indexPath(for: UITableViewCell) |
There is an array that stores the data to be displayed for the cells.
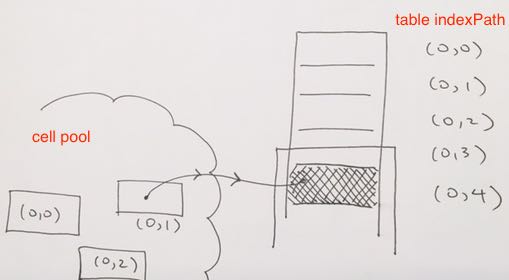
Cells, unlike data in the array, are re-used for efficiency. Thus, they do not stay in place. When a cell with data is about to be displayed, cells are dequeued ( or allocated when there is no cells ). The table will assign the current IndexPath to it, then set data onto it.
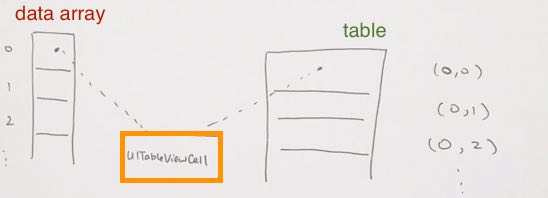
In detail, the cells are kept in a pool where they are dequeued and served as they are needed.
When you ask for a cell with dequeueCellWithReuseIdentifier: a new one is created if and only if there’s no previous created cell that can be served.
Objective C version
In objective C, as you can see, we first ask the pool to return us a cell to use.
If its nil, which means the pool does not have spare ones, we need to allocate and create our own.
Once created, we can start settings it properties, and then return it to the class to be displayed.
|
|
- (UITableViewCell *)tableView:(UITableView *)tableView cellForRowAtIndexPath:(NSIndexPath *)indexPath { UITableViewCell *cell = (UITableViewCell*)[tableView dequeueReusableCellWithIdentifier:@"tvcItems"]; if(cell==nil) { cell = [[UITableViewCell alloc] initWithStyle:UITableViewCellStyleDefault reuseIdentifier: @"tvcItems"]; } [cell.textLabel setText:[self.myData objectAtIndex:[indexPath row]]]; return cell; } |
Swift version
In swift, it combines the re-use or creating a new one in one method call of dequeueReusableCell.
|
|
func tableView(_ tableView: UITableView, cellForRowAt indexPath: IndexPath) -> UITableViewCell { // create a new cell if needed or reuse an old one let cell:UITableViewCell = self.tableView.dequeueReusableCell(withIdentifier: cellReuseIdentifier) as UITableViewCell! // set the text from the data model cell.textLabel?.text = self.animals[indexPath.row] return cell } |
Example
So, let us go ahead and see how it all starts out. When the table or collection view first start out, it sees that the the visible rows needs to be displayed.
First, it looks at the first row at index (section 0, row 0), and that it needs to display that cell.
It goes into delegate method cellForRow and tries to dequeue a cell. Because we are just starting out, our cell pool will be empty. Thus, get a new freshly allocated cell for us to use. We assign its display properties (namely, text, color, etc). In our case we simply assign the text property to something. Say, a string “one”.
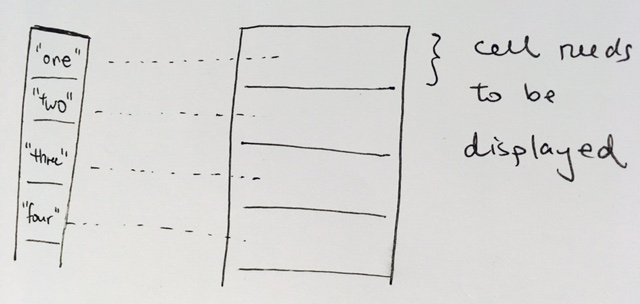
It then goes to the second row at index (section 0, row 1) and does the same thing. It will see that the cell pool is empty, and thus creates a new cell. We assign its display properties, and give it a strong “two”.
This applies for the rest of the cells that needs to be drawn on the table. Say if 8 cells are showing, usually table will allocate a few more cells, say 10. Take note that even though cells 9 and 10 are allocated, its indexPath will be nil because it is not shown by the table yet Once they are shown, their indexPath will be assigned an IndexPath.
Scrolling up, reusing those cells
At this point, we have successfully created table view cells, set their properties, and have displayed the data in the table.
The cell pool is still empty because we are currently using all of the cells. In other words, they are on display.
Now, the user uses their finger and swipes up. The whole table scrolls up one page.
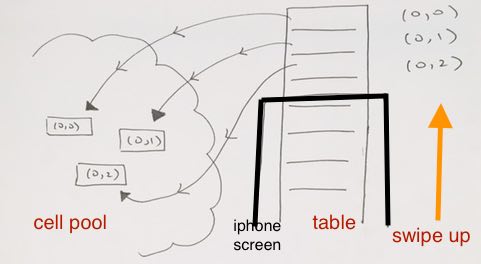
At this point, the first row at index (section 0, row 0), disappears off the screen. The cell object representing that row gets queued into the cell pool.
then the second row at index (section 0, row 1), disappears off the screen. It also gets queued into the cell pool…
As each on display cell disappears off screen, they get “re-collected” into the cell pool.
But! As each row disappears, new rows from the bottom appears right!?
We need to make sure they are drawn. So at this point, say, (section 0, row 4) starts to appear and it needs display.
It runs through delegate method cellForRow for (section 0, row 4) and tries to dequeue a cell.
|
|
func tableView(_ tableView: UITableView, cellForRowAt indexPath: IndexPath) -> UITableViewCell { ... ... } |
It gets a cell object that (section 0, row 1) was previously using.
(section 0, row 1) have disappeared off screen and is not using its cell anymore. It has returned its cell back to the cell pool.
Take note that when the cell (which was previously used by row 0) is dequeued for (section 0, row 4), the tableView will changes the cell’s indexPath to (0,4). Thus, this signifies that this cell now represents for tableView’s section 0, row 4 now.
|
|
// create a new cell if needed or reuse an old one let cell: UITableViewCell = self.tableView.dequeueReusableCell(withIdentifier: cellReuseIdentifier) as UITableViewCell! |
Hence the cell variable we get back is a valid object with our designated IndexPath of (0, 4)
Even though the cell’s IndexPath now is (0,4), its data has not been “cleaned” or “zeroed”, so it has the same configuration it had. In other words, that cell’s property text still has the previous string in it. And thus, as we dequeue that cell object for row 4, we over-write the text property with whatever row 4’s string is.
|
|
... // set the text from the data model cell.textLabel?.text = self.animals[indexPath.row] ... |
Then we properly return the cell object.
Note that the disappearing and appearing of the cells are determined by the TableView or Collection class. It may enqueue a bunch of disappearing cells first into the cell pool, then allow appearing cells to dequeue them. Or they may simply do it one by one.
The Problem
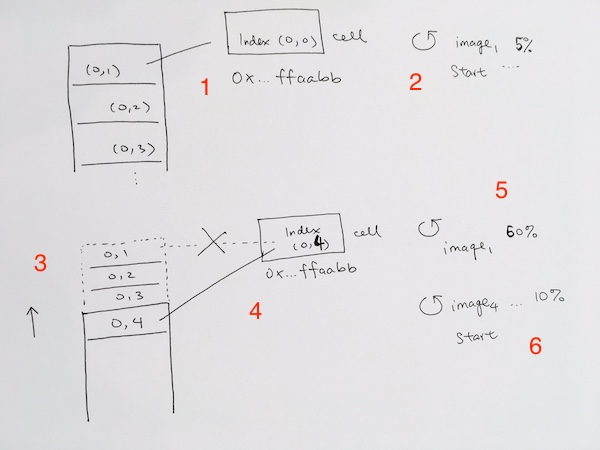
1) When the first cell is loaded, it uses dequeueReusableCellWithIdentifier and gets a fresh cell object with address 0x…ffaabb.
2) It then uses the singleton ImageManager and starts doing a async download operation for image 1.
3) The user then swipes up. This makes the cell go out of display, and thus, the cell objects gets put into the cell pool, with its indexPath assigned to nil.
4) As the first row disappears, the 4th row appears, it uses dequeueReusableCellWithIdentifier cell and gets the cell object 0x…ffaabb from the cell pool. This cell was JUST used by row 1.
5) At this point, image 1 download progresses to 50%.
6) Due to 4) with its cell visible, it starts another async image download operation in singleton ImageManager. Image 4’s download progresses to 10%.
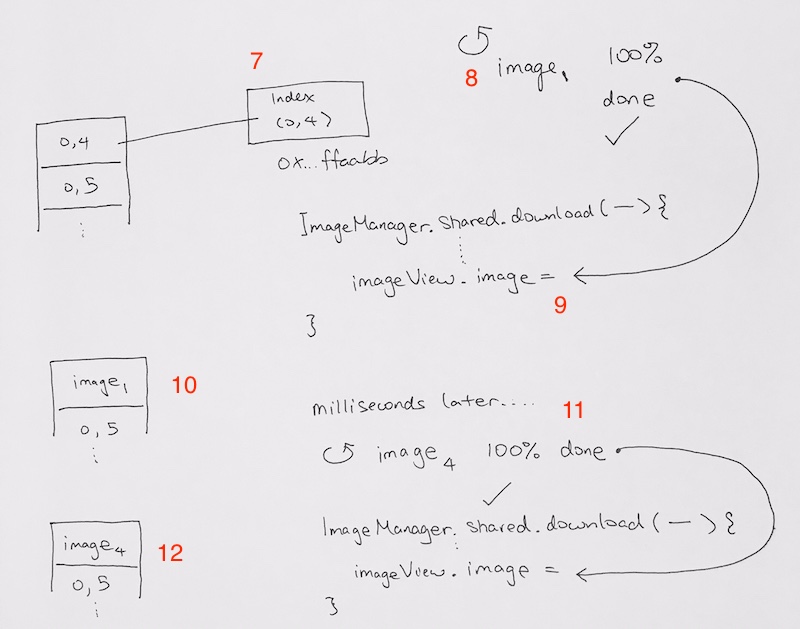
7) With row 4 fully visible, it now has the cell object, and is downlading Image 4.
8) Image 1 finishes downloading.
9) Our closure in the cellForRow method points to the cell 0x…ffaabb. It then assigns cell 0x…ffaabb’s imageView.image to image1.
10) Now, for a split second, the image on row 4 is of image1.
11) Then a second later, image 4 finishes downloading, and thus in the same manager as 9), the closure code from cellForRow assigns 0x…ffaabb’s imageView.image to image 4.
12) Even though row 4 now correctly depicts image4 as intended, steps 9) to 11) creates a flash of of image 1 switching to image 4. The user can see it, depending on how slow the download speed is, and thus, is the problem we’re trying to solve.
Async Operations and when they complete
So, instead of doing instantaneous data assignments, we need to do async operations that may take a few seconds. Then after a certain amount of seconds is over, it comes back and updates our UI.
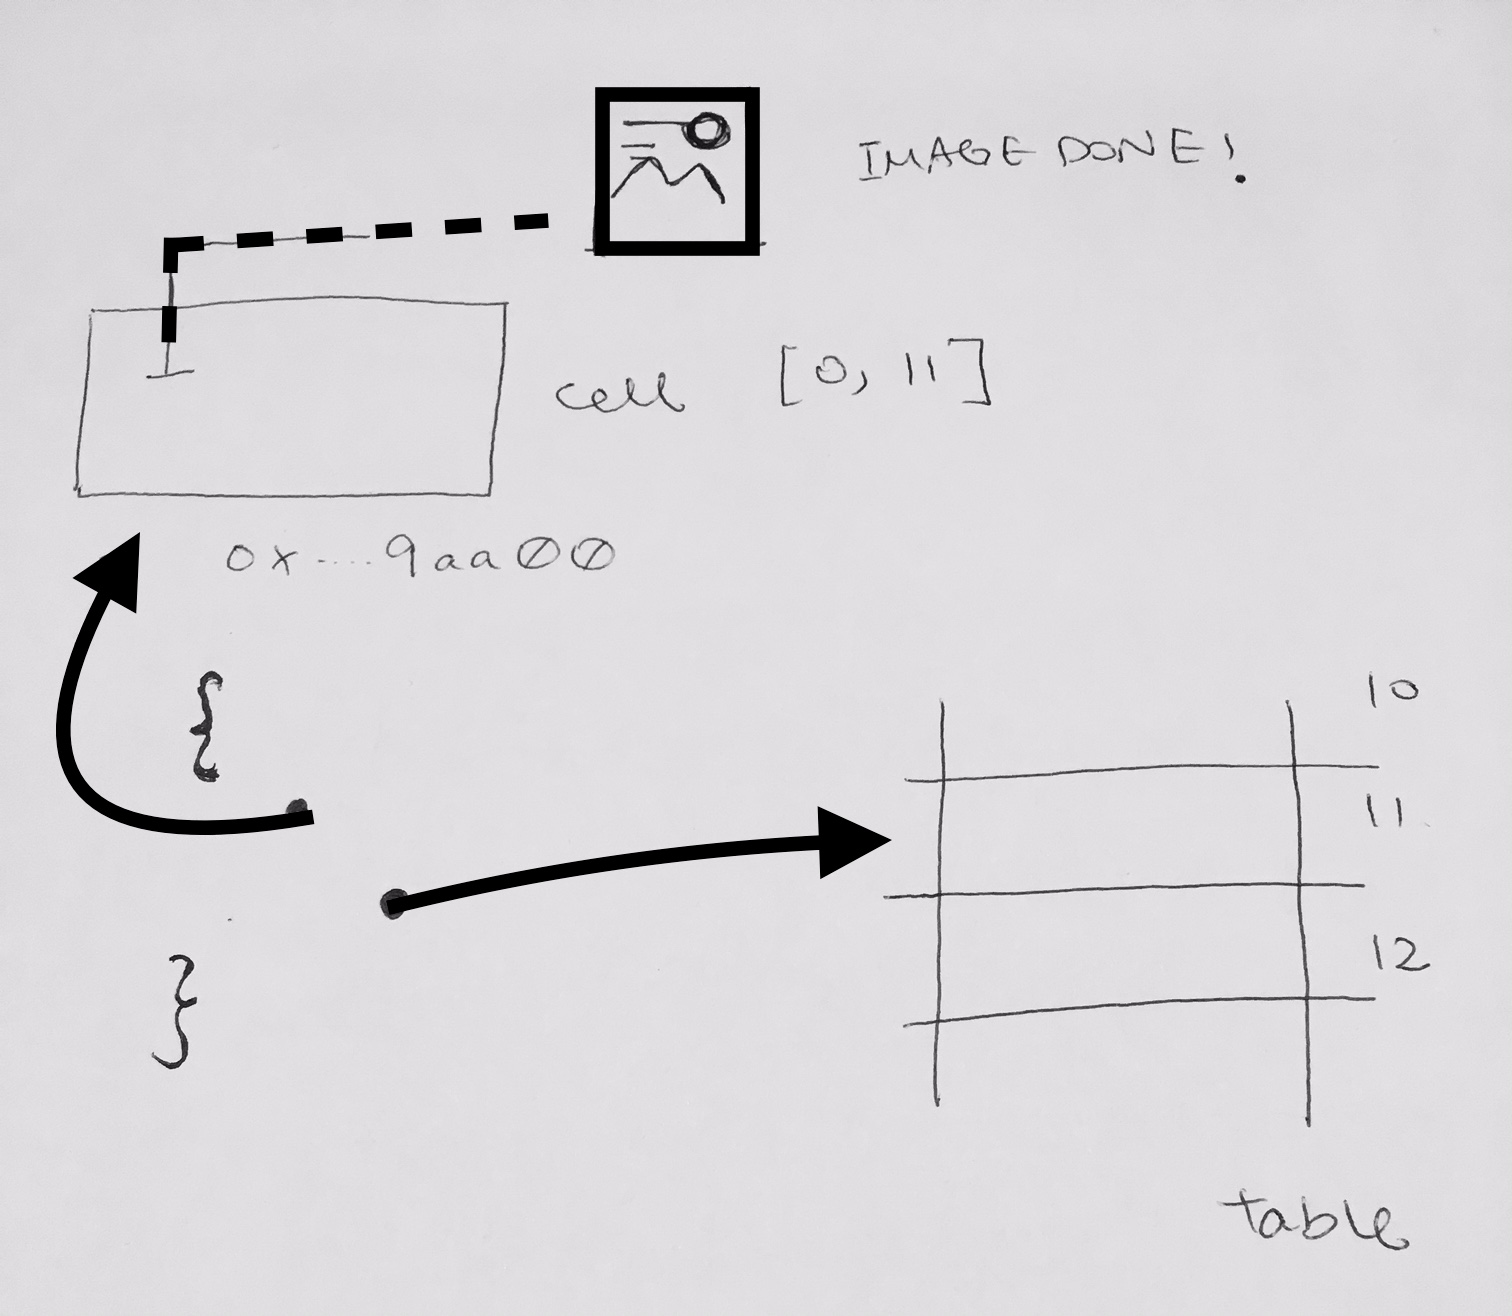
1) cellForRow hits dequeue cell and gets cell 0x…9aa00
|
|
let cell = tableView.dequeueReusableCell(withIdentifier: "LazyLoadTableViewCell", for: indexPath) print(Unmanaged.passUnretained(cell).toOpaque()) //cell has 0x...9aa00 |
2) Each row of the table matches up to the index of the URL array that gives us a string URL to download an image. cellForRow’s indexPath provides the index and we use that index to get the url from the data array.
|
|
let imageURL = images[(indexPath as NSIndexPath).row] |
we will be using this imageURL and use the Downloader singleton to download that image
3) The Downloader singleton uses the url and literally downloads the image. When its done, it hits up a closure to update the table UI
|
|
ImageManager.sharedInstance.downloadImageFromURL(imageURL) { (success, image) -> Void in // closure } |
4) This here is the most important part. Once the download is done. It hits a closure. The closure references
the cell (that was dequeued for this table row), and the table IndexPath.
It references the cell because we want to see which indexPath it is representing
|
|
let aCellIndexPath = (tableView.indexPath(for: cell) as NSIndexPath?)?.row |
It references the table IndexPath to know which row index was assigned to this operation.
|
|
let indexRow = (indexPath as NSIndexPath).row |
Code is below:
1 2 3 4 5 6 7 8 9 10 11 12 13 14 15 16 17 18 |
ImageManager.sharedInstance.downloadImageFromURL(imageURL) { (success, image) -> Void in if success && image != nil { let aCellIndexPath = (tableView.indexPath(for: cell) as NSIndexPath?)?.row guard let cellIndex = aCellIndexPath, aCellIndexPath != nil else { print("processing Cell's index is nil. RETURNING Ø") return } let indexRow = (indexPath as NSIndexPath).row if (aCellIndexPath == indexRow) { imageView.image = image } else { print("HO NO! cell dequeued (or allocated) has index [\(cellIndex)], index path is [\(indexRow)], DO NOT MATCH!!!! NO SETTING OF IMAGE") } } } |
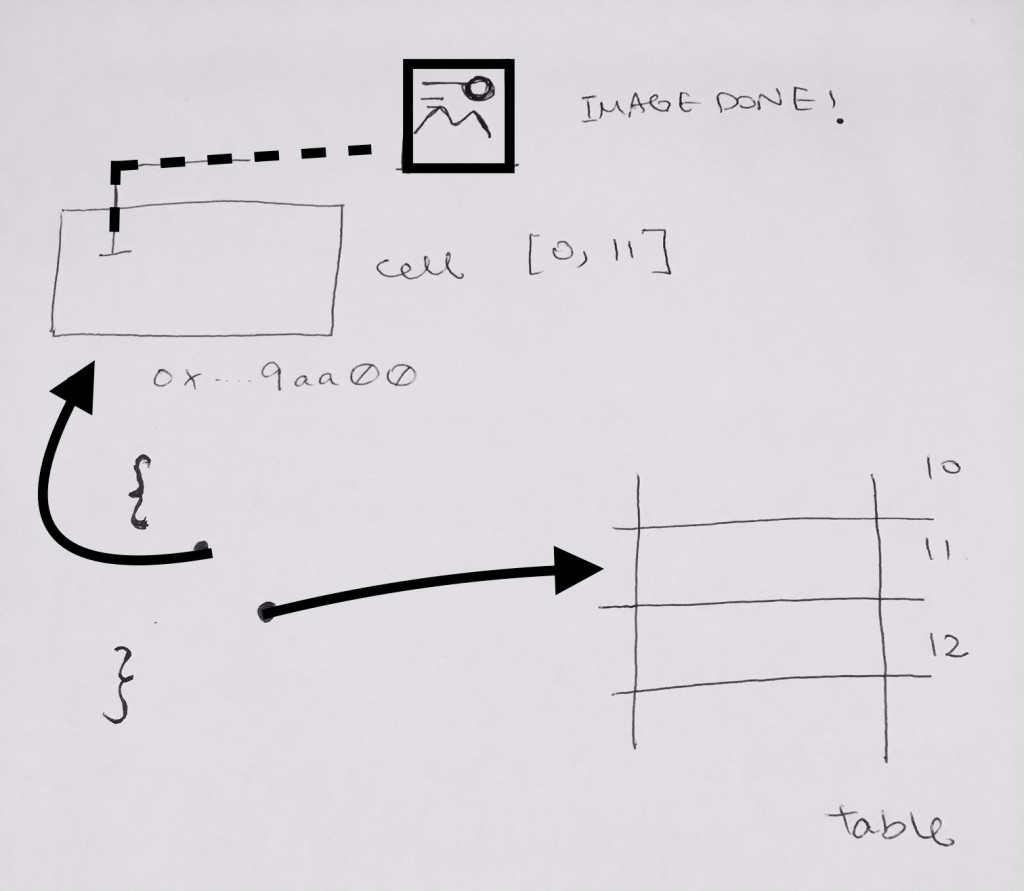
Now in normal circumstances, the cell dequeued for say table row 11 has IndexPath [0, 11]. Table view IndexPath is [0, 11].
The Downloader finishes downloading the image, puts it in cache, and then calls our closure for completion.
It sees that IndexPath of the cell that’s we’re referencing is valid and is [0, 11]. This means as far as the cell is concerned, it is on display for row 11.
(If the IndexPath is nil, it means even though the cell is alive, it is not used by any table rows and not on display yet)
Furthermore, the indexPath of the table is [0, 11]. This means we’re currently processing for that row. Hence, due to:
1) cell’s IndexPath is representing and on display for row 11
2) cellForRow delegate method is called for table row 11
we can safely assign the downloaded image onto this cell.
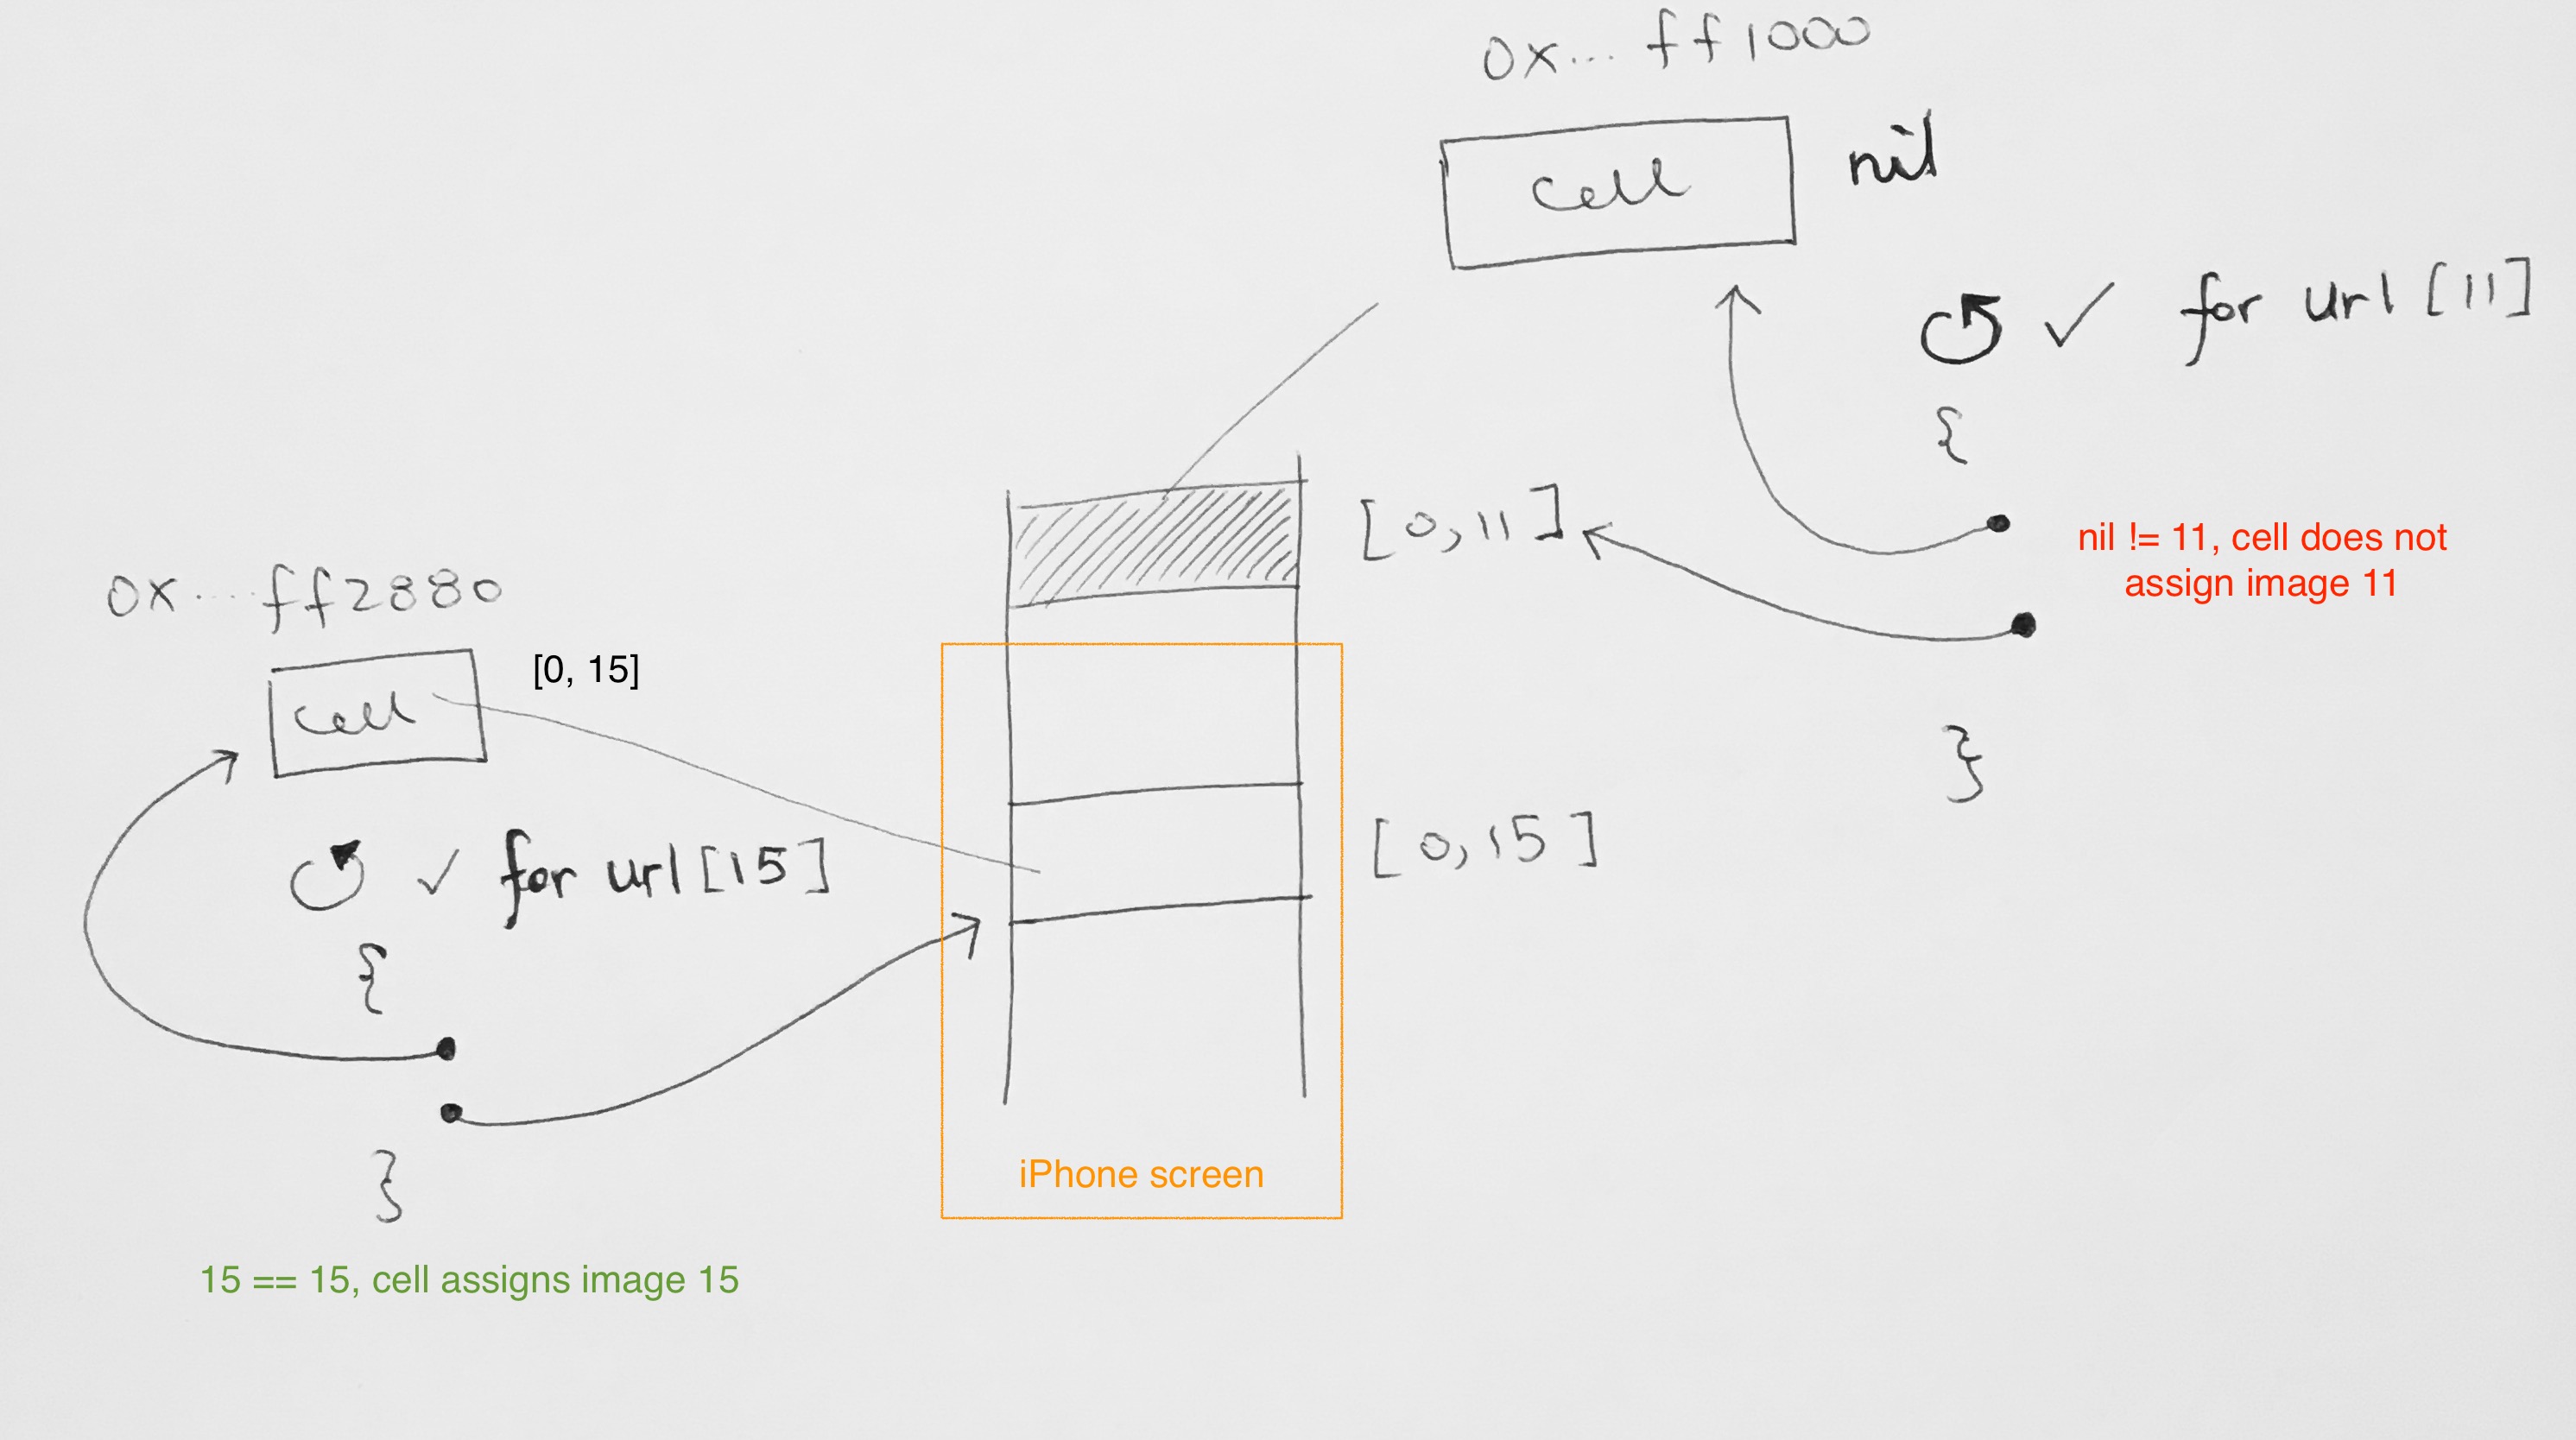
Start download, cell scrolls off screen, download finishes
Let’s say we’re on row 11 and it starts to download an image.
It gets an URL from data[11]
Uses that URL and starts downloading image 11.
Then all of a sudden, the user scrolls row 11 out of view.
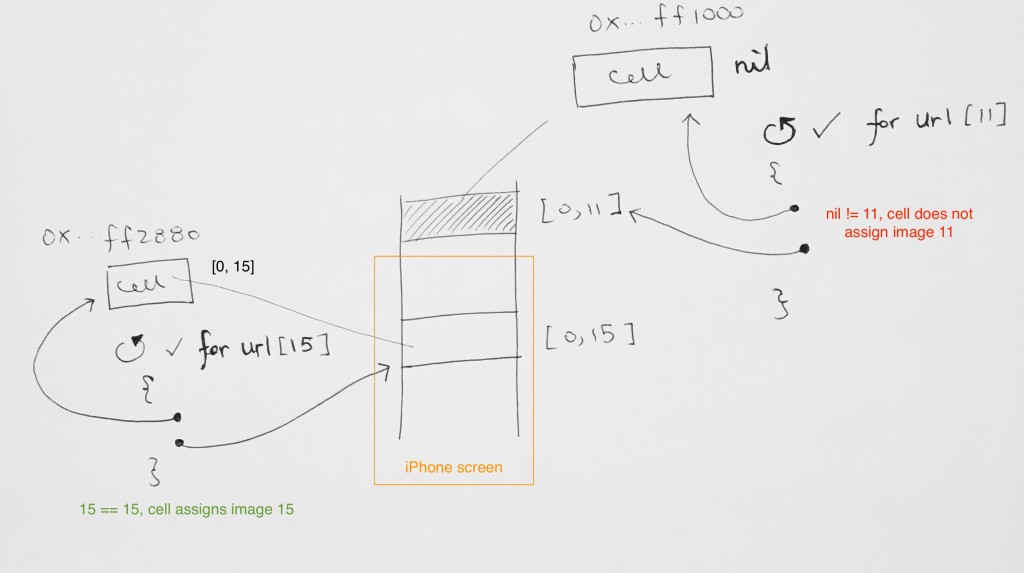
At this point 2 things happen:
1) cell for row 11’s indexPath gets set to nil because it is not on display anymore
2) row 15 appears, and dequeues a cell for usage.
1)
the download for image 11 completes! It runs to the closure. Notice 2 things. The closure references 2 important things:
– the cell that just before represented row 11. Its IndexPath is now nil because it is not only display anymore.
– the index of the cellForRow that is calling this closure (11)
We do a comparison and see that nil != 11, thus we don’t assign image 11 to cell’s imageView.
2)
On the other hand, row 15 appeared and dequeues a cell. It starts downloading the image, the image finishes and hits the closure. The closure references 2 things:
– the cell with IndexPath [0, 15] because it is visible
– the index of the cellForRow that is calling this closure (15)
We do a comparison and see that 15 == 15. Thus, we assign the JUST downloaded image for cell with IndexPath [0, 15].
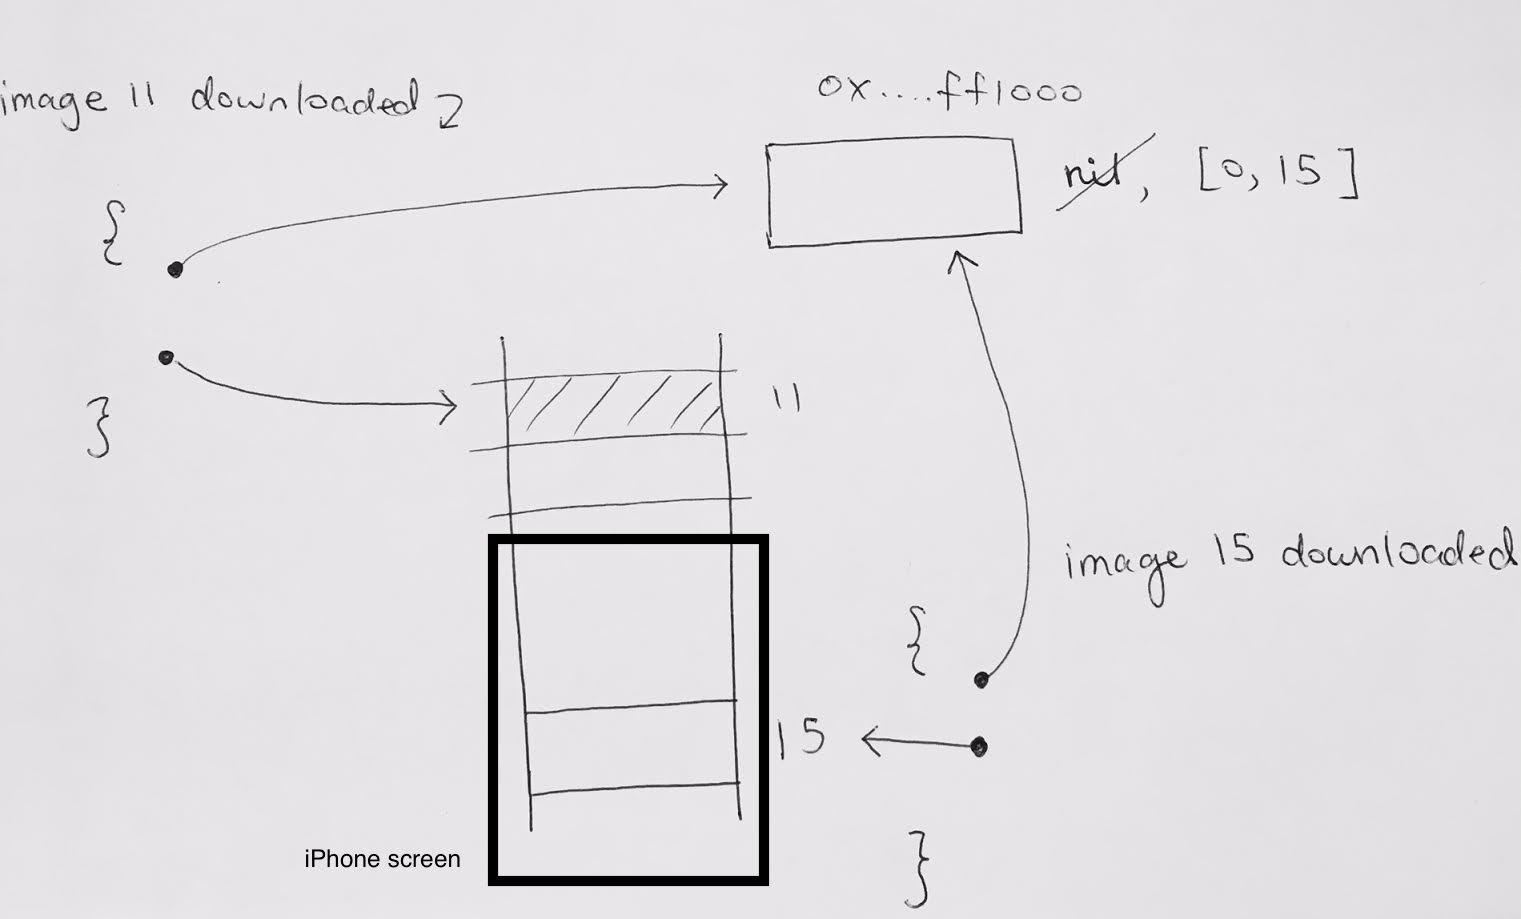
Not visible offscreen cell gets taken by a row that is now visible
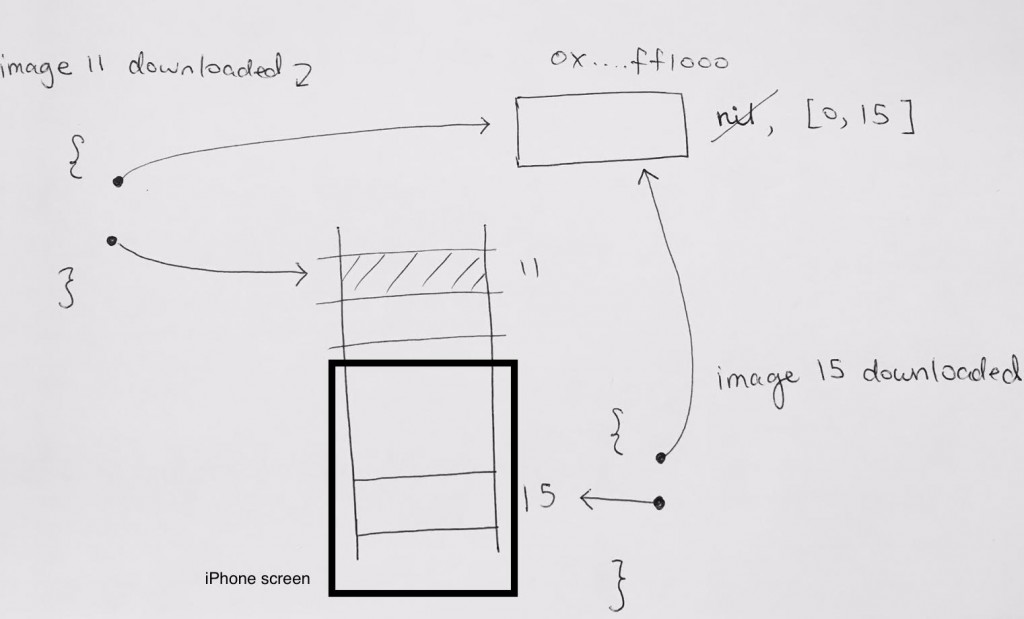
There is another situation where when we scroll off screen, the cell for index 11 (0x…ff1000) nows has indexPath of nil.
The downloader for image 11 is going on.
Row 15 appears on screen. It gets dequeued the cell (0x…ff1000) that was previously used by row 11. This is because row 11 disappeared and not using the cell anymore. Then, cellForRow at index 15 starts downloading image 15.
Hence cell 0x…ff1000 now has IndexPath of 15 because it is representing visible row 15.
downloader for image 11 finishes, and runs its closure. It references 0x…ff1000, but wait, the IndexPath for that is now [0, 15]!!
The index of the cellForRow that is calling this closure is 11. Thus, 15 != 11, and we do not assign image 11 to this cell.
image 15 finishes downloading, and runs its closure. It references 0x…ff1000 and the IndexPath for it is [0, 15].
The index of the cellForRow that is calling this closure is 15. Thus 15 == 15 is valid, and it goes ahead and assigns image 15 to
the cell’s imageView.image.
After everything has been downloaded
After everything is downloaded, all images should be instantaneously retrieved from the dictionary cache (url: Image). Once it gets the image, it would use the main queue to update our table.
|
|
// in your ImageManager singleton if let cachedImage = cachedImageForURL(urlString) { DispatchQueue.main.async(execute: {completion?(true, cachedImage) }) } |
In your cellForRowAt, the cellIndex and tableIndex check should succeed much more now because there is no more delay. The image retrieval is instantaneous and then calls the closure right away.
|
|
// In your ViewController ImageManager.sharedInstance.downloadImageFromURL(imageURL) { (success, image) -> Void in if success && image != nil { if (aCellIndexPath == indexRow) { imageView.image = image } } } |