Import Data Model
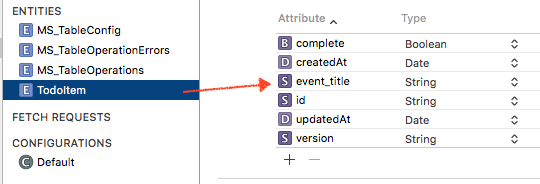
File >> New >> File >> Data Model. Name it “Activities”.
Ctrl + click >> Show in Finder. Then drag that file onto a text editor such as sublime. You will see basic xml file.
Drag and drop an existing data model file onto the text editor. Copy and paste all the content into your Activities file. Save and close. Your data model should be now updated. Your iOS data model is ready.
Basic Core Stack Class
Create a basic core data stack class with a context, MOC, and PSC.
Make sure the your sql file name, and the data model name are specified.
#define DATA_MODEL_FILENAME @”Activities”
#define SQL_FILENAME @”Activities.sqlite”
QSTodoService
Azure should generate a QSTodoService object that does all the reading and writing of data for you.
Unfortunately, it also generates core data code that sits in your AppDelegate. Pull all the core data code out onto your own CoreDataStack class so that AppDelegate is clean.
Then, make these modifications to your QSTodoService:
Use your core stack and its context in QSTodoService’s init method. Commented out code is the original.
|
1 2 3 4 5 6 7 8 9 10 11 12 13 14 15 16 17 18 19 20 21 22 23 |
#import "CoreDataStack.h" ... ... -(QSTodoService *)init { self = [super init]; if (self) { ..... //QSAppDelegate *delegate = (QSAppDelegate *)[[UIApplication sharedApplication] delegate]; CoreDataStack * coreDataStack = [CoreDataStack defaultStack]; //NSManagedObjectContext *context = delegate.managedObjectContext; NSManagedObjectContext *context = coreDataStack.privateQueueContext; ... } return self; } |
ViewController
conform to NSFetchedResultsControllerDelegate protocol
|
1 2 3 4 5 6 7 8 9 10 |
@interface ActivityViewController () <NSFetchedResultsControllerDelegate> // Private properties @property (strong, nonatomic) QSTodoService * todoService; @property (strong, nonatomic) NSFetchedResultsController * fetchedResultsController; @property (weak, nonatomic) IBOutlet UITableView *activitiesTableView; @property (nonatomic, strong)NSMutableArray *activitiesArr; @end |
specify what/how you want to fetch for the fetchedResultsController
|
1 2 3 4 5 6 7 8 9 10 11 12 13 14 15 16 17 18 19 20 21 22 23 24 25 26 27 28 29 30 31 32 33 34 35 36 37 38 39 |
- (NSFetchedResultsController *)fetchedResultsController { if (_fetchedResultsController != nil) { NSLog(@"%s - valid fetchedResultController, just get it", __FUNCTION__); return _fetchedResultsController; } NSLog(@"%s - nil fetchedResultController, we create one", __FUNCTION__); NSFetchRequest *fetchRequest = [[NSFetchRequest alloc] init]; //QSAppDelegate *delegate = (QSAppDelegate *)[[UIApplication sharedApplication] delegate]; CoreDataStack * coreDataStack = [CoreDataStack defaultStack]; //NSManagedObjectContext *context = delegate.managedObjectContext; NSManagedObjectContext * context = coreDataStack.privateQueueContext; fetchRequest.entity = [NSEntityDescription entityForName:@"TodoItem" inManagedObjectContext:context]; // show only non-completed items fetchRequest.predicate = [NSPredicate predicateWithFormat:@"complete == NO"]; // sort by item text fetchRequest.sortDescriptors = @[[NSSortDescriptor sortDescriptorWithKey:@"createdAt" ascending:YES]]; // Note: if storing a lot of data, you should specify a cache for the last parameter // for more information, see Apple's documentation: http://go.microsoft.com/fwlink/?LinkId=524591&clcid=0x409 NSFetchedResultsController *theFetchedResultsController = [[NSFetchedResultsController alloc] initWithFetchRequest:fetchRequest managedObjectContext:context sectionNameKeyPath:nil cacheName:nil]; if(!theFetchedResultsController) { NSLog(@"%s - uh oh, fetchedResultsController NOT successfully created", __FUNCTION__); } self.fetchedResultsController = theFetchedResultsController; _fetchedResultsController.delegate = self; return _fetchedResultsController; } |
In the viewDidLoad, make sure you create your QSTodoService because we are going to implement a refresh method that uses it to sync all the data between your app the backend service.
|
1 2 3 4 5 6 7 8 9 10 11 12 13 14 15 16 17 18 19 20 21 22 23 24 25 26 27 28 29 30 31 |
- (void) refresh { //[self.refreshControl beginRefreshing]; NSLog(@"%s - syncData START", __FUNCTION__); [self.todoService syncData:^ { //[self.refreshControl endRefreshing]; NSLog(@"%s - syncData complete", __FUNCTION__); }]; } - (void)viewDidLoad { [super viewDidLoad]; // Create the todoService - this creates the Mobile Service client inside the wrapped service self.todoService = [QSTodoService defaultService]; NSError *error; if (![[self fetchedResultsController] performFetch:&error]) { NSLog(@"Unresolved error %@, %@", error, [error userInfo]); exit(-1); // Fail } // load the data [self refresh]; ... ... } |
use the fetchedResultsController to get the objects
|
1 2 3 4 5 6 7 8 9 10 11 12 13 14 15 16 17 18 19 20 21 22 23 24 25 26 27 28 29 30 31 32 33 |
#define TABLE_ATTRIBUTE_TITLE @"event_title" #define TABLE_ATTRIBUTE_AUTHOR @"author" #define TABLE_ATTRIBUTE_DATE @"event_date" #define TABLE_ATTRIBUTE_NUM_OF_PARTICIPANTS @"num_of_participants" .... .... - (UITableViewCell *)tableView:(UITableView *)tableView cellForRowAtIndexPath:(NSIndexPath *)indexPath { NSManagedObject *item = [self.fetchedResultsController objectAtIndexPath:indexPath]; cell.accessoryType = UITableViewCellAccessoryDisclosureIndicator; ... ... ... NSDate * date = (NSDate*)[item valueForKey: TABLE_ATTRIBUTE_DATE]; NSDateFormatter *dateFormatter = [[NSDateFormatter alloc] init]; [dateFormatter setDateFormat:@"MMMM dd"]; NSString * dateString = [dateFormatter stringFromDate: date]; cell.activityTimeLbl.text = dateString; cell.activityNameLbl.text = [item valueForKey: TABLE_ATTRIBUTE_TITLE]; cell.activitySponsorLbl.text = [item valueForKey: TABLE_ATTRIBUTE_AUTHOR]; NSNumber * numOfParticipants = [item valueForKey:TABLE_ATTRIBUTE_NUM_OF_PARTICIPANTS]; cell.participantsLbl.text = [numOfParticipants stringValue]; cell.publishTimeLbl.text = activity.publishTime; cell.activitySponsorImg.image = [UIImage imageNamed:activity.sponsorImgStr]; return cell; } |
