https://krakendev.io/blog/weak-and-unowned-references-in-swift
TODO! this article is NOT DONE
STRONG, and reference hierarchies
Let’s start off with what a strong reference is. It’s essentially a normal reference (pointer and all), but it’s special in it’s own right in that it protects the referred object from getting deallocated by ARC by increasing it’s retain count by 1. In essence, as long as anything has a strong reference to an object, it will not be deallocated. This is important to remember for later when I explain retain cycles and stuff.
Strong references are used almost everywhere in Swift. In fact, the declaration of a property is strong by default! Generally, we are safe to use strong references when the hierarchy relationships of objects are linear. When a hierarchy of strong references flow from parent to child, then it’s always ok to use strong references.
Here is an example of strong references at play.
|
1 2 3 |
class Kraken { let tentacle = Tentacle() //strong reference to child.} class Tentacle { let sucker = Sucker() //strong reference to child} class Sucker {} |
Here we have a linear hierarchy at play. Kraken has a strong reference to a Tentacle instance which has a strong reference to a Sucker instance. The flow goes from Parent (Kraken) all the way down to child (Sucker). There is no retain cycle.
Closure as parent
Usually when you use static functions (via class, or from singletons), the closure references another object (usually the self).
|
1 2 3 |
UIView.animate(withDuration: 0.3) { self.view.alpha = 0.0 } |
Since animateWithDuration is a static method on UIView, the closure here is the parent and self is the child.
Closure as child – Retain cycle
A retain cycle is what happens when two objects both have strong references to each other. If 2 objects have strong references to each other, ARC will not generate the appropriate release message code on each instance since they are keeping each other alive.
|
1 2 3 4 5 6 7 8 9 10 11 12 13 14 |
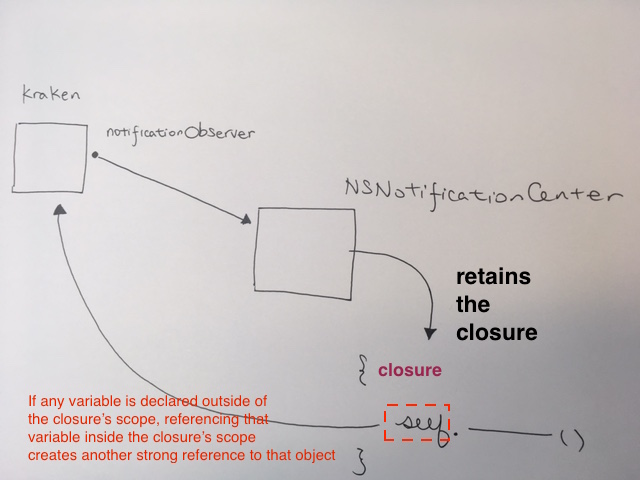
class Kraken { var notificationObserver: ((NSNotification) -> Void)? init() { notificationObserver = NSNotificationCenter.defaultCenter().addObserverForName("humanEnteredKrakensLair", object: nil, queue: NSOperationQueue.mainQueue()) { notification in self.eatHuman() } } deinit { if notificationObserver != nil { NSNotificationCenter.defaultCenter.removeObserver(notificationObserver) } } } |
If any variable is declared outside of the closure’s scope, referencing that variable inside the closure’s scope creates another strong reference to that object. The only exceptions to this are variables that use value semantics such as Ints, Strings, Arrays, and Dictionaries in Swift.
Here, NSNotificationCenter retains a closure that captures self strongly when you call eatHuman(). Best practice says that you clear out notification observers in the deinit function. The problem here is that we don’t clear out the block until deinit, but deinit won’t ever be called by ARC because the closure has a strong reference to the Kraken instance!
How to fix? Introducting…
The fix is to use a weak reference to self in the closure’s capture list. This breaks the strong reference cycle.
Generally speaking…
|
1 2 3 |
let closure = { [weak self] in // capture list self?.doSomething() //Remember, all weak variables are Optionals! } |
You can specify multiple capture values in a closure!
|
1 2 3 4 |
let closure = { [weak self, unowned outsideInstance] in //Look at that sweet Array of capture values. self?.doSomething() //weak variables are Optionals! outsideInstance.executeFunction() //unowned variables are not. } |
WEAK in detail
A weak reference is just a pointer to an object that doesn’t protect the object from being deallocated by ARC. While strong references increase the retain count of an object by 1, weak references do not. In addition, weak references zero out the pointer to your object when it successfully deallocates. This ensures that when you access a weak reference, it will either be a valid object, or nil.
In Swift, all weak references are non-constant Optionals (think var vs. let) because the reference can and will be mutated to nil when there is no longer anything holding a strong reference to it.
For example, this won’t compile:
|
1 2 3 4 |
class Kraken { weak let tentacle = Tentacle() //let is a constant! All weak variables MUST be mutable. } |
because tentacle is a let constant. “Let constants” by definition cannot be mutated at runtime. Since weak variables can be nil if nobody holds a strong reference to them, the Swift compiler requires you to have weak variables as vars.

Delegate weak
Given,
|
1 2 3 4 5 6 7 8 9 10 11 12 13 14 15 16 17 18 19 20 21 22 |
class Kraken: LossOfLimbDelegate { let tentacle = Tentacle() init() { tentacle.delegate = self } func limbHasBeenLost() { print("CRYYYYYYYYY......!") } } protocol LossOfLimbDelegate { func limbHasBeenLost() } class Tentacle { var delegate: LossOfLimbDelegate? func cutOffTentacle() { delegate?.limbHasBeenLost() } } |
When you create delegate definition, and then subsequently use them, make sure you mark them as weak.
Here’s why. Say we have instance Kraken. Kraken strongs an instance tentacle. Then Kraken instance makes tentacle
instance’s delegate point to self. Thus, we now have a retain cycle. Kraken strongs tentacle. Tentacle’s strong property
‘delegate’ strongs Kraken.
|
1 2 3 4 5 6 7 8 9 10 11 12 |
class Kraken: LossOfLimbDelegate { // strongs object tentacle let tentacle = Tentacle() // tentacle object's delegate then strongs this kraken instance init() { tentacle.delegate = self } ... ... } |
In order to fix this, make sure the delegate is marked as weak. Also, in order to use weak,
make sure your delegate extends class. This is because non class type protocols cannot be marked as weak.
Easy!…let’s just make it a class type protocol by extending it with :class:
|
1 2 3 |
protocol LossOfLimbDelegate : class { func limbHasBeenLost() } |
|
1 2 3 4 5 6 7 |
class Tentacle { weak var delegate: LossOfLimbDelegate? // no weak here func cutOffTentacle() { delegate?.limbHasBeenLost() } } |
UNOWNED
Weak and unowned references behave similarly but are NOT the same. Unowned references, like weak references,
do not increase the retain count of the object being referred.
However, in Swift, an unowned reference has the added benefit of
not being an Optional.
In addition, unowned references are non-zeroing. This means that when the object is deallocated, it does not zero out the pointer. This means that use of unowned references can, in some cases, lead to dangling pointers. For you nerds out there that remember the Objective-C days like I do, unowned references map to unsafe_unretained references.
Use a weak reference whenever it is valid for that reference to become nil at some point during its lifetime. Conversely, use an unowned reference when you know that the reference will never be nil once it has been set during initialization.
“Define a capture in a closure as an unowned reference when the closure and the instance it captures will always refer to each other, and will always be deallocated at the same time.”
If you know your reference is going to be zeroed out properly and your 2 references are MUTUALLY DEPENDENT on each other (one can’t live without the other), then you should prefer unowned over weak, since you aren’t going to want to have to deal with the overhead of your program trying to unnecessarily zero your reference pointers.
A really good place to use unowned references is when using self in closure properties that are lazily defined like so:
|
1 2 3 4 5 6 |
class Kraken { let petName = "Krakey-poo" lazy var businessCardName: () -> String = { [unowned self] in // uses unowned return "Mr. Kraken AKA " + self.petName } } |
We need unowned self here to prevent a retain cycle. Kraken holds on to the businessCardName closure for it’s lifetime and the businessCardName closure holds on to the Kraken for it’s lifetime. They are mutually dependent, so they will always be deallocated at the same time. Therefore, it satisfies the rules for using unowned!
HOWEVER, this is not to be confused with lazy variables that AREN’T closures such as this:
|
1 2 3 4 5 6 |
class Kraken { let petName = "Krakey-poo" lazy var businessCardName: String = { return "Mr. Kraken AKA " + self.petName }() } |
Unowned self is not needed since nothing actually retains the closure that’s called by the lazy variable. The variable simply assigns itself the result of the closure and deallocates the closure (and decrements the captured self’s reference count) immediately after it’s first use.