ref –
-
stackoverflow.com/questions/2241348/what-is-unicode-utf-8-utf-16
www.joelonsoftware.com/2003/10/08/the-absolute-minimum-every-software-developer-absolutely-positively-must-know-about-unicode-and-character-sets-no-excuses/
-
https://blog.hubspot.com/website/what-is-utf-8
Text is one of many assets that computers store and process. Text is made up of individual characters, each of which is represented in computers by a string of bits.
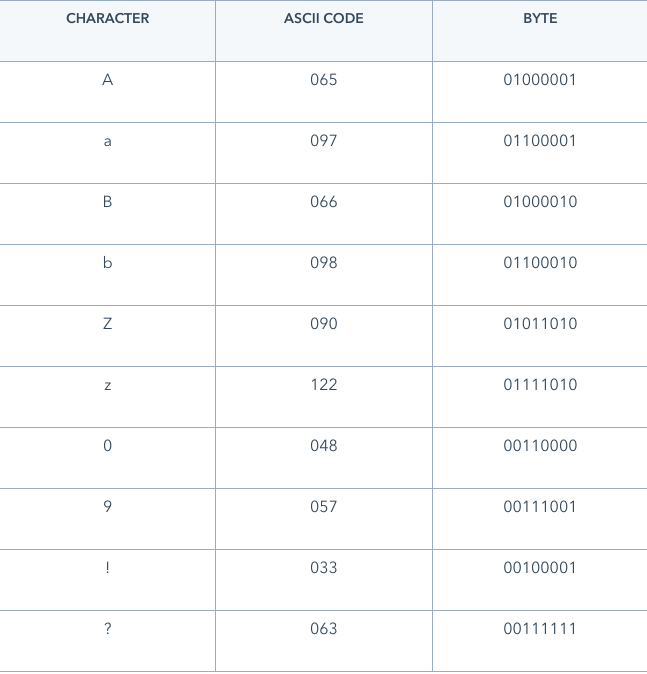
Problem is, which string of bits should match up to which letter? ASCII came up with a table to solve this.
So, the sentence “The quick brown fox jumps over the lazy dog.” represented in ASCII binary would be:
01010100 01101000 01100101 00100000 01110001
01110101 01101001 01100011 01101011 00100000
01100010 01110010 01101111 01110111 01101110
00100000 01100110 01101111 01111000 00100000
01101010 01110101 01101101 01110000 01110011
00100000 01101111 01110110 01100101 01110010
00100000 01110100 01101000 01100101 00100000
01101100 01100001 01111010 01111001 00100000
01100100 01101111 01100111 00101110
Because there are 8 bits in 1 byte, there are 2^8 (256) ways to represent a character in ASCII. When ASCII was introduced in 1960, this was okay, since developers needed only 128 bytes to represent all the English characters and symbols they needed.
Unicode is a character set
Unicode assigns every character in existence a unique number called a code point.
In other words, a letter maps to something called a code point
As Joel would explain it, every platonic letter in every alphabet is assigned a magic number by the Unicode consortium which is written like this: U+0639
This magic number is called a code point.
The U+ means “Unicode”
The numbers are hexadecimal.
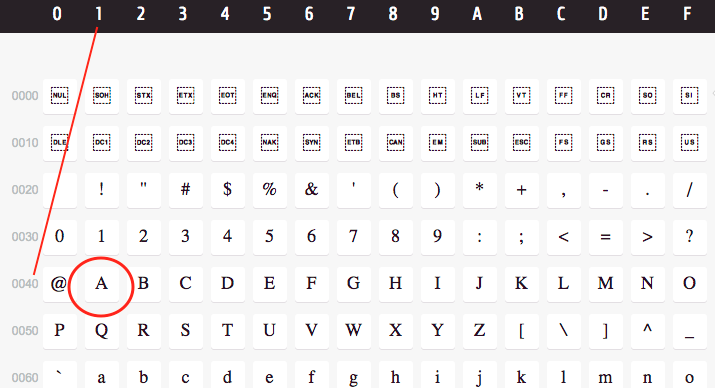
The English letter A would be U+0041.
Why is it U+0041?
0041 is in hex.
We convert it to decimal like so: is 0 * (16^4)^4 + 0 * (16^3) + 4 * (16^2) + 1 * (16^1) = 0 + 0 + 64 + 1 = 65.
65 is represented as A.
What is Unicode?
Unicode was a brave effort to create a single character set that included every reasonable writing system on the planet and some make-believe ones like Klingon, too.
Unicode comprises 1,114,112 code points in the range 0hex to 10FFFFhex. The Unicode code space is divided into seventeen planes (the basic multilingual plane, and 16 supplementary planes), each with 65,536 (= 216) code points. Thus the total size of the Unicode code space is 17 × 65,536 = 1,114,112.
10FFFF (hex)
1 0 15 15 15 15 convert each hex to digit 0-9, A(10) – F(15)
0001 0000 1111 1111 1111 1111 convert digits to binary
1114111 binary to decimal
we also have decimal 0, so total is 1114112 representations of characters
In fact, Unicode has a different way of thinking about characters, and you have to understand the Unicode way of thinking of things or nothing will make sense.
Until now, we’ve assumed that a letter maps to some bits which you can store on disk or in memory:
A –> 0100 0001
In Unicode, a letter maps to something called a code point which is still just a theoretical concept. How that code point is represented in memory or on disk is a whole nuther story.
In Unicode, the letter A is a platonic ideal. It’s just floating in heaven:
A
This platonic A is different than B, and different from a, but the same as A and A and A. The idea that A in a Times New Roman font is the same character as the A in a Helvetica font, but different from “a” in lower case, does not seem very controversial, but in some languages just figuring out what a letter is can cause controversy. Is the German letter ß a real letter or just a fancy way of writing ss? If a letter’s shape changes at the end of the word, is that a different letter? Hebrew says yes, Arabic says no. Anyway, the smart people at the Unicode consortium have been figuring this out for the last decade or so, accompanied by a great deal of highly political debate, and you don’t have to worry about it. They’ve figured it all out already.
Every platonic letter in every alphabet is assigned a magic number by the Unicode consortium which is written like this: U+0639. This magic number is called a code point. The U+ means “Unicode” and the numbers are hexadecimal. U+0639 is the Arabic letter Ain. The English letter A would be U+0041. You can find them all using the charmap utility on Windows 2000/XP or visiting the Unicode web site.
There is no real limit on the number of letters that Unicode can define and in fact they have gone beyond 65,536 so not every unicode letter can really be squeezed into two bytes, but that was a myth anyway.
OK, so say we have a string:
Hello
which, in Unicode, corresponds to these five code points:
U+0048 U+0065 U+006C U+006C U+006F.
Just a bunch of code points. Numbers, really. We haven’t yet said anything about how to store this in memory or represent it in an email message.
That’s where encodings come in.
Step 1 – Number Code to decimal
Let’s look at an example. In Unicode the character A is given code point U+0041. The U+ denotes that its a unicode. The 0041 is represented as hex.
hex 0041 to decimal is converted like so:
0 * (16^3)^4 + 0 * (16^2) + 4 * (16^1) + 1 * (16^0) =
0 + 0 + 64 + 1 = 65.
Thus, decimal 65 is represented as A.
Step 2 – Convert decimal to Binary?
Bi-nary means two.
Binary is represented by bits.
1 Bit binary represents 0 or 1. 2 ^ (1 bit) = 2 combinations
2 bits binary represents 00, 01, 10, 11, 4 combinations. 2 ^ (2 bits) = 4 combinations
…
Point codes represent text in computers, telecommunications equipment, and other devices.
It maps the character “A” to the number 65
How do we convert this decimal to binary?
Division Way
(the proper way is to divide by 2, and use the remainder as bit)
http://www.electronics-tutorials.ws/binary/bin_2.html
65 / 2 = 32 R1 binary bits: [1]
32 / 2 = 16 R0 binary bits: [0 1]
16 / 2 = 8 R0 binary bits: [0 0 1]
8 / 2 = 4 R0 binary bits: [0 0 0 1]
4 / 2 = 2 R0 binary bits: [0 0 0 0 1]
2 / 2 = 1 R0 binary bits: [0 0 0 0 0 1]
1 / 2 = 0 R1 binary bits: [1 0 0 0 0 0 1]
So as you can see the bits are 1 0 0 0 0 0 1
So in 8 bit format we have, 0 1 0 0 0 0 1
That is the binary conversion from decimal point 65.
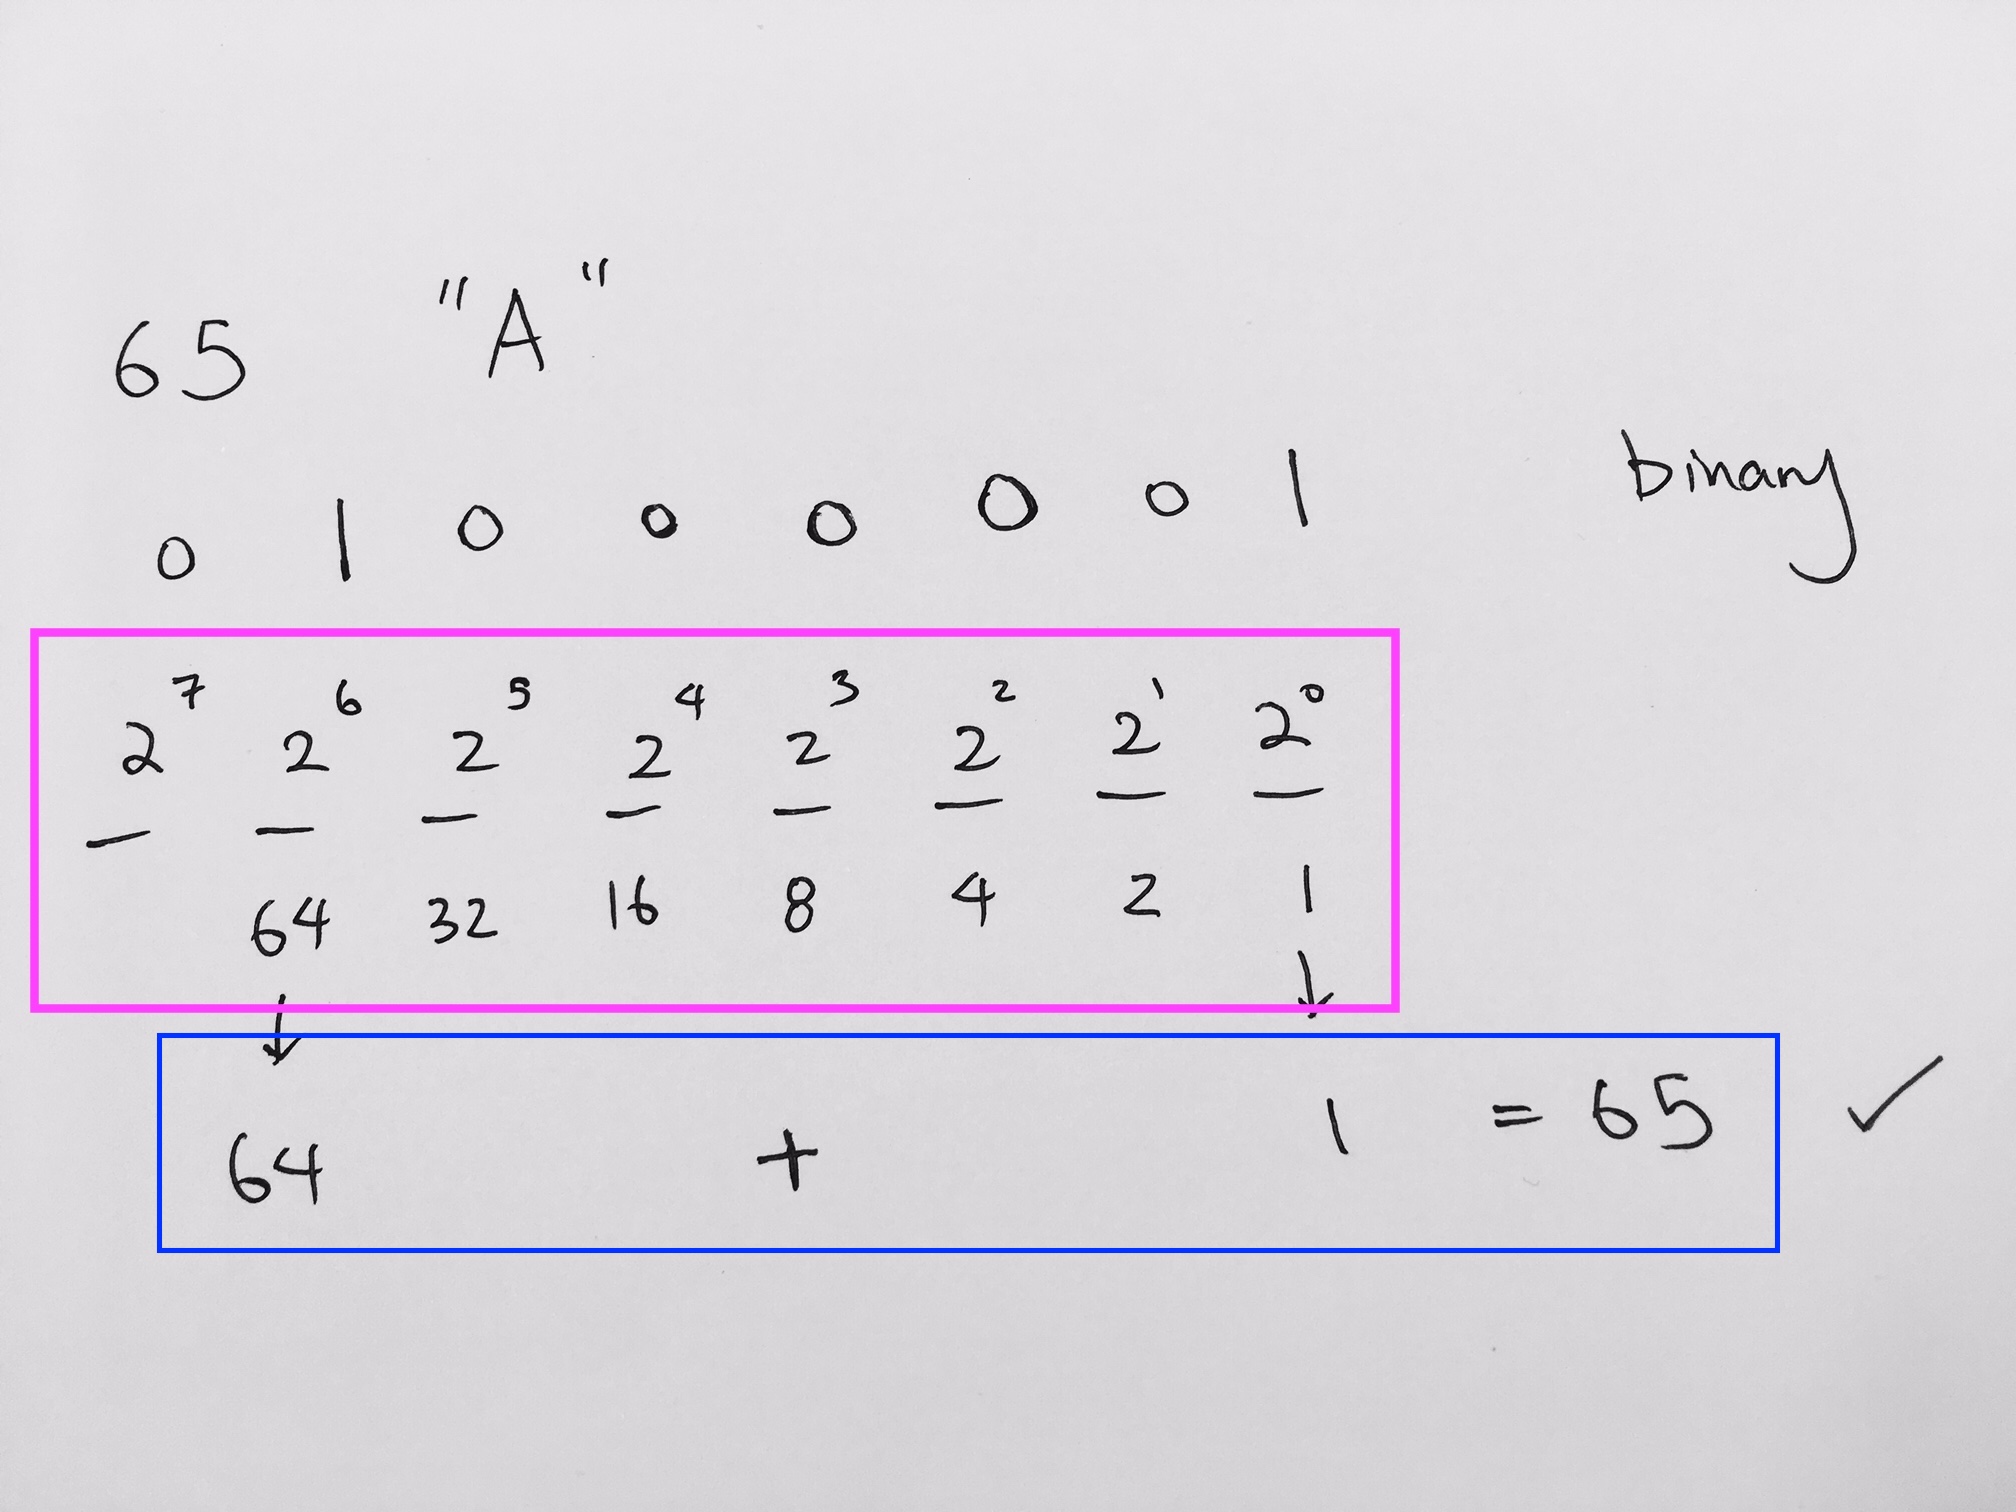
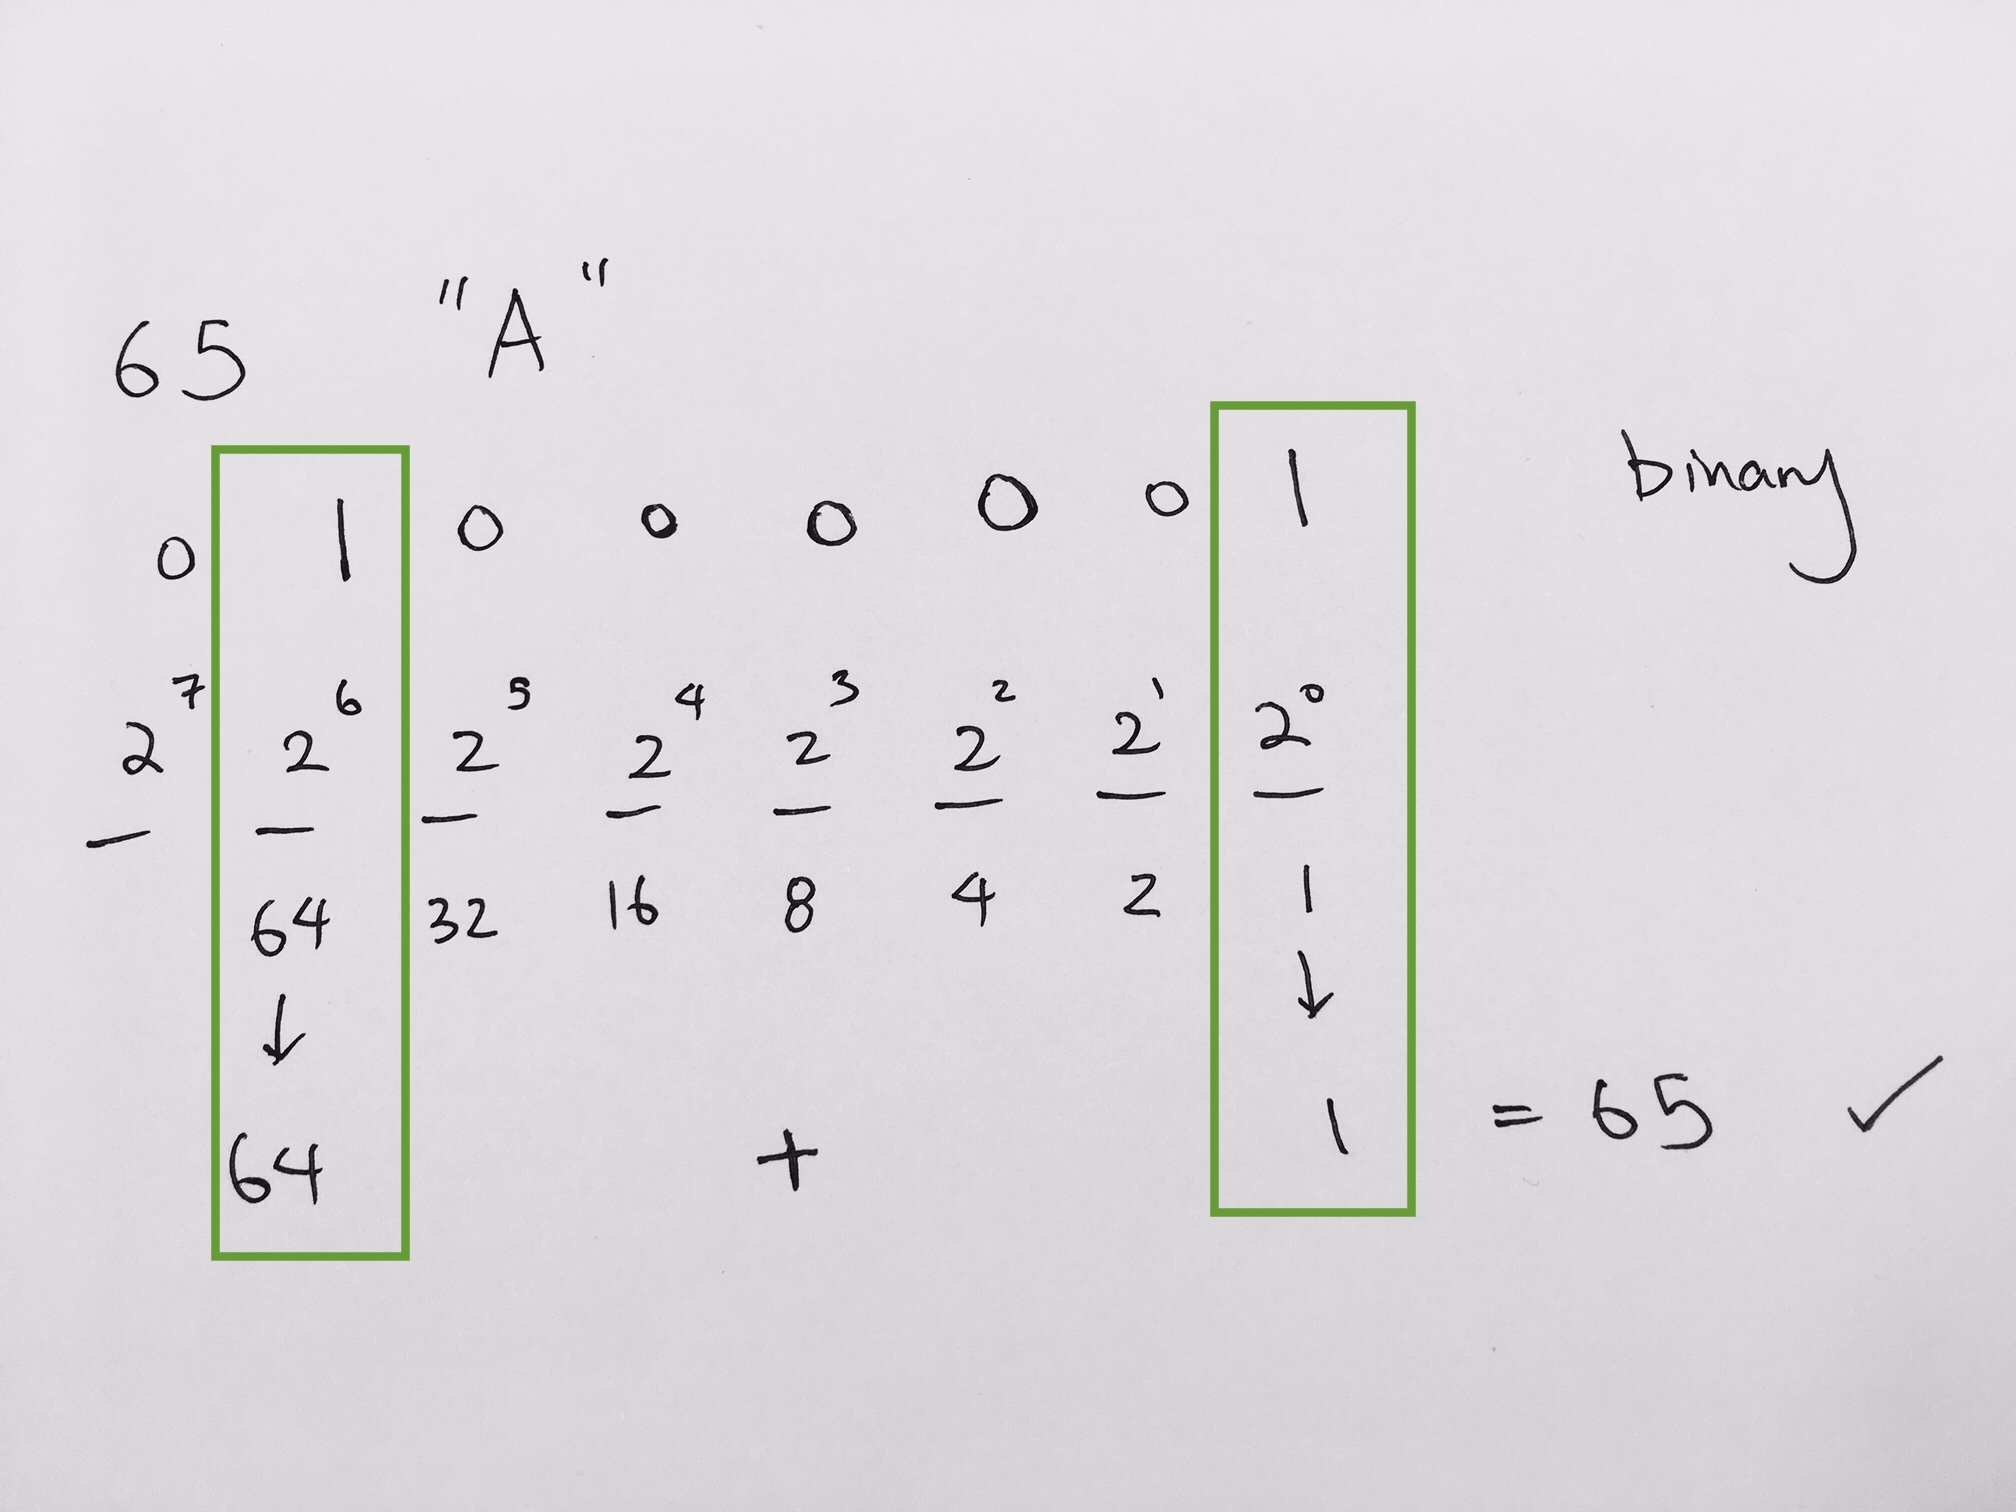
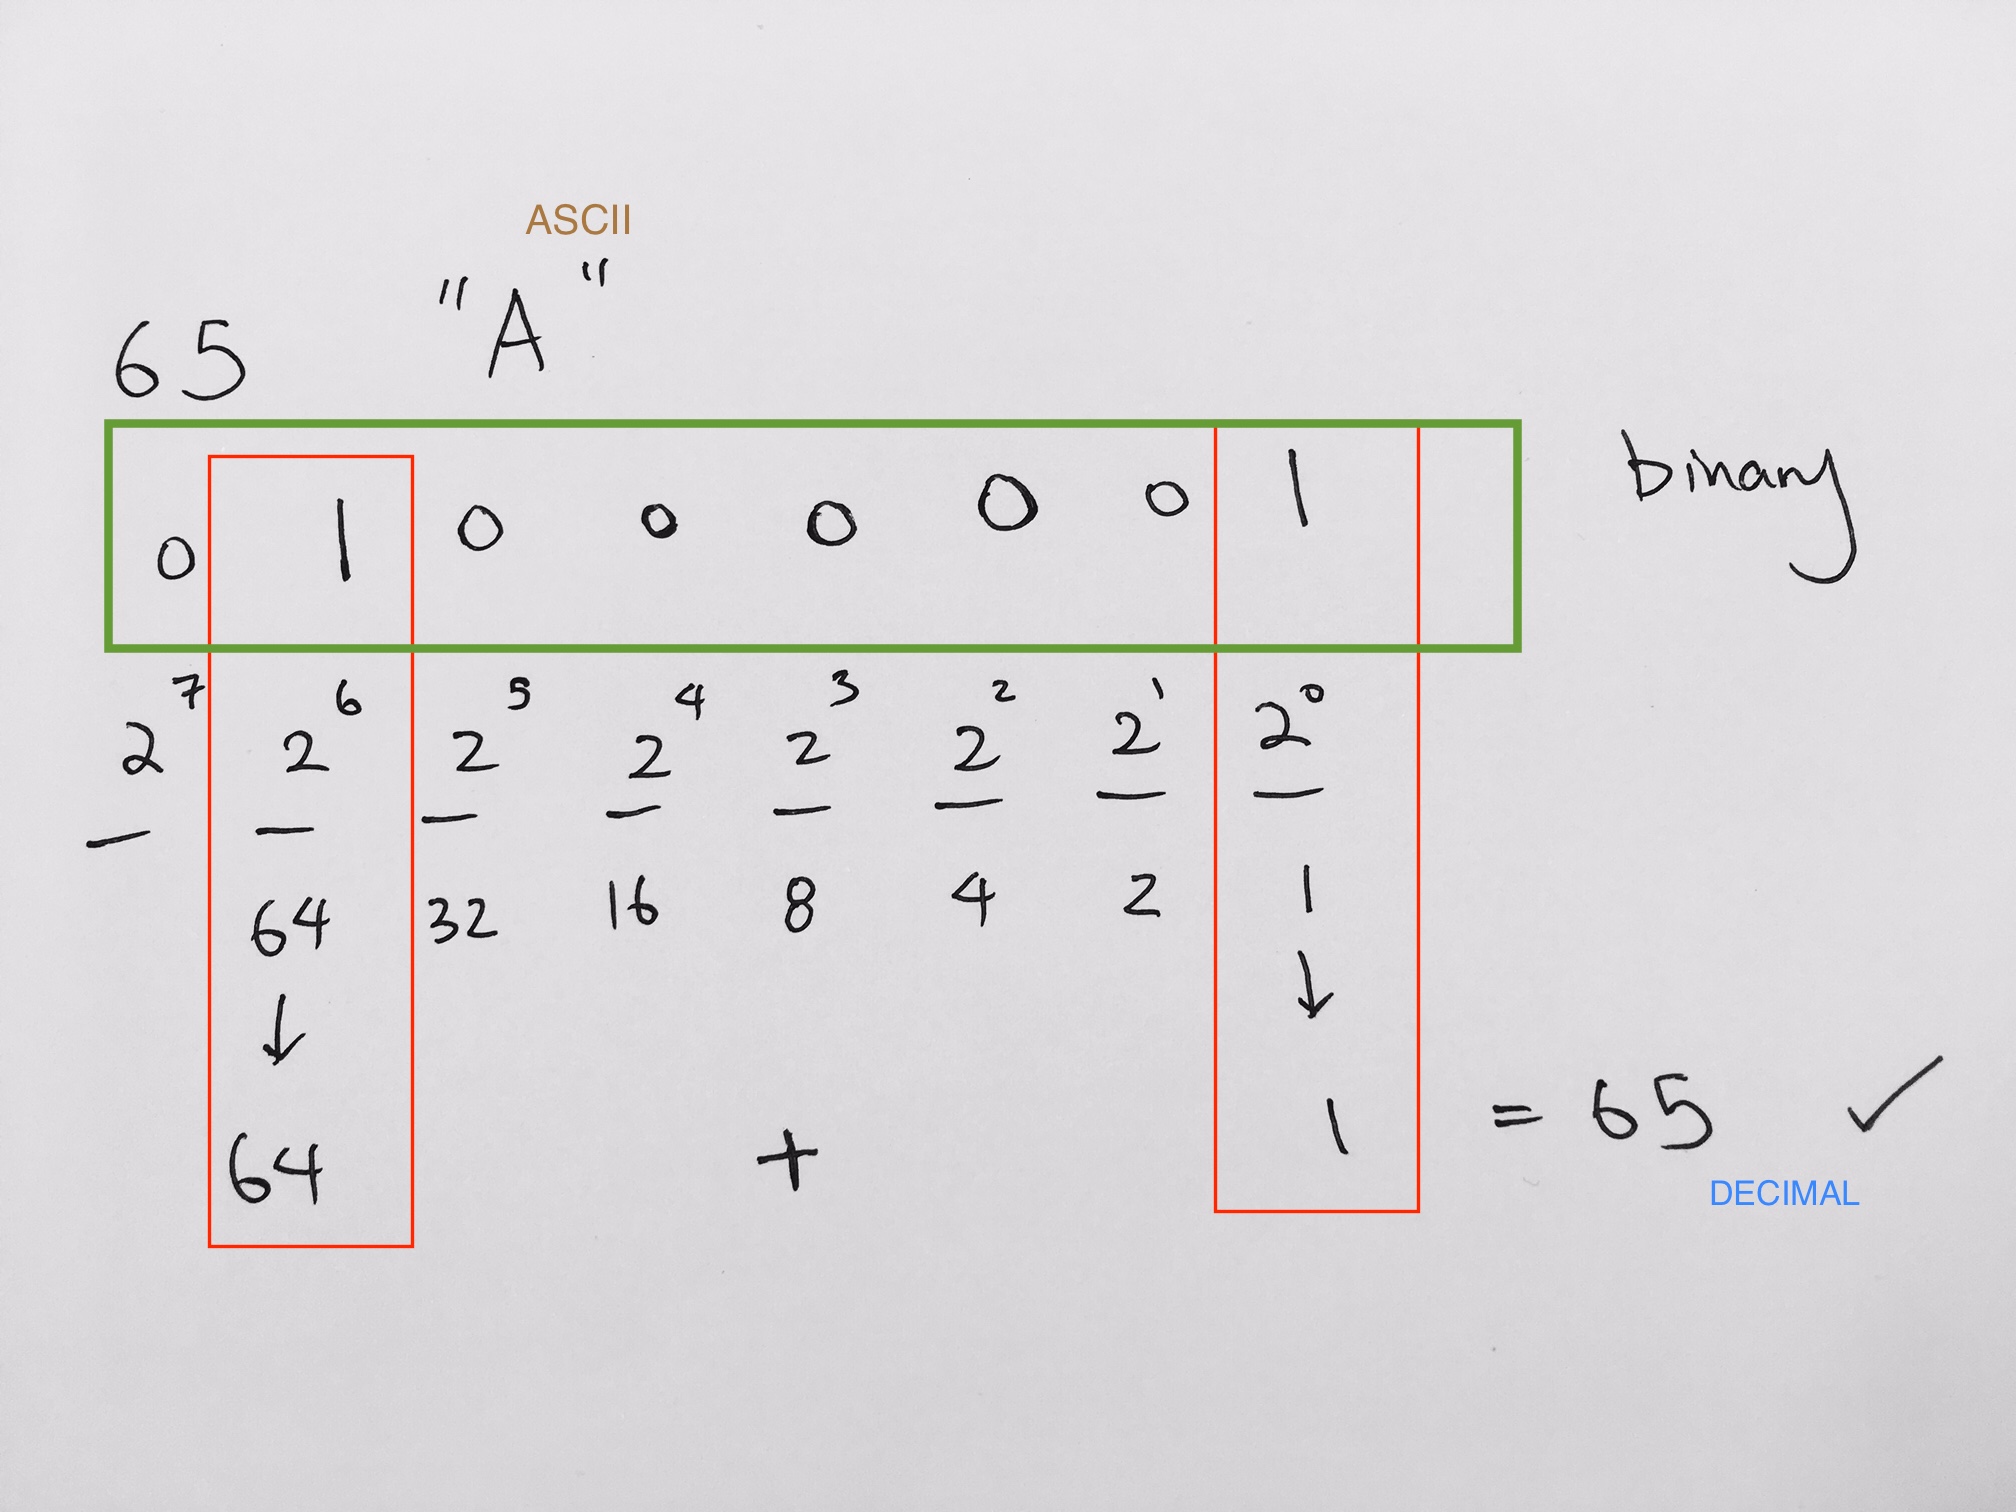
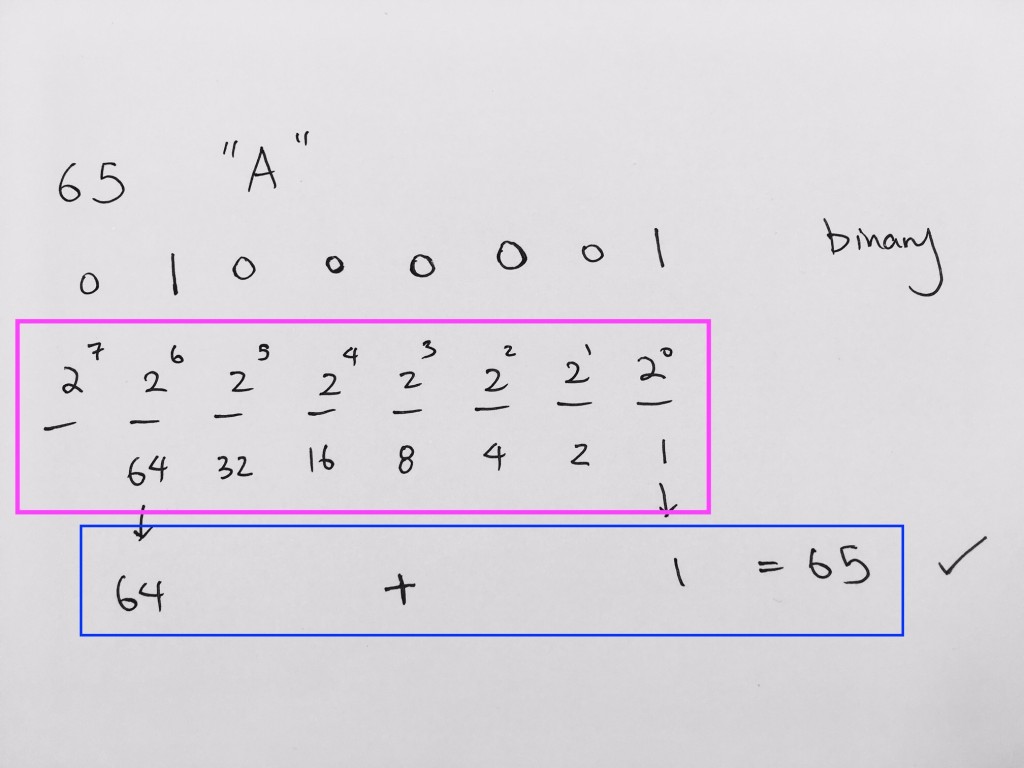
Layout visual way
First, we must lay out the binary and show what decimal it represents
The 0th bit is represented by 2 ^ 0 = 1
The 1st bit is represented by 2 ^ 1 = 2
The 2nd bit is represented by 2 ^ 2 = 4
The 3rd bit is represented by 2 ^ 3 = 8
The 4th bit is represented by 2 ^ 4 = 16
The 5th bit is represented by 2 ^ 5 = 32
The 6th bit is represented by 2 ^ 6 = 64
…so on.
8 bits
0 0 0 0 0 0 0 0
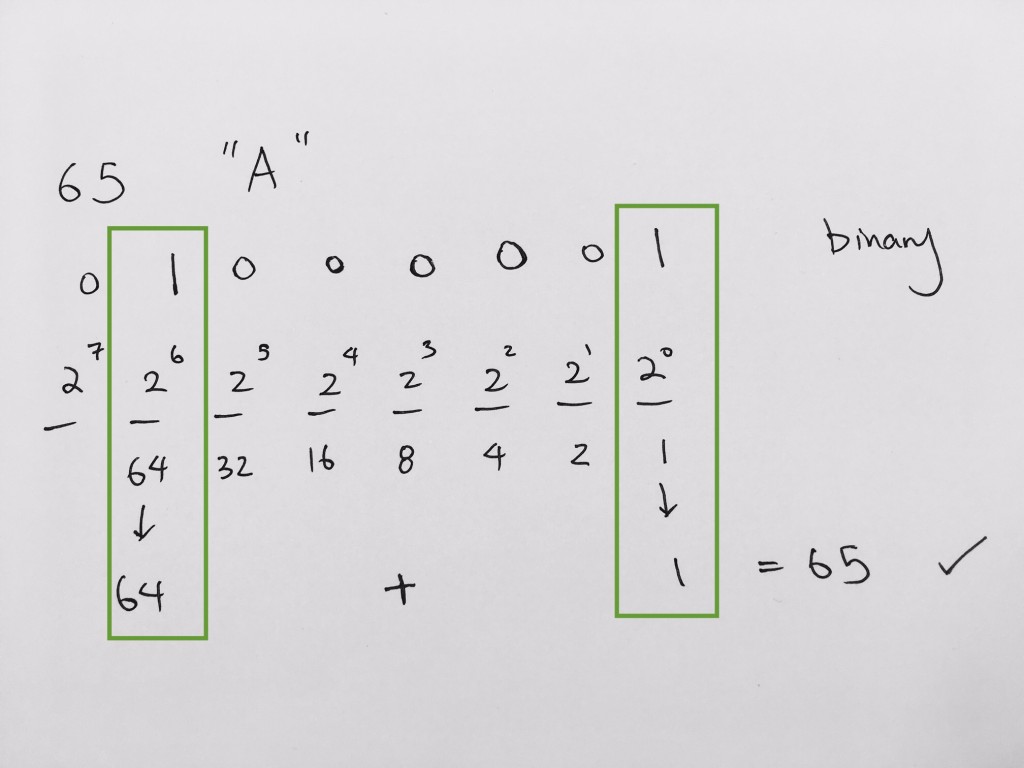
We lay them out and try to see which of these decimals add up to be 65. The trick is to get the largest number where its less than or equal to 65. In our case, its the 6th bit (64). Thus, at the the 6th bit we mark it 1.
0 1 0 0 0 0 0 0
65 – 64 = 1.
Then we try to find a bit where its less than or equal to 1.
Obviously, it would be perfect at 0th bit.
0 1 0 0 0 0 0 1
64 + 1 = 65 Thus it matches the 65 ASCII code.
We see that at the 2^(6th bit) is 64. Then all we need is 1, where it is at 2^0.
Hence at the binary, we need to mark 1 for the 6th bit and the 0th bit in order to represent that we need the decimal value it represents:
+ 0 * (2 ^ 4)
0 * (2^7) + 1 * (2 ^ 6) + 0 * (2 ^ 5) + 0 * (2 ^ 4) + 0 * (2 ^ 3) + 0 * (2 ^ 2) + 0 * (2 ^ 1) + 1 * (2 ^ 0)
Make sure you use only 0 or 1 because we are dealing with binary.
Finally, at the binary level, simply write the binary needed to represent the numbers:
01000010

2) Binary to Hex
First, a hex has 16 code points: 0-15
where 0 – 9 takes on the numbers 0 – 9
and 10 – 15 takes on A, B, C, D, E, F
Thus a hex bit has 15 combinations of 0, 1, 2, 3, 4, 5, 6, 7, 8, 9, A, B, C, D, E, F
This is represented by 4 binary bits because 2^4 = 16
Hence we need to break our binary bits into hex, or literally into 4 bit binary
Thus 01000001 gets divided into 4 bits so that each 4 bits can be converted to a hex: 0100 0001
Let’s convert it to hex:
0100 = 0 * (2^3) + 1 * (2^2) + 0 * (2^1) + 0 * (2^0) = 4 hex
0001 = 0 * (2^3) + 0 * (2^2) + 0 * (2^1) + 1 * (2^0) = 1 hex
(if you get 1111 = 16 –> F)
Thus, ASCII character ‘A’, is 65 code point, binary 0100001, or hex 0x41.
And if we are to check in the unicode table, We see that indeed A is mapped to decimal 65, with a hex of 0x41 for UTF8
and a hex of 0x0041 for UTF 16.
https://unicode-table.com/en/
Thus, you have now succesfully converted from Unicode’s Code point to binary representation.
UTF 8
UTF-8 is an encoding system for Unicode.
It can translate any Unicode character to a matching unique binary string
and can also translate the binary string back to a Unicode character. This is the meaning of “UTF”, or “Unicode Transformation Format.”
There are other encoding systems for Unicode besides UTF-8, but UTF-8 is unique because it represents characters in one-byte units. Remember that one byte consists of eight bits, hence the “-8” in its name.
A character in UTF8 can be from 1 to 4 bytes long. UTF-8 can represent any character in the unicode standard. UTF-8 is backwards compatible with ASCII. UTF-9 is preferred encoding for e-mail and web pages.
The first 128 characters of Unicode (which correspond one-to-one with ASCII) are encoded using a single octet with the same binary value as ASCII, making valid ASCII text valid UTF-8-encoded Unicode as well.
Unicode is a character set. UTF-8 is encoding
UTF-8 is defined to encode code points (any of the numerical values that make up the code space that contains a symbol) in one to four bytes.
UTF-8 uses one byte to represent code points from 0-127. These first 128 Unicode code points correspond one-to-one with ASCII character mappings, so ASCII characters are also valid UTF-8 characters.
The first UTF-8 byte signals how many bytes will follow it. Then the code point bits are “distributed” over the following bytes.
For example:
character: é
Unicode: U+00E9
Calculate Decimal:
0 * 16^3 + 0 * 16^2 + E * 16^1 + 9 * 16^0 =
0 + 0 + 224 + 9 = 233
So the decimal for é is 233
Decimal to Binary:
223/2 = 116 R1 [1]
116/2 = 58 R0 [0 1]
58/2 = 29 R0 [0 0 1]
29/2 = 14 R1 [1 0 0 1]
14/2 = 7 R0 [0 1 0 0 1]
7/2 = 3 R1 [1 0 1 0 0 1]
3/2 = 1 R1 [1 1 0 1 0 0 1]
1/2 = 0 R1 [1 1 1 0 1 0 0 1]
So the binary for character é is [1 1 1 0 1 0 0 1]
It is not part of the ASCII character set. UTF-8 represents this eight-bit number using two bytes.
It will take one byte to represent our binary. If we were to include header data, then it’ll be within two bytes. Hence, this is why we decided on using two bytes.
The first byte begins with 110: 110 XXXXX
The 1s indicate that this is a two-byte sequence.
0 indicates that the code point bits will follow.
The second byte being with 10 to signal that it is a continuation in a UTF8 sequence: 10 XXXXXX
Hence we have 110XXXXX 10XXXXXX in order to represent [1 1 1 0 1 0 0 1]
This leaves 11 slots for the bits. Hence we replace the X with our bits, starting from the right.
110XXX[11] 10[101001]
We have 3 X’s left. UTF-8 pads the leading bits with 0s to fill out the remaining spaces.
UTF-8 representation is: 11000011 10101001
And we split them into 4 bits and get the binary value. We then convert binary value into an hex.
1100 = 1 * 2^3 + 1 * 2^2 + 0 * 2^1 + 0 * 2^0 = 12 0xC
0011 = 0 * 2^3 + 0 * 2^2 + 1 * 2^1 + 1 * 2^0 = 3 0x3
1010 = 1 * 2^3 + 0 * 2^2 + 1 * 2^1 + 0 * 2^0 = 10 0xA
1001 = 1 * 2^3 + 0 * 2^2 + 0 * 2^1 + 1 * 2^0 = 9 0x9
Hence, your UTF-8 code units is C3A9. This matches up with our U+00E9 for character é

Let’s convert Unicode character 八 into different representations
The code point is given as: U+516B
code point to decimal
5 * 16^3 + 1 * 16^2 + 6 * 16^1 + B * 16^0 =
5*4096 + 256 + 96 + 11 = 20843
The decimal representation is 20843
decimal to binary
20843/2 = 10421 R1 [1]
10421/2 = 5210 R1 [1 1]
5210/2 = 2605 R0 [0 1 1]
2605/2 = 1302 R0 [0 0 1 1]
…
…
5/2 = 2 R1 [1 0 0 0 1 0 1 1 0 1 0 1 1]
2/2 = 1 R0 [0 1 0 0 0 1 0 1 1 0 1 0 1 1]
1/2 = 0 R1 [1 0 1 0 0 0 1 0 1 1 0 1 0 1 1]
Hence the binary representation is 1 0 1 0 0 0 1 0 1 1 0 1 0 1 1
We call it UTF-8 Code point bits
We first know that it is 15 bits. Hence we will need a full 2 bytes to represent it. If we were to include the header info for utf-8, then we’ll need a total of 3 bytes to represent this plus header info.
The first byte begins with 1110.
111 indicates its a three-byte sequence.
The 0 indicates that the code point bits will follow.
The second byte begins with 10 to signal that it is a continuation in a UTF-8 sequence.
The third byte begins with 10 to signal that it is a continuation in a UTF-8 sequence.
Therefore, the 3 byte utf-8 looks like this:
1110XXXX 10XXXXXX 10XXXXXX
We then fill in our binary representation starting from the right
1 0 1 0 0 0 1 0 1 1 0 1 0 1 1
[1110]X101 [10]000101 [10]101011
Padding bits: We now have one spot left over, so we’ll just fill it with a 0.
11100101 10000101 10101011
Split this into 4 bit groups:
1110 0101 1000 0101 1010 1011
each group represents hexadecimal.
Calculate decimal value of binary:
1110: 14 0xB
0101: 5 0x5
1000: 8 0x8
1010: 5 0x5
1010: 10 0xA
1011: 11 0xB
UTF-8 representation is: B5 85 AB