All posts by admin

prototype, __proto__, object specifics, and sharing via prototype

https://hackernoon.com/prototypes-in-javascript-5bba2990e04b

Object.prototype is one of the rare objects that has no prototype: it does not inherit
any properties.

Step 1:

Every object in Javascript is derived from base Object. Base Object has many built-in properties, with its prototype pointing to an empty “Object prototype”. Hence, in memory we see “function Object” which has a prototype property referencing Object Prototype. Then it has a constructor reference coming back to Object.

Thus, when we create our literal object (with a name property in there), it derives from Object. Thus, it has its reference __proto__ pointing to Object Prototype.

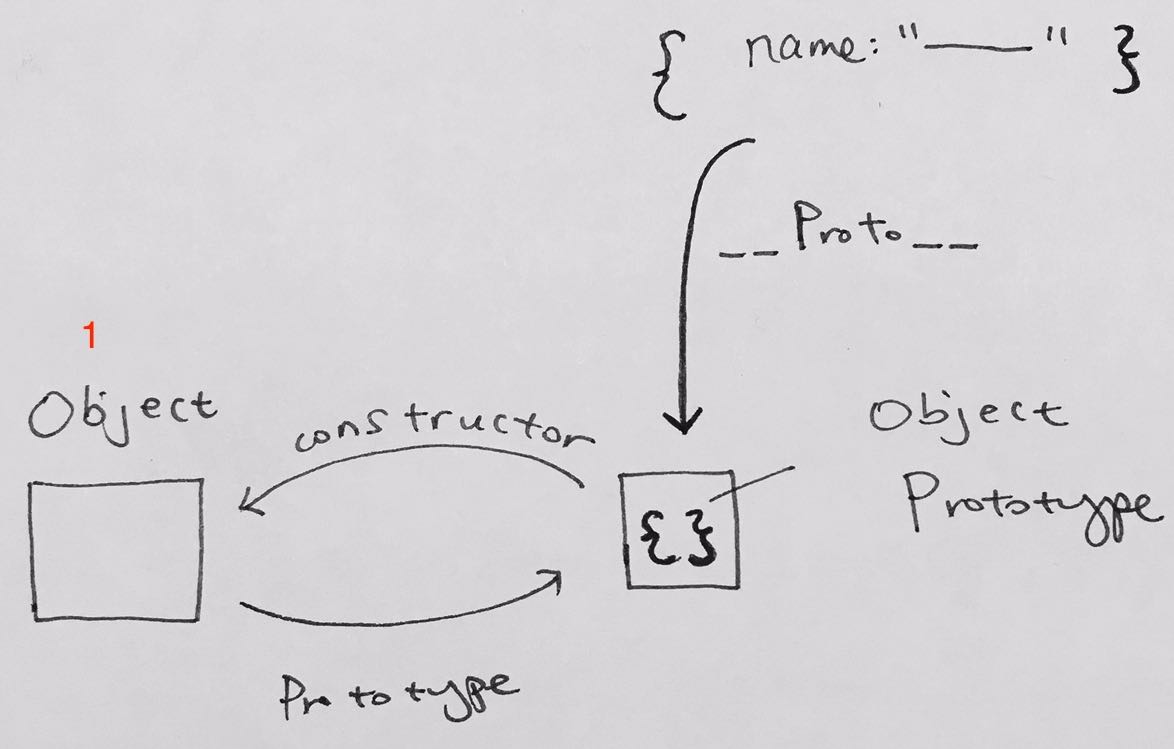
That is why when you see an instance of Object (object literal) and Object, their prototype and constructor are the same.

Object.prototype –> {}
Object.prototype.constructor); –> [Function: Object]

objLiteral.__proto__ –> {}
objLiteral.__proto__.constructor –> [Function: Object]

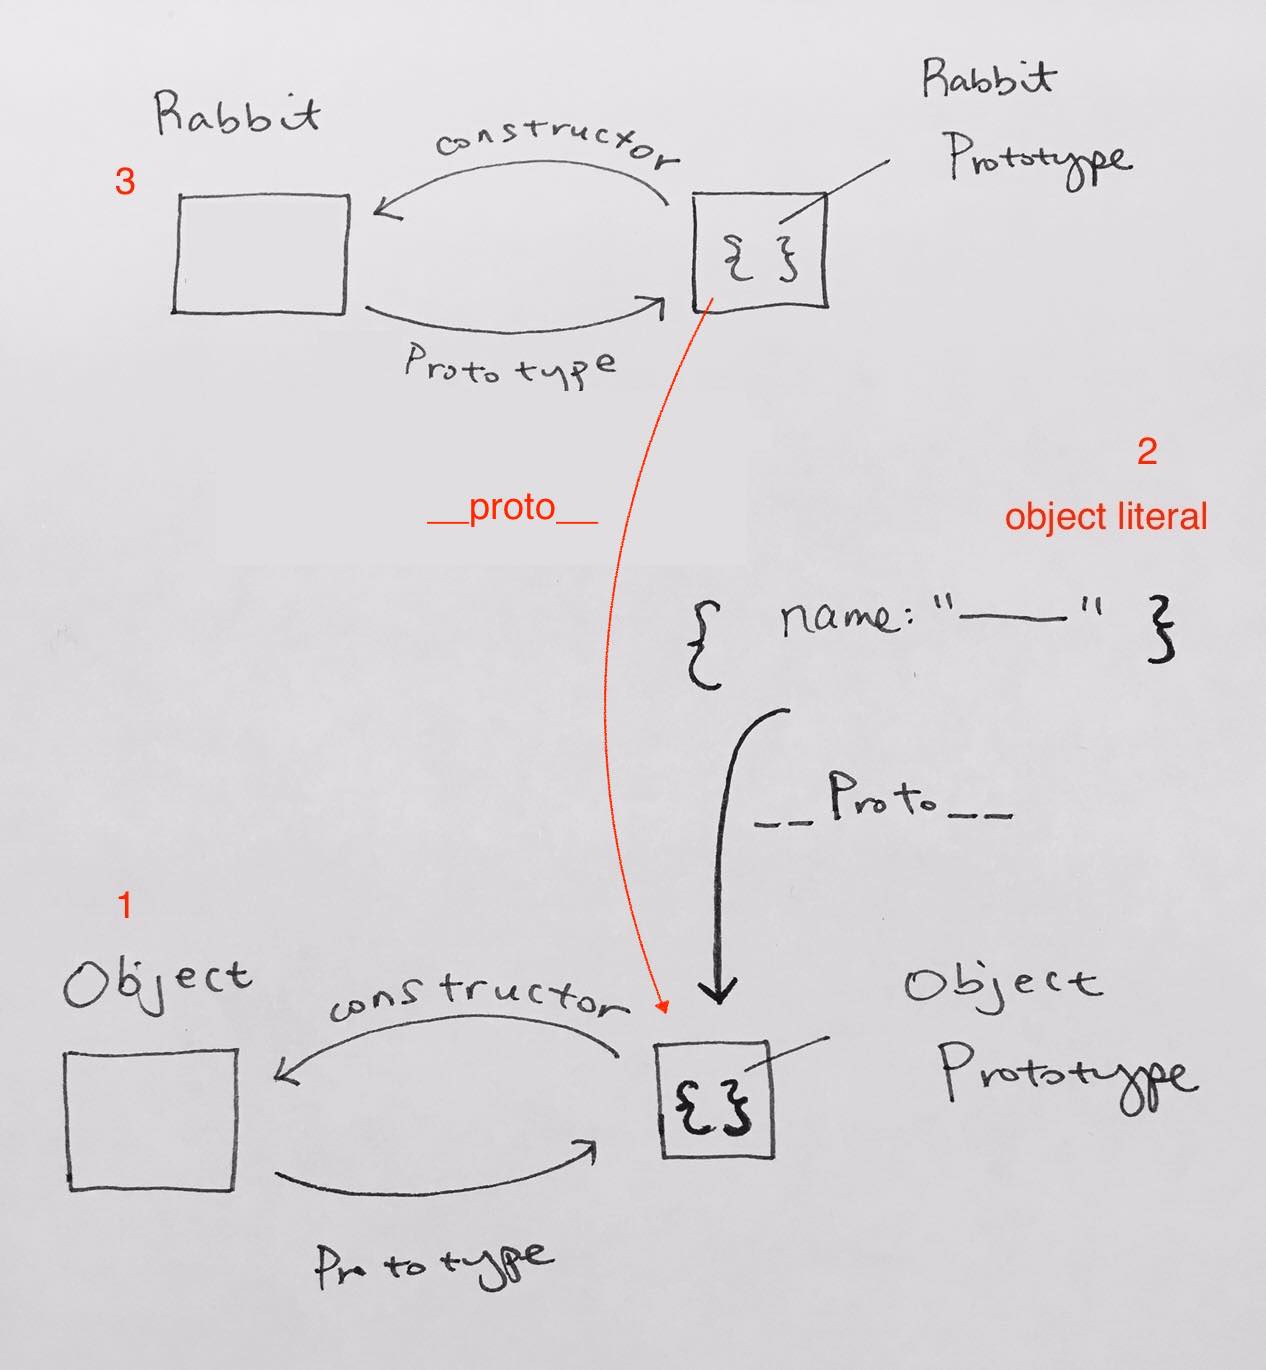
Step 2 – Creating the Rabbit object

Now we create a Rabbit object. Therefore, by definition, Rabbit has a prototype reference pointing to an empty Rabbit Prototype. The Rabbit Prototype has a constructor pointing back to the Rabbit definition. But remember, every object in Javascript derives from Object. Hence Rabbit’s Prototype object is actually an object literal that has a __proto__ pointing to Object Prototype.

So as you see, Rabbit’s prototype and prototype.constructor is very straight forward. But it will be surprising to the reader that Rabbit.prototype has a __proto__ property. That is because Rabbit.prototype itself is an empty object literal. And like any object in JS, it derives from Object. Thus, that is why Rabbit.prototype.__proto__.constructor is [Function: Object].

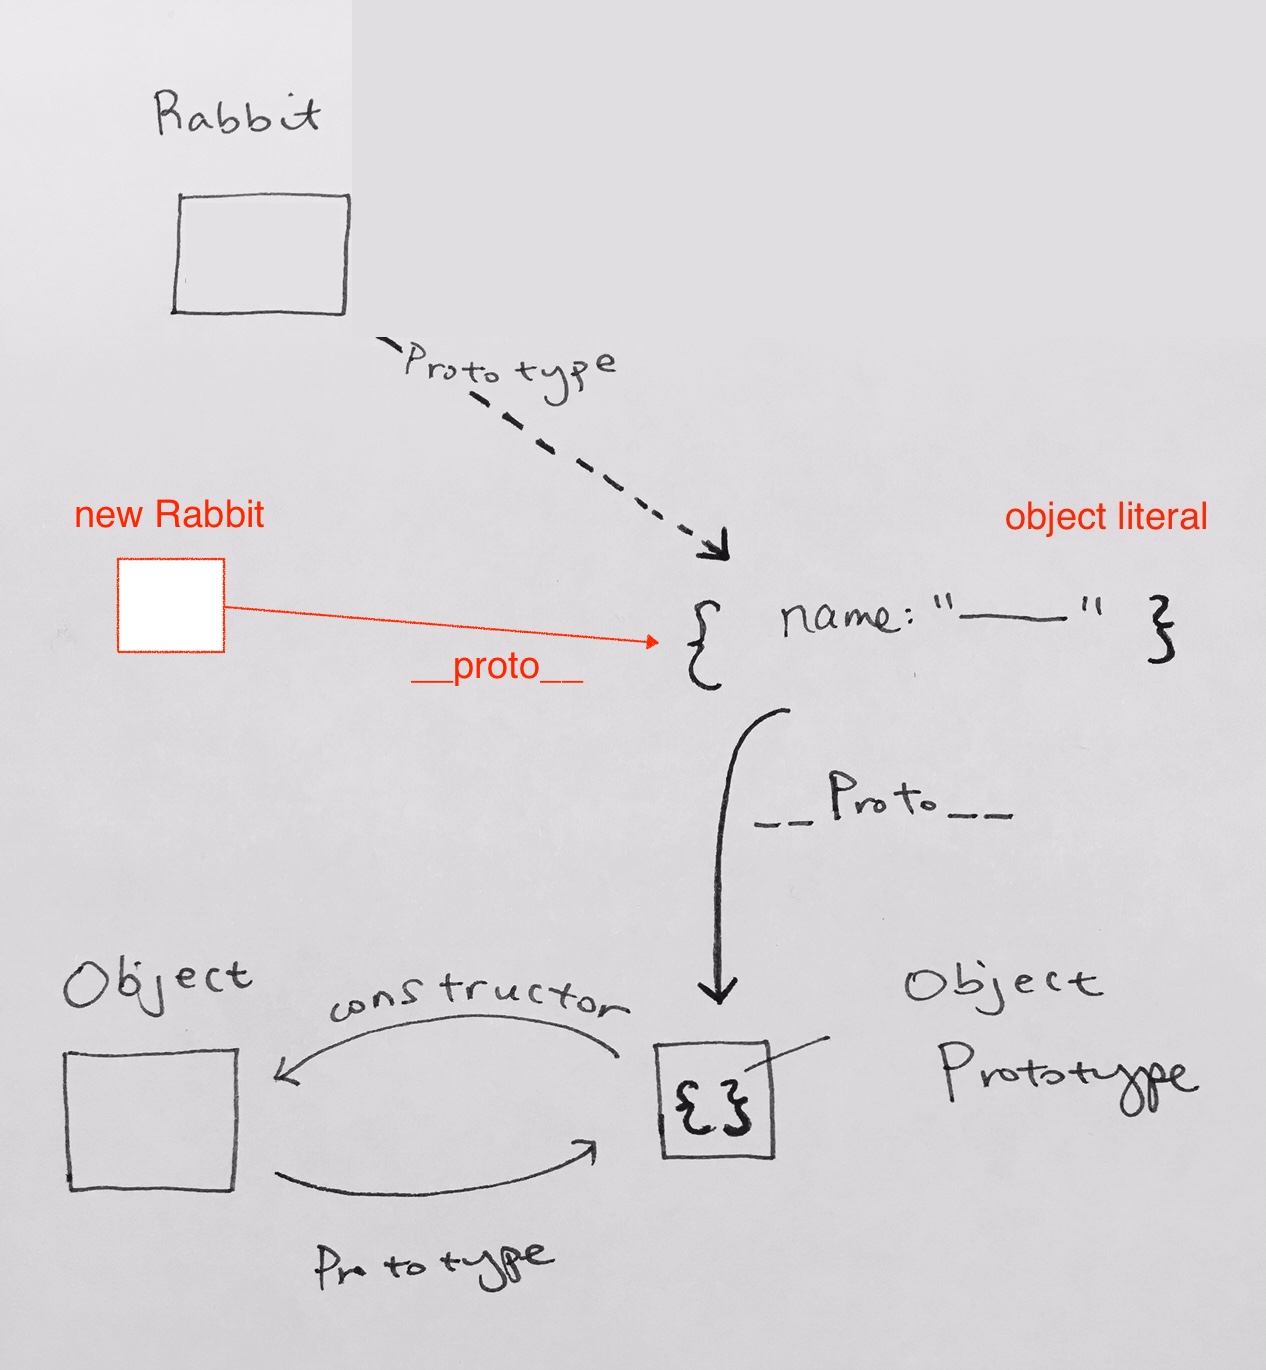
Step 3 – Connecting the Rabbit object

So now, let’s connect the Rabbit’s prototype to some other object literal instead of the empty default one given to us. Say an object literal with property name, initialized to “not entered”. In memory it will looks like this:

As stated earlier, any object in JS has a __proto__ pointing to Object.prototype. Thus, the object literal we created also has this. When we connect our Rabbit.prototype to it, the Rabbit’s prototype takes on the object literal.


Rabbit.prototype –> { name: ‘not entered’ }
Rabbit.prototype.__proto__ –> {}
Rabbit.prototype.constructor –> [Function: Object]

An interesting thing to note here is that when evaluating Rabbit.prototype.constructor, since
Rabbit.prototype is { name: ‘not entered’ }, and we call constructor on it, it does not exist.
So what it does is that it tries to find property “constructor” on object’s __proto__, which is
Object.prototype. It exists (Object.prototye.constructor), and it points to [Function: Object].

Instantiations of Rabbit

Prototype Chain

From all the information presented above, all prototype objects (except Object.prototype) are normal objects that do have a prototype. All of the built-in constructors (and most user-defined constructors) have a prototype that inherits from Object.prototype.

For example, Date.prototype inherits properties from Object.prototype, so a Date object created by new Date() inherits properties from both Date.prototype and Object.prototype.

This linked series of prototype objects is known as a prototype chain.

The problem with Prototoypes

As prototype object is shared among all the objects created using the constructor function, it’s properties and methods are also shared among all the objects. If an object A modifies property of the prototype having primitive value, other objects will not be effected by this as A will create a property on its objects.

If you were to create many rabbit instances, and then change the property name in its __proto__, all other rabbits will be affected.

Solution – Combine Constructor/Prototype

We know 2 things:

  • Every object calls the constructor and thus, gets its own instance of the function definition, along with its own properties.
  • Modifying a Prototype property using one instance reflects the other instances also.

What we can do is to define all the object specific properties inside the constructor and all shared properties and methods inside the prototype as shown below:

Full Source to Rabbit example

OUTPUT

Rabbit {}
{}
[Function: Object]
[Function: Rabbit]
— object literal —
{}
[Function: Object]
———————-
{}
[Function: Object]
———————-
Rabbit.prototype = objLiteral
— Rabbit —
{ name: ‘not entered’ }
{}
[Function: Object]
———————-
{ name: ‘not entered’, copy: [Function] }
[Function: Object]
Rabbit Constructor
{ name: ‘not entered’, copy: [Function] }
[Function: Object]

Using Mocha and Chai for unit tests in Node JS projects

ref – https://ubuverse.com/introduction-to-node-js-api-unit-testing-with-mocha-and-chai/
https://scotch.io/tutorials/test-a-node-restful-api-with-mocha-and-chai

https://gist.github.com/yoavniran/1e3b0162e1545055429e#mocha
https://gist.github.com/yoavniran/1e3b0162e1545055429e#chai

Creating the Directory

mkdir mocha-chai-demo
cd mocha-chai-demo

Setting up the package.json

in directory /mocha-chai-demo:

npm init

use defualt for all the options.
You will then have a package.json file created, which looks something like this:

package name: (mocha-chai-demo) tdd-for-node
version: (1.0.0)
description: test driven dev for node
entry point: (index.js)
test command:
git repository:
keywords: tdd chai mocha node js
author: ricky
license: (ISC)
About to write to /Users/xxxxxxxxx/Desktop/mocha-chai-demo/package.json:

{
“name”: “tdd-for-node”,
“version”: “1.0.0”,
“description”: “test driven dev for node”,
“main”: “index.js”,
“scripts”: {
“test”: “echo \”Error: no test specified\” && exit 1″
},
“keywords”: [
“tdd”,
“chai”,
“mocha”,
“node”,
“js”
],
“author”: “ricky”,
“license”: “ISC”
}

Is this ok? (yes) yes
EPCNSZXW0324:mocha-chai-demo rickytsao$ ls
package.json

Open it with text editor by typing:

open -a TextEdit package.json

and you’ll see your typical specs laid out for your node project.

Whenever you run the project, usually people would do “nodex index.js”. But it can get annoying. So instead, we can shortcut it with start. So next time, all you gotta do to start the server is to type: npm start

You should also edit the test script for mocha.

Under scripts, the value for the key “test” should be: “mocha –recursive”

Implementing the server

in directory /mocha-chai-demo:
touch index.js

Then copy the code below into the index.js

That file will run as our server.

Then run node index.js to see the server in action

If you were to run the app:

node index.js

You’ll see the confirmation messages.

Open up a browser, type: http://localhost:8080/colors
you’ll get {“results”:[“RED”,”GREEN”,”BLUE”]}

Creating the tests

The recommended way to organize your tests within your project is to put all of them in their own /test directory.
By default, Mocha checks for unit tests using the globs ./test/*.js and ./test/*.coffee. From there, it will load and execute any file that calls the describe() method.

In mocha-chai-demo:

mkdir test
cd test

you should now be in /mocha-chai-demo/test
touch test.js

then copy the below test code

Save the file.

Then in the test directory, just type:

npm test

You’ll see that we have 4 passed tests.

Details

ref – http://chaijs.com/api/bdd/

Expect

The BDD style is exposed through expect or should interfaces. In both scenarios, you chain together natural language assertions.

The should style allows for the same chainable assertions as the expect interface, however it extends each object with a should property to start your chain. This style has some issues when used with Internet Explorer, so be aware of browser compatibility.

Differences between expect and should

First of all, notice that the expect require is just a reference to the expect function, whereas with the should require, the function is being executed.

The expect interface provides a function as a starting point for chaining your language assertions. It works on node.js and in all browsers.

The should interface extends Object.prototype to provide a single getter as the starting point for your language assertions. It works on node.js and in all modern browsers except Internet Explorer.

Different ways of creating Objects, Object literal vs Object instances

Object.create()

This method creates a new object extending the prototype object passed as a parameter.

var b = {}

This is equivalent to Object.create(null) method, using a null prototype as an argument.

Using function constructor with new

es6 classes

Singleton pattern

literal vs instances

https://www.internalpointers.com/post/object-literals-vs-constructors-javascript

You have just created a JavaScript object called Website.
The main difference here is what you can do with it.
With the constructor function notation you create an object that can be instantiated into multiple instances with the new keyword

while the literal notation delivers a single object, like a singleton.

recursive divide and conquer on arrays

Quick sort version

The divide and conquer recursion on an array occurs when we have dubbed a mid,
then recursively go into the left side of the array. Then, the right side. We leave the middle element.

Thus we apply recursion on

  • low to (mid-1)
  • print mid
  • (mid+1) to high

But how?

We recursive into the left

1) For each step we go deeper into the leftmost array, we push one recursion onto the stack. Since we recurse first, then print, we need to push recursions on first.

2) When we reach the 0th element of the array, we have reached the leftmost (single element). Once its reached and the recursion function for the 0th element finishes, we pop it, and then continue on to the next line which is print. In other words, we then start executing the print code after the recursion.

3) When the printing is done (printing the mid), we will hit a function to process the right side.

We recursive into the right

4) Due to the order of the print, and recursion, we have printed, then push a recursion function onto the stack to process the right side.

5) Once that’s done, we pop and then come back to the previous left recursion. We move on and print. Then recurse on the right side.

Let’s go into an example.

Recurse deep into the leftmost array item

Say we have an array with 1 to 9. Indexed from 0 to 8. The concept of recursive divide and conquer is that we calculate a pivot first. The pivot is calculated to be somewhere in the middle of the array, then the left and right array are recursively processed.

For simplification purposes, we want to keep things simple. So let’s calculate the pivot such that it is:
floor of (low + high)/2

low: 0
high: 8

pivot = floor(4) = 4, we’ll print this pivot AFTER we process the left array

Our pivot will be printed after all the left array is processed.

Then we recursively process the left array.

low: 0
high: 3

pivot = floor( 0 + 3 /2 ) = 1, we’ll print this pivot AFTER we process the left array

left array is divAndCon(0, 1-1) or divAndCon(0,0)

It happens that divAndCon(0, 0) is a base case (We notice that low == high) and thus, simply prints 0. We then pop the current recursion function and move on.

Processing the right array

Now we pop back to the previous recursion with indexes divAndCon(0, 3). Since we’ve processed the left array of [1], we need to print the mid, which is index 1, element 2. Then we move on to process the right array [2,3]

right array is divAndConq(2,3)

Notice the array we’re processing is [3,4] where:

low: 2
high: 3
mid = floor of (3 + 2 ) / 2 = 2, we’ll print this pivot AFTER we process the left array

left array is divAndCon(2, 2-1) or divAndCon(2, 1)

When we reach to divAndConq(2,1) we see that low > high is false. Thus, we don’t do anything and just return

Once we return, we need to print the the pivot, which is element 3 at index 2.


Then process the right array, which is divAndCon(2+1,3), divAndConq(3,3)

divAndConq(3,3), we see that low == high, and we print (process)

So as you can see, this is how each element is printed (processed) from the beginning to end in a recursive fashion on an array.

Left Recursion not available

There comes a situation where the start index is larger than the end index…

for example, say we’re at recursion where index is 2 and 3.

[2:X][3:Y]

midpoint = (3 – 2)/2 = 0.

So we go into the LEFT recursion like so divideAndConquer(0, 0-1), or divideAndConquer(0,-1).
Under such case, we do not have a left section to go into. We already have mid pointing to the first element in the current array at [2:X].

Thus, mid will print, and all we have to do is take care of the right element [3:Y] in our right recursion.

Hence, we have to implement a base case to avoid this situation:

whenever start > end, we simply return

Source Code

output

Using divide and conquer to loop

output

MergeSort version

The difference is that the recursion in mergesort does not leave out the mid element. It includes the mid element as part of the right array. Thus, that’s why we use Math.ceil when we divide the array. Thus the recursion is applied on

  • low to (mid – 1)
  • mid to high

We want to drill down to the single element itself, which is when low == high. Then we simply return it. The merge function then proceeds to calculate and sort the returned single elements in 2s. Sorting first, 2 elements. Then the next merge call will sort 4 elements. Then sort 8 sorts, and so on.

where the merge happens like so:

output

Futher study

If you want to reverse the display of the array, simply reverse your recursion like so:

This way, you look at the high end first, which is the upper half. Then the next recursion will go upper half. so on, and so on, until you hit the last element first.

JS classes support 3 kinds of methods

https://scotch.io/tutorials/better-javascript-with-es6-pt-ii-a-deep-dive-into-classes

review:

Javascript Prototype

Class Constructors

Static methods

Static methods are methods on the constructor function itself, which are not available on instances of the class.
You define them by using the static keyword.

Prototype methods

Any method that isn’t a constructor or a static method is prototype method. The name comes from the fact that we used to achieve this functionality by attaching functions to the .prototype of functions-as-constructors:

Using Request object to make web requests

UPDATE

Client Side

ref – https://github.com/redmacdev1988/SlideShow-Frontend

When we want to make a web request, we can use JS’s Request object.
The first parameter takes in an url, next parameter is a dictionary where key/values specify the details of the request. i.e web verb, headers, body data, etc.

For example, we want to make a PUT request on an url http://1xx.xx9.xx.xxx/pictorials/beijing-tower, use standard mod as cors, specify body data as “description=’hehe haha'”, etc.

Also notice that we set the body data like so: parameter=value&also=another

https://stackoverflow.com/questions/14551194/how-are-parameters-sent-in-an-http-post-request

updatePictorial.js

Then we fetch this request object, and get the response.

Server side

ref – https://github.com/redmacdev1988/SlideShow-Backend/

In node, we specify our routes. We say for our app, when the incoming request has the route of /pictorials/id and the web verb is PUT, then we take care of this by calling exported function update_a_pictorial in the pictorialController file

SlideShow-Backend/api/routes/pictorialRoutes.js

And so we implement update_a_pictorial function. We have the standard request/response object. In the req object, we look at the body to make sure we have received the data. The id, being passed via the url, will be in the params array property.

Once you have that, we use mongo’s findOneAndUpdate function to update the row associated with the ID with our new description.

SlideShow-Backend/api/controllers/pictorialController.js

DELETE

This feature makes a DELETE request. We set up our basic Request properties such as method, mode, body, etc.
Notice in our body, we now attached the unique id of the pictorial so the server can delete that row in the database.

client side

Also notice that we set the body data like so: parameter=value&also=another
https://stackoverflow.com/questions/14551194/how-are-parameters-sent-in-an-http-post-request

SERVER SIDE

We then let express know that for the delete verb, call delete_a_pictorial function.

SlideShow-Backend/api/routes/pictorialRoutes.js

SlideShow-Backend/api/controllers/pictorialController.js

We extract the data (unique id) from the body, and use it to specify which pictorial we want to delete.

JavaScript Preloading

https://www.htmlgoodies.com/tutorials/web_graphics/article.php/3480001

JavaScript Preloading

JavaScript includes the Image among its native object types. The Image object represents an HTML image tag on the page and exposes the same properties and events. Perhaps oddly, the Image has no constructor that accepts an image source, so an image must be loaded into the object by setting its src attribute. Doing so causes the image to be downloaded from the server at that point.

Once an image is preloaded with JavaScript, you can take advantage of the cached image using only its filename. It’s not necessary to keep using the JavaScript variable that you loaded the image into. The thonky.com provides an excellent demo to illustrate this. The demo provides a button to preload the image. After it has finished loading, the page displays a second button that allows you to use the preloaded image in an image tag, using only the image filename. Even though the code does not refer to the variable that the image was loaded into, the image will still show up right away because it’s in the cache.

Example