github source
What does it do
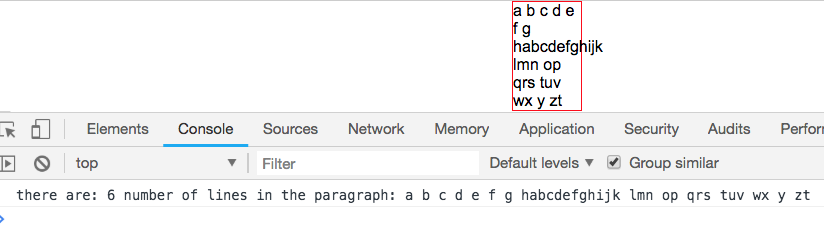
Calculate how many lines are there when you put a long string into a div/span that has a width.
Getting Started
First, let’s set it up. We create a div with id para. We limit it to 68px so we can see the effects of the word break.
html
|
|
<!DOCTYPE html> <html lang="en"> <head> <meta charset="utf-8"> <meta name="viewport" content="width=device-width, initial-scale=1.0" /> <title>Number of lines in a paragraph when squished into an element</title> <script src="jquery-1.11.3.min.js"></script> <script type="text/javascript" src="script.js"></script> <style> #para {width: 68px; border: 1px solid red;} </style> <body> <div id="para"></div> </body> </html> |
js
|
|
$(document).ready(function() { }); |
Getting the width of a string involves first putting test text into your div #para. Then,
1) We need to the get element object of #para first. It will contain all the information you need about this element object. We will be using it in the next step to get font and font size info.
|
|
var para = document.querySelector("#para"); |
2) By using the global window object, we use getComputedStyle of an element object to get style information such as font-size, font-family, background-color…etc.
We do this by calling getPropertyValue on the style object that’s returned. We specify which style attribute we want to get by inserting the style name.
|
|
var font = window.getComputedStyle(para).getPropertyValue('font-family'); |
3) then the font size
|
|
var fontSize = window.getComputedStyle(para).getPropertyValue('font-size'); |
4) Using JQuery, create a span in your DOM.
Using jQuery, insert your text, apply the font and font size, and call width on it.
It will give you the pixel width on it.
The $.fn is an alias for jQuery.prototype which allows you to extend jQuery with your own functions.
We create our own function textWidth. It takes a paragraph, font, and a fontSize. Then it returns you
the width in pixels.
We first check to see if there’s a property placeholderEl. If it doesn’t exist, we attach the property
to our function. We then create a span element object and append it to the document’s body. We attach the
property placeholderEl to that span object.
We then insert the text into the span, and apply the font and font size to the text using css function.
then we call width on the span object to get the pixel.
|
|
$.fn.textWidth = function(text, font, fontSize) { if (!$.fn.textWidth.placeholderEl) $.fn.textWidth.placeholderEl = $('<span>').appendTo(document.body); var validText = text || this.val() || this.text(); font = font.replace(/"/g, ''); $.fn.textWidth.placeholderEl.text(validText).css({'font-family': font, 'font-size': fontSize}); return $.fn.textWidth.placeholderEl.width(); }; |
thus, so far, you should have something like this in your JS file:
1 2 3 4 5 6 7 8 9 10 11 12 13 14 15 16 17 18 19 20 21 22 |
$(document).ready(function() { // jQuery func $.fn.textWidth = function(text, font, fontSize) { if (!$.fn.textWidth.placeholderEl) $.fn.textWidth.placeholderEl = $('<span>').appendTo(document.body); var validText = text || this.val() || this.text(); font = font.replace(/"/g, ''); $.fn.textWidth.placeholderEl.text(validText).css({'font-family': font, 'font-size': fontSize}); return $.fn.textWidth.placeholderEl.width(); }; var TEXT = 'abc'; $("#para").text(TEXT); var para = document.querySelector("#para"); var font = window.getComputedStyle(para).getPropertyValue('font-family'); font = font.replace(/"/g, ''); // remove all quotes var fontSize = window.getComputedStyle(para).getPropertyValue('font-size'); fontSize = fontSize.replace(/"/g, ''); // remove all quotes |
Logic
Now that we can get an accurate width of a paragraph with applied font, let’s take a look at how we’re going to tackle the issue.
note: limit means the end of the width.
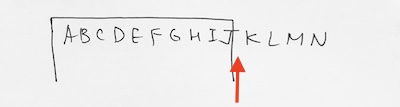
A) no-space long word past limit
In the first basic situation, the long word will stay as is. This is because the browser do not break a word. It will only break a sentence, when it detects a space, but will never break a word in half.
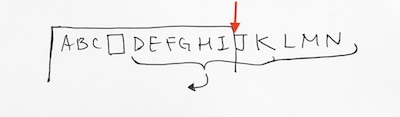
B) long word past limit, then space
The second situation is that our long word goes past the limit. Then it has a space. In this case, we have two parts.
– The string left of the space.
– The string right of the space.
The right part of the space then gets broken and starts at the next line. The space is the last character of the first line.

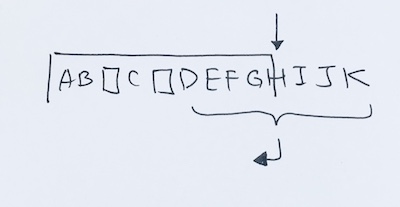
C) long word past limit, with a previous space
When we reach the limit, but there was a previous space. Thus, we have two parts again.
– The string left of the space.
– The string right of the space.
The string to the right of the space gets broken and start at line two. The string left of the space, remains at line 1.
D) long word past limit, with previous multiple spaces
Sometimes, there will be multiple spaces previously. So when we hit the limit, how do we break it? The answer is that we find the last space. We don’t care any previous spaces. All we care about is the last space because we need to see how to break the substring that just went past the limit.
Implementation
We’ll do this in es5.
We first create a function to be new-ed later. It will contain the object’s property and data. We need the basic things such as:
– text (string)
– the width function we’re going to use to calculate string widths on the browser (function)
– font (string)
– fontSize (string)
We also pass in the div element’s id so that we can get the width.
|
|
function DblLineWithEllipsis(newParagraph, calcTextWidthFunc, eleSelector, newFont, newFontSize) { this._paragraph = newParagraph; this._textWidthFunc = calcTextWidthFunc; this.LIMIT = $(eleSelector).width(); this._font = newFont; this._fontSize = newFontSize; } var TEXT = 'abcdefghijklmnopqrstuvwxyz'; var temp = new DblLineWithEllipsis(TEXT, $.fn.textWidth, "#para", font, fontSize); |
Then, let’s implement a function in the prototype so that all instances will use it.
We can easily get the width of the text by using our textWidth function. However, when you use space ‘ ‘, you’ll get 0. So we do a workaround by giving the strings ‘a’. Then a space a, (‘a a’). That way, we know the width of a. And then, can calculate the width of space.
|
|
DblLineWithEllipsis.prototype.calculateWidthOfSpace = function() { var a = this._textWidthFunc('a', this._font, this._fontSize); var a_space_a = this._textWidthFunc('a a', this._font, this._fontSize); return a_space_a - (2 * a); } |
We calculate the width of the string. If the string is a space, then we simply give it the width of space, which we pass in.
However, if not a space, then we calculate it by passing our text, our font, and font size. We then pass the result into a callback to be processed by others.
|
|
DblLineWithEllipsis.prototype.getCharWidth = function (str, widthOfSpace, callback) { if (str == ' ') {callback(widthOfSpace, true);} else {callback(this._textWidthFunc(str, this._font, this._fontSize), false);} } |
The Logic
Given a long text, we run through each character.
1) get width of the char
2) append the width onto a total width.
|
|
for (var i = 0; i < characterArray.length; i++) { // get width of character // totalTextWidth += width of character } |
For every add of a width, we check to see if our total text has passed the limit.
|
|
DblLineWithEllipsis.prototype.textWidthPastLimit = function() {return (this._totalTextWidth > this.LIMIT);} |
Thus,
|
|
for (var i = 0; i < characterArray.length; i++) { // get width of character // totalTextWidth += width of character if (this.textWidthPastLimit()) { // if current char is a space // if previous space exists } } |
using our prototype function getCharWidth. Also, notice “holder”. Holder basically holds the added character so far.
Another thing to notice is that there is a bool to check to see if a previous space exist.
|
|
... var holder = ""; var previousSpaceExists; ... for (var i = 0; i < characterArray.length; i++) { this.getCharWidth(characterArray[i], SPACE_WIDTH, function(width, isSpace) { if (isSpace) previousSpaceExists = true; self._totalTextWidth += width; }); holder += characterArray[i]; if (this.textWidthPastLimit()) { } } |
The key is to check for situations when we hit past the limit.
If after passing the limit, and we detect a space, then we gotta save the left side of the string.
In order to do this, we use a ‘holder’ string to hold everything. Also, notice we have calculated the width of the space also.
– passed the limit
– no previous space was detected
– current char is a space
Thus, we save the everything that was held up to now. But where do we save it to?
We simply save it into an array that will represent the formatting of our paragraph.
First sentence is array[0], second array[1]…etc.
Thus, in our constructor function:
|
|
function DblLineWithEllipsis(newParagraph, calcTextWidthFunc, eleSelector, newFont, newFontSize) { ... ... this._paragraphFormat = []; this._paragraphFormatCur = 0; } |
now..back to our calcNumOfLines.
1 2 3 4 5 6 7 8 9 10 11 12 13 14 15 16 17 18 19 20 21 22 23 24 25 26 27 |
DblLineWithEllipsis.prototype.calcNumOfLines = function() { var SPACE_WIDTH = this.calculateWidthOfSpace(this._font, this._fontSize); var characterArray = this._paragraph.split(''); var holder = ""; holder += characterArray[i]; for (var i = 0; i < characterArray.length; i++) { this.getCharWidth(characterArray[i], SPACE_WIDTH, function(width, isSpace) { ... self._totalTextWidth += width; }); holder += characterArray[i]; if (this.textWidthPastLimit()) { if (this.charIsSpace(characterArray[i])) { this.storeString(holder); holder = ''; this._totalTextWidth = 0; } } } this.storeString(holder); return this._paragraphFormat.length; } |
where
|
|
DblLineWithEllipsis.prototype.storeString = function(strHolder) {this._paragraphFormat[this._paragraphFormatCur++] = strHolder;} |
Basically, if we pass the limit, but no space is found, we just save it. This will satisfy A).
As each additional character is processed, and we find that the current processed character is a space (assuming no previous space), then we simply store it.
This resolves B).
else if we’re past the limit and the character is NOT a space, and there was a previous space, then we resolve cases
C) and D)
1 2 3 4 5 6 7 8 9 10 11 12 13 14 15 16 17 |
for (var i = 0; i < characterArray.length; i++) { this.getCharWidth(characterArray[i], SPACE_WIDTH, function(width, isSpace) { if (isSpace) previousSpaceExists = true; self._totalTextWidth += width; }); holder += characterArray[i]; if (this.textWidthPastLimit()) { if (this.charIsSpace(characterArray[i])) { this.storeString(holder); holder = ''; this._totalTextWidth = 0; } else if (previousSpaceExists) { previousSpaceExists = false; holder = this.splitHoldStringByLastSpace(holder); } } } |
full source
https://github.com/redmacdev1988/NumberOfLines