All posts by admin

Create a React Native App

ref – https://facebook.github.io/react-native/docs/getting-started.html

Install expo


npm install -g expo-cli

To create new React Project and run it

expo init SimpleApp

Then you’ll see a project is being created:

EPCNSZXW0324:testReactAppWithJest2 rickytsao$ expo init SimpleApp
There is a new version of expo-cli available (2.10.1).
You are currently using expo-cli 2.6.14
Run npm install -g expo-cli to get the latest version
? Choose a template: expo-template-blank
? Yarn v1.13.0 found. Use Yarn to install dependencies? Yes
[11:39:06] Extracting project files…
[11:39:09] Customizing project…
[11:39:10] Initialized a git repository.
[11:39:10] Installing dependencies…
yarn install v1.13.0
info No lockfile found.
[1/4] 🔍 Resolving packages…
[2/4] 🚚 Fetching packages…
[3/4] 🔗 Linking dependencies…
warning “expo > expo-background-fetch@1.0.0” has unmet peer dependency “expo-task-manager-interface@~1.0.0”.


warning “expo > babel-preset-expo > metro-react-native-babel-preset > @babel/plugin-proposal-object-rest-spread > @babel/plugin-syntax-object-rest-spread@7.2.0” has unmet peer dependency “@babel/core@^7.0.0-0”.
[4/4] 🔨 Building fresh packages…
success Saved lockfile.
✨ Done in 108.84s.

Your project is ready at /Users/rickytsao/Desktop/testReactAppWithJest2/SimpleApp
To get started, you can type:

cd SimpleApp
yarn start


cd SimpleApp
npm start

Then in the terminal:


> expo start

At this point, you are starting expo and it will run what you have in the current directory.

There is a new version of expo-cli available (2.10.1).
You are currently using expo-cli 2.6.14
Run npm install -g expo-cli to get the latest version
[13:11:22] Starting project at /Users/rickytsao/Desktop/testReactAppWithJest2/SimpleApp
[13:11:26] Expo DevTools is running at http://localhost:19002
[13:11:26] Opening DevTools in the browser… (press shift-d to disable)
[13:11:40] Starting Metro Bundler on port 19001.

exp://10.22.19.89:19000

you’ll also see a QR code image here

To run the app with live reloading, choose one of:
• Sign in as @rtsao6680 in Expo Client on Android or iOS. Your
projects will automatically appear in the “Projects” tab.
• Scan the QR code above with the Expo app (Android) or the Camera app (iOS).
• Press a for Android emulator, or i for iOS simulator.
• Press e to send a link to your phone with email/SMS.

Press ? to show a list of all available commands.
Logs for your project will appear below. Press Ctrl+C to exit.
[13:11:54] Tunnel ready.

A browser will open

On the left sidebar, under connection, “local” is selected.

Mosh React tutorial (part 2)

final source

ref – https://www.youtube.com/watch?v=Ke90Tje7VS0&t=0s&list=LLJEwHxS-Vsf-N8xSFHeMirw&index=4
Starts at 1:01:06 of the video

Handling Events

All those standard DOM events are available via the JSX.

We’ll use onClick and have it respond to our function handleIncrement.
However, when we execute the function, we notice that the this object is undefined.

Its because we need to bind the event handler.

But why is it that in an event handler function, the this object is undefined?

Depending on how a function is called, the ‘this’ changes.

The this reference will always return the calling object.

However, if the function is called as standalone, it will return window object.
If the standalone function is called within ‘strict mode’, it will return undefined.

And that is the reason, our event handler function does not have access to ‘this’.

Notice that handleIncrement is a REFERENCE. We didn’t execute the function yet. If the function was executed right away, then it will correctly call the function, and the function will be able to display this.

But for event handlers, since we pass the handleIncrement function reference, when it is used, it will be used in another function of a different environment. It will not be able have class Counter as its surrounding environment. It will be used in its own environment, namely, as a standalone function. Hence standalone functions (in a ‘strict mode’) will have undefined as the this object.

use ‘bind’ in the constructor

We implement a constructor function. Make sure you call super to initiate its parent class.
Then we bind the current this object to that function. So that when the reference of that function gets passed around, the this will always return to this object, and subsequently, the properties in this classCounter.

Use custom constructor to bind your event handlers to class Counter

Now, this.state.count will be valid.

The reasoning for using bind is explained here

Sometimes we need to pass in objects to our event handlers. In order to do this without having to execute the event handler via syntax, we define an anonymous function. That way, the event handler only executes when you click:

Pass in objects to handle event handlers like so:

or when you’re trying to loop through something and pass in an object to event handlers:

Updating the State

In react, we DO NOT modify the state directly. Instead we use setState, which is a method inherited from the base class Component.

We’re telling React we’re updating the state. It will then diff it with the previous virtual DOM. Finally, it applies the changes to the real DOM.

full code

What happens when State Changes

React state changes, Virtual DOM, reconciliation

Mosh React tutorial (part 1)

final source

ref – https://www.youtube.com/watch?v=Ke90Tje7VS0&t=0s&list=LLJEwHxS-Vsf-N8xSFHeMirw&index=4

Make sure you install Node to use its NPM packaging scheme. You can check the version of your node:

Set up

We first use NPM to install package create-react-app (https://www.npmjs.com/package/create-react-app)

/usr/local/bin/create-react-app -> /usr/local/lib/node_modules/create-react-app/index.js
+ create-react-app@3.4.1
added 98 packages from 46 contributors in 34.739s

In your Visual Code, go to Extensions and look for Simple React Snippets
Then install Prettier – Code formatter

Then search for Format on Save. Check it.

Creating 1st app

Now we have fully working react app..

The app would start and run on port 3000.

JSX (javascript XML)

– describe what UI will look like
– Babel – Modern javascript compiler: Babel takes JXS file, convert it to plain javascript code that browsers can understand.

It takes JXS file:

…convert it to javascript code:

React’s createElement function would then call DOM functions to create HTML Elements.

ref – babeljs.io/repl

Write React code from scratch

in src, delete all files.

In src folder, Add file index.js

babel will compile it down to a call to React.createElement.

This is why we need to import React from top.

That was the output of a JS expression. Its a React Element.
virtual DOM is a lightweight in memory representation of the DOM.
And our React Element is part of virtual DOM.

Whenever state of this object changes, React will get a new React Element, diff it with the old, and figure out what has changed.
React will then go to the real DOM, and apply those changes.

index.js

Thus, you will get “Hello World” printed with div id root.

In real world, we don’t render elements like this.
We render Components instead.

We also render tree of components, which produce complex markup.

from scratch source

First React Component

We create an basic app:

create-react-app counter-app

Now we install bootstrap. Open up a Terminal. Let’s import bootstrap into our app.

npm i bootstrap@4.1.1

index.js

After saving, when you look at the web page, you’ll see that the font has turned purple.

In our folder view, under src, create a components folder.
Inside add a new file called counter.jsx

Earlier, we have installed Simple React Snippets…let’s use that now.

imrc + tab // import react component
cc + tab // create class”

counter.jsx

Notice we’re defining the class above, and exporting it below

Now, let’s import Counter into our index.js file

Go back to your web page and you should see the text from Counter component

Embedding Expressions

add button to our Counter component

Note that JSX expressions must have 1 parent element.
JSX get compiled to React.createElement() where its argument is the type of element we want to create, i.e h1.

Thus, we must wrap what we want to display inside of an element, say a div.

counter.jsx

*Multi cursor editing – Select piece of code, press cmd + d, you’ll get multiple cursor, and change all instance in one go.

React Fragment

But let’s say you don’t like to wrap everything inside of an all encompassing element. You just want to put your fragmented code in the return expression.

Now when you look at the webpage, inspect the element, and you won’t see the div anymore.
You’ll see your html code underneath the id=root div.

Using state for dynamic data

First we override the state property in our Counter component.

We assign a property count to it.

Then in our JSX, we use curly braces and put any js expression inside of it.

save the changes, and you’ll see the results on your web page.

In between curly braces, you can write any valid javascript expression.
Hence, let’s implement a method, and use it within our curly braces.

Now, you will be able to see the string Zero when our count is 0.

We can also return JSX expression in our JS code.

JS expression like normal javascript. Pass them to a function, define const, variable…etc.

Setting Attributes

You can put set attributes via your js code as well. Let’s say we add a state property with a string to a url that generates a random image.

We put our ‘imageUrl’ property inside of the curly brace used in JSX and it will work like so:

Now, you’ll see the image in your output.

Remember that JSX gets compiled into React create element functions, which then outputs html. Hence, in our JSX, when we’re working with classes, we cannot just use class as attribute. We use ‘className’.

When we want to work with styles, we can create properties, which hold CSS data, which then changes dynamically. Those changes will be reflected in our JSX

inline styles

If you want to use inline styles, you can do another curly brace, and type in your styles like so:

Rendering Classes dynamically

We calculate bootstrap class name depending on if the count is 0 or not.
Then we render this calculation.

Thus, every time the page gets rendered, bootstrap’s “badge-warning” will be returned when the count is 0

and “badge-primary” will be returned when the count is not zero

Rendering Lists

Let’s render a list of tags.

We add new property of our state object.

JSX is NOT a TEMPLATE ENGINE, no concept of loops.

Its a simple syntax that gets compiled to React elements.

So we do it through javascript expressions via curly braces {…}

and also in our render function:

However, there is an error in the console.

Warning: Each child in an array or iterator should have a unique “key” prop.

The reason why is because it needs to uniquely identify each item in this list.
If the state of this react element changes, React needs to figure out quickly which element is changed.
And where in the DOM it needs to make changes so that it’s in sync with its virtual DOM.

Whenever you’re using the map method to render items, we need to set the ‘key’ attribute for our JSX.
Note that this key just needs to be unique in this list. It does not need to be unique in the entire application.

Conditional Rendering – use curly braces for js expressions

Let’s spit out a message for when the tags are 0.
If there is some items in the tags array, then we simply display it.

JSX is not a templating engine. We do not have if/else. To put conditional rendering, we need to go back to our javascript.

We can add a helper method i.e renderTags().

Let’s remove our ul with the tags.map and pull it out from render into function renderTags. Update your counter.jsx:

Another technique is use condition in curly braces

The first js expression is if the boolean evaluates to true, we display a string.
The second js expression executes renderTags function.

create basic React JS project

ref – https://code.visualstudio.com/docs/nodejs/reactjs-tutorial

We’ll be using the create-react-app generator for this tutorial.

Make sure you have Node.js JavaScript runtime and npm (Node.js package manager) installed.

To install the create-react-app generator, in a terminal or command prompt type:

npm install -g create-react-app

This may take a few minutes to install. You can now create a new React application by typing:

create-react-app my-app-one

This may take a few minutes to create the React application and install its dependencies.

Let’s quickly run our React application by navigating to the new folder and typing npm start to start the web server and open the application in a browser:


cd my-app-one
npm start

You should see “Welcome to React” on http://localhost:3000 in your browser. We’ll leave the web server running while we look at the application with VS Code.

To open your React application in VS Code, simply open the VS Code application and open the my-app-one folder.

Debugging React

To debug the client side React code, we’ll need to install the Debugger for Chrome extension.
Open the Extensions view and look for “Debugger for Chrome extension” in the search box. You’ll see several extensions which reference Chrome.
Press the Install button for Debugger for Chrome. The button will change to Installing then, after completing the installation, it will change to Reload. Press Reload to restart VS Code and activate the extension.

Set a breakpoint

To set a breakpoint in index.js, click on the gutter to the left of the line numbers. This will set a breakpoint which will be visible as a red circle.

Configure the Chrome debugger

We need to initially configure the debugger. To do so, go to the Debug view and click on the gear button to create a launch.json debugger configuration file. Choose Chrome from the Select Environment drop-down list. This will create a launch.json file in a new .vscode folder in your project which includes a configuration to launch the website.

We need to make one change for our example: change the port of the url from 8080 to 3000. Your launch.json should look like this:

Ensure that your development server is running (“npm start”). Then press fn+F5 or the green arrow
to launch the debugger and open a new browser instance. The source code where the breakpoint is set runs on startup before the debugger was attached so we won’t hit the breakpoint until we refresh the web page. Refresh the page and you should hit your breakpoint.

Currying and Partial Functions (js)

ref – https://hackernoon.com/currying-in-js-d9ddc64f162e
https://codeburst.io/currying-in-javascript-ba51eb9778dc
https://blog.bitsrc.io/understanding-currying-in-javascript-ceb2188c339
https://dev.to/damcosset/higher-order-functions-in-javascript-4j8b

Kyle Simpsons – Functional Programming

Arity
Higher Order functions.
Closure

Curry – the process (implementing) of taking in a function with multiple parameters and creating unary (takes in 1 parameter) closures/functions.

Partial App – is applying the params and actually using the app.

Partial Functions

ref – https://medium.com/@JosephJnk/partial-function-application-in-javascript-and-flow-7f3ca87074fe

Partial application is the act of taking a function which takes multiple arguments, and “locking in” some of those arguments, producing a function which takes fewer arguments. For instance, say we have this function:

‘square’ is partial application: we create square by making a new function, which just passes its arguments through to another function, adding some hard-coded arguments to that other function.

Partial application transforms a function into another function with smaller arity.

where arity means the number of arguments a function takes.

Currying

Named after Haskell Brooks Curry, currying is the process of breaking down a function into a series of functions that each take a single argument. In other words, Currying is a technique of evaluating function with multiple arguments, into sequences of function with single argument.

In other words, when a function, instead of taking all arguments at one time, takes argument one and returns a new function. that takes argument two and returns a new function which takes the third one, and so forth, until all arguments have been fulfilled.

That is, when we turn a function call add(1,2,3) into add(1)(2)(3) . By using this technique, the little piece can be configured and reused with ease.

A curried function is a function that takes multiple arguments one at a time. Given a function with 3 parameters, the curried version will take argument one and return a function that takes argument two. It then returns a function that takes the third argument. The last function returns the result of applying the function to all of its arguments.

Why it’s useful ?

Currying helps you to avoid passing the same variable again and again.
It helps to create a higher order function. It’s extremely helpful in event handling.
Little pieces can be configured and reused with ease.

Currying example

Here’s a simple example. We’ll write a function sum3 takes three numbers and returns their sum.

In a standard way, the function is implemented like so:

However, if we provide too few parameters, or too many parameters, then it can have unintended consequences.

add(1,2) –> NaN
add(1,2,3,4) –> 6 //Extra parameters will be ignored.

The curried version of sum3 behaves a differently. It accepts one argument and returns one function. The returned function also accepts one argument and also returns another function that also accepts one argument and …

This cycle continues until the returned function accepts the last argument. The last one in the chain, finally returns the sum.

This works because JS supports closures.

Currying is a transform that makes f(a,b,c) callable as f(a)(b)(c). JavaScript implementations usually both keep the function callable normally and return the partial if arguments count is not enough.

Another example of why currying is useful

Of course, currying comes in handy when you want to:

1. Write little code modules that can be reused and configured with ease, much like what we do with npm:

For example, you own a store🏠 and you want to give 10%💵 discount to your fav customers:

When a fav customer buys a good worth of $500, you give him:

You see that in the long run, we would find ourselves calculating discount with 10% on a daily basis.

We can curry the discount function, so we don’t always add the 0.10 discount:

Now, we can now calculate only with price of the goods bought by your fav customers:

Again, it happens that, some fav customers are more important than some fav customers- let’s call them super-fav customers. And we want to give 20% discount to our super-fav customers.

We use our curried discount function:

We setup a new function for our super-fav customers by calling the curry function discount with a 0.2 value , that is 20%.

The returned function twentyPercentDiscount will be used to calculate discounts for our super-fav customers:

2. Avoid frequently calling a function with the same argument:

For example, we have a function to calculate the volume of a cylinder:

To resolve this, you curry the volume function(like we did earlier):

We can define a specific function for a particular cylinder height:

More Example

How does Curry work?

Currying works by natural closure.The closure created by the nested functions to retain access to each of the arguments.So inner function have access to all arguments.

Additional Examples

ref – https://www.sitepoint.com/currying-in-functional-javascript/

You can see how powerful this approach is, especially if you need to create a lot of very detailed custom functions.
The only problem is the syntax. As you build these curried functions up, you need to keep nesting returned functions,
and call them with new functions that require multiple sets of parentheses, each containing its own isolated argument.
It can get messy.

To address that problem, one approach is to create a quick and dirty currying function that will take
the name of an existing function that was written without all the nested returns.
A currying function would need to pull out the list of arguments for that function,
and use those to return a curried version of the original function:

Currying is an incredibly useful technique from functional JavaScript.
It allows you to generate a library of small, easily configured functions that behave consistently,
are quick to use, and that can be understood when reading your code. Adding currying to your coding practice
will encourage the use of partially applied functions throughout your code, avoiding a lot of potential repetition,
and may help get you into better habits about naming and dealing with function arguments.

Higher Order function

A higher order function is a function that takes a function as an argument, or returns a function.

One of the great advantages of using higher order functions when we can is composition.

We can create smaller functions that only take care of one piece of logic. Then, we compose more complex functions by using different smaller functions.

This technique reduces bugs and makes our code easier to read and understand.

By learning to use higher-order functions, you can start writing better code.

First we see an array of students:

Let’s write functions:

note, interface for reduce:

function(total,currentValue, index,arr) Required.
A function to be run for each element in the array.

Function arguments:

total Required. The initialValue, or the previously returned value of the function
currentValue Required. The value of the current element
index Optional. The array index of the current element
arr Optional. The array object the current element belongs to

Then insert other functions into function average. It helps you get the average of boy’s grades, and girls grades, and everyone’s grades.
Hence as you can see, its composition.

udemy example

Given function ffn that adds three args.

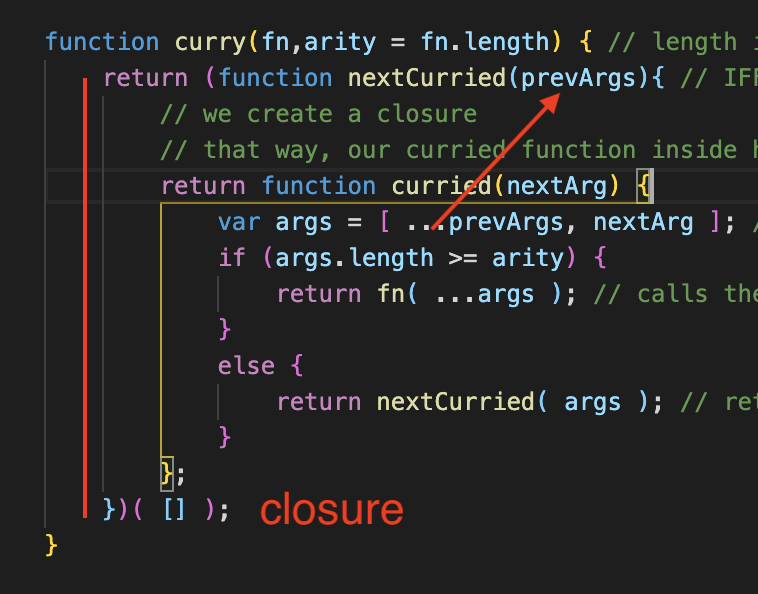
We create a curry function that will will spit back a closure with a function reference in it depending on whether you keep executing the curried function.

It will be used like this:

Let’s break it down.

We start off with

Which dictates the function and the # of args. The # of args will be matched later as each arg is executed during the curry. Hence, take note of arity

Now we create an IIFE that executes right away. This gives prevArgs to whatever is inside. If we decide to return a function that is inside, then that function has access to prevArgs.

Why do we do this? Because we want to get the previous args. Initially, we start off with empty array [].
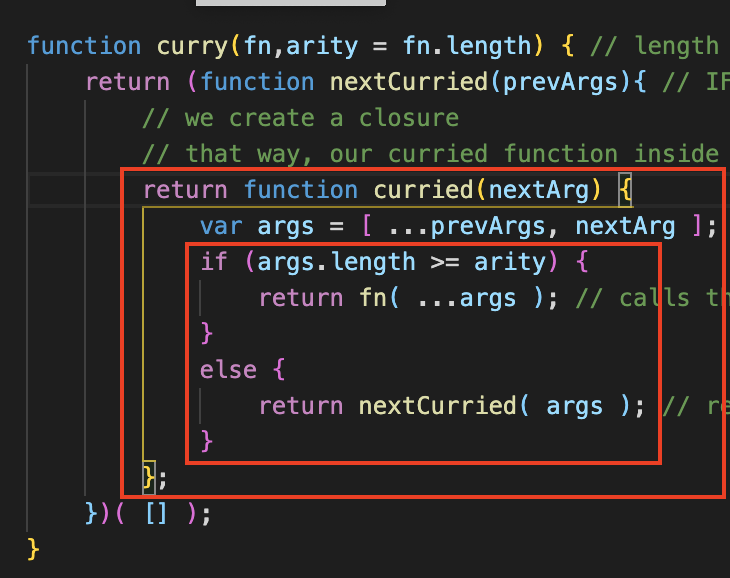
curried is a function reference, so we need to execute and pass in a parameter. After we pass it in, we will be able to see the full args list.

For example curry(10)(14).

We have empty array to start when we execute curry. Then we return a function reference curried,
curry(10)(14), in which we put 10.

Now, we have

the # of args !== arity yet, so we keep going.
We create another closure with IIFE with the args list. We return a function reference curried,
curry(10)(14), in which we put 14.

Now, we have

so on and so forth…

Finally, when the # of args we input matches that of arity, we execute fn, which is the original function.

Source

functions are first class objects (js)

ref – https://medium.com/front-end-weekly/javascript-functions-are-objects-6affba08ab26
https://hackernoon.com/javascript-and-functional-programming-pt-2-first-class-functions-4437a1aec217

Functions as First-Class Objects in JavaScript: Why Does This Matter?

In computer science, a programming language is said to support first-class functions (or function literal) if it treats functions as first-class objects.

First class objects are entities that can be dynamically created, destroyed, passed to functions, returned as a value, have all the rights as other variables in the language. Same as any other objects. It can have properties, methods.
In other words, this means that JS supports constructing new functions during the execution of a program, storing them in data structures, passing them as arguments to other functions, and returning them as the values of other functions. In other words,

First-class citizenship, within the world of programming, means that a

given entity (such as a function) supports all the operational properties inherent to other entities; properties such as being able to be assigned to a variable, passed around as a function argument, returned from a function, etc.

Basically, first-class citizenship simply means “being able to do what everyone else can do.”

Excellent! But okay… who cares if JavaScript functions are first-class objects? What does it matter?

The beauty of JavaScript functions enjoying first-class citizenship is the flexibility it allows.

Functions as first-class objects

opens the doors to all kinds of programmatic paradigms and techniques that wouldn’t otherwise be possible.

– Functional programming is one of the paradigms that first-class functions allow.

– Additionally, listening for and handling multiple events by passing callback functions is a useful feature within JavaScript and is achieved by passing a function as an argument to the document object’s addEventListener method.

for example, we have a form with id msgbox. It takes text input, and when you press the submit button, it’ll send a “submit” event.

What we try to do, is listening for that event, and get the data from the form.

This is where we pass the SendMessage function as a argument to the addEventListener method.

Where callback functions SendMessage implementation is:

Once we have listened in on the ‘submit’ event, we call SendMessage function in order to create a CustomEvent object with id “newMessage”, stick the user text into it, and then dispatch the event. Now, whoever is listening in on Events with id “newMessage” will be able to receive that event.

So we have a div to put all our text in.

Then we have this div listen for “newMessage” events.
Whenever we get “newMessage” events, we want to call newMessageHandler function.

Now, the callback function newMessageHandler has parameter event e, which is the CustomEvent itself.
Take note that the CustomEvent is of an object with properties details, bubbles, and cancelable.

so in newMessageHandler, we have parameter Event e object. This object is

So in newMessageHandler, we then access the msg via detail property via
e.detail.message

– Furthermore, the practices of closure and partial-application/currying would not be possible within JavaScript if functions didn’t enjoy the status of first-class.

ref – http://chineseruleof8.com/code/index.php/2016/01/05/closures-2/
Closure example

output:

The result is:
0
1
2
3
4
5
6
7
8
9

1 second later…

10
10
10
10
10
10

The reason why is because the for loop does 2 things:

1) print out the i
2) set up an async execution of a function that prints i.

The reason why you get 0-9 in the beginning is due to 1). It prints the i right away.
Then it will set up 10 async execution of the callback function.

Once the 1 second passes, it will run the callback.
The reason why the 10 callback functions will all print out all 10s, is because i is already at 10.

The inner function in the setTimeout references the i via parent scope.

The next thing we can do is execute the function expression via IIFE right away like so:

Now, due to executing the inner function right away, we’ll get the results like so:

for loop: 0
callback: 0 √
for loop: 1
callback: 1 √
for loop: 2
callback: 2 √

When the 1 second passes, it won’t execute the inner function because it was already executed.
The reason why i logs correctly is because we not waiting until it hits 10. We are referencing i right at the moment of the loop, and not after the looping is done.

However, this isn’t exactly what we want.

What we want to do is this. Everytime the for loop sets up an inner function for setTimeout, we know that having the inner function referencing i won’t work because 1 second later, i will already be 10. What we want to do is save the state of the i right at the instant the loop is happening. Hence, what we want to do is:

1) use IIFE to pass in a parameter where we store index i. It will execute this IIFE right away. But since it executes right away, similar to the last example, wouldn’t setTimeOut not be able to execute it?

2) That’s the trick. We return a function to be executed by the setTimeout. 1 second later, the returned function will execute. That function will log index, which has saved state.

output:

for loop: 0
execute inner function: 0 √
for loop: 1
execute inner function: 1 √
for loop: 2
execute inner function: 2 √
for loop: 3
execute inner function: 3 √
for loop: 4
execute inner function: 4 √
for loop: 5
execute inner function: 5 √
for loop: 6
execute inner function: 6 √
for loop: 7
execute inner function: 7 √
for loop: 8
execute inner function: 8 √
for loop: 9
execute inner function: 9 √

1 second later …

execute return function: 0
execute return function: 1
execute return function: 2

In conclusion, due to us being able to return functions as objects, and passing them as parameters, functions as firsts class objects allows closures to happen.

Currying Example

ref – http://chineseruleof8.com/code/index.php/2019/01/05/currying-js/

Function

In JavaScript, functions are objects (hence the designation of first-class object). They inherit from the Object prototype and they can be assigned key:value pairs. These pairs are referred to as properties and can themselves be functions (i.e., methods).

And as mentioned, function objects can be assigned to variables, they can be passed around as arguments; they can even be assigned as the return values of other functions. Therefore, functions in JavaScript are first-class objects.

Additionally, functions are a type of object with two special properties, name and code. A function can be named or anonymous. If it’s named then the name will be stored in name property and the code we want to execute will be stored in code. When we try to invoke a function , JavaScript will try to execute the code segment in the code property.

Since functions are a type of objects, we are able to attach properties to the functions. As you can see in the above image, there are several properties and methods in the “myFunction” function.

We can use the function’s prototype property to store our methods which are common to all objects created using this function. This will help to save all the methods in one place and helps us to reduce the memory footprint of our objects since our methods are stored in the prototype not in the individual objects.

Open up a browser, and open up Elements. Then type in:

When you analyze the instance of a, you’ll see the structure and hierarchy. The black box is the instance. It has a __proto__ property that is red. It points to the prototype object of MyFunction.

Under the prototype property, you’ll see properties constructor and __proto__.
MyFunction’s constructor property points back to MyFunction’s constructor function.
The __proto__ points down to object prototype.

From an Object structure point of view, in Chrome Elements, it looks like this:

Diagram wise, it looks like this:

We then add a property to the instance. As you can see, the property belongs to the instance. Each instance will have its own “nickname” property.

Finally, we add a function to the prototype. This means all instances of MyFunction can share/use this singular function.

  • A function is an instance of the Object type
  • A function can have properties and has a link back to its constructor method
  • You can store the function in a variable
  • You can pass the function as a parameter to another function
  • You can return the function from a function

Having functions as type of object helps us to pass our functions into another functions as arguments and open new possibility of writing good programs. I hope you got little more understanding of functions in JavaScript. If you like the article or have any suggestions on improving my article, please reply to this article or contact me.

Storing a function

Functions can be stored in three ways:

store in a variable :

store in an object :

store in an array :

In the first and third example, I used a named function expression.
The function expression defines a function as part of a larger expression. The line of code doesn’t start with function .

Function as an argument

In the next example, the function doSomething is sent as an argument to doAction().

A callback is a function passed as an argument to another function.

Higher order functions

A higher order function is:
1) a function that takes another function as an input,
2) returns a function or does both.

Let’s look at some built-in methods that are higher-order functions : filter(), map() and reduce().

filter() takes elements out from a list based on a function that decides if the value should be kept.

instance of (js)

ref – https://developer.mozilla.org/en-US/docs/Web/JavaScript/Reference/Operators/instanceof

User Object

Create Prototype Object and Connect

Whenever we want a object to derive from other objects, we derive their prototype functionalities.
We do so like this:

1) create the an object X with its property __proto__ pointing to the prototype object via Object.create.
2) have their function constructor’s prototype point to that object X.
3) have the object X’s constructor point back to the constructor function
4) Now that we are done connecting, we can use a callback to execute any prototype implementations.

Admin and SuperAdmin

Create the Admin constructor function, initialize its subclass, and then initiate its own property.
Since we want to derive from the user prototype, we put in Admin as the constructor, User.prototype as the prototype object we want to derive from, and finally, implement the prototype functionalities.

instanceof

The instanceof operator tests whether the prototype property of the [Constructor function] appears anywhere in the prototype chain of the [object].

instanceof is an operator and it expects two operands:

– an object
– Constructor function

it will test if the passed function prototype property exists on the chain of the object.

For example:

Diagram wise:

Hence, as we can see, for object u,

the prototype property of Admin appears in the prototype chain.
the prototype property of User appears in the prototype chain.
However, the prototype property of SuperUser DOES NOT appear

isPrototypeOf

the isPrototypeOf is a function available on the Object.prototype object, it lets you test if an specific object is in the prototype chain of another, since this method is defined on Object.prototype, it is be available for all objects.

for example…

static functions used with prototype functions (js)

ref – https://stackoverflow.com/questions/1635116/javascript-class-method-vs-class-prototype-method

Yes, the first function has no relationship with an object instance of that constructor function, you can consider it like a ‘static method’.

In JavaScript functions are first-class objects, that means you can treat them just like any object, in this case, you are only adding a property to the function object.

The second function, as you are extending the constructor function prototype, it will be available to all the object instances created with the new keyword, and the context within that function (the this keyword) will refer to the actual object instance where you call it.

When MyClass.prototype.publicMethod can access ‘privileged’ members, it means you can access privileged properties and functions from constructor function.

When MyClass.prototype.publicMethod can access ‘public’ members, it means you can access public functions from the prototype, like so:

privacy in IIFE vs Prototypes

Prototypes

In prototypes, we use function constructors to initiate.

Then we use prototypes to create one copy of functions to be shared by all instances of HashTable.

IIFE

If you want privacy, use IFEE and closure.