All posts by admin

Knuth Morris Pratt

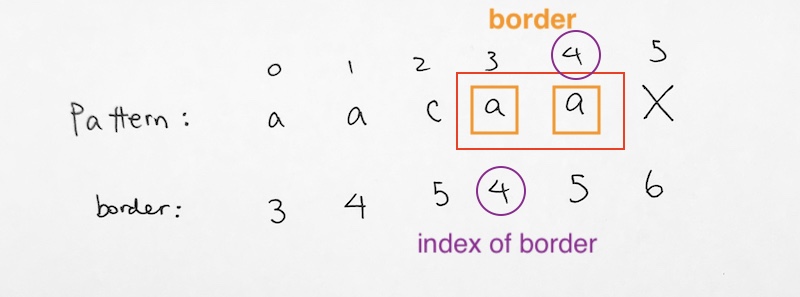
Longest Prefix Suffix (lps)

Longest Prefix Suffix indicates how many matching prefix/suffix strings there are.

In other words, it tell us how many prefix matches we have in the pattern’s current character, which acts as a suffix.

For example, in the example below:

01234 (index)
abcya (pattern)
00001 (lps)

at index 4, we have lps of 1. The prefix is ‘a’. The suffix is ‘a’.
[a]bcy[a]

going further, lps[5] is 2, because the prefix is ‘ab’. The suffix is ‘ab’.
[ab]cy[ab]

012345 (index)
abcyab (pattern)
000012 (lps)

at index 6, we have 3.

0123456 (index)
abcyabc (pattern)
0000123 (lps)

The prefix is ‘abc’. The suffix is ‘abc’.
[abc]y[abc]

No match situation

012 (index)
abc (pattern)
000 (lps)

lps[0] defaults to 0 because there is no suffix to compare with a prefix.

Then when we get ab, the ‘a’ is the prefix, and the ‘b’ is the suffix.
We compare them, they do not match. Thus, lps[1] is 0.

Then we compare a with c. Where ‘a’ is the prefix, and the ‘c’ is the suffix.
They do not match, thus, lps[2] = 0.

How to calculate the LPS array

The source code is like so:

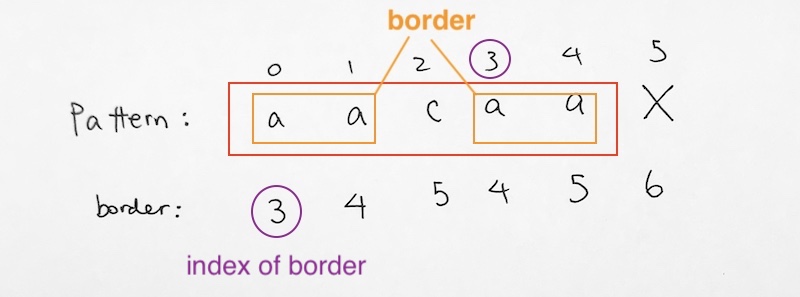
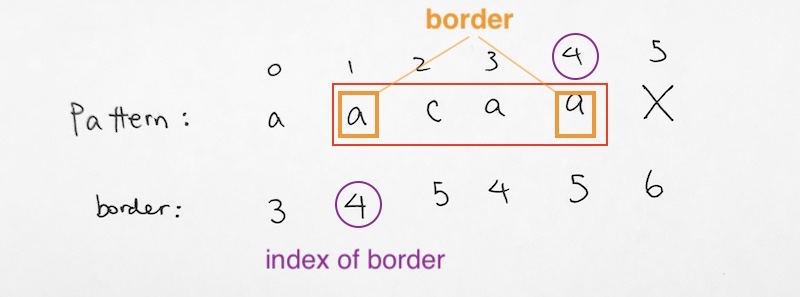
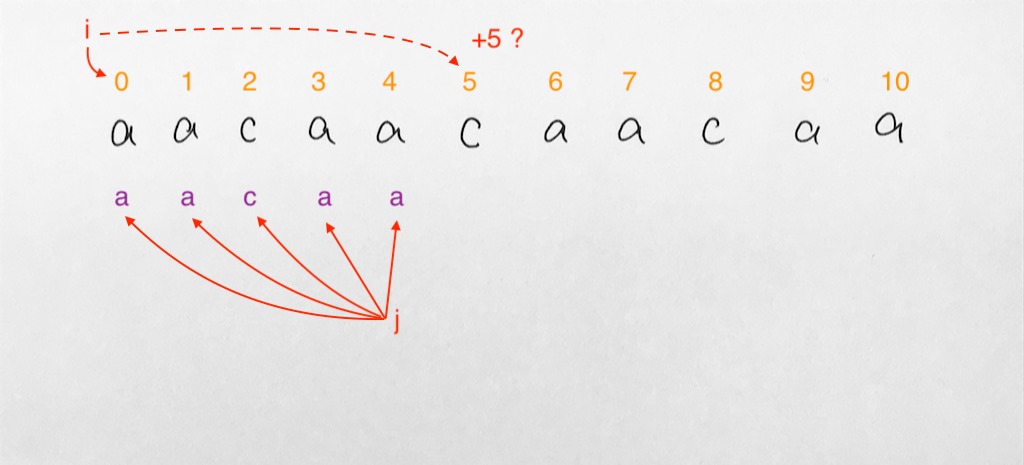
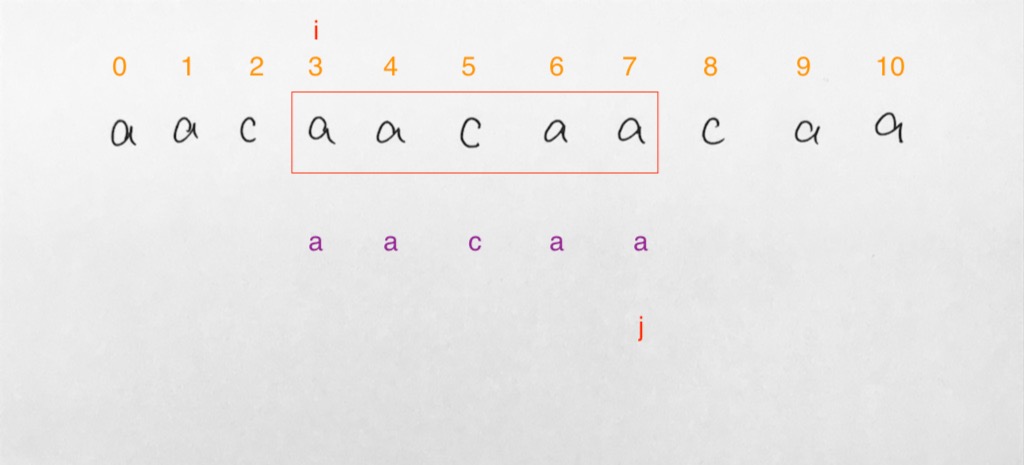
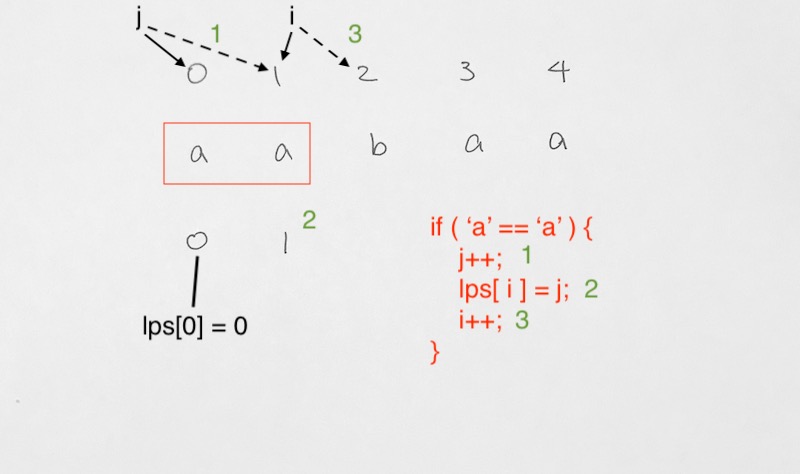
Let’s go through it on a pattern of a a b a a.

We start off j = 0, i = 1. We need to have a parallel matching scheme. Thus, both index will be going down the array in a parallel fashion.
Note that lps[0] is always 0 because at index 0, we only have 1 character.

When going down the array in parallel, we come to 2 situation:

1) Match – we have a match on characters at index i and j. In this case,

1) we move j++ forward
2) and have lps[i] = j;
2) Then, i++.

The i++, j++ is to move the parallel matching forward. The lps[i] = j is so that our lps takes on the j’s index. The reason why we want our lps array to have j as values is because index j is an indicator of how many matches we currently have. i is simply the index of the substring we are checking.
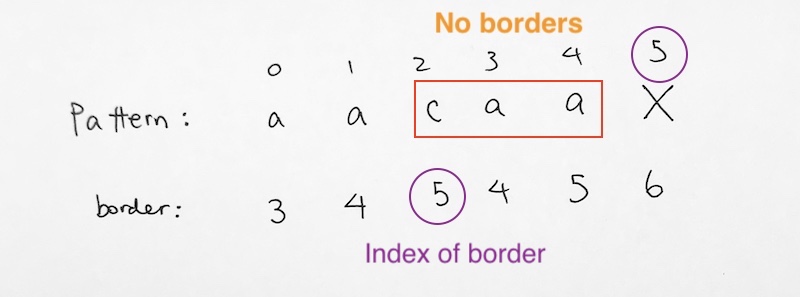
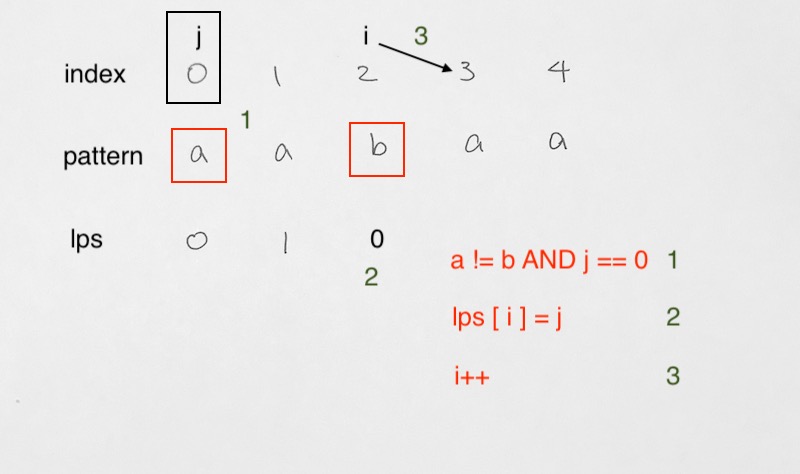
2) Mismatch –

  • mismatch where j != 0
  • In this case, we assign j to lps[j-1]. Then compare values at j and i again.

  • mismatch where j == 0
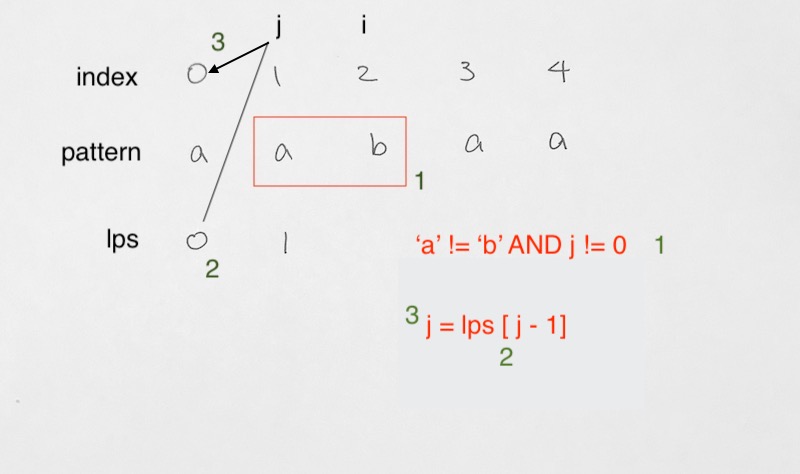
  • Here, j has reached back to 0. There is a mismatch at i and thus, lps[i] takes on 0.
    We then move i forward and start the parallel matching all over again.

We continue on in the main while loop

until i has reached the end of the pattern.

Thus, the final result is:

0 1 2 3 4 (index)
a a b a a (pattern)
0 1 0 1 2 (lps)

The KMP matching algorithm

Now that we have the lps array, we can process the KMP algorithm.

First let’s set it up:

Basically, we have i as the index of text, and j as index of pattern.
If the character of text at index i matches character of pattern at index j, we simply move forward both i and j.

This way, we iterate down both arrays and compare characters in such fashion.

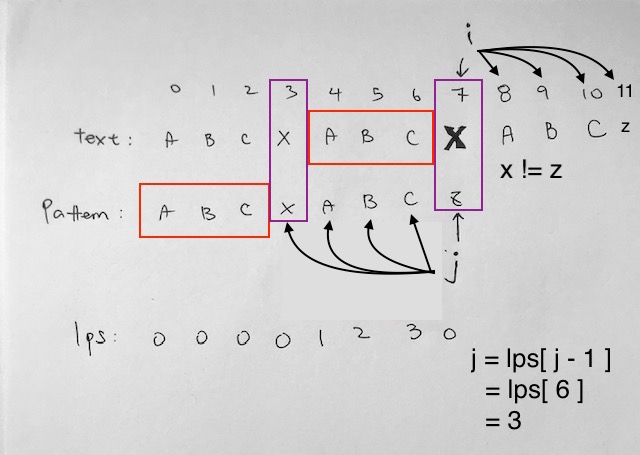
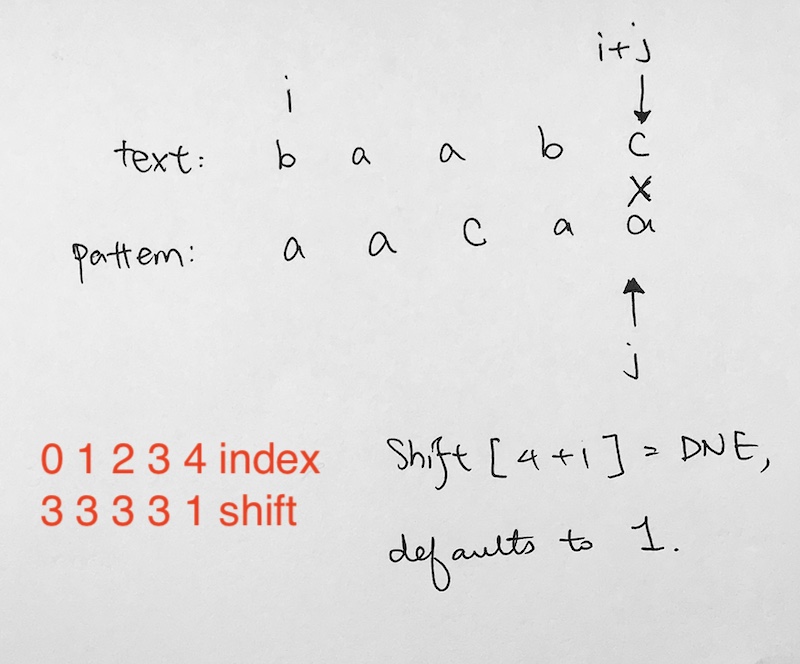
In our example, notice we move down and the characters match up like so: “a b c x a b c..” However, you should think of it as characters match taking place for prefix “abc”, then a substring “x”, then suffix “abc”. Eventually, we hit a mismatch at “x” and “z” at index 7.

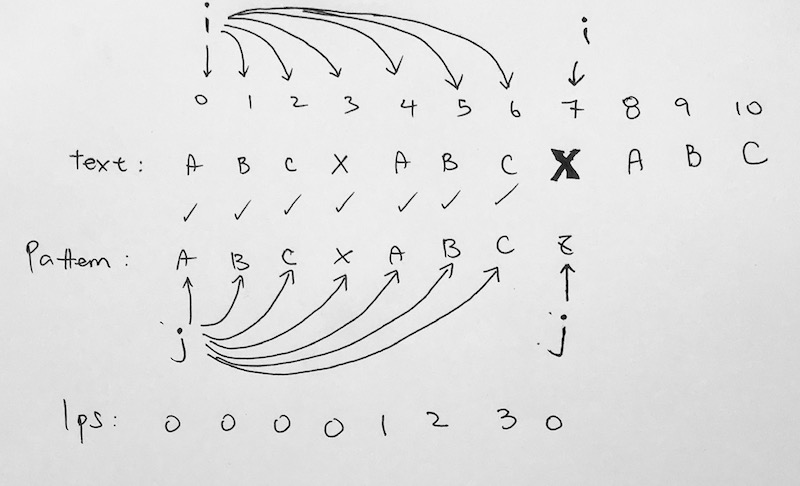
A mismatch is when the characters of pattern and text are not equal, AND i is still within the text.length.

Then we check to see if pattern index j is at 0 or not.
If j is at 0, it means we are at the very beginning of the pattern and cannot go backwards anymore. Thus, we simply have text index i move forward to go on with the next match.

However, if j is not 0, it means, it needs to jump back to a certain point on the pattern. The number of steps to jump back is decided by the lps array at j-1.

Now, in the standard Naive way, j comes back to index 0 (the pattern’s beginning). i goes to index 1, then they start comparing again. This is too slow and cumbersome.

The secret to KMP is that we have a Prefix Suffix array that tells us how far back j should jump on the pattern array.

The LPS array will tell j which index to jump so that we don’t have to start from the beginning of the pattern.

The LPS array will have us jump back to a certain niche between two matching substrings, the prefix and suffix.

The reason why we can jump in between the suffix and prefix substring is because on the previous match, we ran through:

prefix + substring1 + suffix
“abc” + “x” + “abc”

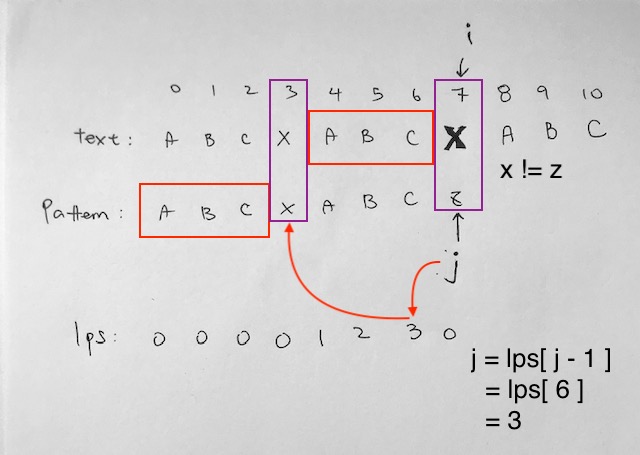
The suffix of the previous match (“abc”) matches our current prefix pattern (“abc”). Thus, we always start at the beginning of the substring (“x”).

Let’s continue with our example.

In our previous match, the prefix is “abc”. The substring is “x”. The suffix is “abc”.

Hence, for our next match, we don’t need to match up the prefix again. We already know that the suffix of our previous run is already a match with our current pattern’s prefix of “abc”. Hence we skip that part entirely.

Instead, j just jumps straight to the “x”. In other words, the number of steps to jump back is decided by the lps array at j-1. That is basically how the lps array helps us save steps.

After our index j jumps to index 3, we continue matching.
text[7] = x, pattern[3] = x √
text[8] = a, pattern[4] = a √

until our index j finally runs to end of the pattern. This signifies that we have a complete pattern match.

We want to see where the index of the match happened in text, so we simply do i – j, which basically means at the last character match at index i, just subtract pattern.length in order to get the index i of where the match starts. In our case, it is i(12) – j(8) = 4.

Boyer Moore (good suffix heuristic)

source code – https://github.com/redmacdev1988/boyerMoore/blob/master/index.js

The idea of prefix and suffix borders

A border is a substring which is both proper suffix and proper prefix.

For example, in string ‘ccacc’,’cc’ is a border because it appears in both end of string but ‘cca’ is not a border.

In string, ‘cacc’, ‘c’ is a border because it appears in both end of the string. ‘ca’ is not a border.

Let’s look at example where our pattern is aacaa, and an already calculated Suffix Border Index array.

At pattern index 0, we have string aacaa. Its border is aa.
Hence, the prefix border is ‘aa’ at [0][1].
The suffix border is ‘aa’ at [3][4].

We write the beginning index of the suffix border (3) into our border array at index 0.

Thus, for the border array at index 0, we write 3. This means that for the string at pattern index 0, the suffix border starts at index 3.

Let’s move on to pattern index 1. We have string acaa. The prefix border is ‘a’ at index 1. The suffix border ‘a’ at index 4.
Hence, for the border array at index 1, we write 4. This means that for the string at pattern index 1, the suffix border starts at index 4.

At pattern index 2, we have string ‘caa’. There is no border string. Thus, for the value in our border array, we simply write 5, which represents DNE.

At pattern index 3, we have ‘aa’. The prefix border is ‘a’ at pattern index 3. The suffix border is ‘a’ at pattern index 4. This means that for the string at pattern index 3, the suffix border starts at index 4.

Finally, we come to the last character of pattern index 4 ‘a’. It is only 1 character and does not have any border. So we simply assign the length of the pattern to represent DNE.

How to calculate the Suffix Border Index table

1) to start off, we get the length of the pattern. This value will represent DNE for all the pattern substrings that do not have borders.

2) The idea is that we process it going backwards using two indexes i and j.
We simply have i go backwards. For each i iteration, we get index j and process it to check if the character at i and character at j matches.

3) If it matches, we record a suffix border index. If it doesn’t match, we simply assign it as length of the pattern to designate the suffix index DNE.

  • i is index of the pattern substring.
  • j is index of the suffix border.
  • _borderPosition represents an array that contains all suffix border positions

Let’s look at it in detail:

Given pattern ‘aacaa’.

i = 5, j = 6.
border position for 5 is 6, because index 5 does not exist.

0 1 2 3 4 5 (index)
a a c a a X (pattern)
0 0 0 0 0 6 (suffix border index)

We then start going backwards for index i.

i is 5, j is 6

(5 > 0) √
(6 <= 5) X

our j index of 6 is larger than pattern length, so we skip.
decrement i, j to 4, 5.

_borderPosition[4] = 5. This means at pattern index 4, the border index is 5, which denotes DNE. It means the substring at pattern index 4 does not have a border.

0 1 2 3 4 5 (index)
a a c a a X (pattern)
0 0 0 0 5 6 (suffix border index)

i is 4, j is 5

(4 > 0) √
(5 <= 5) √

p[4-1] “a”
p[5-1] “a”

There’s a match so we don’t process index j anymore. We jump out of the loop and decrement i, j to 3, 4.

_borderPosition[3] = 4. This means at pattern index 3, which is substring ‘aa’, the suffix border index is 4.

0 1 2 3 4 5 (index)
a a c a a X (pattern)
0 0 0 4 5 6 (suffix border index)

i is 3, j is 4

(3 > 0) √
(4 <= 5) √

p[3-1] “c”
p[4-1] “a”

There’s no match so we keep processing index j.
We keep processing by going backwards on the _borderPosition array.

j = _borderPosition[4] = 5.

(3 > 0) √
(5 <= 5) √

p[3-1] “c”
p[5-1] “a”

j = _borderPosition[5] = 6.

(3 > 0) √
(6 <= 5) X

skip out of inner while loop
i–; j–; so i is now 2, j is now 5.
_borderPosition[2] = 5.

0 1 2 3 4 5 (index)
a a c a a X (pattern)
0 0 5 4 5 6 (suffix border index)

The substring ‘caa’ at index 2, does not have a suffix border index. So we give is value 5 to denote DNE.

i is 2, j is 5

(2 > 0) √
(5 <= 5) √

Notice j starts over again from the end. The reason we do this is so that we try to find borders. We go back to trying to see if there’s a match for “a”.
if there is, then the current index i has a prefix border.

p[2-1] “a”
p[5-1] “a”

i–;j–‘ 1, 4
_borderPosition[1] = 4;

0 1 2 3 4 5 (index)
a a c a a X (pattern)
0 4 5 4 5 6 (suffix border index)

We then go back one more step to see if there’s additional matches. For every match that happens, we record in the border position of that
match at j.

i is 1, j is 4

(1 > 0) √
(4 <= 5) √

p[1-1] = “a”
p[4-1] = “a”

_borderPosition[0] = 3

0 1 2 3 4 5 (index)
a a c a a X (pattern)
3 4 5 4 5 6 (suffix border index)

Why do we need Suffix borders?

Naive algorithm jumps 1 step at a time. But this is too slow.
Other ways, we jump pattern.length at a time. But we will miss out on potential matches in the middle.

Thus the suffix border array is created so we know where the potential matches are in the middle. WE calculate the suffix border so that we can jump to the correct prefix border for the next potential match.

Setting up the Shift array with Suffix Index Array

So given _borderPositions array as

0 1 2 3 4 5 (index)
a a c a a X (pattern)
3 4 5 4 5 6 (suffix border index)

This means that at index 0 of the pattern, 3 is the index in which the suffix border happens.

Given that if our shift array value is 0, this means it was not assigned.
In this case, we give it the default of the first value of the _borderPositions.

This is so that when we find a match, We know how many steps to skip down. For example, in our case, when a successful search is found, we always skip 3 steps (_shift[0] which is the _borderPosition[0]).

This is so that we can successfully start at the index of the next potential match.

After processing, our shift array looks like this:

0 1 2 3 4 index
3 3 3 3 1 shift

What this means is that while trying match our pattern char to the text char, if for any reason from index 0 to index 3 is a mismatch, we want our i to shift down 3 spaces. This is because 3 spaces down, there is potential for our pattern to match again due to the suffix border.

However, at index 4, if there’s a mismatch, we only shift i down 1. This is because our very first character is a mismatch so we always need to check for the next one. Also, in our shift array, _shift[4+1] is DNE, so we just use default step 1.

If say, our first character at index 4, matches, then index 3 is a mismatch, we shift i down text array 1 steps because _shift[3+1] = 1.

You can see it with an example like this:

0 1 2 3 4 5 6
b a a c a a b (text)
a a c a a (pattern)

we have a mismatch at index 3 because text[3] “c” != pattern[3] “a”.
Hence we take _shift[j+1] = _shift[4] = 1.

After we shift 1, we get

0 1 2 3 4 5 6
b a a c a a b (text)
_ a a c a a (pattern)

match!

The Search

We do the match going backwards:

  • i is the index we’re going to use for every substring of the text
  • j is the index on the pattern. We use this to compare the pattern char to the text char

if the chars at i and j keeps matching, we continue down until j is -1. This means we have matched every character in the pattern matched up in the text.

Thus, when j < 0, we found a pattern match in text. We then log i in order to let the user know where the match happens. Now, we move i down for the next substring to check for a match. So the issue here is, how many steps do we move i down? Typically, we would say, hey why not just shift the i down 5 steps because that's the length of our pattern. We've compared our pattern already, so its safe to go down 5 steps right? The answer is no. What we need to do is shift down 3 steps to the to _shift[0]. This is the 1st of the suffix border index. We need to do this in order to find substring potential matches.

tight vs loose coupling (js)

ref – https://www.reddit.com/r/learnjavascript/comments/30mnra/tight_vs_loose_coupling_examples/

In JS, tight coupling between methods and objects in which if you were to change property name to say naaaaame,
then method sayName will not work.

Change from tight to loose

There is a tight coupling with Food and Fork. Because Fork was instantiated inside nomNomNom, you are forced to use a Fork for every Food.

Let’s correct it by using a parameter object to pass in whatever tool we need to use. This way, we inject whatever tool we need into the eating function.

The only thing we need to make sure is that the tool has a getType function and conforms to a common interface. That way, we can get the name of the tool.

How to wire react component to redux store

ref – https://eslint.org/docs/rules/object-shorthand

todos

Say we want to add Reporting component to the web app.
We first create the component.
We do a simple return of basic html.

Now that this component exists, we import it into our App file.

You should now see “Testing 1 2 3” in the output.

Adding the reducer

We now add the reducer. The reducer controls the state the data is in. Thus, naturally, we want to have an initial state. We want to say that whatever happens in the app, according to MACROS that gets passed in, we want to return the state of the data.

Thus, we declare the MACROS in the action file. The action file does two things:

1) contain functions that return action objects. Notably, there is a type property in this action object that contains a MACRO. This MACRO describes what kind of action it is.
i.e fetching report has started, fetching report error, fetching report finished.

2) contains the MACRO definition themselves

/src/actions/index.js

and then say if the action type is
this, then we want to return a certain state.

In our case, we have a state where the fetching of the report has just started.
So we want to set the property to certain defaults.

However, notice that the reducer 1st parameter is the initial state. So make sure you set that.

/src/reducers/reportingReducer.js

Add in mapStateToProps and connect

Now we import connect function from redux and use it to connect our component to the store.

Right now, we just simply connected the component to our mapStateToProps.

Hence, when we refresh the web app our output goes in this order:

1) Component initializes with connect function

the connect function gets run first. – √ connect data to Reporting component.

2) Initialize all reducers

all reducers will receive a default action object with a system INIT macro string. You won’t have to worry about it. Your reducers should simply return the initial states. This will happen for all reducers like so:

reducers/todos.js

reducers/reportingReducer.js

reducers/visibilityFilter.js

3) combineReducers

Now that all the reducers have been initialized, the next step is that we use Object Literal Shorthand in order to create an object literal and declare its properties and values.

so for example this:

becomes this:

hence, we create an object literal with all the reducers as properties like so:

then insert it into combineReducers:

src/reducers/index.js

In other words, we created a object literal using short hand notation.
We declare property ‘todos’, and point it to object todos.
We declare property ‘visibilityFilter’ and point it to object visibilityFilter.
We declare property ‘reportingReducer’ and point it to object reportingReducer.

4) createStore

We then pass this temporary object into the createStore parameter. As a result, we get a singleton store. What’s in the store will reflect what’s in this object.

Now, in mapStateToProps of our Reporting component, let’s look at

Now that the reducers were initialized, and the store created, the store state gets passed into our mapStateToProps.

It will be logged as:


{
reportingReducer: {reportingData: null, reportingLoading: false, reportingError: null}
todos: []
visibilityFilter: “SHOW_ALL”
__proto__: Object
}

The reason why it has those properties is because earlier we created an temporary object with data from our reducer files, and initialized the store with it.

5. mapStateToProps

Once we reach this function, we’re literally trying to map the store’s data into Reporting component’s this.props.

Thus, the reportingState should have all the data of the store. You can check by logging reportingState as shown. Before the other functions are called, this mapStateToProps will be executed. You can decide what kind of objects are returned. These returned objects will be reflected in your this.props.

Now when the component refreshes itself by calling render and componentDidLoad, check log your this.props. You’ll see that it has been updated with the store data.


dispatch: ƒ dispatch(action)
reportingReducer: {reportingData: null, reportingLoading: false, reportingError: null}
todos: []
visibilityFilter: “SHOW_ALL”
__proto__: Object

Creating a trigger

In your reporting.js, insert this code. We have inserted an object to represent mapDispatchToProps.

Let’s use this dispatch function in our componentDidMount:

We then execute the action of fetching the reports.

output:
——————-> calling fetchReportingAction
index.js:67 actions/index.js – called fetchReporting

An action will trigger all the reducers via the connect function.
Hence, all of our reducers will check to see they handle the action.type.


todos.js:3 — reducers/todos.js —
todos.js:4 received action:
todos.js:5 Object
todos.js:26 todos.js – no action.type found. default return state
visibilityFilter.js:5 — reducers/visibilityFilter.js —
visibilityFilter.js:11 visibliytFilter.js – no action.type found. default return state

Going through todos and visibilityFilter reducers, we do not handle the specific action.type.
However, in reporting reducer, the action.type matches.

Hence, say we want to update reportingData property with: [‘ricky’, ‘joy’, ‘en en’]
We update it by returning a temp object with the new values.

output:

reportingReducer.js:10 — reducers/reportingReducer.js —
reportingReducer.js:12 received action is:
reportingReducer.js:13 Object
reportingReducer.js:18 — action.type found! –FETCH_REPORTING_STARTED
reportingReducer.js:19 returning state object with updated action.data…

Once the store gets updated, mapStateToProps of our Reporting component is called to let us know we can update our component with whatever data we want from the whole store.

Reporting.js

Take note that parameter storeState has data from the whole store. It looks like this:


reportingReducer: {reportingData: Array(3), reportingLoading: true, reportingError: null}
todos: []
visibilityFilter: “SHOW_ALL”

We need to filter what we want. For example, if we only need reportingReducer for our this.props, then we need to return just that part.

Then the this.props in your render and other component functions would only have data like this:


{reportingData: Array(3), reportingLoading: true, reportingError: null, fetchReportingAction: ƒ}
fetchReportingAction: ƒ ()
reportingData: (3) [“ricky”, “joy”, “en en”]
reportingError: null
reportingLoading: true

react redux wiring

ref – https://react-redux.js.org/using-react-redux/connect-mapstate
https://react-redux.js.org/using-react-redux/connect-mapdispatch#connect-dispatching-actions-with-mapdispatchtoprops

Connecting React components with the Redux data store

Implementing reducers for the store

First, we create a reducer directory.
In it, we create reducer/todo.js, where we define global variable todos.
It is a reference to a reducer function with two parameters: a state, and an action object.

The state object holds initialized and current information on store’s state. The action object holds an object with a type property, and other custom properties.

Refresh the page and you’ll see a empty list.

If you want to initialize the list to having existing data, you’d initialize the state object like so:

The reason why we initialize using properties id, completed, and text is described in component TodoList.
It describes the todo property as an array.
This array contains object with attributes like so:

We will get to component TodoList later. Now refresh the page, you’ll see data in the list.

Basically, once a reducer is defined, it is combined with other reducers, and then passed into createStore so that the app can create a singleton store.

The reducer function’s 2nd parameter is an action object, which is sent by an action function, as will be described later. We know which action was triggered by looking at:

action.type

We can then work towards manipulating the state according to that action. Once, we’re done manipulating the state, we return it. This means we have updated the store.

As explained earlier, we have many different reducers, and we combine them all in order to give it to the store.
We do so by using combineReducers

Now that we have all the reducers, we simply insert them into the first parameter of createStore in our main index.js:

Notice createStore function.

redux’s createStore function

ref – https://redux.js.org/api/createstore

createStore(reducer, [preloadedState], [enhancer])

We pass in reducer functions to the createStore, which then creates a singleton store for the app to use.

TodoList component

The TodoList component is used by VisibleTodoList container. The container connects the component to the store.

TodoList component returns JSX in order to display data from each individual todo object.
However, before it does, it must define its own properties. Namely:

– todos (array)
– toggleTodo (function)

todos is an array of objects. Those objects have properties id, completed, text. This is the reason why in our reducer function, when we initialized the state object, we must initialize it according to the properties indicated here.

TodoList component has one object initializer parameter. Its properties are todos, and toggleTodo as defined above.

Now, let’s look at mapStateToProps function in container VisibleTodoList:

If a mapStateToProps function is specified (like we have), the TodoList component will subscribe to Redux store updates. This means that any time the store is updated, mapStateToProps in container VisibleTodoList will be called.

Your mapStateToProps functions are expected to return an object. This object, normally referred to as stateProps, will be merged as props to your connected component (TodoList). What gets returned from mapStateToProps is an object that identifies the property we want to change in TodoList component. We’re saying, we want to update property todos’ values.

Thus in mapStateToProps, make sure we return updated property ‘todos’.

Triggering the Action

Let’s create an ‘action’ directory, and an index file: action/index.js.

This is where all of your action functions are. In our case, we have an action function called toggleTodo

We have connected this function to a click handler in VisibleTodoList.js. Once that click handler has been invoked, we execute this action function. This action function returns an object, and this object gets passed into the ‘dispatched’ function for the store. dispatch is a function of the Redux store. You call store.dispatch to dispatch an action. This is the only way to trigger a state change.

Since we triggered a change in state, it will then execute todos reducer function in reducer/todos.js. This is because in container VisibleTodoList, it has connected the state todos array, to toggleTodo function together. Once click handler has happened for toggleTodo, it will trigger change in the todos array.

Hence, when you click on a text, you’ll see this log:


index.js:43 src/actions/index.js (ACTION) returning object of type TOGGLE_TODO and id: 0
todos.js:14 src/reducers/todo.js – (REDUCER) TOGGLE_TODO!
VisibleTodoList.js:35 src/containers/VisibileTodoList.js – mapStateToProps
TodoList.js:7 src/components/TodoList.js – TodoList
TodoList.js:8 [{…}]
Todo.js:19 src/components/Todo.js – Todo

However, notice that it then calls our connector file VisibileTodoList.js’s mapStateToProps.
This is because it’s trying to propagate updates to all that have been connected to our store.

Now that we have our reducers implemented and in place, let’s see how actions trigger those reducers.

First, in container VisibleTodoList.js, we have two parts:

– TodoList component (UI)
– Redux data store. (data)

this is where we connect our UI to data.

We import the UI component TodoList like so:

Then we connect the UI to the data via connect, mapStateToProps, and mapDispatchToProps function.

..notice the connect function.

The connect function

With React Redux, your components never access the store directly – connect does it for you. React Redux gives you two ways to let components dispatch actions:

As the first argument passed in to connect, mapStateToProps is used for selecting the part of the data from the store that the connected component needs. In our example below, TodoList is the component in need. We call connect on it to make it into a connected component.

The connected component TodoList receives dispatch calls from the action function, and then can dispatch actions onto itself via reducer functions. These reducer functions looks at the returned action object’s type property.

Therefore, we see that the connection function “connects” component TodoList to the two functions. One is to maintain state todos. The other is to dispatch actions via click handler toggleTodo.

Connecting the data

In order to connect the UI to the data store, we need to use Redux store’s dispatch function in order to apply a state change to the store. We pass in an action function into the dispatch parameter to let it know how we want this state to change:

In other words, as the second argument passed in to connect, mapDispatchToProps is used for dispatching actions to the store.

dispatch is a function of the Redux store.

You call store.dispatch to dispatch an action. This is the only way to trigger a state change.

With React Redux, your components never access the store directly – connect does it for you. Our connected TodoList component receives props.dispatch and can dispatch actions onto itself. Hence, that’s why we give toggleTodo function to the dispatch function. Whenever we apply a state change via an action, we want this toggleTodo to be called.

we imported this function from actions:

toggleTodo return an action object with 2 properties and their data.

This action object matches up with the action parameter of a reducer function. A Reducer function will take this action object and evaluate its type.

Once, it sees that the property ‘type’ is of string ‘TOGGLE_TODO’, then it will go ahead and modify the state accordingly. In our case, it evaluates the array of strings in state, to find if the todo object’s id matches up with the id in our action object.

In other words, for every todo object, if the todo.id === action.id, then we flip the completed flag by
doing

All other properties of the todo object stays the same via

Thus, due to our TodoList component being connected to the store in VisibleTodoList.js, our reducers functions are patiently waiting for action objects to be sent from the action functions.

Once the action function fires, our reducers will receive it via its action object, and we then manipulate the state and return it.

jest (basics)

ref – https://medium.com/piecesofcode/testing-javascript-code-with-jest-18a398888838

then in package.json:

make sure the “scripts” key, and its values are there.

Test Custom function

Let’s define a custom function.
concat.js

Then we test that custom function

Make sure you name it yourclass.test.js

This lets Jest know which files to test.

So if in our case, if we’re gunna test for concat.js, we’ll name it concat.test.js

concat.test.js

Open a terminal, and in your folder directory, type: npm test

You’ll then see the result of your tests.

Basically, we use expect(…).toBe(…)

to make sure the returned result from our custom function matches up with what’s in toBe(…).

.toBe() basically just checks that value is what you expect it to be.

Testing custom objects

We can also declare a custom object, and then expect(…).toBe(…) an object.

matchers.test.js

Is the object in question equals given object?

Declare a null. Test if its a null. Test if its defined.

doing addition/subtraction with numerics

Check for elements in an array

Match a character in a string

callback

First we define the function getMessage, where we take a callback object parameter.
In the function getMessage, we pass in a string “go Javascript!”.

Then in our test, we define the callback function. In turn we pass in this callback function into the getMessage.

The way we test for the callback is to expect the value inside the callback function to be the string “go Javascript!”

React-Redux

ref – original github

source, with my comments and logs

The app starts off with ReactDOM.render

where we use redux’s applyMiddleware and createStore to create a store with some combinedReducers:

Pay attention here in that a property is mapped to a reducer. So whatever data the reducer returns will be mapped to that property. And that property is kept in the store.

Our reducers are initialized with starting state

for example, ContactsReducer is imported from:

So this means store’s contacts property now has an array of member names and phones.

These reducers are then run with initial state and type at @@redux/INIT
Then the store is created.

Each component’s mapStateToProps will run first, because we need to map the state from our store onto our component’s props.

The component does this and receives the store’s state.

It takes what it needs and creates contacts property and initializes with our store’s state’s contacts data.

Then component then renders. After finishing rendering, the componentDidMount is called.
Finally, the app’s componentDidMount will be called.

Provider’s prop store let’s children components access . data

Notice that App is within Provider.

or

The makes the Redux store available to any nested components that have been wrapped in the connect() function.

Since any React component in a React Redux app can be connected, most applications will render a at the top level, with the entire app’s component tree inside of it.

Normally, you can’t use a connected component unless it is nested inside of a < Provider >.

Hence, our App will be connected.

components/app.js

App is the main container. It houses two other components. Thus, the store data will be available to all containers.

Namely, these containers are ContactList and ContactDetail.

Mapping Redux store state to Component props

and

The contacts, and activeContact property is now available in our state object.

Now, look at a component’s mapStateToProps. Basically, it gets the store’s state as the parameter, and then extract whatever property we need and return it to the component. i.e contacts

Thus, after mapStateToProps is run, you’ll be able to do use it like so:

such as in renderList().

The important thing here is that once we declared our mapStateToProps function, we map it to the connect function.
Thus, whenever the data changes, it will call our mapStateToProps.

Mapping Action to Component props

In our case, when we return an action object with type and payload properties, they are called Action Creators.

Action creators are exactly that—functions that create actions.

In contact list component, there is an onClick handler like so:

The selectContact is imported from actions/action-select-contact.js

when the handler is clicked, the action function selectContact is called. It returns an object.
Take note that this reducer is mapped to property activeContact in combineReducers


{name: ‘Michael’, phone: ‘0988765553’}

with type CONTACT_SELECTED

This is the action object.

Then, ALL reducer functions are then called to see if this action type CONTACT_SELECTED is theirs.
It happens so that our reducer_active_contacts.js reducer function takes care of this CONTACT_SELECTED.

We see the action being passed in

{type: ‘CONTACT_SELECTED’, payload: {…}}

The reducer returns the payload object. The component will then map this payload to its prop property say ‘contact’ by using mapStateToProps

Now the active contact components will render with the new data.

Using Redux in a React component

This is a react native app. Make sure you have expo installed.

demo

make sure to type ‘npm install’ to install all the packages.

Then type ‘npm start’.

Blogs
We install redux, and then import it for usage.

Comments

We import the store variable from Blogs.

AppContainer

Let’s configure our react navigation.
We also implemented our Blogs and Comments components above. We would use these components.

App.js

React Navigation basic example

Installation

yarn add react-navigation

or

npm install –save react-navigation

Creating Friends page (screen/Friends.js)

We create the Friends page. We navigate to the HomeScreen by using that string as the id.

Creating Home page (screen/Home.js)

Create a home page. Make sure any kind of text is wrapped in Text. We have a button, that upon the onPress event, navigates to our ‘FriendScreen’. This string is dictated by our AppContainer file below and used to navigate to the Friends page.

AppContainer

In the latest react navigation, we create an app container that houses a navigator.
We will be implementing this AppContainer in AppContainer.js:

For the AppNavigator object, notice the properties FriendsScreen and HomeScreen. They will be used as strings ids when other screens need to navigate…like so:

App.js

Passing into AppContainer

As you can see we pass in a prop called screenProp
It is an object, which we put inside of JS expression brackets.

In this object, we pass three properties.

1) current Friends array
2) possible Friends array
3) add Friends function

Retrieving the props data

In home, we retrieve it via this.props.

this.props.screenProps.currentFriends.length

In Friends, we use more of its features