All posts by admin
DNY node api (1 – setup)
- download source
- unzip the source code
- go into directory and type npm install to install the modules
- Once the packages are installed, run it npm run dev
- Go to localhost:8080, then check terminal for logs
Set up
Open terminal, navigate to ‘Desktop’
mkdir dnyNodeAPI
cd dnyNodeAPI
npm init
press enter for all selections
npm install express
Then check your node_modules folder and you’ll see whole of packages being installed.
In our package.json file, change ‘main’: ‘index.js’ to ‘main’: ‘app.js’
Create file ‘app.js’:
|
1 2 3 4 5 6 7 8 9 10 11 12 |
const express = require('express') const app = express() app.get("/", (req, res) => { console.log(this) res.send("Hello world from DNY tourism app") }) const port = 8080 app.listen(port, () => { console.log(`DNY tourism app listening on port ${port}`) }) |
in your terminal, if you went node app.js, it will run the server on port 8080.
But whenever we make a code change, we have to restart the server and this becomes cumbersome. So let’s install nodemon.
npm i nodemon
Then in your package.json:
|
1 2 3 |
"scripts": { "dev": "nodemon app.js" }, |
Now, in your terminal, Ctrl+C to get out of whatever is running.
Then npm run dev.
It will run the command as specified in our package.json and we get the server running with constant updates.
Putting in Routes
routes/posts.js
|
1 2 3 |
exports.getPosts = (req, res) => { res.send("Hello world from DNY tourism app") } |
app.js
|
1 2 3 4 5 6 7 8 9 10 11 12 13 |
const express = require('express') const app = express() // bring in routes const { getPosts } = require('./routes/post') app.get("/", getPosts) const port = 8080; app.listen(port, () => { console.log(`DNY tourism app listening on port ${port}`) }) |
Install Middleware
npm i morgan
Installing Database
Create account in mLab, and create a database. Select default for everything, i.e AWS, server at Europe, and create submit. Then ‘create db user’, and create a username and pwd for the db’s user.
Then, in your project, create a file .env:
.env
|
1 2 |
MONGO_URI=mongodb://<username>:<password>@ds263368.mlab.com:63368/dny-tours-api PORT=8080 |
npm i dotenv
npm i mongoose
app.js
|
1 2 3 4 5 6 7 8 9 10 11 12 13 14 15 16 17 18 19 20 21 22 23 24 25 26 27 |
const express = require('express') const app = express() const mongoose = require('mongoose') const morgan = require("morgan"); const dotenv = require('dotenv') dotenv.config() // db mongoose.connect(process.env.MONGO_URI, { useNewUrlParser: true, useUnifiedTopology: true }) .then(() => console.log('DB Connected')) mongoose.connection.on('error', err => { console.log(`DB connection error ${err.message}`) }); // bring in routes const postRoutes = require('./routes/post') app.use(morgan('dev')) app.use("/", postRoutes) const port = process.env.PORT || 8080; app.listen(port, () => { console.log(`DNY tourism app listening on port ${port}`) }) |
post.js
|
1 2 3 4 5 6 7 8 9 |
const express = require('express') const postController = require('../controllers/post') // have access to router const router = express.Router() router.get('/', postController.getPosts) module.exports = router; |
post.js
|
1 2 3 4 5 6 |
exports.getPosts = (req, res) => { //res.send("controllers/post.js - hello wordl from node js"); res.json({ posts: [{title: 'First post'}, {title: 'Second post'}] }) } |
Forkify Web app (part 5 – Displaying the recipe view)
install npm modules: npm install
run web app: open command line and type ‘npm run start’
We implement our files according to MVC paradigm:
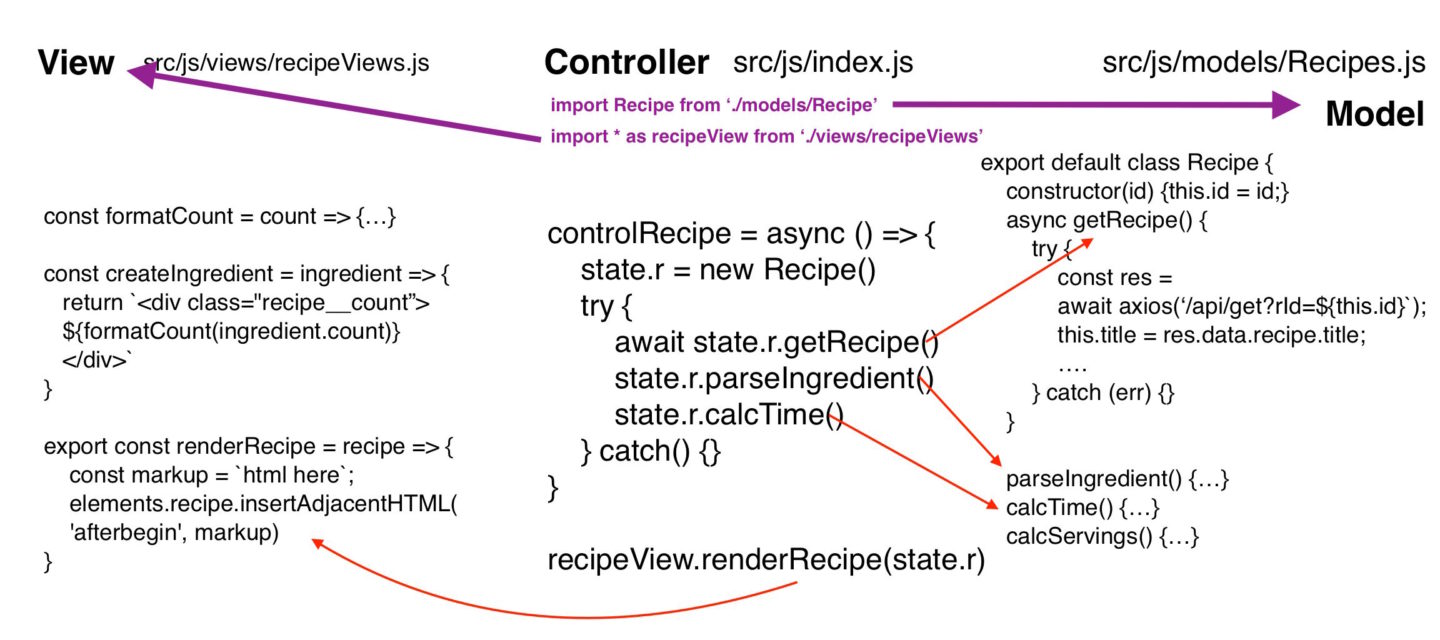
We first create a recipe view file
src/js/views/recipeViews.js
We use fractional module to calculate integer display of fractions: npm install fractional –save
This is so that we can apply the effects to ingredient.count and ingredient.unit
|
1 2 3 4 5 6 7 8 9 10 11 12 13 14 15 16 17 18 19 20 21 22 23 24 25 26 27 28 29 30 31 32 33 34 35 36 37 38 39 40 |
import { elements } from './base' import { Fraction } from 'fractional' const formatCount = count => { console.log(count) if (count) { // 2.5 --> 2 1/2 const result = count.toString().split('.').map(el => parseInt(el, 10)) console.log('result', result) if (!result[1]) return result[0] else if (result[0] == 0) { const fr = new Fraction(count.toFixed(1)) return `${fr.numerator}/${fr.denominator}` } else { const fr = new Fraction(count.toFixed(1) - result[0]) return `${result[0]} ${fr.numerator}/${fr.denominator}` } } return '?'; } const createIngredient = ingredient => { return `<li class="recipe__item"> <svg class="recipe__icon"> <use href="img/icons.svg#icon-check"></use> </svg> <div class="recipe__count">${formatCount(ingredient.count)}</div> <div class="recipe__ingredient"> <span class="recipe__unit">${ingredient.unit}</span> pasta </div> </li>` } export const clearResults = () => { elements.recipe.innerHTML = ''; } |
renderRecipe is used in our controller (index.js) to display html when we click on an item. We use the html from the template, and then add data to it via the recipe object.
|
1 2 3 4 5 6 7 8 9 10 11 12 13 14 15 16 17 18 19 20 21 22 23 24 25 26 27 28 29 30 31 32 33 34 35 36 37 38 39 40 41 42 43 44 45 46 47 48 49 50 51 52 53 54 55 56 57 58 59 60 61 62 63 64 65 66 67 68 69 70 71 72 73 74 |
export const renderRecipe = recipe => { const markup = ` <figure class="recipe__fig"> <img src="${recipe.image}" alt="${recipe.title}" class="recipe__img"> <h1 class="recipe__title"> <span>${recipe.title}</span> </h1> </figure> <div class="recipe__details"> <div class="recipe__info"> <svg class="recipe__info-icon"> <use href="img/icons.svg#icon-stopwatch"></use> </svg> <span class="recipe__info-data recipe__info-data--minutes">${recipe.time}</span> <span class="recipe__info-text"> minutes</span> </div> <div class="recipe__info"> <svg class="recipe__info-icon"> <use href="img/icons.svg#icon-man"></use> </svg> <span class="recipe__info-data recipe__info-data--people">${recipe.servings}</span> <span class="recipe__info-text"> servings</span> <div class="recipe__info-buttons"> <button class="btn-tiny"> <svg> <use href="img/icons.svg#icon-circle-with-minus"></use> </svg> </button> <button class="btn-tiny"> <svg> <use href="img/icons.svg#icon-circle-with-plus"></use> </svg> </button> </div> </div> <button class="recipe__love"> <svg class="header__likes"> <use href="img/icons.svg#icon-heart-outlined"></use> </svg> </button> </div> <div class="recipe__ingredients"> <ul class="recipe__ingredient-list"> ${recipe.ingredients.map(el => createIngredient(el)).join(' ')} </ul> <button class="btn-small recipe__btn"> <svg class="search__icon"> <use href="img/icons.svg#icon-shopping-cart"></use> </svg> <span>Add to shopping list</span> </button> </div> <div class="recipe__directions"> <h2 class="heading-2">How to cook it</h2> <p class="recipe__directions-text"> This recipe was carefully designed and tested by <span class="recipe__by">${recipe.author}</span>. Please check out directions at their website. </p> <a class="btn-small recipe__btn" href="${recipe.url}" target="_blank" rel="noopener noreferrer"> <span>Directions</span> <svg class="search__icon"> <use href="img/icons.svg#icon-triangle-right"></use> </svg> </a> </div> `; elements.recipe.insertAdjacentHTML('afterbegin', markup) }; |
As you can see, when we fetched data for the recipe successfully, we then render the recipe.
src/js/index.js
|
1 2 3 4 5 6 7 8 9 10 11 12 13 14 15 16 17 18 19 20 21 22 23 24 25 26 27 28 29 30 31 32 33 34 35 36 37 38 39 |
import Search from './models/Search' import Recipe from './models/Recipes' import * as searchView from './views/searchView' import * as recipeView from './views/recipeView' import { elements, renderLoader, clearLoader } from './views/base' const state = {} // other code ////// recipe ///////////// const controlRecipe = async () => { const id = window.location.hash.replace('#', ''); // entire url, then get the hash if (id) { // prepare ui for changes renderLoader(elements.recipe); // create new recipe object state.recipe = new Recipe(id) searchView.highlightSelected(id) try { await state.recipe.getRecipe(); state.recipe.parseIngredients(); state.recipe.calcTime() state.recipe.calcServings(); clearLoader(); recipeView.clearResults(); recipeView.renderRecipe(state.recipe) // render recipe here } catch (err) { console.log(err) } } }; ['hashchange', 'load'].forEach(event => window.addEventListener(event, controlRecipe)) |
src/js/models/Recipes.js
|
1 2 3 4 5 6 7 8 9 10 11 12 13 14 15 16 17 18 19 20 21 22 23 24 25 26 27 28 29 30 31 32 33 34 35 36 37 38 39 40 41 42 43 44 45 46 47 48 49 50 51 52 53 54 55 56 57 58 59 60 61 62 63 64 65 66 67 68 69 70 71 72 73 74 75 76 77 78 79 80 81 82 83 84 85 86 87 88 89 90 91 92 93 94 95 |
import axios from 'axios' export default class Recipe { constructor(id) { this.id = id; } async getRecipe() { try { const res = await axios(`https://forkify-api.herokuapp.com/api/get?rId=${this.id}`); this.title = res.data.recipe.title; this.author = res.data.recipe.publisher; this.image = res.data.recipe.image_url; this.url = res.data.recipe.source_url; this.ingredients = res.data.recipe.ingredients; console.log(res) } catch (err) { console.log(error) } } calcTime() { // assuming that we need 15 min for each 3 ingredients const numIng = this.ingredients.length; const periods = Math.ceil(numIng/3); this.time = periods * 15; } calcServings() { this.servings = 4; } // change ingredient long names to short parseIngredients() { const unitsLong = ['tablespoons', 'tablespoon', 'ounce', 'ounces', 'teaspoon', 'teaspoons', 'cups', 'pounds']; const unitsShort = ['tbsp', 'tbsp', 'oz', 'oz', 'tsp', 'tsp', 'cup', 'pound']; const newIngredients = this.ingredients.map( el => { // 1) uniform units let ingredient = el.toLowerCase(); unitsLong.forEach((unit, i) => { ingredient = ingredient.replace(unit, unitsShort[i]); }) // 2) remove parenthesis ingredient = ingredient.replace(/ *\([^)]*\) */g, ' ') // 3) parse ingredients into count, unit, and ingredient const arrIng = ingredient.split(' '); const unitIndex = arrIng.findIndex(el2 => unitsShort.includes(el2)); let objIng; if (unitIndex > -1) { // there is a unit // Ex. 4 1/2 cups, arrCount is [4, 1/2] ---> "4+1/2" ---> 4.5 // Ex. 4 cups, arrCunt is [4] const arrCount = arrIng.slice(0, unitIndex); let count; if (arrCount.length === 1) { count = eval(arrIng[0].replace('-', '+')); } else { count = eval(arrIng.slice(0, unitIndex).join('+')); } objIng = { count, unit: arrIng[unitIndex], ingredient: arrIng.slice(unitIndex+1).join(' ') }; } else if (parseInt(arrIng[0], 10)) { // there is NO unit, but 1st element is number objIng = { count: parseInt(arrIng[0], 10), unit: '', ingredient: arrIng.slice(1).join(' ') } } else if (unitIndex === -1) { // there is no unit and no 1st position objIng = { count: 1, unit: '', ingredient }; } return objIng; }); this.ingredients = newIngredients } } |
Forkify Web app (part 4 – Building the recipe model)
We create the model part, and then get the controller to use it:
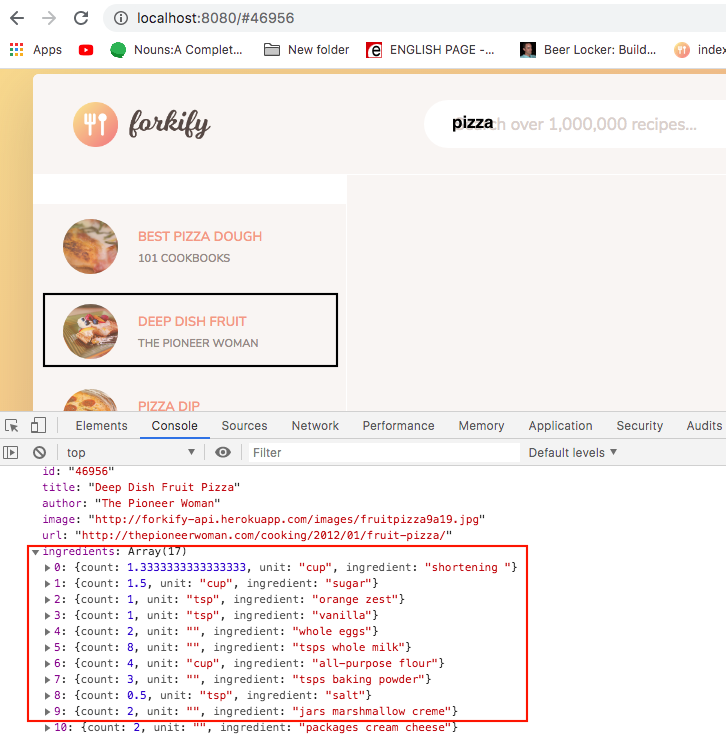
First create the Recipe where we fetch the data from the backend. We dynamically assign properties title, author, image…etc to the data that we get back.
What you’ll notice is that the ingredients we get back are whole words. What we want to do is to parse ingredients words into a short-handed format. But in the end, we also want to put them into an array of objects. That way, we can pass the measurement, unit, and text.
src/js/Model/Recipe.js
|
1 2 3 4 5 6 7 8 9 10 11 12 13 14 15 16 17 18 19 20 21 22 23 24 25 26 27 28 29 30 31 32 33 34 35 36 37 38 39 40 41 42 43 44 45 46 47 48 49 50 51 52 53 54 55 56 57 58 59 60 61 62 63 64 65 66 67 68 69 70 71 72 73 74 75 76 77 78 79 80 81 82 83 84 85 86 87 88 89 90 91 92 93 94 95 96 97 98 99 100 |
import axios from 'axios' export default class Recipe { constructor(id) { this.id = id; } async getRecipe() { try { const res = await axios(`https://forkify-api.herokuapp.com/api/get?rId=${this.id}`); this.title = res.data.recipe.title; this.author = res.data.recipe.publisher; this.image = res.data.recipe.image_url; this.url = res.data.recipe.source_url; this.ingredients = res.data.recipe.ingredients; console.log(res) } catch (err) { console.log(error) } } calcTime() { // assuming that we need 15 min for each 3 ingredients const numIng = this.ingredients.length; const periods = Math.ceil(numIng/3); this.time = periods * 15; } calcServings() { this.servings = 4; } // change ingredient long names to short parseIngredients() { console.log('parse ingredients'); const unitsLong = ['tablespoons', 'tablespoon', 'ounce', 'ounces', 'teaspoon', 'teaspoons', 'cups', 'pounds']; const unitsShort = ['tbsp', 'tbsp', 'oz', 'oz', 'tsp', 'tsp', 'cup', 'pound']; const newIngredients = this.ingredients.map( el => { // 1) uniform units let ingredient = el.toLowerCase(); unitsLong.forEach((unit, i) => { ingredient = ingredient.replace(unit, unitsShort[i]); }) // 2) remove parenthesis ingredient = ingredient.replace(/ *\([^)]*\) */g, ' ') // 3) parse ingredients into count, unit, and ingredient const arrIng = ingredient.split(' '); const unitIndex = arrIng.findIndex(el2 => unitsShort.includes(el2)); let objIng; if (unitIndex > -1) { // there is a unit // Ex. 4 1/2 cups, arrCount is [4, 1/2] ---> "4+1/2" ---> 4.5 // Ex. 4 cups, arrCunt is [4] const arrCount = arrIng.slice(0, unitIndex); let count; if (arrCount.length === 1) { count = eval(arrIng[0].replace('-', '+')); } else { count = eval(arrIng.slice(0, unitIndex).join('+')); } objIng = { count, unit: arrIng[unitIndex], ingredient: arrIng.slice(unitIndex+1).join(' ') }; } else if (parseInt(arrIng[0], 10)) { // there is NO unit, but 1st element is number objIng = { count: parseInt(arrIng[0], 10), unit: '', ingredient: arrIng.slice(1).join(' ') } } else if (unitIndex === -1) { // there is no unit and no 1st position objIng = { count: 1, unit: '', ingredient }; } return objIng; }); this.ingredients = newIngredients } } |
We do the same thing for Recipe as we did for Search.
We get data from server. Parse it, and do some processing on it.
We also implement functionality for ‘load’ event.
src/js/index.js
|
1 2 3 4 5 6 7 8 9 10 11 12 13 14 15 16 17 18 19 20 21 22 23 24 25 26 27 28 29 30 31 32 33 34 35 36 37 38 39 40 41 42 43 44 45 46 47 48 |
import Search from './models/Search' import Recipe from './models/Recipes' import * as searchView from './views/searchView' import { elements, renderLoader, clearLoader } from './views/base' const state = {} /////////////// search controller ///////////////////// const controlSearch = async () => { const query = searchView.getInput(); if (query) { state.search = new Search(query); searchView.clearInput(); searchView.clearResults(); renderLoader(elements.searchRes) try { await state.search.getResults() searchView.renderResults(state.search.result) } catch(err) { console.log(err) } clearLoader() } } // other code ////// recipe ///////////// const controlRecipe = async () => { const id = window.location.hash.replace('#', ''); // entire url, then get the hash if (id) { state.recipe = new Recipe(id) try { await state.recipe.getRecipe(); state.recipe.parseIngredients(); state.recipe.calcTime() state.recipe.calcServings(); } catch (err) { console.log(err) } } }; ['hashchange', 'load'].forEach(event => window.addEventListener(event, controlRecipe)) |
Make sure we render the results from our fetch operation. We put the result into a list on the left. The result is basically an array of recipes.
src/js/views/searchView.js
|
1 2 3 4 5 6 7 8 9 10 11 12 13 14 15 16 17 18 19 20 21 22 |
export const renderResults = (recipes, page=1, resPerPage=10) => { const start = (page - 1) * resPerPage; const end = page * resPerPage; recipes.slice(start, end).forEach(recipe => renderRecipe(recipe)) renderButtons(page, recipes.length, resPerPage) } const renderRecipe = receipe => { const markup = `<li> <a class="results__link results__link--active" href="#${receipe.recipe_id}"> <figure class="results__fig"> <img src="${receipe.image_url}" alt="${limitRecipeTitle(receipe.title)}"> </figure> <div class="results__data"> <h4 class="results__name">${limitRecipeTitle(receipe.title)}</h4> <p class="results__author">${receipe.publisher}</p> </div> </a> </li>`; elements.searchResList.insertAdjacentHTML('beforeend', markup) } |
Forkify Web app (part 3 – loader and pagination)
Loader
Loader is about using the CSS that is provided to you. We copy and paste the html into our js file. Since the style file is present, it will animate the loader.
We then call the renderLoader js function in the controller.
src/js/views/base.js
|
1 2 3 4 5 6 7 8 9 10 11 12 13 14 15 16 17 |
export const renderLoader = parent => { const loader = ` <div class="loader"> <svg> <use href="img/icons.svg#icon-cw"></use> </svg> </div> `; parent.insertAdjacentHTML('afterbegin', loader); } export const clearLoader = () => { const loader = document.querySelector('.loader') if (loader) { loader.parentElement.removeChild(loader); } } |
When the data fetched is finished, we then call the removeLoader. We basically find the element with the class name ‘.loader’ and then go up to its parent, and call removeChild on it.
src/js/index.js
Now just use them right before and after the fetching of your data result.
|
1 2 3 4 5 6 7 8 9 10 11 12 13 14 15 |
const controlSearch = async () => { const query = searchView.getInput(); if (query) { state.search = new Search(query); searchView.clearInput(); searchView.clearResults(); renderLoader(elements.searchRes) await state.search.getResults() clearLoader() searchView.renderResults(state.search.result) } } |
Pagination
Pagination is part of rendering the results that we fetched from the backend.
src/js/index.js
|
1 2 3 4 5 6 7 |
const controlSearch = async () => { const query = searchView.getInput(); if (query) { ... searchView.renderResults(state.search.result) } } |
We need to modify our renderResults functionality. Before, we just a simple forEach that renders all results. Now we have to be more selective.
We need to know two things, the page we’re on and the number of results per page.
We calculate for start and end so that we can selectively extract those data to be displayed.
If we were to start on say page 1, and 10 results per page we need 0-9.
if we start on page 2, 10 – 19…
…etc.
for ‘start’, we just do: (page-1) * resPerPage
for ‘end’, we simply do: page * resPerPage
Notice we get 0, 10
10 – 20
20 – 30…
We then use slice to get the start/end – 1
so slice(0,10) means to get elements from index 0 to 9
slice (10, 20) means to get elements from index 10 to 19
…etc
which is exactly how we want to render our recipes.
src/js/views/searchView.js
|
1 2 3 4 5 6 7 |
export const renderResults = (recipes, page=1, resPerPage=10) => { const start = (page - 1) * resPerPage; const end = page * resPerPage; recipes.slice(start, end).forEach(recipe => renderRecipe(recipe)) renderButtons(page, recipes.length, resPerPage) } |
Forkify Web app (part 2 – fetching data and presenting it)
The url to fetch data is https://forkify-api.herokuapp.com/api
We get GET data like so:
https://forkify-api.herokuapp.com/api/search?q=pizza
https://forkify-api.herokuapp.com/api//get?rId=47746
src/js/models/Search.js
We use Axios library for data fetching:
1) We await the Promise object to be done
2) then we extract the status to make sure its all OK
3) we finally log the result
|
1 2 3 4 5 6 7 8 9 10 11 12 13 14 15 16 17 18 19 20 21 22 |
import axios from 'axios' export default class Search { constructor(query) { this.query = query this.result = null } async getResults() { try { const res = await axios(`https://forkify-api.herokuapp.com/api/search?q=${this.query}`); const {status, statusText} = res if (status === 200 && statusText === 'OK') { this.result = res.data && res.data.recipes; console.log(this.result) } } catch (err) { console.log(err) } } } |
The default http grammar is GET. axios(…) automatically use this if we only give it an url.
We will be using this Search’s getResults in the view. However, we need to set up utility functionality first.
src/js/views/base.js
This is just a way to get the DOM element of a certain class or id. Typically, we use document.querySelector, and then we store it in a literal object like so:
|
1 2 3 4 5 |
export const elements = { searchForm: document.querySelector('.search'), searchInput: document.querySelector('.search__field'), searchResList: document.querySelector('.results__list') } |
Once we get the DOM element, we can use textContent, innerText, innerHTML to get the content.
src/js/views/searchView.js
The whole point to this searchView is to create a renderResults function that our controller can use.
We implement a renderResults function that outputs HTML for rending the content. We render the content. It takes in an recipe object and then uses the object’s properties along with the HTML. We also shorten the incoming titles to the length we want by using reduce.
Other purpose is to clear textfields and such:
– clearResults
– clearInputs
We first import the base. Then we simply access value, or innerHTML, according to what we want. From there we can clear certain HTML controls.
|
1 2 3 4 5 6 7 8 9 10 11 12 13 14 15 16 17 18 19 20 21 22 23 24 25 26 27 28 29 30 31 32 33 34 35 36 37 38 39 40 41 42 43 44 45 |
import { elements } from './base' export const getInput = () => elements.searchInput.value; export const clearInput = () => { elements.searchInput.value = ''; } export const clearResults = () => { elements.searchResList.innerHTML = ''; } const limitRecipeTitle = (title, limit = 17) => { const newTitle = []; if (title.length > limit) { title.split(' ').reduce((acc, cur) => { if (acc + cur.length <= limit) { newTitle.push(cur) } return acc + cur.length; }, 0); return `${newTitle.join(' ')}` } return title } const renderRecipe = receipe => { const markup = `<li> <a class="results__link results__link--active" href="#${receipe.recipe_id}"> <figure class="results__fig"> <img src="${receipe.image_url}" alt="${limitRecipeTitle(receipe.title)}"> </figure> <div class="results__data"> <h4 class="results__name">${limitRecipeTitle(receipe.title)}</h4> <p class="results__author">${receipe.publisher}</p> </div> </a> </li>`; elements.searchResList. insertAdjacentHTML('beforeend', markup) } export const renderResults = recipes => { recipes.forEach(recipe => renderRecipe(recipe)) } |
for all elements in array A, see if any of it matches in array B.
Given an array of target data…
|
1 2 3 4 5 |
var sortedWebcasts = [ { id: 136, providerName: "ATT", 'providerID': 36, 'active': true }, { id: 138, providerName: "Bell", 'providerID': 40, 'active': false }, { id: 140, providerName: "Verizon", 'providerID': 1, 'active': true } ]; |
We want to see if an array of ids can be found in that target data.
Say a user selects these ids:
|
1 2 3 4 |
var selectedIDs = [ { id : 136}, { id : 138} ] |
We want to see if the selected ids can be found in the target array:
|
1 2 3 4 |
// in array selectedIDs, for every {selectID}, // find if {selectID}.id matches for any element in array sortedWebcasts with id let idMatch = selectedIDs.map(selectID => _.find(sortedWebcasts, {id: selectID.id})) console.log(idMatch); |
Thus, you see that it looks through the target array on all the selected ids. If the ids match, then it saves it into an array and returns it to you:
output:
(2) [{…}, {…}]
0: {id: 136, providerName: “ATT”, providerID: 36, active: true}
1: {id: 138, providerName: “Bell”, providerID: 40, active: false}
length: 2
__proto__: Array(0)
You can also do it the other way, around, but it is not intuitive. You get every single target item and see if it exists in the toFind array.
It doesn’t fare very well as it forces you to go through every target item. If that target item is not found, undefined is returned and it sticks it into your result array. Thus, that is why we must use _.remove to removes those undefined. This is not the way to go.
|
1 2 |
let results = sortedWebcasts.map(webcast => _.find(selectedIDs, {id: webcast.id}) ) console.log(_.remove(results, undefined)) |
forEach vs map
ref – https://programmingwithmosh.com/javascript/whats-the-difference-between-foreach-and-map-in-javascript/
Array.prototype.forEach
Anytime you want to iterate through the items in an array, the first thing that comes to our mind in any programming language is the for loop. forEach() in JavaScript is an interesting alternative to the regular for loops.
The forEach() iterates through the elements in the array. It calls a provided callback function once for each element in the array in ascending order.
The callback function accepts three arguments:
value of the element
index of the element
array object
Let’s take a look at an example to see how forEach() works.
|
1 2 3 4 5 |
let temp = [1, 4, 9]; temp.forEach((item, index) => { return temp[index] = item * 3; }); // temp is now [3, 12, 27] |
Array.prototype.map
The map() method creates a new array with the results of calling a provided function on every element in the calling array. map() calls a provided callback function once for each element in an array, in order, and constructs a new array from the results.
The callback accepts three arguments:
- value of the element
- index of the element
- array object
You may have used the map() function before. It qualifies as a higher-order function, because it takes in a callback function as an input argument.
|
1 2 3 4 5 6 |
let numbers = [1, 4, 9]; let triples = numbers.map((item) => { return item * 3; }); // numbers is still [1, 4, 9] // triples is [3, 12, 27] |
In the example above, we have an array of numbers and creating a new array using the map(). The map() takes a function as an argument. The argument item within the function will automatically be assigned from each element of the array as map() loops through the original array.
What is the difference?
If you notice closely, although they look very similar there is a fundamental difference between forEach() and map() functions.
- forEach() changes the original array
- whereas map() returns a new array, without mutating the original array.
So which one should you pick? It depends on what you are trying to do with the array.
Note: I always prefer to use map() over forEach().
If you are looking to make changes to the array, map() is preferable. map() ensures that it doesn’t change/mutate the original array, and returns a new array instead.
forEach() is used when you want to iterate through the array and allows a callback function that mutates the original array unlike map(). If you are not looking to transform the array items, but just need to iterate through it and print them or do other actions with them, then forEach() could can be used.
Which one is faster
?
So which one is faster? There seems to be a very small difference between forEach() and map() with respect to speed. map() is faster, but these are so miniscule that it shouldn’t affect your application’s performance significantly. You can almost always use map() and other array methods like filter() and reduce() instead of using forEac
Which is better?
The original array that the map() function iterates through is immutable. This means it cannot be changed, and the map() has to return a new array with the updated items. This is a big benefit since your original array is guaranteed to remain the same and not change after the iteration. Incase your code needs the original array elsewhere, map() will be the best option.
h().
Forkify Web app (part 1 – setting up your environment)
download the forkify starter files.
Install Node
download node via command line or an executable/dmg file from Node’s website.
check if node is installed correctly:
node -v
Go into the forkify folder and you’ll see folders:
– dist
– src
This is where our source files are.
Go ahead and make this into a project: npm init
Go ahead and fill it in. The output should look something like this:
bogon:starter$ npm init

This utility will walk you through creating a package.json file.

It only covers the most common items, and tries to guess sensible defaults.
See npm help json for definitive documentation on these fields
and exactly what they do.
Use npm install afterwards to install a package and
save it as a dependency in the package.json file.
Press ^C at any time to quit.
package name: (starter) forkify
version: (1.0.0)
description: forkify project
entry point: (index.js)
test command:
git repository:
keywords:
author: ricky t
license: (ISC)
About to write to /Users/*****/Desktop/complete-javascript-course/9-forkify/starter/package.json:
{
"name": "forkify",
"version": "1.0.0",
"description": "forkify project",
"main": "index.js",
"scripts": {
"test": "echo \"Error: no test specified\" && exit 1"
},
"author": "ricky t",
"license": "ISC"
}
Is this OK? (yes) yes
Once you’re done, go back to the directory, and you’ll see a package.json.
Now let’s install webpack: npm install webpack –save-dev
It will save webpack as a development dependency. Now go back and look at your packpage.json, you’ll see that webpack has been added.
Your packpage.json should look something like this:
|
1 2 3 4 5 6 7 8 9 10 11 12 |
{ "name": "forkify", "version": "1.0.0", "description": "forkify project", "main": "index.js", "scripts": "...test", "author": "ricky t", "license": "ISC", "devDependencies": { "webpack": "^4.41.2", } } |
Now let’s install jQuery: npm install jquery –save
It will save jQuery not as a dev dependency, but as dependency.
You can also uninstall jQuery like so: npm uninstall jQuery –save
Let’s install local web server: npm install live-server –global
If you get an error, make sure you use ‘sudo’ to give permission:
sudo npm install live-server –global
when you install globally, you can run it anywhere by typing:
live-server
In main directory, create file webpack.config.js:
|
1 2 3 4 5 6 7 8 9 10 |
const path = require('path'); module.exports = { entry: './src/js/index.js', output: { path: path.resolve(__dirname, 'dist/js'), filename: 'bundle.js' }, mode: 'development', } |
The entry point is where we want to start running the project. Create a file: /src/js/index.js
|
1 2 |
import x from './test' console.log(`i imported ${x} from ./test`) |
Basically, we have a value/component in test.js, and we export it to index.js.
Create file: /src/js/test.js
|
1 2 |
console.log('Imported module'); export default 23; |
The output means that after we package all of our js files together, we want to export the resulting file into ‘dist/js’ with the name ‘bundle.js’.
This bundle.js will have all of our code, which can be easily run in the browser. It literally packs everything for the web to run. If you were to look inside the bundle.js file, you’ll see our js code of test and index.
Install webpack client: npm install webpack-cli –save-dev
Another thing you should look at is change your package.json when you run the scripts. Make sure we’re running the webpack conversion using development or production.
Your package.json should look like this:
|
1 2 3 4 5 6 7 8 9 10 11 12 13 14 15 16 17 18 19 |
{ "name": "forkify", "version": "1.0.0", "description": "forkify project", "main": "index.js", "scripts": { "dev": "webpack --mode development", "build": "webpack --mode production" }, "author": "ricky t", "license": "ISC", "devDependencies": { "webpack": "^4.41.2", "webpack-cli": "^3.3.10" }, "dependencies": { "jquery": "^3.4.1" } } |
Now, when you go: npm dev run, webpack should convert our web files into a bundle.js.
Built at: 12/15/2019 6:23:26 PM

    Asset        Size  Chunks             Chunk Names

bundle.js  1020 bytes       0  [emitted]  main

Entrypoint main = bundle.js

[0] ./src/js/index.js + 1 modules 143 bytes {0} [built]

    | ./src/js/index.js 92 bytes [built]

    | ./src/js/test.js 51 bytes [built]
However, we need to put this bundle into an html file so we can see it:
create index.html in distr/
Then in index.html, type ‘!’, then press ‘tab’.
you’ll get the typical html template. Then in body tag, put:
your index.html should look like this:
|
1 2 3 4 5 6 7 8 9 10 11 12 |
<!DOCTYPE html> <html lang="en"> <head> <meta charset="UTF-8"> <meta name="viewport" content="width=device-width, initial-scale=1.0"> <meta http-equiv="X-UA-Compatible" content="ie=edge"> <title>hohoho</title> </head> <body> <script src="js/bundle.js"></script> </body> </html> |
Open the index html file dist/index.html and when you see the html load, it will also load the bundle.js file. You’ll see the test.js and index.js print out the results.Make sure your web server is running by typing live-server.
Development Server
Let’s install this so we don’t have to run webpack manually everytime.
|
1 |
npm install webpack-dev-server --save-dev |
package.json
|
1 2 3 4 5 6 7 8 9 10 11 12 13 14 15 16 17 18 19 20 21 22 |
{ "name": "forkify", "version": "1.0.0", "description": "forkify project", "main": "index.js", "scripts": { "dev": "webpack --mode development", "build": "webpack --mode production", "start": "webpack-dev-server --mode development --open" }, "author": "ricky t", "license": "ISC", "devDependencies": { "webpack": "^4.41.2", "webpack-cli": "^3.3.10", "webpack-dev-server": "^3.10.1" }, "dependencies": { "jquery": "^3.4.1", "lodash": "^4.17.15" } } |
webpack.config.js
|
1 2 3 4 5 6 7 8 9 10 11 12 |
const path = require('path'); module.exports = { entry: './src/js/index.js', output: { path: path.resolve(__dirname, 'dist/js'), filename: 'bundle.js' }, devServer: { contentBase: './dist' } } |
now run:
npm run start
you’ll get a browser up and running with the code. Now, when you make changes to your code, you will get live compiling of the files. You don’t need to go to your terminal and run “npm run dev” every single time. Every save you make will automatically compile and rerun the server.
That you can go straight to the webpage to see the updates.
Now we try to run it with the given css from the css folder
remove index.html in distr/js
make sure to install html-webpack-plugin:
|
1 |
npm install html-webpack-plugin --save-dev |
webpack.config.js
we alter our webpack.config.js like so:
|
1 2 3 4 5 6 7 8 9 10 11 12 13 14 15 16 17 18 19 |
const path = require('path'); const HtmlWebpackPlugin = require('html-webpack-plugin'); module.exports = { entry: './src/js/index.js', output: { path: path.resolve(__dirname, 'dist'), filename: 'js/bundle.js' }, devServer: { contentBase: './dist' }, plugins: [ new HtmlWebpackPlugin({ filename: "index.html", template: "./src/index.html" }) ] } |
however, u won’t see it because it’s not saving it on disk.
It simply injects the script.
If you want to save it to disk, run:
npm run dev
At this point, your files should look something like this:
Installing Babel
Babel is a JS compiler, in order to use next generation JS.
npm install babel-core babel-preset-env babel-loader –save-dev
check out package.json file to make sure you’ve installed.
|
1 2 3 4 5 6 7 8 9 10 11 12 13 14 15 16 17 18 19 20 21 22 23 24 25 26 |
{ "name": "forkify", "version": "1.0.0", "description": "forkify project", "main": "index.js", "scripts": { "dev": "webpack --mode development", "build": "webpack --mode production", "start": "webpack-dev-server --mode development --open" }, "author": "ricky t", "license": "ISC", "devDependencies": { "babel-core": "^6.26.3", "babel-loader": "^8.0.6", "babel-preset-env": "^1.7.0", "html-webpack-plugin": "^3.2.0", "webpack": "^4.41.2", "webpack-cli": "^3.3.10", "webpack-dev-server": "^3.10.1" }, "dependencies": { "jquery": "^3.4.1", "lodash": "^4.17.15" } } |
Loaders allow us to import all different kind of files and process them. Convert es6 to es5. Or convert less to sass.
We need to babel loader to do the conversion.
There are certain rules to do these loading. So in our webpack.config.js, we need to define rules. It is an array.
short circuit evaluation (js)
https://stackoverflow.com/questions/2802055/what-does-the-construct-x-x-y-mean