All posts by admin

DNY client (5 – Menu and filtering authenticated content)

dny-client-5 source code
src/core/Menu.js

We first look at how we decide whether a link is active or not. We do so by looking at the history’s path name and the current path. If they match, then we’re on that page and we color it orange.

The way how we get history is to import withRouter from ‘react-router-dom’ and then using it as middleware on our Menu component.

The history object is returned to our component as an object. Within this object, we look at property location, and find the pathname of what page we’re on.

Then we implement signout functionality for when we click on sign out link.
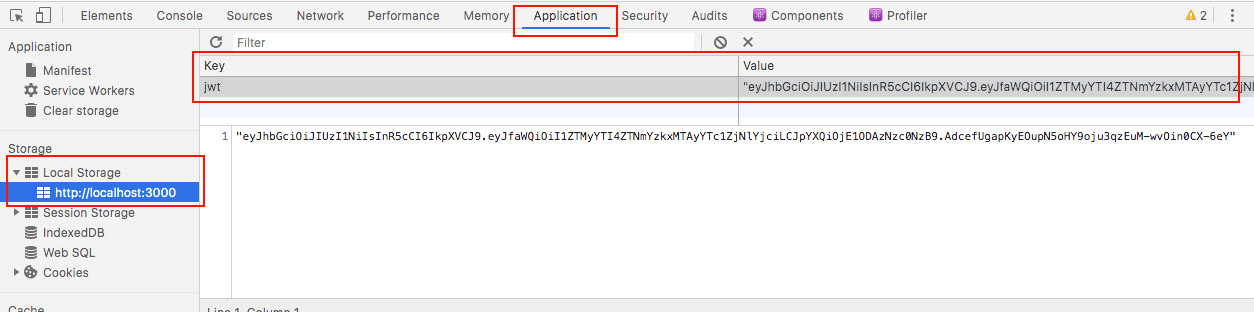
1) We first clear out jwt from the local storage
2) we then make a request to the server for it to signout the current user.

Finally, we implment the filtering of which menu item should be visible depending on whether we’re authenticated or not.

Basically, if our local storage has jwt property, then we’re signed in. We need to get this string, parse it into an JS object, and return it. Else, if this jwt property is empty, then we’re not signed in.

We then copy and paste template html into our code. Then use the previous functionality for
1) signing out
2) filtering menu items
3) coloring the active link

DNY client (4 – Signing in)

We first create a sign in page routing in our MainRouter. It routes to component Signin

src/MainRouter.js

We then create component Signin. It has email and password for the user to sign in with. The error is required for erroneous situations and the redirect to a specific referer page.

src/user/Signin.js

We have an authenticate function that gets the jwt token and stores it into local storage. We store the token value on key ‘jwt’.

But before we do so, we need to make sure the window object exists.
Once the token is set, we set the referer to yes.

Once the user clicks submit, we sign by passing in the email and password. We stringify that data and put it in the body of our POST request to http://localhost:8080/signin.

When successful, we should then get the response with token and some data. We then put this token into the localstorage and set the our redirect to yes so that we redirect to the homepage.

Before you sign in, clear your localStorage first by opening up Inspect Element, then click on the Application tab. On the left-hand side, you’ll see a clearStorage. Click on it to clear any key/values stores previously.

Now, on the left-hand side, make sure you’re still on the Application tab click on the localhost URL. On your browser navigate to localhost:3000/signin. Then sign in using correct credentials. You’ll see that the key/value will be updated with the token given by the server. This is so that whenever you make future requests, you’ll be using this token with each request. The server will verify it and thus authenticate your requests.

After the successful sign in, you’ll be redirected to the home page.

DNY client (3 – Creating a User)

On the client side, make sure we create the event handler for the submit button:

src/user/Signup.js

On the server side, make sure use cors.

To set up: npm i -S cors

app.js:

Now when you fill in the username, password, email, (like I did in the screenshot) you’ll see that the password is ‘compaq’ and does not have a number. Thus, you’ll get a bad request:

Click on the Network tab to see what this bad request is about. You’ll see the request, which is called signup. Click on signup.

In the response from the server, we see that the text tells us that we need a number in our password:

So change our password so that it has a number. This time, when you submit, you’ll see that the response to our request will be successful. When you analyze the response to our request, you’ll see that the json response will have a success message:

Go into your mLab account and you’ll see that our users have the information we just used to create a user:

Now, if you try to submit the same data for registration, the response from the server will tell you that the email you’re using to register already exists:

DNY client (2- Routing)

download dny-client-2
install react router dom package: npm i react-router-dom

In App.js, we extract BrowserRouter from react-router-dom which is the package we just installed.
BrowserRouter needs Router components to let it know where and how to route. Thus we need to implement MainRouter. MainRouter routes ‘/’ to a component called Home. We need to implement this Home component also.

src/App.js

Implement MainRouter

This is the main routing mechanism. We basically extract Route and Switch from the package we just installed. In our case, we need a simple router to route path ‘/’ to component Home

We create this pure component so that it can be used inside component BrowserRouter in App.js
It routes different paths to different components.

src/MainRouter.js

Implement Home component for viewing

We created a router that routes to a Home component. Let us implement that Home component.

First, we create a core folder in src. Then we put Home component in there, which basically just displays the data. This simple display of data is fitting to use a pure component like so:

src/core/Home.js

Hence, this core folder will contain all display of views using pure components.

Adding Sign up Page

Create another folder called user, we’ll put all user-related UI in there. Then create file Signup.js:

src/user/Signup.js

update src/MainRouter.js like so:

DNY Client (1 – setup)

create-react-app dny-client

cd dny-client

npm start

You’ll see the default site.

Open your project with Code and remove these files:

  • App.test.js
  • ServiceWorker.js
  • setupTests.js
  • logo.svg

Edit these files to like so:

App.js

index.js

Go to Bootstrap Material.
We want to put the CSS into our index.html

copy and paste the link int the index.html

Add className container to your App and return the site.
You’ll be able to see some CSS take effect.

App.js

React Router DOM

npm i react-router-dom

DNY Node API (6 – Users)

dnyNodeAPI-Users source

First we sign in. Make sure you select post.
Use signin as url. Make sure you have the Body tab selected.
Then select radio button raw, and JSON application/json at the pull down.

Put the body below, where you specify the email and password using json:

Then press send. If the user exists, you’ll get a result back with a token property. Copy the value of the token.

Select Headers tab. Make sure there is a key Authorization. For the value type in “Bearer “, with a space behind it, then paste the token. Then change the url to /users so that we can get a list of all users.

You’ll see a lot of find the user that matches the user you’ve just authenticated and copy the id. Paste the id behind localhost:8080/user/{id}, then change the http verb to PUT. In the Body, make sure you specify the JSON key/value of whatever you want to change. So if you want to change the name property to something just go:

Let’s double check to make sure your update took place. Make sure you select ‘Get’, use the ID of the user that you’ve authenticated, and run it. You’ll see that the authenticated user’s name have been updated.

DNY Node API (4 – sign in using JWT )

npm i jsonwebtoken

npm i cookie-parser

dnyNodeAPI-authentication

Creating a User

After creating a user correctly, we get a message saying that a user has been created.

Ensuring user creation correctness

In validator/index.js, we have function userSignupValidator function that ensures we check for the format of the data for when user is created.

We use this function as a middleware in
routes/auth.js

This means that userSignupValidator is used to validate the incoming JSON’s properties. Only when it passes do we continue on to signup function.

validator/index.js

Be sure that you include a number inside your password:

Make sure you include a name when you register for an account:

For your email, ensure to have it in an email format:

Successful Signin

In order to sign in, use /signin, then click on tab Body, choose raw and then JSON format.
Type in a JSON object with key/value “email” and “password”. Then click send. If your credentials are correct, you’ll get an object back with a token key/value.

Copy and paste the value into Headers. In Headers, create a key called “Authorization”.
In the value, type “Bearer ” with a space at the end. Then copy the token behind it.

You are not set up to create/update/delete posts, get/update/delete your own user data.

DNY Node API (3 – validator)

down dnyNodeAPI-validator

install the package:
npm i express-validator

In package.json, change to 5.3.1

re-install everything:
npm install

create validator folder. Then create index.js file: