to run: npm install, npm start
download source
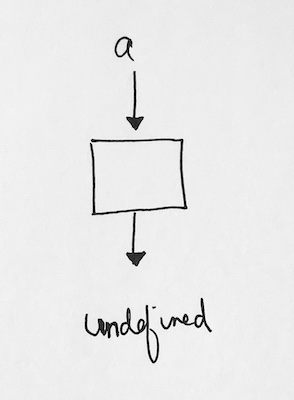
Single Sources of Truth
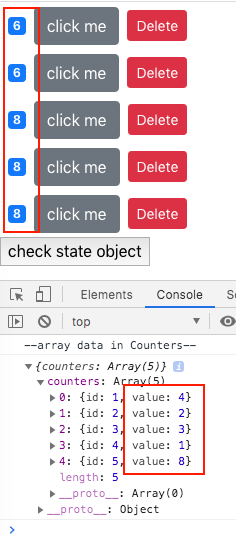
In Counters, create a checkState to view what your state object looks like:
|
1 2 3 4 5 6 7 8 9 10 11 12 13 14 15 16 17 18 19 20 |
checkState = () => { console.log('--array data in Counters--'); console.log(this.state); } render() { return ( <div> {this.state.counters.map(counter => ( <Counter counter={counter} key={counter.id} selected={true} onDelete={this.handleDelete} /> ))} <button onClick={this.checkState}> check state object </button> </div> ); } |
Let’s initialize your state like so:
|
1 2 3 4 5 6 7 8 9 |
state = { counters: [ {id: 1, value: 4}, {id: 2, value: 6}, {id: 3, value: 3}, {id: 4, value: 2}, {id: 5, value: 1}, ] } |
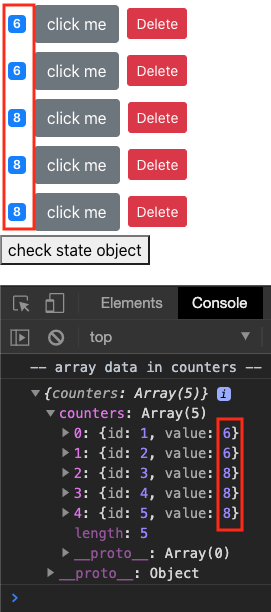
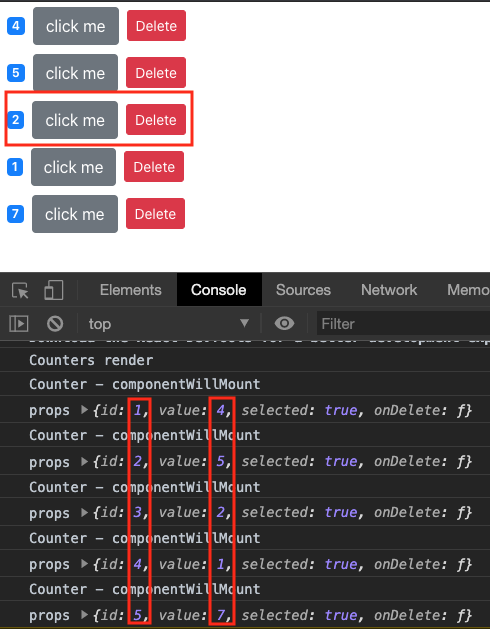
Now run your app and click on the check state button. The counters array you see in your log matches.
Now, click on your counters to increase their number.
I increased mine to 6, 6, 8, 8, 8.
Now if you click the check state button again, you’ll see that the state object in Counters is still in its initial values, and not the updated ones you just gave.
The reason why this happens is because when you increment, you are incrementing the state’s count property in Counter. The correct way is to update the counters array in Counters. We shall use Controlled Component to fix this issue.
Controlled Component
Controlled component does not have local state.
ref – http://chineseruleof8.com/code/index.php/2020/06/27/controlled-component/
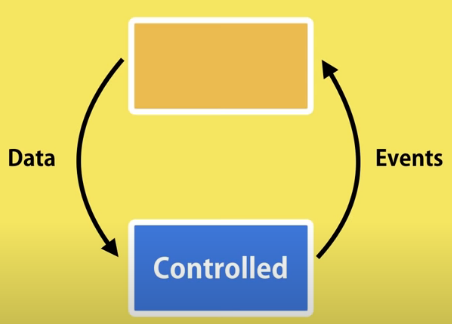
- It receives all props by data
- Raise events whenever data needs to be changed
- Component is entirely controlled by its parent
- Cannot have state
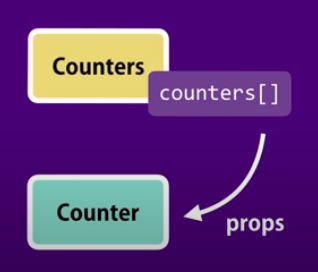
counters.jsx
This is where you give data to your child component using prop attributes.
In our case, we give:
– data counter object
– counter.id as key
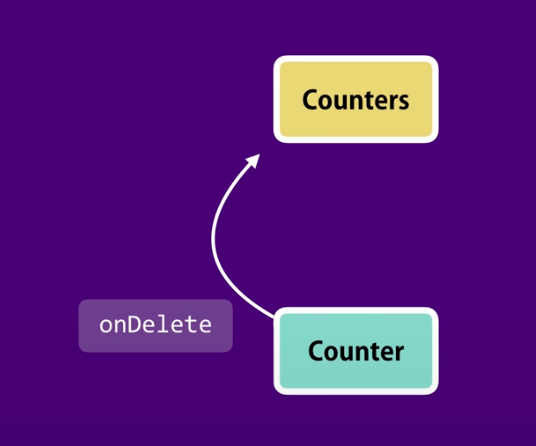
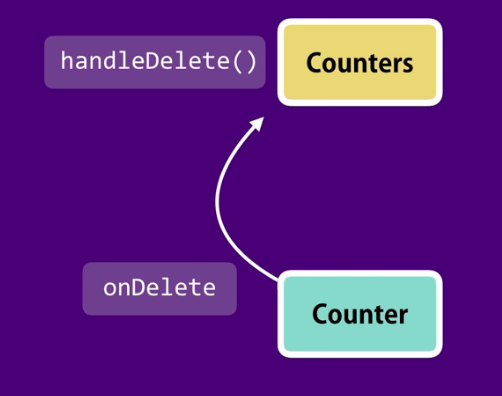
The two reference functions onDelete and onIncrement is to take care of the events that our child component Counter raises.
First, we handle increment in counters component. We do a deep copy. First we clone the counters array.
We then get the array index of the counter by using indexOf
Then we re-point the reference of that array element to a new literal object with same properties/values.
Then we increment the value.
We then reset our state’s counters property to our cloned counters array.
This way, we don’t use any of the old counters array.
counters.jsx
|
1 2 3 4 5 6 7 8 9 10 11 12 13 14 15 16 17 18 19 20 21 22 23 24 25 26 27 28 29 30 31 32 |
constructor() { super(); this.checkState = this.checkState.bind(this); this.handleIncrement = this.handleIncrement.bind(this); } handleIncrement = counter => { // deep copy counter object, and edit its value to reflect increment const counters = [...this.state.counters]; // clone array as not to change original counters const index = counters.indexOf(counter); // find the index of where our counter is counters[index] = {...counter}; // for that counter, re-point reference to new literal object with same value counters[index].value++; // increase the value this.setState({counters}); // re-point state's counters to newly created counters array } render() { return ( <div> {this.state.counters.map(counter => ( <Counter counter={counter} key={counter.id} selected={true} onDelete={this.handleDelete} onIncrement={this.handleIncrement} /> ))} <button onClick={this.checkState} >check state object</button> </div> ); } |
counter.jsx
Since data is received as prop from our parent Counters, we should not have any state.
All data displayed and used here should be from the prop object.
All button click events are raised to our parent component by callings its prop function references onIncrement and onDelete.
|
1 2 3 4 5 6 7 8 9 10 11 12 13 14 15 16 17 18 19 20 21 22 23 24 25 26 27 28 29 30 31 32 33 |
import React, { Component } from "react"; // Component has bunch of methods we are going to inherit into Counter class class Counter extends Component { constructor() { super(); console.log('-- Counter constructor --'); } getBadgeClasses() { let classes = "badge m-2 badge-"; classes += this.props.counter.value === 0 ? "warning" : "primary"; return classes; } names() { return "btn btn-secondary"; } formatCount() { const { value } = this.props.counter; return value === 0 ? "Zero" : value; } render() { return ( <div> <span className={this.getBadgeClasses()}>{this.formatCount()}</span> <button onClick={ () => this.props.onIncrement(this.props.counter)} className={this.names()}> click me </button> <button onClick={() => this.props.onDelete(this.props.counter.id)} className="btn btn-danger btn-sm m-2">Delete</button> </div> ); } } export default Counter; |
As you can see, everything we do in counter.jsx, as a controlled component, is to use this.props. Through this.props, we use callbacks to tell parent component counters to increment, or decrement. We use other values from this.props to display.
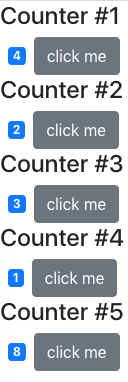
Now when we run the program, we increment our numbers in the components, then look at the state, it reflects what we’ve updated. This is because we tell our parent component to change the one and only data source to change.