ref – https://developer.mozilla.org/en-US/docs/Web/JavaScript/EventLoop
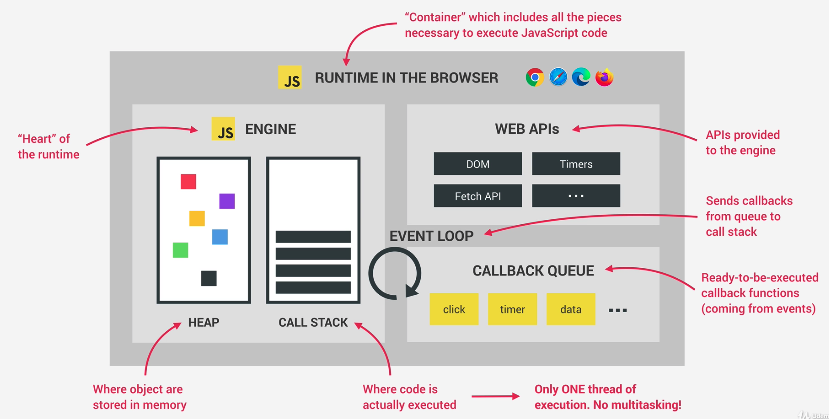
So the runtime in our web browser works like so.
– We have a call stack that contains the execution contexts.
– We have a callback queue sitting and waiting.
– We also have a Web API section
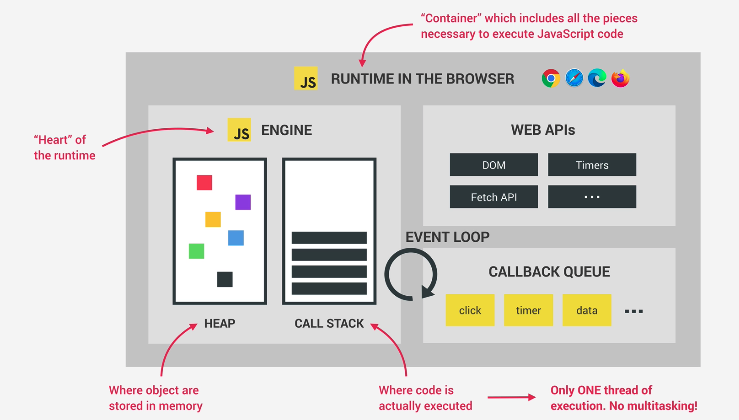
- Objects created in memory are stored in the heap.
- Execution context happens on the callback.
- We have a Web API that runs code used by the browser. It executes events and will place code in either the callback queue or other data structures.
- We also have a callback queue that receives callback functions whenever an an event in the Web API is done or executed.
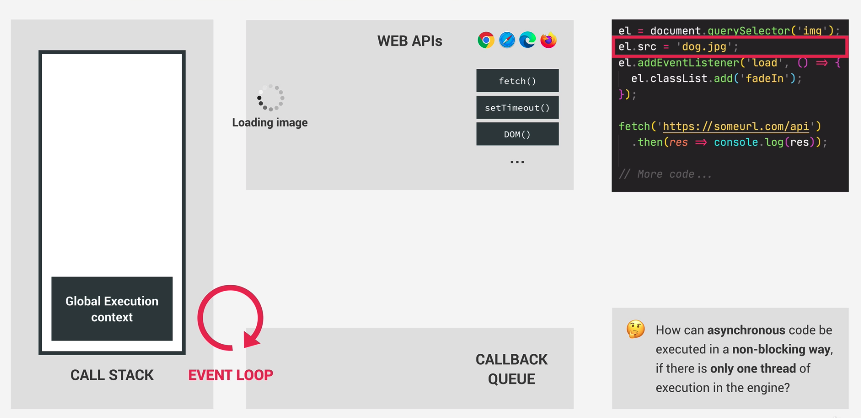
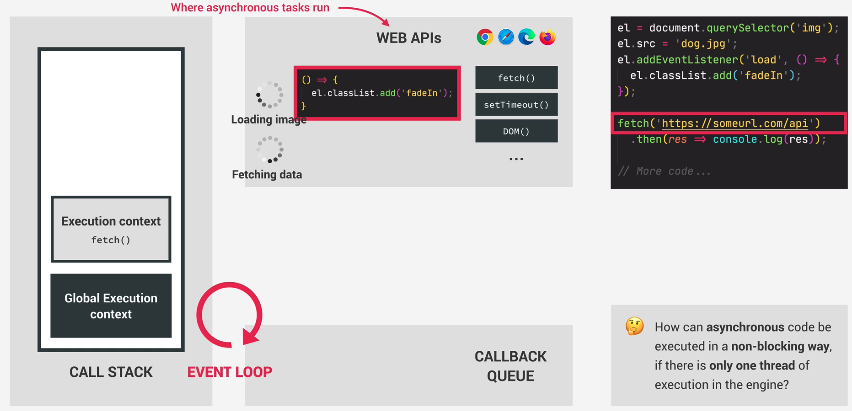
Say we start off with code like so
|
1 2 3 4 5 6 7 8 9 10 |
e1 = document.querySelector('img'); e1.src = 'dog.jpg'; e1.addEventListener('load', () => { e1.classList.add('fadeIn'); }); fetch('https:....') .then(res=>console.log(res))); // more code ... |
Thus, when we start the program, we start with an execution context for global scope.
It executes the first line of code, which is sync.
We then move on to the next line of code.
|
1 |
e1.src = 'dog.jpg'; |
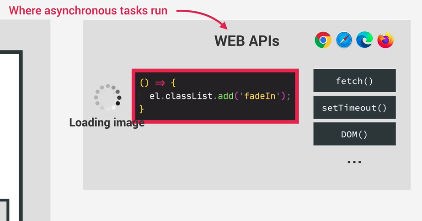
This will load up an image asynchronously. Thus, the loading of the image happens in the Web API and we let the async tasks run.
We move on to the next line of code:
|
1 2 3 |
e1.addEventListener('load', () => { e1.classList.add('fadeIn'); }); |
So now, in the Web API, we have this callback function added. Our Web API keeps track of all these callbacks.
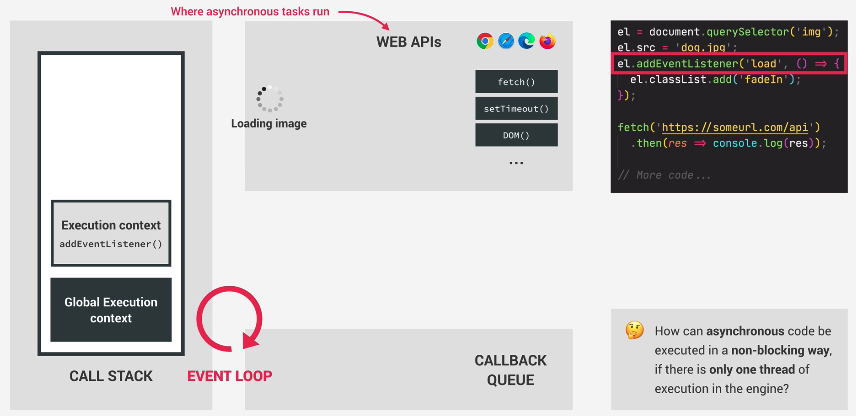
So here as you can see, Web API has the current async operation going…and maintains a callback. This is so that when the async operation of loading up the image is done, it has a valid callback to execute. The callback will stay there until load event is emitted. This is why we want to add the event listener for when the image finishes loading.
Having telling the Web API to load an image, and declaring a callback for when load is done, we now move forward to the fetch operation:
|
1 |
fetch('https://....') |
As always, the async fetch operation will happen in the Web API’s environment. Otherwise, we’d be blocking the call stack if we were to execute it using the execution context.
The Web API appends it to its running async operations and now have two async operations going:
Finally we use the then method returned by the fetch function. And this will also register a callback in the Web API’s environment. So we can react to the future resolved value of the promise.
In other words, we place the callback from then then in our Web API. This is so that when fetch operation is completed, it will know to execute the callback provided to then.
Now our Web API environment has two async operation working, and two callback to execute when they are done.
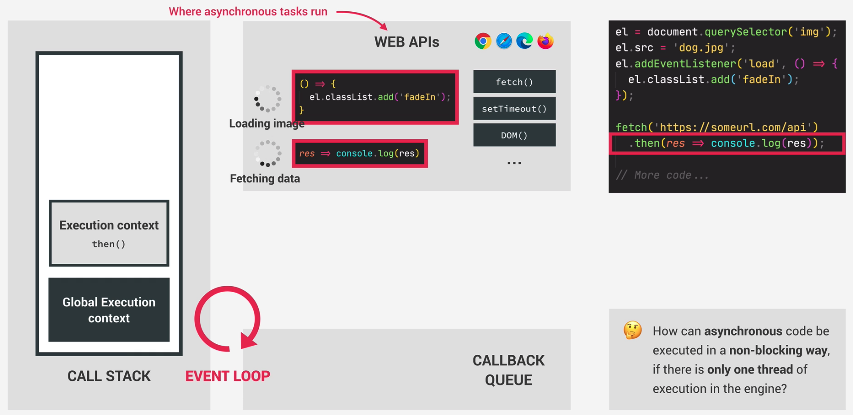
The execution goes forward and processes other code…

Now, comes the good part. Our loading of the image async operation is done! It signals with the load event. Load event has emitted. The callback for this event is then put into the callback queue.
Now, we DO NOT execute this callback right away. Instead, we now put this callback in the callback queue.
Callback queue is like a todo list. Whereas the event loop is an executor.
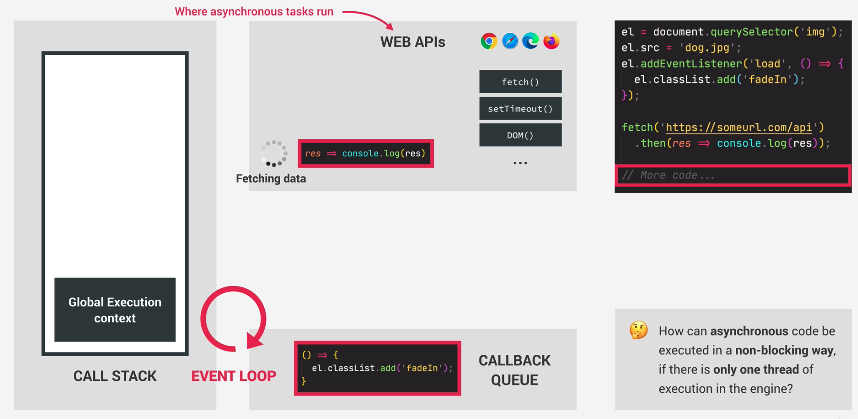
There could be other callbacks. Then our new callback would be queued and wait until the others are done. This callback will execute when the event loop has finished the other callbacks in the queue. It decides when each callback is worked upon.
This has implications.
Hence, keep in mind that if you decide to use setTimer and wait 5 seconds before putting a callback inside the callback queue, it doesn’t mean your callback will be executed at exactly 5 seconds later. It may be that the callback queue is still processing other queues in front. This will take whatever time those operations specify to be. And then, then they are done, the event loop will come to your callback and execute it.
Hence, when working with timers, just remember that the time you specify in milliseconds is the fastest time that your callback will execute.
Keep in mind that the callback queue also keeps callbacks from DOM events like clicks, or key presses.
DOM events are not async, but they still callback queue to run their attached callbacks. So if a click callback executes on a button with an event listener, it works in the same way that it stays in the event queue until others are finished. So if you somehow have a callback that takes some seconds IN FRONT of a button callback, then your button presses will not work. It will need for the hanging callback in the queue to finish, the event loop processes the button callback, which will then make your button presses work.
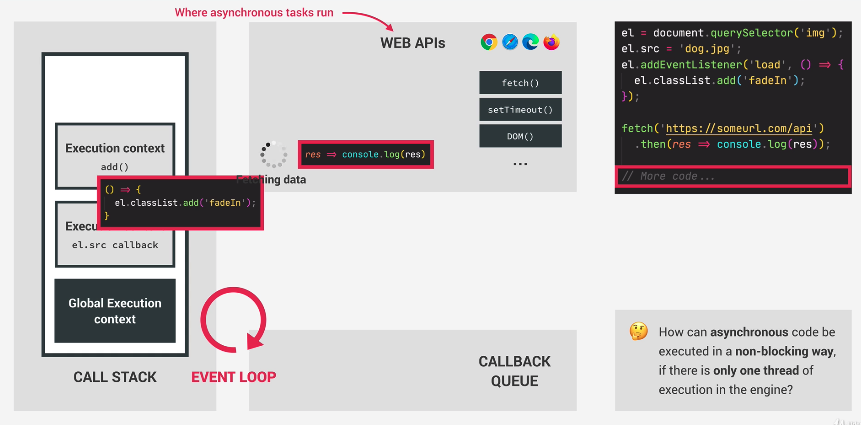
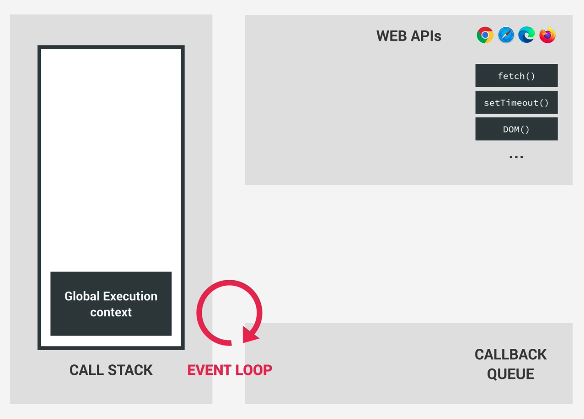
The event loop looks into the call stack. Aside from the global context, is it empty?
The Event Loop Tick
If the stack is empty, this means no code is being executed. It takes first callback from callback queue and put it onto the call stack to be executed. This is called the Event Loop Tick
It orchestrates javascript runtime.
Javascript language itself has no sense of time.
Everything that is async, does not happen in the engine.
Its the runtime that manages the async behavior, and it is the event loop that decides which code gets executed next.
The event loop got its name because of how it’s usually implemented, which usually resembles:
|
1 2 3 |
while (queue.waitForMessage()) { queue.processNextMessage() } |
The Web API environment, the callback queue, and event loop all make it possible that async operations are executed in a non-blocking way, while using only 1 thread of execution in the engine.

The MicroTask Queue
Callbacks of Promises have priority over other callbacks by using the Microtask queue
So now say the data arrives, and fetch is done. Callback related to promises, actually DO NOT go into the callback queue. Instead, callbacks of promises go to a special queue for microtasks queue.
It is special because it has priority over callback queue. It will run ALL of the microtasks until it is empty. Only then will it process the callback queue again.
The way that it runs microtasks is the same as it would for callback queue. It puts the tasks onto the execution context to be executed. Note that if any microtasks add another microtask, then naturally the new microtask(s) will be processed until the microtask queue is empty. Only then will the callback queue continue to be processed.
Therefore, note that microtasks can starve a callback queue.
A Quick Example
|
1 2 3 4 5 6 7 8 9 10 11 12 13 14 |
console.log('Test start'); // timer, goes onto the callback queue setTimeout( () => { console.log('0 sec timer!'); }, 0); // Promise callback. Placed on microtasks queue Promise.resolve('Resolved Promise 1') .then(res => console.log(res)); console.log('test end'); |
output:
Test start
test end
Resolved Promise 1
0 sec timer!
If microtask takes long time to run, then our timer tasks on the callback queue will be blocked for that amount of time.
|
1 2 3 4 5 6 7 8 9 10 11 12 13 14 15 16 17 18 19 20 |
console.log('Test start'); // timer, goes onto the callback queue setTimeout( () => { console.log('0 sec timer!'); }, 0); // Promise callback. Placed on microtasks queue Promise.resolve('Resolved Promise 1') .then(res => console.log(res)); Promise.resolve('Resolved Promise 2').then(res => { // have for loop to simulate time // Hence, this tasks on the microtask will block the callback queue for (let i = 0; i < 100000000; i++) {} console.log(res); }); console.log('test end'); |
So as you can see there will be few seconds when Promise #2’s callback is executing on the microtask queue because the loop from our callback in Promise #2 is running. Once its done, it will log its text, and then finally, the timer’s callback will run on the callback queue.
output:
Test start
test end
Resolved Promise 1
…then a few seconds here because the loop from our callback in Promise #2 is running.
Resolved Promise 2
0 sec timer!
Additional Information
A JavaScript runtime uses a message queue
It is a queue that contains type Message.
Each message object in the queue has a reference to an associated function.
The Event Loop decides when to call the referenced functions.
queue.waitForMessage() waits synchronously for a message to arrive. Because Javascript is single-threaded, it can only do one thing at at a time. It can only processNextMessage if it has nothing to do (waiting).
But if a new message comes into the queue, it will be busy adding it to the queue. Thus in that situation, it cannot processNextMessage. It must first finish adding to the Queue. Then when no more Messages comes in, it will go into waitForMessage status, and thus be able to ProcessNextMessage
Processing Message
Each message is processed completely before any other message is processed.
Pro
This offers some nice properties when reasoning about your program, including the fact that whenever a function runs, it cannot be pre-empted and will run entirely before any other code runs (and can modify data the function manipulates).
This differs from C, for instance, where if a function runs in a thread, it may be stopped at any point by the runtime system to run some other code in another thread.
Con
A downside of this model is that if a message takes too long to complete, the web application is unable to process user interactions like click or scroll. The browser mitigates this with the “a script is taking too long to run” dialog. A good practice to follow is to make message processing short and if possible cut down one message into several messages.
How Message are Added
In web browsers, messages are added anytime an event occurs. An event occurs whenever we attach an event listener to the element like so:
|
1 2 3 4 |
let newsBtn = document.querySelector('#News'); newsBtn.addEventListener('click', evt => { // process click according to evt object }); |
We have an element with the id News. We put a click handler on that element. Now, whenever the user clicks on that element, we can process it the way we like.
When the click happens, an event occurs, and the callback function in the example gets added to the queue as a Message. Similarly, any other event will be added as well. If there is no listener, the event is lost.
Example
The function setTimeout is called with 2 arguments: a message to add to the queue, and a time value (default is 0).
|
1 2 3 |
setTimeOut( function() { console.log('hello'); }, 2000); |
The time value represents a delay in milliseconds. After the delay, the message (anon function provided) will then be pushed into the queue. In other words, when setTimeOut executes, the delay happens instantaneously. After two seconds, our anon function that logs hello will be pushed onto the queue.
If there is no other message in the queue, and the stack is empty, the message is processed right after the delay. However, if there are messages, setTimeout’s anon function will have to wait for the other messages in the queue to be processed. For this reason, the second argument indicates a minimum time — not a guaranteed time.
Basic setTimeout Example
The code gets executed synchronously. However, all async operations such as our setTimeout be placed into our queue. The thing is, Synchronously, our code gets pushed onto the queue first. Even though the setTimeout is wedged in between, the dely starts to run after our code is placed into the queue.
|
1 2 3 4 5 6 7 8 9 10 11 12 13 |
const s = new Date().getSeconds(); setTimeout(function() { // prints out "2", meaning that the callback is not called immediately after 500 milliseconds. console.log("Ran after " + (new Date().getSeconds() - s) + " seconds"); }, 500) while (true) { if (new Date().getSeconds() - s >= 2) { console.log("Good, looped for 2 seconds") break; } } |
So the code gets pushed onto the queue. Async operations will obviously not run because it has to do the delay first. Thus, as the sync code is being run (our while loop), the 500 ms delay is happening. Then when the 500 ms is up, it then places the async operation (our anon function that logs) onto the queue. Let’s look at some drawings to depict this situation:
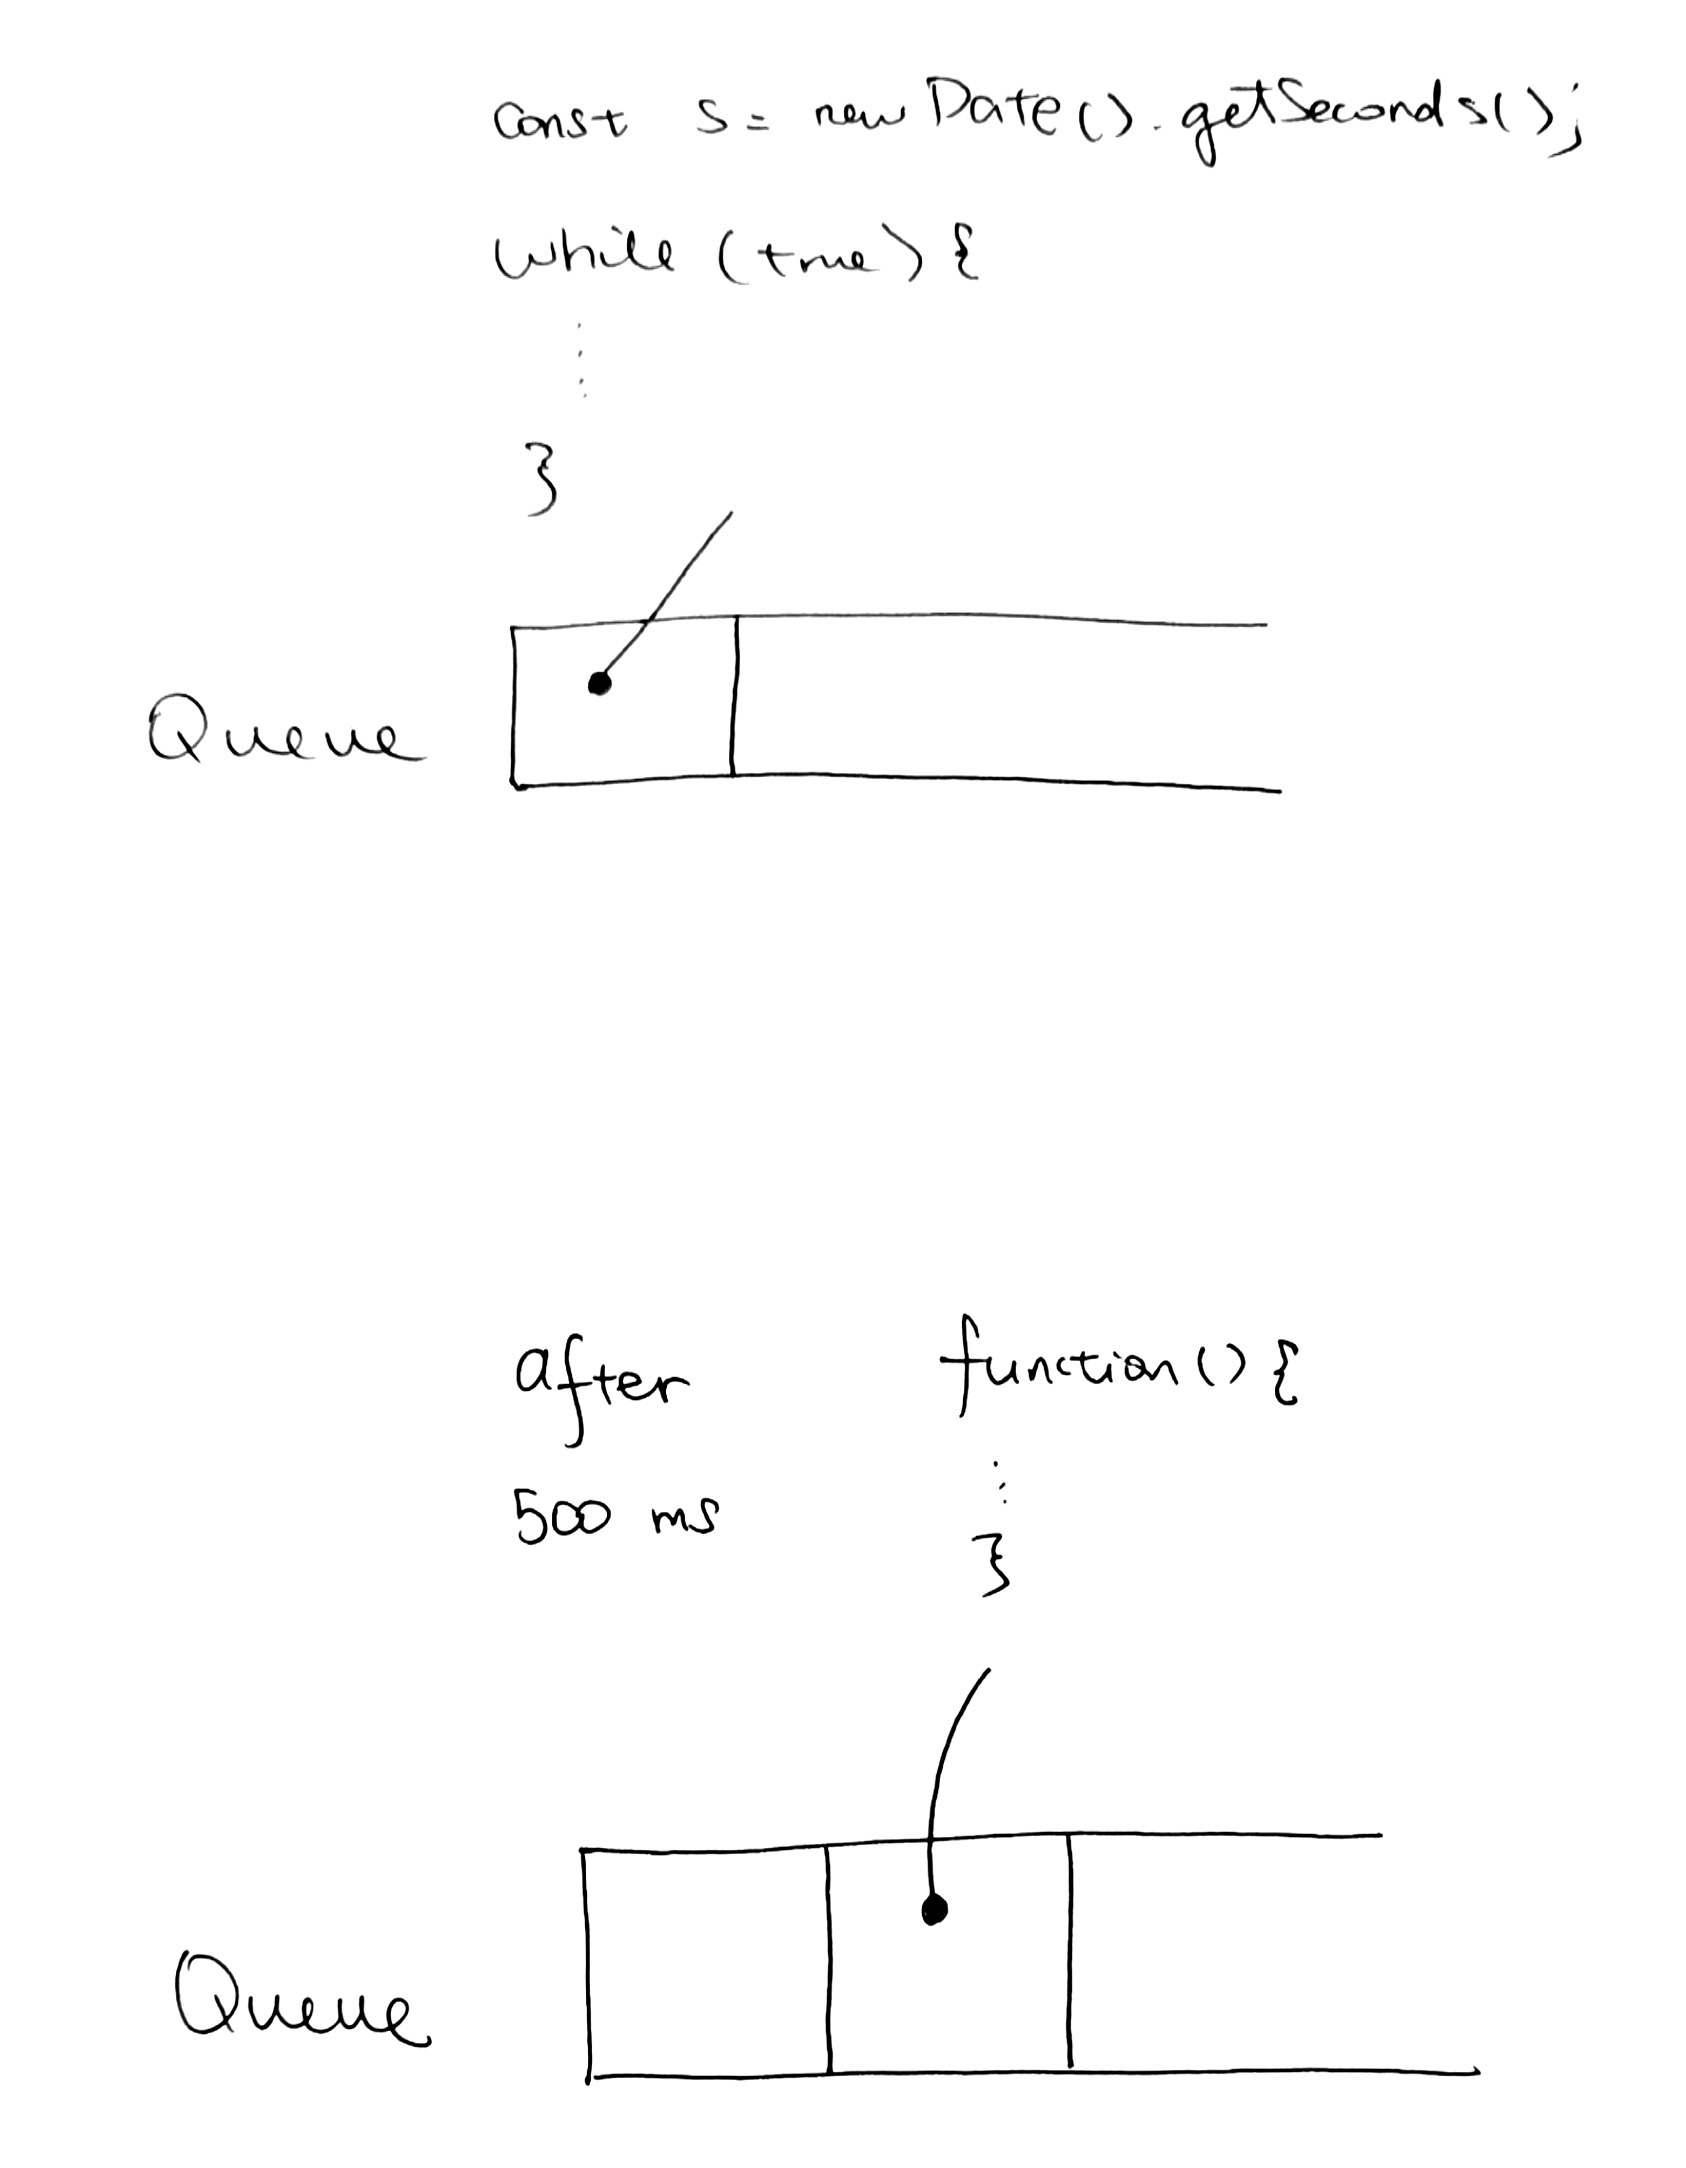
But since our while loop is still running, we can’t process the async function yet. We need for the while loop to finish running.
– First, we get a starting timestamp in seconds. Then use while loop to continuously get another timestamp in seconds.
– We subtract the second timestamp from the initial timestamp to get the difference.
– Because the difference is less than two, we repeat the loop. As time moves forward, this difference gets bigger.
– We keep doing this until the difference is two seconds.
– When this happens, we break out of the loop. This finishes our task in the queue.
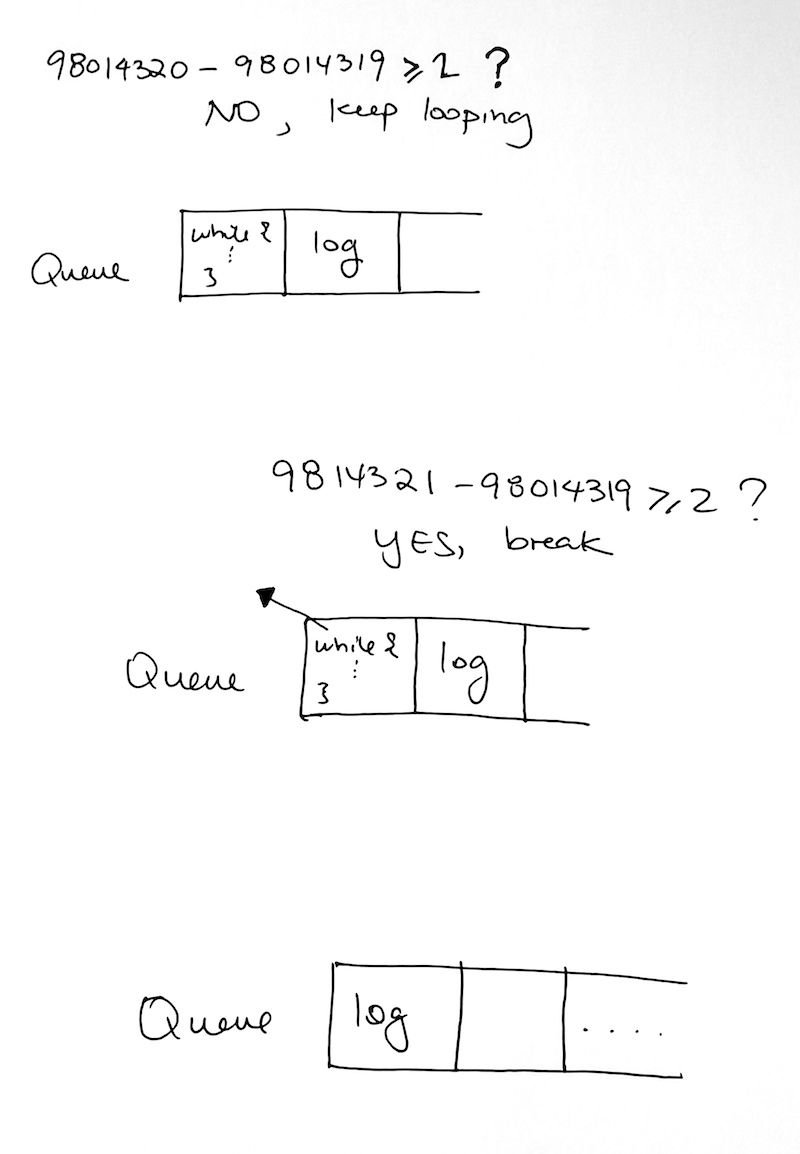
The queue then remove our while loop, and then moves on to the next task, which is our console log.
Therefore, if there are messages, the setTimeout message will have to wait for other messages to be processed. For this reason, the second argument (delay) indicates a minimum time — not a guaranteed time.
From this example, you’ll be tempted to ask…if we change the dealay from 500 ms to 0ms, wouldn’t the function in setTimeout run exactly AFTER the first line of code?
|
1 2 3 4 5 6 7 8 9 10 11 12 13 |
const s = new Date().getSeconds(); setTimeout(function() { // prints out "2", meaning that the callback is not called immediately after 500 milliseconds. console.log("Ran after " + (new Date().getSeconds() - s) + " seconds"); }, 0) while (true) { if (new Date().getSeconds() - s >= 2) { console.log("Good, looped for 2 seconds") break; } } |
OUTPUT:
Good, looped for 2 seconds
Ran after after 2 seconds
Thus, as the output shows, the answer is no.
Here’s why.
Zero Delay
Zero delay doesn’t actually mean the call back will fire-off after zero milliseconds. Calling setTimeout with a delay of 0 (zero) milliseconds doesn’t execute the callback function after the given interval.
The execution depends on the number of waiting tasks in the queue. In the example below, the message this is just a message will be written to the console before the messages in the callback gets processed, because the delay is the minimum time required for the runtime to process the request (not a guaranteed time).
|
1 2 3 4 5 6 7 8 9 10 11 12 13 14 15 16 17 18 19 20 21 22 23 |
(function() { console.log('this is the start'); setTimeout(function cb() { console.log('Callback 1: this is a msg from call back'); }); // has a default time value of 0 console.log('this is just a message'); setTimeout(function cb1() { console.log('Callback 2: this is a msg from call back'); }, 0); console.log('this is the end'); })(); // "this is the start" // "this is just a message" // "this is the end" // "Callback 1: this is a msg from call back" // "Callback 2: this is a msg from call back" |
We enter all the synchronous code into the queue first. Then we place the setTimeout async functions in according to delay.
In our case, our 3 sync code lines starts executing. As its running, our delay of 0 starts for the setTimeout async operations. We immediately place cb1 function into queue.
Then the thread continues to process the sync code for a step. Then it comes back to our async operations and places cb1 anon function into the queue.
1) Puts the sync code (all 3 logs) into the queue
2) starts processing the sync code
3) delay of 0 is executed
4) logs ‘this is the start’
5) queue cb into the queue
6) logs ‘this is a message’
7) queue cb1 into the queue
8) logs ‘this is the end’
9) pops sync code
10) executes cb and logs ‘Callback1…’
11) dequeue cb
12) execute cb1 and logs ‘Callback2…’
13) dequeue cb1
Never Blocks
A very interesting property of the event loop model is that JavaScript, unlike a lot of other languages, never blocks. Handling I/O is typically performed via events and callbacks, so when the application is waiting for an IndexedDB query to return or an XHR request to return, it can still process other things like user input. This is parallel programming. The single thread work between multiple tasks at the same time.
Legacy exceptions exist like alert or synchronous XHR, but it is considered a good practice to avoid them. Beware: exceptions to the exception do exist (but are usually implementation bugs, rather than anything else).