All posts by admin
Protected: Apply Theme in React (part 4) – Routing in React using React-Router-Dom
Protected: Flood Fill Algorithm
Enumerable properties in Javascript
ref – https://www.geeksforgeeks.org/what-does-enumerable-property-mean-in-javascript/
An enumerable property in JavaScript means that a property can be viewed if it is iterated using the for…in loop or Object.keys() method. All the properties which are created by simple assignment or property initializer are enumerable by default.
|
1 2 3 4 5 6 7 8 9 10 11 12 13 14 |
<script> // Creating a student object const student = { registration: '12342', name: 'Sandeep', age: 27, marks: 98 }; // prints all the keys in student object for (const key in student) { console.log(key); } </script> |
output:
registration
name
age
marks
Since all the properties are initialized by property initializer, they all have enumerable set to true by default. To explicitly change the internal enumerable attribute of a property, the Object.defineProperty() method is used. Also, to check whether a property is enumerable or not, we use the function propertyIsEnumerable(). It returns true if the property is enumerable or false otherwise.
|
1 2 3 4 5 6 7 8 9 10 11 12 13 14 15 16 17 18 19 20 21 22 23 24 |
<script> // Creating a student object const student = { registration: '12342', name: 'Sandeep', age: 27, }; // This sets the enumerable attribute // of marks property to false Object.defineProperty(student, 'marks', { value: 98, configurable: true, writable: false, enumerable: false, }); // To print whether enumerable or not console.log(student.propertyIsEnumerable('registration')); console.log(student.propertyIsEnumerable('name')); console.log(student.propertyIsEnumerable('age')); console.log(student.propertyIsEnumerable('marks')); </script> |
output:
true
true
true
false
Properties that are created using the defineProperty() method have enumerable flag set to false. When the same above code is run using a for loop, the “marks” property is not visible.
|
1 2 3 4 5 6 |
// This will not print the property // Who's enumerable property is set to false for (const key in student){ console.log(key) } |
Output:
registration
name
age
Function in React called twice
ref – https://stackoverflow.com/questions/50819162/why-is-my-function-being-called-twice-in-react
When you create a project using create-react-app, it puts the App component inside React.StrictMode tags.
|
1 2 3 |
<React.StrictMode> <App /> </React.StrictMode> |
Document says:
Strict mode can’t automatically detect side effects for you, but it can help you spot them by making them a little more deterministic. This is done by intentionally double-invoking the following methods:
Class component constructor method
The render method
setState updater functions (the first argument)
The static getDerivedStateFromProps lifecycle
The shouldComponentUpdate method
It is expected that setState updaters will run twice in strict mode in development.
This helps ensure the code doesn’t rely on them running a single time.
If your setState updaters are pure functions (as they should be) then this shouldn’t affect the logic of your application.
If you do not want this effect, do this:
|
1 2 3 4 |
<> <App /> <MyPureComponent /> </>, |
Server side rendering (isomorphic React apps) – Data
Server
We start the server side.
At the GET verb of any url..we already have code where we store initial state in our redux. This time, let’s start it off by fetching data.
We create an initial state object, when store fetched data into an array called repositoryNames. Remember that in order to fetch in Node, we need to either use axios, or node-fetch package.
server.js
|
1 2 3 4 5 6 7 8 9 10 11 12 13 14 15 16 17 18 19 20 21 22 23 24 25 26 |
... import thunk from 'redux-thunk'; import axios from 'axios'; ... app.get('*', async (req, res) => { const scripts = ['vendor.js', 'client.js']; let initialState; if (req.url === '/') { const repositories = await axios.get('https://jsonplaceholder.typicode.com/todos'); console.log('http get data'); initialState = { repositoryNames: repositories.data.map((repo) => ({ id: repo.id, name: repo.title, })), }; } const store = createStore(reducers, initialState, applyMiddleware(thunk)); ... ... ... |
Notice thunk. Redux Thunk is a middleware that lets you call action creators that return a function instead of an action object. That function receives the store’s dispatch method, which is then used to dispatch regular synchronous actions inside the function’s body once the asynchronous operations have been completed.
Once that is done, we create our store, and place it in Provider component. Then place that into StaticRouter within our appMarkup.
|
1 2 3 4 5 6 7 8 |
const store = createStore(reducers, initialState, applyMiddleware(thunk)); const appMarkup = ReactDOMServer.renderToString( <StaticRouter location={req.url} context={{}}> <Provider store={store}> <App /> </Provider> </StaticRouter> ); |
This is so that we can inject it into our HTML component.
|
1 2 3 4 5 6 7 |
const html = ReactDOMServer.renderToStaticMarkup( <Html children={appMarkup} scripts={scripts} initialState={initialState} /> ); |
We then return this HTML component in our response object to the client.
|
1 2 3 4 5 6 7 8 9 |
const html = ReactDOMServer.renderToStaticMarkup( <Html children={appMarkup} scripts={scripts} initialState={initialState} /> ); console.log('html', new Date()); res.send(`<!doctype html>${html}`); |
Client Side
We do the same and apply thunk for the client. Since we already have the store and initial app state, it will match up with what the server has.
|
1 2 3 4 5 6 7 8 9 10 11 12 13 14 15 16 |
... import thunk from 'redux-thunk'; import { applyMiddleware, createStore } from 'redux'; ... const store = createStore(reducers, { ...window.APP_STATE }, applyMiddleware(thunk)); ReactDOM.hydrate( <BrowserRouter> <Provider store={store}> <App /> </Provider> </BrowserRouter>, document.getElementById('app') ); |
Before in App.js, where we declare our mapping to props with initialText and changeText handler, we dispatch a very simple Action object with a literal object like so:
|
1 2 3 |
const mapDispatchToProps = (dispatch) => ({ changeText: () => dispatch({ type: 'CHANGE_TEXT' }), }); |
which then get passed to reducers/index.js to be processed like so. The initialText is a simple string so we can do this:
|
1 2 3 4 5 6 7 8 9 10 |
function reducer(state, action) { switch (action.type) { case 'CHANGE_TEXT': return { ...state, initialText: 'changed in the browser!' }; default: return { ...state }; } } export default reducer; |
But now, we use action objects defined in actions/index.js for more complicated procedures:
|
1 2 3 4 5 6 7 8 9 10 11 12 13 14 15 |
import axios from 'axios'; export const getRepositoryNames = () => (dispatch) => { axios .get('https://api.github.com/repositories') .then(({ data }) => { dispatch({ type: 'SET_REPOSITORY_NAMES', payload: data.map((repo) => ({ id: repo.id, name: repo.title, })), }); }); }; |
Thus, now in Home.js, we declare mapDispatchToProps with the action object getRepositoryNames:
|
1 2 3 4 5 6 7 8 9 10 11 12 13 14 15 16 |
import { getRepositoryNames } from '../actions'; ... const Home = ({ repositoryNames, getRepositoryNames }) => { ... }; const mapStateToProps = ({ repositoryNames }) => ({ repositoryNames, }); const mapDispatchToProps = (dispatch) => ({ getRepositoryNames: () => dispatch(getRepositoryNames()), }); export default connect(mapStateToProps, mapDispatchToProps)(Home); |
ref – https://reactjs.org/docs/hooks-effect.html
That way, we can use getRepositoryNames inside of Home component. Since Home is a functional component, we use useEffectuseEffect runs after every render!
By default, it runs both after the first render and after every update. Instead of thinking in terms of “mounting” and “updating”, you might find it easier to think that effects happen “after render”. React guarantees the DOM has been updated by the time it runs the effects.
This is the basic case in our example.
Hence we check for props repositoryNames. If its valid, we’ll display it. If it isn’t, we’ll fetch the data so it can be rendered.
Also, useEffect has a nifty feature where it can look at a state variable. If that state changes, it will run the effect. In our case, it would fetch. Hence, I put two use cases of this:
1) value changes after each click. useEffect will run every time the button is clicked because onClick updates value everytime.
2) value changes once after clicks. So useEffect will run the first time, value updates, runs second time, and that’s it.
|
1 2 3 4 5 6 7 8 9 10 11 12 13 14 15 16 17 18 19 20 21 22 23 24 25 26 27 28 29 30 31 32 33 34 35 36 37 38 39 40 41 42 43 |
const Home = ({ repositoryNames, getRepositoryNames }) => { console.log('Home', new Date()); const [value, setValue] = useState(true); const onClick = useCallback((a, b) => { /* // always run useEffect because value is always changing let changedValue = !value; setValue(changedValue); */ setValue(false); // value changed once. useEffect will that one time. // Then it will not run anymore because value will stay at 'false'. console.log('value', value); }); useEffect(() => { console.log('---------> useEffect', new Date()); if (!repositoryNames) { console.log('repositoryNames DNE exists, lets read it'); getRepositoryNames(); } else { console.log('repositoryNames already exists'); } }, [value]); return ( <div> <button onClick={onClick}>heheh</button> <ul> {repositoryNames && repositoryNames.map((repo) => ( <li key={repo.id}> {repo.name} </li> ))} </ul> </div> ); }; |
Protected: SendGrid
Using Keycloak in React
ref – https://scalac.io/user-authentication-keycloak-1/
Start up your keycloak server and sign into https://localhost:8080/auth/admin
Server configuration
What you’re seeing on the page above is the default (master) realm. A realm is a domain in which several types of entities can be defined, the most prominent being:
Users: basic entities that are allowed access to a Keycloak-secured system.
Roles: a User’s authorization level, such as admin/manager/reader.
Clients: browser apps and web services that are allowed to request a login.
Identity Providers: external providers to integrate with, such as Google, Facebook, or any OpenID Connect/SAML 2.0 based system.
The master realm serves as the root for all of the others. Admins in this realm have permission to view and manage any other realm created on the server instance. Keycloak authors don’t recommend using the master realm to manage your users and applications (it is intended as space for super-admins to create other realms).
So let’s start by creating a new realm for our app named MyDemo.
Make sure that the MyDemo realm is selected. On the left sidebar, go to the Users tab and hit Add users button.
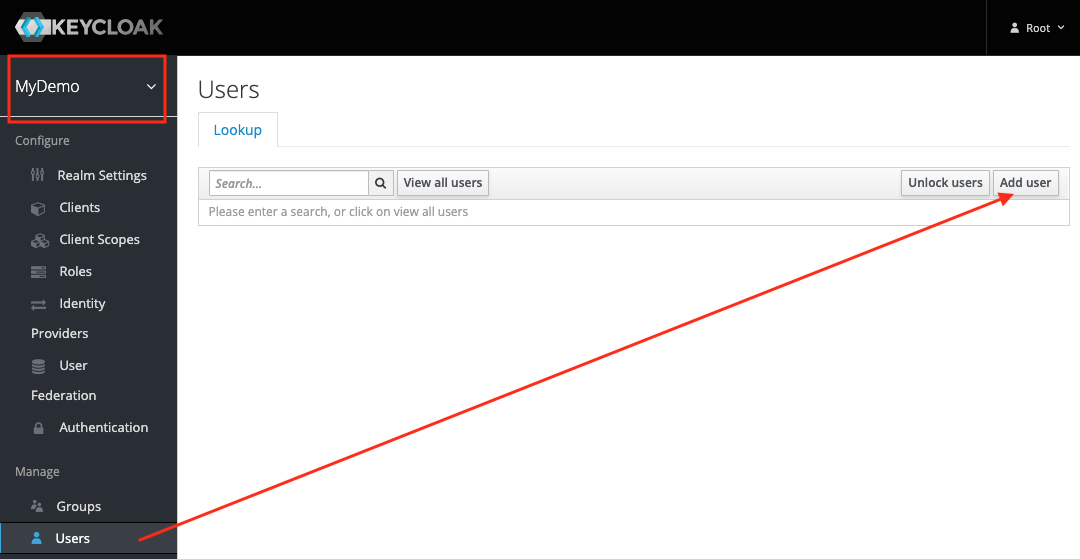
For now, the only thing you’ll need to provide is the username. Let’s call him John.
After creating the user, you’ll need to set up his password.
Go to Credentials tab, enter the new password twice and hit Reset Password.
To check if the new user works, open a new incognito window in your browser. Then go to https://localhost:8080/auth/realms/MyDemo/account and try logging in with the username john and the password you provided earlier.
Since we left the Temporary option turned on when resetting the password, you’ll be asked to provide a new one on the first login. Afterwards, you’ll be taken to your account management panel.
Among other things, this will allow you to provide your profile information (which may or may not be enforced by the admin), change your password, and see all your active login sessions. For now, let’s update the Email, First name and Last name fields with whatever values you like, then get back to the admin window.
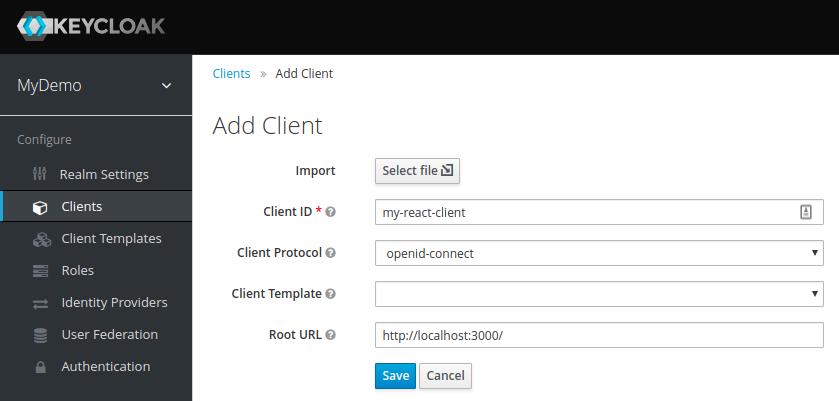
Create Client
The final step of the initial server configuration is to create a client. Clients are browser apps and web services that are either allowed to initiate the login process or have been provided with tokens resulting from earlier logins.
Today we’ll be securing a React-based front-end, so let’s go to the Clients tab and hit the Create button:
For the Access Type, select public. Since we have no real way of hiding the secret in a JS-based browser app, this is what we need to stick with.
Next comes Valid Redirect URIs – this is the URI pattern (one or more) which the browser can redirect to after completing the login process.
Since we picked public access type for our client (and thus anyone can ask to initiate the login process), this is especially important. In a real app, you will need to make sure you make this pattern as restrictive as possible, otherwise, you could open your system to phishing attacks! However, for dev purposes, you can just leave it at default.
The last of the important options is Web Origins, which governs CORS requests. Again, for dev purposes the default value is fine.
One last thing we’ll need is the client configuration to use with our app. Go to the Installation tab and select Keycloak OIDC JSON as the format:
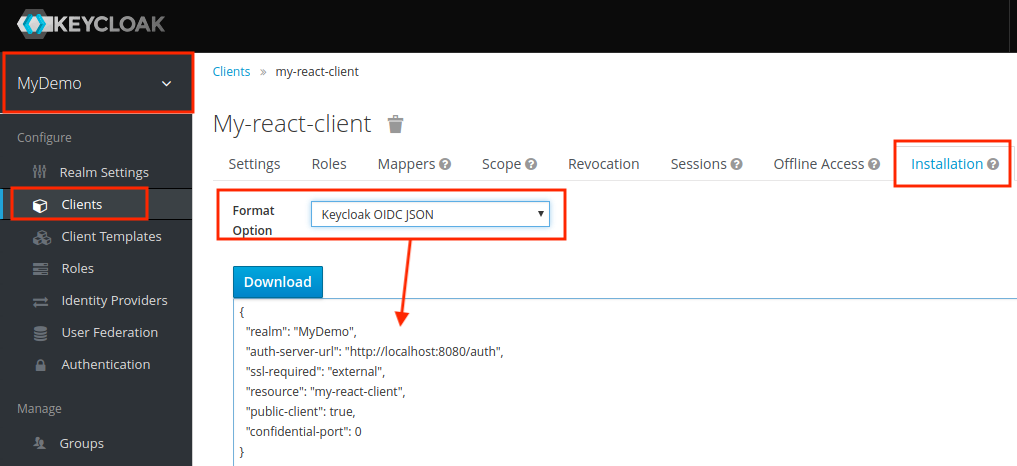
Download this JSON and keep it. We’ll be needing it later.
React App
open up a terminal and make sure create-react-app package is installed.
Now we use it to create a react app called keycloak-react.
create-react-app keycloak-react
Firstly, we’ll need to add some dependencies. Open package.json and add the following two items:
|
1 2 3 4 5 |
"dependencies": { ... "react-router-dom": "^4.2.2", "keycloak-js": "4.0.0-beta.2" } |
Now in your terminal, install all the packages
npm install
Open up the directory with VS Code.
Let’s replace the contents of src/App.js with our skeleton:
|
1 2 3 4 5 6 7 8 9 10 11 12 13 14 15 16 17 18 19 20 21 22 23 24 |
import React, { Component } from 'react'; import { BrowserRouter, Route, Link } from 'react-router-dom'; import Welcome from './Welcome'; import Secured from './Secured'; import './App.css'; class App extends Component { render() { return ( <BrowserRouter> <div className="container"> <ul> <li><Link to="/">public component</Link></li> <li><Link to="/secured">secured component</Link></li> </ul> <Route exact path="/" component={Welcome} /> <Route path="/secured" component={Secured} /> </div> </BrowserRouter> ); } } export default App; |
As you can see, this is just a Router providing navigation between two other components. Let’s add the first of those, src/Welcome.js:
|
1 2 3 4 5 6 7 8 9 10 11 12 |
import React, { Component } from 'react'; class Welcome extends Component { render() { return ( <div className="Welcome"> <p>This is your public-facing component.</p> </div> ); } } export default Welcome; |
Nothing particularly fancy here, just some generic text. The next one should be a bit more interesting – put it at src/Secured.js:
|
1 2 3 4 5 6 7 8 9 10 11 12 13 14 15 16 17 18 19 20 21 22 23 24 25 26 27 28 29 30 31 32 |
import React, { Component } from 'react'; import Keycloak from 'keycloak-js'; class Secured extends Component { constructor(props) { super(props); this.state = { keycloak: null, authenticated: false }; } componentDidMount() { const keycloak = Keycloak('/keycloak.json'); keycloak.init({onLoad: 'login-required'}).then(authenticated => { this.setState({ keycloak: keycloak, authenticated: authenticated }) }) } render() { if (this.state.keycloak) { if (this.state.authenticated) return ( <div> <p>This is a Keycloak-secured component of your application. You shouldn't be able to see this unless you've authenticated with Keycloak.</p> </div> ); else return (<div>Unable to authenticate!</div>) } return ( <div>Initializing Keycloak...</div> ); } } export default Secured; |
Explanation
In the secured component, as soon as the component is mounted into the DOM, we can create the Keycloak object by providing client configuration:
|
1 |
const keycloak = Keycloak('/keycloak.json'); |
Remember the JSON you downloaded from the admin panel? Put it into public/keycloak.json to get the above to work. Alternatively, you could pass a matching JavaScript object to Keycloak directly like so:
|
1 2 3 4 5 6 7 8 |
const keycloak = Keycloak({ realm: "MyDemo", auth-server-url: "http://localhost:8080/auth", ssl-required: "external", resource: "my-react-client", public-client: true, confidential-port: 0 }); |
login-required is one of two possible values to be passed as an onLoad parameter. This will authenticate the client if the user has already logged into Keycloak, or redirect the browser to the login page if he hasn’t. The other option is check-sso: this will only authenticate the client if the user has already logged in, otherwise the client will remain unauthenticated without automatic redirection.
Time to check it out – run npm start and your browser should open automatically. You’ll see that you have a public, and secured component.
Click on the secured one and you’ll be redirected to the login page. Log in as John and you’ll be able to see the text from the secured component.
You’ll find you can now navigate between the two components without having to log in again.
Profile Data and Logout
Let’s expand our app a little bit by adding the logout functionality and some user data extraction. We’ll start with the latter – add the following as src/UserInfo.js:
|
1 2 3 4 5 6 7 8 9 10 11 12 13 14 15 16 17 18 19 20 21 22 23 24 25 26 27 |
import React, { Component } from 'react'; class UserInfo extends Component { constructor(props) { super(props); this.state = { name: "", email: "", id: "" }; this.props.keycloak.loadUserInfo().then(userInfo => { this.setState({name: userInfo.name, email: userInfo.email, id: userInfo.sub}) }); } render() { return ( <div className="UserInfo"> <p>Name: {this.state.name}</p> <p>Email: {this.state.email}</p> <p>ID: {this.state.id}</p> </div> ); } } export default UserInfo; |
This component accepts a Keycloak instance from its parent, then uses the loadUserInfo method to extract the user’s data.
Now for the logout button, place the following in src/Logout.js:
|
1 2 3 4 5 6 7 8 9 10 11 12 13 14 15 16 17 18 19 |
import React, { Component } from 'react'; import { withRouter } from 'react-router-dom' class Logout extends Component { logout() { this.props.history.push('/'); this.props.keycloak.logout(); } render() { return ( <button onClick={ () => this.logout() }> Logout </button> ); } } export default withRouter(Logout); |
Similarly, this accepts a Keycloak instance from the parent, then uses its logout method. Note that it has to be called last – otherwise it would redirect you to the login form again.
Let’s include these new components in src/Secured.js:
|
1 2 3 4 5 6 7 8 9 10 11 12 13 14 15 16 17 18 19 20 21 22 23 24 25 26 27 28 29 30 31 32 33 34 35 36 |
import React, { Component } from 'react'; import Keycloak from 'keycloak-js'; import UserInfo from './UserInfo'; import Logout from './Logout'; class Secured extends Component { constructor(props) { super(props); this.state = { keycloak: null, authenticated: false }; } componentDidMount() { const keycloak = Keycloak('/keycloak.json'); keycloak.init({onLoad: 'login-required'}).then(authenticated => { this.setState({ keycloak: keycloak, authenticated: authenticated }) }) } render() { if(this.state.keycloak) { if(this.state.authenticated) return ( <div> <p>This is a Keycloak-secured component of your application. You shouldn't be able to see this unless you've authenticated with Keycloak.</p> <UserInfo keycloak={this.state.keycloak} /> <Logout keycloak={this.state.keycloak} /> </div> ); else return (<div>Unable to authenticate!</div>) } return ( <div>Initializing Keycloak...</div> ); } } export default Secured; |
As expected, clicking the logout button forces you to have to log in again, the next time you try to access the Secured component.
Basic KeyCloak + Node JS tutorial
ref –
- Install KeyCloak Server – https://huongdanjava.com/install-keycloak-standalone-server.html
- Install and run Node JS with KeyCloak Server -https://medium.com/devops-dudes/securing-node-js-express-rest-apis-with-keycloak-a4946083be51
- demo
Install Keycloak
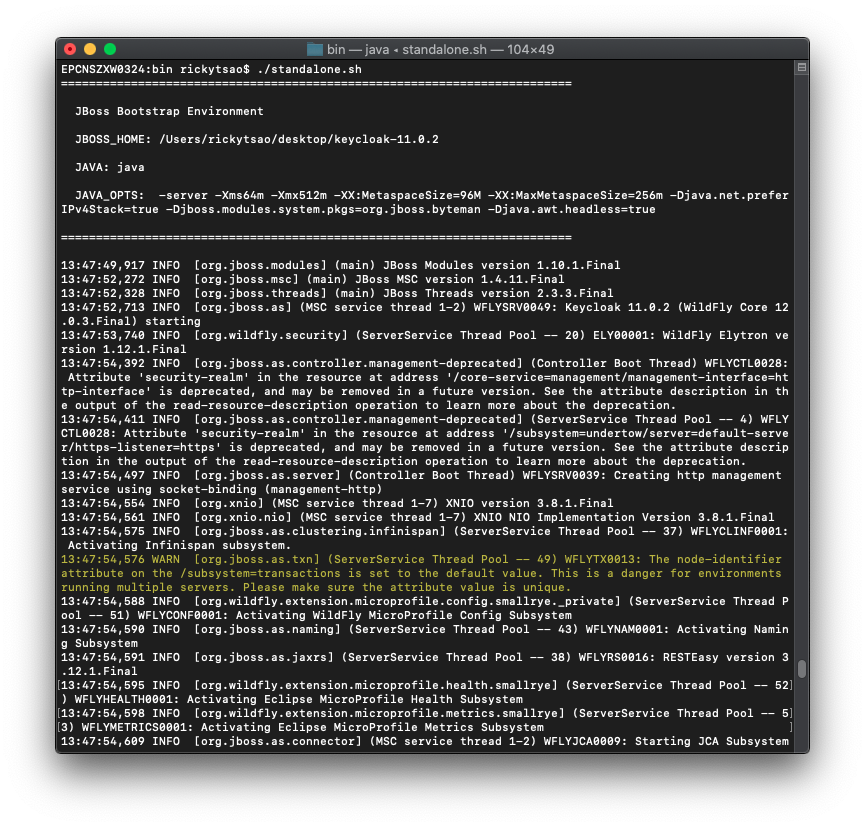
Download Keycloak zip and unzip it onto a directory.
Go into the directory and cd into the bin folder. Then: ./standalone.sh
Open up a browser and go to http://localhost:8080/auth/
We then need to create a new user admin by filling in the Administration Console and then clicking Create button.
I will create a new user using admin/admin.
Go to the admin console http://localhost:8080/auth/admin/ and log in.
Create Realm
A Realm manages a set of users, clients, credentials, roles, and groups. A user belongs to and logs into a realm. Realms are isolated from one another and can only manage and authenticate the users that they control.
Clients are browser apps and web services that are either allowed to initiate the login process or have been provided with tokens resulting from earlier logins.
First, make sure you are logged into the Admin Console.
From the Master drop-down menu, click Add Realm. When you are logged in to the master realm this drop-down menu lists all existing realms.
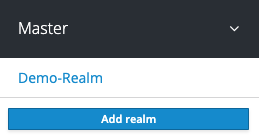
Type Demo-Realm in the Name field and click Create.
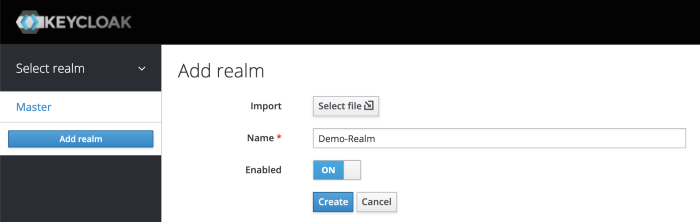
Make sure Demo-Realm is selected for the below configurations. Avoid using the master realm.
Create Client for your Realm
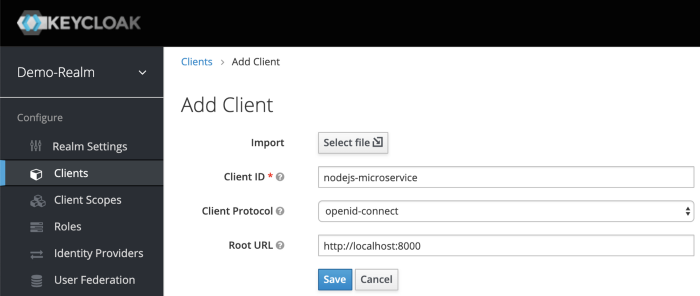
Click on the Clients menu from the left pane. All the available clients for the selected Realm will get listed here.
To create a new client, click Create. You will be prompted for a Client ID, a Client Protocol and a Root URL. A good choice for the client ID is the name of your application nodejs-microservice, the client protocol should be set to openid-connect and the root URL should be set to the application URL of http://localhost:8000
After saving you will be presented with the client configuration page where you can assign a name and description to the client if desired.
Set the Access Type to confidential, Authorization Enabled to ON , Service Account Enabled to ON and click Save.
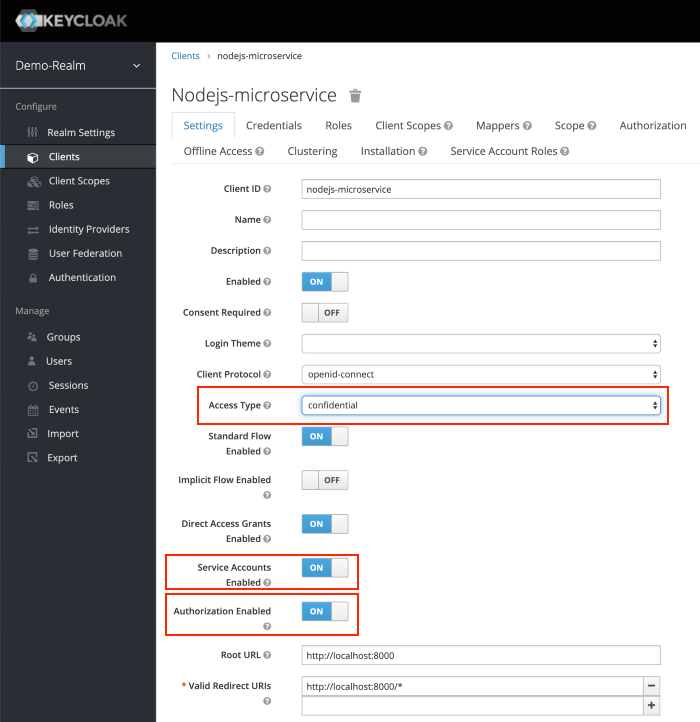
Credentials tab will show the Client Secret which is required for the Node.js Application Keycloak configurations later on.
Creating Client Roles
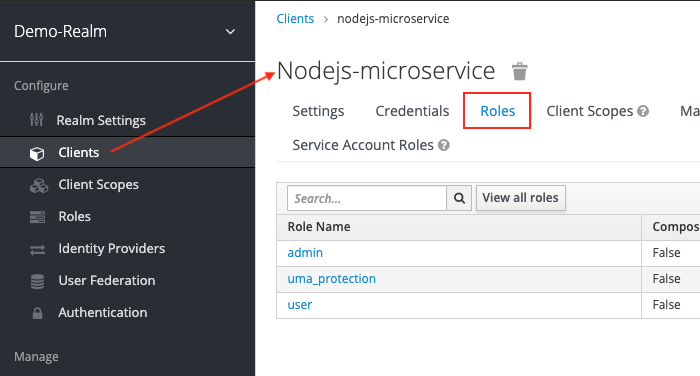
First, click on Clients > nodejs-microservice > Roles tab.
We need to create roles for this.
Do this for user and admin.
After creating those roles, you should be able to see them appear under the Roles tab of Client nodejs-microservice.
Creating Realm Roles
We have applications assign access and permissions to specific roles. Let’s create realm roles to give application access to our user and admin roles.
For example, for user boss, we want it with admin roles to be able to access, so we will create an app-admin realm role to give to this user.
for user rtsao, we want it with user roles to be able to access, so we will create an app-user realm role for this.
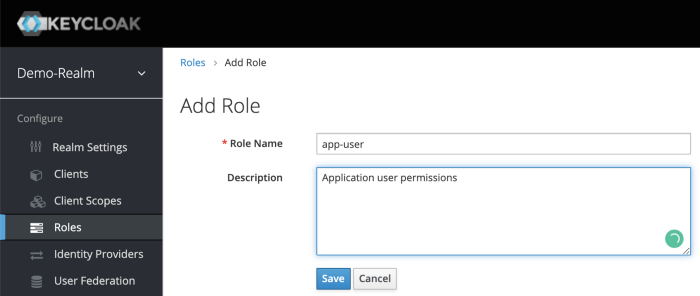
On the left sidebar menu, click on the roles. Click Add Role.
After Save, enabled Composite Roles and Search for nodejs-microservice under Client Roles field. Select user role of the nodejs-microservice and Click Add Selected >.
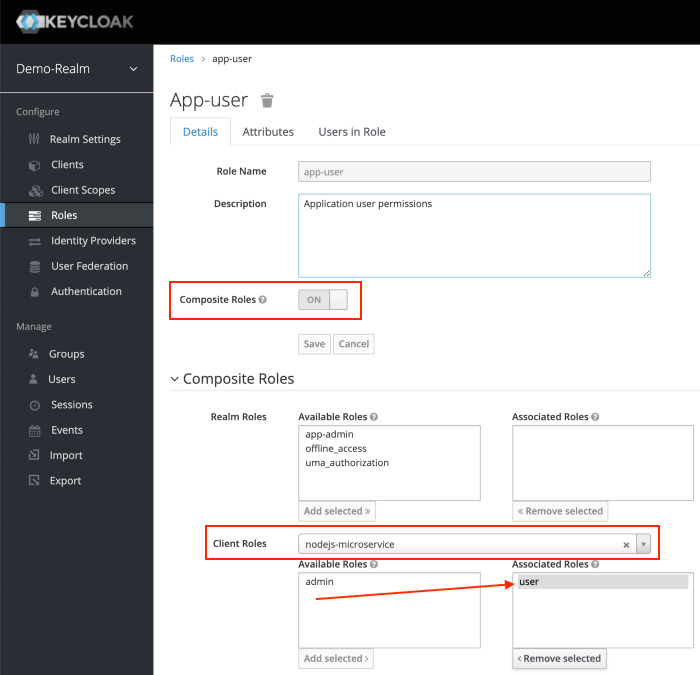
This configuration will assign nodejs-microservice user client role to the app-user realm role. We can also mix and match for more complicated permissions.
Let’s do the same for realm role app-admin.
Creating Users with realm roles
Users are entities that are able to log into your system. We can grant them our realm roles for testing purposes.
Let’s create users:
rtsao – user role only
boss – admin role only
ver – both user and admin role
On the left hand sidebar, click on Users.
On the right side of the empty user list, click Add User to open the add user page.
Enter a name in the Username field; this is the only required field. Flip the Email Verified switch from Off to On and click Save to save the data and open the management page for the new user.
Click the Credentials tab to set a temporary password for the new user.
– Flip the Temporary switch from On to Off
– Type a new password and confirm it, click Reset Password to set the user password to the new one you specified.
For simplicity let’s set the password to mypassword for all the users.
Click the Role Mappings tab to assign realm roles to the user.
Realm roles list will be available in Available Roles list. Select one required role and click on the Add Selected > to assign it to the user.
After role assignment, assigned roles will be available under Assigned Roles list. Role assignments for rtsao should be app-user.
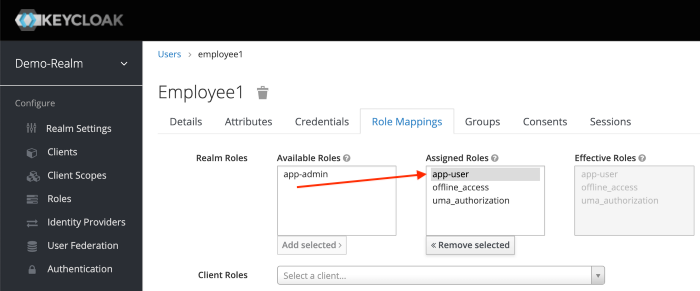
for boss, give it app-admin.
For ver, give it both app-admin and app-user.
Generating Tokens for users to access resource
Go to Realm Settings of the Demo-Realm from the left menu and click on OpenID Endpoint Configuration to view OpenID Endpoint details.
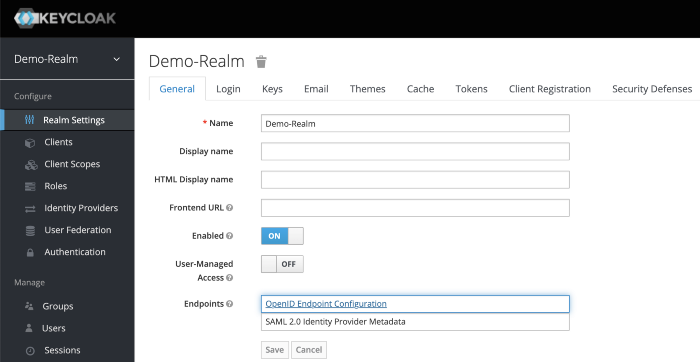
copy the token endpoint.
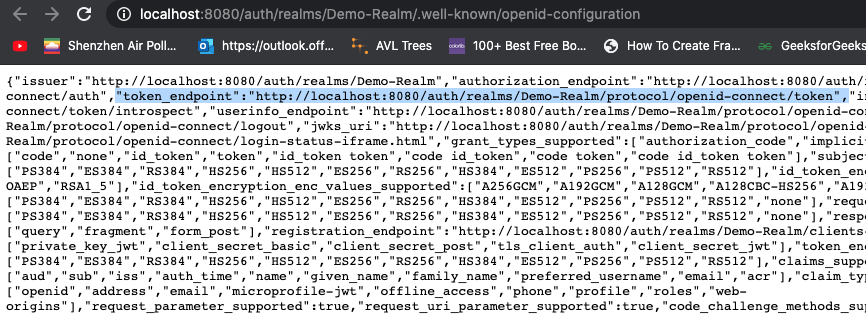
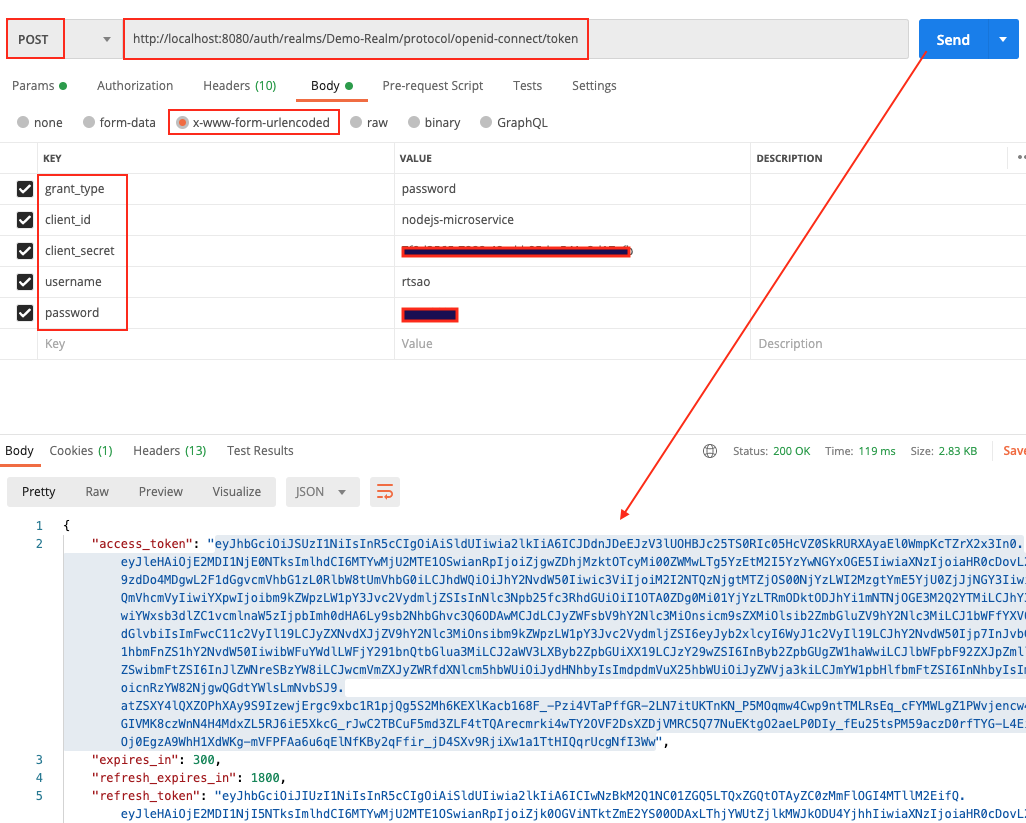
Open up Postman, and put it into the url.
Make sure you put http verb as POST.
Click on Body tab. Click on x-www-form-urlencoded radio button.
They put these key/values
grant_type, password
client_id, nodejs-microservice
client_secret,
username, rtsao
password, *************
This is the basics of getting an access token. With this token, you give it to keycloak’s API later in the tutorial, and it will grant you access to the URL resource.
When you hit send, you should get a status 200 and the token itself.
Copy the token and give it to https://jwt.io/ to verify.
On the right hand side, look at the payload. You should see various information. At the very bottom, you should see ‘signature verified’.
access_token includes the permission details.
realm_access.roles includes app_user realm role.
resource_access.nodejs-microservice.roles include the user client role.
preferred_username includes the username of the user (rtsao)
iat, exp includes the token issued time as well as the token expiry time. Access Token expiry times can be customizable under Realm Settings, Tokens tab. By default, Access Token Lifespan would be set to 5 minutes which can be customized based on your security requirements.
Node JS App
Make sure you have the latest node and npm.
mkdir keycloak-nodejs-microservice
cd keycloak-nodejs-microservice
npm init
It will ask you for the following information. Just keep pressing enter, and enter your name at the “author name” field.
npm install –save express
npm install -g nodemon
Open the project with VS Code.
Create a new file called index.js and with the below content.
|
1 2 3 4 5 6 7 8 |
var express = require('express'); var app = express(); app.get('/', function(req, res){ res.send("Server is up!"); }); app.listen(3000); |
Save the file, go to your terminal and type the following.
nodemon index.js
This will start the server. To test this app, open your browser and go to http://localhost:3000 and Server is up! message will appear in the browser.
Create sub directory Test
We want all of our resource strings to have a sub route of ‘test’. test/route1, test/route2…etc.
Create a new folder controller and create a new file test-controller.js in the created folder with the below content.
|
1 2 3 4 5 6 7 8 9 10 11 12 13 14 15 16 17 18 19 |
var express = require('express'); var router = express.Router(); router.get('/anonymous', function(req, res){ res.send("Hello Anonymous"); }); router.get('/user', function(req, res){ res.send("Hello User"); }); router.get('/admin', function(req, res){ res.send("Hello Admin"); }); router.get('/all-user', function(req, res){ res.send("Hello All User"); }); module.exports = router; |
Import test-controller.js and add the testController router to express in index.js before the app.listen function call.
|
1 2 |
var testController = require('./controller/test-controller.js'); app.use('/test', testController); |
invoke by opening Postman and do a GET on http://localhost:3000/test/{anonymous} (user, admin, all-user)
You should get the response text accordingly because so far, no authorization is applied.
Integrating Keycloak with our Node app
Install keycloak-connect, express-session dependencies to your project.
npm install keycloak-connect –save
npm install express-session –save
npm install express-session –save
Create a new folder config and create a new file keycloak-config.js in the created folder with the below content. Change the keycloakConfig variable content with Keycloak Server URL and nodejs-microservice Client Id.
config/keycloak-config.js
|
1 2 3 4 5 6 7 8 9 10 11 12 13 14 15 16 17 18 19 20 21 22 23 24 25 26 27 28 29 30 31 32 33 34 35 36 37 38 39 |
var session = require('express-session'); var Keycloak = require('keycloak-connect'); let _keycloak; var keycloakConfig = { clientId: 'nodejs-microservice', bearerOnly: true, serverUrl: 'http://localhost:8080/auth', // the keycloak instance that's running realm: 'Demo-Realm', credentials: { secret: '7f0d2565-7888-48ad-b95d-a541e2d17afb' } }; function initKeycloak() { if (_keycloak) { console.warn("Trying to init Keycloak again!"); return _keycloak; } else { console.log("Initializing Keycloak..."); var memoryStore = new session.MemoryStore(); _keycloak = new Keycloak({ store: memoryStore }, keycloakConfig); return _keycloak; } } function getKeycloak() { if (!_keycloak){ console.error('Keycloak has not been initialized. Please called init first.'); } return _keycloak; } module.exports = { initKeycloak, getKeycloak }; |
Apply the Role-Based Access for our API
keycloak.protext() can be used to secure APIs in the routers.
|
1 2 3 4 5 6 7 8 9 10 11 12 13 14 15 16 17 18 19 20 21 22 |
var express = require('express'); var router = express.Router(); const keycloak = require('../config/keycloak-config.js').getKeycloak(); router.get('/anonymous', function(req, res){ res.send("Hello Anonymous"); }); router.get('/user', keycloak.protect('user'), function(req, res){ res.send("Hello User"); }); router.get('/admin', keycloak.protect('admin'), function(req, res){ res.send("Hello Admin"); }); router.get('/all-user', keycloak.protect(['user','admin']), function(req, res){ res.send("Hello All User"); }); module.exports = router; |
Test it all out
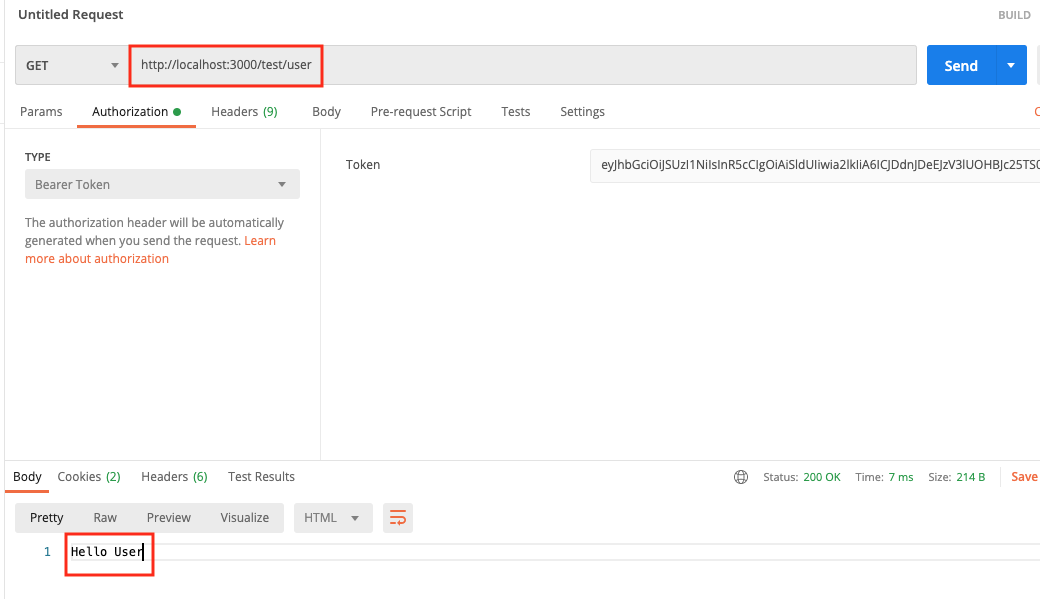
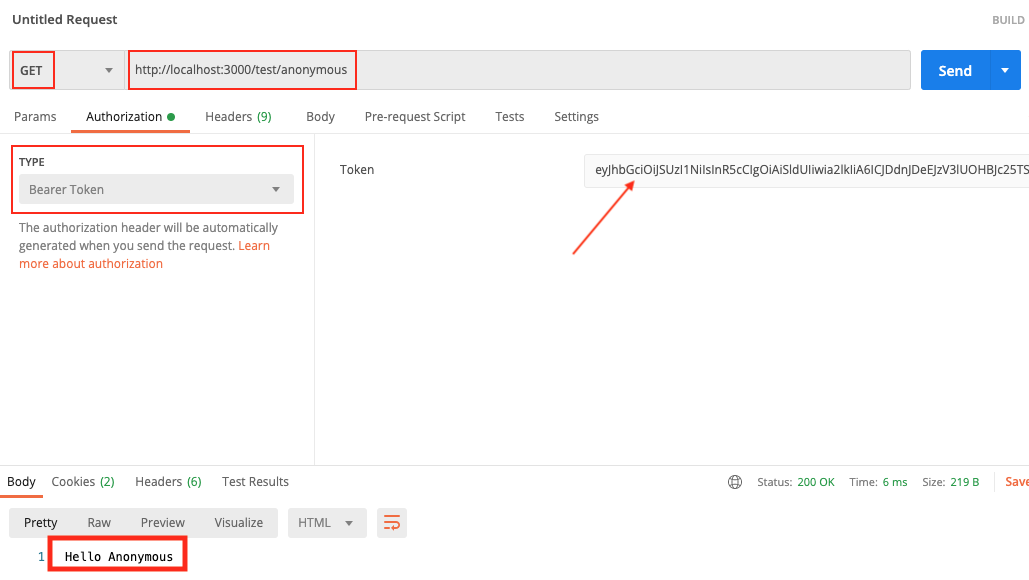
Open Postman, and generate another access token like we did before. When generating, let’s use user rtsao. Remember that this user only has user role access.
Open up a tab on Postman and put GET as the http verb.
put http://localhost:3000/test/anonymous
Click on Authorization tab, type Bearer Token, then paste the token.
Click on Send. Because the anonymous url is not protected, we always get the response.
We then test on the admin, we get access denied because the token shows that we’re a user role.
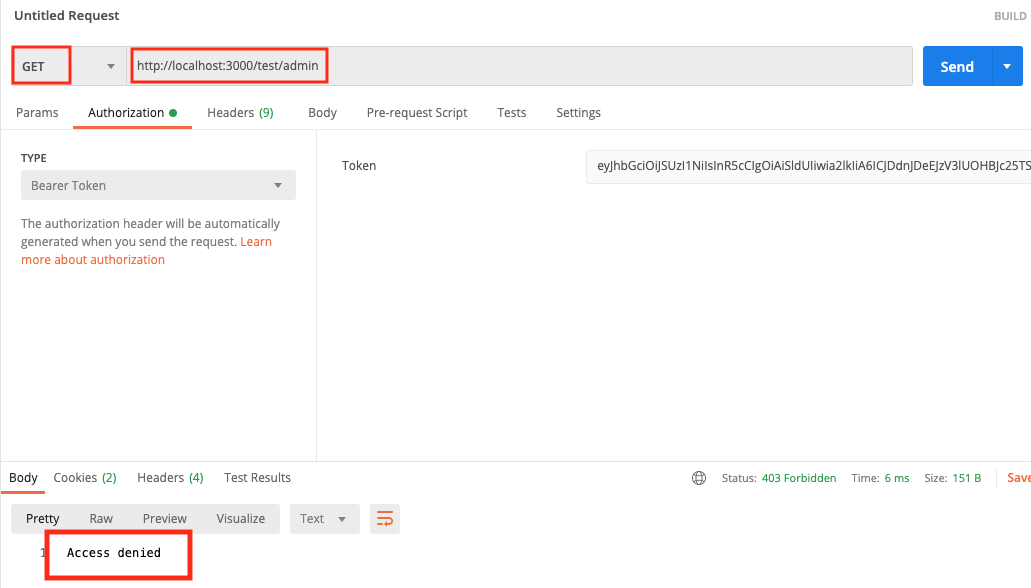
When we test for role user, it all works.