|
1 2 3 4 5 6 7 8 9 10 11 12 13 14 15 16 |
class FiatBravo { var price : String = "0" get() { println("get() on 'price' for FiatBravo") return field; } set(value) { println("set() on 'price' for FiatBravo") field = value } } val fiatBravo = FiatBravo() fiatBravo.price = "29689" println("FiatBravo priced at ${fiatBravo.price}") |
All posts by admin
Property Delegation in Kotlin
Interface Delegation in Kotlin
ref – https://medium.com/@Joseph82/interface-delegation-in-kotlin-1404dfcd9167
Interface delegation, in Kotlin, is a simple yet powerful technique that allows a class to delegate the actual implementation of the interfaces, to separate objects.
Usually, we have a class implement a function which satisfies the required interface function like so:
|
1 2 3 4 5 6 7 8 9 10 11 12 13 14 15 16 17 18 19 20 |
// declare our interface interface EngineType { val type: String } // wants our component FiatBravo to conform to EngineType // we then override interface function 'type' class FiatBravo : EngineType { override val type: String get() = "Electric" } // we then create an instance of FiatBravo, and then get its engine type. val fiatBravo = FiatBravo() // Engine type: Electric println("Engine type: ${fiatBravo.type}") |
So our FiatBraov is directly implementing the abstract property defined in the interface EngineType.
But note that it’s 2020, and many other vehicles are probably going to use the Electric, instead of Diesel. We don’t want to have very car component re-write this Electric Engine type over and over.
Let’s use SteeringWheel as an example.
We want to create a SteeringWheel object that every car component just conform to it and use, and not have to implement it individually.
Let’s first create an interface like so:
|
1 2 3 4 |
interface SteeringControl { fun turnLeft() fun turnRight() } |
This tells us that whatever component conforms to this SteeringControl interface must at least implement turnLeft and turnRight.
We then create an object SteeringWheel and conform to SteeringControl. In our SteeringWheel component, we implement those abstract functions set by our interface SteeringControl.
|
1 2 3 4 5 6 7 8 9 |
object SteeringWheel : SteeringControl { override fun turnLeft() { println("Rotate steering wheel counterclockwise") } override fun turnRight() { println("Rotate steering wheel clockwise") } } |
Now, back in our FiatBravo, we must conform to interface SteeringControl because we’re a car. But we’d rather someone else do the implementation for us because we don’t want to be bothered with this. Thus, we use the by keyword to say that SteeringWheel is a component that conforms to SteeringControl, and we want it to implement it for us.
In other words, interface SteeringControls is to be implemented by SteeringWheel.
|
1 2 3 4 5 6 7 |
class FiatBravo : EngineType, SteeringControl by SteeringWheel { override val type: String get() = "Electric" } |
Now the output would be:
Turn handlebar to left
Turn handlebar to right
Engine type: Electric
So as you can see, we can over-ride abstract interface methods, and we can also have other components do it for us.
Finally, notice that our SteeringWheel is an object. We can also use a class to represent the blueprint of a component that does the implementing for us. And then just instantiate it
Let’s use Tires as an example:
|
1 2 3 4 5 6 7 8 9 10 11 12 13 14 15 16 17 18 19 20 21 22 23 24 25 26 27 28 |
interface Tires { val brandName: String val circumference: Array<Int> } class GoodYear : Tires { override val circumference: Array<Int> get() = arrayOf<Int>(18, 22, 26) override val brandName: String get()="Good Year" } class FiatBravo : EngineType, SteeringControl by SteeringWheel, Tires by GoodYear() { override val type: String get() = "Electric" } fun main(args: Array<String>) { val fiatBravo = FiatBravo() fiatBravo.turnLeft() fiatBravo.turnRight() println("Engine type: ${fiatBravo.type}") } |
Dockerize Node app
ref – https://nodejs.org/en/docs/guides/nodejs-docker-webapp/
Creating the Node App
First, npm init, which crates a package.json file.
Then npm i express
Your package.json file should look something like this:
|
1 2 3 4 5 6 7 8 9 10 11 12 13 |
{ "name": "docker_web_app", "version": "1.0.0", "description": "Node.js on Docker", "author": "First Last <first.last@example.com>", "main": "server.js", "scripts": { "start": "node server.js" }, "dependencies": { "express": "^4.16.1" } } |
Or you can just touch a package.json file, and run npm install. If you are using npm version 5 or later, this will generate a package-lock.json file which will be copied to your Docker image.
Then, create a server.js file that defines a web app using the Express.js framework:
|
1 2 3 4 5 6 7 8 9 10 11 12 13 14 15 |
'use strict'; const express = require('express'); // Constants const PORT = 8080; const HOST = '0.0.0.0'; // App const app = express(); app.get('/', (req, res) => { res.send('Hello World'); }); app.listen(PORT, HOST); console.log(`Running on http://${HOST}:${PORT}`); |
In the next steps, we’ll look at how you can run this app inside a Docker container using the official Docker image. First, you’ll need to build a Docker image of your app.
Dockerize it
A Dockerfile is a text document that contains all the commands a user could call on the command line to assemble an image. Using docker build users can create an automated build that executes several command-line instructions in succession.
Create an empty file called Dockerfile in the main directory (where your package.json file is):
|
1 |
touch Dockerfile |
Open the Dockerfile in your favorite text editor
The first thing we need to do is define from what image we want to build from. Here we will use the latest LTS (long term support) version 14 of node available from the Docker Hub:
FROM node:14
Next we create a directory to hold the application code inside the image, this will be the working directory for your application:
# Create app directory
WORKDIR /Users/ricky_tsao/Desktop/dockerizeNode
This image comes with Node.js and NPM already installed so the next thing we need to do is to install your app dependencies using the npm binary. Please note that if you are using npm version 4 or earlier a package-lock.json file will not be generated.
# A wildcard is used to ensure both package.json AND package-lock.json are copied
# where available (npm@5+)
COPY package*.json ./
# Install app dependencies
RUN npm install
# If you are building your code for production
# RUN npm ci –only=production
Note that, rather than copying the entire working directory, we are only copying the package.json file.
To bundle your app’s source code inside the Docker image, use the COPY instruction:
# Bundle app source
COPY . .
Your app binds to port 8080 so you’ll use the EXPOSE instruction to have it mapped by the docker daemon:
EXPOSE 8080
Last but not least, define the command to run your app using CMD which defines your runtime. Here we will use node server.js to start your server:
CMD [ “node”, “server.js” ]
Dockerfile
|
1 2 3 4 5 6 7 8 9 10 11 12 13 14 15 16 17 18 19 20 21 22 23 24 25 26 27 28 29 30 |
# Here we will use the latest LTS (long term support) version 14 # of node available from the Docker Hub FROM node:14 # Create app directory WORKDIR /Users/ricky_tsao/Desktop/dockerizeNode # This image comes with Node.js and NPM already installed so the next thing we need to do # is to install your app dependencies using the npm binary. # Install app dependencies # A wildcard is used to ensure both package.json AND package-lock.json are copied # where available (npm@5+) COPY package*.json ./ RUN npm install # If you are building your code for production # RUN npm ci --only=production # To bundle your app's source code inside the Docker image, use the COPY instruction: COPY . . # Your app binds to port 8080 so you'll use the EXPOSE instruction to have it mapped by the docker daemon: EXPOSE 8080 # Last but not least, define the command to run your app using CMD which defines your runtime. # Here we will use node server.js to start your server: CMD [ "node", "server.js" ] |
.dockerignore file
Create a .dockerignore file in the same directory as your Dockerfile with following content:
node_modules
npm-debug.log
Building your image
Go to the root directory that has your Dockerfile and run the following command to build the Docker image. The -t flag lets you tag your image so it’s easier to find later using the docker images command:
docker build -t rtsao6680/node-web-app .
Your image will now be listed by Docker:
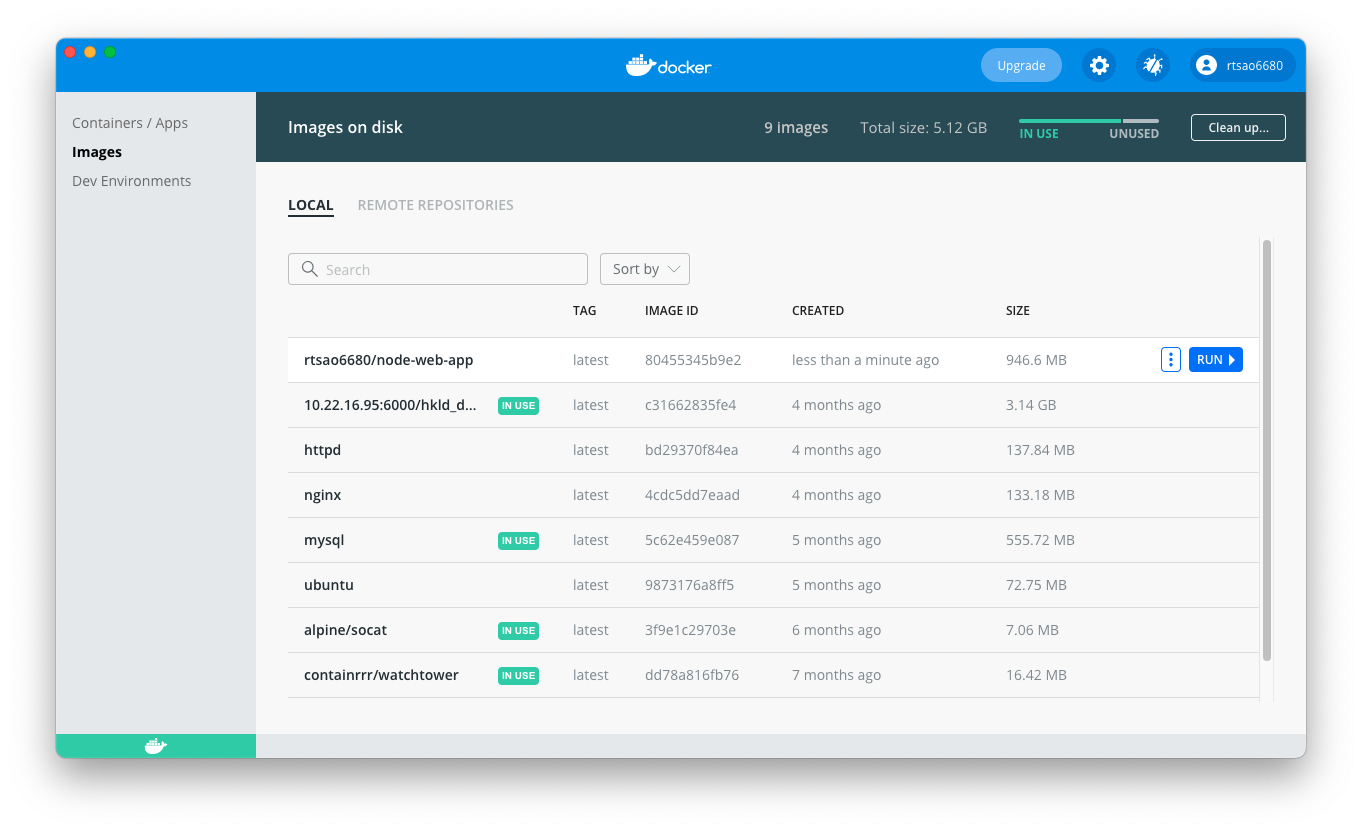
Run the image
Running your image with -d runs the container in detached mode, leaving the container running in the background. The -p flag redirects a public port to a private port inside the container. Run the image you previously built:
docker run -p 40000:8080 -d rtsao6680/node-web-app
so now your web will run at localhost:
http://localhost:40000/
In our case, Docker mapped the 8080 port inside of the container to the port 40000 on your machine.
You can check the status of it:
docker ps
Docker Intro
ref – https://docker-curriculum.com/
Requirement: Docker app be installed
What is a container?
A container is simply another process on your machine that has been isolated from all other processes on the host machine. It is created from Docker images and runs the actual application. We create a container using docker run which we did using the busybox image that we will download. A lit of running containers ca be seen using the docker ps command.
What is a container image
When running a container, it uses an isolated filesystem. This custom filesystem is provided by a container image. Since the image contains the container’s filesystem, it must contain everything needed to run an application – all dependencies, configuration, scripts, binaries, etc. The image also contains other configuration for the container, such as environment variables, a default command to run, and other metadata.
In other words, the blueprints of our application which form the basis of a container. In the tutorial below, we use the docker pull command to download the busybox image.
Docker Hub
A registry of Dicker images. Directory of all the images. We can host our own Docker registries and can use them for pulling images.
Docker Client to communicate with Docker Daemon
So the background service running on the host that manages building, running, and distributing Docker containers are called Docker Daemon. We as users interact with this Daemon by using a client, which is GUI based.
Tutorial – BusyBox
docker pull busybox – fetches busybox image from the Docker registry and saves it to our system.
docker images – to see a list of all images on your system
docker run busybox
Wait, nothing happened! Is that a bug? Well, no. Behind the scenes, a lot of stuff happened. When you call run, the Docker client finds the image (busybox in this case), loads up the container and then runs a command in that container. When we run docker run busybox, we didn’t provide a command, so
the container booted up, ran an empty command and then exited.
Well, yeah – kind of a bummer. Let’s try something more exciting.
docker run busybox echo “hello from busybox”
In this case, the Docker client dutifully ran the echo command in our busybox container and then exited it. If you’ve noticed, all of that happened pretty quickly. Imagine booting up a virtual machine, running a command and then killing it. Now you know why they say containers are fast! Ok, now it’s time to see the docker ps command.
docker ps – The docker ps command shows you all containers that are currently running
docker ps -a – list of containers that we ran. Notice under STATUS that these containers exited a few minutes ago.
We can also start an tty interactive and start executing commands for that container.
docker run -it busybox sh
docker ps -a to look at the list of containers that ran
copy and paste the container ID.
Removing stopped Containers
Then run docker rm [CONTAINER ID].
But if you find it tedious, you can go
docker rm $(docker ps -a -q -f status=exited)
The Containers that have been removed will display their IDs.
the -q flag, only returns the numeric IDs and -f filters output based on conditions provided. One last thing that’ll be useful is the –rm flag that can be passed to docker run which automatically deletes the container once it’s exited from. For one off docker runs, –rm flag is very useful.
You can also use docker container prune
Tutorial – Run a static site
docker run –rm prakhar1989/static-site
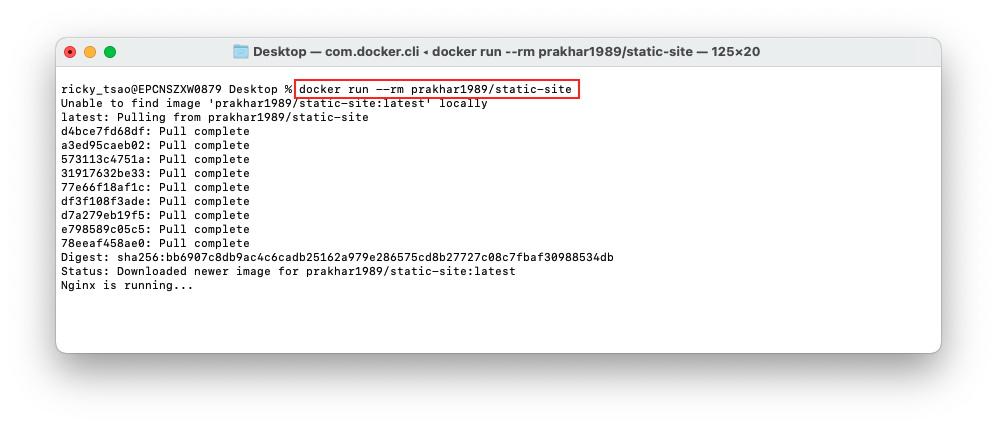
Since the image doesn’t exist locally, the client will first fetch the image from the registry and then run the image. If all goes well, you should see a Nginx is running… message in your terminal.
kay now that the server is running, how to see the website?
What port is it running on? And more importantly, how do we access the container directly from our host machine?
Hit Ctrl+C to stop the container.
Well, in this case, the client is not exposing any ports so we need to re-run the docker run command to publish ports. While we’re at it, we should also find a way so that our terminal is not attached to the running container. This way, you can happily close your terminal and keep the container running. This is called detached mode.
First, we look at the docker list
docker ps -a
note the CONTAINER ID of our prakhar1989/static-site
say the container id is f57dfdf7e5a3
docker stop f57dfdf7e5a3
docker rm f57dfdf7e5a3
docker run -d -P –name static-site prakhar1989/static-site
In the above command, -d will detach our terminal, -P will publish all exposed ports to random ports and finally –name corresponds to a name we want to give.
then it outputs:
909e91f61b817dfa50df43d3eb5f94c4585331f9328d1348857363306b92f29f
docker port static-site
443/tcp -> 0.0.0.0:55002
80/tcp -> 0.0.0.0:55003
Now if you open a browser and hit http://localhost:55003/ you’ll see a webpage.
to stop the site docker stop static-site
Docker images
Base images are images that have no parent image, usually images with an OS like ubuntu, busybox or debian.
Child images are images that build on base images and add additional functionality.
Official images are images that are officially maintained and supported by the folks at Docker. These are typically one word long. In the list of images above, the python, ubuntu, busybox and hello-world images are official images.
User images are images created and shared by users like you and me. They build on base images and add additional functionality. Typically, these are formatted as user/image-name.
Dockerfile
A Dockerfile is a simple text file that contains a list of commands that the Docker client calls while creating an image.
It’s a simple way to automate the image creation process.
The best part is that the commands you write in a Dockerfile are almost identical to their equivalent Linux commands. This means you don’t really have to learn new syntax to create your own dockerfiles.
Let’s pull from git: git clone https://github.com/prakhar1989/docker-curriculum.git
cd docker-curriculum/flask-app
Now, we have a project that we’ve cloned from github.
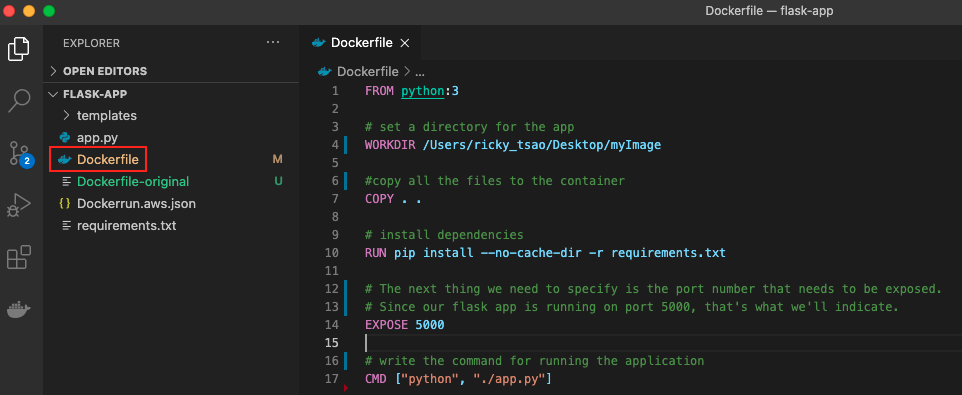
Inside this project, let’s create a Dockerfile.
Dockerfile
|
1 2 3 4 5 6 7 8 9 10 11 12 13 14 15 16 17 |
FROM python:3 # set a directory for the app WORKDIR /Users/ricky_tsao/Desktop/myImage #copy all the files to the container COPY . . # install dependencies RUN pip install --no-cache-dir -r requirements.txt # The next thing we need to specify is the port number that needs to be exposed. # Since our flask app is running on port 5000, that's what we'll indicate. EXPOSE 5000 # write the command for running the application CMD ["python", "./app.py"] |
Now that we have our Dockerfile, we can build our image. The docker build command does the heavy-lifting of creating a Docker image from a Dockerfile.
The section below shows you the output of running the same. Before you run the command yourself (don’t forget the period), make sure to replace my username with yours. This username should be the same one you created when you registered on Docker hub. If you haven’t done that yet, please go ahead and create an account. The docker build command is quite simple – it takes an optional tag name with -t and a location of the directory containing the Dockerfile.
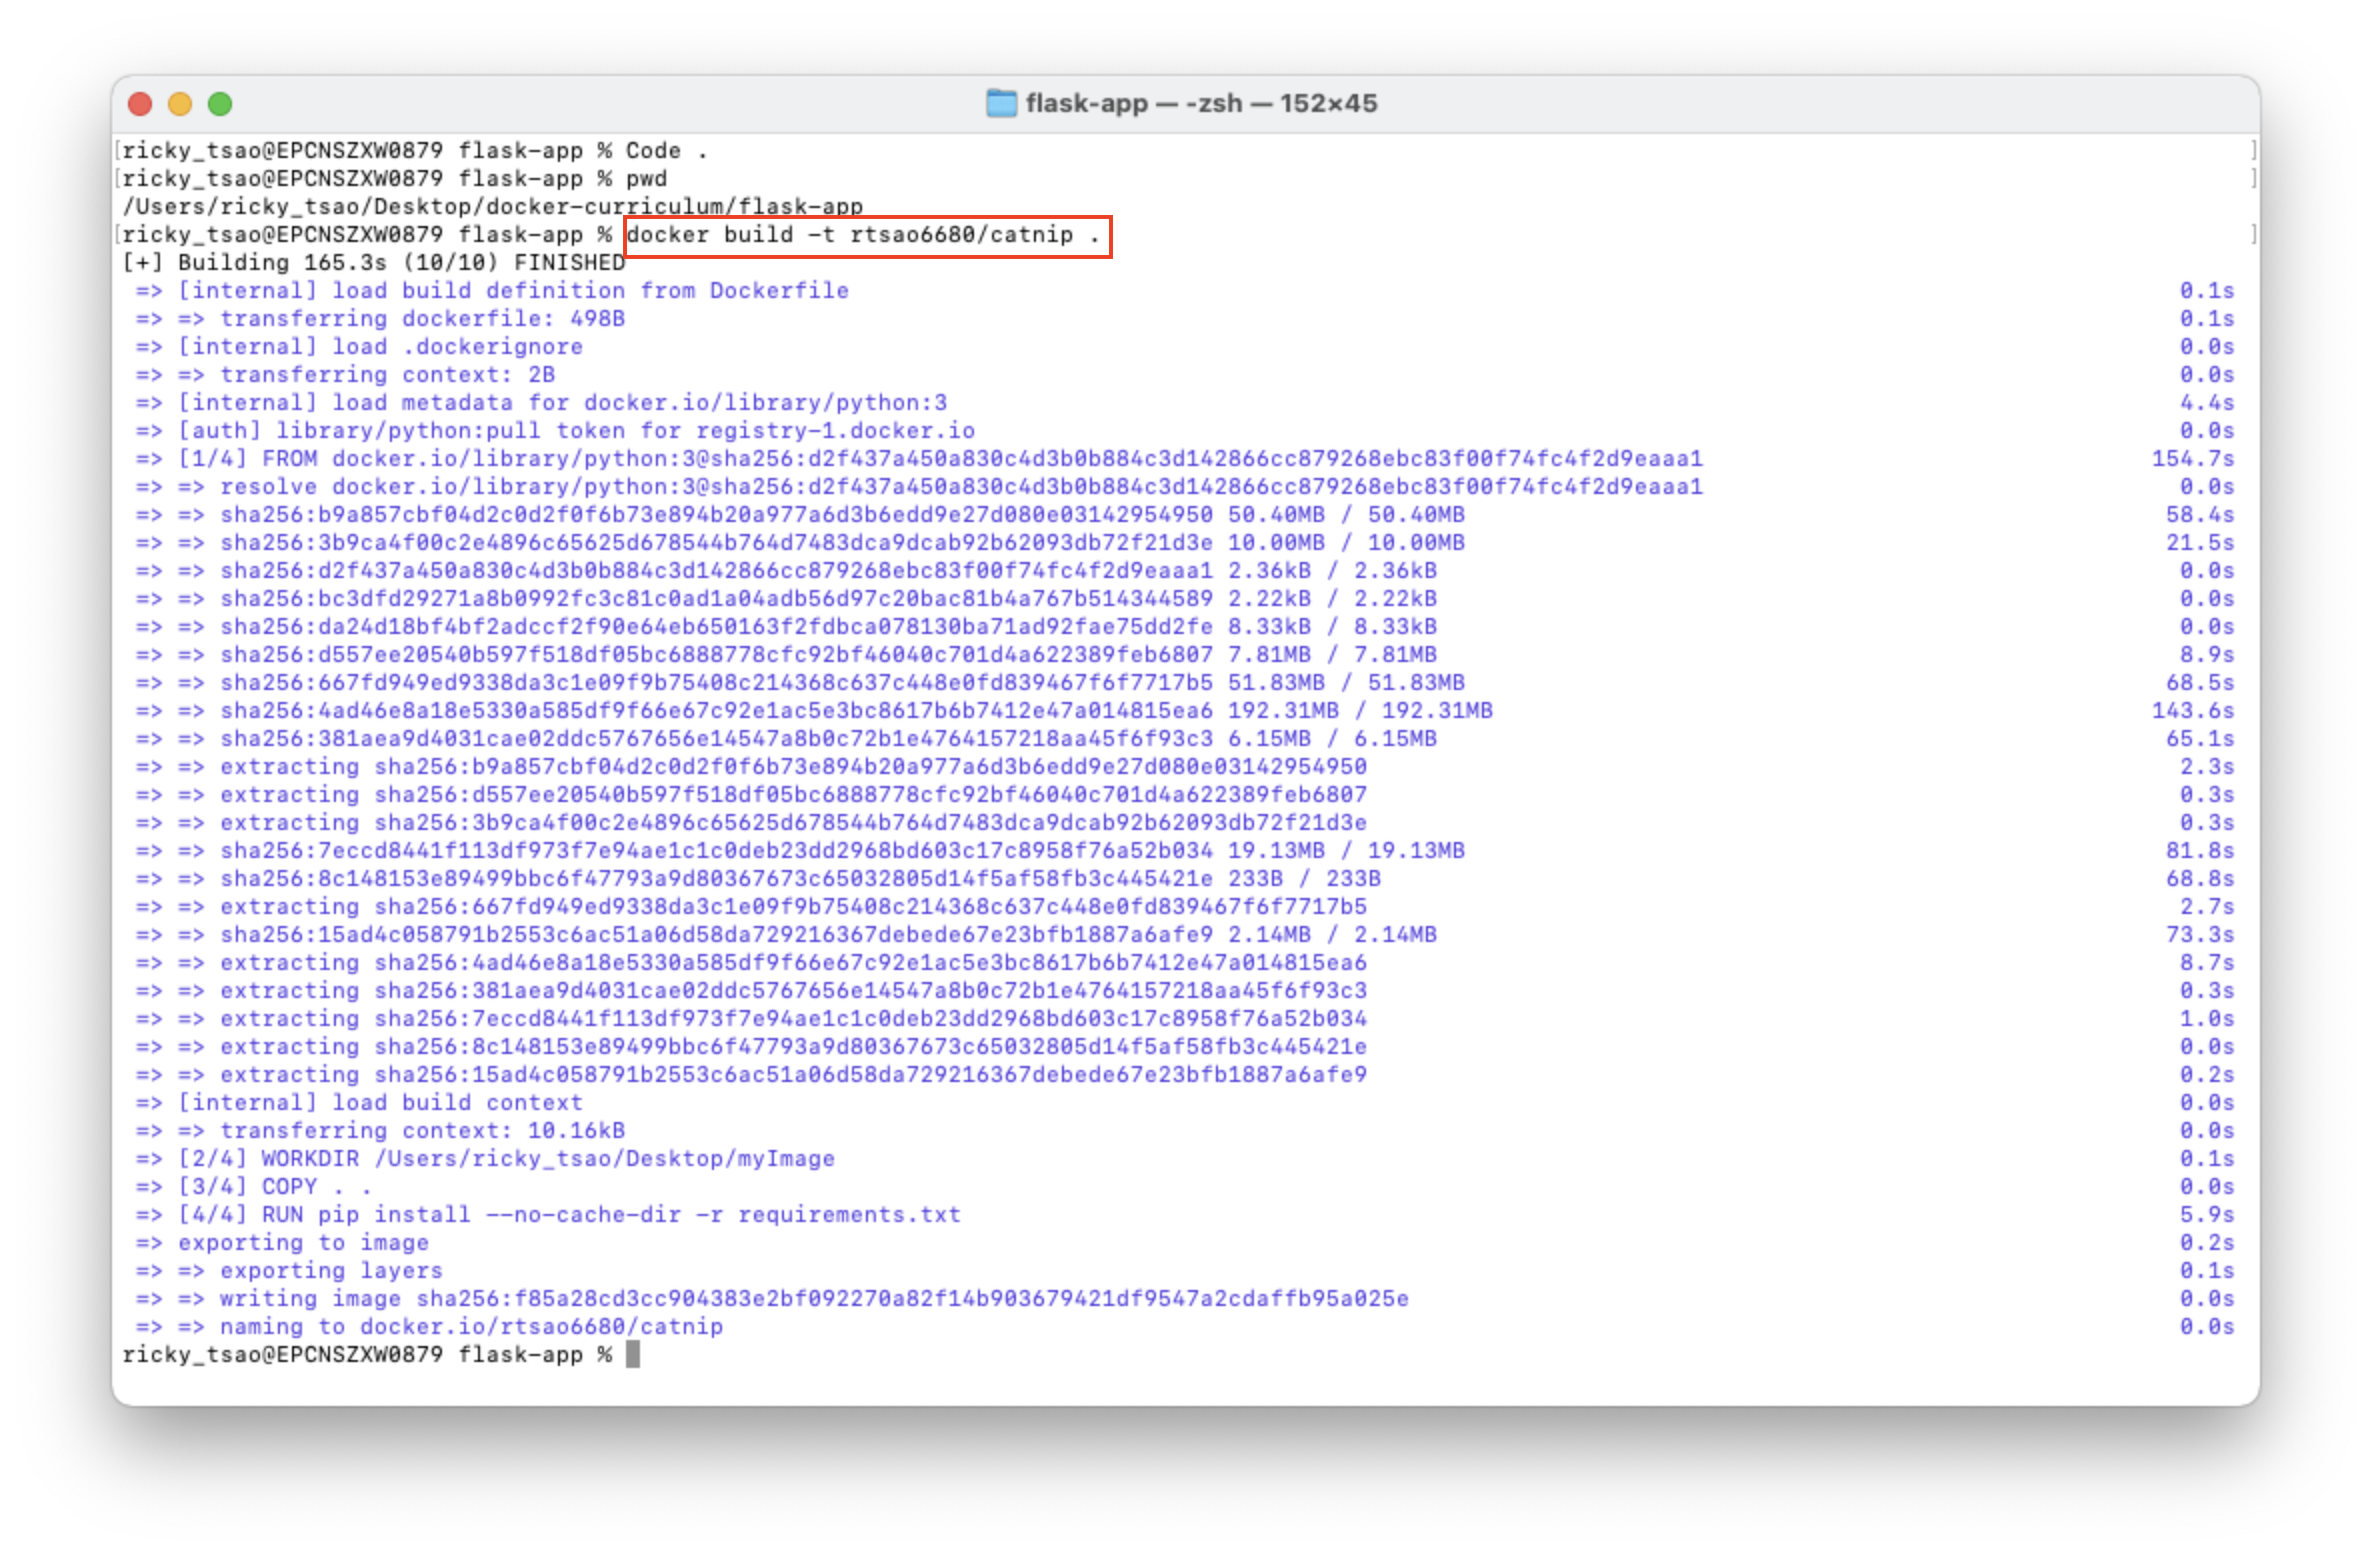
Run docker images and see if your image shows.
Perfect, we see:
rtsao6680/catnip latest f85a28cd3cc9 6 minutes ago 895MB
The last step in this section is to run the image and see if it actually works (replacing my username with yours).
docker run -p 8888:5000 rtsao6680/catnip
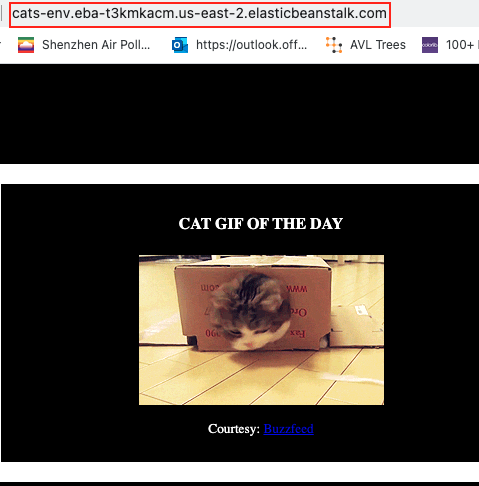
Go to http://localhost:8888/ and you’ll see the latest gif of a cat
Congratulations! You have successfully created your first docker image.
Sharing it on AWS
We can deploy our awesome application to the cloud so that we can share it with our friends! We’re going to use AWS Elastic Beanstalk to get our application up and running in a few clicks. We’ll also see how easy it is to make our application scalable and manageable with Beanstalk!
The first thing that we need to do before we deploy our app to AWS is to publish our image on a registry which can be accessed by AWS. There are many different Docker registries you can use (you can even host your own). For now, let’s use Docker Hub to publish the image.
docker login
Then let’s push our catnip project
docker push rtsao6680/catnip
output:
flask-app % docker push rtsao6680/catnip
Using default tag: latest
The push refers to repository [docker.io/rtsao6680/catnip]
d03f56673e4c: Pushed
060c2d81fdfd: Pushed
b86d642a1859: Pushed
394ec6c8d61d: Mounted from library/python
c5e393b8a19a: Mounted from library/python
b3f4557ae183: Mounted from library/python
9f5b4cdea532: Mounted from library/python
cd702377e4e5: Mounted from library/python
aa7af8a465c6: Mounted from library/python
ef9a7b8862f4: Mounted from library/python
a1f2f42922b1: Mounted from library/python
4762552ad7d8: Mounted from library/python
latest: digest: sha256:d2ba2613cdc9d0fb211c230d0e336e498cc16a1e319866e6fce61bdd2083e014 size: 2843
Now go on Docker Hub and check for your image.
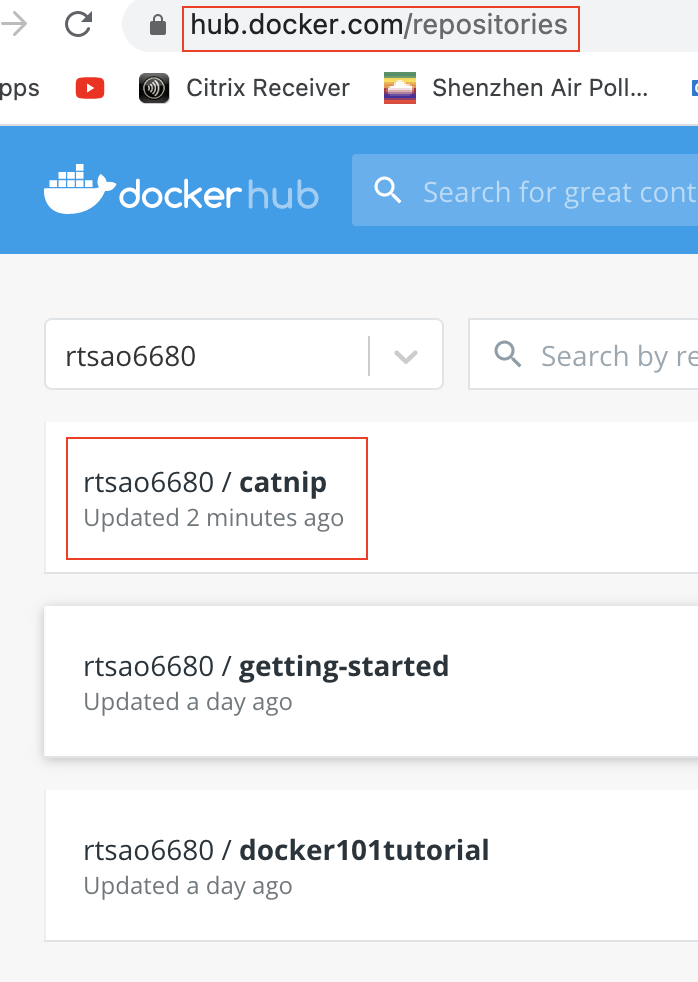
Now that your image is online, anyone who has docker installed can play with your app by typing just a single command.
docker run -p 8888:5000 rtsao6680/catnip
Making it public on AWS
Login to your AWS console.
Click on Elastic Beanstalk.
It will be in the compute section on the top left.
Alternatively, you can access the Elastic Beanstalk console.
In https://hub.docker.com/repositories, our app name is rtsao6680/catnip.
Hence, make sure we reflect that in our Dockerrun.aws.json:
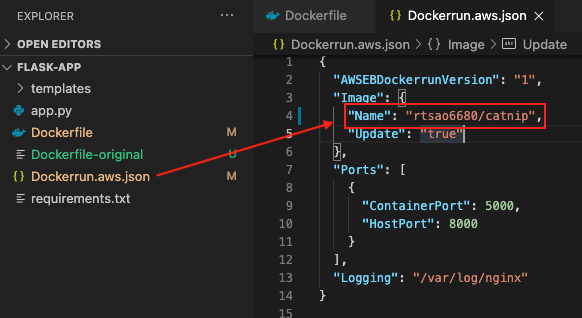
Under Platform, choose Docker. The other settings will auto-select. It should look something like this:

The Name rtsao6680/catnip should tell AWS EBS to seek out that image from Docker. Then upload it and make it public. However, if it doesn’t work, make sure you try to upload and deploy again.
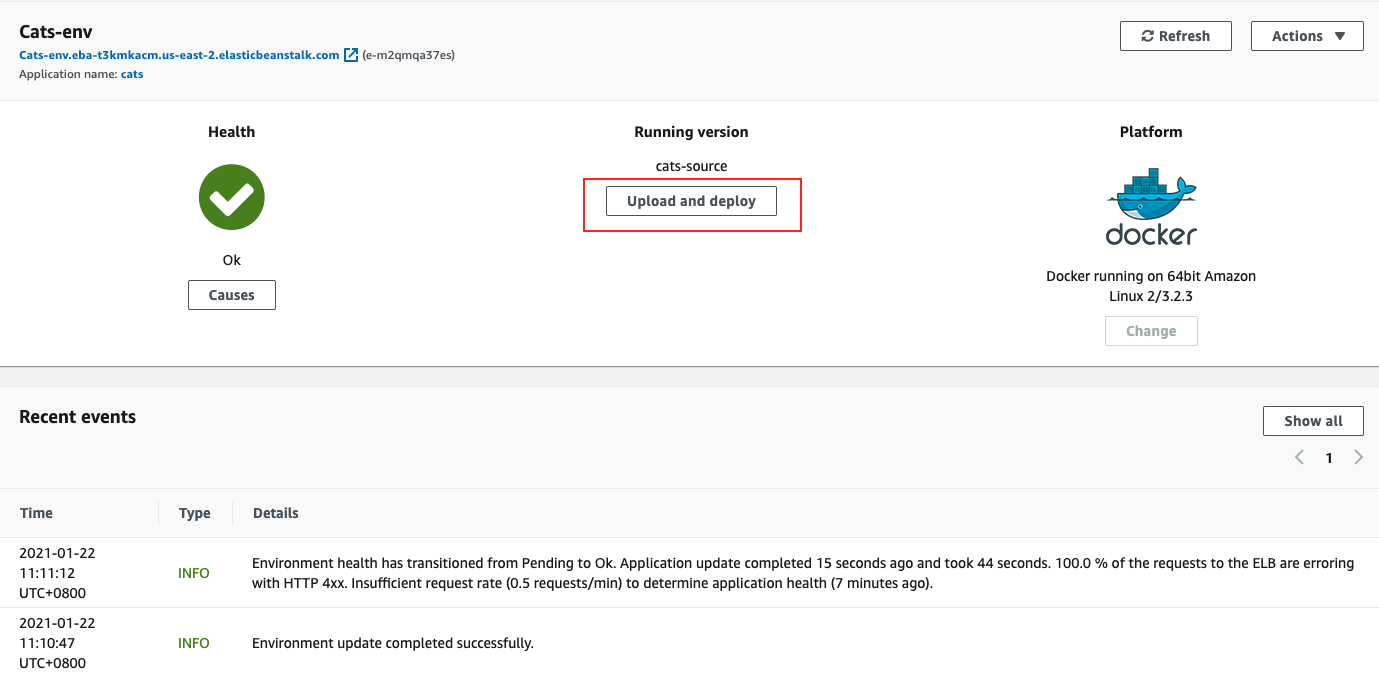
When it succeeds, you should be able to click the link and see the site publicly.
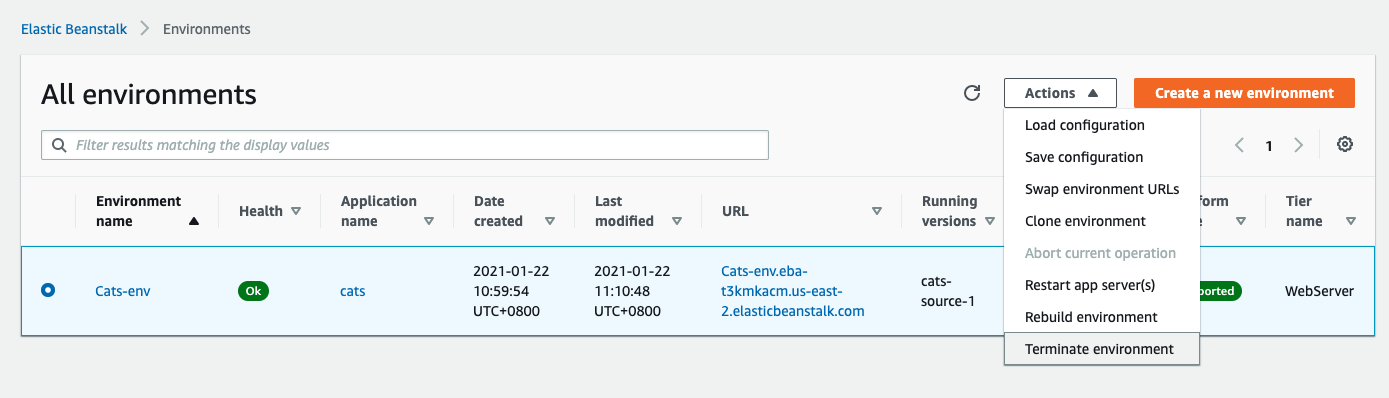
Cleanup
Once you done basking in the glory of your app, remember to terminate the environment so that you don’t end up getting charged for extra resources.
Nullish Coalescing
|
1 2 |
const userInput = ''; const result = userInput ?? 'Default'; |
Is userInput null or undefined? NO. So don’t do anything.
|
1 2 |
const userInput = null; const result = userInput ?? 'Default'; |
Is userInput null or undefined? YES. So we result is assigned to ‘Default’.
Index Properties (typescript)
interface ErrorContainer {
[props: string]: string;
}
All I know is that every property which is added to this object must have a property name, which can be interpreted into a string, must contain a string.
i.e id: string;
i.e
const errorBag: ErrorContainer = {
email: “not a valid email”,
username: ‘Must start wiht capital character’
};
[props: number]
1: “hahahah”;
typescript (type guard)
Instead of using instanceof, or checking for an existing property, we create a discriminating union type.
Type Guard is the idea that a certain property exists
Type Guarding for types
|
1 2 3 4 5 6 7 8 9 10 11 12 13 14 15 16 17 18 19 20 21 22 |
type Employee = { name: string; startDate: Date; } type Admin = { name: string; privilege: string []; } type UnknownEmployee = Employee | Admin; function print(emp: UnknownEmployee) { if ('privileges' in emp) { // is an Admin } if ('startDate' in emp) { // is an Employee } } |
|
1 2 3 4 5 6 7 8 9 10 11 12 13 14 15 16 17 18 19 20 21 22 23 24 |
class Car { drive() { } } class Truck { drive() {...} loadCargo(amount: number) {. } } type Vehicle = Car | Truck; const v1 = new Car(); const v2 = new Truck(); function useVehicle (vehicle: Vehicle) { vehicle.drive(); if ('loadCargo' in vehicle) { vehicle.loadCargo(1000); } } useVehicle(v1); useVehicle(v2); |
Much better way is to use instanceof when trying to figure out what type the instance is. Because literally, instanceof is implemented to check if this particular instance is a type of something.
|
1 2 3 |
if (vehicle instanceof Truck) { } |
Discriminated Union
…helps with type guard.
|
1 2 3 4 5 6 7 8 9 10 11 |
interface Bird { flyingSpeed: number; } interface Horse { // type: 'horse' runningSpeed: number; } type Animal = Bird | Horse; |
3) discriminated Union types
can add type: ‘bird’, ‘horse’, then use switch animal.type in moveAnimal
|
1 2 3 4 5 6 7 8 9 |
function moveAnimal(animal: Animal) { // 1) use check guard // if ('flyingSpeed' in animal) {...} // but not good because if lots of interfaces, have to check a lot // 2) can't use instanceof because we're working with interfaces console.log('Moving with speed: ' + animal.speed); } |
abstract (typescript)
ref –
- https://www.tutorialsteacher.com/typescript/abstract-class
- https://stackoverflow.com/questions/260666/can-an-abstract-class-have-a-constructor?rq=1
- https://www.typescripttutorial.net/typescript-tutorial/typescript-abstract-classes/
- https://khalilstemmler.com/blogs/typescript/abstract-class/
- https://khalilstemmler.com/blogs/typescript/abstract-class/
TypeScript – Abstract Class
Abstraction removes the need to implement all the low-level details upfront; instead, we can focus on the high-level and figure out the specifics later.
Abstract classes are mainly for inheritance where other children classes derive from parent classes.
An abstract class is typically used to:
- define common behaviors for derived classes to extend
- cannot be instantiated directly (although regularly parent class can be instantiated)
- An abstract method does not contain implementation. It only defines the signature of the method without including the method body, which the child class MUST define
We deal primarily with two types of classes in object-oriented programming languages: concretions and abstractions.
Concrete classes are real, and we can construct objects from them to use at runtime using the new keyword. They’re what most of us end up using when we first start learning object-oriented programming.
|
1 2 3 4 5 6 7 8 9 10 11 12 13 14 15 |
// Concrete class class User { private name: string; public getName (): string { return this.name; } constructor (name: string) { this.name = name; } } const user = new User('Khalil'); // Creating an instance // of a concrete class |
On the other hand, abstractions are blueprints or contracts that specify the properties and methods that a concretion should have. We can use them to contractualize the valid structure of an object or a class.
|
1 2 3 4 5 6 7 8 |
// Interface (abstraction) interface Box { length: number; width: number; } const boxOne: Box = { length: 1, width: 2 }; // ✅ Valid! Has all props const boxTwo: Box = { length: 1 }; // ❌ Not valid, missing prop |
another example:
|
1 2 3 4 5 6 7 8 9 10 11 12 13 14 15 16 17 18 |
// Interface (abstraction) interface Box { length: number; width: number; } // Concrete class implementing Box abstraction class MobileBox implements Box { // ✅ Valid! Implements all necessary props public length: number; public width: number; constructor (length: number, width: number) { this.length = length; this.width = width; } } let boxThree = new MobileBox(1, 2); |
In the previous examples, we used the interface keyword to create abstractions. However, when we speak of abstractions in object-oriented programming, we’re generally referring to one of two tools:
- interfaces (i.e.: the interface keyword) or
- abstract classes (i.e.: the abstract keyword in front of a class)
We want to focus on defining a contract containing all the necessary things that a subtype needs to provide if they want it to work with the base type — and leave it to developers to implement them?
This satisifes:
Liskov Substitution Principle — since we define valid subtypes, each implementation should work and be interchangeable as long as it implements the contract.
Dependency Inversion — we do not directly depend on the concretions; instead, we rely on the abstraction that the concretions depend on; this keeps our core code unit testable.
Defining common properties
Within this Book abstraction, we can then decide on the contract for a Book. Let us say that all Book subclasses must have author and title properties. We can define them as instance variables and accept them as input using the abstract class constructor.
|
1 2 3 4 5 6 7 8 9 |
abstract class Book { private author: string; private title: string; constructor (author: string, title: string) { this.author = author; this.title = title; } } |
Defining common logic
We can then can place some of the common logic within the Book abstract class using regular methods.
|
1 2 3 4 5 6 7 8 9 10 11 12 13 14 15 16 17 18 |
abstract class Book { private author: string; private title: string; constructor (author: string, title: string) { this.author = author; this.title = title; } // Common methods public getBookTitle (): string { return this.title; } public getBookAuthor (): string { return this.title; } } |
Remember that an abstract class is an abstraction comparable to an interface. We can’t instantiate it directly. Trying anyway for demonstration purposes, we’ll notice that we get an error that looks like this:
|
1 2 3 4 |
let book = new Book ( // ❌ error TS2511: Cannot create an 'Robert Greene', // instance of an abstract class. 'The Laws of Human Nature' ); |
We’ll introduce one of our specific types of Book concretions — the PDF class. We extend/inherit the abstract Book class as a new subclass to hook it up.
|
1 2 3 4 5 6 7 8 9 |
class PDF extends Book { // Extends the abstraction private belongsToEmail: string; constructor (author: string, title: string, belongsToEmail: string) { super(author, title); // Must call super on subclass this.belongsToEmail = belongsToEmail; } } |
Since PDF is a concrete class, we can instantiate it. The PDF object has all of the properties and methods of the Book abstraction, so we can call getBookTitle and getBookAuthor as if it were originally declared on the PDF class.
|
1 2 3 4 5 6 7 8 |
let book: PDF = new PDF( 'Robert Greene', 'The Laws of Human Nature', 'khalil@khalilstemmler.com' ); book.getBookTitle(); // "The Laws of Human Nature" book.getBookAuthor(); // "Robert Greene" |
Defining mandatory methods
Abstract classes have one last important feature: the notion of the abstract method. Abstract methods are methods that we must define on any implementing subclass.
In the abstract class, we define them like so:
|
1 2 3 4 5 6 7 8 9 10 11 |
abstract class Book { private author: string; private title: string; constructor (author: string, title: string) { this.author = author; this.title = title; } abstract getBookType (): string; // No implementation } |
Notice that there is no implementation for the abstract method? That’s because we implement it on the subclass.
Demonstrating with the PDF and an additional EPUB subclass, we add the required abstract method to both of them.
|
1 2 3 4 5 6 7 8 9 10 11 12 13 14 15 16 17 18 19 |
... class PDF extends Book { ... getBookType (): string { // Must implement this return 'PDF'; } } class EPUB extends Book { constructor (author: string, title: string) { super(author, title); } getBookType (): string { // Must implement this return 'EPUB'; } } |
Failing to implement the required abstract methods will fail to make the class complete and concrete — this means we’ll run into errors when trying to compile our code or create instances.
Use cases (when to use abstract classes)
Now that we know the mechanics behind how abstract classes work, let’s talk about real-life use cases for it — scenarios you are likely to encounter.
There are two primary use cases for needing to use abstract classes:
- Sharing common behavior
- Template method pattern (framework hook methods)
Sharing Common Behavior
Let’s say that we definitely need to fetch data from:
a Users API located at example.com/users
a Reviews API located at example.com/reviews
What’s the common logic?
Setting up an HTTP library (like Axios)
Setting up interceptors to set up common refetching logic (say, like when an access token expires)
Performing HTTP methods
|
1 2 3 4 5 6 7 8 9 10 11 12 13 14 15 16 17 18 19 20 21 22 23 24 25 26 27 28 |
export abstract class BaseAPI { protected baseUrl: string; private axiosInstance: AxiosInstance | any = null; constructor (baseUrl: string) { this.baseUrl = baseUrl this.axiosInstance = axios.create({}) this.enableInterceptors(); } protected get (url: string, params?: any, headers?: any): Promise<any> { return this.getAxiosInstance({ method: 'GET', url: `${this.baseUrl}${url}`, params: params ? params : null, headers: headers ? headers : null }) } protected post (url: string, params?: any, headers?: any): Promise<any> { return this.getAxiosInstance({ method: 'POST', url: `${this.baseUrl}${url}`, params: params ? params : null, headers: headers ? headers : null }) } } |
Here, we’ve placed the low-level behavior within a BaseAPI abstraction. Now we can define the high-level behavior — the rich stuff — in the subclasses.
|
1 2 3 4 5 6 7 8 9 10 11 12 13 |
export class UsersAPI extends BaseAPI { constructor () { super('http://example.com/users'); } // High-level functionality async getAllUsers (): Promise<User[]> { let response = await this.get('/'); return response.data.users as User[]; } ... } |
So now we can get all sort of data whether it us Users, Reviewers…etc.
Template Method Pattern ( framework hooking )
So then, a simplistic version of the abstract class for a component could look like the following:
|
1 2 3 4 5 6 |
abstract class Component { private props: any; private state: any; abstract render (): void; // Mandatory } |
And then to use it, we’d need to extend the Component abstraction and implement the render method.
|
1 2 3 4 5 |
class Box extends Component { render () { // Must implement this method } } |
We need to implement the render method because it is a critical part of the work involved with deciding what gets created on screen.
An abstract class is a suitable tool for this problem is because there is an algorithm running behind the scenes — an algorithm in which the render step is but a single step amongst many.
We can see that there are three distinct phases to React: mounting, updating, and unmounting. React’s abstract class further gives us (the client developer) the ability to customize our components by connecting the ability to hook into various lifecycle events. For example, you can perform some behavior as soon as your component mounts (componentDidMount), when it updates (componentDidUpdate), and when it’s about to unmount (componentWillUnmount).
so the algorithm may look like this:
|
1 2 3 4 5 6 7 8 9 10 11 12 13 14 15 16 17 18 19 20 21 22 23 24 25 26 27 28 29 30 31 32 33 34 35 36 37 38 39 40 41 42 43 44 |
abstract class Component { private props: any; private state: any; abstract render (): void; // Algorithm for mounting constructor () { this.render(); this.componentDidMount(); } // The general algorithm for updating. Called when new props occur, // when setState is called or when forceUpdate is called onUpdate () { if (this.componentShouldUpdate()) { this.render(); this.componentDidUpdate(); } } // Algorithm for unmounting onUnmount () { this.componentWillUnmount(); // Complete unmounting } public componentDidMount (): void { // No implementation lifecycle method, allow the client to override } public componentDidUpdate (): void { // No implementation lifecycle method, allow the client to override } public componentWillUnmount (): void { // No implementation lifecycle method, allow the client to override } private componentShouldUpdate (): boolean { // Determines if the component should update ... } } |
And now, a customized component subclass can plug in behavior within those key lifecycle hook methods. This is the concept of Inversion of Control.
|
1 2 3 4 5 6 7 8 9 10 11 12 13 14 15 16 17 18 19 20 21 |
class Box extends Component { constructor () { super(); } componentDidMount () { // (Optional) Perform custom logic } componentDidUpdate () { // (Optional) Perform custom logic } componentWillUnmount () { // (Optional) Perform custom logic } render () { // Must implement this method } } |
So as a framework designer, the Template Method design pattern is attractive when:
- You need the client to implement a step of the algorithm → so you make that step an abstract method
You want to provide the ability for clients to customize behavior at various steps of the algorithm → so you expose optional lifecycle methods to the client
Supplementals
The following abstract class declares one abstract method find and also includes a normal method display.
|
1 2 3 4 5 6 7 8 9 10 11 12 13 14 15 16 17 18 19 20 21 22 23 24 25 26 27 28 29 30 31 32 |
abstract class Person { name: string; constructor(name: string) { this.name = name; } display(): void{ console.log(this.name); } abstract find(string): Person; } class Employee extends Person { empCode: number; constructor(name: string, code: number) { super(name); // must call super() this.empCode = code; } find(name:string): Person { // execute AJAX request to find an employee from a db return new Employee(name, 1); } } let emp: Person = new Employee("James", 100); emp.display(); //James let emp2: Person = emp.find('Steve'); |
In the above example, Person is an abstract class which includes one property and two methods, one of which is declared as abstract.
The find() method is an abstract method and so must be defined in the derived class. In other words, the Employee class derives from the Person class and so it must define the find() method as abstract.
The Employee class must implement all the abstract methods of the Person class, otherwise the compiler will show an error.
Note:
The class which implements an abstract class must call super() in the constructor.
|
1 2 3 4 5 6 7 8 9 10 11 12 13 14 15 16 17 18 19 20 21 22 23 24 |
abstract class Person { abstract name: string; // The abstract class can also include an abstract property // does not have abstract keyword. Derived classes do not have to implement this. // Instead they can call and use this. display(): void { console.log(this.name); } } class Employee extends Person { name: string; // this property must be declared as indicated in the abstract class empCode: number; constructor(name: string, code: number) { super(); // must call super() this.empCode = code; this.name = name; } } let emp: Person = new Employee("James", 100); emp.display(); //James |
Array Destructuring (JS)
Given,
|
1 |
const arr = ['sports', 'cooking', 'sleeping', 'eating']; |
We can destructure our array by placing the array elements into variables we create:
|
1 |
const [first, second, ...remainingHobbies] = arr; |
first sports
second cooking
remainingHobbies [‘sleeping’, ‘eating’]