All posts by admin

git rebase

ref – https://www.atlassian.com/git/tutorials/merging-vs-rebasing

say you’re on your main branch. and you do a git pull for the latest.

However, you’ve been working your feature branch.
By using rebase, you can cut your branch from its root, and snap it onto main’s HEAD:

git checkout feature

git rebase main

git commit -m “git rebase” .

git pull

git push

When there are merge conflicts

simply fix the merge conflicts, then:

eventually you’ll be done with the rebase, then do


git status

to see what the next steps are.

Sequelize Belongs to Many

Belongs-To-Many associations

Belongs-To-Many associations are used to connect sources with multiple targets. Furthermore the targets can also have connections to multiple sources.

This will create a new model called UserProject with the equivalent foreign keys projectId and userId. Whether the attributes are camelcase or not depends on the two models joined by the table (in this case User and Project).

Defining through is required. Sequelize would previously attempt to autogenerate names but that would not always lead to the most logical setups.

This will add methods

  • getUsers
  • setUsers
  • addUser
  • addUsers

to Project, and

  • getProjects
  • setProjects
  • addProject
  • addProjects

to User

Similarly,

This will add methods

  • getBuildings
  • setBuildings
  • addBuilding
  • addBuildings

to User

like this:

There are also remove version of the generated methods like so:

  • removeBuilding
  • removeBuildings

Spread Syntax in JS

ref –
https://developer.mozilla.org/en-US/docs/Web/JavaScript/Reference/Operators/Spread_syntax

Literal Objects

Arrays

Spread in Array Literals

[“head”, “shoulders”, “knees”, “and”, “toes”]

Spread in Object Literals

Decorator pattern using Dart

ref –

  • https://dart.academy/structural-design-patterns-for-dart-and-flutter-decorator/
  • https://medium.com/flutter-community/flutter-design-patterns-16-decorator-bf0dd711f093
  • Pizza Example

Decorator pattern provides a flexible way to add attributes or behavior to an object at runtime

…as an alternative to creating new classes to cover every combination of traits an object may need.

Here we create a square first. It has its basic methods and attributes for use.

But what if we’re not satisfied with its basic functionalities and properties? Say we don’t just want to draw it. We also want to give it a color.

So we then create something like GreenShapeDecorator(square) to let it know that we want to color our square green:

..or blue

Extends an object’s functionality by wrapping it in an object of a Decorator class, leaving the original object intact without modification.

How to do it

Let’s create an abstract class called Shape. (It cannot be instantiated because we want real shapes to implement according to its interface)
It says you must implement draw function.

Hence, when we declare a Shape, for example Square or Triangle, it implements Shape,
and we

We define the Shape interface using an abstract class, so that it can’t be directly instantiated. In this simplified example, the draw() method will return a string appropriate to the shape’s type. Because Square and Triangle implement Shape, they are required to provide an implementation of the draw() method. This means client code can create variables of type Shape that can be assigned any of the shape classes.

In order to add attributes to our Shape, we first create an parent abstract class called ShapeDecorator

1) use constructor to reference a shape, and pass it in using constructor
2) Satisfy implements by declaring it again.
3) Use ‘implements’ to say we’re simply wrapping abstract Shape.

We basically wrapped abstract Shape by passing in the Shape, and keeping the interface draw.

Now, we create concrete decorator class by extending our ShapeDecorator.
Let’s say we want to add color green. We over-ride the draw function and implement it, thus satisfying the interface ShapeDecorator. Inside its implementation, we use green to color the Shape.

1) We use an abstract class to define the interface all shape decorators should adhere to.

2) ShapeDecorator implements Shape, so all classes that extend ShapeDecorator are interface compatible with shape classes.

This is key, because it means we can instantiate a decorator, pass it a shape, and then use the decorator as though it were the shape.

That’s the essence of the Decorator pattern.

Pizza Example

We first declare an interface. It says, all pizzas that implements this must have a description property, a function to get the description, and a function to get the price.

We then have to create a concrete base where it implements our Pizza interface. In order to conform to the interface, we use declaration for properties and override for functions. Being a concrete implementation, don’t forget the constructor.

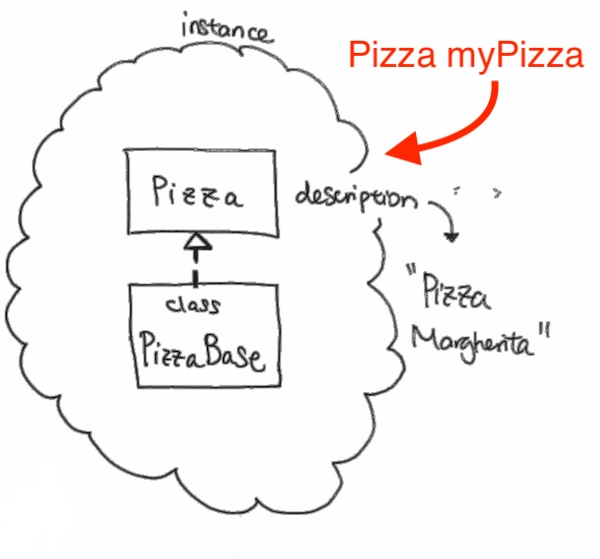
So, as long as a class implements an interface that is Pizza (or extends from Pizza), we can have a reference of type Pizza and point to the instantiation of that class. This is shown in the picture above.

Now that our base is complete, we are to do the same for an interface for decorating our Pizza base.

Because PizzaDecorator needs to be abstract and needs to extend from abstract Pizza, we simply use extends
It just means we extend the abstract properties from Pizza.

We have a property where its of type Pizza. This means any property that implements Pizza is valid here.
This is because we are going to use it in our overriden getDescription and getPrice functions.
Also, a constructor that injects an instance of pizza is required.

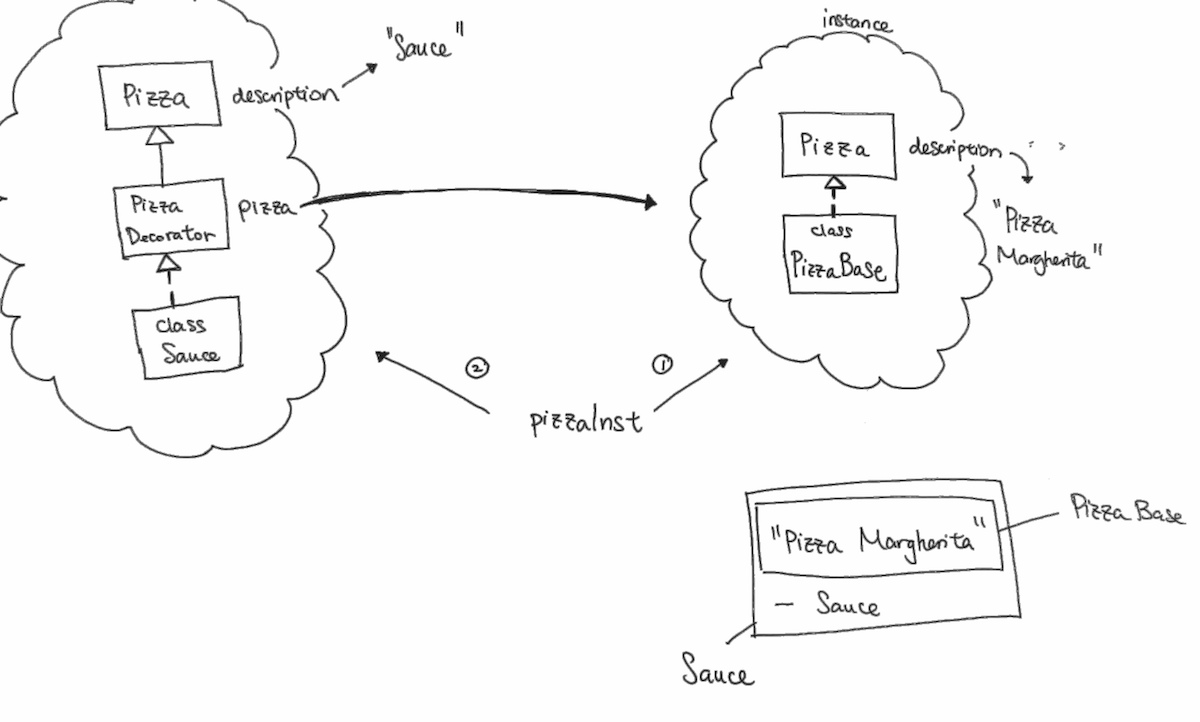
As you can see, we have Pizza pizzaInt, which can reference either our PizzaBase object or a Sauce object. This is because at the top of the abstract class, we have Pizza.

Also notice that in abstract PizzaDecorator, we have a Pizza pizza reference that points to PizzaBase.

On the right side, we instantiate a PizzaBase object. We have a reference pizzaInst point to it.

We then pass the reference inside of Sauce.

Sauce is depicted on the left side. Its abstract class Decorator has a property Pizza pizza, which points to abstract Pizza. This means, it can point to PizzaBase, Sauce, or any condiments (which must extend from abstract Pizza).

Notice getDescription.

To get the whole pizza’s description of the name, and toppings, it first looks at reference pizza, which is pointing to the PizzaBase. It calls its getDescription, which gets “Pizza Margherita”.

Then we return the interpolated string with our own description.

Thus

“Pizza Margherita” <-- PizzaBase's getDescription "- Sauce" <-- Sauce's getDescription

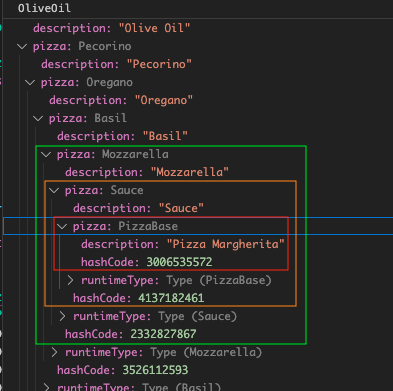
If were to keep going with toppings like Mozzarella

it would be the same concept. Mozzarella’s Pizza pizza reference would point to Sauce.
When we call getDescription, it would call

Mozzarella’s

Sauce’s

PizzaBase

Thus, in the end the output would be:

Creating a bridge from react native to native iOS

  • https://reactnative.dev/blog/2017/03/13/introducing-create-react-native-app
  • https://reactnative.dev/docs/next/communication-ios

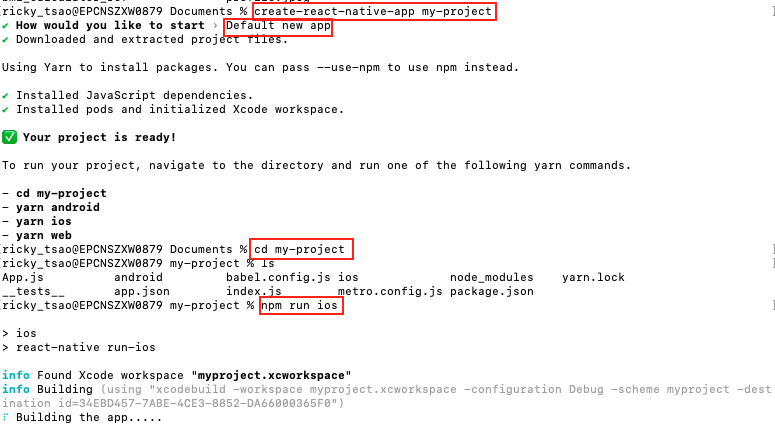
We first install create-react-native-app module:

npm install -g create-react-native-app

We then create the app:

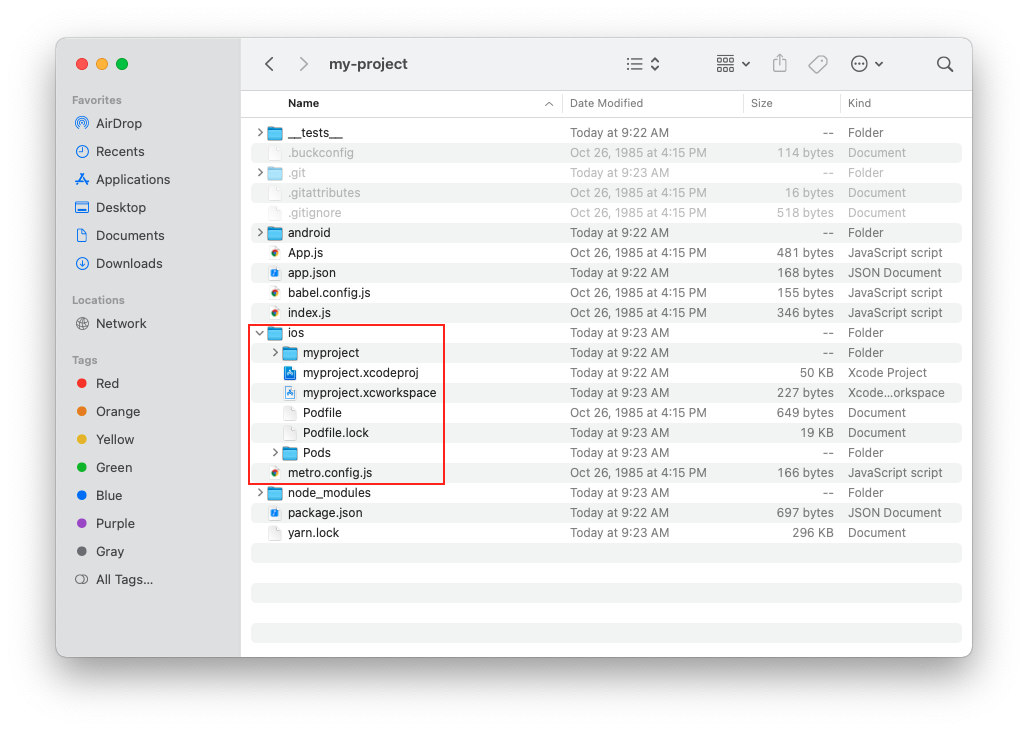
Look at the directory. You’ll see the iOS folder with its xcode files.

Running the iOS simulator

npm run ios

It’ll take a few minutes for the app to build. You’ll see a terminal pop up with the title “Metro.node launcher package”. Then your simulator will start and the app will install and run.

Implementing the app

Features

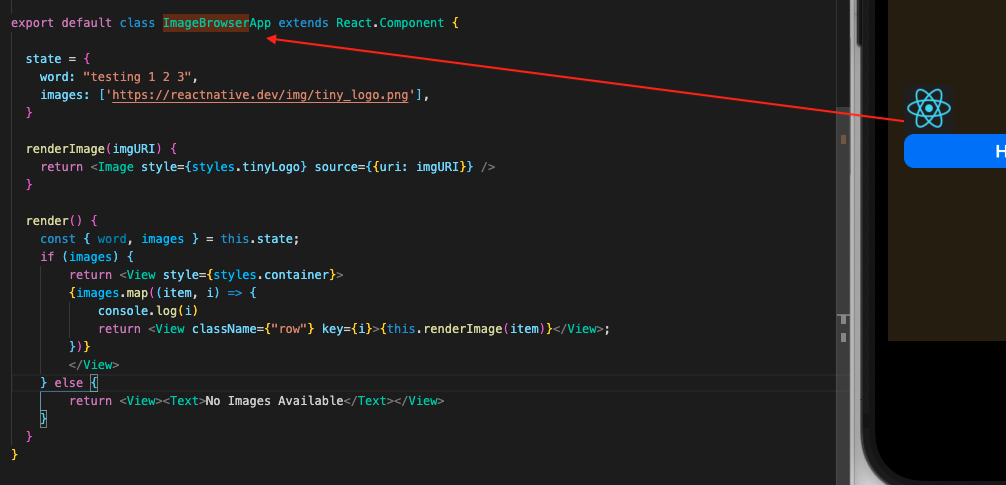
We first create a file called ImageBrowserApp.js

Its a class component, where we simply display an image.
We render this image through JSX Image tag.
If no image URLs are given, we simply return ‘No Images Available’.

In index.js, make sure we use AppRegistry to register this component like so:

In your App.js, you can use it like so:

App.js

When you export it to iOS, it will look like this:

In the native iOS side, we can also instantiate ImageBrowserApp to be used as a view.
This is made possible when we registered the component with the name ImageBrowserApp

So in AppDelegate, we simply create a RCTRootView and initialize the module name to ImageBrowserApp.
Then we add it to the rootView.

iOS side

AppDelegate.h

AppDelegate.m

Adding flutter to native iOS

ref –

  • https://blog.codemagic.io/how-to-add-flutter-modules-to-native-ios-project-and-test-it-on-codemagic/
  • https://www.programmersought.com/article/24365560827/

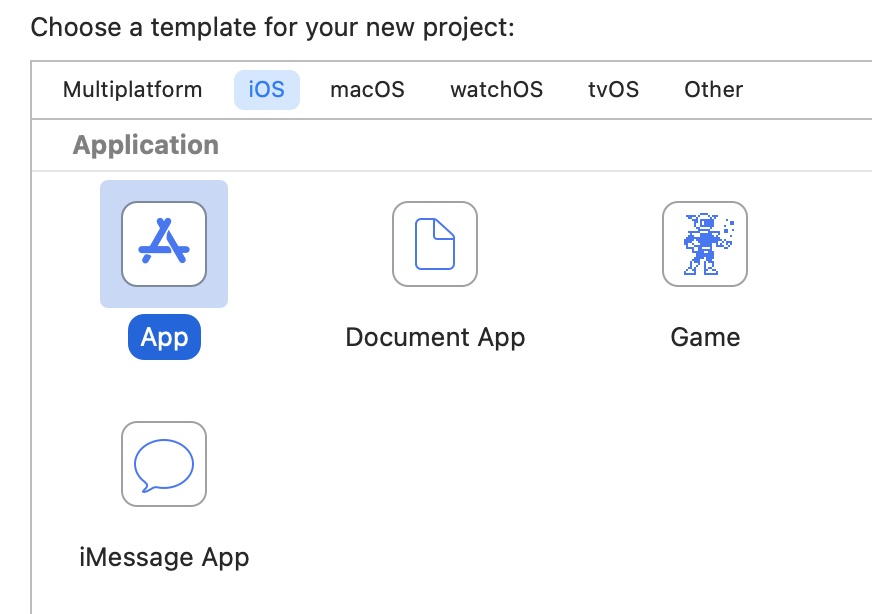
Create an iOS native project

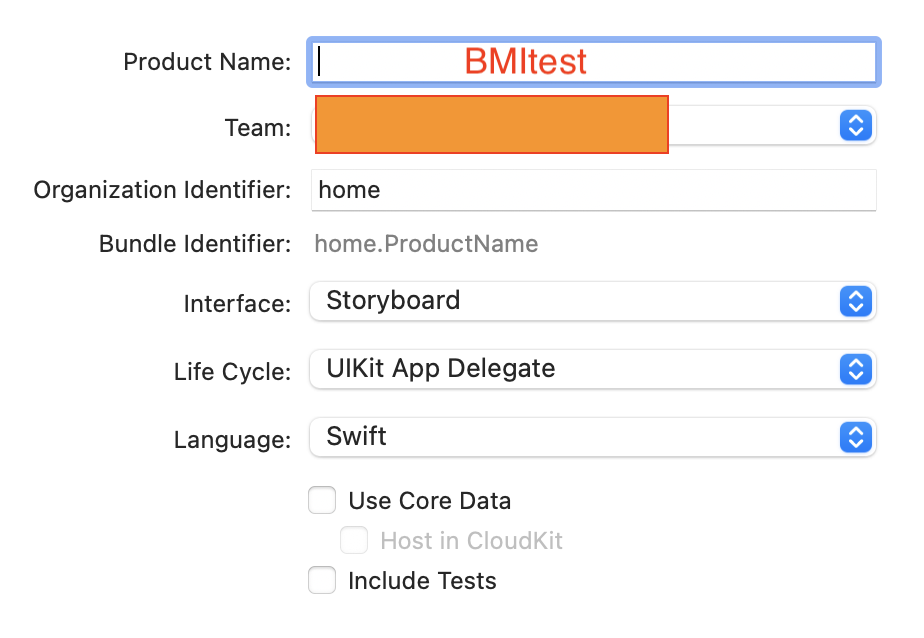
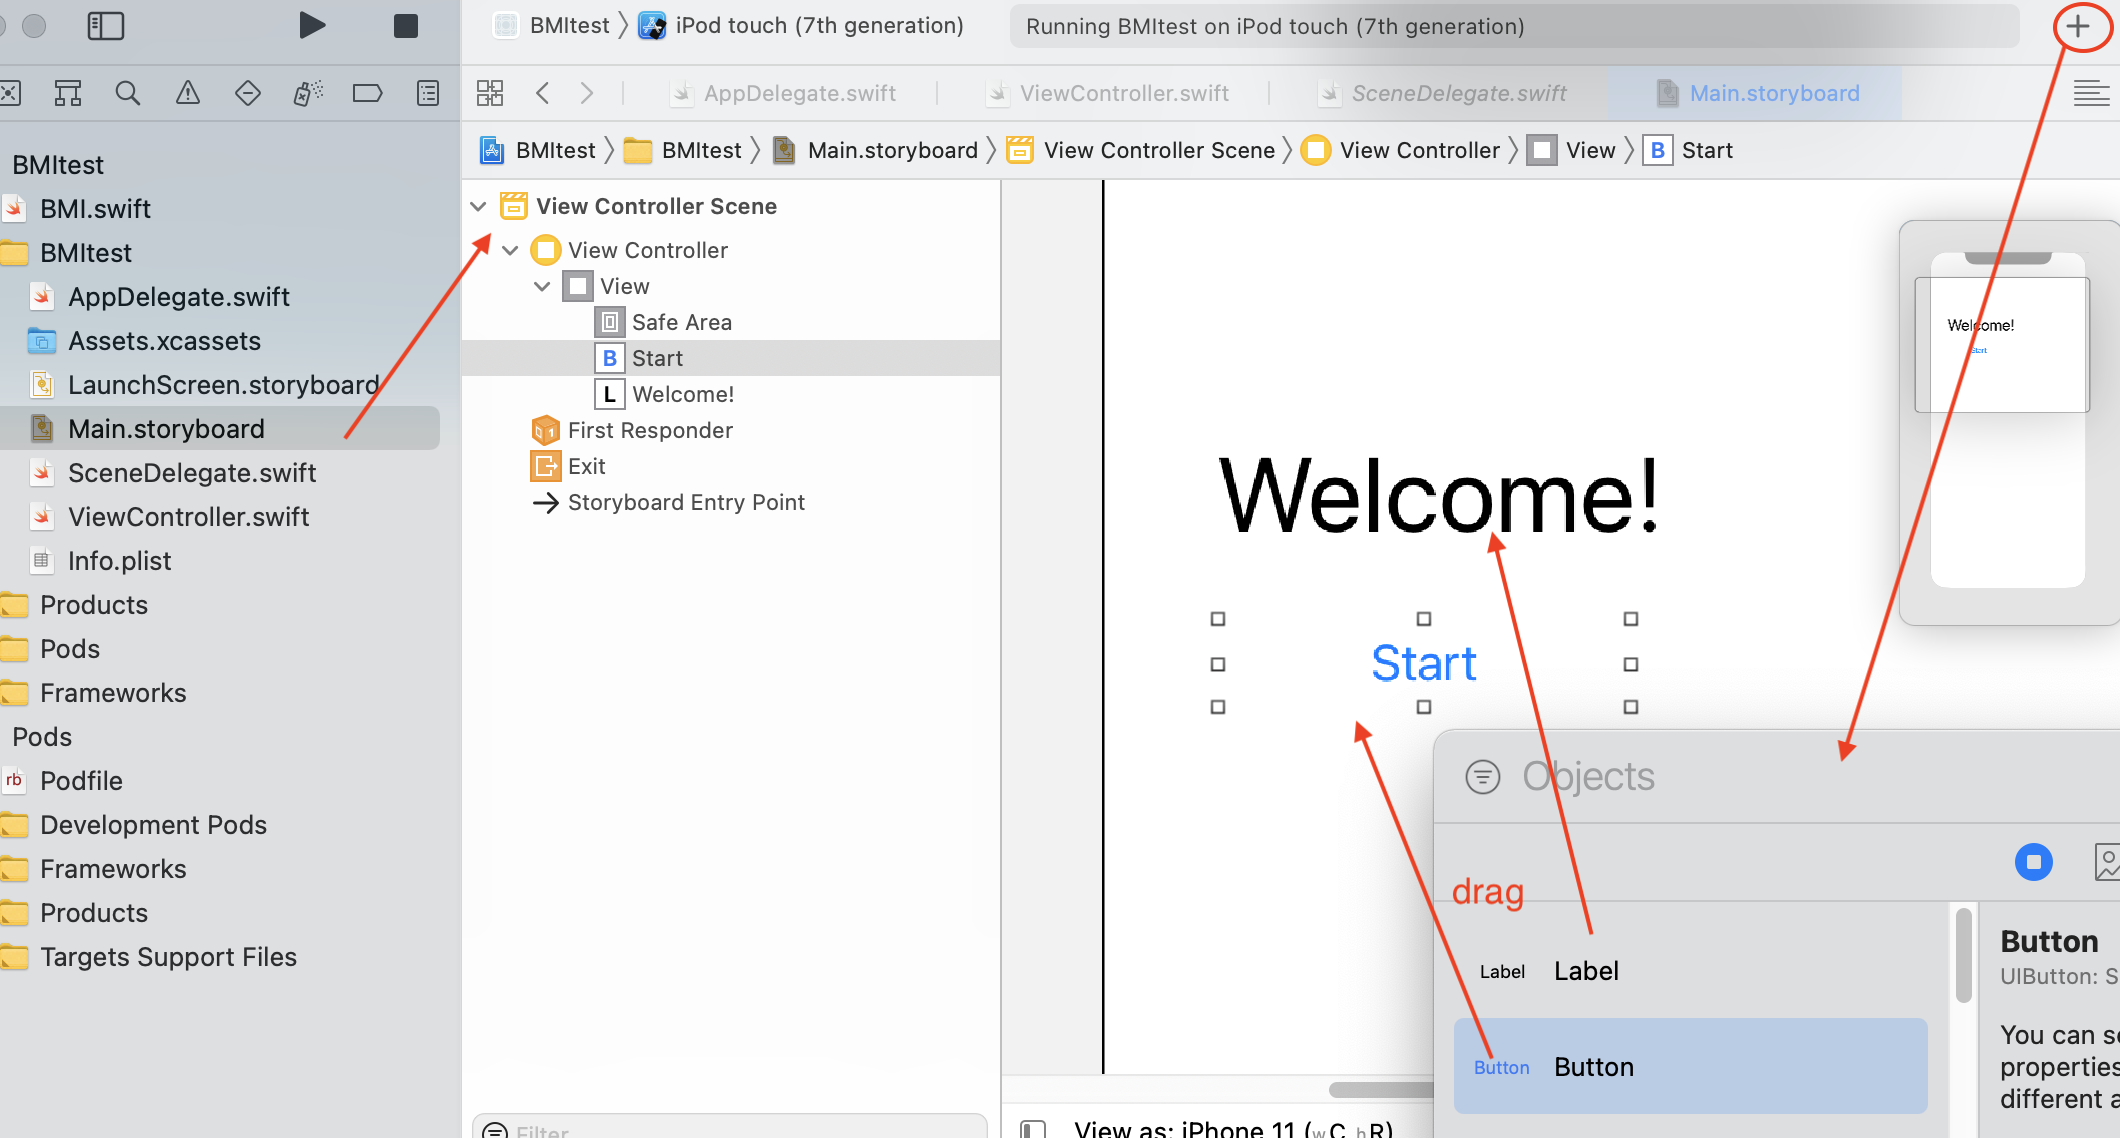
First we create a native iOS project.
click on tab option iOS, select App.

Create a text Welcome, and a button.

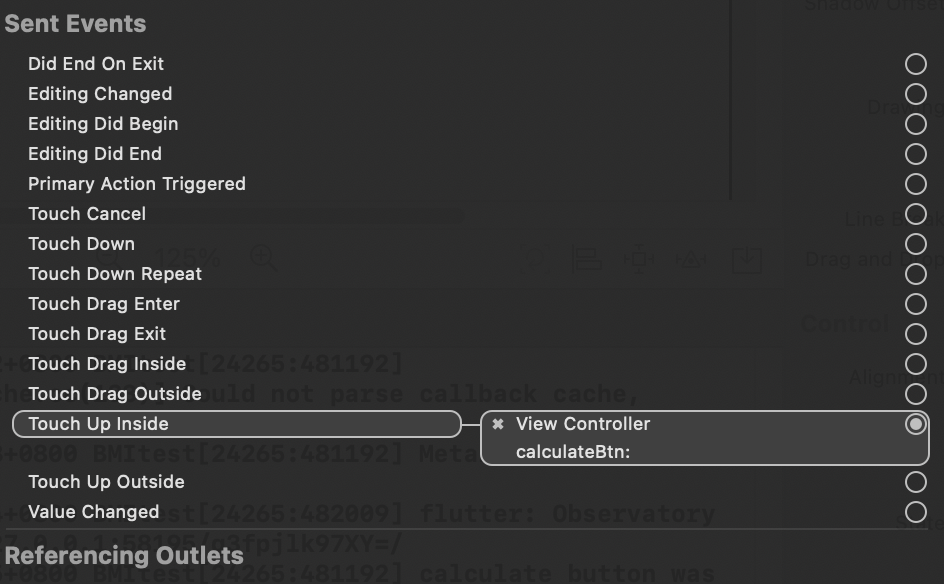
Right click on the start button and let’s implement a handler of the event touch up inside
Open up a side window and make sure ViewController.swift is open next to our Main.storyboard. Your can literally drag the event handler into ViewController.swiftConnect a button handler like so:

ViewController.swift

(your directory)/BMI_Calculator/BMItest/AppDelegate.swift

Save the project.

create folder bmi_calculator in a directory
copy and paste the iOS native project we just created into this folder.

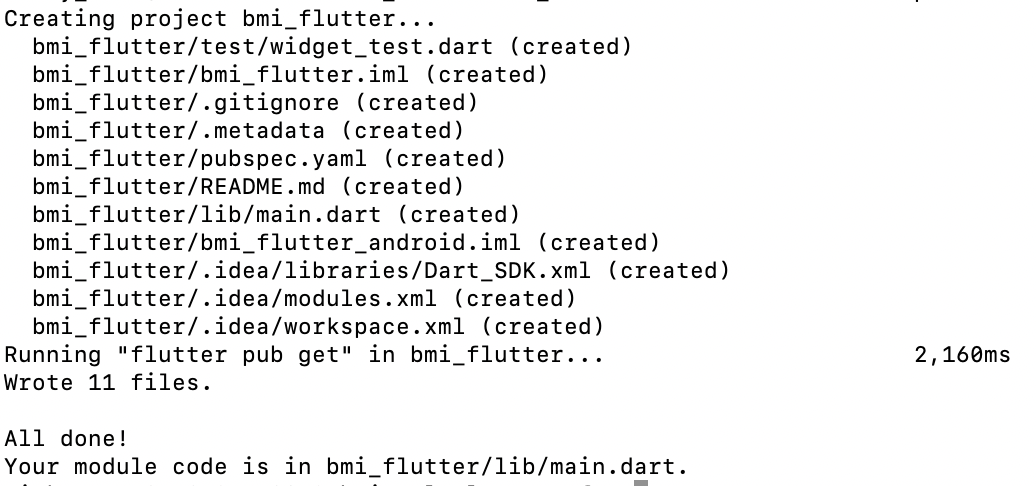
Creating Flutter Module

Make sure you are in bmi_calculator folder.

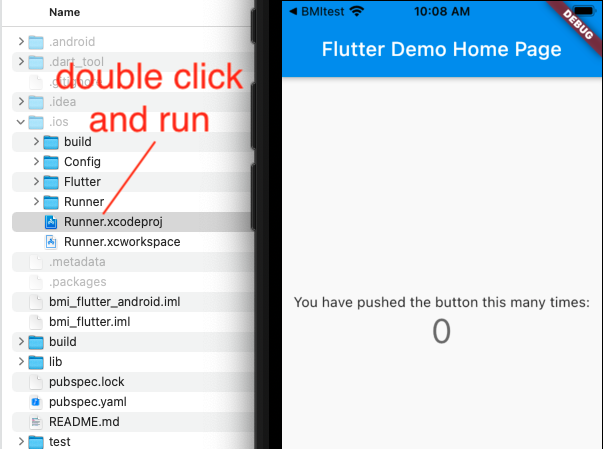
Let’s make sure our app runs correctly by double clicking on .xcodeproj file and running the app.

This screen will later be used and appear in our iOS project.

Integrating Flutter module to native iOS

cd into the previous created BMI_calculator and create a pod file:

pod init

You’ll have a directory like so:

bmi_calculator/
├── bmi_flutter/
│ └── .ios/
│ └── Flutter/
│ └── podhelper.rb
└── BMI Calculator/
└── Podfile

In the Podfile:

flutter_application_path = ‘../bmi_flutter’
This is so that in your xcode project, it will go one directory up into bmi_calculator, and look for bmi_flutter.
load File.join(flutter_application_path, ‘.ios’, ‘Flutter’, ‘podhelper.rb’)
Once it finds bmi_flutter folder, it will go into folder .ios, folder Flutter, and finally access the podhelper.rb file

Now run pod install in BMI_calculator.

Make sure you see the log messages where it says installing flutter…etc:


Downloading dependencies
Installing Flutter (1.0.0)
Installing FlutterPluginRegistrant (0.0.1)
Installing my_flutter (0.0.1)

Now, reopen the project using the file with .xcworkspace extension.

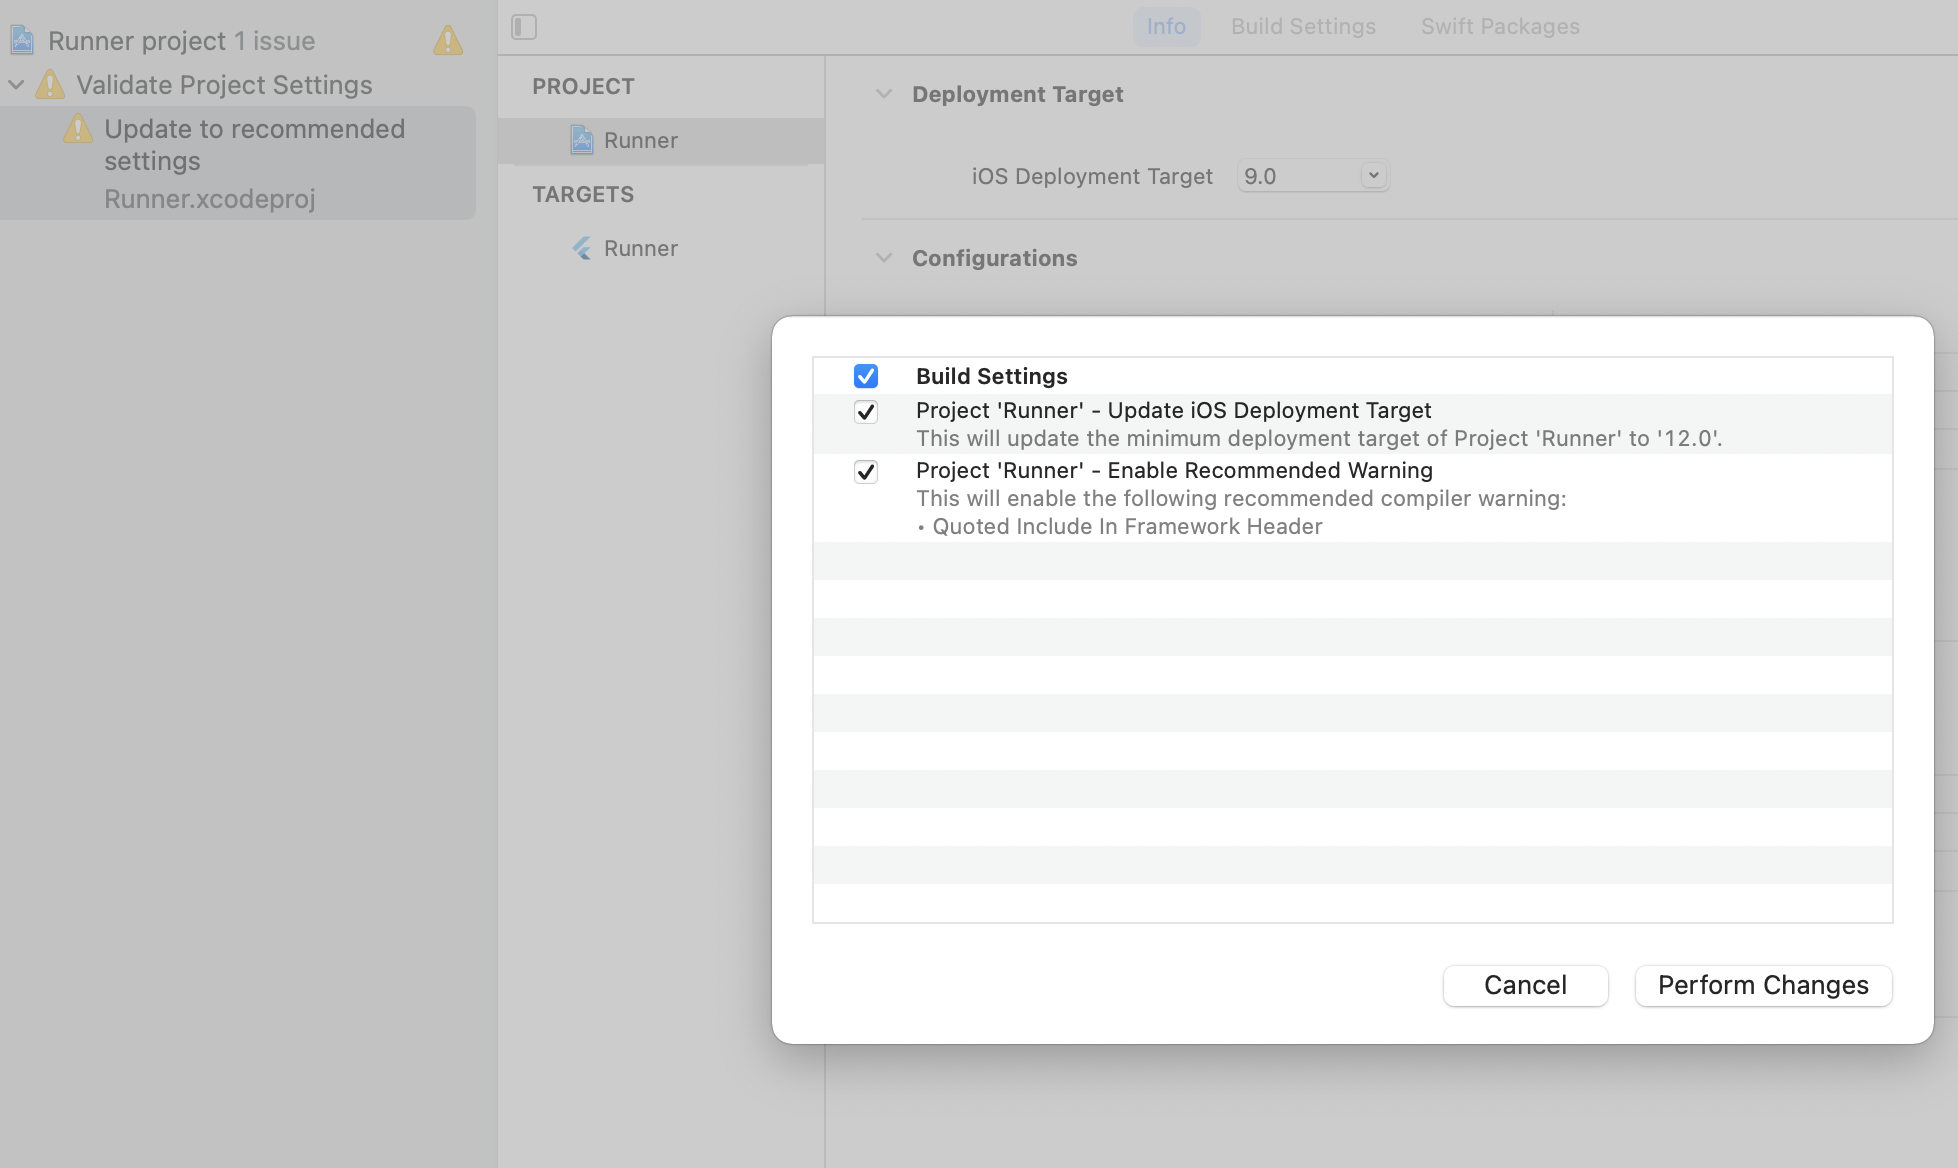
You’ll see some warnings about converting it to Swift. Go ahead and do that.

Also be sure that your provisioning is correct.

Now make sure you press run and it should work on your simulator.

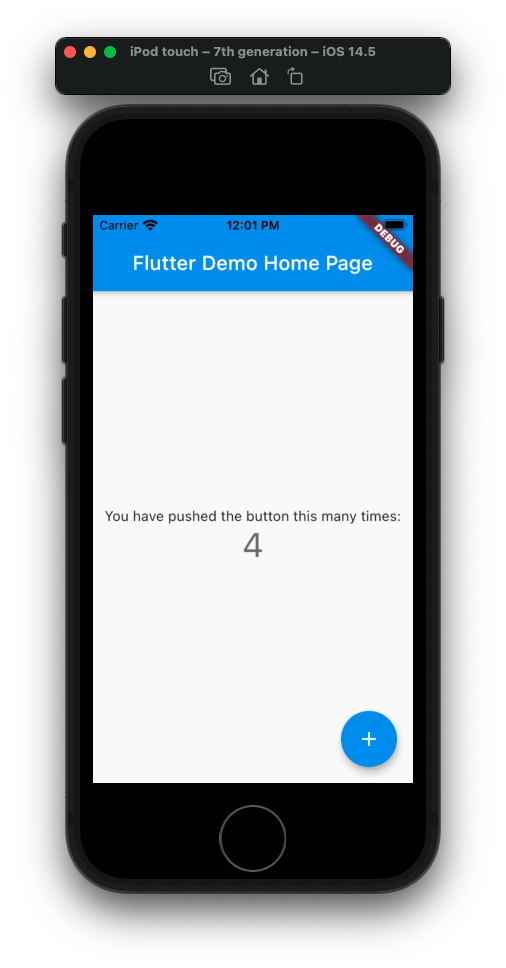
Now, when you click on the start button, you’ll see Flutter demo app come up.

Issues

If you get errors that says can’t find Flutter for your header files, make sure you do a clean build and then build in your xCode.

Algorithm to add a number to every element in an array

  • https://www.hackerrank.com/challenges/crush/forum/comments/255515
  • https://www.hackerrank.com/challenges/crush/forum
  • https://www.hackerrank.com/challenges/crush/problem

Problem

Given an array of ten elements [0,0,0,0,0,0,0,0,0,0].

Let’s say we are to apply an update to a certain range of indexes…say from a (index 2) to b (index 6), we want to add k (10) to all elements.

so

[0,0,0+10,0+10,0+10,0+10,0+10,0,0,0]

Let’s denote iteration from a to b as m, this would be O(m) time.
If we were to apply n updates, then we’d end up n * O(m) or O(m*n)
If m or n is huge, then we’d have a performance problem, as it could get close to O(n^2).

How to Solve

So the thing we’re trying to do is to figure out how to express the idea that we want to add a number k from a to b in better running time. Our tactic involves two steps:

1) Assign indices O(x)
2) Calculate sum O(y)

Total running time is O(x+y)

Step One

Use +k and -k at indexes to denote the change

[0, 0, 0(+10), 0, 0, 0, 0(-10), 0, 0, 0]

With our original array, we use +k at index 2 and -k and index (5+1) to show what we want to add k (10) to all the numbers from index 2 to 5.

The assignment of k is O(2), which is O(1).

But, since there are x updates, and we need to assign k indices for all the updates.
so the running time will be O(x) for x updates.

Step Two

Once all the indices have been assigned, we iterate and use a summation to assign all the numbers.

Using initial sum = 0, we add a[0] to sum

a[0] = 0;
a[1] = a[1] + a[0] = 0 + 0 = 0;
a[2] = a[2] + a[1] = 10 (k) + 0 = 10
a[3] = a[3] + a[2] = 0 + 10 = 10
a[4] = a[4] + a[3] = 0 + 10 = 10
a[5] = a[5] + a[4] = 0 + 10 = 10
a[6] = a[6] + a[5] = -10 (-k) + 10 = 0
a[7] = a[7] + a[6] = 0 + 0 = 0

[0, 0, 10, 10, 10, 10, 0, 0]

To do the sum, its O(y) where y is the number of elements, since we need to iterate from 0 to length – 1.

Thus, two steps of indices assignment at O(x) and then the sum at O(y) will give
O(x) + O(y) or O(x+y).

Example

One query:
[2, 5, 100]

initial array:
[0, 0, 0, 0, 0, 0, 0, 0, 0, 0]

step 1 – assign indices:
[0, 0, 100, 0, 0, 0, -100, 0, 0, 0]

step 2 – summation:

sum = 0,
a[0] = a[0] + sum = 0 + 0 = 0
a[1] = a[1] + a[0] = 0
a[2] = a[2] + a[1] = 100 + 0 = 100
a[3] = a[3] + a[2] = 0 + 100 = 100
a[4] = a[4] + a[3] = 0 + 100 = 100
a[5] = a[5] + a[4] = 0 + 100 = 100
a[6] = a[6] + a[5] = -100 + 100 = 0
a[7] = a[7] + a[6] = 0 + 0 = 0
a[8] = a[8] + a[7] = 0 + 0 = 0
a[9] = a[9] + a[8] = 0 + 0 = 0

[0, 0, 100, 100, 100, 100, 0, 0, 0, 0]

Two queries:
[2, 5, 100]
[3, 4, 50]

initial array:
[0, 0, 0, 0, 0, 0, 0, 0, 0, 0]

Step 1 – assign indices:

[0, 0, 100, 0, 0, 0, -100, 0, 0, 0]
[0, 0, 0, 50, 0, -50, -0, 0, 0, 0]

We can add them together like so:

[0, 0, 100, 50, 0, -50, -100, 0, 0, 0]

Step 2 – summation:

sum = 0,
a[0] = a[0] + sum = 0 + 0 = 0
a[1] = a[1] + a[0] = 0
a[2] = a[2] + a[1] = 100 + 0 = 100
a[3] = a[3] + a[2] = 50 + 100 = 150
a[4] = a[4] + a[3] = 0 + 150 = 150
a[5] = a[5] + a[4] = -50 + 150 = 100
a[6] = a[6] + a[5] = -100 + 100 = 0
a[7] = a[7] + a[6] = 0 + 0 = 0
a[8] = a[8] + a[7] = 0 + 0 = 0
a[9] = a[9] + a[8] = 0 + 0 = 0

[0, 0, 100, 150, 150, 100, 0, 0, 0, 0]

Let’s verify by hand.

[0, 0, 0, 0, 0, 0, 0, 0, 0, 0]
add 100 from 2 to 5
[0, 0, 100, 100, 100, 100, 0, 0, 0, 0]
add 50 from 3 to 4
[0, 0, 100, 150, 150, 100, 0, 0, 0, 0]

So our results match.

Let’s try one last example:

1) assign their indices first:

[0 0 0 100 0 -100 0 0 0] [3 4 100]
[0 0 100 0 0 0 -100 0 0] [2 5 100]
[0 100 0 -100 0 0 0 0 0] [1 2 100]

Because we have multiple operations, let’s group them together

[0 100 100 0 0 -100 -100 0 0]

2) calculate their summation

sum = 0,
a[0] = a[0] + sum = 0 + 0 = 0
a[1] = a[1] + a[0] = 100 + 0 = 100
a[2] = a[2] + a[1] = 100 + 100 = 200
a[3] = a[3] + a[2] = 0 + 200 = 200
a[4] = a[4] + a[3] = 0 + 200 = 200
a[5] = a[5] + a[4] = -100 + 200 = 100
a[6] = a[6] + a[5] = -100 + 100 = 0
a[7] = a[7] + a[6] = 0 + 0 = 0
a[8] = a[8] + a[7] = 0 + 0 = 0

[0 100 200 200 200 100 0 0 0]