ref – https://scalac.io/user-authentication-keycloak-1/
Start up your keycloak server and sign into https://localhost:8080/auth/admin
Server configuration
What you’re seeing on the page above is the default (master) realm. A realm is a domain in which several types of entities can be defined, the most prominent being:
Users: basic entities that are allowed access to a Keycloak-secured system.
Roles: a User’s authorization level, such as admin/manager/reader.
Clients: browser apps and web services that are allowed to request a login.
Identity Providers: external providers to integrate with, such as Google, Facebook, or any OpenID Connect/SAML 2.0 based system.
The master realm serves as the root for all of the others. Admins in this realm have permission to view and manage any other realm created on the server instance. Keycloak authors don’t recommend using the master realm to manage your users and applications (it is intended as space for super-admins to create other realms).
So let’s start by creating a new realm for our app named MyDemo.
Make sure that the MyDemo realm is selected. On the left sidebar, go to the Users tab and hit Add users button.
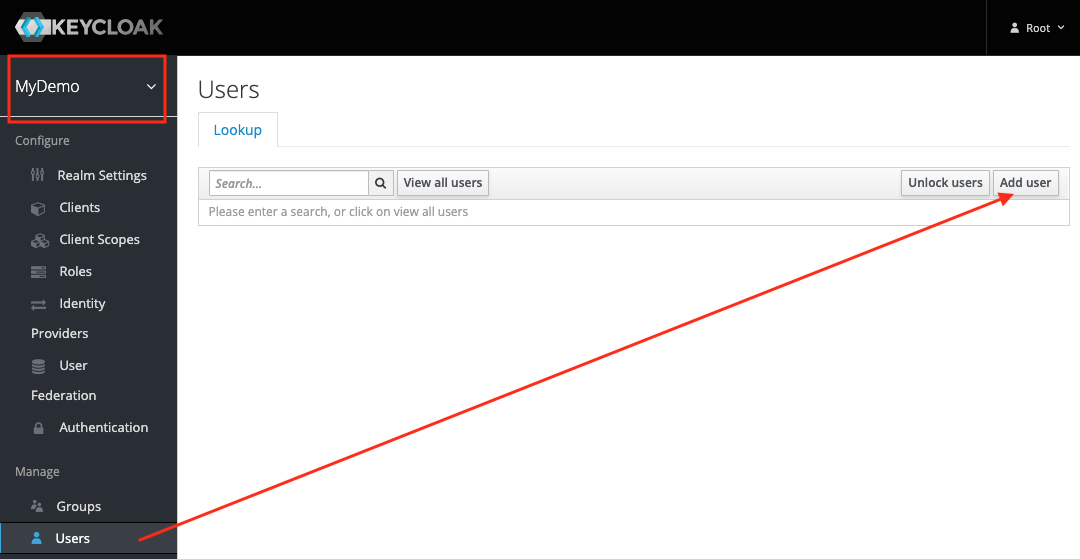
For now, the only thing you’ll need to provide is the username. Let’s call him John.
After creating the user, you’ll need to set up his password.
Go to Credentials tab, enter the new password twice and hit Reset Password.
To check if the new user works, open a new incognito window in your browser. Then go to https://localhost:8080/auth/realms/MyDemo/account and try logging in with the username john and the password you provided earlier.
Since we left the Temporary option turned on when resetting the password, you’ll be asked to provide a new one on the first login. Afterwards, you’ll be taken to your account management panel.
Among other things, this will allow you to provide your profile information (which may or may not be enforced by the admin), change your password, and see all your active login sessions. For now, let’s update the Email, First name and Last name fields with whatever values you like, then get back to the admin window.
Create Client
The final step of the initial server configuration is to create a client. Clients are browser apps and web services that are either allowed to initiate the login process or have been provided with tokens resulting from earlier logins.
Today we’ll be securing a React-based front-end, so let’s go to the Clients tab and hit the Create button:
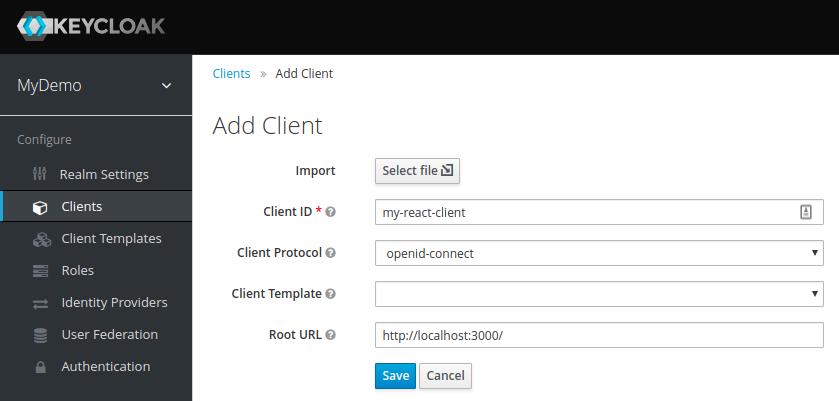
For the Access Type, select public. Since we have no real way of hiding the secret in a JS-based browser app, this is what we need to stick with.
Next comes Valid Redirect URIs – this is the URI pattern (one or more) which the browser can redirect to after completing the login process.
Since we picked public access type for our client (and thus anyone can ask to initiate the login process), this is especially important. In a real app, you will need to make sure you make this pattern as restrictive as possible, otherwise, you could open your system to phishing attacks! However, for dev purposes, you can just leave it at default.
The last of the important options is Web Origins, which governs CORS requests. Again, for dev purposes the default value is fine.
One last thing we’ll need is the client configuration to use with our app. Go to the Installation tab and select Keycloak OIDC JSON as the format:
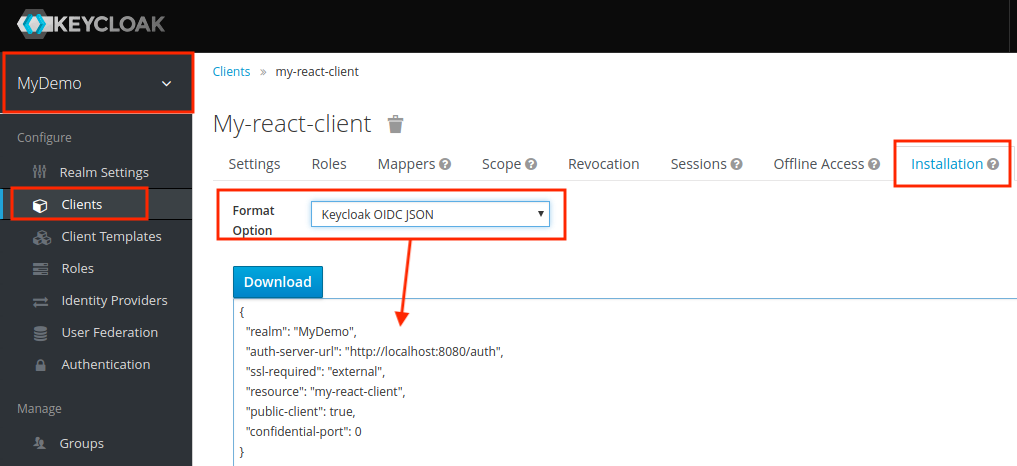
Download this JSON and keep it. We’ll be needing it later.
React App
open up a terminal and make sure create-react-app package is installed.
Now we use it to create a react app called keycloak-react.
create-react-app keycloak-react
Firstly, we’ll need to add some dependencies. Open package.json and add the following two items:
|
1 2 3 4 5 |
"dependencies": { ... "react-router-dom": "^4.2.2", "keycloak-js": "4.0.0-beta.2" } |
Now in your terminal, install all the packages
npm install
Open up the directory with VS Code.
Let’s replace the contents of src/App.js with our skeleton:
|
1 2 3 4 5 6 7 8 9 10 11 12 13 14 15 16 17 18 19 20 21 22 23 24 |
import React, { Component } from 'react'; import { BrowserRouter, Route, Link } from 'react-router-dom'; import Welcome from './Welcome'; import Secured from './Secured'; import './App.css'; class App extends Component { render() { return ( <BrowserRouter> <div className="container"> <ul> <li><Link to="/">public component</Link></li> <li><Link to="/secured">secured component</Link></li> </ul> <Route exact path="/" component={Welcome} /> <Route path="/secured" component={Secured} /> </div> </BrowserRouter> ); } } export default App; |
As you can see, this is just a Router providing navigation between two other components. Let’s add the first of those, src/Welcome.js:
|
1 2 3 4 5 6 7 8 9 10 11 12 |
import React, { Component } from 'react'; class Welcome extends Component { render() { return ( <div className="Welcome"> <p>This is your public-facing component.</p> </div> ); } } export default Welcome; |
Nothing particularly fancy here, just some generic text. The next one should be a bit more interesting – put it at src/Secured.js:
|
1 2 3 4 5 6 7 8 9 10 11 12 13 14 15 16 17 18 19 20 21 22 23 24 25 26 27 28 29 30 31 32 |
import React, { Component } from 'react'; import Keycloak from 'keycloak-js'; class Secured extends Component { constructor(props) { super(props); this.state = { keycloak: null, authenticated: false }; } componentDidMount() { const keycloak = Keycloak('/keycloak.json'); keycloak.init({onLoad: 'login-required'}).then(authenticated => { this.setState({ keycloak: keycloak, authenticated: authenticated }) }) } render() { if (this.state.keycloak) { if (this.state.authenticated) return ( <div> <p>This is a Keycloak-secured component of your application. You shouldn't be able to see this unless you've authenticated with Keycloak.</p> </div> ); else return (<div>Unable to authenticate!</div>) } return ( <div>Initializing Keycloak...</div> ); } } export default Secured; |
Explanation
In the secured component, as soon as the component is mounted into the DOM, we can create the Keycloak object by providing client configuration:
|
1 |
const keycloak = Keycloak('/keycloak.json'); |
Remember the JSON you downloaded from the admin panel? Put it into public/keycloak.json to get the above to work. Alternatively, you could pass a matching JavaScript object to Keycloak directly like so:
|
1 2 3 4 5 6 7 8 |
const keycloak = Keycloak({ realm: "MyDemo", auth-server-url: "http://localhost:8080/auth", ssl-required: "external", resource: "my-react-client", public-client: true, confidential-port: 0 }); |
login-required is one of two possible values to be passed as an onLoad parameter. This will authenticate the client if the user has already logged into Keycloak, or redirect the browser to the login page if he hasn’t. The other option is check-sso: this will only authenticate the client if the user has already logged in, otherwise the client will remain unauthenticated without automatic redirection.
Time to check it out – run npm start and your browser should open automatically. You’ll see that you have a public, and secured component.
Click on the secured one and you’ll be redirected to the login page. Log in as John and you’ll be able to see the text from the secured component.
You’ll find you can now navigate between the two components without having to log in again.
Profile Data and Logout
Let’s expand our app a little bit by adding the logout functionality and some user data extraction. We’ll start with the latter – add the following as src/UserInfo.js:
|
1 2 3 4 5 6 7 8 9 10 11 12 13 14 15 16 17 18 19 20 21 22 23 24 25 26 27 |
import React, { Component } from 'react'; class UserInfo extends Component { constructor(props) { super(props); this.state = { name: "", email: "", id: "" }; this.props.keycloak.loadUserInfo().then(userInfo => { this.setState({name: userInfo.name, email: userInfo.email, id: userInfo.sub}) }); } render() { return ( <div className="UserInfo"> <p>Name: {this.state.name}</p> <p>Email: {this.state.email}</p> <p>ID: {this.state.id}</p> </div> ); } } export default UserInfo; |
This component accepts a Keycloak instance from its parent, then uses the loadUserInfo method to extract the user’s data.
Now for the logout button, place the following in src/Logout.js:
|
1 2 3 4 5 6 7 8 9 10 11 12 13 14 15 16 17 18 19 |
import React, { Component } from 'react'; import { withRouter } from 'react-router-dom' class Logout extends Component { logout() { this.props.history.push('/'); this.props.keycloak.logout(); } render() { return ( <button onClick={ () => this.logout() }> Logout </button> ); } } export default withRouter(Logout); |
Similarly, this accepts a Keycloak instance from the parent, then uses its logout method. Note that it has to be called last – otherwise it would redirect you to the login form again.
Let’s include these new components in src/Secured.js:
|
1 2 3 4 5 6 7 8 9 10 11 12 13 14 15 16 17 18 19 20 21 22 23 24 25 26 27 28 29 30 31 32 33 34 35 36 |
import React, { Component } from 'react'; import Keycloak from 'keycloak-js'; import UserInfo from './UserInfo'; import Logout from './Logout'; class Secured extends Component { constructor(props) { super(props); this.state = { keycloak: null, authenticated: false }; } componentDidMount() { const keycloak = Keycloak('/keycloak.json'); keycloak.init({onLoad: 'login-required'}).then(authenticated => { this.setState({ keycloak: keycloak, authenticated: authenticated }) }) } render() { if(this.state.keycloak) { if(this.state.authenticated) return ( <div> <p>This is a Keycloak-secured component of your application. You shouldn't be able to see this unless you've authenticated with Keycloak.</p> <UserInfo keycloak={this.state.keycloak} /> <Logout keycloak={this.state.keycloak} /> </div> ); else return (<div>Unable to authenticate!</div>) } return ( <div>Initializing Keycloak...</div> ); } } export default Secured; |
As expected, clicking the logout button forces you to have to log in again, the next time you try to access the Secured component.