ref – https://www.youtube.com/watch?v=YaioUnMw0mo
Getting Started
create-react-app breaking-bad
cd breaking-bad
npm start
the server should start on localhost:3000
Can can remove:
– Tests.js
– serviceWorker.js
– App.test.js
– index.css
In index.jsn and App.js, remove the code where it imports the files we’ve just deleted.
index.js
|
1 2 3 4 5 6 7 8 9 10 |
import React from 'react'; import ReactDOM from 'react-dom'; import App from './App'; ReactDOM.render( <React.StrictMode> <App /> </React.StrictMode>, document.getElementById('root') ); |
In App, we change the function to es6 syntax. However, it still remains a functional component. A functional component is just a plain JavaScript function which:
– accepts props as an argument
– returns a React element.
– DOES NOT have state. Thus, you cannot use setState()
– No lifecycle methods.
In our case, we don’t accept any props, and we return a simple div React element. Also, no state, no lifecycle methods.
|
1 2 3 4 5 6 7 8 |
import React from 'react' import './App.css' const App = () => { return <div className='container'>Hello</div> } export default App |
In App.css, remove all the default styling. It should be empty.
Go back to browser, should only see ‘hello’.
Import own resources
Now you can incorporate your own resources: avatar, background, and a spinner image.
Open up your App.css, and paste in your custom styles. I used a random styles from a template I downloaded from the web.
In App.css, remove all the default styling. We copy and paste our code from custom .css.
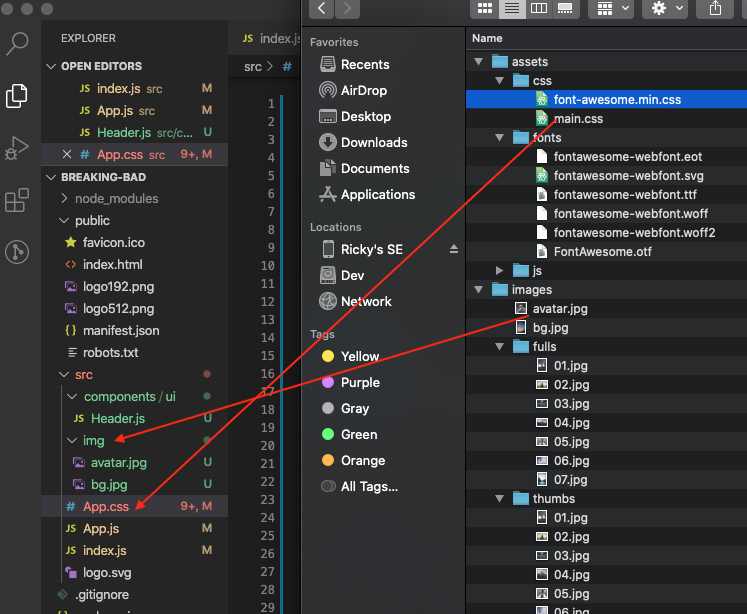
We then create an img folder and put bg.jpg, avatar.jpg, and a spinner image in there.
We also create components folder. Create ui folder inside of that. And then create an empty Header.js file.
Run the app. Go back to browser, should only see a blank page with ‘hello’ text.
In src, create components folder.
create subfolder UI, create Header.js. We create a functional component that returns an empty div.
|
1 2 3 4 5 6 7 8 9 10 |
import React from 'react' const Header = () => { return ( <div> </div> ) } export default Header |
We import out logo so that it appears in our header. Stick it in a img tag.
|
1 2 3 4 5 6 7 8 9 10 11 12 |
import React from 'react' import logo from '../../img/logo.png' const Header = () => { return ( <header className='center'> <img src={logo} alt='' /> </header> ) } export default Header |
We then import it into our App.
|
1 2 3 4 5 6 7 8 9 10 11 12 13 |
import React from 'react' import Header from './components/ui/Header' import './App.css' const App = () => { return ( <div className='container'> <Header /> </div> ) } export default App |
Finally, in your App.css, update the location of the background image.
|
1 2 3 4 5 6 |
body { background-color: #000; background-image: url("./img/bg.jpg"); background-size: cover; background-position: top center; } |
Also, remove an import of font-awesome at the very top of the css file.
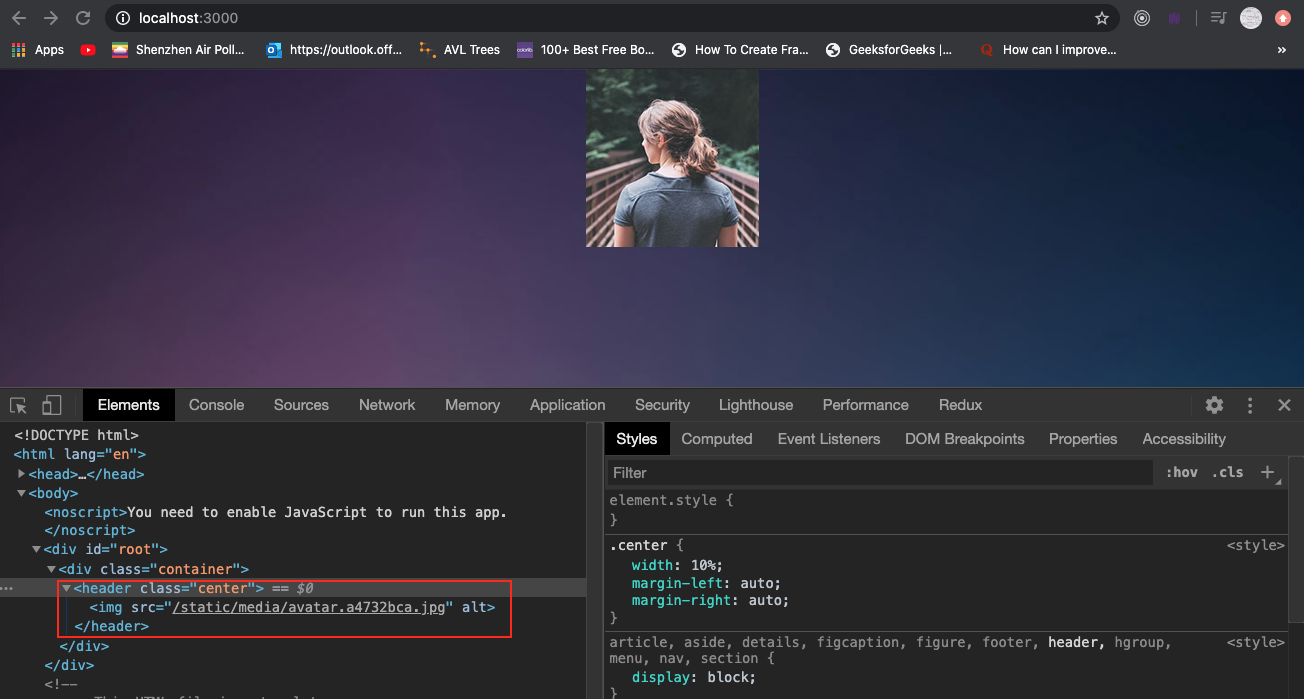
So when you refresh the app, you should see our Header component. Look at the DOM, all the code should match up.
Using Hooks
Originally, we cannot use state because we’re a functional component. In order to do so, we must convert it to a class component. But now with hooks, we can declare get/set functions that manipulates the state object in function components.
By using useEffect, you tell React that your component needs to do something after it calls render. We tell React our ‘effect’ will run after React flushes all the changes to the DOM. React will then run your effect function after it performs all the DOM updates.
Your useEffect function will be executed after each render, and after every setState/update.
If we return a function inside of useEffect, it’s the ‘unmounting’ effect we want to run when the component WILL Un mount. The effect function we declare in the useEffect’s anonymous function body is what we want to run with the component DID mount.
Let’s update our App.js file like so:
|
1 2 3 4 5 6 7 8 9 10 11 12 13 14 15 16 17 18 19 20 21 22 23 24 |
import React, { useState, useEffect } from 'react' import Header from './components/ui/Header' import './App.css' const App = () => { const [items, setItems] = useState([]); const [isLoading, setIsLoading] = useState(true); useEffect(() => { fetch('https://www.breakingbadapi.com/api/characters') .then(res => res.json()) .then(result => { console.log('result', result); }); }) return ( <div className='container'> <Header /> </div> ) } export default App |
We first declare all the get/set for the items to contain the incoming data, and also isLoading for displaying the busy icon.
We use built-in fetch function to retrieve the data. It will return a Promise with a resolved mixin BODY object. We call json on it, and it’ll return a Promise with an array of data for us to use.

Setting up the Character Grid
Under components, create folder for characters. Then create CharacterGrid.js:
|
1 2 3 4 5 6 7 8 9 10 11 12 13 14 15 16 17 18 |
import React from 'react' // if its still loading, show spinner const CharacterGrid = ({ items, isLoading }) => { return isLoading ? (<h1>Loading...</h1>) : (<section className = 'thumbnails'> {items.map(items => ( <div> <a href='/'> <h3>{items.name}</h3> </a> </div> ))} </section>) } export default CharacterGrid |
We created a functional component that takes in a prop. We use destructure to extract items, and isLoading. From there we simply display the data from items.
In App.js, make sure you have passed in the data to CharacterGrid:
|
1 2 3 4 5 6 7 8 9 10 11 12 13 14 15 16 17 18 19 20 21 22 23 24 25 26 27 |
import React, { useState, useEffect } from 'react' import Header from './components/ui/Header' import CharacterGrid from './components/characters/CharacterGrid' import './App.css' const App = () => { const [items, setItems] = useState([]); const [isLoading, setIsLoading] = useState(true); useEffect(() => { fetch('https://www.breakingbadapi.com/api/characters') .then(res => res.json()) .then(result => { setItems(result); setIsLoading(false); }); }, []); return ( <div className='container'> <Header /> <CharacterGrid isLoading={isLoading} items={items} /> </div> ) } export default App |
Now you should see the names successfully being displayed along with the CSS applied.
Notice in your console, you get an error that says something like: index.js:1 Warning: Each child in a list should have a unique “key” prop.
This means when you display an array of data, React needs to identify them by a special unique string. This way, it knows where to match the string with the list item. Luckily for us, we get special IDs in our data array. We can just use that instead. Note to never use index. If React uses index to match a particular string to a list item, then the strings would pop to wrong places. (i.e. If you add an item at the top, React would always make the string that go matched with index 0 to appear at the very top) don’t use index as key
|
1 2 3 4 5 6 7 |
{items.map(items => ( <div key={items.char_id}> <a href='/'> <h3>{items.name}</h3> </a> </div> ))} |
Refactor
Looking at CharacterGrid, it seems like the component may take on a lot more responsibilities in the future. Let’s take the load off by making a component that strictly displays data, whereas CharacterGrid can take care of mapping the data and other logic.
We’ll call this display component CharacterItem.js:
|
1 2 3 4 5 6 7 8 9 10 11 12 13 |
import React from 'react' const CharacterItem = ({ item }) =>{ return ( <a href='/'> <img src={item.img} alt='' /> <h3>{item.name}</h3> <p>{item.nickname}</p> <p>{item.birthday}</p> <p>{item.status}</p> </a> ) } export default CharacterItem |
CharacterGrid.js
|
1 2 3 4 5 6 7 8 9 10 11 12 13 14 |
import React from 'react' import CharacterItem from './CharacterItem'; const CharacterGrid = ({ items, isLoading }) => { return isLoading ? (<h1>Loading...</h1>) : (<section className = 'thumbnails'> {items.map(item => ( <CharacterItem key={item.char_id} item={item} > </CharacterItem> ))} </section>) } export default CharacterGrid |
Search
Let’s create a search component. Under folder src > components > ui, let’s create Search.js
|
1 2 3 4 5 6 7 8 9 10 11 12 13 14 15 16 17 18 |
import React, { useState } from 'react' const Search = () => { return ( <section className='search'> <form> <input type='text' className='form-control' placeholder='Search characters' autoFocus /> </form> </section> ) } export default Search |
Then in your App.js
|
1 2 3 4 5 6 7 |
return ( <div className='container'> <Header /> <Search /> <CharacterGrid isLoading={isLoading} items={items} /> </div> ) |
Creating a controlled component
Form elements (like input) maintain their own state. In React, we have mutable state objects and updated with setState().
So the situation is that we have two separate state: React’s, and input’s.
We can combine the two by making the React state to be ‘single source of truth’. This means we get input element’s value to be controlled by React’s state object.
Hence we make this into a controlled component by doing:
1) create state object’s text property (parent component)
2) child component has input state. It gets latest from parent via prop.
3) child component’s input’s onChange will receive event obj’s target.value. We use prop callback to update parent component’s text property.
4) Finally, make sure we pass text property, and also the callback from parent component to child component. This way child component can get the latest text query, and also update parent when its input has been updated.
This is one of the ways to solve the issue of the parent having state, the child having state, and thus trying to update multiple versions of the state. We call this
In order to test this, simply display text in your JSX.
Search.js
|
1 2 3 4 5 6 7 8 9 10 11 12 13 14 15 16 17 18 19 20 21 22 23 24 25 26 27 |
import React from 'react' const Search = ({ getQuery, text }) => { const updateParentQuery = latestQuery => { console.log('Search updating parent query variable'); getQuery(latestQuery); // parent passes in prop // we call it to pass data back up to parent component } return ( <section className='search'> Search.js - {text} <form> <input type='text' className='form-control' placeholder='Search characters' value={text} onChange={e => updateParentQuery(e.target.value)} autoFocus /> </form> </section> ) } export default Search |
Notice all state is here in this parent component. We pass what needs to be displayed into Search, which is text property. We then get the updated user inputted text from search and update our state object via callback getQuery. In getQuery, we simply update the text (which is for display) and query (which is for query string). This is how a controlled component solves problems of multiple versions of state.
App.js
|
1 2 3 4 5 6 7 8 9 10 11 12 13 14 15 16 17 18 19 20 21 22 23 24 25 26 27 28 29 30 31 32 33 34 35 36 37 38 |
import React, { useState, useEffect } from 'react' import Header from './components/ui/Header' import CharacterGrid from './components/characters/CharacterGrid' import Search from './components/ui/Search' import './App.css' const App = () => { const [items, setItems] = useState([]); const [isLoading, setIsLoading] = useState(true); const [query, setQuery] = useState('') const [text, setText] = useState(''); useEffect(() => { fetch(`https://www.breakingbadapi.com/api/characters?name=${query}`) .then(res => res.json()) .then(result => { console.log('useEffect'); setItems(result); setIsLoading(false); }) }, [query]); return ( <div className='container'> App.js - {text} <Header /> <Search text={text} getQuery = {q => { setQuery(q) setText(q) }} /> <CharacterGrid isLoading={isLoading} items={items} /> </div> ) } export default App |
As you can see, whatever we type into our form, will be updated in property ‘text’ via setText.

Querying API using updated input from users
Now let’s update App.js:
App.js
|
1 2 3 4 5 6 7 8 9 10 11 12 13 14 15 16 17 18 19 20 21 22 23 24 25 26 27 28 29 30 31 32 33 34 35 36 |
import React, { useState, useEffect } from 'react' import Header from './components/ui/Header' import CharacterGrid from './components/characters/CharacterGrid' import Search from './components/ui/Search' import './App.css' const App = () => { const [items, setItems] = useState([]); const [isLoading, setIsLoading] = useState(true); const [query, setQuery] = useState('') // whenever query changes, useEffect will fire useEffect(() => { fetch(`https://www.breakingbadapi.com/api/characters?name=${query}`) .then(res => res.json()) .then(result => { console.log('useEffect'); setItems(result); setIsLoading(false); }); }, [query]); console.log('query', query); return ( <div className='container'> <Header /> <Search getQuery={q => { setQuery(q); // this way, our query gets updated via setState // and then re-renders }} /> <CharacterGrid isLoading={isLoading} items={items} /> </div> ) } export default App |
In the useEffect’s second parameter, if we put absolutely nothing, useEffect only gets called once because one effect will follow one render. When we call useEffect, we tell React to run our effect after flushing changes to the DOM. Hence we wait until everything is flushed to the DOM, before we execute our first useEffect.
For example, Query is empty so we retrieve data from online API. We then set items, which will trigger a re-render. EVERY TIME we re-render, we schedule a different useEffect, replacing the previous one. AKA, each effect belongs to a particular render. They get paired up.
But in our particular example, notice we call setItems and setIsLoading. We’re setting state in useEffect, which will cause a render again. That render gets paired with a useEffect, which then calls setItems/setIsLoading again….useEffect –> setStates –> renders –> useEffect –> setState… repeat infinitely.
So in our particular example, it ends up going into an infinite loop.
React hooks
If we only put [], useEffect will only fire once. It won’t look for any changes in any specified properties to re-render. If we put [query], whenever the query change, useEffect will fire. But if the previous and current state are the same, then React will bail out and won’t re-render.
If we put [query], whenever the query change, useEffect will fire. But if the previous and current state are the same, then React will bail out and won’t re-render.
Now when you type out a search text, React will take the text and query the API for the latest results and populate it onto the UI screen.

Spinner
Import a spinner image.
Under src/components/ui, create Spinner.js:
|
1 2 3 4 5 6 7 8 9 10 11 12 13 14 15 |
import React from 'react' import spinner from '../../img/refresh.png' const Spinner = () => { return ( <img src={spinner} style={{ margin: 'auto', display: 'block' }} alt='Loading' className='spinIt' /> ) } export default Spinner |
In your CharacterGrid.js, replace the waiting h1 tag, with our Spinner component:
|
1 2 3 4 5 6 7 8 9 10 11 12 13 14 15 |
import React from 'react' import CharacterItem from './CharacterItem'; import Spinner from '../ui/Spinner'; const CharacterGrid = ({ items, isLoading }) => { return isLoading ? (<Spinner />) : (<section className = 'thumbnails'> {items.map(item => ( <CharacterItem key={item.char_id} item={item} > </CharacterItem> ))} </section>) } export default CharacterGrid |
Now when you refresh, you’ll see a spinner while the data is being retrieved. Once the app gets the data, it removes the spinner and displays the content.