ref –
https://github.com/janl/mustache.js/
https://medium.com/@koalamango/javascript-templating-with-mustache-js-b50919cb4f57
https://www.elated.com/articles/easy-html-templates-with-mustache/
Templates are a great way to separate your website’s code from its design.
Mustache is a logic-less template syntax. It can be used for HTML, config files, source code – anything.
It works by expanding tags in a template using values provided in a hash or object
One of Mustache’s big plus points is that is logic-less, which means it keeps your templates very neat and tidy. There are no messy if … then or looping constructs embedded within a Mustache template; it’s all just markup and simple Mustache tags. All the logic is hidden away inside your data objects (and the code that creates or fetches them).
A mustache template is a string that contains any number of mustache tags.
Tags are indicated by the double mustaches that surround them.
{{person}} is a tag, as is {{#person}}
Using mustache basics
- First, we’ll include mustache js file
- Second, we’ll create a template with tags
- Then, we’ll use a object’s values provided by its properties
- Finally, we’ll see the output from the template + object by using Mustache.render
include the mustache js file in your header
|
1 2 3 4 5 6 7 |
<meta charset="utf-8"> <meta name="viewport" content="width=device-width, initial-scale=1.0" /> <title>basic mustache</title> <script src="https://cdnjs.cloudflare.com/ajax/libs/mustache.js/2.3.2/mustache.js"></script> ... ... |
Create the template
The template is a string.
For example: “{{name}} is a {{occupation}}”
The tags are:
{{name}}
{{occupation}}
It expands the tags by using object view.
It looks inside this object for properties name and occupation. Then it would expand the tags with the values occupied at properties name, and occupation.
|
1 2 3 4 5 6 7 8 9 10 11 12 13 14 15 16 17 18 19 20 21 |
<script> // object var view = { name : "Joe", occupation : "Web Developer" }; function loadtemp(){ let tagName = "{{name}}"; let tagOccupation = "{{occupation}}"; let template = `${tagName} is a ${tagOccupation}`; // render the output using a given mustache template, and tags. var output = Mustache.render(template, view); // insert output into html document.getElementById('person').innerHTML = output; } </script> |
Load the template
Then, simply execute our tags, templates, objects, and render them.
Id person for paragraph p is to hold the result.
|
1 2 3 4 5 |
<body onload="loadtemp()"> <p id="person"></p> ... ... </body> |
Another Example
This time, we introduce the concept of sections.
Sections render blocks of text one or more times, depending on the value of the key in the current context. A section begins with a hashtag and ends with a slash:
template:
|
1 2 3 |
{{#Robot}} My name is Pinocchio! {{/Robot}} |
The behavior of the section is determined by the value of the key:
object:
|
1 2 3 |
{ "Robot": true } |
Since the object property is true, we display what’s between Robot tags.
My name is Pinocchio!
|
1 2 3 4 5 6 7 8 9 10 11 12 13 14 15 16 17 18 19 20 21 22 23 24 25 26 27 28 29 30 31 32 33 34 |
<!DOCTYPE html> <html lang="en"> <head> <meta charset="utf-8"> <meta name="viewport" content="width=device-width, initial-scale=1.0" /> <title>Slide Show</title> <script src="https://cdnjs.cloudflare.com/ajax/libs/mustache.js/2.3.2/mustache.js"></script> ... <script> var ex2_view = { "name": "Pinocchio", "place": "woods", "Robot": true, // controls the visibility of its inner content "creature": "animals" }; var ex2_template = `Hello {{name}}. You live in the {{place}}! {{#Robot}} Well, you are friends with {{creature}} {{ /Robot }}`; function ex2_loadtemp() { var output = Mustache.render(ex2_template, ex2_view); document.getElementById('ex2').innerHTML = output; } </script> </head> <body onload="ex2_loadtemp()"> <p id="ex2"></p> </body> </html> |
Your output when you run the web file is:
Hello Pinocchio You live in the woods! Well, you are friends with animals
Inverted Sections
An inverted section begins with a caret (hat) and ends with a slash.
Inverted section means when its false, it displays. When true, it won’t display.
template:
|
1 2 3 |
{{^Robot}} No content! {{/Robot}} |
object:
|
1 2 3 |
{ "Robot": false } |
Since Robot is false, let’s display what’s in between the Robot tags because this is an inverted section.
No content!
Another Example
In this next example, we’ll first use textarea to hold strings that can represent our templates and data objects. You can specify the strings in your html code, or simply have the user enter them via the web page.
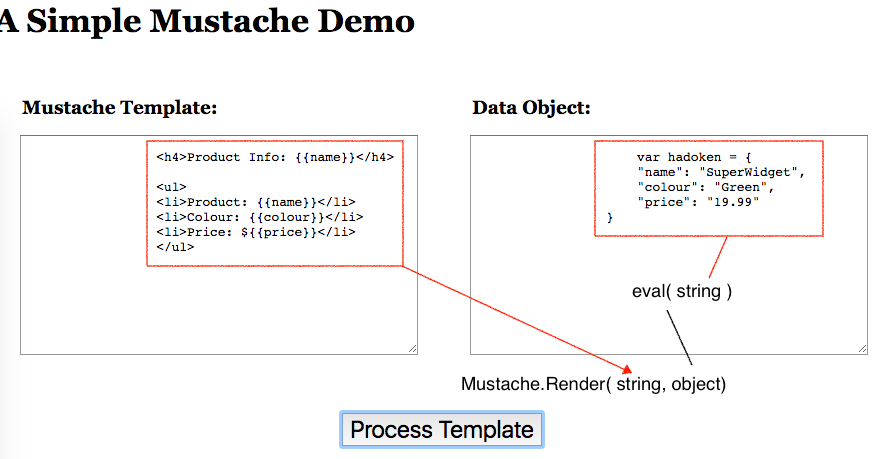
In html, you can put the contents of the textarea in between textarea tags. Thus, that is the text that will be appear when the textarea tags are rendered on the web page. In our case, we put the template string inside the textarea with id template.
|
1 2 3 4 5 6 7 8 9 |
<textarea id="template"> <!-- template string --> <h4>Product Info: {{name}}</h4> <ul> <li>Product: {{name}}</li> <li>Colour: {{colour}}</li> <li>Price: ${{price}}</li> </ul> </textarea> |
When we’re processing the code, we need to get whatever the input is from the textarea “template”. Thus, we get the string from the textarea via javascript like so:
|
1 2 |
let template = document.getElementById("template"); let templateStr = template.textContent; |
In, Mustache.Render(template, object), the template parameter needed is a string. Thus, our templateStr can simply be passed in.
The string we pass into the textarea “data” is the object. However, the object must be a code evaluation. In other words, we have to convert the string into code. We can use javascript’s eval function.
Remember that whatever variable you decide to use for the object in dataStr must be used in code.
|
1 2 3 4 5 |
var hadoken = { "name": "SuperWidget", "colour": "Green", "price": "19.99" } |
In our case, it is “hadoken”.
In our js, we basically get the data from the textareas. Then pass them into Mustache.render function. It returns the result that we need.
And we finally throw that result into the html.
js
|
1 2 3 4 5 6 7 8 9 10 11 12 13 14 15 16 17 18 19 |
var hadoken = { "name": "SuperWidget", "colour": "Green", "price": "19.99" } ... ... let data = document.getElementById("data"); // get the htmlElement object let dataStr = data.textContent; // get the string eval(dataStr); // changes string into usable code // insert the string, and object parameters let htmlOutput = Mustache.render(templateStr, hadoken); // now we simply throw the output into a tag let resultDiv = document.getElementById("result"); resultDiv.innerHTML = htmlOutput; |
Source Code
html
|
1 2 3 4 5 6 7 8 9 10 11 12 13 14 15 16 17 18 19 20 21 22 23 24 25 26 27 28 29 30 31 32 33 34 35 36 37 38 39 40 41 42 43 44 45 46 47 48 49 50 51 52 53 54 55 56 57 58 59 60 61 62 63 64 |
<!DOCTYPE html> <html lang="en"> <head> <meta charset="utf-8"> <meta name="viewport" content="width=device-width, initial-scale=1.0" /> <title>Slide Show</title> <script src="https://cdnjs.cloudflare.com/ajax/libs/mustache.js/2.3.2/mustache.js"></script> <style> /* enter styles code here */ </style> <script> // enter your js code here </script> <body onload="ex2_loadtemp()"> <h1>A Simple Mustache Demo</h1> <div id="wrap"> <div class="template"> <h3>Mustache Template:</h3> <textarea id="template"> <h4>Product Info: {{name}}</h4> <ul> <li>Product: {{name}}</li> <li>Colour: {{colour}}</li> <li>Price: ${{price}}</li> </ul> </textarea> </div> <!-- template--> <div class="data"> <h3>Data Object:</h3> <textarea id="data"> var hadoken = { "name": "SuperWidget", "colour": "Green", "price": "19.99" } </textarea> </div> <!-- data --> <div class="process"><button onclick="process()">Process Template</button></div> <div class="result"> <h3>How It Looks:</h3> <div id="result"> </div> </div> </div> <!-- wrap --> </body> </html> |
css
|
1 2 3 4 5 6 7 8 9 10 11 12 13 14 15 16 17 18 19 20 21 22 23 24 25 26 27 28 29 30 31 32 33 34 35 36 37 38 39 40 41 42 43 44 45 46 47 48 49 |
<style> body { font-family: "Georgia", serif; line-height: 1.8em; } #wrap { width: 57em; } textarea, .result div { font-size: .8em; width: 29em; height: 15em; margin: 1em 2em 2em 2em; padding: 1em; } textarea { font-family: Courier, fixed; } .template, .html, .data, .result { float: left; } .result div { border: 1px solid #333; } h3 { display: block; margin: 2em 0 0 1.5em; } .process { display: block; clear: both; margin: 1em 0; width: 56em; text-align: center; } button { font-size: 1.5em; margin-top: 1em; } </style> |
js
|
1 2 3 4 5 6 7 8 9 10 11 12 13 14 15 16 17 18 19 20 21 22 23 24 25 26 |
<script> function process() { console.log("process it!"); let template = document.getElementById("template"); let templateStr = template.textContent; console.log(templateStr); // The argument of the eval() function is a string. If the string represents an expression, eval() evaluates the expression. // evaluate the string into code to be used let data = document.getElementById("data"); let dataStr = data.textContent; console.log(dataStr); eval(dataStr); // changes string into usable code console.log(hadoken); // call the code let htmlOutput = Mustache.render(templateStr, hadoken); console.log(htmlOutput); let resultDiv = document.getElementById("result"); resultDiv.innerHTML = htmlOutput; } </script> |