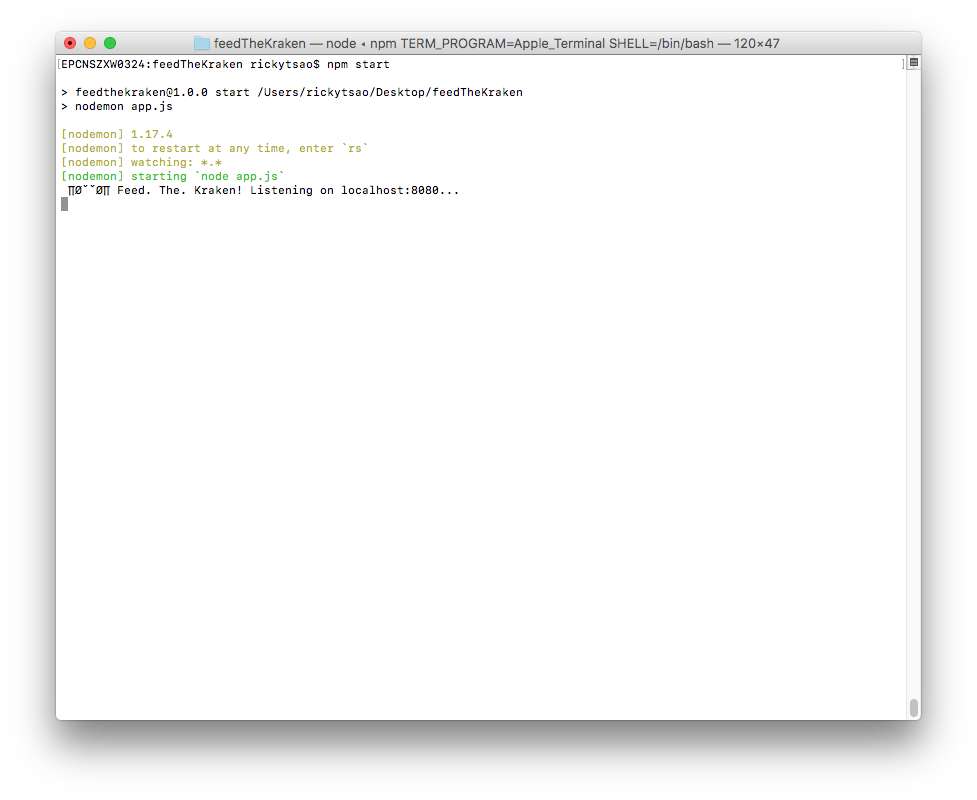
Get the project running
Download the source code onto your computer
download v1.0
cd into the directory, and install all packages
npm install
Then start the server:
npm start
You should see the server starting up.
In the directory, there is an index.html file. Double click it.
You’ll see the web page.
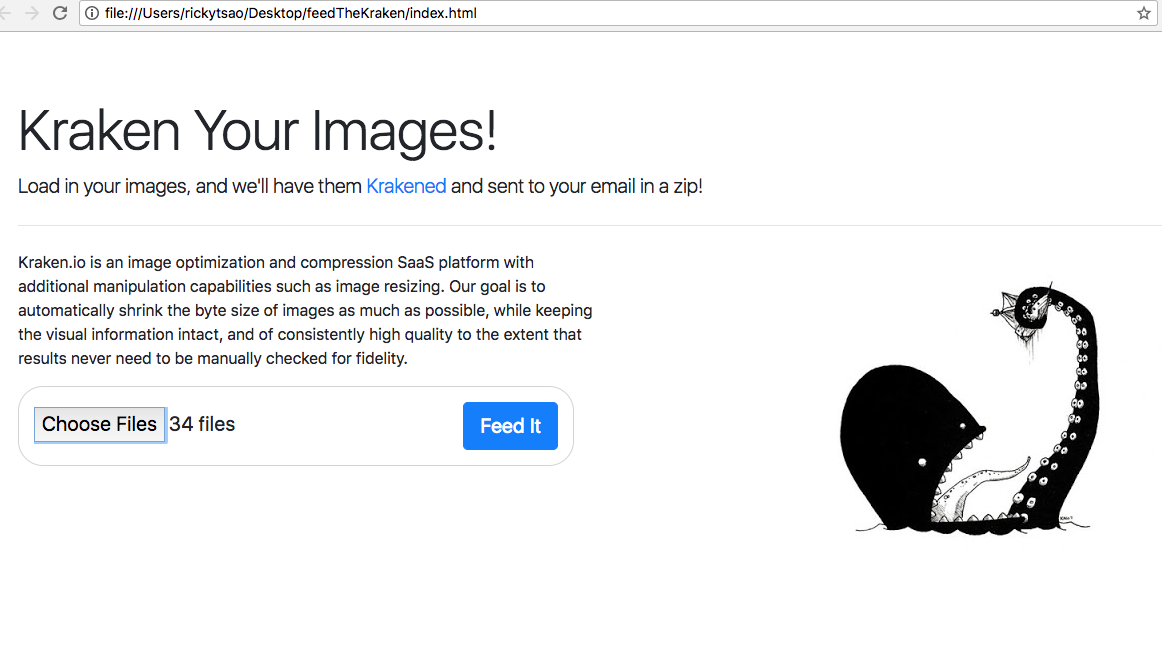
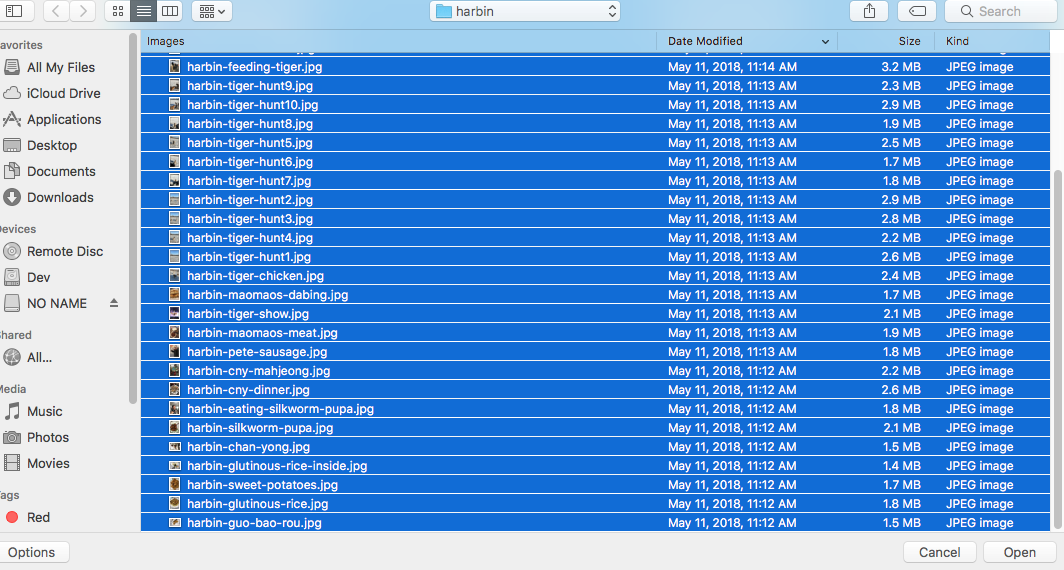
Go ahead and starting using it. Click on the browse button and select images you want to kraken.
Then click the “Feed it” button. This sends all your images to the server.
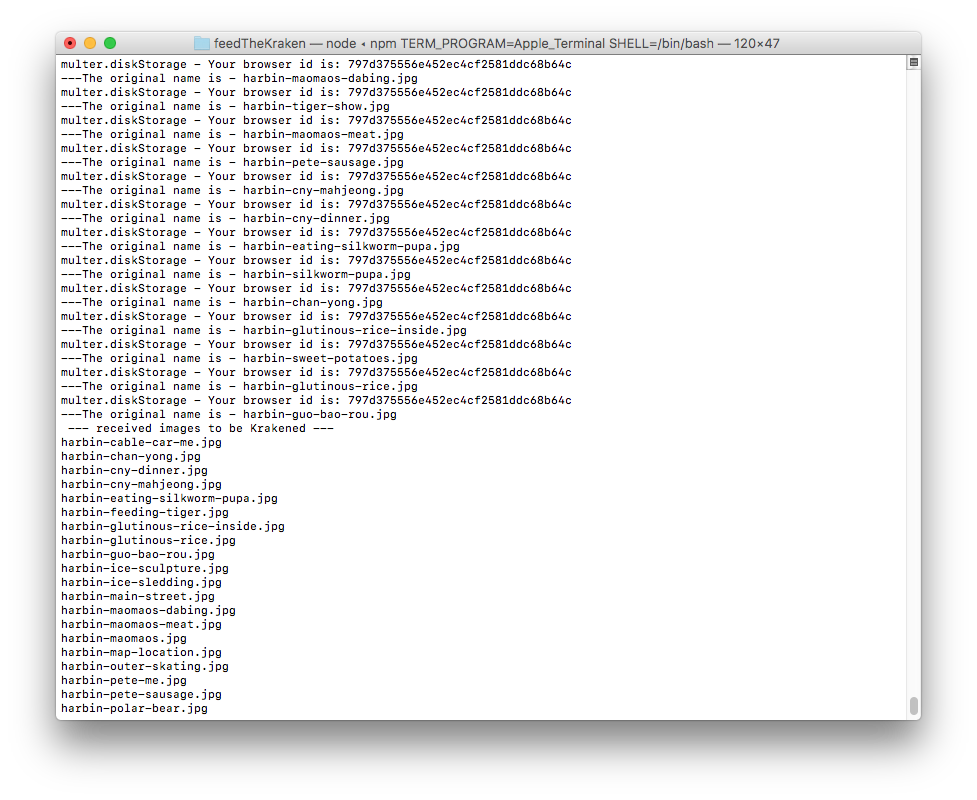
The server will then download these images into an ‘unprocessed’ folder that is unique to your browser.
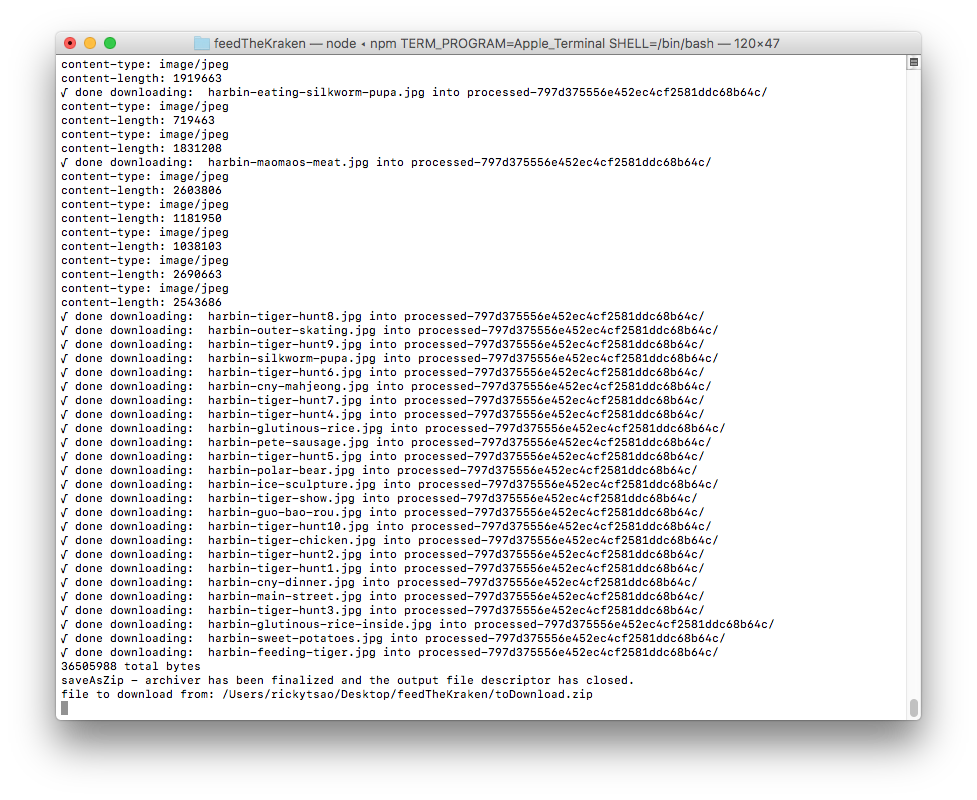
Once the images are in that folder, it sends the images to Kraken.io to be processed. You will see the images being processed in your terminal.
Once processed, Kraken.io will return urls that contains the finished image. The server takes those url and downloads these finished image into a ‘processed’ folder.
Then it zips the processed folder and will log out the finishing steps.
Starting the project from scratch
set up a basic project with gulp:
ref – http://chineseruleof8.com/code/index.php/2015/06/30/starting-gulp/
You should now have a functioning server going with nodemon as work flow.
install body parser
npm install express body-parser –save
edit your app.js
We implement the server to be a bit more detailed, and standard.
|
1 2 3 4 5 6 7 8 9 10 11 12 13 14 15 16 17 18 19 20 21 22 23 24 25 26 27 28 29 30 31 |
'use strict'; const express = require('express'); const bodyParser = require('body-parser'); const PORT = 8080; const HOST = 'localhost'; const app = express(); app.use(function(req, res, next) { res.header("Access-Control-Allow-Origin", "*"); res.header("Access-Control-Allow-Headers", "Origin, X-Requested-With, Content-Type, Accept"); res.header('Access-Control-Allow-Methods', 'PUT, POST, GET, DELETE, OPTIONS'); next(); }); app.use(bodyParser.urlencoded({ extended: false })); app.use(bodyParser.json()); // post example app.post("/upload", function(req, res) { console.log("reached /upload..."); res.end("We will send you a zip with your Krakened images soon..."); }); app.listen(PORT, HOST); console.log(' ∏ØˇˇØ∏ Feed. The. Kraken! Listening on %s:%d...', HOST || '*', PORT); module.exports = app; |
Creating the index.html
in your project directory, touch index.html
First, we have an file input control that takes in multiple files.
Second, we have a button right underneath it. This button will execute a js function. The JS function will proceed to pass the file information onto a url that hits our server.
First, let’s see the skeleton. Notice we have included boostrap css. This is so that we have some ready
made CSS to use.
|
1 2 3 4 5 6 7 8 9 10 11 12 13 14 15 16 17 18 19 20 21 22 23 24 25 26 27 28 29 30 31 32 33 34 35 36 37 38 39 40 41 42 |
<!DOCTYPE html> <html lang="en"> <head> <meta charset="utf-8"> <meta name="viewport" content="width=device-width, initial-scale=1.0" /> <title>Kraken your images! Feed it</title> <link rel="stylesheet" type="text/css" href="style.css"> <link rel="stylesheet" href="https://maxcdn.bootstrapcdn.com/bootstrap/4.0.0/css/bootstrap.min.css" integrity="sha384-Gn5384xqQ1aoWXA+058RXPxPg6fy4IWvTNh0E263XmFcJlSAwiGgFAW/dAiS6JXm" crossorigin="anonymous"> <script> function uploadImage() { } </script> </head> <body> <div id="page" class="jumbotron"> <h1 class="display-4">Kraken Your Images (limit 80)</h1> <p class="lead">Load in your images, and we'll have them <a href="https://kraken.io/">Krakened</a> and sent to your email in a zip!</p> <hr class="my-4"> <p id="intro">Kraken.io is an image optimization and compression SaaS platform with additional manipulation capabilities such as image resizing. Our goal is to automatically shrink the byte size of images as much as possible, while keeping the visual information intact, and of consistently high quality to the extent that results never need to be manually checked for fidelity. </p> <img id="kraken" src="images/kraken.jpg" ondrop="drop(event)" ondragover="allowDrop(event)" /> <div> <p id="uploaderSection" class="lead"> <input type="file" name="imgUploader" id="imgUploader" multiple=""/> <button class="btn btn-primary btn-lg" name="submit" id="btnSubmit" onclick="uploadImage()">Feed It</button> </p> </div> </div> </body> </html> |
Fingerprint2
Make sure you include this in your script area
|
1 |
<script src="https://cdnjs.cloudflare.com/ajax/libs/fingerprintjs2/1.8.0/fingerprint2.min.js"></script> |
Multiple browsers will be hitting our servers. Hence, all the unprocessed and processed images are to be kept in a folder for that browser only. There will be many folders that match up to each browser via a unique string id. As the browsers make their requests, images will be kept in those folders. That is how we know which image belong to which browsers. Fingerprint2 basically distinguishes browsers by returning a unique id for that browser.
|
1 2 3 |
new Fingerprint2().get(function(result, components) { // where result is the browser id }); |
Using axios to send files to node server
Make sure you include this in your script area
|
1 |
<script src="https://unpkg.com/axios/dist/axios.min.js"></script> |
Keep in mind that in order to distinguish ourselves from the other browsers, we throw in the browser id in the url parameter. That way, when we save our images into a folder on the server, the server will keep track of it via our browser id.
1) first, we get the array of images received from the “file” control.
2) Then we create a FormData class that collects.
3) We include the browser id in the url parameter, and pass in the FormData in the parameter
4) We receive response from server
|
1 2 3 4 5 6 7 8 9 10 11 12 13 14 15 16 17 18 19 20 21 22 23 24 25 26 27 28 29 30 31 32 33 34 35 36 37 38 39 40 41 42 43 |
function uploadImage() { new Fingerprint2().get(function(result, components) { console.log("uploading images...."); // 1) var images = document.getElementById("imgUploader").files; var arrayOfImages = Array.from(images); // 2) let data = new FormData(); for (let i = 0; i < arrayOfImages.length;i++) { console.log(`appending image ${arrayOfImages[i].name} to FormData`); data.append('file', images[i], images[i].fileName); } console.log("viewing FormData"); for (var pair of data.entries()) {console.log(pair)} // 3) axios.post("http://localhost:8080/upload?browserIdentity="+result, data, { headers: { 'accept': 'application/json', 'Accept-Language': 'en-US,en;q=0.8', 'Content-Type': `multipart/form-data; boundary=${data._boundary}` } }) .then((response) => { // 4 console.log(`received response from server....${response.data}`); let a = document.createElement('a'); var linkText = document.createTextNode("download"); a.href = response.data; document.getElementById("downloadLink").appendChild(a); }) .catch((error) => { }); }) // new fingerprint2 } // function |
Don’t forget to implement upload for POST requests on the server. The point is that we have different browsers uploading images. We keep track of each browser’s image by creating a “unprocessed-${browser id}” folder. It holds all uploaded images from that browser that is not current processed by Kraken.
|
1 2 3 4 5 6 7 8 |
app.post("/upload", function(req, res) { console.log("reached upload...") return res.status(200).send({ result: "good" }); }); |
You should then be able to see the response back to index.html with result: “good”.
Installing Multer
In your directory, install multer:
npm i multer
|
1 |
var multer = require('multer'); |
Create a function called processImagesFromClientPromise and implement it like so.
|
1 2 3 4 5 6 7 8 9 10 11 12 13 14 15 16 17 18 19 20 21 22 23 24 25 26 27 28 29 30 31 |
obj.processImagesFromClientPromise = function(req, res) { let p = new Promise((resolve, reject) => { var Storage = multer.diskStorage({ destination: function(req, file, callback) { console.log("multer.diskStorage - Your browser id is: "+req.query.browserIdentity); // we create a folder like so callback(null, `./${obj.unprocessedFolderName}`); }, filename: function(req, file, callback) { console.log(`---The original name is - ${file.originalname}`); callback(null, file.originalname); } }); var upload = multer({ storage: Storage }).array("file", 86); if (upload) { upload(req, res, function(err) { console.log("√ Finished receiving image(s) from client"); if (err) { console.log("----error uploading file----"); console.log(err); return res.end("Something went wrong!"); } console.log("processImagesFromClientPromise: resolving saving images using Multer..."); resolve(obj.unprocessedFolderName); }); } }); return p; } |
make sure you implement createFolderForBrowser because as the images come in, you’ll need a place to store them.
|
1 2 3 4 5 6 7 8 9 10 11 12 13 14 15 16 17 18 19 20 21 22 |
const UNPROCESSED_FOLDER_NAME = "unprocessed"; const PROCESSED_FOLDER_NAME = "processed"; ... ... function KrakenClass(browserIdentity) { // private function function createFolderForBrowser(folderAlphaString) { let folderWithBrowserIDName = `${folderAlphaString}-${browserId}`; if (!fs.existsSync(folderWithBrowserIDName)){ fs.mkdirSync(folderWithBrowserIDName); } return folderWithBrowserIDName; } // public properties obj.unprocessedFolderName = createFolderForBrowser(UNPROCESSED_FOLDER_NAME); obj.processedFolderName = createFolderForBrowser(PROCESSED_FOLDER_NAME); return obj; } |
Zipping a folder
After krakening all the images, we place it in the “processed” folder.
In the future, we may want to send all these images via email, or a link so the user can download it.
Its best if we can zip all these images together. We use the archiver to do this.
First, we install archiver:
npm install archiver –save
This is how we implement it. However, in the future, we want to place it inside of a Promise for refactoring.
|
1 2 3 4 5 6 7 8 9 10 11 12 13 14 15 16 |
obj.saveAsZip2 = function(fileName, fromDirectoryName, response) { console.log("-- saveAsZip2 --"); let fullFileName = `/${fileName}.zip` var output = fs.createWriteStream(__dirname + fullFileName); var archive = archiver('zip'); output.on('close', function() { var file = __dirname + `${fullFileName}`; resolve(`file to download from: ${file}`); }); archive.on('error', function(err) { throw err; }); archive.pipe(output); archive.directory(`${fromDirectoryName}/`, false); archive.finalize(); } |
Downloading the Krakened image from provided url
something like this:
https://dl.kraken.io/api/83/b0/37/75905b74440a18e6fe315cae5e/IMG_1261.jpg
We provide the link string via uri.
We give it a filename such as “toDownload”
Then we provide a callback for once it is done.
|
1 2 3 4 5 6 7 |
var downloadProcessedImages = function(uri, filename, callback){ request.head(uri, function(err, res, body){ console.log('content-type:', res.headers['content-type']); console.log('content-length:', res.headers['content-length']); request(uri).pipe(fs.createWriteStream(filename)).on('close', callback); }); }; |
used like so:
|
1 2 3 4 5 |
downloadProcessedImages(status.kraked_url, `${obj.processedFolderName}/${fileName}`, function(){ console.log(`√ done downloading: ${fileName} into ${obj.processedFolderName}/`); resolve(status.kraked_url); }); |
Function setup
|
1 2 3 4 5 6 7 8 9 10 11 12 13 14 15 16 17 18 19 20 21 22 23 24 25 26 27 28 29 30 31 32 33 34 35 36 37 38 39 40 41 42 43 44 45 46 47 48 49 50 51 52 53 54 55 56 57 58 59 60 61 62 63 64 65 66 67 68 69 70 71 72 73 74 75 76 77 78 79 80 81 82 83 84 85 86 87 88 89 90 91 92 93 94 95 96 97 98 99 100 101 102 103 104 105 106 107 108 109 110 111 112 113 114 115 116 117 118 119 120 121 122 123 124 125 126 127 128 129 130 131 132 133 134 135 136 137 138 139 140 141 142 143 144 145 146 147 148 149 150 151 152 153 154 155 156 157 158 159 160 161 162 163 164 165 166 167 168 169 170 171 172 173 174 175 176 177 178 179 180 181 182 183 |
'use strict'; var Kraken = require('kraken'); var kraken = new Kraken({ 'api_key': '...', 'api_secret': '...' }); var fs = require('fs'); const express = require('express'); const bodyParser = require('body-parser'); var multer = require('multer'); var archiver = require('archiver'); // for saving images into a zip var request = require('request'); // for downloading from urls const PORT = 8080; const HOST = 'localhost'; const app = express(); const UNPROCESSED_FOLDER_NAME = "unprocessed"; const PROCESSED_FOLDER_NAME = "processed"; app.use(function(req, res, next) { res.header("Access-Control-Allow-Origin", "*"); res.header("Access-Control-Allow-Headers", "Origin, X-Requested-With, Content-Type, Accept"); res.header('Access-Control-Allow-Methods', 'PUT, POST, GET, DELETE, OPTIONS'); next(); }); app.use(bodyParser.urlencoded({ extended: false })); app.use(bodyParser.json()); // using functional inheritance function KrakenClass(browserIdentity) { console.log("Kraken Construction: √ create stack object to be returned"); var obj = {}; // the object itself console.log(`√ Creating private vars...`); var browserId = browserIdentity; console.log("√ Creating private functions..."); function uploadToKrakenAndDownloadResult(urlString, browserId) { return new Promise((resolve, reject) => { kraken.upload(urlString, function (status) { if (status.success) { let fullURL = status.kraked_url let indexOfSlash = fullURL.lastIndexOf("/") let fileName = fullURL.substring(indexOfSlash+1, fullURL.length); downloadProcessedImages(status.kraked_url, `${obj.processedFolderName}/${fileName}`, function(){ console.log(`√ done downloading: ${fileName} into ${obj.processedFolderName}/`); resolve(status.kraked_url); }); } else { console.log('ø Failed! Error message: %s', status.message); reject(status.message); } }); // kraken upload }); // Promise } function createFolderForBrowser(folderAlphaString) { let folderWithBrowserIDName = `${folderAlphaString}-${browserId}`; if (!fs.existsSync(folderWithBrowserIDName)){ fs.mkdirSync(folderWithBrowserIDName); } return folderWithBrowserIDName; } function readyKrakenPromises(unprocessedDirectory, req, res) { let unprocessedImagesArr = []; // read file names from unprocessedDirectory const testFolder = `./${unprocessedDirectory}/`; fs.readdirSync(testFolder).forEach(file => { unprocessedImagesArr.push(file); }) let paramArray = []; for (let i = 0; i < unprocessedImagesArr.length; i++) { paramArray.push({ file: `${unprocessedDirectory}/${unprocessedImagesArr[i]}`, wait: true, lossy: true }); } // now let's get the unprocessed images and have it Krakened! const krakenPromises = []; for (let i = 0; i < paramArray.length; i++) { krakenPromises.push(uploadToKrakenAndDownloadResult(paramArray[i], browserId)); } runAllKrakenPromises(krakenPromises, req, res); } function saveAsZip(fileName, fromDirectoryName, response) { let fullFileName = `/${fileName}.zip` var output = fs.createWriteStream(__dirname + fullFileName); var archive = archiver('zip'); output.on('close', function() { console.log(archive.pointer() + ' total bytes'); console.log('saveAsZip - archiver has been finalized and the output file descriptor has closed.'); var file = __dirname + `${fullFileName}`; console.log(`file to download from: ${file}`); }); archive.on('error', function(err) { throw err; }); archive.pipe(output); archive.directory(`${fromDirectoryName}/`, false); archive.finalize(); } function runAllKrakenPromises(promises, req, res) { Promise.all(promises).then(function(output) { saveAsZip("toDownload", obj.processedFolderName, res); }); } var downloadProcessedImages = function(uri, filename, callback){ request.head(uri, function(err, res, body){ console.log('content-type:', res.headers['content-type']); console.log('content-length:', res.headers['content-length']); request(uri).pipe(fs.createWriteStream(filename)).on('close', callback); }); }; console.log("√ Creating public functions...") obj.processImagesFromClient = function(req, res) { // image storage var Storage = multer.diskStorage({ destination: function(req, file, callback) { console.log("multer.diskStorage - Your browser id is: "+req.query.browserIdentity); // we create a folder like so callback(null, `./${obj.unprocessedFolderName}`); }, filename: function(req, file, callback) { console.log(`---The original name is - ${file.originalname}`); callback(null, file.originalname); } }); // multier takes the requst object var upload = multer({ storage: Storage }).array("file", 86); if (upload){ upload(req, res, function(err) { console.log("√ Finished receiving image(s) from client"); if (err) { console.log("----error uploading file----"); console.log(err); return res.end("Something went wrong!"); } // resolve here readyKrakenPromises(obj.unprocessedFolderName, req, res); }); } } console.log("√ Creating public vars") obj.unprocessedFolderName = createFolderForBrowser(UNPROCESSED_FOLDER_NAME); obj.processedFolderName = createFolderForBrowser(PROCESSED_FOLDER_NAME); console.log(`constructed folders: ${obj.unprocessedFolderName}, ${obj.processedFolderName}`) return obj; // return it } app.post("/upload", function(req, res) { console.log("reached /upload..."); console.log("browserIdentity: " + req.query.browserIdentity); res.end("We will send you a zip with your Krakened images soon..."); var krakenInstance = KrakenClass(req.query.browserIdentity); krakenInstance.processImagesFromClient(req, res); }); app.listen(PORT, HOST); console.log(' ∏ØˇˇØ∏ Feed. The. Kraken! Listening on %s:%d...', HOST || '*', PORT); module.exports = app; |
However, the problem is that all of that deteriorates down to pyramid of Doom. Each task does something asynchronous, and we wait until it is done. When it’s complete, inside of the callback, we call the next task.
Hence our tasks list is something like this:
- processImagesFromClient
- readyKrakenPromises
- runAllKrakenPromises
- saveAsZip
Some of the functionalities are run inside of a callback. Some of them are run at the end of the functions, hence at the end, we get this complicated chain that no one wants to follow.
|
1 2 3 4 5 6 7 8 9 |
processImagesFromClient upload(req, res, function() { ... readyKrakenPromises(obj.unprocessedFolderName, req, res) { ... runAllKrakenPromises(krakenPromises, req, res) { ... saveAsZip } |
Hence, let’s use Promises to fix it.
Promises version
ref – http://chineseruleof8.com/code/index.php/2017/10/03/promise-js/
…with promises, it looks much prettier:
|
1 2 3 4 5 6 7 8 |
var krakenInstance = KrakenClass(req.query.browserIdentity); krakenInstance.processImagesFromClientPromise(req, res) .then(unprocessedFolderName => krakenInstance.readyKrakenPromises2(unprocessedFolderName, req, res)) .then(krakenPromises => krakenInstance.runAllKrakenPromises2(krakenPromises, req, res)) .then(processedFolderName => krakenInstance.saveAsZip2(`${req.query.browserIdentity}-download`, processedFolderName, res)) .then(function(result) { console.log(result); }); |
full source promises version
Basically we group code inside a new Promise. Then return that promise. Whatever variable we return, shall be passed inside of resolve. Resolve indicates that we move on to the next Promise.
Also, whatever parameter that gets passed into resolve, will appear in the .then parameter. You may then pass that parameter on to the next function.
|
1 2 3 4 5 6 7 8 9 10 11 12 13 14 15 16 17 18 19 20 21 22 23 24 25 26 27 28 29 30 31 32 33 34 35 36 37 38 39 40 41 42 43 44 45 46 47 48 49 50 51 52 53 54 55 56 57 58 59 60 61 62 63 64 65 66 67 68 69 70 71 72 73 74 75 76 77 78 79 80 81 82 83 84 85 86 87 88 89 90 91 92 93 94 95 96 97 98 99 100 101 102 103 104 105 106 107 108 109 110 111 112 113 114 115 116 117 118 119 120 121 122 123 124 125 126 127 128 129 130 131 132 133 134 135 136 137 138 139 140 141 142 143 144 145 146 147 148 149 150 151 152 153 154 155 156 157 158 159 160 161 162 163 164 165 166 167 168 169 170 171 172 173 174 175 176 177 178 179 180 181 182 183 184 |
// using functional inheritance function KrakenClass(browserIdentity) { console.log("Kraken Construction: √ create stack object to be returned"); var obj = {}; // the object itself console.log(`√ Creating private vars...`); var browserId = browserIdentity; console.log("√ Creating private functions..."); function readFileNamesFromDirectory(fileSystem, directoryName) { let directoryContentNames = []; const folder = `./${directoryName}/`; fileSystem.readdirSync(folder).forEach(file => { directoryContentNames.push(file); }) return directoryContentNames; } function createParamArrayForKrakenService(unprocessedArr, unprocessedDirectory) { let paramArray = []; for (let i = 0; i < unprocessedArr.length; i++) { paramArray.push({ file: `${unprocessedDirectory}/${unprocessedArr[i]}`, wait: true, lossy: true }); } return paramArray; } function assembleKrakenServicesIntoPromises(paramArray, browserId) { const krakenPromises = []; for (let i = 0; i < paramArray.length; i++) { krakenPromises.push(uploadToKrakenAndDownloadResult(paramArray[i], browserId)); } return krakenPromises; } function uploadToKrakenAndDownloadResult(urlString, browserId) { return new Promise((resolve, reject) => { kraken.upload(urlString, function (status) { if (status.success) { let fullURL = status.kraked_url let indexOfSlash = fullURL.lastIndexOf("/") let fileName = fullURL.substring(indexOfSlash+1, fullURL.length); downloadProcessedImages(status.kraked_url, `${obj.processedFolderName}/${fileName}`, function(){ console.log(`√ done downloading: ${fileName} into ${obj.processedFolderName}/`); resolve(status.kraked_url); }); } else { console.log('ø Failed! Error message: %s', status.message); reject(status.message); } }); // kraken upload }); // Promise } function createFolderForBrowser(folderAlphaString) { let folderWithBrowserIDName = `${folderAlphaString}-${browserId}`; if (!fs.existsSync(folderWithBrowserIDName)){ fs.mkdirSync(folderWithBrowserIDName); } return folderWithBrowserIDName; } var downloadProcessedImages = function(uri, filename, callback){ request.head(uri, function(err, res, body){ console.log('content-type:', res.headers['content-type']); console.log('content-length:', res.headers['content-length']); request(uri).pipe(fs.createWriteStream(filename)).on('close', callback); }); }; console.log("√ Creating public functions...") obj.saveAsZip2 = function(fileName, fromDirectoryName, response) { console.log("-- saveAsZip2 --"); let p = new Promise((resolve, reject) => { let fullFileName = `/${fileName}.zip` var output = fs.createWriteStream(__dirname + fullFileName); var archive = archiver('zip'); output.on('close', function() { var file = __dirname + `${fullFileName}`; resolve(`file to download from: ${file}`); }); archive.on('error', function(err) { throw err; }); archive.pipe(output); archive.directory(`${fromDirectoryName}/`, false); archive.finalize(); }); return p; } obj.runAllKrakenPromises2 = function(promises, req, res) { console.log("-- runAllKrakenPromises2 --"); let p = new Promise((resolve, reject)=> { Promise.all(promises).then(function(output) { console.log(output); console.log("runAllKrakenPromises2: resolving all kraken promises..."); console.log(obj.processedFolderName); resolve(obj.processedFolderName); }); }); return p; } obj.processImagesFromClientPromise = function(req, res) { let p = new Promise((resolve, reject) => { var Storage = multer.diskStorage({ destination: function(req, file, callback) { console.log("multer.diskStorage - Your browser id is: "+req.query.browserIdentity); // we create a folder like so callback(null, `./${obj.unprocessedFolderName}`); }, filename: function(req, file, callback) { console.log(`---The original name is - ${file.originalname}`); callback(null, file.originalname); } }); var upload = multer({ storage: Storage }).array("file", 86); if (upload) { upload(req, res, function(err) { console.log("√ Finished receiving image(s) from client"); if (err) { console.log("----error uploading file----"); console.log(err); return res.end("Something went wrong!"); } console.log("processImagesFromClientPromise: resolving saving images using Multer..."); resolve(obj.unprocessedFolderName); }); } }); return p; } obj.readyKrakenPromises2 = function(unprocessedDirectory, req, res) { let p = new Promise(function(resolve, reject) { let unprocessedImagesArr = readFileNamesFromDirectory(fs, unprocessedDirectory); let paramArray = createParamArrayForKrakenService(unprocessedImagesArr, unprocessedDirectory); let allKrakenPromises = assembleKrakenServicesIntoPromises(paramArray, browserId); resolve(allKrakenPromises); }) return p; } console.log("√ Creating public vars") obj.unprocessedFolderName = createFolderForBrowser(UNPROCESSED_FOLDER_NAME); obj.processedFolderName = createFolderForBrowser(PROCESSED_FOLDER_NAME); console.log(`constructed folders: ${obj.unprocessedFolderName}, ${obj.processedFolderName}`) return obj; // return it } app.post("/upload", function(req, res) { console.log("reached /upload..."); console.log("browserIdentity: " + req.query.browserIdentity); res.end("We will send you a zip with your Krakened images soon..."); var krakenInstance = KrakenClass(req.query.browserIdentity); krakenInstance.processImagesFromClientPromise(req, res) .then(unprocessedFolderName => krakenInstance.readyKrakenPromises2(unprocessedFolderName, req, res)) .then(krakenPromises => krakenInstance.runAllKrakenPromises2(krakenPromises, req, res)) .then(processedFolderName => krakenInstance.saveAsZip2(`${req.query.browserIdentity}-download`, processedFolderName, res)) .then(function(result) { console.log(result); }); }); app.listen(PORT, HOST); console.log(' ∏ØˇˇØ∏ Feed. The. Kraken! Listening on %s:%d...', HOST || '*', PORT); module.exports = app; |
Encapsulation
However, make sure we encapsulate the functionalities. We don’t want outside to be able to use functions such as readyKrakenPromises, runAllKrakenPromises, and saveAsZip.
So we change these functions to be private functions. Then create a public function that does the Promise calls like so:
|
1 2 3 4 5 6 7 8 9 10 11 12 13 14 15 16 17 18 19 |
function KrakenClass(browserIdentity) { ... ... // create public function obj.krakenTheImages = function(req, res, callback) { processImagesFromClientPromise(req, res) .then(unprocessedFolderName => readyKrakenPromises(unprocessedFolderName, req, res)) .then(krakenPromises => runAllKrakenPromises(krakenPromises, req, res)) .then(processedFolderName => saveAsZip(`${req.query.browserIdentity}-download`, processedFolderName, res)) .then(function(result) { callback(result); }); } return obj; // return it } |
used like so:
|
1 2 3 4 |
var krakenInstance = KrakenClass(req.query.browserIdentity); krakenInstance.krakenTheImages(req, res, function(result){ console.log(result); }); |
app.js full source
|
1 2 3 4 5 6 7 8 9 10 11 12 13 14 15 16 17 18 19 20 21 22 23 24 25 26 27 28 29 30 31 32 33 34 35 36 37 38 39 40 41 42 43 44 45 46 47 48 49 50 51 52 53 54 55 56 57 58 59 60 61 62 63 64 65 66 67 68 69 70 71 72 73 74 75 76 77 78 79 80 81 82 83 84 85 86 87 88 89 90 91 92 93 94 95 96 97 98 99 100 101 102 103 104 105 106 107 108 109 110 111 112 113 114 115 116 117 118 119 120 121 122 123 124 125 126 127 128 129 130 131 132 133 134 135 136 137 138 139 140 141 142 143 144 145 146 147 148 149 150 151 152 153 154 155 156 157 158 159 160 161 162 163 164 165 166 167 168 169 170 171 172 173 174 175 176 177 178 179 180 181 182 183 184 185 186 187 188 189 190 191 192 193 194 195 196 197 198 199 200 201 202 203 204 205 206 207 208 209 210 211 212 213 214 215 216 217 218 219 220 |
'use strict'; var Kraken = require('kraken'); var kraken = new Kraken({ 'api_key': '。。。', 'api_secret': '。。。' }); var fs = require('fs'); const express = require('express'); const bodyParser = require('body-parser'); var multer = require('multer'); var archiver = require('archiver'); // for saving images into a zip var request = require('request'); // for downloading from urls const PORT = 8080; const HOST = 'localhost'; const app = express(); const UNPROCESSED_FOLDER_NAME = "unprocessed"; const PROCESSED_FOLDER_NAME = "processed"; app.use(function(req, res, next) { res.header("Access-Control-Allow-Origin", "*"); res.header("Access-Control-Allow-Headers", "Origin, X-Requested-With, Content-Type, Accept"); res.header('Access-Control-Allow-Methods', 'PUT, POST, GET, DELETE, OPTIONS'); next(); }); app.use(bodyParser.urlencoded({ extended: false })); app.use(bodyParser.json()); // using functional inheritance function KrakenClass(browserIdentity) { console.log("Kraken Construction: √ create stack object to be returned"); var obj = {}; // the object itself console.log(`√ Creating private vars...`); var browserId = browserIdentity; console.log("√ Creating private functions..."); function readFileNamesFromDirectory(fileSystem, directoryName) { let directoryContentNames = []; const folder = `./${directoryName}/`; fileSystem.readdirSync(folder).forEach(file => { directoryContentNames.push(file); }) return directoryContentNames; } function createParamArrayForKrakenService(unprocessedArr, unprocessedDirectory) { let paramArray = []; for (let i = 0; i < unprocessedArr.length; i++) { paramArray.push({ file: `${unprocessedDirectory}/${unprocessedArr[i]}`, wait: true, lossy: true }); } return paramArray; } function assembleKrakenServicesIntoPromises(paramArray, browserId) { const krakenPromises = []; for (let i = 0; i < paramArray.length; i++) { krakenPromises.push(uploadToKrakenAndDownloadResult(paramArray[i], browserId)); } return krakenPromises; } function uploadToKrakenAndDownloadResult(urlString, browserId) { return new Promise((resolve, reject) => { kraken.upload(urlString, function (status) { if (status.success) { let fullURL = status.kraked_url let indexOfSlash = fullURL.lastIndexOf("/") let fileName = fullURL.substring(indexOfSlash+1, fullURL.length); downloadProcessedImages(status.kraked_url, `${obj.processedFolderName}/${fileName}`, function(){ console.log(`√ done downloading: ${fileName} into ${obj.processedFolderName}/`); resolve(status.kraked_url); }); } else { console.log('ø Failed! Error message: %s', status.message); reject(status.message); } }); // kraken upload }); // Promise } function createFolderForBrowser(folderAlphaString) { let folderWithBrowserIDName = `${folderAlphaString}-${browserId}`; if (!fs.existsSync(folderWithBrowserIDName)){ fs.mkdirSync(folderWithBrowserIDName); } return folderWithBrowserIDName; } var downloadProcessedImages = function(uri, filename, callback){ request.head(uri, function(err, res, body){ console.log('content-type:', res.headers['content-type']); console.log('content-length:', res.headers['content-length']); request(uri).pipe(fs.createWriteStream(filename)).on('close', callback); }); }; console.log("√ Creating public functions...") function saveAsZip(fileName, fromDirectoryName, response) { console.log("-- saveAsZip --"); let p = new Promise((resolve, reject) => { let fullFileName = `/${fileName}.zip` var output = fs.createWriteStream(__dirname + fullFileName); var archive = archiver('zip'); output.on('close', function() { var file = __dirname + `${fullFileName}`; resolve(`file to download from: ${file}`); }); archive.on('error', function(err) { throw err; }); archive.pipe(output); archive.directory(`${fromDirectoryName}/`, false); archive.finalize(); }); return p; } function runAllKrakenPromises(promises, req, res) { let p = new Promise((resolve, reject)=> { Promise.all(promises).then(function(output) { console.log(output); console.log("runAllKrakenPromises: resolving all kraken promises..."); console.log(obj.processedFolderName); resolve(obj.processedFolderName); }); }); return p; } function processImagesFromClientPromise(req, res) { let p = new Promise((resolve, reject) => { var Storage = multer.diskStorage({ destination: function(req, file, callback) { console.log("multer.diskStorage - Your browser id is: "+req.query.browserIdentity); // we create a folder like so callback(null, `./${obj.unprocessedFolderName}`); }, filename: function(req, file, callback) { console.log(`---The original name is - ${file.originalname}`); callback(null, file.originalname); } }); var upload = multer({ storage: Storage }).array("file", 86); if (upload) { upload(req, res, function(err) { console.log("√ Finished receiving image(s) from client"); if (err) { console.log("----error uploading file----"); console.log(err); return res.end("Something went wrong!"); } console.log("processImagesFromClientPromise: resolving saving images using Multer..."); resolve(obj.unprocessedFolderName); }); } }); return p; } function readyKrakenPromises(unprocessedDirectory, req, res) { let p = new Promise(function(resolve, reject) { let unprocessedImagesArr = readFileNamesFromDirectory(fs, unprocessedDirectory); let paramArray = createParamArrayForKrakenService(unprocessedImagesArr, unprocessedDirectory); let allKrakenPromises = assembleKrakenServicesIntoPromises(paramArray, browserId); resolve(allKrakenPromises); }) return p; } obj.krakenTheImages = function(req, res, callback) { processImagesFromClientPromise(req, res) .then(unprocessedFolderName => readyKrakenPromises(unprocessedFolderName, req, res)) .then(krakenPromises => runAllKrakenPromises(krakenPromises, req, res)) .then(processedFolderName => saveAsZip(`${req.query.browserIdentity}-download`, processedFolderName, res)) .then(function(result) { callback(result); }); } console.log("√ Creating public vars") obj.unprocessedFolderName = createFolderForBrowser(UNPROCESSED_FOLDER_NAME); obj.processedFolderName = createFolderForBrowser(PROCESSED_FOLDER_NAME); console.log(`constructed folders: ${obj.unprocessedFolderName}, ${obj.processedFolderName}`) return obj; // return it } app.post("/upload", function(req, res) { console.log("reached /upload..."); console.log("browserIdentity: " + req.query.browserIdentity); res.end("We will send you a zip with your Krakened images soon..."); var krakenInstance = KrakenClass(req.query.browserIdentity); krakenInstance.krakenTheImages(req, res, function(result){ console.log(result); }); }); app.listen(PORT, HOST); console.log(' ∏ØˇˇØ∏ Feed. The. Kraken! Listening on %s:%d...', HOST || '*', PORT); module.exports = app; |
index.html full source
|
1 2 3 4 5 6 7 8 9 10 11 12 13 14 15 16 17 18 19 20 21 22 23 24 25 26 27 28 29 30 31 32 33 34 35 36 37 38 39 40 41 42 43 44 45 46 47 48 49 50 51 52 53 54 55 56 57 58 59 60 61 62 63 64 65 66 67 68 69 70 71 72 73 74 75 76 77 78 79 80 81 |
<!DOCTYPE html> <html lang="en"> <head> <meta charset="utf-8"> <meta name="viewport" content="width=device-width, initial-scale=1.0" /> <title>Kraken your images! Feed it</title> <link rel="stylesheet" type="text/css" href="style.css"> <link rel="stylesheet" href="https://maxcdn.bootstrapcdn.com/bootstrap/4.0.0/css/bootstrap.min.css" integrity="sha384-Gn5384xqQ1aoWXA+058RXPxPg6fy4IWvTNh0E263XmFcJlSAwiGgFAW/dAiS6JXm" crossorigin="anonymous"> <script src="https://cdnjs.cloudflare.com/ajax/libs/fingerprintjs2/1.8.0/fingerprint2.min.js"></script> <script src="https://unpkg.com/axios/dist/axios.min.js"></script> <script> function uploadImage() { new Fingerprint2().get(function(result, components) { console.log("uploading images...."); var images = document.getElementById("imgUploader").files; var arrayOfImages = Array.from(images); let data = new FormData(); for (let i = 0; i < arrayOfImages.length;i++) { console.log(`appending image ${arrayOfImages[i].name} to FormData`); data.append('file', images[i], images[i].fileName); } console.log("viewing FormData"); for (var pair of data.entries()) {console.log(pair)} axios.post("http://localhost:8080/upload?browserIdentity="+result, data, { headers: { 'accept': 'application/json', 'Accept-Language': 'en-US,en;q=0.8', 'Content-Type': `multipart/form-data; boundary=${data._boundary}` } }) .then((response) => { console.log(`received response from server....${response.data}`); let a = document.createElement('a'); var linkText = document.createTextNode("download"); a.href = response.data; document.getElementById("downloadLink").appendChild(a); }) .catch((error) => { }); }) // new fingerprint2 } // function </script> </head> <!-- execute a script once a web page has completely loaded all content (including images, script files, CSS files, etc.). --> <body> <div id="page" class="jumbotron"> <h1 class="display-4">Kraken Your Images (limit 80)</h1> <p class="lead">Load in your images, and we'll have them <a href="https://kraken.io/">Krakened</a> and sent to your email in a zip!</p> <hr class="my-4"> <p id="intro">Kraken.io is an image optimization and compression SaaS platform with additional manipulation capabilities such as image resizing. Our goal is to automatically shrink the byte size of images as much as possible, while keeping the visual information intact, and of consistently high quality to the extent that results never need to be manually checked for fidelity. </p> <img id="kraken" src="images/kraken.jpg" ondrop="drop(event)" ondragover="allowDrop(event)" /> <div> <p id="uploaderSection" class="lead"> <input type="file" name="imgUploader" id="imgUploader" multiple=""/> <button class="btn btn-primary btn-lg" name="submit" id="btnSubmit" onclick="uploadImage()">Feed It</button> </p> </div> </div> </body> </html> |